Archiving Your Outlook Data 759
Configuring Automatic Archiving 765
Backing Up and Restoring Data 769
OVER time, your Microsoft Outlook 2010 data store can become overloaded with messages, contact information, appointments, and other data. If you can’t manage all this data, you’ll be lost each time you try to find a particular item. What’s more, the more data in your data store, the larger your .pst file (if you’re using one) or your Microsoft Exchange Server mailbox. Many companies impose mailbox size limits to help manage disk use on the servers, so the size of your mailbox can become a problem.
This chapter focuses on managing your Outlook 2010 folders and their contents. You’ll learn how to archive your data, both manually and automatically, using AutoArchive. You’ll also learn how to back up your data and recover it when needed.
Sooner or later, you will likely want to move some of your Outlook 2010 items to a separate location because you no longer need them but don’t want to delete them. For example, perhaps you want to keep copies of all the messages in your Sent Items folder so that you can refer to them later if needed, but you don’t want them to stay in Sent Items. In these situations, you can use the Outlook 2010 AutoArchive feature to move out those old items.
The Outlook 2010 AutoArchive feature archives data automatically according to settings that you configure for each folder or all your folders. There is no right or wrong timeframe for AutoArchive; for some people, a month is appropriate, and for others, weekly. It’s mainly a factor of how much email you send and receive, although the other items in your mailbox also contribute to the overall space used. For example, because of the volume of email I receive in my “day job” mailbox, I have to archive about twice a month or run afoul of my 200 MB mailbox limit.
Tip
If your company uses Exchange Server, a better solution to users archiving their mailbox to a local .pst (which has negative security and backup implications) is to use a server-side archiving solution. Exchange Server 2010 includes an online archive option, which moves messages to a user’s archive mailbox on the server based on retention criteria that you set. Or, you can choose a solution such as those from Barracuda, Mimosa Systems, GFI, and others. These archiving solutions not only help users keep their mailboxes trimmed down, but also can eliminate duplicate attachments, reduce storage requirements for Exchange Server, and facilitate discovery.
To set up a folder to archive automatically using the default AutoArchive settings, follow these steps:
Right-click a folder in the Folder List, choose Properties, and then, in the Properties dialog box, click the AutoArchive tab.
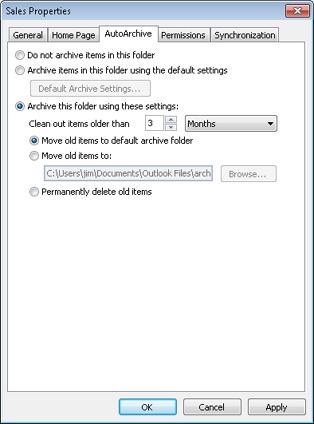
Select Archive Items In This Folder Using The Default Settings, as shown in Figure 30-1.
Click OK.
Repeat these steps for each folder that you want to archive.
By default, Outlook 2010 starts AutoArchive every 14 days and archives your data in the selected folder to the Archive.pst personal folders file.
Note
For information about changing the default AutoArchive settings, see the section Configuring Automatic Archiving, on page 765.
You can also specify custom AutoArchive settings for a folder. Open the Properties dialog box for the folder, click the AutoArchive tab, and then select the Archive This Folder Using These Settings option. Then specify settings on the AutoArchive tab as desired for the folder. See the section Configuring Automatic Archiving, on page 765, for details about each of the available settings.
From this point on, the folder for which you have enabled automatic archiving will be archived when Outlook 2010 performs its next automatic archive operation. However, you can also initiate an archive operation any time you need. The next section explains how.
You can archive data not only automatically but also manually—for example, before leaving on vacation, when your mailbox reaches its storage limit, or when you need to move your files to a new machine.
To archive data manually, perform these steps:
Choose File, Cleanup Tools, and finally Archive.
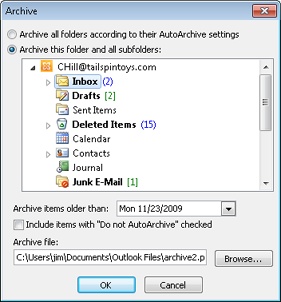
In the Archive dialog box, shown in Figure 30-2, select one of the following options:
Archive All Folders According To Their AutoArchive Settings Use this option to archive all folders using preset AutoArchive settings. When you select this option, the remaining options in this dialog box become unavailable. Go to step 7.
Archive This Folder And All Subfolders Select this option if you want to archive individual folders and their subfolders. Go to step 3.
Select the folder you want to archive. If the folder includes subfolders, those folders are archived as well.
In the Archive Items Older Than drop-down list, specify the latest date from which Outlook 2010 should start archiving data. For instance, if you want to archive data older than today’s date, select that date. Otherwise, all your data in the selected folder will not be archived.
If you have specified that a folder should not be archived automatically but you want to archive this folder now, select the Include Items With “Do Not AutoArchive” Checked check box.
To change the personal folders file that will store your archive, click Browse, and then specify the file and folder where the archive will be stored. You also can type the path and file name in the Archive File box if you know this information.
Outlook 2010 begins archiving your data. If the folder contains a large amount of data, archiving might take several minutes (or longer, depending on the speed of your computer, network connection, and other factors). You can watch the status of the archiving by looking at the Outlook 2010 status bar. When the process has finished, the Archive.pst file (or whichever archive file that you specified in step 6) will contain the data that Outlook 2010 just archived.
Suppose that you’ve worked on a project for six months and you’ve been diligent about archiving messages and other items from the project. You come into work one day and find that your system has failed and Outlook 2010 has lost all your data. You need the archived data to get back all your lost information and continue working. How do you get it back?
You can restore data from an archive file in two ways: drag items from a .pst file to a folder, or import a .pst file.
Follow these steps to drag data from a .pst file:
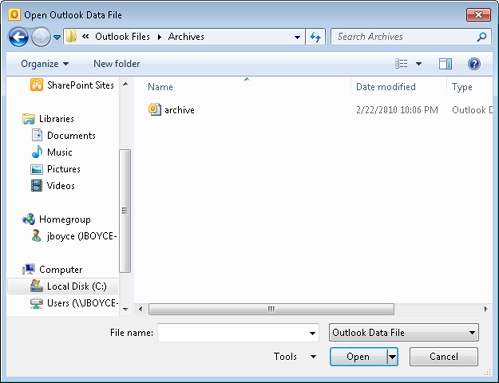
After restoring your computer and, if necessary, reinstalling Outlook 2010, choose File, Open, and Open Outlook Data File to open the Open Outlook Data File dialog box, shown in Figure 30-3.
Select the file that contains the archived items that you want to restore.
Click OK. The archive folder (named Archives by default) now appears in your folder list.
Click the plus sign (+) next to Archives (or the name you’ve given this folder) to expand the folder. Expand subsequent folders if necessary until your data is in the pane on the right.
Drag the folder or item to the original folder in which the data was stored.
Continue dragging items until all of them are restored. To drag multiple items at one time, hold down the Ctrl key, select the items, and then drag them to the destination.
To restore items by importing a .pst file, follow these steps:
Choose File, Open, and Import to open the Import And Export Wizard.
Select Import From Another Program Or File, and then click Next.
Select Personal Folder File (.pst), and then click Next.
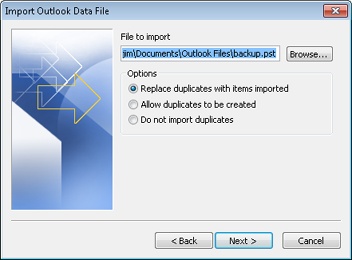
On the Import Outlook Data File page, shown in Figure 30-4, type the name of the file that you want to import in the File To Import box, or click Browse to locate the file using the Open Personal Folders dialog box.
Select one of the following import options pertaining to duplicate data:
Replace Duplicates With Items Imported Replaces duplicate items that might be in your folders during import.
Allow Duplicates To Be Created Lets Outlook 2010 create duplicates in the destination folders.
Do Not Import Duplicates Outlook 2010 will not create duplicate items.
Click Next.
Select the folder from which you want to import data.
If the archived folder includes subfolders that you want to import as well, select the Include Subfolders option.
To filter data, click Filter. You can filter by using search strings, Structured Query Language (SQL), and other advanced querying methods. Click OK after filling in your filter information.
Select one of the following destination options:
Import Items Into The Current Folder Select this option to import data into the current folder—that is, the folder currently selected.
Import Items Into The Same Folder In Choose this option to import data into the destination folder of the same name as the source folder (such as from the Inbox to the Inbox). Then, in the drop-down list under this last option, select the destination personal folders or mailbox.
Click Finish.
Outlook 2010 displays a window showing you the progress of the import process. The archive folder appears in the folder list (if the folder list is open), but it is removed when the operation is completed.
Outlook 2010 provides several ways to configure and manage your data-archiving settings. For example, suppose that you want Outlook 2010 to run AutoArchive every day, but you want to be prompted before it starts. You can configure AutoArchive to do just that. In addition, you might want to delete old items after a specific date (say, after a message sits in the Inbox for six months). This section shows you how to configure AutoArchive to handle many of your archiving needs.
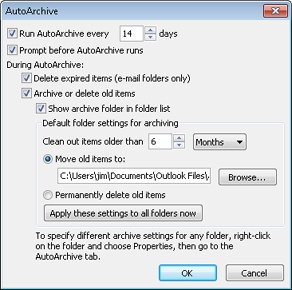
To set AutoArchive options, click File, Options, and Advanced, and then click AutoArchive Settings to open the AutoArchive dialog box. The following sections explain the options that you’ll find in the AutoArchive dialog box.
Outlook 2010 allows you to run AutoArchive on a per-day cycle. For example, if you want to run it each day, set it to run every 1 day. To archive every other day, set AutoArchive to run every 2 days, and so on.
Note
Outlook 2010 has different aging periods for different types of items. Calendar, Notes, Journal, Drafts, and Inbox folders have a default of six months. The default for the Outbox folder is three months, and Sent Items and Deleted Items are two months. Contacts folders do not have an AutoArchive option, so you must archive them manually.
To set the length of time between AutoArchive sessions, set the Run AutoArchive Every n Days option to the number of days you want between archiving sessions, as shown in Figure 30-5. The number that you enter must be between 1 and 60.
You can have Outlook 2010 display a message before it starts an AutoArchive session. The message includes a Cancel button to let you cancel the AutoArchive session for that day.
To activate this option, select the Prompt Before AutoArchive Runs check box in the AutoArchive dialog box.
In your message folders, AutoArchive can delete messages if they are older than a specified amount of time. To set this option, select the Delete Expired Items check box. Also make sure that the Archive Or Delete Old Items check box is selected.
In the Default Folder Settings For Archiving area, set the amount of time that you want to elapse before AutoArchive automatically deletes email messages. The default is six months, but you can set this to as high as 60 months or as low as one day.
If you want AutoArchive to archive or delete old Outlook 2010 items, select the Archive Or Delete Old Items check box. Then set the amount of time that should elapse before old items are archived or deleted. Again, the default is six months, but you can set this to as high as 60 months or as low as one day.
Tip
Archiving is based on an item’s modified date, not the received date. For example, assume that you have an Outlook add-in that saves your attachments automatically to disk. When the add-in moves the attachment, it causes the Outlook item to be modified. If you run the add-in today on a message that you received a week ago, and then tell Outlook to archive items older than yesterday, that item will not be archived because it was modified today by the add-in.
If you want Outlook 2010 to display your archive folder in the Folder List, select the Show Archive Folder In Folder List check box. You might want to select this check box if you think you’d like to be able to see which items have been archived. Also, you might find that some items are removed from your working folders (such as Inbox or Calendar) before you want them removed. By showing the archive folder in the Folder List, you can move items back to a working folder quickly and easily.
In the Default Folder Settings For Archiving area, you can specify the number of days, weeks, or months that should elapse before email messages or other items are archived or deleted (as described in the preceding two sections).
In addition, this area includes options for the way old items are handled. With the Move Old Items To option, you can specify a .pst file to which Outlook 2010 should move archived items. Click Browse to identify a different location and the .pst file in which you want to store archives.
On the other hand, if you want to delete archived items, select Permanently Delete Old Items, and Outlook 2010 will delete items during the AutoArchive sessions. This option is probably not a good choice if you want to retain information for long periods of time.
If you want these AutoArchive settings to apply to all your folders, click Apply These Settings To All Folders Now. Any settings you establish for individual folders (see the next section) are not overridden by the default settings in the AutoArchive dialog box.
When you configure AutoArchive settings, you can use the default settings just described, or you can specify options for individual folders.
To take the latter approach, open the Properties dialog box for the folder, click the AutoArchive tab, and then click Archive This Folder Using These Settings. Then set the following options:
Do Not Archive Items In This Folder Specify that the current folder should not be archived.
Archive This Folder Using These Settings Direct Outlook 2010 to archive items in the folder based on the custom settings that you specify.
Clean Out Items Older Than n This option lets you specify the number of days, weeks, or months that should pass before AutoArchive removes items in the selected folder.
Move Old Items To Default Archive Folder You can have Outlook 2010 move old items to the folder specified for default AutoArchive settings.
Move Old Items To This option lets you specify a .pst file in which to archive old items. Click Browse to locate a file.
Permanently Delete Old Items You can direct Outlook 2010 to delete items in this folder during archiving.
Your system administrator might enforce company retention policies for your mailbox. If you are running Outlook 2010 with Exchange Server, your administrator can set retention polices that you can’t override with AutoArchive settings. For example, your company might require that all email messages be saved and archived to backup tapes or disks and then retained for seven years. As much as you try, you can’t change these settings without having the appropriate permissions.
An important part of working with a computer system is ensuring that you protect any critical data against loss. You protect your data by making a backup, a copy of the information that you can store on another disk or on a backup tape. In the event of a critical failure, you can then use this copy to replace or restore any lost information.
Outlook 2010 stores information in two primary ways: in a set of personal folders or in an Exchange Server mailbox. With an Exchange Server mailbox, your message store is located on the server. The network administrator is generally responsible for backing up the server, and with it, the Exchange Server database that contains all the users’ information.
If you don’t use Exchange Server, Outlook 2010 stores your data in a .pst file, a set of personal folders. In this scenario, each user has his or her own .pst file or even multiple personal folder files. These .pst files can be located either on the local hard disk of your computer or in a home directory on the server. Although server-based .pst files and local .pst files are identical from a functional standpoint, they aren’t identical from a backup perspective. Generally, the network administrator regularly backs up server-based user home directories, so if the .pst files are in your home directory, you shouldn’t have to do backups on your own (although you can, of course).
With local message stores, however, normal network backup strategies do not apply. Most networks don’t back up every hard disk on every machine. It simply isn’t efficient. Similarly, if you’re a home user, you probably don’t have a server to which you can save data or a network administrator to watch over the server. In such cases, you need to take steps on your own to protect your data. Individual backup and restore scenarios apply to these kinds of cases.
Three primary options are available for backing up Outlook 2010 data:
Table 30-1 lists the features available in each backup option.
Table 30-1. Backup Options in Outlook 2010
Backup Type | Export | Copy | Backup |
|---|---|---|---|
Complete backup | Yes | Yes | Yes |
Partial backup | Yes | No | No |
Automated backup | No | Yes | Yes |
The following sections focus on the use of backup programs and .pst copies.
If you store your Outlook 2010 data in one or more sets of personal folders, the data resides in a .pst file. This file is usually located on your local hard disk, but it could also be stored on a shared network folder. The first step in backing up your personal folders is to determine where the .pst file is located.
If you are not sure whether you use an Exchange Server account, follow these steps to check your email settings:
Click the Mail icon in Control Panel.
In the Mail Setup dialog box, click Show Profiles, choose your profile, and then click Properties. Then click E-Mail Accounts to open the E-Mail Accounts dialog box.
If the E-Mail Accounts list includes only Exchange Server, your Outlook 2010 data is stored in your Exchange Server mailbox on the server, and your Exchange Server administrator handles backups. However, you can use the Export method described in the section Exporting Data, on page 775, to back up your mailbox to a local .pst file. If the E-Mail Accounts list shows an Exchange Server account along with other accounts, look at the mail delivery location specified at the bottom of the dialog box. This area shows where incoming mail is delivered. If it specifies a mailbox, your incoming mail is delivered to your Exchange Server mailbox. If it references a set of personal folders, your incoming mail is stored in a .pst.
If the E-Mail Accounts list shows more than one email account, it’s possible that your Outlook 2010 data is stored in more than one set of personal folders. For example, Internet Message Access Protocol (IMAP) and Hotmail accounts store their data in their own .pst files. If you want to back up everything in this situation, you need to back up multiple .pst files.
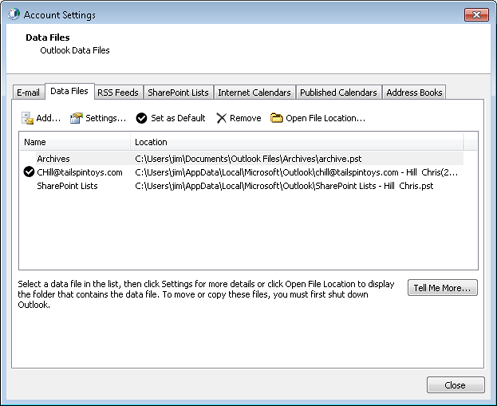
To determine whether you are using more than one .pst file, click the Data Files tab of the Account Settings dialog box, shown in Figure 30-6. The path name and file name for the .pst are generally long, so it’s unlikely that you’ll be able to read the full name. Click the vertical bar at the right of the Filename column and drag it to the right until you can view the entire path. Alternatively, simply click Open File Location, which opens the folder where the .pst file is stored and highlights the .pst file in the folder.
After you have verified that the message store is not being backed up elsewhere and is stored in a .pst file, you need to choose which kind of backup to do. Both of the following methods work well, and each has its advantages. Back up each of the .pst files listed in the Data Files tab of the Account Settings dialog box using one of these methods.
Personal folders or archive files can be extremely large—often hundreds of megabytes—so you need to make sure that your backup method can accommodate the size of your .pst file(s). Any of the following options would be acceptable to use with a file backup method:
Tip
INSIDE OUT Check network backup policies
Be certain to check with your network administrator about the recommended policy for backing up .pst files in your organization. If, for example, .pst files are not allowed on your network because of resource allocation, you’ll want to know this and choose another backup method rather than copying your .pst file to the network only to find it deleted the next week. Remember that whatever the merits of a particular backup method, it’s critical that your IT staff support it.
If you are saving to a CD or DVD, you can probably use the software that was included with the drive to copy the file. If you’re using a flash drive, USB drive, or a network location, simply drag the file to your chosen backup location. Make sure to exit Outlook 2010 before starting the backup copy process.
Tip
INSIDE OUT Don’t move the .pst file
When copying, be careful not to move the .pst file instead by accident. If you move it, you’ll find that you have no message store when you restart Outlook 2010. If you do move your .pst file accidentally, you simply need to copy the file back to the correct location. To avoid this potential problem, automate the copy.
Anyone who works with computers long enough will eventually experience a critical error. A drive will become corrupted, a virus will get through your virus software’s protection, or you’ll accidentally delete something that you need. This is the point when all the time and trouble you’ve invested in backing up your data will pay dividends.
Depending on how you created your backup file, you will have one of two options: You can simply recopy your backup .pst file from the backup location where you copied it, or you can run the backup utility and use the Restore tab to bring back the missing file or files. From there, you can select the backup file that contains the .pst file and then determine which files to restore and where to put them.
Note
By default, the backup utility restores a file to its original location. This is generally the best choice because if the .pst file isn’t restored to the proper location, Outlook 2010 won’t be able to find it.
Whichever method you use, be certain to check the drive carefully for errors and viruses before you restore your data. You don’t want to restore the file, only to see it destroyed again a few hours later.
Tip
INSIDE OUT Familiarize yourself with the restore process
It’s important to be familiar with the restore process before a disaster recovery process is under way. You should occasionally try restoring your backed-up .pst file to another computer to verify that your backups work. This will help to ensure that the restore process will work and that you know how to perform the necessary tasks.
If you use an Exchange Server account and want to have a backup of your message store available locally, one possible option is to use offline folders. Offline folders allow you to access your message store when your computer is not connected to the server, such as when you’re away from the office. To use offline folders, you must create an offline folder (.ost) file, which is stored on the local drive of your computer. If you configure the Exchange Server account to use Cached Exchange Mode, Outlook 2010 creates an .ost file for you automatically and stores your data in that .ost file.
In a sense, .ost files provide backup in reverse: Instead of saving data to a server to back it up, the offline process saves the information from the server to the workstation. Although offline folders don’t offer a standard backup, an occasional synchronization to an offline store is an easy way to create a second copy of Outlook 2010 data. (With Cached Exchange Mode, Outlook 2010 always works from the .ost file and synchronizes with the Exchange Server mailbox automatically.) If the Exchange Server mailbox is lost, you need only start Outlook 2010 and choose to work offline to access the lost data. At that point, you can export the data to a .pst file to create a backup.
Note
For more information about setting up and using offline folders, see the section Working Offline with Outlook 2010 and Exchange Server, on page 974.
