Establishing a Remote LAN Connection 972
Working Offline with Outlook 2010 and Exchange Server 974
MICROSOFT Outlook 2010 provides several features that enable you to work offline (while you are not connected to your mail server) as well as from a remote location. Using the offline feature and the offline storage of Outlook 2010, which contains copies of all the folders and items in your Microsoft Exchange Server mailbox, you can work with contacts, messages, and other items stored in your mailbox without being connected to the server (except to perform periodic synchronizations). You can create and delete items, add folders, and make other changes while offline; Outlook 2010 synchronizes those changes the next time you connect to the server and perform a send/receive operation.
Note
This chapter focuses on the offline and remote features in Outlook 2010 used in conjunction with Exchange Server.
Note
If you are looking for ways to work offline and remotely using other types of email servers and accounts, see Chapter 15.
Offline use and remote use are two separate aspects of using Outlook 2010, although they typically go hand in hand. When you work offline, your computer is not connected to the server(s) running Exchange Server. This usually means that you’re working on a computer that uses a dial-up connection to the server or on a portable computer that you connect to the server through a docking station or a wireless access point on the local area network (LAN). You can be working offline even while your computer is connected to the LAN when the Exchange Server is down for maintenance, or you can set Outlook 2010 offline deliberately.
You can perform most of the same operations offline that you perform when you’re connected to the server. You can create messages, contacts, and other Outlook 2010 items; schedule meetings; and carry out other common Outlook 2010 tasks. The items that you create and the changes that you make to your folders and their contents, however, are made to the offline store instead of to your Exchange Server mailbox store. When you reconnect to the server, Outlook 2010 synchronizes the offline store with the mailbox store. Any items that arrived in the mailbox while you were working offline are added to your offline store when Outlook 2010 performs the synchronization. This behavior is the same whether you use Cached Exchange Mode and work from a locally cached copy of your mailbox or simply add an offline store (.ost) file to your profile—the main difference is in how Outlook 2010 synchronizes the online and offline mailboxes.
In contrast, working remotely generally means working with Outlook 2010 from a location other than the LAN on which the server running Exchange Server is located. For example, you might dial in to your LAN with a modem, connect to it through the Internet, or even connect through a demand-dial connection between two offices. Whatever your location, you can be working either offline or online when you work remotely. The only consideration is whether you are connected to the server. If you are not connected to the server, you are working offline. If you are connected to the server, you are simply working remotely.
To work remotely, you need to establish a remote connection to the server. How you accomplish this depends on the connection options available on your LAN and how the network administrator configured the LAN. The following are the most common methods for establishing a remote LAN connection:
Dial up access directly to the LAN In this scenario, the LAN includes a Remote Access Services (RAS) server that enables clients to dial up directly to the network using a modem or other device, such as an Integrated Services Digital Network (ISDN) connection. The RAS server can be the computer running Exchange Server or another server on the network, depending on the size of the organization and the load on the computer running Exchange Server. Depending on the configuration of the RAS server, dial-up clients might have access to the network or only to the computer running Exchange Server.
Connect through a virtual private network connection over the Internet If your LAN is connected to the Internet and includes a virtual private network (VPN) server, one of the options for retrieving email messages is to create a VPN connection to the LAN and then connect to the computer running Exchange Server. A VPN server enables clients to establish secure connections to the network through a public network such as the Internet.
Use a demand-dial connection between two networks If you have two or more offices, those offices might connect using a demand-dial connection. The connection might take place over a standard dial-up line, or you can use ISDN or another communication method. The demand-dial interface enables the two routers that connect the offices to establish the connection when a client requests it, such as when you connect to synchronize your Outlook 2010 data.
Use HTTP to connect to the server Outlook 2010 includes support for Hypertext Transfer Protocol (HTTP) as a communications protocol when used with Exchange Server 2003 or later, enabling you to connect to your computer running Exchange Server remotely (such as from the Internet) without using a VPN connection.
Caution
You can connect to a computer running Exchange Server through the Internet without configuring Outlook 2010 to use remote procedure call (RPC) over HTTP. However, doing so requires that you open several ports on the firewall that, for security reasons, really should not be opened. For that reason, this method is neither recommended nor explained in this chapter.
Because this book focuses specifically on Outlook 2010 and its integration with Exchange Server, the details of how to set up a RAS or VPN server aren’t covered.
Using HTTP as the communications protocol for your computer running Exchange Server is a useful remote access method that eliminates the need for you to run VPN software on your client. It also eliminates the need for the network administrator to support those VPN connections. Most networks already have port 80 open for HTTP and port 443 open for Hypertext Transfer Protocol Secure HTTP (Hypertext Transfer Protocol)(HTTPS) through Secure Sockets Layer (SSL), so providing HTTP-based access to Exchange Server requires only some setup on the computer running Exchange Server and configuring Outlook to use HTTP.
Note
HTTP-based access to Exchange Server requires Exchange Server 2003 or later and Outlook 2003 or later.
Chapter 39, explains how to configure the Exchange Server client for Outlook 2010, including setting up the account to use HTTP and configuring the server, so that information isn’t repeated here. Beyond those steps, there is really nothing else to do to start using HTTP to access your mailbox. However, here is some advice:
Use Cached Exchange Mode and synchronize from the LAN at least once To reduce the load on the server and the amount of bandwidth that you will use connecting to the server, consider using Cached Exchange Mode, which creates a locally cached copy of your mailbox on your computer. Before connecting remotely, connect to the server on your LAN (if possible) and allow Outlook 2010 to synchronize the cache with your mailbox. By synchronizing from the LAN rather than a remote connection, you will likely decrease the amount of time required to complete the synchronization, particularly if your mailbox contains a large amount of data.
Use RPC and TCP/IP when connected locally to the network The default settings for using HTTP in Outlook 2010 to connect to your computer running Exchange Server cause Outlook 2010 to attempt a connection with remote procedure call (RPC) rather than Transmission Control Protocol/Internet Protocol (TCP/IP) for a fast connection before it attempts to use HTTP. Leave this setting at its default to provide better performance when you connect to the server from your LAN. Change this setting only if your Exchange Server requires an HTTP connection to the server.
There are a few specific issues and settings that you need to consider when working with Outlook 2010 offline. This section explains how to configure the Outlook 2010 startup mode and offline folders and how to use an offline address book.
When you start Outlook 2010, it attempts by default to determine the online or offline status of the server. If the server is unavailable and Outlook 2010 is configured with an .ost file, Outlook 2010 starts in offline mode and uses the offline folder specified in your profile for displaying existing items and storing new items (such as email messages) before synchronizing with Exchange Server. With Cached Exchange Mode enabled, Outlook 2010 automatically uses the local cache (stored in an .ost file) and attempts to synchronize the cached copy with your Exchange Server mailbox if a server connection is available. If you configured autodial in your operating system, Outlook 2010 dials the connection to the Internet service provider (ISP) or RAS server. However, you might want to exercise more control over the Outlook 2010 startup mode and when it connects. For example, you might prefer to have Outlook 2010 start in offline mode so that you can compose messages or perform other tasks before you connect and synchronize with the server.
You configure startup options by setting the properties for the Exchange Server account in your profile, as outlined in the following steps:
Open the Mail item in the Control Panel.
If you don’t use multiple profiles, skip to step 3. If you use multiple profiles, click Show Profiles. Select the profile that you want to change and then click Properties.
Click E-Mail Accounts.
Select the Exchange Server account and then click Change.
If you decide to use Cached Exchange Mode, you can click the Use Cached Exchange Mode option; otherwise, click More Settings and then click the General tab (see Figure 41-1).
Configure the following settings:
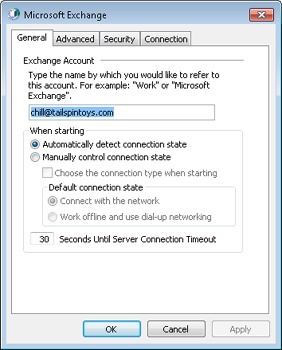
Automatically Detect Connection State With this setting, Outlook 2010 detects the connection state at startup and enters online or offline mode accordingly (selected by default).
Manually Control Connection State With this setting, you control the connection state when Outlook 2010 starts. The next three options work in combination with this option.
Choose The Connection Type When Starting With this setting, Outlook 2010 prompts you to select the connection state when it starts. This enables you to select between online and offline states.
Connect With The Network With this setting, connect through your local LAN to Exchange Server. You can use this option if you connect to the Internet through a dedicated connection such as a cable modem or a Digital Subscriber Line (DSL) connection (selected by default).
Work Offline And Use Dial-Up Networking With this setting, you can start in an offline state and use Dial-Up Networking to connect to Exchange Server. On the Connection tab, specify the dial-up connection that you want to use.
Seconds Until Server Connection Timeout With this setting, specify the timeout, in seconds, for the server (30 seconds by default). Outlook 2010 attempts a connection for the specified amount of time; if Outlook 2010 is unable to establish a connection in the specified period, it times out. You might want to increase the time-out period if you connect to the Internet through a shared dial-up connection hosted by another computer on your LAN.
Note
See the sidebar “Increase TCP Time-Out for On-Demand Connections”, on Configuring Advanced Properties, for details on configuring the TCP/IP timeout.
Although you don’t have to use offline folders when you work with Exchange Server over a remote connection, you do need a set of offline folders to work offline. If you haven’t set up offline folders and can’t connect to the remote server, Outlook 2010 won’t start. One of your first tasks after you create your dial-up connection and configure your Exchange Server account should be to configure a set of offline folders. Note, however, that you don’t have to perform this step if you configure Outlook 2010 to use Cached Exchange Mode for your Exchange Server account. When you enable Cached Exchange Mode, Outlook 2010 automatically creates an offline store for you.
Note
See Chapter 39 for more information on enabling Cached Exchange Mode.
You can associate one set of offline folders with the Exchange Server account in your profile. The offline file has an .ost file extension and stores a copy of all the folders and items in your Exchange Server mailbox. Outlook 2010 synchronizes the data between the two. For example, suppose that you create an email message and a new contact item while working offline. The message goes in the Outbox folder of the offline store, and the new contact item goes in the Contacts folder of the offline store. When you next connect to the server and perform synchronization, Outlook 2010 moves the message in the local Outbox to the Outbox folder on your computer running Exchange Server, and the message then gets delivered. Outlook 2010 also copies the new contact item in your local Contacts folder to the Contacts folder stored on the computer running Exchange Server. Any additional changes, including those at the server (such as new email messages waiting to be delivered), are copied to your local offline folders.
Note
The .ost file does not appear as a separate set of folders in Outlook 2010. In effect, Outlook 2010 uses it transparently when your computer is offline.
An .ost file, like a personal folders (.pst) file, contains Outlook 2010 folders and items. One difference, however, is that you can have only one .ost file, but you can have multiple .pst files. Also, Outlook 2010 synchronizes the offline store with your computer running Exchange Server automatically but does not provide automatic synchronization for .pst files.
Note
For more information on adding .pst files to a profile, see the section Adding Other Data Stores, on page 59.
Follow these steps to configure offline storage with an .ost file:
If Outlook 2010 is running, click File, Account Settings, and finally Account Settings. Otherwise, open the Mail item in the Control Panel and click Properties.
Select the Exchange Server account and click Change.
To use offline folders without Cached Exchange Mode, clear the Use Cached Exchange Mode check box in the Change E-Mail Account dialog box.
Click More Settings and then click the Advanced tab.
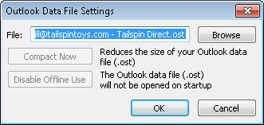
Click Outlook Data File Settings to open the dialog box shown in Figure 41-2.
In the File box, specify a path and name for the .ost file and click OK.
On the Advanced tab, click OK.
Click Next and then click Finish.
Note
This option to configure the offline folder store might be dimmed (disabled) if you have only an Exchange Server email account configured, yet it can be enabled if you have multiple types of email accounts. If you have a POP3 account configured, for example, and you add an Exchange Server account, the capability to configure the offline storage location is enabled.
After you add an .ost file to your profile, you need to synchronize the file with your Exchange Server mailbox at least once before you can work offline.
Follow these steps to synchronize your offline folders:
Connect to the remote network where the computer running Exchange Server is located using the Internet, a dial-up connection to a remote access server on the remote LAN, or other means (such as ISDN, cable modem, or DSL). A LAN connection will give you the best performance for the initial synchronization.
Click the Send/Receive tab on the ribbon and click Send/Receive All Folders. Outlook 2010 then synchronizes with the computer running Exchange Server.
The preceding section explained how to synchronize your offline folders and your Exchange Server mailbox. Sometimes, though, you might not want to synchronize all folders each time you perform a send/receive operation. You can use send/receive groups to define the actions that Outlook 2010 takes when sending and receiving. For example, you might want to create a send/receive group that sends only mail waiting in your local Outbox and doesn’t retrieve waiting messages from the server.
Note
For a detailed discussion of send/receive groups, see the section Controlling Synchronization and Send/Receive Times, on page 199.
Whether you’re composing messages offline, scheduling meetings, or creating tasks to assign to others, chances are good that you want access to your Exchange Server address book so that you can address messages to other users in your organization. If the Global Address List (GAL) doesn’t change very often on the server (if, for example, employee turnover at your company is low), you can get by with downloading the offline address book infrequently. Otherwise, you’ll need to update the offline address book more often.
Note
You can download additional address lists from the server if the Exchange Server administrator has created additional address books and given you the necessary permissions to access them. Additional address books give you quick access to addresses that are sorted using different criteria than the GAL uses or access to other addresses not shown in the GAL (such as external contacts).
To download the address book manually whenever you want an update, follow these steps:
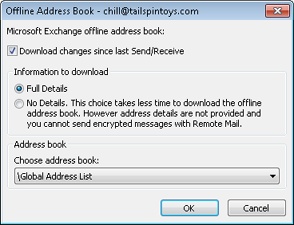
Click the Send/Receive tab, click Send/Receive Groups, and choose Download Address Book to open the Offline Address Book dialog box (see Figure 41-3).
Select options as needed from the following:
Download Changes Since Last Send/Receive Download only changes made since the last time you performed a send/receive operation. Clear this check box to download the entire address list.
Full Details Download all address information, including phone, fax, and office location. (You must select this option if you want to send encrypted messages because you need the users’ digital signatures.)
No Details Download only email addresses and no additional address book details.
Click OK to download the address book.
In addition to performing manual offline address book updates, you also can configure a send/receive group to download the address book.
Follow these steps to do so:
Click the Send/Receive tab, click Send/Receive Groups, and choose Define Send/Receive Groups.
Select the send/receive group in which you want to configure the address book download, and then click Edit.
On the Accounts bar of the Send/Receive Settings dialog box, select your Exchange Server account (see Figure 41-4).
Select the Download Offline Address Book check box and then click Address Book Settings to open the Offline Address Book dialog box.
Configure settings as necessary in the Offline Address Book dialog box (discussed in the preceding set of steps) and then click OK.

Each time you synchronize folders using the send/receive group, Outlook 2010 downloads the offline address book according to the settings that you specified. You probably don’t want to configure this option for the default All Accounts send/receive group unless you have a fast connection to the server and your offline address book changes frequently. One option is to create a send/receive group that downloads only the offline address book and does not process any other folders. However, this is essentially the same as clicking Send/Receive, Send/Receive Groups, and Download Address Book. Consider how often you need to download the address book and work that task into your send/receive groups as you see fit.