Outlook as an Exchange Server Client 943
Configuring General Properties 947
Configuring Advanced Properties 948
Configuring Security Properties 950
Configuring Connection Properties 951
ALTHOUGH you can use Microsoft Outlook 2010 with other types of mail servers, you derive the greatest benefit when you use Outlook 2010 with Microsoft Exchange Server. Added benefits include the Out Of Office Assistant, the ability to recall messages, the ability to delegate functions to an assistant, the use of server-side message rules, and many other collaboration features.
You can connect to Exchange Server using any of several protocols, including Post Office Protocol 3 (POP3), Internet Message Access Protocol (IMAP), and even Hypertext Transfer Protocol (HTTP). This means two things: You can connect to a computer running Exchange Server using email clients other than Outlook 2010 (Microsoft Outlook Express or Windows Mail, for example), and you can use a service provider other than the Exchange Server client within Outlook 2010 (such as POP3) to connect to the server, assuming that the server is configured appropriately. To get all the benefits afforded by the combination of Outlook 2010 and Exchange Server, however, you must use the Exchange Server service provided with Outlook 2010.
This chapter explains how to add the Exchange Server client to an Outlook 2010 profile and configure its settings.
Note
For detailed information about adding other service providers to an Outlook 2010 profile, see Chapter 3. You’ll find additional information about setting up Internet email accounts in Chapter 7.
The Microsoft Exchange Server service in Outlook 2010 allows you to use Outlook 2010 as a client for Exchange Server. Of all the services supported by Outlook 2010, Exchange Server offers the broadest range of functionality, providing excellent support for collaboration, information sharing, group scheduling, and more.
Note
The remaining chapters in this part of the book cover a broad range of topics to help you use Outlook 2010 effectively as an Exchange Server client.
Setting up an Exchange Server account in Outlook 2010 isn’t difficult, but it does require several steps, as follows:
If you are running Outlook 2010 for the first time, in the Outlook 2010 Startup Wizard, go to the Choose E-Mail Service page. To reach this page if you have run Outlook 2010 previously and your profile already includes a mail account, open the Mail item from the Control Panel, select the profile, and then choose Properties. Click E-Mail Accounts, and then click New on the E-Mail tab in the Account Settings dialog box. If Outlook 2010 is already open, click File, Add Account.
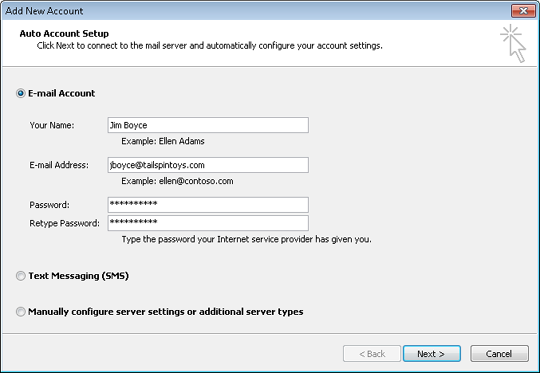
The Auto Account Setup page, shown in Figure 39-1, gives you a place to specify your name, email address, and password. If AutoDiscover is configured properly for your Exchange Server environment, you can enter your name, email address, and password as it is set on the server, click Next, and have Outlook 2010 determine the necessary settings to connect to your server. However, the following steps assume that you are not able to use AutoDiscover and must configure the account manually.
Note
AutoDiscover requires that your computer be able to resolve the autodiscover host in your domain. For example, if your computer resides in the tailspintoys.com domain, your computer must be able to resolve autodiscover.tailspintoys.com to the servers on the tailspintoys.com network that are providing AutoDiscover services. For more details on AutoDiscover, see the Exchange Server 2010 documentation.
If you don’t want to use AutoDiscover, choose Manually Configure Server Settings Or Additional Server Types, and then click Next.
Choose Microsoft Exchange Or Compatible Service, and then click Next.
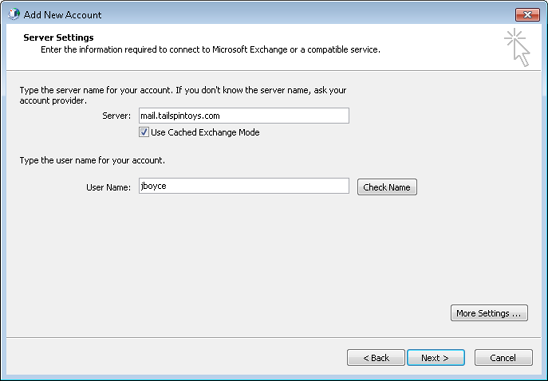
On the Server Settings page, shown in Figure 39-2, specify the following information:
Server Specify the NetBIOS or Domain Name System (DNS) name of the computer running Exchange Server, or its Internet Protocol (IP) address. You don’t have to include a double backslash (\\) before the server name.
Use Cached Exchange Mode Select this check box to have Outlook 2010 create a locally cached copy of your entire Exchange Server mailbox on your local computer. Outlook 2010 creates an offline folder store (.ost) file in which to store the mailbox and works from that cached copy, handling synchronization issues automatically.
User Name Specify the name of your mailbox on the server. You can specify your logon account name or mailbox name. For example, you might use chill or Chris Hill.
Check Name After you enter your logon or mailbox name, click Check Name to check the specified account information against the information on the server. If you specify your logon name, clicking Check Name automatically changes the user name to your mailbox name. Outlook 2010 indicates a successful check by underlining the user name. If you are connecting to the server using Outlook Anywhere (RPC over HTTP), do not click Check Name—you must configure the connection first because Outlook 2010 must be able to communicate with the server to check your name.
Click More Settings to open the Microsoft Exchange dialog box, shown in Figure 39-3.
Use the information in the following sections to configure additional settings if needed, and then click OK to close the Microsoft Exchange dialog box. Click Next, and then click Finish.
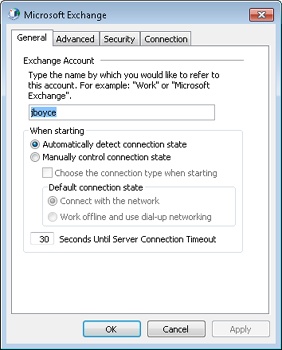
You use the General tab in the Microsoft Exchange dialog box (shown in Figure 39-3) to configure the account name, the connection state, and other general settings, as follows:
Exchange Account This option specifies the name under which the account appears in your Outlook 2010 configuration. This name has no bearing on the Exchange Server name or your account name. For example, you might name the account Office Email, Work Account, or Microsoft Exchange Server.
Automatically Detect Connection State This option directs Outlook 2010 to detect the connection state (offline or online) at startup and choose the appropriate state. Use this option if your computer is connected to the network all the time. Also use this option if you’re setting up an Exchange Server account on a notebook computer under a profile that you use when the notebook is connected to the network.
Manually Control Connection State This option controls the connection state at startup. Choose this option if you’re setting up an Exchange Server account on a computer that is sometimes disconnected from the network (a notebook computer, for example) or that always accesses the computer running Exchange Server remotely. Choose one of the following suboptions, depending on how you want Outlook 2010 to connect to the server:
Choose The Connection Type When Starting Specifies which method Outlook 2010 uses to connect to the computer running Exchange Server at startup. If this check box is selected, Outlook 2010 prompts you each time it starts, asking whether you want to connect to the network or work offline. Clear this check box if you want Outlook 2010 to make that determination.
Connect With The Network Connects to the computer running Exchange Server through the network rather than initiating a dial-up connection. Use this option if your computer is hard-wired to the network or always online, such as with a Digital Subscriber Line (DSL), cable modem, or other persistent remote connection.
Work Offline And Use Dial-Up Networking Use dial-up networking to connect to the computer running Exchange Server. Specify the connection options on the Connection tab.
Seconds Until Server Connection Timeout This option specifies the time-out for connection attempts to the computer running Exchange Server. If you are working remotely over a slow connection, increase this value to give Outlook 2010 more time to establish the connection to the server.
Tip
INSIDE OUT Increase TCP Time-Out for On-Demand Connections
If you use Internet Connection Sharing (ICS) or demand-dial router connections, you’ve no doubt had your client computer time out while waiting for the ICS or demand-dial router to establish a connection. This can cause a remote connection to the computer running Exchange Server to fail.
Transmission Control Protocol (TCP) sets a retransmission timer when it attempts the first data transmission for a connection, with an initial retransmission time-out value of 3 seconds. TCP doubles the retransmission time-out value for each subsequent connection attempt, and by default, it attempts retransmission two times. The first attempt is made at 3 seconds, the second at 3 + 6 seconds, and the third at 3 + 6 + 12 seconds, for a maximum time-out of 21 seconds. Increasing the initial retransmission timer to 5 seconds results in a total maximum time-out of 5 + 10 + 20, or 35 seconds.
The initial TCP retransmission time-out is defined by the registry value HKEY_LOCAL_MACHINE\System\CurrentControlSet\Services\Tcpip\Parameters\InitialRtt. The InitialRtt value is a REG_DWORD with a valid range from 0 to 65,535 and specifies the time-out in milliseconds.
The number of connection attempts is defined by the registry setting HKEY_LOCAL_MACHINE\System\CurrentControlSet\Services\Tcpip\Parameters\TcpMaxDataRetransmissions. The TcpMaxDataRetransmissions value is also a REG_DWORD with a valid range of 0 to 65,535.
You use the Advanced tab in the Microsoft Exchange dialog box, shown in Figure 39-4, to configure additional mailboxes to open, as well as security and offline processing settings. Why use additional mailboxes? You might own two mailboxes on the server and need access to both of them. For example, if you are the system administrator, you probably need to manage your own account as well as the Administrator account; or perhaps you’ve been delegated as an assistant for a set of mailboxes and need to access them to manage someone’s schedule (discussed in Chapter 34). The Advanced tab is where you add mailboxes that you own or for which you’ve been granted delegate access.
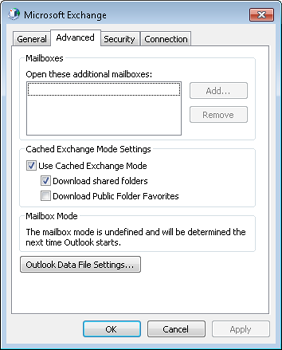
Figure 39-4. Use the Advanced tab to configure additional mailboxes, Cached Exchange Mode, and offline file settings.
The options on the Advanced tab are:
Open These Additional Mailboxes This option defines the set of mailboxes you want Outlook 2010 to open. These can be mailboxes that you own or for which you’ve been granted delegate access.
Use Cached Exchange Mode This option has Outlook 2010 create and work from a locally cached copy of your mailbox. This setting corresponds to the Use Cached Exchange Mode setting on the Exchange Server Settings page of the E-Mail Accounts Wizard.
Download Shared Folders Select this option if you want Outlook 2010 to download the contents of shared folders, such as other users’ Inbox or Calendar folders made available to you through delegate permissions or Microsoft SharePoint folders.
Download Public Folder Favorites Select this check box if you want Outlook 2010 to cache the public folders that you have added to the Favorites folder in the Public Folders branch. Before selecting this check box, consider how much replication traffic you will experience if the folders in your Favorites folder contain a large number of posts and are very active.
Outlook Data File Settings You can use this option to set up an .ost file to use as your data cache while working offline. You need to use an .ost file only if the account is configured to store your data in your Exchange Server mailbox. If your primary data file is a personal folders (.pst) file, or if you don’t work offline, you don’t need an .ost file.
The following settings on the Security tab of the Microsoft Exchange dialog box, shown in Figure 39-5, control whether Outlook 2010 encrypts data between the client and the server and how authentication is handled:
Encrypt Data Between Microsoft Outlook And Microsoft Exchange This setting determines whether Outlook 2010 uses encryption to secure transmission between your system and the server. Select this check box to enable encryption for greater security.
Always Prompt For Logon Credentials Select this check box if you want Outlook 2010 to prompt you for your logon credentials each time it needs to connect to the server. This is useful if you are concerned that others who have access to your computer might be accessing your mailbox.
Logon Network Security This setting specifies the type of authentication to use when connecting to Exchange Server. The Password Authentication option causes Exchange Server to use Microsoft Windows NT LAN Manager (NTLM) challenge/response to authenticate on the server using your current logon account credentials. This is the standard authentication mechanism in Windows NT domains. Kerberos Password Authentication is the default authentication mechanism for Microsoft Windows 2000 Server and later domains. You can choose either of these or choose the Negotiate Authentication option to have Outlook 2010 attempt both.
Insert Smart Card Use a smart card to authenticate to Exchange Server.

The Connection tab in the Microsoft Exchange dialog box, shown in Figure 39-6, allows you to specify how your computer connects to Exchange Server. You can connect through the local area network (LAN), through dial-up networking, or through a third-party dialer, such as the one included with Internet Explorer. The LAN connection option applies if you’re connecting over a hard-wired connection—for example, when your computer is connected to the same network as the server. You should also use the LAN option if you connect to the server over a shared dial-up connection hosted by another computer.
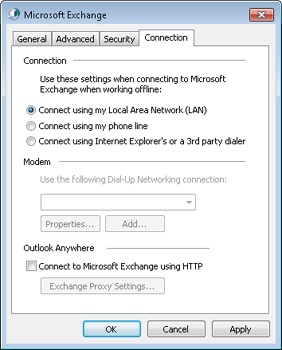
Click Connect Using My Phone Line to use an existing dial-up networking connection or to create a new dial-up connection. Select the desired connection in the drop-down list, and then click Properties if you need to modify the dial-up connection. Click Add if you need to add a dial-up connection.
If you want to connect to the Internet or your remote network using the dialer included in Internet Explorer or a dialer included in a third-party dial-up client, click Connect Using Internet Explorer’s Or A 3rd Party Dialer.
The Outlook Anywhere group of controls lets you configure Outlook 2010 to connect to Exchange Server using HTTP. The capability to use HTTP to connect to a remote computer running Exchange Server provides an additional connection option for users of Outlook 2010 and can drastically reduce administrative overhead. Administrators do not need to provide virtual private network (VPN) access to the network or configure VPN client software for users to access the computer running Exchange Server from remote locations.
HTTP access also provides native access to the computer running Exchange Server as an alternative to Outlook Web Access (OWA) for users.
The Connect To Microsoft Exchange Using HTTP check box, if selected, causes Outlook 2010 to connect to the computer running Exchange Server using the HTTP protocol. To configure additional settings, click Exchange Proxy Settings to open the Microsoft Exchange Proxy Settings dialog box, shown in Figure 39-7.
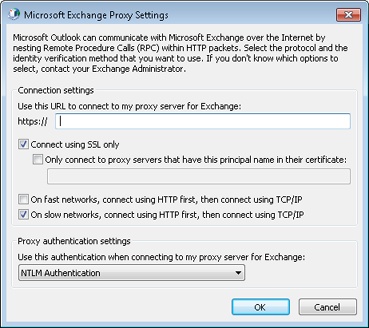
Figure 39-7. Specify settings for the HTTP connection in the Microsoft Exchange Proxy Settings dialog box.
Configure settings in this dialog box using the following list as a guide:
Use This URL To Connect To My Proxy Server For Exchange This option specifies the Uniform Resource Locator (URL) that serves as the access point for the server. The default is <server>/RPC, where <server> is the web address of the front-end server running Exchange Server. An example is httpmail.boyce.us/rpc. Omit the https:// prefix.
Connect Using SSL Only Select this check box to connect to the server using Secure Sockets Layer (SSL). Note that Outlook 2010 changes the URL prefix to https:// for the URL. (See the preceding option.)
Only Connect To Proxy Servers That Have This Principal Name In Their Certificate This option specifies the principal name for the remote proxy server for SSL authentication.
On Fast Networks, Connect Using HTTP First, Then Connect Using TCP/IP With this setting, when Outlook 2010 senses a fast connection to the server, it attempts HTTP first and then resorts to TCP/IP if HTTP fails.
On Slow Networks, Connect Using HTTP First, Then Connect Using TCP/IP With this setting, when Outlook 2010 senses a slow connection to the server, it attempts HTTP first and then resorts to TCP/IP if HTTP fails.
Use This Authentication When Connecting To My Proxy Server For Exchange Select the authentication method to use to authenticate on the remote computer running Exchange Server. Choose the type of authentication required by the front-end server.
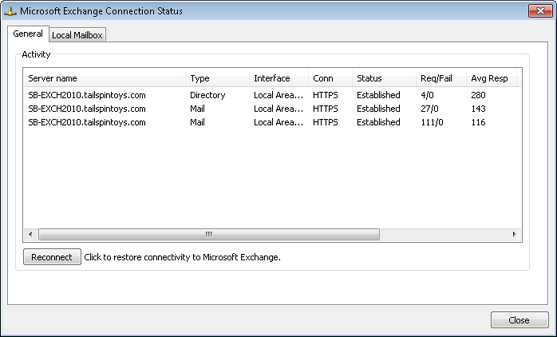
After you have finished configuring Outlook 2010 to use RPC over HTTP to connect to your computer running Exchange Server, you can verify the type of connection that it is using. To do this, hold down the Ctrl key, right-click the Outlook 2010 icon in the system tray, and then choose Connection Status to open the Microsoft Exchange Connection Status dialog box, shown in Figure 39-8.
Outlook 2010 supports automatic account configuration, which means that Outlook 2010 can attempt to determine your account settings automatically. With Exchange Server 2010, Outlook 2010 relies on being able to identify and communicate with the autodiscover host for your domain, such as autodiscover.tailspintoys.com. This host corresponds to a virtual server hosted on the computer running Exchange Server. With versions of Exchange Server prior to 2007, you must specify your name, email address, and account password, and then Outlook 2010 attempts to identify the appropriate server based on that information.
To be able to resolve the fully qualified autodiscover host name, your client must be pointed to a DNS server that hosts the records for the autodiscover host or that can forward a query to the appropriate DNS server(s).
After your client is configured appropriately to resolve the autodiscover host, you can use a feature in Outlook 2010 to test the capability to discover account information. If you are having difficulties viewing free/busy information or using the Out Of Office Assistant, the inability of the client to contact the autodiscover host could be the problem.
To test the connection, create an Outlook 2010 profile, with or without a valid email account. To do this, start Outlook 2010, hold down the Ctrl key, and right-click the Outlook 2010 icon in the system tray. Choose Test E-Mail AutoConfiguration to open the Test E-Mail AutoConfiguration dialog box, shown in Figure 39-9.
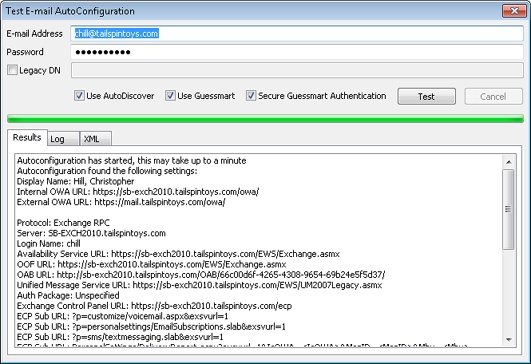
Type the email address for your Exchange Server account in the E-Mail Address field, type your email account password in the Password field, and then click Test. If AutoConfigure succeeds, the dialog box will display information similar to that shown in Figure 39-9. If AutoConfigure fails, the dialog box will display an error message indicating that it was unable to determine the correct settings. If you receive the error, verify that the client is configured for the appropriate DNS server(s) and retest.