Configuring Accounts and Services 49
Configuring Online and Offline Data Storage 57
BECAUSE Microsoft Outlook 2010 has so many features, configuring the program—particularly for first-time or inexperienced users—can be a real challenge. However, after you master the basic concepts and experiment with the configuration process, it quickly becomes second nature.
This chapter examines Outlook 2010 setup issues, including what you see the first time you start Outlook 2010 and how to use the Add New Account Wizard to create, modify, and test email accounts. You’ll also learn about user profiles, including how to create and modify them, how to use multiple profiles for different identities, how to copy profiles, and how to configure profile properties.
After you have a solid understanding of profiles, you’re ready to tackle configuring the many email and data file services that Outlook 2010 offers. This chapter discusses configuring both online and offline storage and will help you add, modify, and remove personal message stores (personal folders) for a profile.
In addition, you’ll learn how to configure Outlook 2010 to maintain an offline copy of your Microsoft Exchange Server mailbox and folders so that you can work with your account while you are disconnected from the network. You’ll also learn how to change the storage location for your data and how to set options to control mail delivery.
Outlook 2010 provides a wizard to help simplify the setup and configuration of email accounts, data stores, and directory services. You use the Add New Account Wizard to add new email accounts. If you are starting Outlook for the first time, or Outlook can’t find any profiles in the registry, Outlook will prompt you for a profile name and then show the Add New Account Wizard. In many cases, the wizard can configure your email account for you automatically after you give it only your name, email address, and mailbox password.
Note
If you upgraded to Outlook 2010 from an earlier version, Outlook 2010 automatically migrates your accounts, preferences, and data the first time you run it. This means that you don’t have to perform any other tasks before working with Outlook 2010 unless you want to add other accounts or take advantage of features not provided by your current profile settings. In the following section, you’ll learn how to add other services and accounts to your current Outlook 2010 profile.
Follow these steps to get started in setting up email accounts:
Start Outlook 2010. When the Outlook 2010 Startup Wizard appears, click Next. If the wizard does not start automatically, choose File, Account Settings, Account Settings, and then click New on the E-Mail tab.
On the E-Mail Accounts page, select Yes, indicating that you want to set up an email account, and then click Next.
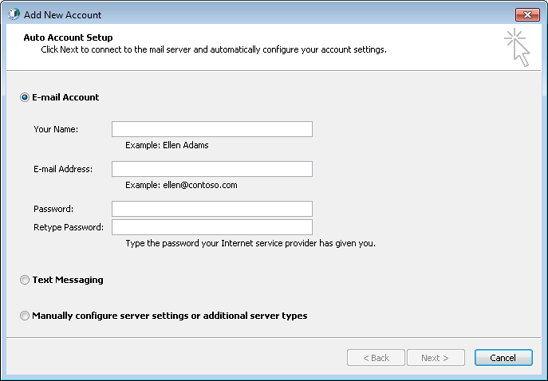
The Add New Account Wizard displays, as shown in Figure 3-1. Fill in your email account information to have Outlook 2010 attempt to locate your email account automatically.
Type the password as required, and then click Next.
Click Finish on the last page of the wizard.
Note
For a discussion of user profiles and how Outlook 2010 uses them to store your account settings, see the section Understanding Profiles, on page 52.
Note
If you select Manually Configure Server Settings Or Additional Server Types on the Auto Account Setup page, the wizard prompts you for the email service type. The action that the wizard takes at this point depends on the type of account or server you select. Rather than cover account configuration here, outside the context of using each type of account, this book covers the specifics of each account type in the associated chapter. The following list helps you locate the appropriate chapter and section:
Exchange Server See Chapter 39.
Internet Email (POP3 or IMAP) See the section Using Internet POP3 Email Accounts, on page 160.
Other (Fax Mail Transport or Hotmail) See Chapter 7, to configure the Outlook Hotmail Connector. The Fax Mail Transport is not covered in detail in Microsoft Outlook 2010 Inside Out.
Text Messaging (SMS) See Chapter 43, to learn how to configure Short Message Service (SMS) accounts in Outlook.
You can easily add an email account to your Outlook 2010 profile after Outlook 2010 is installed. Just click File, and then click Add Account to start the Add New Account Wizard.
Note
If your system includes multiple profiles, select the one to which you want to add accounts. Open the Mail item from Control Panel. Click Show Profiles, locate and select your profile, click Properties, and then select E-Mail Accounts.
Troubleshooting
Outlook 2010 can’t find your email server
If Outlook 2010 can’t seem to locate your email server, you can check a handful of settings to determine the problem. First, make sure that your computer is connected to the network or the Internet, depending on where the server is located. If you’re specifying a server on the Internet, make sure that you have specified the correct, fully qualified domain name (FQDN) of the server, such as mail.tailspintoys.com. If you specify the correct name but Outlook 2010 still can’t find the server, try pinging the server by name. Open a command prompt window and type the following command, where <server> is the FQDN of the server:
PING <server>
If this results in an unknown host error, it’s likely that the Domain Name System (DNS) is not configured or working properly on your computer (or the host name is wrong). Check the DNS settings for your Transmission Control Protocol/Internet Protocol (TCP/IP) protocol to make sure that you are specifying the correct DNS server. If you know the IP address of the server, ping the address. If you are able to ping the address but not the host name, you definitely have a DNS problem or are specifying the wrong DNS name. If the ping fails, you have a network connectivity or TCP/IP stack problem. If you are connecting to a computer running Exchange Server using Outlook Anywhere, you must be able to resolve the autoconfigure host for your Exchange Server environment (such as autoconfigure.tailspintoys.com). Try pinging that FQDN as well. If you still have no luck, consult your network support staff. Your configuration needs to be verified (and changed, if an incorrect value has been specified). If you have faulty hardware, it needs to be replaced.
In Outlook 2010, profiles store the configuration of email accounts, data files, and other settings that you use in a given Outlook 2010 session. For example, your profile might include an Exchange Server account, an Internet mail account, and a set of personal folders. Outlook 2010 either prompts you to select a profile at startup or selects one automatically, depending on how you’ve configured it.
In most cases, you’ll probably use only one profile and will configure Outlook 2010 to select it automatically. In some situations, however, multiple profiles can be useful. For example, you might prefer to keep your work and personal data completely separate on your notebook computer because of privacy concerns or office policies. In this situation, you maintain two profiles: one for your work data and a second for your personal data.
You then configure Outlook 2010 to prompt you to choose a profile at startup. The profile controls which set of data files and configuration settings are used for that specific session. For example, when you’re working at the office, you use the office profile, and when you’re using the computer at home, you use the personal profile.
It’s important to understand that Outlook 2010 profiles have no relationship to the other types of profiles that you’ll find in a Microsoft Windows operating system, which include hardware profiles and user profiles. Hardware profiles store hardware settings and allow you to switch between different hardware configurations without reconfiguring your system. User profiles store the unique working environment (Desktop, Documents, and so on) that you see when you log on to your computer. Outlook 2010 profiles, in contrast, apply only to Outlook 2010.
Each profile can contain multiple accounts and services, which means that you can work with different email servers at one time and use multiple sets of data files (such as a set of personal folders, or .pst files). The following list describes the items stored in an Outlook 2010 profile:
Services These include email accounts, directory services, and data files, along with their settings. For example, your profile might include an Exchange Server account, two Internet email accounts, a .pst file, and a directory service account. When these accounts are in a single profile, you can use all of them in the same Outlook 2010 session.
RSS feeds The profile stores the list of Really Simple Syndication (RSS) feeds that you have configured in Outlook. You don’t need to open the profile to add the feed; instead, you can simply subscribe to it and allow Outlook to add the feed to your profile for you.
SharePoint lists SharePoint lists (such as calendars and task lists) that you have connected to Outlook appear in your profile. You add these from the SharePoint site, rather than from Outlook.
Internet calendars You can add Internet calendars to Outlook from your profile and view those calendars alongside your own.
Published calendars The profile lists the calendars that you have published to Office Online or another online calendar server. You can change the account and other settings for the published calendar from the profile.
Delivery settings The profile specifies the store to which Outlook 2010 should deliver new mail when it arrives. You also can specify the order in which Outlook 2010 processes accounts.
To learn how to configure these delivery properties for a given profile, see the section Setting Send and Delivery Options, on page 65.
Address settings You can specify which address book Outlook 2010 displays first, where Outlook 2010 should store personal addresses, and the order of the address books that Outlook 2010 uses to check email addresses when the profile includes multiple address books.
For detailed information about configuring and using address books in Outlook 2010, see Chapter 6.
The first time you run Outlook 2010, it creates a profile named Outlook even if you don’t add any email accounts to the profile. If you do add an email account, Outlook 2010 uses the name that you specify in the account settings as the name for the profile.
As mentioned earlier, you can use multiple profiles. The following sections explain how to create new profiles, copy existing profiles to new profiles, and perform related operations.
You don’t have to be in Outlook 2010 to create a profile—in fact, you can’t create one in Outlook 2010. You can create profiles through the Control Panel. In addition to specifying a profile name, you can also (optionally) add email and other services to the profile. You can create a profile from scratch or copy an existing profile to create a new one.
When you have no existing Outlook profile or no profile that contains the accounts or settings you need, you must create a profile from scratch.
Follow these steps to create a new profile:
In the Mail Setup dialog box, shown in Figure 3-2, click Show Profiles. If no profiles exist, the Mail dialog box appears; continue with step 3.
Click Add, specify a name for the profile in the New Profile dialog box, and then click OK.
The Add New Account Wizard starts. Add accounts and other services to the profile. Enter requested data, such as email address and password. To create a new profile without adding any services (useful if you are not using Outlook 2010 for email), click Cancel, and then click OK. In this situation, Outlook 2010 automatically creates a set of personal folders (a .pst file) to store your Outlook 2010 data.

In addition to creating profiles from scratch, you can also create a profile by copying an existing one. When you copy a profile, Outlook 2010 copies all the settings from the existing profile to the new one, including accounts and data files.
Follow these steps to copy an existing profile:
Open the Mail item from the Control Panel.
In the Mail Setup dialog box, click Show Profiles.
Select the existing profile that you want to use as the basis for the new profile, and then click Copy.
In the Copy Profile dialog box, specify a name for the new profile and click OK.
You can configure Outlook 2010 either to use a specific profile automatically or to prompt you to select a profile at startup. If you use the same profile most of the time, you can configure Outlook to start automatically with that profile.
Follow these steps to specify the default profile and use it automatically when Outlook 2010 starts:
Open the Mail item from the Control Panel.
In the Mail Setup dialog box, click Show Profiles.
In the Mail dialog box, on the General tab, select Always Use This Profile, as shown in Figure 3-3. In the drop-down list, select the default profile that you want Outlook 2010 to use.
Click OK.

If you work with multiple profiles and switch profiles relatively often, you’ll probably want to configure Outlook 2010 to prompt you to choose a profile at startup. This saves you the trouble of changing the default profile each time you want to switch. For example, assume that you use one profile for your personal accounts and another for your work accounts. Have Outlook 2010 prompt you for the profile when the program starts, rather than configuring the settings each time to specify the default profile.
Follow these steps to configure Outlook 2010 to prompt you to choose a profile:
Open the Mail item from the Control Panel.
In the Mail Setup dialog box, click Show Profiles.
In the Mail dialog box, select Always Use This Profile, select the profile that you want Outlook 2010 to display as the initial selection in the list, and then select Prompt For A Profile To Be Used.
Click OK.
Tip
INSIDE OUT Set the initial profile
You probably noticed in step 3 of the preceding procedure that you enabled an option and then immediately disabled it by selecting Prompt For A Profile To Be Used. In effect, you’ve accomplished two tasks: setting the default profile and also configuring Outlook 2010 to prompt you for a profile. In the drop-down list, select the profile that you use most often, which saves you the step of selecting it when prompted at startup.
The preceding section explained how to add email account services and introduced data stores. This section provides a more detailed look at storage options in Outlook 2010 and shows how to configure those options.
Like earlier versions of Outlook, Outlook 2010 offers three options for storing data: your Exchange Server mailbox, .pst files, and offline folder (.ost) files. Like Outlook 2007, Outlook 2010 can use Cached Exchange Mode in conjunction with an .ost file to create a local copy of an Exchange Server mailbox. With Cached Exchange Mode, Outlook 2010 works from the cached local copy of the mailbox and automatically handles synchronization between the local profile and the server. Your mailbox is therefore always available, even when the server is not. When you connect to the network, Outlook 2010 automatically detects server connection status and synchronizes the Outlook 2010 folders.
Note
See Chapter 39 to learn how to configure a client running Exchange Server, including enabling and disabling Cached Exchange Mode.
Note
For detailed information about configuring and using IMAP accounts and how Outlook 2010 stores IMAP folders and messages, see the section Using IMAP Accounts, on page 169.
An Outlook profile can contain multiple data files (also called stores). For example, if your profile contains an Exchange Server account and a POP3 account, the Exchange Server account probably uses an .ost file to store an offline copy of your Exchange Server store, and the POP3 account probably uses a .pst file for its items. Add an Internet Message Access Protocol (IMAP) account to that same profile and you’ll get another .pst file to contain the items for that account. What’s more, you can add a data file to a profile without associating it with an email account. For example, you might add a data file to use as an archive for old messages. In fact, Outlook does that very thing for you when you use its archive features (discussed in Chapter 29).
Whatever your situation, you need to decide which type of data file is right for your situation (and how many you need). Let’s get started with a look at .pst and .ost files.
A .pst file is a special Outlook file that stores Outlook folders and the items in those folders (emails, tasks, etc.). Each .pst file that you add to your profile or open separately shows up as a folder branch in the Navigation pane.
Note
The native .pst format of Outlook 2010 is not compatible with Outlook 2002 or earlier. The Outlook 2010 .pst format provides better support for multilingual Unicode data and eliminates the 2-GB file size limit imposed by the .pst format in Outlook 2002 and earlier.
You can password-protect .pst files for greater security, although utilities available on the web can bypass the password security. The .pst files offer encryption, providing an additional level of security. The .pst files do not have a built-in capability for synchronization with an Exchange Server mailbox, although you can work offline if a .pst file is configured as the default store location rather than the Exchange Server mailbox. If the Exchange Server mailbox is your default store (which is recommended), you must use an .ost file to work offline, whether in normal offline mode or in Cached Exchange Mode.
Tip
INSIDE OUT Make your .pst file available when you’re roaming
If you use a roaming Windows profile to provide a common desktop configuration regardless of the computer from which you log on, consider placing the .pst file (if you use one) on a network share that is available from all your logon locations. This eliminates the need to copy your .pst file across the network each time you log on, reducing network utilization and speeding logon time. Microsoft doesn’t recommend placing .pst files on a network share because of performance issues, but we have found that this is a workable solution that offers enough advantages to balance any performance issues. Naturally, performance depends on the size of a user’s mailbox and available network bandwidth. A great alternative is to enable and use Outlook Web Access (OWA) to access your mailbox.
You can choose the format of a .pst file only when you create the .pst file—you can’t convert an existing .pst file to the new format. You can, however, simply export all the items in an existing .pst file to a new .pst file that does use the new format. Start Outlook 2007, choose File, Import And Export, and then follow the wizard’s prompts to export to a .pst file. The wizard creates an Outlook 2007 native format .pst file by default.
To decide which .pst file format you should use, consider whether you need to use the .pst file with an earlier version of Outlook. If not, the Outlook 2010 native format is the best choice. If you need to export items from an Outlook 2010 .pst file to an earlier version, simply export the items to a .pst file that you created with an earlier version of Outlook, or create the pre–Outlook 2003 .pst file in Outlook 2007. To do so, choose the Office Outlook 97-2002 Personal Folders File option when creating the .pst file.
So much for .pst files—what about .ost files? An .ost file is essentially the same as a .pst file, except that Outlook uses the .ost file for offline storage and synchronizes changes up to Exchange Server when Outlook is connected to the server. The main difference is that the .ost file does not show up as a separate set of folders in the Navigation pane as .pst files do.
Outlook 2010 uses a particular store as your default store to contain your Outlook 2010 data and email, but you can add other store files to help you organize, separate, or archive your data.
When you add an email account to a profile, Outlook gives you the option of creating a new .pst file for the account or choosing an existing .pst file. If you choose the existing .pst file, Outlook places new email that arrives from that account into that existing .pst file. Otherwise, Outlook creates a new .pst file and stores the incoming email for that account in that new .pst file.
You can also add another .pst file without adding another email account. For example, you might want to use the new .pst file as your local archive file.
Adding another store is easy. Just follow these steps:
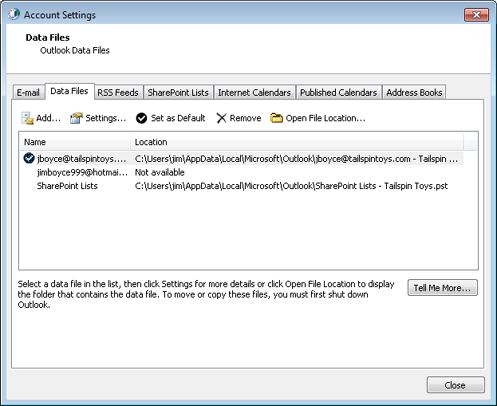
Open the Mail item from the Control Panel, click the appropriate profile (if you have multiple profiles), and click Data Files. Or, if Outlook 2010 is running, choose File, Account Settings, Account Settings, and Data Files. The current storage files are listed on the Data Files tab.
Click Add, enter the file name, select the type of personal folder file to create, and then click OK.
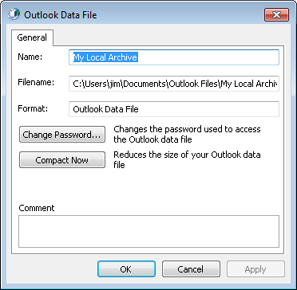
To change other settings for the .pst file that you just created, select the new data file from the list and click Settings to display the Outlook Data File dialog box, shown in Figure 3-4. Configure settings as necessary based on the following list:
Change Password Specify an optional password (and type it a second time to verify it) to protect your .pst file from access by others.
Save This Password In Your Password List Select this check box to have Outlook 2010 save the password for your .pst file in your local password cache. This eliminates the need for you to enter the password each time you open the .pst file. Clear this check box if you want Outlook 2010 to prompt you each time (providing greater security).
Compact Now This option doesn’t apply to new .pst files, which need no cleanup. However, you can use this option to compact a large .pst file.
Click OK to close the Create Microsoft Personal Folders dialog box.
Note
It’s possible for others to gain access to your .pst file even if you use a password for it, if they can get physical or network access to your computer. For that reason, if you have an Exchange Server account and are concerned with the potential for data theft, you should keep your email in your mailbox on the server running Exchange Server and not use an offline file. If that isn’t practical, or you don’t use Exchange Server, consider implementing whole disk encryption on your computer using Microsoft’s BitLocker or a third-party encryption tool like PGP (www.pgp.com).
Tip
INSIDE OUT Add an existing .pst file to a profile
You can add an existing .pst file to a profile so that you can work with its contents in Outlook 2010, either permanently or temporarily. For example, you might want to open an archived .pst file to find an old message or two and then “disconnect” the .pst file when you have finished using it. Just start Outlook 2010, choose File, Open, and Open Outlook Data File, and then choose the .pst file. When you have finished using the file, right-click its root in the folder list, and then choose Close to remove the .pst file from the folder list.
Occasionally, you might want to remove a data store from a profile—for example, perhaps you’ve been using a .pst file as your primary store and are now moving to Exchange Server with an .ost file for offline use.
To remove a data store from a profile, you use steps similar to those you followed to add a store:
When you remove a data file from a profile, Outlook 2010 does not delete the file itself. This means that you can add the file back to a profile later if you need to access its contents. If you don’t need the data stored in the file, or if you’ve already copied the data to a different store, you can delete the file. Open the folder where the file is located, and then delete it as you would any other file.
Configuring an offline store allows you to continue working with data stored in your Exchange Server mailbox when the server is not available (if your computer is disconnected from the network, for example). As soon as the server becomes available again, Outlook 2010 synchronizes the data either automatically or manually, according to the way in which you have configured Outlook 2010.
Note
For a detailed explanation of folder synchronization, see the section Controlling Synchronization and Send/Receive Times, on page 197.
Like earlier versions of Outlook, Outlook 2010 supports the use of an .ost file to serve as an offline cache for Exchange Server.
You can use an .ost file to provide offline capability for your Exchange Server mailbox. You do not need to use a .pst file in conjunction with the .ost file—the .ost file can be your only local store file, if you want. However, you can use other .pst files in addition to your .ost file.
This section assumes that you are working with an Exchange Server account that has not been configured to use Cached Exchange Mode. When you add an Exchange Server account in Outlook 2010, the Add New Account Wizard enables Cached Exchange Mode by default. This section helps you create and enable an offline store for a profile that has not had Cached Exchange Mode enabled previously.
Note
The .ost file does not appear as a separate set of folders in Outlook 2010. In effect, the .ost file is hidden and Outlook 2010 uses it transparently when your computer is offline. For more information, see Chapter 41.
Follow these steps to configure offline storage with an .ost file:
Open the Mail item from the Control Panel, select the appropriate profile, and then click E-Mail Accounts. Or, if Outlook 2010 is running, click File, Account Settings, and Account Settings.
On the E-Mail tab, select the account, and then click Change.
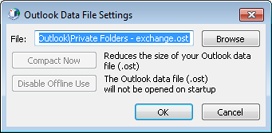
Click More Settings to display the Microsoft Exchange Server dialog box. Click the Advanced tab, and then click Outlook Data File Settings to open the dialog box shown in Figure 3-5.
Specify a path and name for the .ost file in the File box, and then click OK.
Click OK to close the Outlook Data File Settings dialog box.
Click Next, and then click Finish.
When you add an Exchange Server account to a profile in Outlook 2010, Outlook enables Cached Exchange Mode by default and creates the .ost file that Cached Exchange Mode will use to store the local copy of the mailbox. If you originally added the Exchange Server account without Cached Exchange Mode, you can still enable it by following these steps:
Outlook 2010 creates the .ost file the next time you start the program and begins the synchronization process if the server is available.
On occasion, you might need to move a data file from one location to another. For example, perhaps your C: drive is filling up and you want to put your .pst file on another hard disk. Or, you’ve been using a local .pst file file and now want to place that file on a network share for use with a roaming profile so that you can access the file from any computer on the network.
Moving a .pst file is a manual process. You must exit Outlook 2010, move the file, and then reconfigure the profile accordingly.
Follow these steps to move a .pst file:
Exit Outlook 2010 and open the Mail item from the Control Panel.
Select a profile if necessary, and then click Data Files to display the Data Files tab in the Account Settings dialog box, shown in Figure 3-6.
Select the .pst file that you want to move, and then click Open File Location. Outlook 2010 opens the folder where the .pst file is located and selects the file’s icon.
Drag the file or use the Clipboard to move the file to the desired location, and then close the folder.
On the Data Files tab, click Settings. Outlook 2010 displays an error message, indicating that it can’t find the file. Click OK.
Browse to the new location of the .pst file, select it, click Open, and then click OK.
Click Close to close the Outlook Data Files dialog box, and then click Close again to close the Mail Setup dialog box.
Outlook 2010 uses one data store location as the default location for delivering messages and storing your other Outlook 2010 items. You can change the store location if needed. You also can specify the order in which Outlook 2010 processes email accounts, which determines the server that Outlook 2010 uses (where multiple servers are available) to process outgoing messages. The order also determines the order in which Outlook 2010 checks the servers for new messages.
For example, assume that you have an Exchange Server account and a POP3 account for your personal Internet mail. If the Exchange Server account is listed first, Outlook 2010 sends messages destined for Internet addresses through Exchange Server. In many cases, however, this might not be what you want. For example, you might want all personal mail to go through your POP3 account and work-related mail to go through your Exchange Server account.
You have two ways to change the email service that Outlook 2010 uses to send a message: You can configure the service order, or you can specify the account to use when you create the message.
Follow these steps to configure the service order for your email:
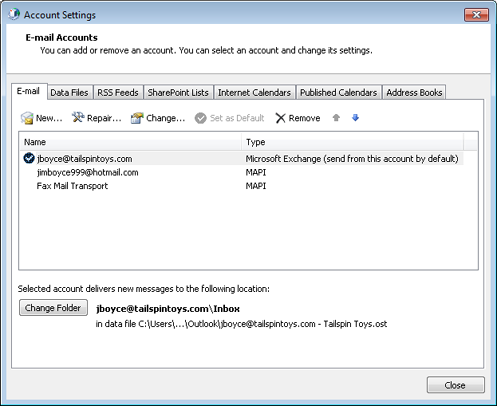
Open the Mail item from the Control Panel and click E-Mail Accounts, or in Outlook 2010, choose Tools, Account Settings, and Account Settings to display the E-Mail tab in the Account Settings dialog box, shown in Figure 3-7.
Use the Move Up and Move Down buttons to change the order of the accounts in the list.
Click Close.
Note
The account at the top of the list is the default account. Choosing an account and clicking Set As Default moves the account to the top of the list. You can also set the default account simply by using the up arrow button to move it to the top of the list.
When you compose a message, you can override the default email service that Outlook 2010 uses to send messages simply by selecting the account before sending the message.
To select the account, follow these steps: