Understanding Address Books 136
Configuring Address Books and Addressing Options 139
Finding People in the Address Book 144
Using AutoComplete for Addresses 146
Using Contact Groups (Distribution Lists) 149
Adding Addresses to the Address Book Automatically 156
Using the Mobile Address Book (MAB) 156
AN email program isn’t very useful without the capability to store addresses. Microsoft Outlook 2010, like other email–enabled applications, has this storage capability. In fact, Outlook 2010 offers multiple address books that not only can help make sending messages easy and efficient but also let you keep track of contact information for other purposes, such as postal mail, phone lists, and so on.
This chapter explores how Outlook 2010 stores addresses and explains how Outlook 2010 interacts with Microsoft Exchange Server (which has its own address lists) to provide addressing services. You’ll learn how to store addresses in the Outlook 2010 Contacts folder and use them to address messages, meeting requests, appointments, and more. You’ll also learn how to create distribution lists to broadcast messages and other items to groups of users and how to hide the details of the distribution list from recipients. The chapter concludes with a look at how you can share your address books with others.
Note
Although this chapter discusses the Contacts folder in the context of address lists, it doesn’t cover this folder in detail.
Note
For a detailed discussion of using and managing the Contacts folder, see Chapter 18.
As you begin working with addresses in Outlook 2010, you’ll find that you can store them in multiple locations. For example, if you’re using an Exchange Server account, you have a couple of locations from which to select addresses. Understanding where these address books reside is an important first step in putting them to work for you. The following sections describe the various address books in Outlook 2010 and how you can use them.
On all installations, including those with no email accounts, Outlook 2010 creates a default Outlook Address Book (OAB). This address book consolidates all your Outlook 2010 Contacts folders. With a new installation of Outlook 2010, the OAB shows only one location for storing addresses: the default Contacts folder. As you add other Contacts folders, those additional folders appear in the OAB, as shown in Figure 6-1. As you’ll learn in the section Removing Contacts Folders from the OAB later in this chapter, you can configure additional Contacts folders so that they don’t appear in the OAB.
Note
For detailed information on creating and using additional Contacts folders, see the section Creating Other Contacts Folders on page 439.
The OAB functions as a virtual address book collection instead of as an address book because Outlook 2010 doesn’t store the OAB as a file separate from your data store. Instead, the OAB provides a view into your Contacts folders and other contact sources.
Note
Earlier versions of Office Outlook prior to 2007 enabled users to store addresses in Personal Address Books (PABs), which were kept in separate files from the personal data store. Although PABs are not available in Outlook 2010, you can import them into a Contacts folder, which is visible in the OAB.
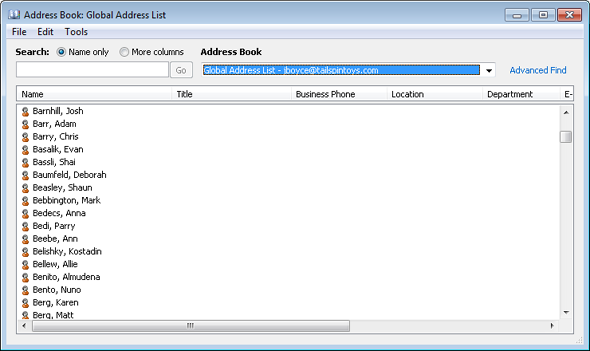
When you use a profile that contains an Exchange Server account, you’ll find one other address list in addition to the OAB: the Global Address List (GAL). This address list resides on the computer running Exchange Server and presents the list of mailboxes on the server as well as other address items created on the server, including distribution groups and external addresses (see Figure 6-2). However, users can’t create address information in the GAL; only the Exchange Server system administrator can do this.
Some email addresses are not available in the OAB or GAL but are available using the Lightweight Directory Access Protocol (LDAP). This requires network connectivity to the LDAP server. LDAP simply provides a mechanism for Outlook to query and obtain contact information from one or more servers that host LDAP data stores.
Note
Details on configuration are found in Chapter 17.
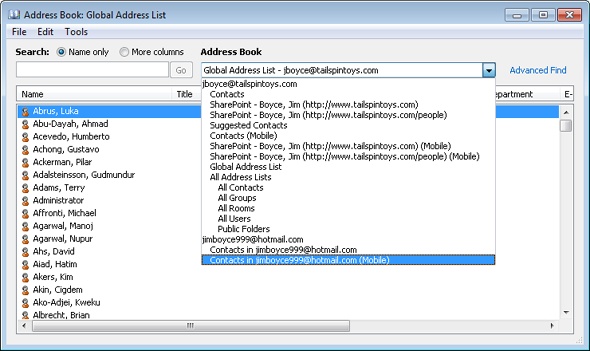
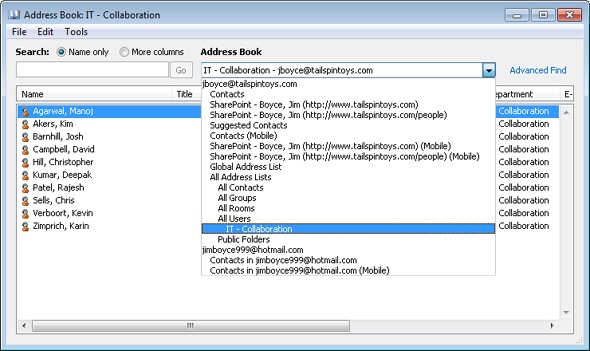
In addition to the OAB, GAL, and LDAP, you might see other address sources when you look for addresses in Outlook 2010. For example, in an organization with a large address list, the Exchange Server system administrator might create additional address lists to filter the view to show only a selection, such as contacts with last names starting with the letter A or contacts external to the organization. You might also see a list named All Address Lists. This list, which comes from Exchange Server, can be modified by the Exchange Server administrator to include additional address lists. The list can also include Public Folders (see Figure 6-3), which can store shared contacts. In addition, the list by default includes All Contacts, All Groups, All Rooms, and All Users, which sort addresses by type.
Outlook 2010 offers a handful of settings that you can use to configure the way your address books display contacts and address information. You also can add other address books and choose which address book Outlook 2010 uses by default for opening and storing addresses and processing messages.
You can set only one option for the OAB. This setting controls the order in which Outlook 2010 displays names from the OAB: either First Last or using the File As field (Last Name, First Name).
Follow these steps to set this display option:
If Outlook 2010 is open, click File, Account Settings, and Account Settings, and then select the Address Books tab. If Outlook 2010 is not open, open the Mail item from the Control Panel, click E-Mail Accounts, and then select the Address Books tab.
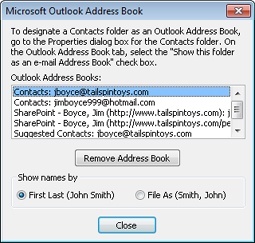
Select Outlook Address Book and click Change to display the Microsoft Office Outlook Address Book dialog box, shown in Figure 6-4.
In the Show Names By box, select the display format that you prefer. Click Close, and then click Close again.
In most cases, you’ll want all your Contacts folders to appear in the OAB. If you have several Contacts folders, however, you might prefer to limit how many folders appear in the OAB, or you might simply want to restrict the folders to ensure that specific addresses are used.
You can set the folder’s properties to determine whether it appears in the OAB by following these steps:
Open Outlook 2010 and open the folders list (or click the Contacts button in the Navigation pane). Then, right-click the Contacts folder in question and choose Properties.
Click the Outlook Address Book tab and clear the Show This Folder As An E-Mail Address Book option to prevent the folder from appearing in the OAB.
Change the folder name, if necessary, and then click OK.
You can configure other addressing options to determine which address book Outlook 2010 displays by default for selecting addresses, which address book is used by default for storing new addresses, and the order in which address books are processed when Outlook 2010 checks names for sending messages. The following sections explain these options in detail.
To suit your needs or preferences, you can have Outlook 2010 display a different address list by default. For example, for profiles that include Exchange Server accounts, Outlook 2010 displays the GAL by default. If you use the GAL only infrequently and primarily use your Contacts folders for addressing, you might prefer to have Outlook 2010 show the OAB as the default address list instead of the GAL, or you might want to display a filtered address list other than the GAL on the server.
Follow these steps to specify the default address list:
In Outlook 2010, click Address Book in the Find group on the Home tab of the Ribbon. Outlook 2010 displays the Address Book dialog box.
Choose Tools, Options.
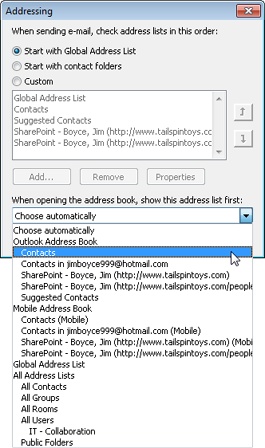
In the Addressing dialog box, select the default address list from the When Opening The Address Book, Show This Address List First drop-down list (see Figure 6-5).
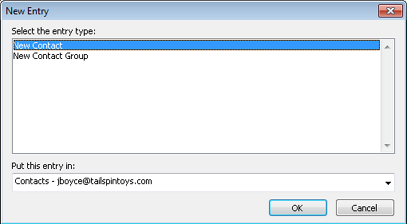
Although you can’t add addresses in the GAL or other server address books, you can store them in other, local address books. You can create addresses in the Address Book, and when you do so, Outlook 2010 suggests storing the entry in the address book that you have chosen as the default. If you want to store a particular address in a different address book, start by opening the Address Book as described in the previous section. Click File, New Entry to open the New Entry dialog box. Click the Put This Entry In The option and select the address book from the drop-down list (see Figure 6-6). Fill in the resulting Contact form and click Save & Close.
When you create a message, you can specify the recipient’s name instead of specifying the address. Instead of typing jim.boyce@tailspintoys.com, for example, you might type Jim Boyce and let Outlook 2010 convert the name to an email address for you. This saves you the time of opening the address book to look for the entry if you know the name under which it’s stored. To have Outlook check the address, simply press Ctrl+K or click Check Names in the Names group on the ribbon.
Outlook 2010 checks the address books to determine the correct address based on the name you entered. Outlook 2010 checks names from multiple address books if they are defined in the current profile. For example, Outlook 2010 might process the address through the GAL first, then through your OAB, and then through the LDAP (assuming that all three are in the profile). If Outlook 2010 finds a match, it replaces the name in the message with the appropriate address. If it doesn’t find a match or finds more than one, it displays the Check Names dialog box, shown in Figure 6-7, in which you can select the correct address, create a new one, or open the address book to display more names and then select an address.
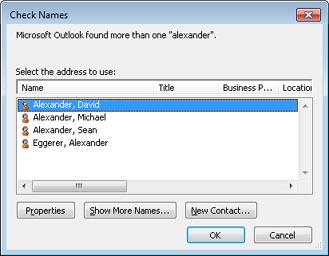
Figure 6-7. The Check Names dialog box helps you resolve address problems before you send a message.
Why change the order in which Outlook 2010 checks your address books? If most of your addresses are stored in an address book other than the one Outlook 2010 is currently checking first, changing the order can speed up name checking, particularly if the address book contains numerous entries.
Here’s how to change the address book order:
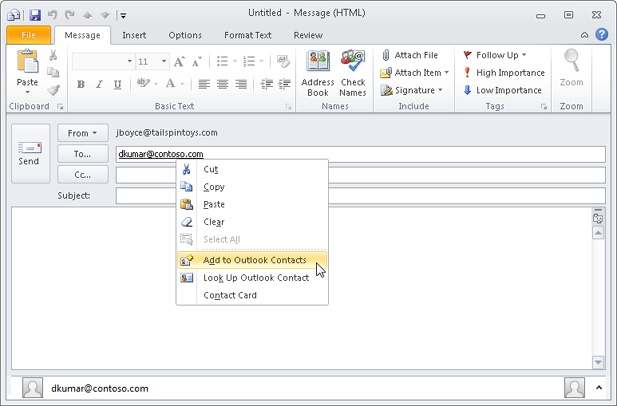
To create a contact quickly while you’re composing a message, type the email address in the To, Cc, or Bcc field, and then press Tab. The email address becomes underlined after a short delay. Right-click the email address and select Add To Outlook Contacts (see Figure 6-8). You can also create new contacts, contact groups, and other types of entries from any navigation pane. To do this, select the drop-down arrow next to the New Items button on the Home tab of the ribbon and choose the type of item to create.
You can modify any addresses stored in your own address books, as well as in the address books of other users for which you have the appropriate access. You can modify an address while working with an email message or while working directly in the address book. If you’re using a message form, click To, Cc, or Bcc. Right-click the address you want to change and click Properties. If you’re working in the address book instead, just right-click the address and choose Properties. Outlook 2010 displays the same form you used to create the contact. Make the changes you want and click OK.
If your address book contains numerous addresses, as might be the case in a very large organization, it can be a chore to locate an address if you don’t use it often. Outlook 2010 provides a search capability in the address book to overcome that problem, making it relatively easy to locate addresses based on several criteria.
Note
You can simply click in the text box at the top of the Address Book and type a name. Outlook 2010 locates the first name that matches the text you type. If you prefer to see only those items that match the text for which you are searching, you can use the Find dialog box, as described in the following steps.
Follow these steps to locate an address in any address book:
Click the Address Book button on the ribbon to open the address book.
In the Address Book drop-down list, select the address book you want to search.
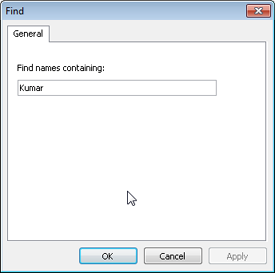
Click Advanced Find to display the Find dialog box shown in Figure 6-9 (for Exchange Server address lists) or Figure 6-10 (for the OAB).
If you’re searching an address list on the computer running Exchange Server, decide which criteria you want to use and enter data in the fields to define the search. If you’re searching an OAB, specify the text to search for, which must be contained in the contact’s name.
Click OK to perform the search.

When you click OK, Outlook 2010 performs a search in the selected address book based on your search criteria and displays the results in the Address Book window. You can revert to the full address book list by selecting the address book from the Address Book drop-down list. Select Search Results from the Address Book drop-down list to view the results of the last search.
Tip
INSIDE OUT Using a directory service
In addition to searching your address books, you also can search a directory service for information about contacts. A directory service is a server that answers queries about data (typically contact information) stored on the server. For detailed information on setting up and using directory services in Outlook 2010, see the section Configuring a Directory Service Account in Outlook, on page 423.
If you have used previous versions of Outlook, you are probably familiar with Outlook’s nickname cache, which stored the addresses that you type in the address fields so that you would not have to type them again the next time you wanted to use them. Instead, you simply typed a few characters and Outlook suggested email addresses based on what you typed. In these previous versions of Outlook, these addresses were stored in a nickname file within your user profile.
Outlook 2010 still automatically keeps track of addresses that you enter in the address fields, but it does away with the nickname cache file and instead stores them in the Suggested Contacts folder in Outlook. When you type an address in the To, Cc, or Bcc fields, Outlook 2010 adds the address to the folder, which looks and functions much like your regular Outlook Contacts folder.
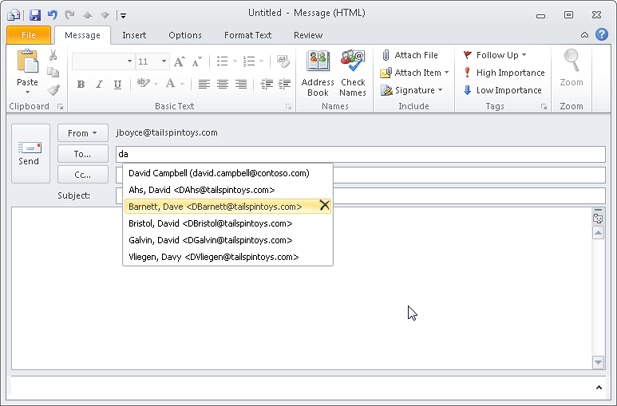
When you begin typing in any of these address fields, Outlook 2010 begins matching the typed characters against the entries in the Suggested Contacts folder. If it finds a match, it automatically completes the address. If there is more than one match in the folder, Outlook 2010 displays a drop-down list that contains the names for all the matching entries (see Figure 6-11). Use the arrow keys or mouse to select a name from the list and then press Enter or Tab to add the address to the field.
Note
AutoComplete doesn’t check to see whether a particular contact has more than one email address. Instead, it uses whatever address it finds in the Suggested Contacts folder. If Outlook 2010 has cached one address, but you prefer that it cache a different one, delete the existing cache entry (as explained in the next section). Then, address a new message to the contact using the desired email address to cache that address. Or, as the following section explains, you can simply create a contact entry in the Suggested Contacts folder.
You can turn AutoComplete on or off to suit your needs by following these steps:
Click File, choose Options, and click Mail in the left pane of the Outlook Options dialog box.
Scroll down to the Send Messages group of settings.
Select or clear the Use Auto-Complete List To Suggest Names When Typing In The To, Cc, And Bcc Lines check box to turn AutoComplete on or off, respectively.
Tip
You can move your Suggested Contacts folder file from one computer to another by simply exporting the items and then importing them. You can also back it up so you can restore it in the event your computer crashes.
Note
See the section Backing Up and Restoring Data, on page 769, for details.
One common reason to delete a contact item from the Suggested Contacts folder is that you either don’t use it very often or want to use a different email address for that contact.
It’s easy to delete a name from the Suggested Contacts folder. One of the most direct ways is simply to open the Suggested Contacts folder, locate the item, and delete it. You can also get to it indirectly through the message form, which is often quicker than opening the folder and hunting for the item. To do this, perform the following steps:
Start a new email message and type the first few letters of the name.
When Outlook 2010 displays the shortcut menu with the matching entries, select the one you want to delete and then press Delete.
Repeat this process for any other cached addresses you want to delete.
As described in the previous section, you can add items to the Suggested Contacts folder simply by adding a new email address to one of the address fields on a message form and then sending the message. But because the Outlook 2010 Suggested Contacts folder acts just like your other Contacts folders, you can create items directly in the folder. Just click Contacts in the Navigation pane, and then click Suggested Contacts in the list of contact folders. Click New Contact in the ribbon, fill in as much information as you like (or just add the email address), and click Save & Close.
On occasion, you might want to clear out your Suggested Contacts folder and let Outlook start fresh. Perhaps you have several hundred items in the folder or so many duplicates that you are getting too many off-target suggestions. You have two options for deleting all the items from the Suggested Contacts folder. One is simply to open the folder, press Ctrl+A to select all items in the folder, and then press Delete or click Delete in the ribbon. If you change your mind right after deleting something, immediately press Ctrl+Z to get it back.
You can also clear out the folder from the Outlook Options dialog box by doing the following:
Click File, Options to open the Outlook Options dialog box, then click Mail in the left pane.
Scroll down to the Send Messages group and click Empty Auto-Complete List.
If you often send messages to groups of people, adding all their addresses to a message one at a time can be a real chore, particularly if you’re sending the message to many recipients. Contact groups in Outlook 2010 help simplify the process, enabling you to send a message to a single address and have it broadcast to all recipients in the group. Instead of addressing a message to each individual user in the sales department, for example, you could address it to the sales contact group. Outlook 2010 (or Exchange Server) takes care of sending the message to all the members of the group.
Tip
Previous versions of Outlook refer to contact groups as distribution lists. The terms contact group and distribution list are used synonymously in this book except where noted.
You can create contact groups in the OAB. You can’t create contact groups in the GAL or other Exchange Server address lists—only the Exchange Server administrator can create the distribution lists on the server. However, you can modify distribution lists on the computer running Exchange Server if you’re designated as the owner of the list.
Setting up a contact group in your OAB is a relatively simple procedure. You can create a contact group using addresses from multiple address books, which means, for example, that you might include addresses from the GAL on the computer running Exchange Server as well as personal addresses stored in your Contacts folder. You can also include addresses of different types (for example, Exchange Server addresses, Internet addresses, and X.400 addresses). In general, it’s easiest to set up a contact group if all the addresses to be included already exist, but you can enter addresses on the fly if needed.
Follow these steps to create a contact group:
Open the address book.
Choose File, New Entry or right-click in any area of the address list field and click New Entry.
From the drop-down list, select the address book in which you want to store the distribution list.
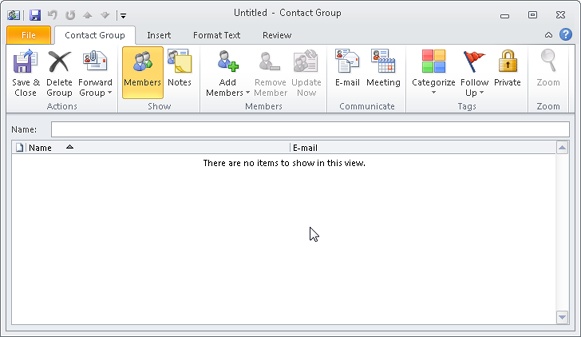
In the Select The Entry Type list, select New Contact Group, and then click OK to display the Contact Group dialog box, as shown in Figure 6-12.
In the Name box, specify a name for the group. This is the contact group name that will appear in your address book.
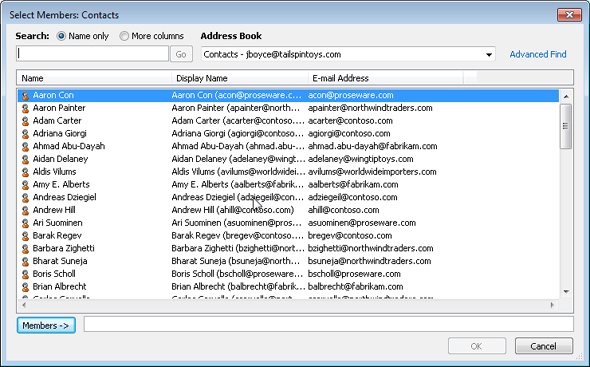
Click Add Members, and then, if the contact already exists, choose From Outlook Contacts to add addresses from your Contacts folder, or choose From Address Book to add from other locations in the OAB (such as the Exchange Server GAL). In either case, the Select Members dialog box opens (see Figure 6-13).
If the contact does not already exist, click Add Members on the ribbon and choose New E-Mail Contact to open the Add New Member dialog box. Enter the person’s name and email address and, if desired, choose a sending format for the recipient (such as plain text only). If you want Outlook to add the new contact to your Contacts folder, leave the Add to Contacts check box selected. Click OK when you finish adding members to the list.
Set other options as needed for the distribution list—for example, you can assign categories to the list, mark it as private, or add notes to the group.
Click Save & Close in the Contact Group dialog box.
Tip
Select the Advanced Find option in the Select Members dialog box to search all your address books for members. Enter a name or partial name to display all address book matches to find the desired contact.
Contact groups appear in the address book with a group icon and a boldface name to differentiate them from individual addresses (see Figure 6-14).

Tip
INSIDE OUT Address types identified
Outlook 2010 differentiates addresses in the Select Names dialog box as well as the Address Book. When you address an email message, you can tell which address is a fax number and which is an email address because Outlook displays those items separately in the list, even though they are stored in the same contact item. You can also easily differentiate personal addresses from work addresses in both the Select Names and Address Book dialog boxes.
Over time, you will add or remove names from your contact groups. To modify the contents of a group, locate the contact group in the address book or in your Contacts folder, open the group, and then use the Select Members button to modify the list. You can also remove members from the group by selecting the member and then clicking the Remove Member button on the ribbon, or by pressing Delete on your keyboard.
You can change the name of a contact group any time after you create it to reflect changes in the way you use the list, to correct spelling, or for any other reason. To rename a contact group, locate the list in the address book, open it, and then change the name in the Name box. Click Save & Close to apply the change.
You can delete a contact group the same way you delete an address. Locate the contact group in the address book or Contacts folder, select it, and then click the Delete button on the ribbon or press Delete. Alternatively, you can right-click the group and choose Delete from its shortcut menu.
If you include a contact group in the To or Cc field of a message, all the recipients of your message—whether members of the group or not—can see the addresses of individuals in the group. Outlook 2010 doesn’t retain the group name in the address field of the message but instead replaces it with the actual addresses from the group.
In some cases, you might not want to have their addresses made public, even to other members of the group. In these situations, add the contact group to the Bcc (blind carbon copy) field instead of the To or Cc field. The Bcc field sends copies of the email to all addresses and contact groups but keeps the addresses hidden from the other recipients.
Regardless of where you create a contact group, you can’t allocate some addresses in the group to the To field and other addresses to the Cc or Bcc field. You can, however, place the contact group address in either the Cc or Bcc field, if needed.
If you often need to separate addresses from contact groups into different address fields, you can use a couple of techniques to simplify the process. First, consider splitting the contact groups into two or three separate groups. This approach works well if the To, Cc, and Bcc fields generally receive the same addresses each time. A second approach is to create a template with the addresses already filled in, as follows:
Start a new mail message.
To view the Bcc field, click the Options tab on the ribbon and then click Bcc.
Fill in the addresses in the appropriate fields as needed.
Click File and choose Save As.
In the Save As dialog box, choose Outlook Template from the Save As Type drop-down list.
Specify a name and location for the template and click Save.
When you need to send a message using the template, browse to the folder in which the template is stored and double-click the file to open the message template. Add any additional addresses, text, or attachments; then send the message as usual.
You can use distribution lists with Exchange Server—which are set up by the Exchange Server administrator—in the same way that you use local contact groups to simplify broadcasting messages to multiple recipients. (As mentioned earlier, you can’t create your own contact groups or distribution lists in the GAL or other Exchange Server address lists from Outlook 2010, although you can modify such a list if you are designated as the list owner.)
You can use a server-side distribution list in the same way that you use a local contact group. Select the list from the appropriate address list on the server. The list name is converted to addresses when you send the message, just as a local contact group is.
If you prefer working through your local address books instead of the server address lists, you might want to add a server-side distribution list to your local Contacts folder. You can do so easily through the address book or the list’s dialog box. Open the address book, select the distribution list, and then choose File, Add To Contacts.
Tip
If you have the list’s dialog box open, click Add To Contacts on the General tab. Outlook 2010 then adds the list to your Contacts folder.
When Outlook 2010 displays the distribution list, you can then modify the group, assign categories, send a meeting request or email, mark it as private, or even use the Proof button to run a spell-check or use the thesaurus (see Figure 6-15). Make any necessary changes to the distribution list and then click Save & Close.

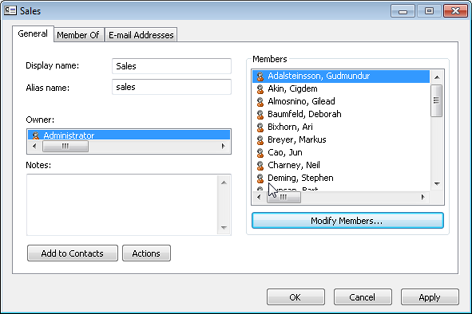
If you are an owner of a server-side distribution list, you can modify its members and other properties. For example, perhaps you manage a team of people and the team has a distribution list in Exchange Server. A new person joins your team, and you want to add that person to the list. To do so, open the address book and double-click the distribution list to open it (see Figure 6-16). You can add or remove members by clicking Modify Members.
When you receive a message from a sender whose address you want to save in your local Contacts folder, you can add the address manually. As it has for previous versions, however, Outlook 2010 also provides an easier method. With the message open, right-click the sender’s address on the InfoBar and choose Add To Outlook Contacts.
Outlook 2010 offers a new method for adding contacts from incoming email, however, in the form of the Suggested Contacts folder. As new messages arrive, Outlook checks to see if the sender already exists in your Contacts folder. If not, Outlook adds the address to the Suggested Contacts folder. From there, you can drag the contact item to your regular Contacts folder or use copy and paste to copy it from one folder to another. Outlook also adds the addresses of people to whom you have addressed email.
Like Outlook 2007, Outlook 2010 includes the Mobile Address Book (MAB), which is added automatically to your profile.
Note
See the section Using Outlook Mobile Service Accounts, on page 1005, for more details on Mobile Service accounts.
Like the OAB, the MAB does not actually store addresses. Instead, it searches for and displays existing addresses that have phone numbers in the Mobile contact field (see Figure 6-17). Because the MAB searches for and displays these contacts automatically, you don’t have to do anything to add them to the MAB.
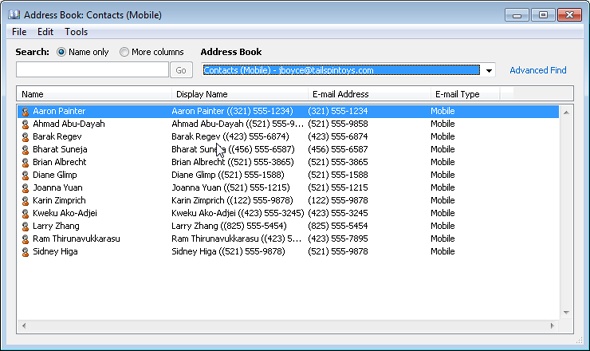
You can use the MAB as a means to look up mobile numbers for your contacts quickly. Just open the OAB and select Contacts (Mobile) in the Address Book drop-down list.
Note
To learn how to work with the MAB in conjunction with an Outlook Mobile Service account, see the section Using Outlook Mobile Service Accounts, on page 1005.