Exporting Data 775
Importing Data 780
TO be truly useful, your data needs to be portable. You need to be able to move it between applications. For example, maybe you want to copy all your contacts from Microsoft Outlook 2010 to Microsoft Excel 2010 or Microsoft Access 2010. Maybe you need to bring data from Excel 2010 into Outlook 2010. Whatever the case, your Outlook 2010 data is portable, thanks to the import and export features built into the program.
This chapter explains the features in Outlook 2010 that enable you to move data out of Outlook 2010 to other programs and to import data into Outlook 2010 from other programs.
Sooner or later, you might want to make copies of part of or all the Outlook data store for use in other applications. You can do this by using the export process, in which you save information to a different .pst file or transform data for use in Microsoft Word 2010, Access 2010, or other programs. (The reverse process, importing data, is covered in the next section.)
The export process in Outlook 2010 is straightforward. It allows you to use a wizard to send copies of information from the Outlook 2010 message store. This section looks at three export options in some depth: exporting messages, exporting addresses, and exporting data to a file.
You can copy messages and other items into a new or an existing set of personal folders. Unlike backing up, this option lets you choose which items you want to export and which you want to exclude. You can use this method whether your mail is stored in a Microsoft Exchange Server mailbox or in a set of personal folders.
You might already know how to use the AutoArchive feature to move messages out of your message store and into a long-term storage location in another .pst file. You can use the Import And Export Wizard to export messages to a file. Using the Import And Export Wizard to export messages works in a similar way to AutoArchive; the major difference is that when messages in the store are exported, they aren’t removed; instead, they are copied, as they are during backup. Another key difference is that archiving is based on modification date of the item, while exporting does not by default consider modification date.
Note
For information about using AutoArchive, see the section Archiving Your Outlook Data, on page 759.
To export some of or all your Outlook 2010 data, follow these steps:
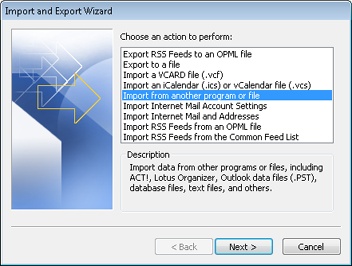
Choose File, Open, and Import to start the Import And Export Wizard, as shown in Figure 31-1.
Select Export To A File, and then click Next.
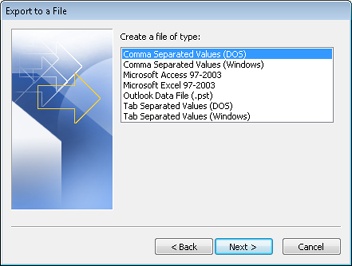
The options available on the next wizard page break down into four basic types: text files, databases, spreadsheets, and a personal folders file. Figure 31-2 shows the formats available for exporting. Although you can export your messages in any of these formats, you’ll probably find .pst files the most useful. For this example, select Outlook Data File (.pst), and then click Next.
On the Export Outlook Data File page, select the folder that you want to export. To include subfolders of the selected folder, select the Include Subfolders option. To export all your Outlook 2010 data, select the Mailbox or Personal Folders branch, and then select the Include Subfolders option.
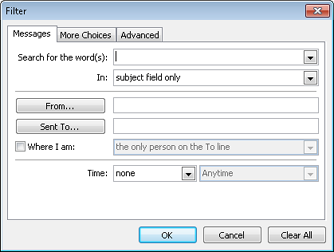
If you want to specify a filter, click Filter, and the Filter dialog box appears (see Figure 31-3). By using a filter, you can specify that only certain items be exported. This option could be useful, for example, if you need to send all correspondence with representatives of Wingtip Toys to a new sales representative who will be dealing with that firm. You could export the relevant messages to a .pst file that you could send to the new rep, who could then import them. After you’ve specified any needed filters, click OK to close the Filter dialog box and return to the wizard page, and then click Next.
On the final wizard page, specify the location where you want to save exported information, and then specify how duplicate items should be handled. If no export file exists, specify the path and name of the file to be created. If an export file does exist, browse to the file you want to use. When you click Finish, the wizard creates the personal folders file (if it is new), runs the export, and then closes the file.
You can also export address lists out of Outlook 2010 for use elsewhere. Exporting addresses is similar to exporting messages: you use the same Import And Export Wizard. The difference is that addresses are sometimes exported to a database or a spreadsheet to allow easier access to phone numbers, addresses, and other information.
To export the address list to Microsoft Access, for example, first start the Import And Export Wizard. As you work through the wizard, select Export To A File, and then select Microsoft Access. Select the Contacts folder, and then provide a name for the Access database that will be created for the exported addresses.
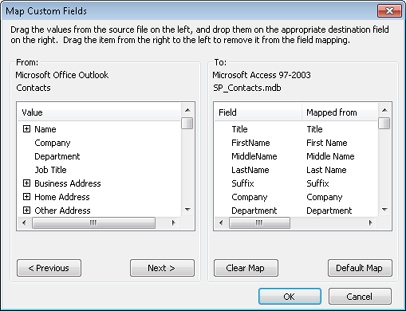
The primary difference between exporting to a personal folders file and exporting to a database lies in mapping out the fields for the database itself. From the wizard, you can click Map Custom Fields to open the Map Custom Fields dialog box, shown in Figure 31-4. Here, you can specify which fields in Outlook get mapped to fields in the database.
After you’ve finished the field mapping, click OK, and then click Finish to create the new database file and export the contact information into it.
Note
When you’re exporting to a database, you don’t have a filter option. Therefore, if you’re exporting only certain records, you should create a subfolder to contain the contacts that you want to export. Copy the contacts to this new subfolder, export the subfolder, and then delete the duplicate contacts and the folder containing them.
Occasionally, data in .pst format simply isn’t usable for a particular task. Outlook 2010 gives you a number of options for other export formats, such as Excel, Access, or various text file formats. For example, if you need to export information from Outlook 2010 into a third-party software package, or if you want to use the information in any capacity for which a direct export path is not available, your best option might be to export the needed information to a basic text file, either tab-delimited or comma-delimited. Figure 31-5 shows a text file that was exported from Outlook 2010.
Exporting data to a text file is an easy process, as follows:
Choose File, Open, and Import.
Choose Export To A File, and then click Next.
To export to a comma-delimited file, select Comma Separated Values (Windows). To export to a tab-delimited file, select Tab Separated Values (Windows). Then click Next.
Specify a file name for the export file, and then click Next.
If you want to change the way fields are mapped, click Map Custom Fields (shown in Figure 31-4). When you have finished mapping fields, click OK, and then click Finish.
Data transfer is a two-way street, of course, and any discussion of how to take information out of Outlook 2010 would be incomplete without a discussion of how to bring information back in as well. Far more options are available for bringing information in than for sending information out.
The process of importing data into your Outlook 2010 message store is the same regardless of whether you’re importing information into a personal folder or an Exchange Server mailbox. You begin the process by identifying exactly what type of information that you want to import and whether Outlook 2010 can access and import the data properly.
The next sections examine some examples of importing information into Outlook 2010. To begin the import process for any of the examples discussed in these sections, use the Import And Export Wizard.
When upgrading an email system to Outlook 2010, you can often save time and avoid configuration problems by importing the Internet mail settings from the previous system. This process does not bring over any messages or addresses; it simply transfers any existing Internet email account information to the current Outlook 2010 profile. This option works only if the computer on which Outlook 2010 is installed had been using previously a different email client, such as Outlook Express or Eudora.
To start the wizard to import your settings, choose File, Open, and Import. Select Import Internet Mail Account Settings, and then click Next. The wizard is very straightforward, taking you through all the steps of verifying and reestablishing the account (although you’ll need to reenter the password). Fields are filled with information taken from the detected settings; you can modify them as needed during the import process. After you have imported the information, the new service will often require you to exit, log off, and restart Outlook 2010 before it will be active. At that point, you should be able to receive and send Internet email through Outlook 2010.
In addition to importing Internet email configuration settings, as just discussed, the other step involved in migrating email data to Outlook 2010 is to bring in any address lists or saved messages that were stored in the previous system. To import an existing message store, follow these steps:
Choose File, Open, and Import. When the wizard starts, select Import Internet Mail And Addresses, and then click Next.
On the Outlook Import Tool page of the wizard, specify the program from which you are migrating the data. After you select the application, you must specify what to import: messages (Import Mail), addresses (Import Address Book), or both. Then click Next.
On the Import Addresses page, specify how Outlook 2010 should handle duplicates. The default entry, Allow Duplicates To Be Created, can create a bit of cleanup work (deleting the duplicate entries that might be created for certain contacts), but it guards against accidental information loss from overwriting the wrong contact entry. Replace Duplicates With Items Imported causes Outlook 2010 to overwrite any existing contacts in Outlook 2010 with matching items from your other mail program. Select Do Not Import Duplicate Items if you want Outlook 2010 to skip any duplicate addresses.
Click Finish. The wizard runs the import and then displays the Import Summary dialog box. If the import has gone well, you’ll see an indication that all the messages have been imported. If you see that only a portion of the total messages have been imported, you’ll know that a problem occurred and not all the information was transferred.
In the Import Summary dialog box, click Save In Inbox if you want to save the summary message to your Outlook Inbox folder. Click OK if you just want to close the dialog box.
One of the handiest ways to share contact information is by using vCards, which are a form of electronic business card. When you receive a vCard from someone, you can import the card into your Contacts folder for later use. Start the Import And Export Wizard, select Import A vCard File (.vcf), and then click Next. Browse to the directory where you saved the .vcf file, select the file, and then click Open. The file will be imported as a new contact entry in your Contacts folder.
Note
For details about using vCards to share contact information, see the section Sharing Contacts, on page 464.
Numerous options, including iCalendar and vCalendar files, are available to users who want to share calendar information. Although they’re used for much the same purpose, iCalendar and vCalendar work in different ways.
Note
iCalendar is a newer standard that is gradually replacing vCalendar. Both are still commonly used, however.
You use iCalendar to send calendar information out across the web to anyone using an iCalendar-compatible system. Users who receive an iCalendar meeting invitation simply accept or decline the meeting, and the information is entered automatically into their calendars. An import process is generally not necessary.
In contrast, you use vCalendar files much as you use vCards: They allow you to create a meeting and send it out as an attachment to other attendees. Attendees can then double-click the attachment or use the import process to bring this meeting into their schedules. If necessary, users can also import iCalendar meetings the same way.
Importing iCalendar and vCalendar files is easy. Choose File, Open, and Import to start the Import And Export Wizard. Select Import An iCalendar (.ics) Or vCalendar File (.vcs), and then click Next. Select the file, and then click OK to complete the import.
You’ve now seen most of the common import options. However, you’ll also occasionally encounter situations in which you might need to import other types of information, such as third-party data, text files, and so on. Perhaps the most important of these other possibilities is importing information from another .pst file. This could involve bringing back information from an archive, restoring lost messages from a backup, or even completing the process in the example discussed earlier, in which you need to give a new sales rep copies of all messages sent to or received from Wingtip Toys. If three or four other employees had all exported messages to .pst files, the easiest option for the new rep would be to import the messages back into his or her own message store for easy access.
The following steps describe the process of importing from an existing .pst file. Keep in mind that other file import options are similar, although the particular data and formatting of each file will dictate certain changes in the import process.
To import from an existing .pst file, perform the following steps:
Start the Import And Export Wizard. Select Import From Another Program Or File, and then click Next.
Browse to the .pst file that you want to import. (If you want to import multiple .pst files, you must import each one separately.) Specify how to handle duplicates on the same page, and then click Next.
Note
As mentioned earlier, allowing Outlook 2010 to create duplicates minimizes the risk of overwriting data, but it does increase the size of the store. If you’re importing a number of .pst files that might have overlapping data (if many recipients were copied on the same messages, for example), it’s often better to avoid importing duplicates.
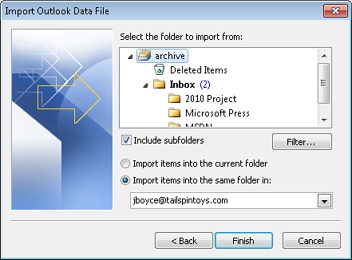
On the page of the wizard shown in Figure 31-6, select the folders to import—either the entire store or only a particular folder or set of folders.
The wizard allows you to filter the data that you’re importing the same way you filter exported data. Click Filter to open the Filter dialog box, and then add any filters you need.
Specify the folder into which the data should be imported.
Note
Our fictional sales rep could create a subfolder named Wingtip under the Inbox and then select that folder before starting the Import And Export Wizard. Note that by choosing to import only from the .pst file’s Inbox and selecting Import Items Into The Current Folder, the sales rep could bring all the messages from the .pst file into his or her message store without flooding the Inbox with old Wingtip information. Creating subfolders for importing and exporting can be a good way to keep track of where information is coming from and what you are sending out.
