Creating and Using Custom Views 653
Custom Printing with Scripts and Word 676
Custom Printing with Excel 684
EARLIER chapters in this book discussed the standard views that Microsoft Outlook 2010 provides for its many folders and data types. Those chapters also discussed customizing standard views by grouping and sorting items and by adding and removing columns, changing column order and properties, filtering the view, and so on.
In this chapter, you’ll learn how to create custom views in Outlook 2010 to present the information you want in a format that suits your needs. Because generating a printed version of your data is often a byproduct of creating a view, this chapter also focuses on how to create custom print styles in Outlook 2010. For those situations in which the Outlook 2010 custom views and print styles won’t give you the results you need, you can turn to scripts and Microsoft Word 2010 to accomplish custom printing tasks.
Note
For more information about customizing existing views, see the section Working with the Standard Outlook Views, on page 72. You’ll also find information about specific views in the chapters that cover them. For example, for more information about working with and customizing views in the Contacts folder, see the section Viewing Contacts, on page 452.
If the options for customizing existing Outlook 2010 views don’t provide the information view that you need, you can create your own views. You have two options for doing this: modifying an existing view or creating a new view from scratch.
You can create a new, custom view from an existing view if the existing one offers most of the view elements that you need. This is usually the easiest method because it requires the least amount of work.
Follow these steps to create a new, custom view from an existing view:
Open the folder for which you want to modify the view, and then select the view to display it.
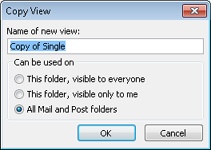
On the View tab, click Change View and choose Save Current View As A New View to open the Copy View dialog box, shown in Figure 26-1.
In the Copy View dialog box, type a name in the Name Of New View box, and then select one of the following options:47
This Folder, Visible To Everyone Makes the view available only in the folder from which it was created. Anyone with access to the specified folder can use the view.
This Folder, Visible Only To Me Makes the view available only in the folder from which it was created. Only the person who created the view can use it.
All Type Folders Makes the view available in all folders that match the specified folder type. For example, when you create a custom view based on the Inbox, this option becomes All Mail And Post Folders, and Outlook 2010 makes the view available from the Inbox, Outbox, Drafts, Sent Items, and other message folders. If you base the new view on the Contacts folder, this option becomes All Contact Folders and makes the view available from all contacts folders.
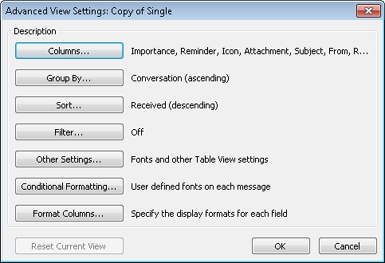
On the View tab, click View Settings to open the Advanced View Settings dialog box, as shown in Figure 26-2.
Use the options provided in the Advanced View Settings dialog box to customize the view.
Note
For details on all the options that you can configure in the Customize View dialog box, see the section Customizing a View’s Settings, on page 659.
After you’ve modified the settings as needed, click OK to close the Customize View dialog box and apply the view changes.
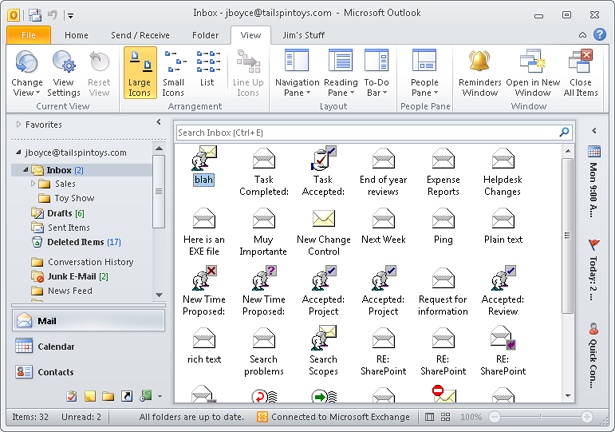
You can create an Outlook 2010 view from scratch if the view you want doesn’t have much in common with any of the existing views. For example, perhaps you want to create an Inbox view that displays your messages as icons rather than headers, as shown in Figure 26-3. You can’t modify a standard message view to display messages as icons, so you need to create the view from scratch.
The process for creating a view from scratch is much like the process of modifying an existing view. When you create a new view, however, you have additional options for specifying the view.
Follow these steps to create a view from scratch:
Open the folder or folder type for which you want to create a custom view.
Click the View tab and then click Change View, Manage Views to open the Manage All Views dialog box.
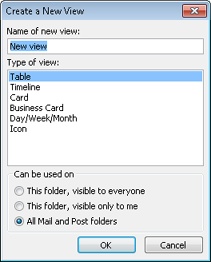
Click New to open the Create A New View dialog box, shown in Figure 26-4.
In the Type Of View list, select the type of view you want to create, as follows:
Table Presents information in tabular form, with one item per row and columns laid out according to your selections. The default Inbox view is an example of a table view.
Timeline Displays items on a timeline based on the item’s creation date (such as the received date for a message or the event date for a meeting). You might find this view type most useful for the Calendar folder.
Card Displays information using cards, as in Address Cards view (the default view in the Contacts folder).
Business Card Displays information using customizable, graphical business cards, similar to Detailed Address Cards view.
Day/Week/Month Displays days in the left half of the window and monthly calendars in the right half. The actual view depends on the type of folder for which you create the view. Figure 26-5 shows a Day/Week/Month view created for the Inbox folder.
Icon Displays the items as icons, much as a file system folder does.
In the Can Be Used On area, select an option as described in the preceding section, and then click OK. The Advanced View Settings dialog box opens.
Customize the view as needed, and then click OK.
Click Apply View to apply the view, or click Close to close the dialog box without applying the view.

Note
For details on all the options you can configure in the Customize View dialog box, see the section Customizing a View’s Settings, on page 659.
You can easily modify, rename, or delete views. For example, perhaps you want to apply a filter to a view in the Contacts folder to show only those contacts who work for a particular company. Maybe you want to have Outlook 2010 apply a certain label to appointments that have specified text in the subject.
To modify, rename, or delete a view, follow these steps:
Click the View tab, and click Change View, Manage Views to open the Manage All Views dialog box.
In the Views For Folder list, select the view that you want to change, and then do one of the following:
To modify the view, click Modify. Use the options in the Customize View dialog box to apply changes to the view (as explained in the following section).
To rename the view, click Rename, and then type the new name.
To delete the view, click Delete. The Reset button changes to Delete if you select a custom view.
Click Close.
Outlook 2010 gives you considerable control over the appearance and contents of a view. When you define a new view or modify an existing view, you end up in the Advanced View Settings dialog box, shown in Figure 26-2. To open this dialog box, click the View tab and click View Settings in the Current View group.
The options available in the Advanced View Settings dialog box change according to the folder selected. For example, the options for the Contacts folder differ in some respects from the options for the Inbox. The same general concepts hold true for each type of folder, however. The following sections explain the various ways that you can use these dialog box options to customize a view.
In most cases, clicking Columns in the Advanced View Settings dialog box opens the Show Columns dialog box, similar to the one shown in Figure 26-6, in which you can select the columns that you want to include in the view. (Exceptions to this behavior are discussed later in the section.) For example, you might use the dialog box to add the Cc or Sensitivity column to the view.
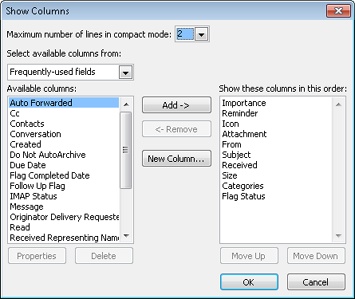
Adding columns in the Show Columns dialog box is easy. The available columns (those not already in the view) appear in the list on the left, and the columns already displayed appear in the list on the right. Select a column in the Available Columns list, and then click Add to add it to the view. To remove a column from the view, select the field in the Show These Columns In This Order list, and then click Remove. Use the Move Up and Move Down buttons to rearrange the order in which the columns are displayed in the view.
TROUBLESHOOTING
You need to restore a view to its original settings
You’ve customized a view, and now you’ve decided that you need the old view back. (For the future, remember that you can copy an existing view. Rather than modifying an existing view, you can copy a view and then modify the copy. This way you’ll still have the original view if you need it.)
It’s easy to restore a standard view to its previous settings, however. Click View Settings on the View tab and then click Reset Current View. Click Yes when prompted to confirm the action.
Tip
You can rearrange the order in which columns are displayed in a table view by dragging the column header for a column to a new location on the column header bar.
Tip
You can click New Column in the Show Columns dialog box to create a custom column. For additional information about creating and using custom columns, see Chapter 27.
In some cases, clicking Columns in the Advanced View Settings dialog box opens a Date/Time Fields dialog box similar to the one shown in Figure 26-7. This occurs when you’re working with a view that shows time duration, such as Day/Week/Month view in the Calendar folder or By Type view in the Journal folder—in effect, nontable views that show time duration graphically.
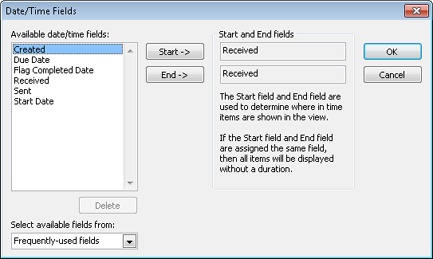
You use the Date/Time Fields dialog box to specify the fields that Outlook 2010 will use to show item duration in the view. The default settings vary but are typically either Start and End or Start Date and Due Date. As an example, you might use the Date/Time Fields dialog box to change the Task Timeline view in the Tasks folder to show the Date Completed field for the task’s end rather than the Due Date field.
Sometimes it’s helpful to be able to group items in an Outlook 2010 folder based on specific data fields. For example, you might want to group tasks by owner so that you can see at a glance the tasks assigned to specific people. Perhaps you want to organize contacts by country or region. In these and similar cases, you can modify an existing view or create a new one to organize the view based on the most pertinent data. To group data in a view, click Group By in the Advanced View Settings dialog box to open the Group By dialog box, shown in Figure 26-8.

Follow these steps to group data in a view:
In the Group By dialog box, clear the Automatically Group According To Arrangement check box.
Select a field type in the Select Available Fields From drop-down list at the bottom of the dialog box. This selection controls the fields that appear in the Group Items By drop-down list.
Select a field in the Group Items By drop-down list, and then select either Ascending or Descending, depending on the sort order that you want to use. Select the Show Field In View check box to display the field in the view.
If you want to create subgroups under the main group, select a field in the Then By drop-down list. (The dialog box contains three such lists, providing three additional grouping levels.) For example, you might group tasks by Owner and then by Due Date.
After you’ve specified all the grouping levels that you need, use the Expand/Collapse Defaults drop-down list to specify how you want Outlook 2010 to treat the groups. Use the following list as a guide:
As Last Viewed Collapses or expands the group according to its state in the previous session.
All Expanded Expands all items in all groups.
All Collapsed Collapses all items in all groups.
When you’re satisfied with the group settings, click OK to close the Group By dialog box. Then click OK to close the Advanced View Settings dialog box.
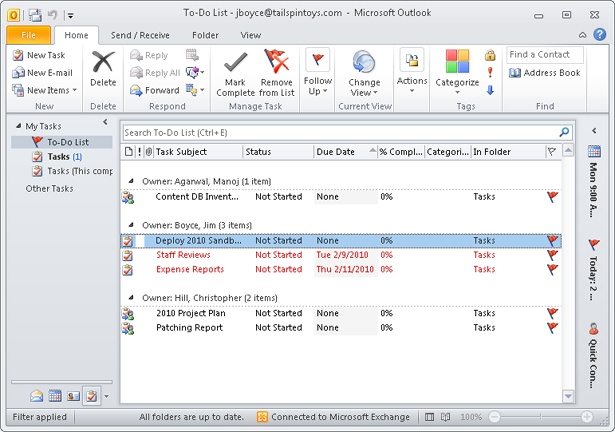
Sorting data in a view is different from grouping data. For example, you might group the Tasks folder by owner. Each group in the view then shows the tasks assigned to a particular person. You can then sort the data within the group as needed. For example, you might sort the tasks based first on due date and then on subject. Figure 26-9 shows the Tasks folder grouped by owner and sorted by due date.
Sorting doesn’t rely on grouping—you can sort a view whether or not it is grouped. For example, you might sort the Inbox based on the Received column to show messages in the order in which you received them.
Tip
INSIDE OUT Sort table views quickly
You can sort a table view quickly by clicking the column header for the column by which you want to sort the view. Click the header again to change between ascending and descending sort order.
To create a sort order when you customize or define a view, click Sort in the Advanced View Settings dialog box to open the Sort dialog box, shown in Figure 26-10.
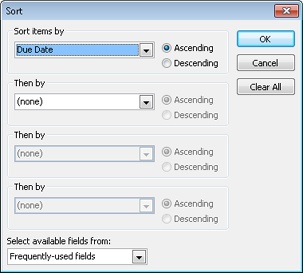
To configure sorting in the Sort dialog box, follow these steps:
In the Select Available Fields From drop-down list, select the type of field that the sort should be based on.
In the Sort Items By drop-down list, select the specific field by which you want to sort the view.
Select Ascending or Descending, depending on the type of sort you need.
Use the Then By lists to specify additional sort levels, if necessary.
Click OK to close the Sort dialog box, and then click OK to close the Customize View dialog box.
In Outlook 2010, filtering a view is an extremely powerful feature that gives you considerable control over the data displayed in a given view. For example, you might have hundreds of messages in your Inbox and need to filter the view to show only those messages from a particular sender. You could simply sort the Inbox by the From field and scan the list of messages, but you might want to refine the search a little, perhaps viewing only messages from a specific sender that have an attachment and were sent within the previous week. Filters allow you to do just that.
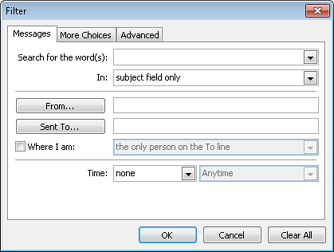
To configure a filter, click Filter in the Advanced View Settings dialog box to open the Filter dialog box, shown in Figure 26-11. This multi-tabbed dialog box lets you specify multiple conditions to define which items will appear in the view.

Figure 26-11. Use the Filter dialog box to specify multiple conditions that determine what data appears in the view.
Note that the first tab in the Filter dialog box varies according to the current folder type. For a contacts folder, for example, the first tab is labeled Contacts and offers options for creating filter conditions that apply to contacts. For a message folder, the first tab is labeled Messages and provides options for creating filter conditions specific to messages.
The various tabs in the Filter dialog box include a broad range of options that let you specify multiple conditions for the filter. You can use conditions from more than one tab. For example, you might enter words to search for and a sender on the Messages tab, select categories on the More Choices tab, and specify a particular field and value on the Advanced tab.
Tip
The Advanced tab of the Filter dialog box gives you access to all available fields and several criteria (Contains, Doesn’t Contain, and Is Empty, for example), making it the place to go to configure conditions not available on the other tabs. To define filter criteria, select a field in the Field drop-down list, select an option in the Condition drop-down list, type a value, and then click Add. Use the SQL tab to perform Structured Query Language (SQL) queries to retrieve data from the folder to show in the custom view.
When you click Other Settings in the Advanced View Settings dialog box, Outlook 2010 opens a dialog box that lets you configure some general settings for the custom view. These options vary from one folder type to another—for example, the Contacts folder, the Inbox, and the Calendar folder all use different options. You can change such properties as the font used for column headers and row text, the grid style and shading for table views, and a handful of other general options.
Click Conditional Formatting in the Advanced View Settings dialog box to display the Conditional Formatting dialog box, similar to the one shown in Figure 26-12. This dialog box lets you create rules that cause Outlook 2010 to format data in the view automatically based on the criteria that you specify. For example, you might create an automatic conditional formatting rule that has Outlook 2010 display in blue all tasks that you own and display all other tasks in black. Or perhaps you may create a rule to display in green all contacts from a specific company.
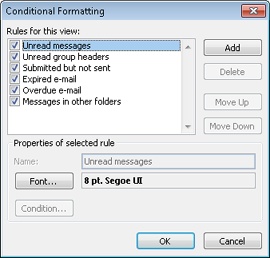
Figure 26-12. Use the Conditional Formatting dialog box to create rules that automatically format text in views based on the conditions that you specify.
As you’re working in the Conditional Formatting dialog box, keep in mind that you can’t create task-oriented rules, as you can with the Rules Wizard. For example, you can’t create a rule in this dialog box that moves messages from one folder to another. The rules you create in the Conditional Formatting dialog box control only the appearance (color, font, and font styles) of data in the view.
Note
For information about the Rules Wizard, see Chapter 11.
You can’t modify the conditions for predefined rules, but you can specify the font characteristics to use for the rule. You can also create your own rules and change the order in which rules are applied to achieve the results you need.
To set up a one formatting rule for text, follow these steps:
Click Add in the Conditional Formatting dialog box to add a new rule named Untitled.
Click Font to open a standard Font dialog box, in which you specify the font, font style, and color that will apply to text that meets the rule’s condition.
Close the Font dialog box, and then click Condition to open the Filter dialog box, shown in Figure 26-13. This dialog box offers three tabs that you can use to specify the condition for the rule. You can specify multiple conditions from multiple tabs, if needed.
Click OK when you’re satisfied with the filter condition.
TROUBLESHOOTING
You need to restrict the available views
In some situations, you might want to restrict the available views to only the custom views you’ve created, hiding the standard views that Outlook 2010 provides. For example, perhaps you created a custom calendar view that you want all employees to use instead of the standard calendar views because your custom view includes additional information that the standard views don’t contain. When you restrict the Outlook 2010 views to only custom views, the standard views no longer appear on the View menu.
You must configure each folder separately. For example, you might restrict the Calendar folder views without restricting the Inbox folder views. This would give users the ability to choose one of the standard Outlook 2010 views in the Inbox folder but would limit their choices to only custom views in the Calendar folder.
Follow these steps to restrict the views that Outlook 2010 provides on the View menu:
In Outlook 2010, select the folder for which you want to restrict views.
Click View, Change View, Manage Views to open the Manage All Views dialog box.
Select the Only Show Views Created For This Folder check box, and then click Close.
Repeat steps 2 and 3 to restrict other folders as necessary.
Many users work in Outlook 2010 and never print any of the items that they store in the program. For other users, however, the ability to print from Outlook 2010 is important. For example, if you use a hard-copy day planner rather than a notebook computer or a Personal Digital Assistant (PDA) to keep track of your daily schedule, you might prepare the schedule in Outlook 2010 and then print it for insertion in the day planner.
This section examines the options and methods for printing your Outlook 2010 data. It also explains how to customize the print styles provided by Outlook 2010 to create custom styles that better suit your preferences or needs.
Outlook 2010 offers several predefined print styles that you can use to print information from various Outlook 2010 folders. The most common print styles are Table and Memo, but there are others available, particularly for Calendar folders.
Note
Most views that have just Table and Memo styles available have only the Table style available if no item is selected.
Tip
INSIDE OUT Printing a timeline
You can print only individual items when you’re working with a timeline view. However, if you’re scheduling a major project, a printout of a timeline view would be useful. If you need that capability, consider using Microsoft Project 2010 instead of Outlook 2010.
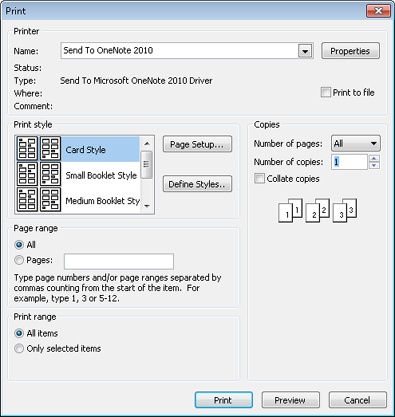
The easiest way to view a print style is simply to preview the style when you print. Click File, Print and then view the print styles on the Print page, as shown in Figure 26-14. Printing is discussed in more detail in the following section.
Printing from Outlook 2010 is just as easy as printing from any other application. Simply select the view or item that you want to print, and then choose File, Print. Outlook 2010 displays a Print page similar to the one shown in Figure 26-14. The contents of the page vary according to the type of view from which you’re printing.
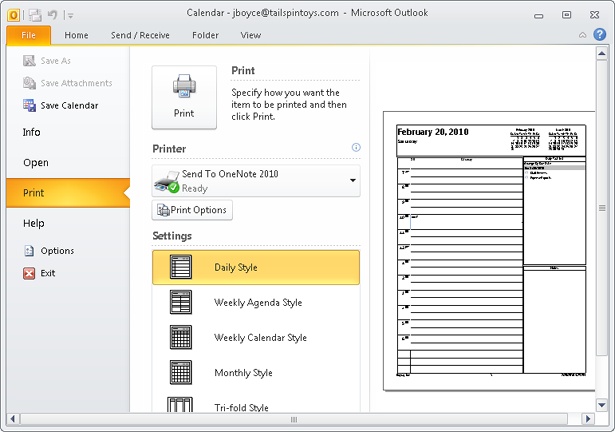
From the Settings list, select a print style. For example, select Phone Directory Style for the Contacts folder to print a phone list, or select one of the two booklet styles to print contact entries for a day planner. If you need to fine-tune the print settings, click Print Options to display a Print dialog box similar to the one shown in Figure 26-15.
Note
For additional details on printing contacts and using different print styles with the Contacts folder, see the section Printing Contacts, on page 459.
Click Page Setup and use the Format tab of the Page Setup dialog box to specify the layout, fonts, and other general properties for the job. The options on the Format tab vary from one folder type to another. For example, you can use the Format tab to set the following options, some of which are specific to particular folder types:
Whether Outlook 2010 keeps sections together or starts a new page for each section
The number of columns per page
The number of blank forms to print at the end of the job (such as blank contact forms)
Whether Outlook 2010 prints a contact index on the page edge
Whether letter headings for each alphabetic section of a contact list are included
The font used for headings and for body text
Whether Outlook 2010 adds gray shading to headings
Whether the Daily Task List, To-Do Bar, or Notes areas are printed with a calendar
Whether weekends are printed in a calendar view
Whether Outlook 2010 prints one month of a calendar per page
Use the Paper tab, shown in Figure 26-16, to configure the page type, size, source, and other properties. For example, in the Type list on the Paper tab, you can select the type of day planner that you use so that Outlook 2010 prints using that style.

Figure 26-16. Use the Paper tab to configure the paper source, size, type, and other paper settings.
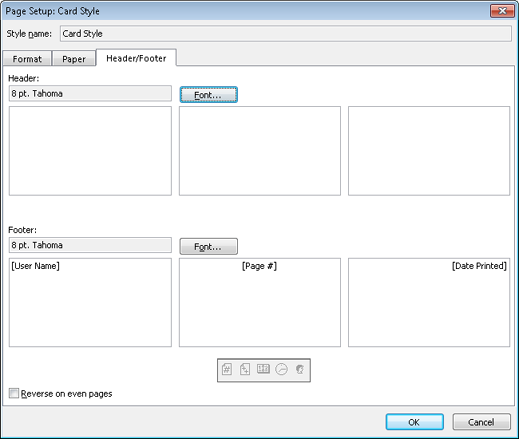
Use the Header/Footer tab, shown in Figure 26-17, to specify the items that you want printed in the header and the footer. This tab provides three boxes for the header and three for the footer. The left box specifies items that print on the left side of the page, the middle box specifies items that print in the middle of the page, and the right box specifies items that print on the right side of the page. You can enter text manually or use the buttons near the bottom to insert specific data such as page numbers, the user, the time, and other dynamic data.
After you select the page setup options, you can return to the Print page to preview the document. Click Print Options again; set the printer properties, the number of copies to print, and other general print settings, and then click Print to print or click Preview to preview the document.
Outlook 2010 provides a broad range of print styles, so it’s likely that they will fit most of your needs. When these print styles don’t quite offer what you need or want, however, you can create a custom print style.
Tip
If you find yourself using an existing print style but frequently making the same option changes before printing, modify the existing print style to create a custom print style.
You can either modify an existing print style or copy a style and then modify it to incorporate the changes that you need. If you always use the same modifications on a particular print style, you might prefer to simply modify that existing style rather than creating a new one. If you use the default style occasionally but modify its properties for most other print jobs, consider creating a custom print style based on the existing one so that both are available.
Follow these steps to modify or create a new print style:
Open the view for which you want to modify the print style or on which you want to base your custom print style.
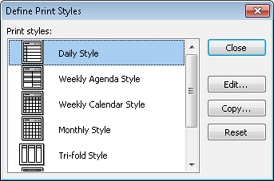
Choose File, Print, Print Options, and finally Define Styles to open the Define Print Styles dialog box, shown in Figure 26-18.
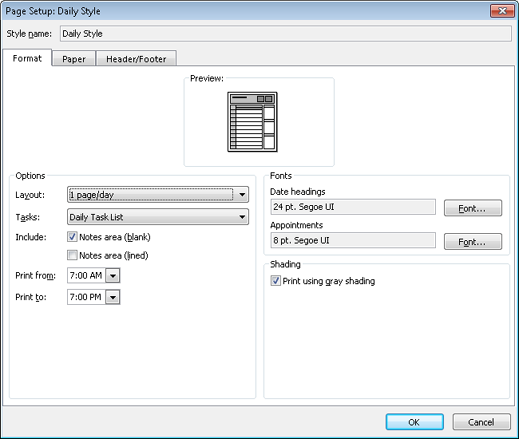
If you want to create a new style, select an existing style, and then click Copy. Otherwise, select an existing style, and then click Edit. In either case, Outlook 2010 displays a Page Setup dialog box similar to the one shown in Figure 26-19.
Specify options as needed in the dialog box, and then click OK to apply the changes.
When you want to print using a particular style, open the view from which you want to print and then choose File, Print. On the Print page, select the style in the Settings list, set other properties as necessary, and then click OK to print.
If you’ve created some custom print styles but no longer use them, or if you’ve been experimenting with print styles and have a few samples you want to delete, removing them is simple.
Follow these steps to remove a print style:
Choose File, Print, Print Options, and finally Define Styles to open the Define Print Styles dialog box.
Select the style you want to remove, and then click Delete.
When you have finished deleting print styles, click Close.
You can’t delete the standard print styles provided in Outlook 2010, but you can restore them to their default state. For example, suppose that you made several changes to the default Small Booklet style for the Contacts folder. Now you want to restore the print style to its default settings, but you don’t remember what they are. Fortunately, Outlook 2010 remembers them for you.
To reset a print style, follow these steps:
Choose File, Print, Print Options, and finally Define Styles to open the Define Print Styles dialog box.
Select the style you want to reset and then click Reset. Outlook 2010 prompts you to verify the action.
Click OK to reset the style or Cancel to cancel the operation.
Click Close.
The existing print styles in Outlook 2010 and the capability to define custom styles accommodate the needs of most users. In some situations, however, these built-in printing features are not enough. With a little custom scripting and Word 2010, however, you can overcome these limitations.
Word 2010 offers almost unlimited print layout capabilities, making it a great tool for laying out almost any type of document. For example, assume that you’re not satisfied with the way Outlook 2010 prints messages from mail folders. When you print a message, the recipient’s name appears in large, bold type at the top of the page, as shown in Figure 26-20. You are likely printing your own messages, so you might want different information—such as the message subject—displayed on the first line.

Although you can make minimal changes to the print layout, such as adding headers or footers, you can’t do much in Outlook 2010 to change the way that most items are printed. You can, however, copy Outlook 2010 items to Word 2010, format the document as needed, and then print it from Word. You might think that moving the data from Outlook 2010 to Word 2010 is a time-consuming task, but you can make it happen in less than a second, provided you create a script to accomplish the task for you.
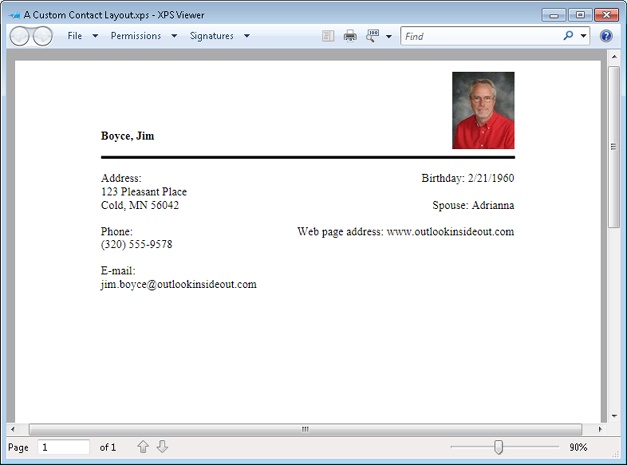
In this first example, assume that you want to create a specific layout for contacts that prints the contact name in bold, places the contact’s picture in the upper-right corner, and then includes selected contact information such as address, phone, email, and other properties underneath. Figure 26-21 illustrates this custom print layout.
The first step in creating this custom contact style is to create the document layout in Word 2010.
In a nutshell, this means creating a document template that contains a text form field for each contact item that you want included on the printout and then following these steps:
In Word 2010, open a new document. If the Developer tab does not appear in the ribbon, click File, Options, and then Customize Ribbon. Place a check beside Developer in the list of ribbon tabs, and then click OK.
Enter labels for the Outlook 2010 fields. Then position the insertion point after the first label, and on the Developer tab, in the Controls group, select the Rich Text content control to insert a field to contain the data that will come from the Outlook 2010 contact.
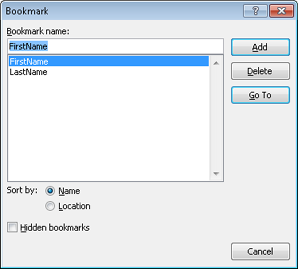
Select the first text form field, and on the Insert tab, in the Links group, choose Bookmark. In the Bookmark dialog box, shown in Figure 26-22, type a name for the bookmark that identifies the field (such as LastName), and then click Add.
Select the remaining fields and add bookmarks for them, naming the bookmarks according to the information that the field will contain, such as FirstName, Email, Phone, and so on.
Select the Title field, format it using a larger font, and then add any other characteristics, such as bold type.
Draw a line separating the name and other information, if desired.
Click File, click Save As, Word Template, specify the path C:\myMail and the name CustomContactPrint.dotx, click Save, and then exit Word 2010.
You now have a template that is ready to be filled in by Outlook 2010. The next step is to create a macro in Outlook 2010 that copies the desired information from the current contact item to the form and then prints the form. The following sample macro accomplishes these tasks. However, this sample does not provide extensive error checking, so consider this a starting point for your own macro. For example, you might want to add code that verifies that the current item is a contact item, and if not, displays an error message and exits.
Click the Developer tab, click Macros, choose Macros, type CustomContactPrint in the Macro Name field, and then click Create. Enter the following code:
Sub CustomContactPrint()
    'Set up objects
    Dim strTemplate As String
    Dim objWord As Object
    Dim objDocs As Object
    Dim objApp As Application
    Dim objItem As Object
    Dim objAttach As Object
    Dim numAttach As Integer
    Dim objNS As NameSpace
    Dim mybklist As Object
    Dim x As Integer
    Dim pictureSaved As Boolean
    Dim myShape As Object
    'Dim ContactAddress
    'Create a Word document and current contact item object
    Set objApp = CreateObject("Outlook.Application")
    Set objNS = objApp.GetNamespace("MAPI")
    'Check to ensure Outlook item is selected
    If TypeName(objApp.ActiveInspector) = "Nothing" Then
        MsgBox "Contact not open. Exiting", vbOKOnly + vbInformation, "Outlook Inside
Out"
        Exit Sub
    End If
    Set objItem = objApp.ActiveInspector.CurrentItem
    Set objWord = CreateObject("Word.Application")
    strTemplate = "c:\myMail\CustomContactPrint.dotx
    Set objDocs = objWord.Documents
    objDocs.Add strTemplate
    Set mybklist = objWord.activeDocument.Bookmarks
    'Fill in the form
    objWord.activeDocument.Bookmarks("LastName").Select
    objWord.Selection.TypeText CStr(objItem.LastName)
    objWord.activeDocument.Bookmarks("FirstName").Select
    objWord.Selection.TypeText CStr(objItem.FirstName)
    If objItem.HasPicture = True Then
        Set objAttach = objItem.Attachments
        numAttach = objAttach.Count
        For x = 1 To numAttach
            If objAttach.Item(x).DisplayName = "ContactPicture.jpg" Then
                objAttach.Item(x).SaveAsFile "C:\myMail\" & _
                objAttach.Item(x).DisplayName
                pictureSaved = True
            End If
        Next x
        If pictureSaved = True Then
            objWord.activeDocument.Bookmarks("Picture").Select
            Set myShape = objWord.activeDocument.Shapes.AddPicture("c:\myMail\ContactPicture.jpg", False, True, 432, -25)
            objWord.activeDocument.Shapes(1).Left = 432 - objWord.activeDocument.
 Shapes(1).Width
         End If
     End If
     objWord.activeDocument.Bookmarks("Address1").Select
     objWord.Selection.TypeText CStr(objItem.BusinessAddressStreet)
     objWord.activeDocument.Bookmarks("Address2").Select
     objWord.Selection.TypeText CStr(objItem.BusinessAddressCity)
     objWord.Selection.TypeText ", "
     objWord.Selection.TypeText CStr(objItem.BusinessAddressState)
     objWord.Selection.TypeText " "
     objWord.Selection.TypeText CStr(objItem.BusinessAddressPostalCode)
     objWord.activeDocument.Bookmarks("Birthday").Select
     objWord.Selection.TypeText CStr(objItem.Birthday)
     objWord.activeDocument.Bookmarks("Spouse").Select
     objWord.Selection.TypeText CStr(objItem.Spouse)
     objWord.activeDocument.Bookmarks("Phone1").Select
     objWord.Selection.TypeText CStr(objItem.BusinessTelephoneNumber)
     objWord.activeDocument.Bookmarks("WebPage").Select
     objWord.Selection.TypeText CStr(objItem.BusinessHomePage)
     objWord.activeDocument.Bookmarks("Email1").Select
     objWord.Selection.TypeText CStr(objItem.Email1Address)
     'Print and exit
     objWord.PrintOut Background:=True

    'Process other system events until printing is finished
    While objWord.BackgroundPrintingStatus
        DoEvents
    Wend
    objWord.Quit SaveChanges:=wdvbaDoNotSaveChanges
    Set objApp = Nothing
    Set objNS = Nothing
    Set objItem = Nothing
    Set objWord = Nothing
    Set objDocs = Nothing
    Set mybklist = Nothing
End Sub
If you examine this macro code, you’ll see that it uses named bookmarks to locate the position in the document where each contact element will be inserted. Also, notice that the lines in the macro that insert specific contact items reference those items by their Outlook 2010 object model names, such as Email1Address, BusinessTelephoneNumber, BusinessHomePage, and so on. If you want to modify this macro to insert other contact items, you’ll need to know the item names. To view contact item properties, click Visual Basic on the Developer tab in the Outlook ribbon, and then choose Help, Microsoft Visual Basic Help. Select Outlook Object Model Reference, and then click ContactItem Object. Click the Properties link, and then scroll through the list of properties to locate the one that you need.
This macro also determines whether the contact has a picture associated with it. If so, the macro cycles through the attachments to locate the picture (which is always named ContactPicture.jpg) and saves it to disk. The macro then inserts the picture in the Word 2010 document. Although ContactPicture.jpg is always the first attachment, regardless of the order in which items are attached or their names, this macro checks each attachment anyway to accommodate future changes in Outlook 2010 regarding picture attachments.
Note
The macro saves the picture file in the folder you created for the Word 2010 templates, C:\myMail\. You can change the macro code to save and load the picture from any path. You can also change the path location for the Word 2010 document template as needed.
To run the macro and print a contact in this format, in the Contacts folder, open the contact that you want to print. On the Developer tab, in the Code group, select Macros. (If you have not added the Developer tab to the ribbon, press Alt+F8.) Click the Macros button and choose the Project1.CustomContactPrint macro. The macro will run and print the open contact on the default printer.
You can use a method similar to the one in the preceding section to print messages from Outlook 2010 using Word 2010. For example, assume that you want to print email messages with the subject in large, bold type at the top of the page and with other message content printed below that. Figure 26-23 shows a sample form in Word 2010. Use the same general steps detailed in the preceding section to create a Word 2010 template that contains the form text fields and bookmarks needed to hold the message items.

After you create the document template in Word 2010 and save it, open the Microsoft Visual Basic Editor and create the following macro:
Sub CustomMessagePrint()
    'Set up objects
    Dim strTemplate As String
    Dim objWord As Object
    Dim objDocs As Object
    Dim objApp As Application
    Dim objItem As Object
    Dim objNS As NameSpace
    Dim mybklist As Object
    'Create a Word document and current message item object
    Set objApp = CreateObject("Outlook.Application")
    Set objNS = objApp.GetNamespace("MAPI")
    'Check to ensure Outlook item is selected
    If TypeName(objApp.ActiveInspector) = "Nothing" Then
        MsgBox "Message not open. Exiting", vbOKOnly + vbInformation, "Outlook Inside
Out"
        Exit Sub
    End If
    Set objItem = objApp.ActiveInspector.CurrentItem
    Set objWord = CreateObject("Word.Application")
    strTemplate = "c:\myMail\prnmsg.dotx"
    Set objDocs = objWord.Documents
    objDocs.Add strTemplate
    Set mybklist = objWord.activeDocument.Bookmarks
    'Fill in the form
    objWord.activeDocument.Bookmarks("Title").Select
    objWord.Selection.TypeText CStr(objItem.Subject)
    objWord.activeDocument.Bookmarks("From").Select
    objWord.Selection.TypeText CStr(objItem.SenderName)
    objWord.activeDocument.Bookmarks("Sent").Select
    objWord.Selection.TypeText CStr(objItem.SentOn)
    objWord.activeDocument.Bookmarks("Received").Select
    objWord.Selection.TypeText CStr(objItem.ReceivedTime)
    objWord.activeDocument.Bookmarks("To").Select
    objWord.Selection.TypeText CStr(objItem.To)
    objWord.activeDocument.Bookmarks("Cc").Select
    objWord.Selection.TypeText CStr(objItem.CC)
    objWord.activeDocument.Bookmarks("Subject").Select
    objWord.Selection.TypeText CStr(objItem.Subject)
    objWord.activeDocument.Bookmarks("Body").Select
    objWord.Selection.TypeText CStr(objItem.Body)
    'Print and exit

    objWord.PrintOut Background:=True
    'Process other system events until printing is finished
    While objWord.BackgroundPrintingStatus
        DoEvents
    Wend
    objWord.Quit SaveChanges:=wdvbaDoNotSaveChanges
End Sub
As with the CustomContactPrint macro, you can customize this macro and document template to accommodate different or additional message fields as needed.
Microsoft Excel 2010 is another solution to custom printing requirements, particularly for Outlook 2010 table views. For example, assume that you want to print all your Outlook 2010 contacts but you want to arrange them in a different order from what the Table style offers in Outlook 2010 and use different formatting for some of the columns. The solution is simple: Copy the contacts to Excel 2010, format and rearrange as needed, and print by following these steps:
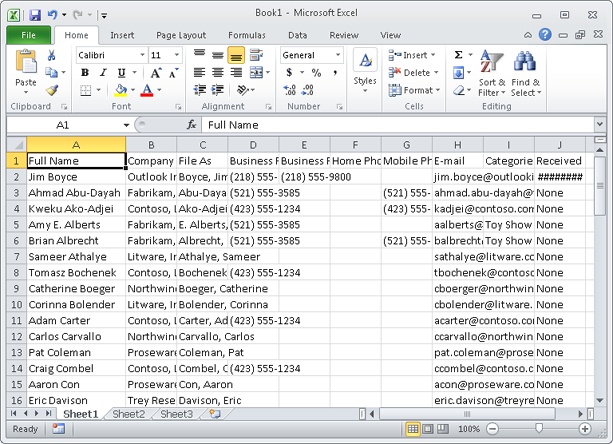
Open the Outlook 2010 folder containing the items you want to print, and then choose a table view. This example uses the Phone view, as shown in Figure 26-24.
Select the items that you want included in the printed document, and then press Ctrl+C or choose Edit, Copy to copy the items to the Clipboard.
Start Excel 2010, and then press Ctrl+V or choose Edit, Paste to paste the data into Excel 2010, as shown in Figure 26-25.
Rearrange columns, apply formatting, and otherwise adjust the layout as needed, and then print the worksheet.