Configuring HTML Message Handling 356
Protecting Messages with Digital Signatures 360
Signing Messages 368
Protecting Data with Information Rights Management 393
MICROSOFT Outlook 2010 includes features that can help protect your system from computer viruses and malicious programs, prevent others from using email to impersonate you, and prevent the interception of sensitive messages. Some of these features—such as the ability to block specific types of attachments—were first introduced in Outlook 2002. Other security features—such as the ability to block external images in HTML-based messages—were introduced in Outlook 2003. This feature enables Outlook to block Hypertext Markup Language (HTML) messages sent by spammers to identify valid recipient addresses. These messaging security features were extended and enhanced in Outlook 2007 and are also present in Outlook 2010.
This chapter begins with a look at the settings you can use to control HTML content. Because HTML messages can contain malicious scripts or even HTML code that can easily affect your system, the capability to handle these messages securely in Outlook 2010 is extremely important.
This chapter also discusses the use of both digital signatures and encryption. You can use a digital signature to authenticate your messages, proving to the recipient that a message indeed came from you, not from someone trying to impersonate you. Outlook 2010 enables you to encrypt outgoing messages to prevent them from being intercepted by unintended recipients; you can also read encrypted messages sent to you by others. In this chapter, you’ll learn how to obtain and install certificates to send encrypted messages and how to share keys with others so that you can exchange encrypted messages.
Spammers are always looking for new methods to identify valid email addresses. Knowing that a given address actually reaches someone is one step in helping spammers maintain their lists. If a particular address doesn’t generate a response in some way, it’s more likely to be removed from the list.
One way that spammers identify valid addresses is through the use of web beacons. Spammers often send HTML messages that contain links to external content, such as pictures or sound clips. When you display the message, your mail program retrieves the remote data to display it, and the remote server then validates your address. These external elements are the web beacons.
Note
Nonspammers also frequently include external content in messages to reduce the size of the message. So external content isn’t a bad thing per se (depending on how it is used).
Since Outlook 2003, Outlook blocks external content from HTML messages by default, displaying a red X in the place of the missing content. The result is that these web beacons no longer work because the external content is not accessed when the message is displayed. Messages that fit criteria for the Safe Recipients and Safe Senders lists are treated as exceptions—the external content for these messages is not blocked.
Note
You can rest the mouse pointer on a blocked image to view the descriptive alternate text (if any) for the image.
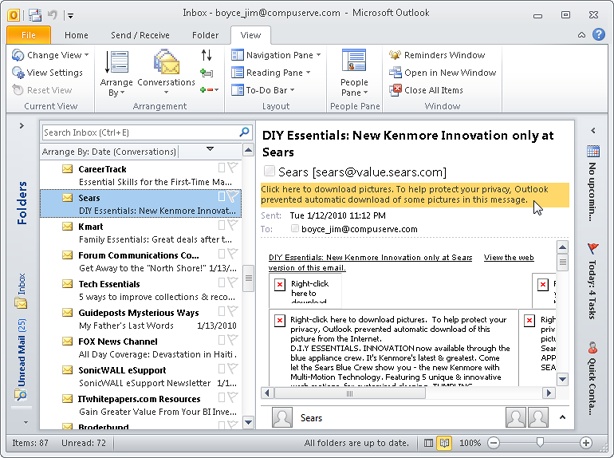
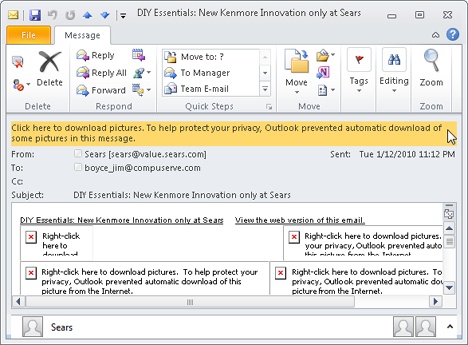
When you preview an image in the Reading pane for which Outlook 2010 has blocked external content, Outlook 2010 displays a message in the InfoBar, indicating that the blocking occurred (see Figure 14-1). You can click the InfoBar and choose Download Pictures to view the external content. Outlook 2010 then downloads and displays the content in the Reading pane. The same is true if you open a message; Outlook 2010 displays a warning message, telling you that the content was blocked (see Figure 14-2). You can click the warning message and choose Download Pictures to download and view the content. Because Outlook 2010 blocks external content for messages in this way, you can take advantage of content blocking without using the Reading pane.
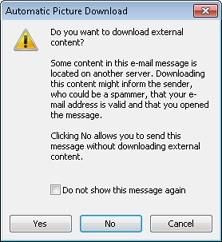
If you edit, forward, or reply to a message containing blocked content (from an open message or a message displayed in the Reading pane), Outlook 2010 displays a warning dialog box indicating that the external content will be downloaded if you continue. You can click OK to download the content and continue with the reply or forward, click No to tell Outlook 2010 to forward the content as text without downloading the content, or click Cancel to not open the message or download the content (see Figure 14-3). Thus, you can reply to or forward a message without downloading the external content.
Figure 14-2. You can access blocked content when you open a message by clicking the InfoBar and selecting Download Pictures.
Figure 14-3. You can forward or reply to a message with blocked content without downloading the content.
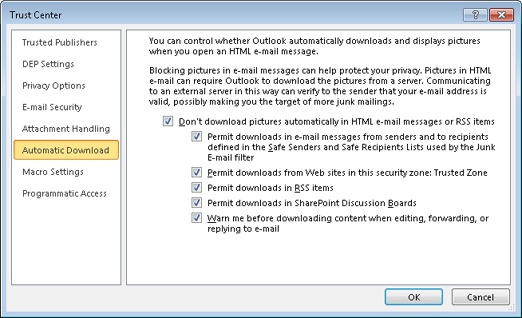
Outlook 2010 provides a few options to control the way content blocking works. To configure these options, click File, Options, Trust Center, Trust Center Settings, and then click the Automatic Download page. Figure 14-4 shows the resulting Automatic Download settings page.
Configure content blocking using the following options:
Don’t Download Pictures Automatically In HTML E-Mail Or RSS Items Select this check box to allow Outlook 2010 to block external picture content with the exception of messages that fit the Safe Senders and Safe Recipients lists. When selected, this check box enables the five check boxes below it to refine content blocking further.
Permit Downloads In E-mail Messages From Senders And To Recipients Defined In The Safe Senders And Safe Recipients List Used By The Junk E-Mail Filter Select this check box to allow Outlook to download content if the message is from a sender in your Safe Senders list or is addressed to a recipient in your Safe Recipients list.
Permit Downloads From Web Sites In This Security Zone: Trusted Zone Select this check box to allow external content from sites in the Trusted Sites zone in Windows Internet Explorer.
Permit Downloads In RSS Items Select this check box to allow external content included in Really Simple Syndication (RSS) feeds.
Permit Downloads In SharePoint Discussion Boards Select this check box to allow external content included in SharePoint Discussion Boards.
Warn Me Before Downloading Content When Editing, Forwarding, Or Replying To E-Mail Select this check box to receive a warning about external content when you edit, reply to, or forward a message for which external content has been blocked.
To take advantage of the exceptions for external content, you must add the message’s originating address to the Safe Senders list, add the recipient address to the Safe Recipients list, or add the remote domain to the Trusted Sites zone in Internet Options (in the Windows Security Center).
Note
For more details on configuring the Safe Recipients and Safe Senders lists, see the section Enabling and Configuring Junk Email Filtering, on page 334.
Outlook 2010 supports the use of digital signatures to sign messages and validate their authenticity. For example, you can sign a sensitive message digitally so that the recipient can know with relative certainty that the message came from you and that no one is impersonating you by using your email address. This section of the chapter explains digital certificates and signatures and how to use them in Outlook 2010.
A digital certificate is the mechanism that makes digital signatures possible. Depending on its assigned purpose, you can use a digital certificate for a variety of tasks, including the following:
Verifying your identity as the sender of an email message
Encrypting data communications between computers—between a client and a server, for example
Encrypting email messages to prevent easy interception
Signing drivers and executable files to authenticate their origin
A digital certificate binds the identity of the certificate’s owner to a pair of keys, one public and one private. At a minimum, a certificate contains the following information:
The certificate can also include other identifying information, such as the owner’s email address, postal address, country, or gender.
The two keys are the aspect of the certificate that enables authentication and encryption. The private key resides on your computer and is a large unique number. The certificate contains the public key, which you must give to recipients to whom you want to send authenticated or encrypted messages.
Think of it as having a “read content key” and a “create content key”: one key (the private key) lets you create encrypted content, and the other key (the public key) lets others read the content encrypted with the private key.
Outlook 2010 uses slightly different methods for authenticating messages with digital signatures and for encrypting messages, as you’ll see later in the chapter. Before you begin either task, however, you must first obtain a certificate.
Digital certificates are issued by certification authorities (CAs). In most cases, you obtain your email certificate from a public CA such as VeriSign or Thawte. However, systems based on Windows servers running Certificate Services can function as CAs, providing certificates to clients who request them. Check with your system administrator to determine whether your enterprise includes a CA. If it doesn’t, you need to obtain your certificate from a public CA, usually at a minimal cost. Certificates are typically good for one year and must be renewed at the end of that period.
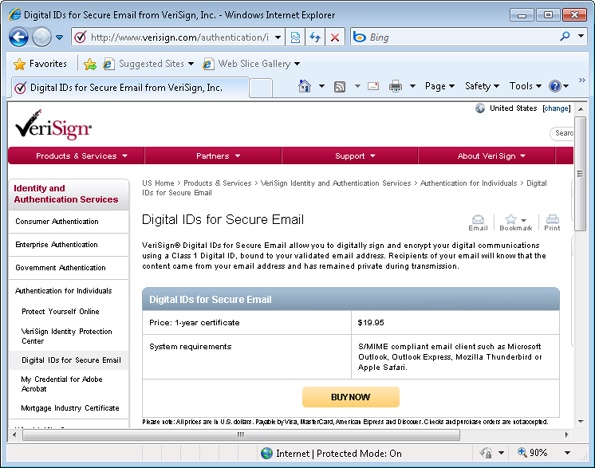
If you need to obtain your certificate from a public CA, point your web browser to the CA website, such as www.verisign.com or www.thawte.com. Follow the instructions provided by the site to obtain a certificate for signing and encrypting your email (see Figure 14-5, for example). The certificate might not be issued immediately; instead, the CA might send you an email message containing a Uniform Resource Locator (URL) that links to a page where you can retrieve the certificate. When you connect to that page, the CA installs the certificate on your system.
Note
Alternatively, in the Trust Center, click E-Mail Security, and then click on Get A Digital ID to display a page from the Microsoft website that includes links to several certificate authorities. Select a vendor under Available Digital IDs and click the link to its website to obtain a certificate.
If you’re obtaining a certificate from a CA on your network, the method that you use depends on whether the network includes an enterprise CA or a stand-alone CA.
If you’re using Windows Vista or Windows 7 as a domain client on a network with an enterprise CA, follow these steps to request a certificate:
Click the Windows button, and then, in the Start Search box, type MMC. Click OK.
In the Microsoft Management Console (MMC), choose File, Add/Remove Snap-In.
In the Add Standalone Snap-In dialog box, select Certificates, and then click Add.
In the Certificates Snap-In dialog box, select My User Account, and then click Finish.
Click OK to return to the MMC.
Expand the Certificates–Current User branch.
Expand the Personal branch, right-click Certificates, and choose All Tasks, Request New Certificate. You can also right-click the Personal branch and choose All Tasks, Request New Certificate.
Follow the prompts provided by the Certificate Request Wizard and the enterprise CA to request your certificate. The certificate should install automatically.
To request a certificate from a stand-alone CA on your network (or if your computer is part of a workgroup), point your web browser to http://<server>/certsrv, where <server> is the name or Internet Protocol (IP) address of the CA. The CA provides a web page with a form that you must fill out to request the certificate (see Figure 14-6). Follow the CA prompts to request and obtain the certificate. The site includes a link that you can click to install the certificate.
You can copy your certificate from one computer to another, which means that you can use it on more than one system. The process is simple: You first export (back up) your certificate to a file, and then you import the certificate into the other system. The following sections explain how to export and import certificates.
Note
As you use the Certificate Import Wizard and the Certificate Export Wizard (discussed in the following sections), you might discover that they don’t precisely match the descriptions presented here. Their appearance and operation might vary slightly, depending on the operating system you’re running and the version of Internet Explorer you’re using.
Whether you obtained your certificate from a public CA or from a CA on your network, you should back it up in case your system suffers a drive failure or if the certificate is lost or corrupted. You also should have a backup of the certificate so that you can export it to any other computers you use on a regular basis, such as a notebook computer or your home computer. In short, you need the certificate on every computer from which you plan to digitally sign or encrypt messages. To back up your certificate, you can use Outlook 2010, Internet Explorer, or the Certificates console. Each method offers the same capabilities; you can use any one of them.
Follow these steps to use Outlook 2010 to back up your certificate to a file:
In Outlook 2010, click File, Options, Trust Center, and Trust Center Settings, and then click E-Mail Security in the left pane.
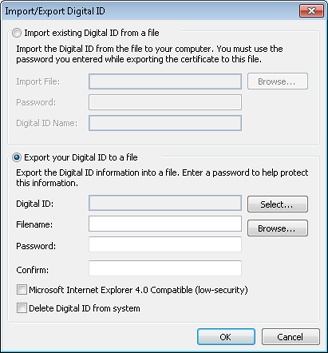
Click Import/Export to display the Import/Export Digital ID dialog box, shown in Figure 14-7.
Select the Export Your Digital ID To A File option. Click Select, choose the certificate to be exported, and click OK.
Click Browse and specify the path and file name for the certificate file.
Enter and confirm a password.
If you plan to use the certificate on a system with Internet Explorer 4, select the Microsoft Internet Explorer 4.0 Compatible (Low-Security) check box. If you use Internet Explorer 5 or later, clear this check box.
If you want to remove this Digital ID from this computer, select the check box next to Delete Digital ID From System.
Click OK to export the file. The Exporting Your Private Exchange Key dialog box is displayed. Click OK to complete the export process.
If you want to use either Internet Explorer or the Certificates console to back up a certificate, use the Certificate Export Wizard, as follows:
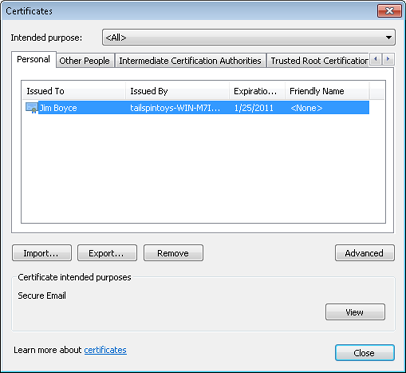
If you’re using Internet Explorer, begin by choosing Tools, Internet Options. Click the Content tab, and then click Certificates. In the Certificates dialog box, shown in Figure 14-8, select the certificate that you want to back up and click Export to start the wizard. If you’re using the Certificates console, begin by opening the console and expanding Certificates–Current User/Personal/Certificates. Right-click the certificate that you want to export, and then choose All Tasks, Export to start the wizard.
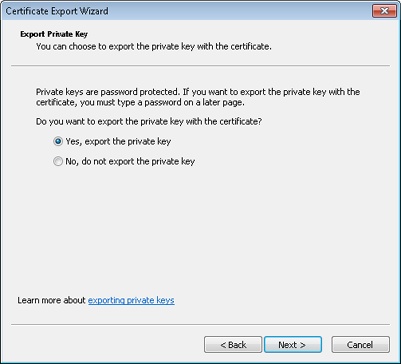
On the wizard page shown in Figure 14-9, select Yes, Export The Private Key; then click Next.
Select Personal Information Exchange; if other options are selected, clear them unless needed. (If you need to include all certificates in the certification path, remove the private key on export, or export all extended properties, and then select that option.) Click Next.
Specify and confirm a password to protect the private key and click Next.
Specify a path and file name for the certificate and click Next.
Review your selections and click Finish.
TROUBLESHOOTING
You can’t export the private key
To use a certificate on a different computer, you must be able to export the private key. If the option to export the private key is unavailable when you run the Certificate Export Wizard, it means that the private key is marked as not exportable. Exportability is an option you choose when you request the certificate. If you request a certificate through a local CA, you must select the Advanced Request option to request a certificate with an exportable private key. If you imported the certificate from a file, you might not have selected the option to make the private key exportable during the import. If you still have the original certificate file, you can import it again—this time selecting the option that will enable you to export the private key.
You can install (or reinstall) a certificate from a backup copy of the certificate file by using Outlook 2010, Internet Explorer, or the Certificates console. You must import the certificate to your computer from the backup file.
The following procedure assumes that you’re installing the certificate using Outlook 2010:
Click File, Options, Trust Center, and Trust Center Settings, and then click E-Mail Security.
Click Import/Export to display the Import/Export Digital ID dialog box, shown in Figure 14-7.
In the Import Existing Digital ID From A File section, click Browse to locate the file containing the backup of the certificate.
In the Password box, type the password associated with the certificate file.
In the Digital ID Name box, type a name by which you want the certificate to be shown. Typically, you’ll enter your name, mailbox name, or email address, but you can enter anything you want.
You can also import a certificate to your computer from a backup file using either Internet Explorer or the Certificates console, as explained here:
If you’re using Internet Explorer, begin by choosing Tools, Internet Options. Click the Content tab, click Certificates, and then click Import to start the Certificate Import Wizard. If you’re using the Certificates console, begin by opening the console. Right-click Certificates–Current User/Personal, and then click All Tasks, Import to start the wizard.
Browse and select the file to import, and then click Open. (If you don’t see your certificate file, check the type of certificates shown in the Open dialog box by clicking the drop-down list to the right of the file name field.) After your certificate is selected in the File To Import dialog box, click Next.
If the certificate was stored with a password, you are prompted to enter the password. Provide the associated password and click Next.
Select the Automatically Select The Certificate Store Based On The Type Of Certificate option and click Next.
Click Finish.
Now that you have a certificate on your system, you’re ready to start digitally signing your outgoing messages so that recipients can verify your identity. When you send a digitally signed message, Outlook 2010 sends the original message and an encrypted copy of the message with your digital signature. The recipient’s email application compares the two versions of the message to determine whether they are the same. If they are, no one has tampered with the message. The digital signature also enables the recipient to verify that the message is from you.
Note
Because signing your email requires Outlook 2010 to send two copies of the message (the unencrypted message and the encrypted copy), the signed email message is larger.
Secure/Multipurpose Internet Mail Extensions (S/MIME), an Internet standard, is the mechanism in Outlook 2010 that enables you to digitally sign and encrypt messages. The email client handles the encryption and decryption required for both functions.
Users with email clients that don’t support S/MIME can’t read digitally signed messages unless you send the message as clear text (unencrypted). Without S/MIME support, the recipient is also unable to verify the authenticity of the message or verify that the message hasn’t been altered. Without S/MIME, then, digital signatures are relatively useless. However, Outlook 2010 does offer you the option of sending a digitally signed message as clear text to recipients who lack S/MIME support. If you need to send the same digitally signed message to multiple recipients—some of whom have S/MIME-capable email clients and some of whom do not—digitally signing the message allows those with S/MIME support to authenticate it, and including the clear-text message allows the others to at least read it.
The following section explains how to send a digitally signed message, including how to send the message in clear text for those recipients who require it.
Follow these steps to sign an outgoing message digitally:
Compose the message in Outlook 2010.
On the Options tab, in the More Options group, click the Message Options button (in the lower-right corner) to open the Message Options dialog box.
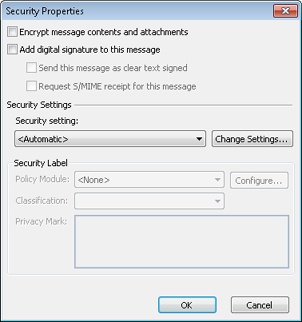
Click Security Settings to open the Security Properties dialog box, as shown in Figure 14-10.
Select Add Digital Signature To This Message, and then select other check boxes as indicated here:
Send This Message As Clear Text Signed Select this check box to include a clear-text copy of the message for recipients who don’t have S/MIME-capable email applications. Clear this check box to prevent the message from being read by mail clients that don’t support S/MIME.
Request S/MIME Receipt For This Message Select this check box to request a secure receipt to verify that the recipient has validated your digital signature. When the message has been received and saved, and your signature is verified (even if the recipient doesn’t read the message), you receive a return receipt. No receipt is sent if your signature is not verified.
If necessary, select security settings in the Security Setting drop-down list. (If you have not yet configured your security options, you can do so by clicking Change Settings.)
Note
For details on security option configuration, see the section Creating and Using Security Profiles, on page 372.
Click OK to add the digital signature to the message.
Note
If you send a lot of digitally signed messages, you’ll want to configure your security options to include a digital signature by default; see the following section for details. In addition, you might want to add a button to the toolbar to let you quickly sign the message without using a dialog box.
Note
For details about how to add such a button to the toolbar, see the Inside Out sidebar “You need a faster way to sign a message digitally”, on Creating and Using Security Profiles.
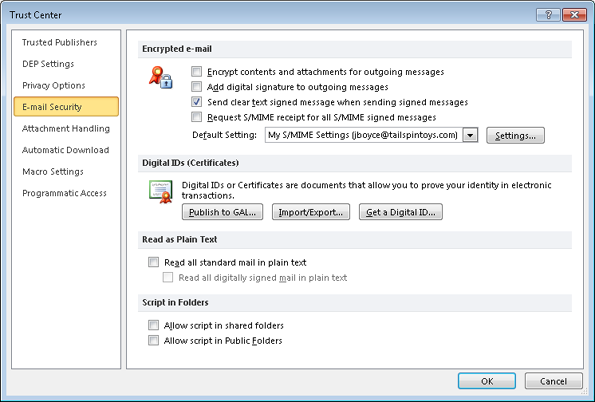
To save time, you can configure your security settings to apply globally to all messages, changing settings only as needed for certain messages. In Outlook 2010, click File, Options, Trust Center, Trust Center Settings, and then click E-Mail Security. On the E-Mail Security page, shown in Figure 14-11, you can set security options using the following list as a guide.
Encrypt Contents And Attachments For Outgoing Messages If most of the messages that you send need to be encrypted, select this check box to encrypt all outgoing messages by default. You can override encryption for a specific message by changing the message’s properties when you compose it. Clear this check box if the majority of your outgoing messages do not need to be encrypted.
Note
For information about encryption, see the section Encrypting Messages, on page 387.
Add Digital Signature To Outgoing Messages If most of your messages need to be signed, select this check box to sign all outgoing messages digitally by default. Clear this check box if most of your messages do not need to be signed; you will be able to sign specific messages digitally as needed when you compose them.
Send Clear Text Signed Message When Sending Signed Messages If you need to send digitally signed messages to recipients who do not have S/MIME capability, select this check box to send clear-text digitally signed messages by default. You can override this option for individual messages when you compose them. In most cases, you can clear this check box because most email clients support S/MIME.
Request S/MIME Receipt For All S/MIME-Signed Messages Select this check box to request a secure receipt for all S/MIME messages by default. You can override the setting for individual messages when you compose them. A secure receipt indicates that your message has been received and the signature verified. No receipt is returned if the signature is not verified.
Settings Select this option to configure more-advanced security settings and create additional security setting groups. For details, see the following section, Creating and Using Security Profiles.
Publish To GAL Click this button to publish your certificates to the Global Address List (GAL), making them available to other Microsoft Exchange Server users in your organization who might need to send you encrypted messages. This is an alternative to sending the other users a copy of your certificate.
Although in most cases you need only one set of Outlook 2010 security settings, you can create and use multiple security profiles. For example, you might send most of your secure messages to other Exchange Server users and only occasionally send secure messages to Internet recipients. In that situation, you might maintain two sets of security settings: one that uses Exchange Server security and another that uses S/MIME, each with different certificates and hash algorithms (the method used to secure the data).
You can configure security profiles using the Change Security Settings dialog box, which you access through the Settings button on the E-Mail Security page of the Trust Center dialog box. One of your security profiles acts as the default, but you can select a different security profile any time it’s needed.
Follow these steps to create and manage your security profiles:
In Outlook 2010, click File, Options, Trust Center, Trust Center Settings, and then click E-Mail Security.
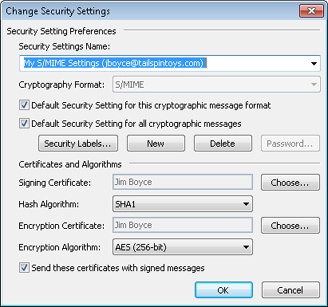
Click Settings to display the Change Security Settings dialog box, shown in Figure 14-12. Set the options described in the following section as needed. If you are creating a new set of settings, start by clicking New prior to changing settings because selecting New clears all other setting values.
Security Settings Name Specify the name for the security profile that should appear in the Default Setting drop-down list on the Security tab.
Cryptographic Format In this drop-down list, select the secure message format for your messages. The default is S/MIME, but you also can select Exchange Server Security. Use S/MIME if you’re sending secure messages to Internet recipients. You can use either S/MIME or Exchange Server Security when sending secure messages to recipients on your computer running Exchange Server.
Default Security Setting For This Cryptographic Message Format Select this check box to make the specified security settings the default settings for the message format you selected in the Cryptography Format drop-down list.
Default Security Setting For All Cryptographic Messages Select this check box to make the specified security settings the default settings for all secure messages for both S/MIME and Exchange Server security.
Security Labels Click to configure security labels, which display security information about a specific message and restrict which recipients can open, forward, or send that message.
New Click to create a new set of security settings.
Delete Click to delete the currently selected group of security settings.
Password Click to specify or change the password associated with the security settings.
Signing Certificate This read-only information indicates the certificate being used to sign your outgoing messages digitally. Click Choose if you want to choose a different certificate. Once you choose a signing certificate, all the fields in the Certificates and Algorithms are populated automatically.
Note
You assign the default signing and encryption certificates through the global security settings in Outlook 2010; for information, see the section Setting Global Security Options, on page 370.
Hash Algorithm Use this drop-down list to change the hash algorithm used to encrypt messages. Hash algorithm options include MD5, SHA1, SHA256, SHA384, and SHA512. For more information on these hashing algorithms, see the following article:
"The .Net Developers Guide Cryptography Overview" (http://msdn.microsoft.com/en-us/library/92f9ye3s.aspx)
Encryption Certificate This read-only information indicates the certificate being used to encrypt your outgoing messages. Click Choose if you want to specify a different certificate.
Encryption Algorithm Use this drop-down list to change the encryption algorithm used to encrypt messages. The encryption algorithm is the mathematical method used to encrypt the data.
Send These Certificates With Signed Messages Select this check box to include your certificate with outgoing messages. Doing so allows recipients to send encrypted messages to you.
In the Default Setting drop-down list on the E-Mail Security page, select the security profile you want to use by default and then click OK.
Tip
INSIDE OUT You need a faster way to sign a message digitally
If you don’t send a lot of digitally signed messages, you might not mind going through all the steps for getting to the Security Properties dialog box to sign a message that you compose. However, if you frequently send digitally signed messages but don’t want to configure Outlook 2010 to sign all messages by default, all the clicking involved in signing the message can be onerous. To sign your messages digitally faster, consider adding a toolbar button that lets you toggle a digital signature with a single click by following these steps:
Open the Inbox folder in Outlook 2010.
Click New E-mail to display the message form for a new message.
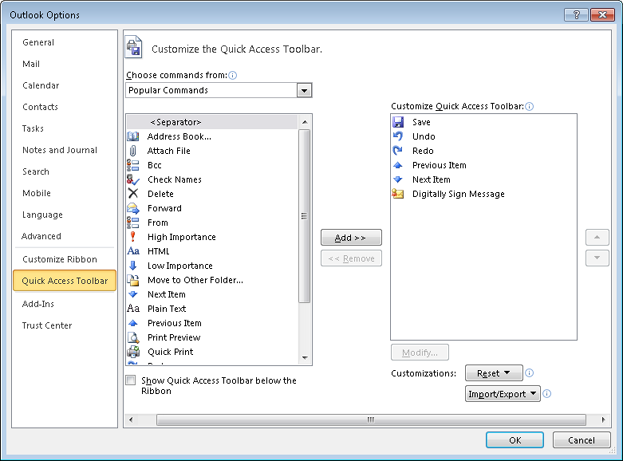
In the message form, choose the Customize Quick Access Toolbar drop-down list (at the end of the Quick Access Toolbar) and click More Commands.
In the Choose Commands From drop-down list, select All Commands.
In the All Commands list, shown in Figure 14-13, select Digitally Sign Message and click Add, then OK to close the dialog box. The Digitally Sign Message icon will be added to the end of the Quick Access Toolbar. If you later want to switch security profiles, you can select the profile that you want to use in the Default Setting drop-down list on the E-Mail Security page in the Trust Center dialog box.
Close the message form.
Now whenever you need to digitally sign or encrypt a message, you can click the appropriate button on the Quick Access Toolbar when you compose the message.
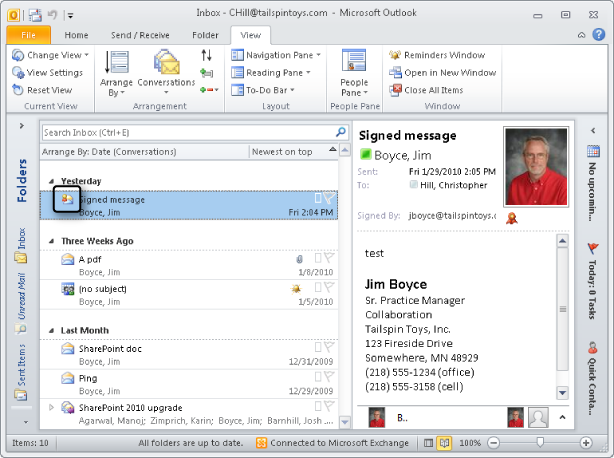
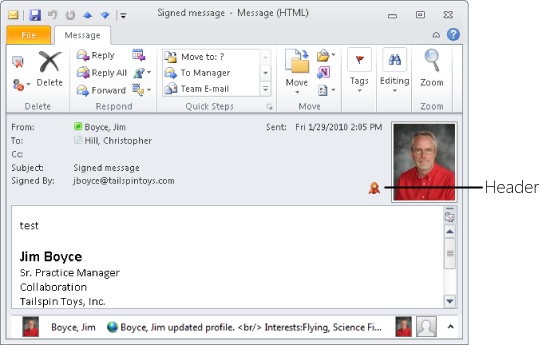
When you receive a digitally signed message, the Inbox displays a Secure Message icon in place of the standard envelope icon (see Figure 14-14) and shows a Signature button in the Reading pane. The message form also includes a Signature button (see Figure 14-15). You can click the Signature button in either the Reading pane or the form to display information about the certificate.
Figure 14-15. Click the Signature button on the message form to view information about the certificate.
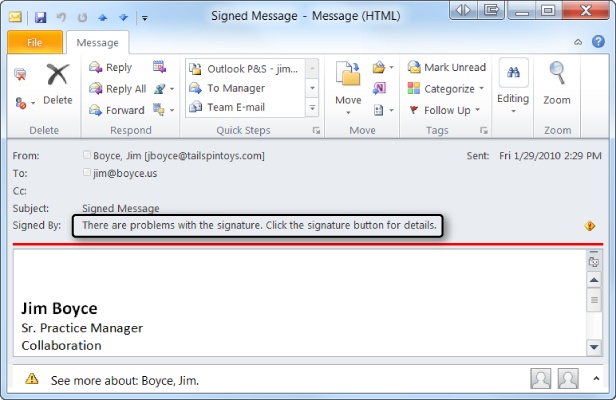
Because Outlook 2010 supports S/MIME, you can view and read a digitally signed message without taking any special action. How Outlook 2010 treats the message, however, depends on the trust relationship of the associated certificate. If there are problems with the certificate, you’ll see a message to that effect in the Reading pane header, as shown in Figure 14-16. You can click on the Digital Signature button to view more information about the certificate and optionally change its trust.
Figure 14-16. Outlook 2010 displays an error message if the digital signature of an incoming message is not trusted or there are other problems with the signature.
There is no danger per se in opening a message with an invalid certificate. However, you should verify that the message really came from the person listed as the sender and is not a forged message.
To have Outlook 2010 authenticate a signed message and treat it as being from a trusted sender, you must add the certificate to your list of trusted certificates. An alternative is to configure Outlook 2010 to inherit trust for a certificate from the certificate’s issuer. For example, assume that you have a CA in your enterprise. Instead of configuring each sender’s certificate to be trusted explicitly, you can configure Outlook 2010 to inherit trust from the issuing CA—in other words, Outlook 2010 will trust implicitly all certificates issued by that CA.
Follow these steps to configure the trust relationship for a certificate:
In Outlook 2010, select the signed message. Click the Digital Signature button to view the Digital Signature dialog box (see Figure 14-17). The dialog box varies depending on whether the signature is valid (trusted) or invalid (not trusted).
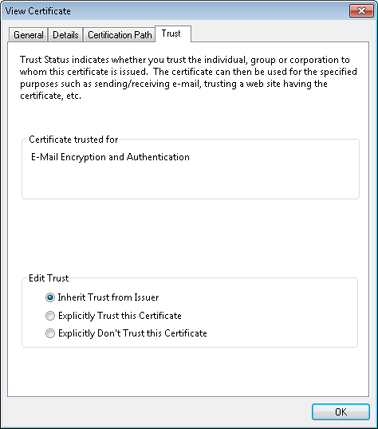
Click Details, and in the Message Security Properties dialog box, click the Signer line, and then click Edit Trust to display the Trust tab of the View Certificate dialog box, as shown in Figure 14-18.
Select one of the following options:
Inherit Trust From Issuer Select this option to inherit the trust relationship from the issuing CA. For detailed information, see the following section, Configuring CA Trust.
Explicitly Trust This Certificate Select this option to trust explicitly the certificate associated with the message if you are certain of the authenticity of the message and the validity of the sender’s certificate.
Explicitly Don’t Trust This Certificate Select this option to distrust explicitly the certificate associated with the message. Any other messages that you receive with the same certificate will generate an error message in Outlook 2010 when you attempt to view them.
Click OK, click Close to close the Message Security Properties dialog box, and click Close again to close the Digital Signature dialog box.
Note
For information on viewing a certificate’s other properties and configuring Outlook 2010 to validate certificates, see the section Viewing and Validating a Digital Signature, on page 384.
Although you might not realize it, your computer system by default includes certificates from several public CAs (typically VeriSign, Thawte, Equifax, GTE, or several others), which were installed when you installed your operating system. By default, Outlook 2010 and other applications trust certificates issued by those CAs without requiring you to trust explicitly each certificate issued by the CA.
The easiest way to view these certificates is through Internet Explorer, as follows:
In Internet Explorer, choose Tools, Internet Options, and then click the Content tab. Alternatively, open the Internet Options item from the Control Panel.
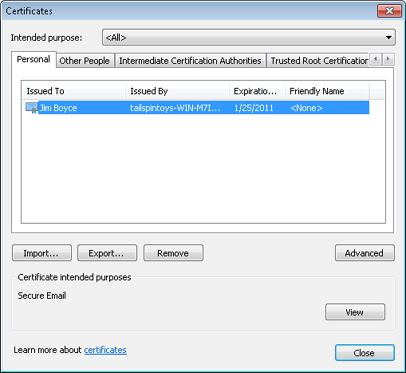
Click Certificates to open the Certificates dialog box (see Figure 14-19). Click the Trusted Root Certification Authorities tab, which contains a list of the certificates.
Figure 14-19. You can view a list of certificates in the Certificates dialog box in Internet Explorer.
If you have a personal certificate issued by a specific CA, the issuer’s certificate is installed on your computer. Messages you receive that are signed with certificates issued by the same CA inherit trust from the issuer without requiring the installation of any additional certificates. If you have not yet obtained the CA certificate from your Enterprise CA, you need to add that CA’s certificate to your system before certificates issued by that CA will be trusted.
Follow these steps to connect to a Windows-based enterprise CA to obtain the CA’s certificate and install it on your system:
Point your web browser to http://<machine>/certsrv, where <machine> is the name or IP address of the CA.
After the page loads, select Download A CA Certificate, Certificate Chain, Or CRL.
Select Download CA Certificate, and then choose to Open (at this point, you could also save it to your computer if you want to save the certificate file for later use).
Click Install Certificate to install the CA’s certificate on your system. This will start the Certificate Import Wizard. Click Next.
In the Certificate Store dialog box, select Automatically Select The Certificate Store Based Upon The Type Of Certificate. Click Next and then click Finish to add the CA certificate. You will be notified that the import was successful and will have to click OK twice to close the dialog boxes.
The procedure just outlined assumes that the CA administrator has not customized the certificate request pages for the CA. If the pages have been customized, the actual process you must follow could be slightly different from the one described here.
The process described in the preceding section is useful when configuring CA trust for a small number of computers, but it can be impractical with a large number of computers. In these situations, you can turn to Group Policy to configure CA trust in a wider area such as an organizational unit (OU), a domain, or an entire site.
You can create a certificate trust list (CTL), which is a signed list of root CA certificates that are considered trusted, and deploy that CTL through Group Policy. This solution requires that you be running the Active Directory Domain Services (AD DP) with desktop clients running Windows XP or later as domain members.
Tip
The steps in this section for creating and deploying a CTL are for Windows Server 2008. If you are running Windows Server 2003, open the AD Users and Computers console, and create a new Group Policy Object (GPO) or edit an existing GPO. In the Group Policy Editor, expand the branch User Configuration\Windows Settings\Security Settings\Public Key Policies\Enterprise Trust, right-click Enterprise Trust, and choose New, Certificate Trust List to start the Certificate Trust List Wizard.
Follow these steps on Windows Server 2008 to create and deploy the CTL:
Log on to a domain controller and open the Group Policy Management console.
Create a new GPO or edit an existing GPO at the necessary container in AD DS, such as an OU. Select the GPO and in the right pane, click More Actions, Edit.
In the Group Policy Management Editor, expand the branch User Configuration\Policies\Windows Settings\Security Settings\Public Key Policies\Enterprise Trust.
Right-click Enterprise Trust and choose New, Certificate Trust List to start the Certificate Trust List Wizard.
Click Next, and then specify a name and valid duration for the CTL (both optional), as shown in Figure 14-20. Select one or more purposes for the CTL in the Designate Purposes list (in this example, choose Secure Email), and then click Next.
On the Certificates In The CTL page (see Figure 14-21), click Add From Store to add certificates to the list from the server’s certificate store. Choose one or more certificates and click OK.
If the certificates are stored in an X.509 file, Microsoft Serialized Certificate Store, or PKCS #7 certificate file, click Add From File, select the file, and click Open.
Back on the Certificates In The CTL page, click Next. On the Signature Certificate page, select a certificate to sign the CTL. The certificate must be stored in the local computer certificate store instead of the user certificate store. Click Next after you select the certificate.
If you want, you can choose the Add A Timestamp To The Data option and specify a timestamp service URL if one is available. Otherwise, click Next.
If you want, enter a friendly name and description for the CTL to help identify it, click Next, and click Finish.
You can view the certificate associated with a signed message to obtain information about the issuer, the person to whom the certificate is issued, and other matters.
To do so, follow these steps:
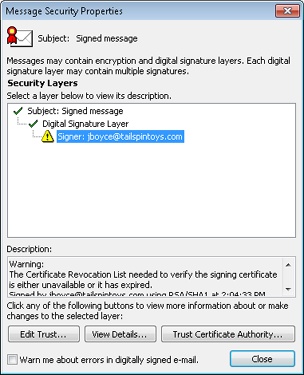
Open the message and click the Digital Signature button in either the Reading pane or the message form; and then click Details to display the Message Security Properties dialog box, which provides information about the certificate’s validity in the Description box.
Click Signer in the list to view additional signature information in the Description box, such as when the message was signed (see Figure 14-22).
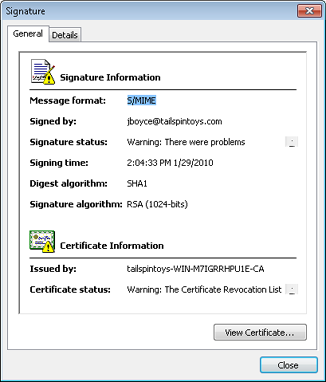
Click View Details to open the Signature dialog box, shown in Figure 14-23, which displays even more detail about the signature.
On the General tab of the Signature dialog box, click View Certificate to display information about the certificate, including issuer, certification path, and trust mode.
Click OK, click Close to close the Message Security Properties dialog box, and click Close again to close the Digital Signature dialog box.
The CA uses a certificate revocation list (CRL) to indicate the validity of certificates. If you don’t have a current CRL on your system, Outlook 2010 can treat the certificate as trusted, but it can’t validate the certificate and will indicate this when you view the signature.
You can locate the path to the CRL by examining the certificate’s properties as follows:
Click the Signature button for the message, either in the Reading pane or in the message form, and then click Details.
In the Message Security Properties dialog box, click Signer and then click View Details.
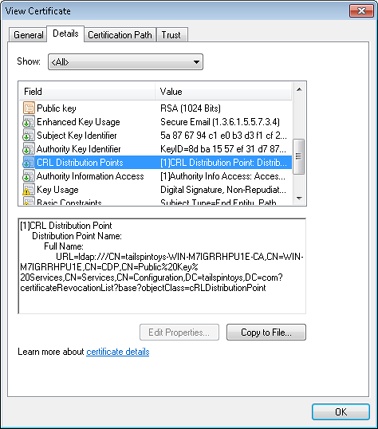
On the General tab of the Signature dialog box, click View Certificate and then click the Details tab (see Figure 14-24).
Scroll through the list to find and select CRL Distribution Points.
Scroll through the list in the lower half of the dialog box to locate the URL for the CRL.
When you know the URL for the CRL, you can point your browser to the site to download and install the CRL. If a CA in your enterprise issued the certificate, you can obtain the CRL from the CA.
To obtain and install the CRL, follow these steps:
Point your browser to http://<machine>/certsrv, where <machine> is the name or IP address of the server.
Select the Retrieve The CA Certificate Or Certificate Revocation List option and click Next.
Click Download Latest Certificate Revocation List and save the file to disk.
After downloading the file, locate and right-click the file, and then choose Install CRL to install the current list.
You can encrypt messages to prevent them from being read by unauthorized persons. Of course, it is true that with significant amounts of computing power and time, any encryption scheme can probably be broken. However, the chances of someone investing those resources in your email are pretty remote. So you can be assured that the email encryption that Outlook 2010 provides offers a relatively safe means of protecting sensitive messages against interception.
Before you can encrypt messages, you must have a certificate for that purpose installed on your computer. Typically, certificates issued for digital signing can also be used for encrypting email messages.
Note
For detailed information on obtaining a personal certificate from a commercial CA or from an enterprise or stand-alone CA on your network, see the section Obtaining a Digital Certificate, on page 361.
After you’ve obtained a certificate and installed it on your system, encrypting messages is a simple task. Getting to that point, however, depends in part on whether you’re sending messages to an Exchange Server recipient on your network or to an Internet recipient.
Before you can send an encrypted message to an Internet recipient, you must have a copy of the recipient’s public key certificate. To read the message, the recipient must have a copy of your public key certificate, which means you first need to swap public certificates.
Note
When you are sending encrypted messages to an Exchange Server recipient, you don’t need to swap certificates. Exchange Server takes care of the problem for you.
The easiest way to swap certificates is to send a digitally signed message to the recipient and have the recipient send you a signed message in return, as outlined here:
In Outlook 2010, click File, Options, Trust Center, Trust Center Settings, and then click the E-Mail Security link.
Click Settings to display the Change Security Settings dialog box.
Verify that you’ve selected S/MIME in the Cryptography Format drop-down list.
Select the Send These Certificates With Signed Messages option and click OK.
Click OK to close the Trust Center dialog box.
Compose the message and digitally sign it. Outlook 2010 will include the certificates with the message.
When you receive a signed message from someone with whom you’re exchanging certificates, you must add the person to your Contacts folder to add the certificate by following these steps:
Open the message, right-click the sender’s name, and then choose Add To Outlook Contacts. If the Reading pane is displayed, you can right-click the sender’s name in the pane and choose Add To Outlook Contacts.
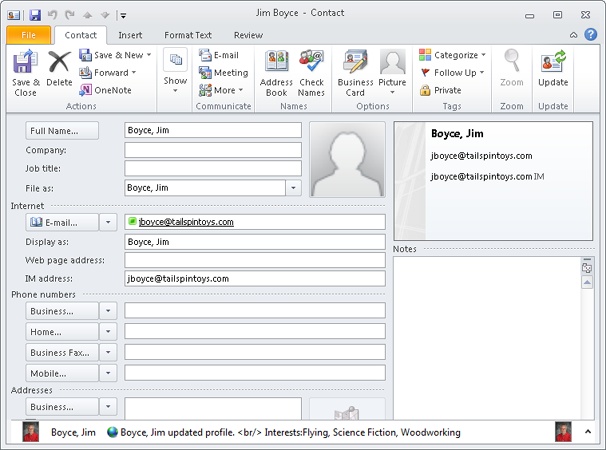
Outlook 2010 displays the Contact tab of the contact form (see Figure 14-25). Fill in additional information for the contact as needed.
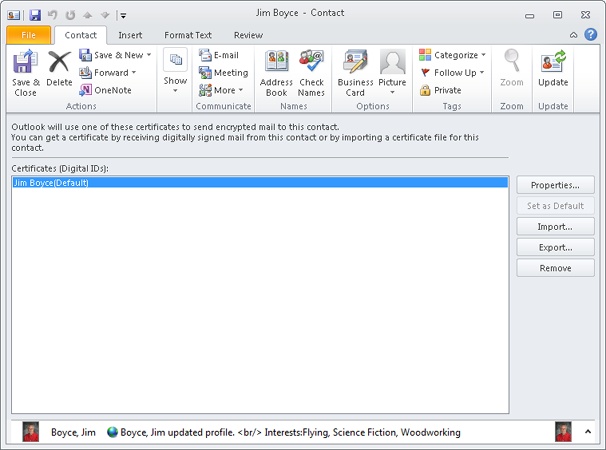
Click the Certificates button (in the Show group of the Contact tab). You should see the sender’s certificate listed (see Figure 14-26), and you can view the certificate’s properties by selecting it and clicking Properties. If no certificate is listed, contact the sender and ask for another digitally signed message.
Click Save & Close to save the contact item and the certificate.
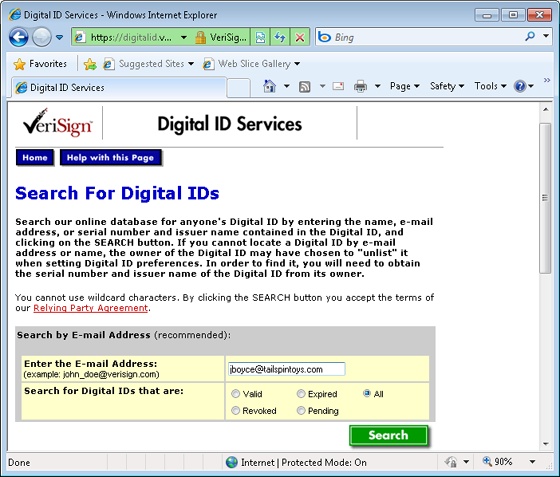
As an alternative to receiving a signed message with a certificate from another person, you might be able to obtain the person’s certificate from the issuing CA. For example, if you know that the person has a certificate from VeriSign, you can download that individual’s public key from the VeriSign website. Other public CAs offer similar services. To search for and download public keys from VeriSign (see Figure 14-27), connect to https://digitalid.verisign.com/services/client/index.html. Check the sites of other public CAs for similar links that enable you to download public keys from their servers.
Figure 14-27. VeriSign, like other public CAs, provides a form you can use to search for and obtain public keys for certificate subscribers.
The process for downloading a public key varies by CA. In general, however, you enter the person’s email address in a form to locate the certificate, and the form provides instructions for downloading the certificate. You should have no trouble obtaining the public key after you locate the certificate on the CA (there is a link to download the public key certificate from the CA to a file on your computer).
Save the public key to disk, and then follow these steps to install the key:
Open the Contacts folder in Outlook 2010.
Locate the contact for whom you downloaded the public key.
Open the contact item, and then click Certificates.
Click Import. Browse to and select the certificate file obtained from the CA and click Open.
Click Save & Close to save the contact changes.
When you have everything set up for sending and receiving encrypted messages, it’s simple to send one. Just do the following:
Open Outlook 2010 and compose the message.
On the Options tab, click the Message Options button in the lower-right section of the More Options group to display the Message Options dialog box, and then click Security Settings.
Select Encrypt Message Contents And Attachments, and then click OK.
Click Close, and then send the message as you normally would.
If the message is protected by Exchange Server security, you can send it in one of three ways, depending on your system’s security level:
If the security level is set to Medium (the default), Outlook 2010 displays a message informing you of your security setting. Click OK to send the message.
If the security level is set to Low, Outlook 2010 sends the message immediately, without any special action on your part.
If the security level is set to High, type your password to send the message.
Note
To make it easier to encrypt a message, you can add the Encrypt command to the Quick Access Toolbar in the message form. For details about the process involved in doing this, see the Inside Out sidebar “You need a faster way to sign a message digitally”, on Creating and Using Security Profiles.
When you receive an encrypted message, you can read it as you would read any other message, assuming that you have the sender’s certificate. Double-click the message to open it. Note that Outlook 2010 uses an icon with a lock instead of the standard envelope icon to identify encrypted messages.
Note
You can’t preview encrypted messages in the Reading pane. Also, the ability to read encrypted messages requires an S/MIME-capable mail client. Keep this in mind when sending encrypted messages to other users who might not have Outlook 2010 or another S/MIME-capable client.
You can verify and modify the trust for a certificate when you read a message signed by that certificate. For information on viewing and changing the trust for a certificate, see the section Changing Certificate Trust Relationships, on page 377.
If you have used Microsoft Windows Mail or Microsoft Outlook Express to send and receive secure messages, your Windows Mail Contacts (or Outlook Express address book) contains the public keys of the recipients. You can import those certificates to use in Outlook 2010 if they are not already included in the Contacts folder. Unfortunately, Windows Mail and Outlook Express don’t export the certificates when you export their address books; instead, you must export the certificates one at a time.
Follow these steps to move certificates from Windows Mail, Windows Live Mail, or Outlook Express to Outlook 2010:
Open Windows Mail and select Tools, Windows Contacts. If using Outlook Express, choose Tools, Address Book. For Windows Live Mail, choose Go, Contacts.
In Windows Contacts (for Windows Mail), the Address book (for Outlook Express), or Windows Live Contacts (Windows Live Mail) double-click the name of the person whose certificate you want to export.
Click the IDs tab in Windows Mail, or the Digital IDs tab in Outlook Express.
Select the certificate to export and click Export.
Save the certificate to a file. (Windows Mail and Outlook Express use the .cer file extension.)
Open Outlook 2010, open the Contacts folder, and open the contact item for the person who owns the certificate you’re importing.
Click Certificates, click Import, select the file created in step 5, and click Open.
Save and close the contact form.
In response to market demands for a system andwith which companies can protect proprietary and sensitive information, Microsoft has developed an umbrella of technologies called Information Rights Management (IRM). Outlook 2010 incorporates IRM, enabling you to send messages that prevent the recipient from forwarding, copying from, or printing the message. The recipient can view the message, but the features for accomplishing these other tasks are unavailable.
Note
IRM is an extension for the Microsoft Office system applications of Windows Rights Management. For information on using IRM with other Office applications, see 2010 Microsoft Office System Inside Out, from Microsoft Press.
There are two paths to implementing IRM with the Office system. Microsoft offers an IRM service that, as of this writing, is free. This path requires that you have a Windows Live ID to send or view IRM-protected messages. You must log in to the service with your Windows Live ID credentials to download a certificate, which Outlook 2010 uses to verify your identity and enable the IRM features. The second path is to install Microsoft Windows Server 2003 running the Rights Management Service (RMS) on Windows Server 2003, or the Active Directory Rights Management Service on Windows Server 2008. With this path, users authenticate on the server with NTLM or Windows Live ID authentication and download their IRM certificates.
The first path provides simplicity because it does not require that organizations deploy an RMS server. The second path provides more flexibility because the RMS administrator can configure company-specific IRM policies, which are then available to users. For example, you might create a policy template requiring that only users within the company domain can open all email messages protected by the policy. You can create any number of templates to suit the company’s data rights needs for the range of Office system applications and document types.
Not everyone who receives an IRM-protected message will be running Outlook 2003 or later, so Microsoft has developed the Rights Management Add-On for Internet Explorer, which enables these users to view the messages in Internet Explorer. Without this add-on, recipients cannot view IRM-protected messages. With the add-on, recipients can view the messages, but the capability to forward, copy, or print the message is disabled, just as it is in Outlook 2010.
Note
This chapter explains how to configure and use IRM in Outlook 2010 with the Microsoft IRM service. If you want to use RMS in Windows Server, you will find more information by searching technet.microsoft.com for “Active Directory Rights Management Services.” RMS provides a much richer set of features and control than the free service offered by Microsoft, but it is beyond the scope of this book.
To configure Outlook 2010 to use the IRM service and send IRM-protected messages, follow these steps:
Open Outlook 2010 and start a new message. With the message form open, click File, Set Permissions, Do Not Forward.
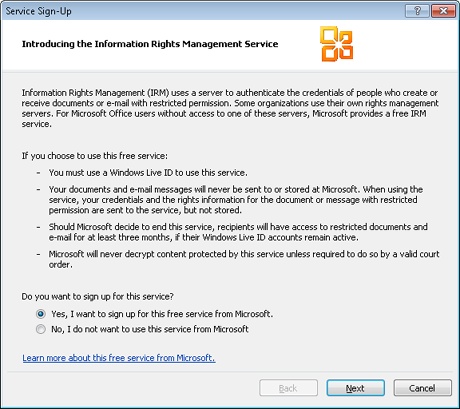
If you do not have the IRM add-on installed, Outlook 2010 displays the dialog box shown in Figure 14-28. Choose Yes, I Want To Sign Up For This Free Service From Microsoft, and then click Next.
The wizard asks if you already have a Windows Live ID. If so, choose Yes and click Next to open a sign-in dialog box and enter your Windows Live credentials. If not, choose No and click Next; then follow the prompts to obtain a Windows Live ID.
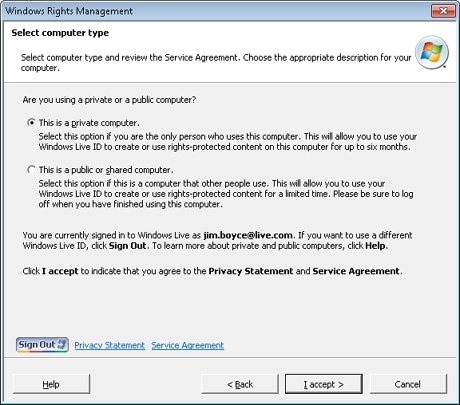
After you obtain a Windows Live ID and log on, Outlook 2010 displays the page shown in Figure 14-29. Choose This Is A Private Computer to obtain a certificate that you can use on your own computer. Choose This Is A Public Or Shared Computer if you need a certificate only for a limited time, such as when you are working from a public computer. Then click Accept, Finish to complete the process.
Outlook displays the Select User dialog box, which in this case will likely contain only one user (the one that you just created). Click OK.
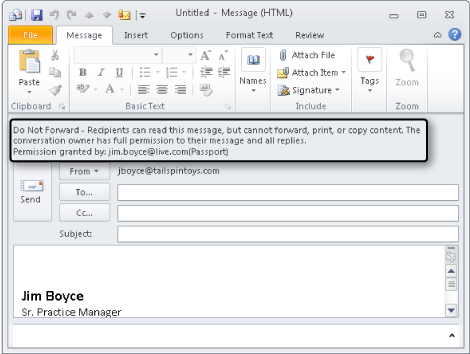
Click the Message tab and note that the InfoBar in the form displays a Do Not Forward message, as shown in Figure 14-30, indicating that the message is protected by IRM.
Address the message and add the message body and attachments, if any, as you would for any other message, and then send the message.
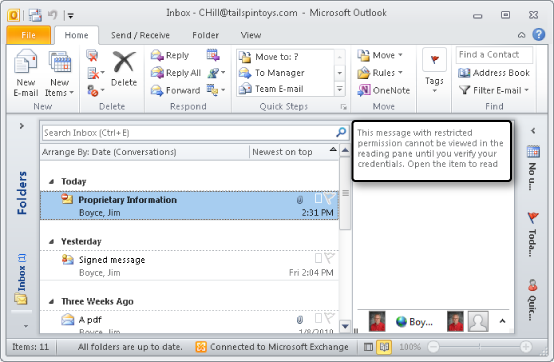
If you attempt to view an IRM-protected message without first obtaining a certificate, Outlook 2010 gives you the option of connecting to Microsoft’s service to obtain one. After the certificate is installed, you can view the message, but Outlook 2010 indicates in the InfoBar (on both the Reading pane and message form) that the message is restricted (see Figure 14-31). The commands for forwarding, copying, and printing the message are disabled.
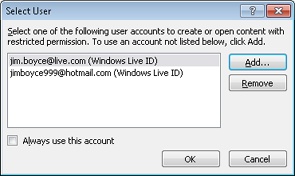
It’s possible that you use more than one Windows Live ID. If you have more than one Windows Live ID and need to choose between them when you send or view an IRM-protected message, open the message form for sending or viewing and click File, Set Permissions, Manage Credentials to open the Select User dialog box, as shown in Figure 14-32. Choose an account and click OK to use that account for the current message.
Figure 14-32. You can select from multiple accounts to restrict messages or view restricted messages.
If you have only one account configured on the computer and want to add another account, click Add to start the Service Sign-Up Wizard and download a certificate for another email address and corresponding Passport.
