Understanding Automation Options 715
Using Macros 716
MICROSOFT Outlook 2010 is a feature-rich product and, as such, has an option, a wizard, or a graphical tool for accomplishing nearly anything that you require from a personal information manager. If something does come up that the folks at Microsoft haven’t planned for, however, you also have the option of customizing Outlook 2010 by using its built-in support for Microsoft Visual Basic code additions. Through the use of flexible Microsoft Visual Basic for Applications (VBA) scripting options and built-in security controls, you can simplify and automate common tasks.
In this chapter, you’ll learn how to create and use a macro. This includes creating the macro, stepping through a macro to test it, and deleting macros you no longer need. In addition, you’ll find out about implementing security options for macros.
Note
See Chapter 11, for a discussion of Quick Steps, which enable you to process messages automatically.
Outlook 2010 has a number of built-in automation options that allow the application to perform certain tasks for you. For example, the Rules Wizard automatically moves, copies, and forwards email messages. The Out Of Office Assistant acts as an answering service when you’re away.
Note
For information about these examples of built-in automation options, see Chapter 11 and the section Creating Automatic Responses with the Out Of Office Assistant, on page 345.
If a built-in option can accomplish the automated task that you require, it should be your first choice. By using a built-in option instead of a custom one, you minimize problems that can occur if you need to reinstall Outlook 2010 or use Outlook 2010 on multiple machines. Using standardized options also guards against compatibility problems with upgrades to Outlook 2010.
If none of the automation options does the trick, however, you can accomplish just about any customization by using VBA. This chapter focuses on the use of VBA procedures known as macros to automate common tasks.
So just what is a macro? In general terms, a macro is a number of commands grouped together to execute a particular task. Macros are like small programs that operate within other programs. Macros have been around for a long time, and all Microsoft Office 2010 system products support them at some level. In Outlook 2010, macros are implemented as VBA procedures that are not linked to a particular form and are available from anywhere in Outlook 2010. In Outlook 2010, you manage macros by using commands in the Code area on the Developer tab. To display the Developer tab, right-click the ribbon and choose Customize The Ribbon. In the Outlook Options dialog box, place a check beside Developer in the tab list on the right and click OK.
Macros are most useful for tasks that must be performed repeatedly without change. Even so, because a macro contains Visual Basic code, it can be flexible and can respond to variables or user input. With the power of scripting, a macro can accomplish a task in the most efficient way in response to specific conditions.
Caution
Macros can be extremely powerful. This power can be a great asset for you, but it can also mean that any problems can become serious ones. Like many other things, macros can be dangerous when used improperly. Inexperienced programmers should take great care when writing and using macros in Outlook 2010.
The following are the three basic programming elements you can work with in an Outlook 2010 macro:
Object An object is a particular part of a program, such as a button, a menu item, or a text field. Objects make up any element of Outlook 2010 that you can see or work with. An object has properties, and how you set these properties determines how the object functions.
Property Any part of an object—its color, its width, and its value—is part of the set of attributes that make up its properties.
Method A method is a task that an object carries out, such as showing a form or reading file information. Methods can be modified based on user input or the value of certain properties.
In general, a VBA macro either determines or modifies the value of an object property or calls a method. Macros, then, are nothing more than simple programs that use VBA to access or modify Outlook 2010 information.
Note
Before you can work with macros, you might need to configure macro security settings. For information about configuring macro security, see the section Setting Macro Security, on page 725.
Note
In Microsoft Excel 2010 and Microsoft Word 2010, you can simply record your mouse movements and keystrokes using the Macro Recorder, and the computer plays them back when you execute the macro. Outlook 2010 doesn’t include a macro recorder, so you have to create macros by writing the macro code yourself. Therefore, users familiar with programming basics and VBA will have a head start in learning to create Outlook 2010 macros.
The process for creating an Outlook 2010 macro is simple. The process for creating a useful macro, on the other hand, is more complex. In this chapter, we’ll fall back on the most basic of functions, the “Hello World” message box macro. This macro creates a function that displays a message box containing the text Hello World. Clicking OK (the only button) closes the message box and ends the macro.
To create this macro, follow these steps:
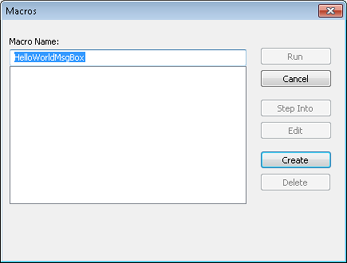
Click the Developer tab, click Macros, and choose Macros to open the Macros dialog box.
In the Macro Name box, type a descriptive name for your new macro (no spaces are allowed). In Figure 28-1, the macro is titled HelloWorldMsgBox.
Click Create. Visual Basic starts, which allows you to add functionality to your macro. For those who are not programmers, creating VBA code might seem daunting, but simple tasks are actually quite easy to write code for. (Note that if you have macros, they will be displayed in this window, each in its own section of the project file.)
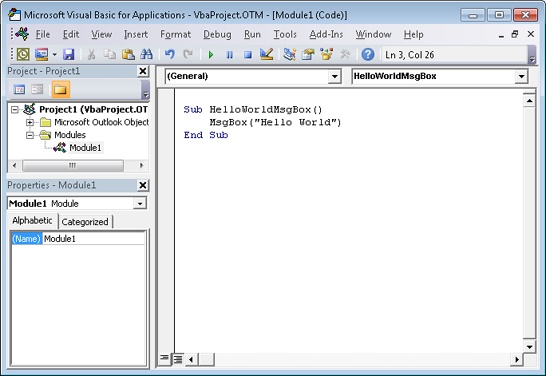
The first line of the macro starts with Sub and contains the macro name—in this case, HelloWorldMsgBox. On the next line, type the following, as shown in Figure 28-2: MsgBox (“Hello World”)
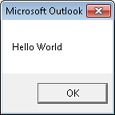
To test the code, choose Run, Run Sub/UserForm, or click the Run Sub/UserForm button on the toolbar. The message box shown in Figure 28-3 appears.
Note
If you get a message saying macros are not enabled, you should check your macro security settings. To learn how to configure macro security, see the section Setting Macro Security, on page 725.
Choose File, Save. (The file name, which cannot be changed here, is VbaProject.OTM.)
Close the Visual Basic Editor.
After you save a macro, it is available for use. Click the Developer tab, click Macros, and then select the Project1.HelloWorldMsgBox macro. The message box appears, just as it did when you tested the macro in the Visual Basic Editor.
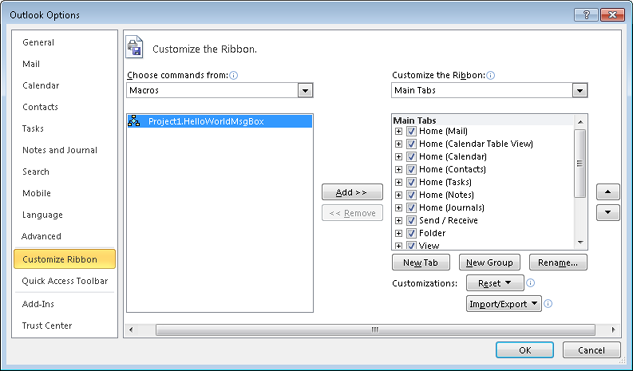
Although macros are available from the Developer tab, in some cases you might want to add a macro to the ribbon or Quick Access Toolbar to make it readily available when you need it. To add the macro to a tab in the Outlook 2010 ribbon, follow these steps:
Right-click the ribbon and choose Customize The Ribbon.
In the Choose Commands From list, select Macros. The HelloWorldMsgBox macro appears on the left, as shown in Figure 28-4.
Select a custom group in which to place the macro (you can’t add the macro to any of the default groups).
Click Add to add HelloWorldMsgBox macro to the group. Clicking the button in the group will run the macro.
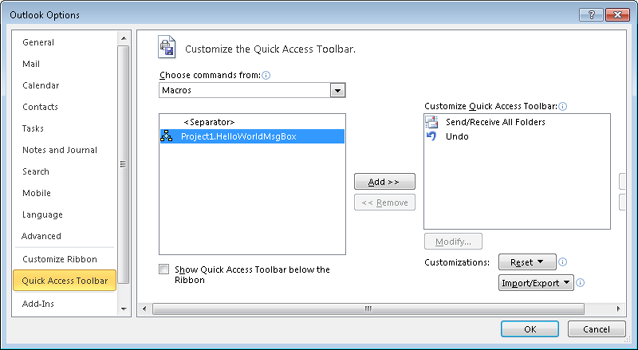
To add the macro to the Quick Access Toolbar, follow these steps:
Click Customize Quick Access Toolbar, and then choose More Commands to open the Editor Options dialog box.
In the Choose Commands From drop-down list, select Macros. The HelloWorldMsgBox macro appears in the list below, as shown in Figure 28-5.
Click Add to add the HelloWorldMsgBox macro button to the Quick Access Toolbar.
Click OK to close the Outlook Options dialog box.
After you create a macro, you can edit it by returning to the Macros dialog box as follows:
Open the Macros dialog box from the Developer tab, and then, in the Macros dialog box, select the HelloWorldMsgBox macro and click Edit. The Visual Basic Editor starts and displays the selected macro.
Modify the macro so that it matches the following:
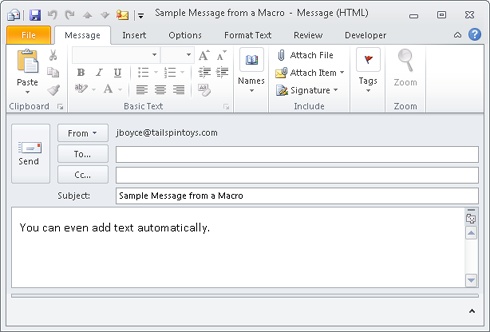
Sub HelloWorldMsgBox()
MsgBox ("Click OK to create a new message")
Set newMsg = Application.CreateItem(0)
    newMsg.Subject = "Sample Message from a Macro"
    newMsg.Body = "You can even add text automatically."
    newMsg.Display
End Sub
Verify that the changed macro works properly by clicking the Run Sub/UserForm button on the Microsoft Visual Basic toolbar. Instead of showing a simple message box as before, the macro should now present you with an email message window. (This window might be hidden behind the Microsoft Visual Basic for Applications window.) The message should have information automatically filled in in the subject and body fields, as shown in Figure 28-6.
Save the changes to your Visual Basic project, and then close the Microsoft Visual Basic for Applications window. Close the email message that you created.
When you return to the Macros dialog box, select the modified macro, and then click Run. You should see the same email message that you saw in Figure 28-6. Close the email message.
Note
When you edit a macro, you’ll eventually want to save it and test the changes. To ensure that you can return to the original macro in case of trouble, first export the project so that you can retrieve it later. For more information about exporting, see the section Sharing Macros with Others, on page 724.
When you’re creating a macro, it’s often helpful to step through the code, which allows you to watch each line as it is being processed and see problems as they occur. To do this, open the HelloWorldMsgBox macro for editing (as described in the preceding section), and then press F8. Alternatively, open the Macros dialog box, select a macro, and then choose Step Into. The first line of the macro is highlighted, and its code is processed. To process the next line, press F8 again.
Step through the rest of the macro using the F8 key. Notice that clicking OK merely closes the message box rather than creating the email message. This is because later steps are not followed automatically. The new email message is created only after you press F8 through the line of the subprocedure that displays it—in this case, the last line of the macro.
Note
You can step through a macro only when it is being edited. When macros are executed from within Outlook 2010, they automatically move through all procedures.
TROUBLESHOOTING
Your macro doesn’t run properly
If you are having problems getting a macro to run properly, you can try several approaches to determine the source of the problem. The most common problem is incorrect syntax in your code. Finding errors in code can be a vexing job, but using the step-through process generally helps to find the line that is causing you problems.
If your syntax is correct, the problem might have to do with the way you’re running the macro. Among the problems you should check for are the security settings on the macro and the security settings on the computer. Also, if the macro has been deleted but a toolbar button still remains, you might be trying to run a macro that no longer exists.
Sometimes a macro outlives its usefulness. To delete a macro that you no longer need, click the Developer tab, click Macros, and choose Macros. In the Macros dialog box, select the macro that you want to remove, and then click Delete. When you’re prompted to verify that you want to delete the macro permanently, click Yes to remove the macro from the list, making its code unavailable to Outlook 2010.
If you’re creating macros for use by a group of people, or even an entire organization, the macros must be installed separately for each user. Unfortunately, although the Macros dialog box has options for creating and deleting macros, it has no option for adding macros from other places. You can’t share macros in the same way you can share files. Instead, sharing macros with other users is generally a two-step process: the user who creates the macro must export the macro code, and the other user must import the code. To share a macro, follow these steps:
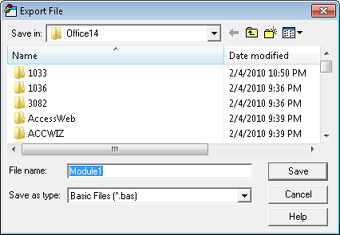
In Microsoft Visual Basic, choose File, Export File to open the Export File dialog box, shown in Figure 28-7.
In the Save As Type box, save the project as a .bas file. (By doing so, you can then email the file to another user or make it available on the network.)
Once another user has access to the .bas file, that user can install the macro by following these steps:
On the Developer tab, click Visual Basic.
In the Visual Basic Editor, choose File, Import File.
Browse to the file, open it, and then save it.
The user can now access the macro through the Macros dialog box.
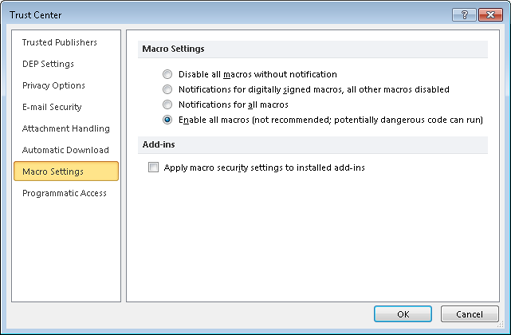
Macros have several advantages, including their power, their flexibility, and their ability to run automatically, even without your knowledge. These advantages have a dark side, however, and poorly written or malicious macros can do significant damage to an Outlook 2010 message store. Because of the potential danger that macros pose, the Outlook 2010 Tools menu offers four security levels for Outlook 2010 macros:
Disable All Macros Without Notification Macros are totally disabled, and Outlook 2010 does not display any warning that a macro is attempting to run.
Notifications For Digitally Signed Macros; All Other Macros Disabled Your system can run only macros that are signed digitally. This means that some macros—even benign and potentially useful ones—are not available unless they are signed.
Notifications For All Macros You will be prompted as to whether you want to run any macros.
Enable All Macros (Not Recommended) Macros run automatically, regardless of their signature. This is the most dangerous setting.
Note
For information about digital signatures, see the section Protecting Messages with Digital Signatures, on page 360.
To view or change the security level, on the Developer tab, click Macro Security to open the Macro Settings page of the Trust Center, as shown in Figure 28-8. (You can also access the Trust Center by opening an Outlook 2010 item and, on the Developer tab, in the Code group, clicking Macro Security.) The default setting is Notifications For Digitally Signed Macros; All Other Macros Are Disabled, which is probably the best choice for most users.
Tip
INSIDE OUT Security and user-created macros
When you create your own macros, they are not controlled by the security settings. User-created macros do not need to be signed and will run regardless of the security setting that you have selected—even if you choose the Disable All Macros Without Notification option! This is nice for purposes of design and editing, but it assumes that you realize exactly what a macro will do. Moreover, it means that when you want to test macro security settings, you must run Outlook 2010 using a different user account.
To reduce the number of times you’re prompted about whether to run a macro (if you’ve set the security level to Notifications For Digitally Signed Macros; All Other Macros Disabled) or to be able to run macros at all (if you’ve set the security level to Notifications For All Macros), you can specify a trusted source.
When a digitally signed macro runs, Outlook 2010 displays the certificate attached to the macro. In addition to choosing whether to run the macro, you’re given the choice of adding the certificate holder (the organization or individual who created the macro) to your list of trusted sources. Once the holder of the certificate is trusted, any macros signed with that certificate run without prompting at the Notifications For Digitally Signed Macros; All Other Macros Disabled security setting. To view the list of trusted certificates or to remove a trusted source, click File, Options, Trust Center, and finally Trust Center Settings. Click Trusted Publishers to view the sources. To remove a trusted source, select the source and then click Remove.
Macro security in Outlook 2010 gives you control over when macros can run, which helps prevent malicious code from affecting the system of someone using Outlook 2010. In Outlook 2010, when macro security is set to Notifications For Digitally Signed Macros; All Other Macros Disabled, only digitally signed macros from trusted sources can run. A setting of Notifications For All Macros causes Outlook 2010 to prompt you whether to enable and allow macros to run. A setting of Enable All Macros allows all macros to run, which poses significant risks from malicious code.
If you create your own macros, you probably would like to sign your macros digitally so that they will run on other people’s computers without triggering Outlook 2010 macro security warnings. Outlook 2010, like all versions since Outlook 2000, provides the means to sign VBA projects.
To create a self-signing certificate, follow these steps:
Choose Start, All Programs, Microsoft Office, and Microsoft Office 2010 Tools, and then select Digital Certificate For VBA Projects.
Type a descriptive name for your certificate, such as Outlook 2010 Code Signing Certificate, in the Your Certificate’s Name dialog box, and then click OK.
Click OK to confirm the creation of the certificate.
To sign a macro, follow these steps:
On the Developer tab, click Macros, Macros to open the Macros dialog box.
Select a macro, and then click Edit to open the Visual Basic Editor.
Choose Tools, Digital Signature to open the Digital Signature dialog box.
Click Choose, select your code-signing certificate, and then click OK. Click OK again, and then close the Visual Basic Editor.
On the computer that will be running the macro, verify that you have configured Outlook 2010 macro security for either the Notifications For Digitally Signed Macros; All Other Macros Disabled setting or the Notifications For All Macros setting, and then attempt to run a macro. When Outlook 2010 asks whether you want to trust the macro publisher, click Yes. Your custom macros should now run on that computer without triggering the Outlook 2010 security warnings.