Using Contacts for a Mail Merge in Word 870
Performing a Mail Merge from Outlook 876
Exporting Contacts to Access 878
Importing Contacts from Access 880
Exporting Contacts to Excel 882
Importing Contacts from Excel 883
Exporting Tasks to Office Applications 884
Using Notes in Other Applications 885
MICROSOFT Outlook 2010 works well as a stand-alone application, but its real strength is realized when you integrate it with other Microsoft Office 2010 system applications. Most of us spend our days working in one or two main programs, such as Microsoft Word or Microsoft Excel, so most of our information is saved in files designed for those programs. For instance, you probably save letters and other correspondence in Word 2010 files; save contact information in Outlook 2010; and save financial or other data in Excel 2010. With the Office system, you can integrate it all, which enables you to choose the best tool for creating your information and the best tool for sharing or producing your data.
Some of the ways to integrate Outlook 2010 with other Office system applications include the following:
Using Outlook 2010 contacts for a Word 2010 mail merge
Exporting Outlook 2010 contacts to Word 2010, Excel 2010, or Microsoft Access 2010
Importing contacts from Word 2010, Excel 2010, or Access 2010 into Outlook 2010
Using Outlook 2010 notes in other Office system applications
In this chapter, you’ll learn about using Outlook 2010 and other Office system applications to share information between applications. Instead of employing standard copy-and-paste or cut-and-paste techniques, you’ll find out about ways to reuse your information in Outlook 2010 or another file format without retyping or re-creating the data.
The Outlook 2010 Contacts folder enables you to create contact entries to store information about a person, a group, or an organization. You can then use that contact data to create email messages, set up meetings or appointments, or complete other tasks associated with a contact. Your contacts list can also be used as the data source to provide names, addresses, phone numbers, and other pertinent data to your mail merge documents.
You perform a mail merge in Word 2010 when you want to create multiple documents that are all based on the same letter or document but have different names, addresses, or other specific information (referred to as merge data). For instance, you might perform a mail merge operation when you want to do a mass mailing to your customers about a new product launch.
You begin by creating and saving a standard letter. Next, you place field codes where you want the recipient’s address, the salutation, and other merge data to appear. Field codes are placeholders in documents where data will change. For instance, the name of the recipient should be a field code because it will change for each letter you send out.
You then create or assign a database to populate the field codes (that is, to insert the merge data). Word 2010 uses the database and contact information to create separate letters. You can then save these files or print each letter for your mass mailing.
Tip
Before starting to set up a mail merge using your Outlook 2010 contact data, review your contact entries to make sure that the data is complete and current and that you don’t have duplicate entries.
To perform a mail merge using Word 2010, follow these steps:
Start Word 2010.
Click the Mailings tab on the ribbon.
Click Start Mail Merge.
Click Step By Step Mail Merge Wizard (see Figure 36-1).
In the task pane, select the type of document to create, such as Letters, and then click Next: Starting Document at the bottom of the pane.
Select the document to use—for example, the current document. Click Next: Select Recipients.
Click Select From Outlook Contacts.
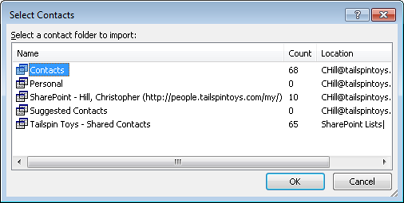
Select the Choose Contacts Folder option to open the Select Contacts dialog box (see Figure 36-2). (If you have configured Outlook 2010 to always prompt you for a profile and Outlook 2010 is not open, you are asked to select a profile.)
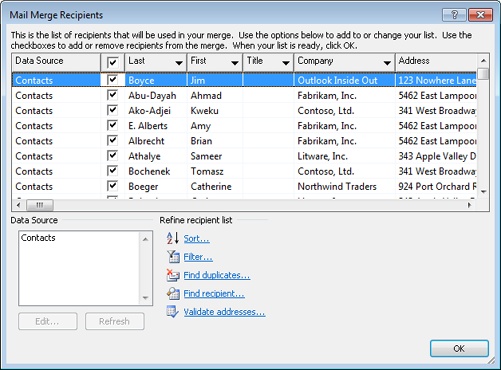
Select the folder that contains the contacts list that you want to use, and then click OK to open the Mail Merge Recipients dialog box (see Figure 36-3).
Select the contacts that you want to use to populate the mail merge document. All the contacts are selected by default. You can use the following methods to modify the selected list of contacts:
Select the check box beside the Data Source column to choose all the contacts in the list (the default), or clear the check box to clear all the contacts and then select individual contacts.
Click Sort to sort the contact list.
Click Filter to filter the list according to user-specified criteria.
Click Find Duplicates to locate duplicate names to clear them from the mail merge list.
Click Find Recipient to locate a specific name in your contact list.
Click Validate Addresses to use an add-in tool to verify that the addresses are valid.
Clear the check boxes next to the names of those whom you do not want to include in the mail merge.

Note
If you want to create a mailing list that is a subset of your Contacts folder, you can filter the contacts list with a custom view and then use the custom view to perform a mail merge from Outlook 2010.
Note
See the section Performing a Mail Merge from Outlook, on page 876.
Click OK.
Click Next: Write Your Letter.
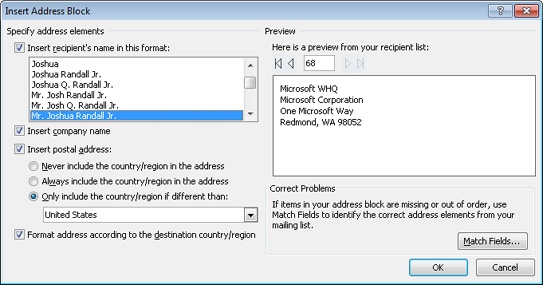
Click Address Block to open the Insert Address Block dialog box (see Figure 36-4).
Using the options in this dialog box, specify the address fields and format that you want to include in your letter. Click OK.
Press Enter and then click Greeting Line to insert and format a greeting line from your Contact information.
Click More Items to insert specific fields from your Contact information.
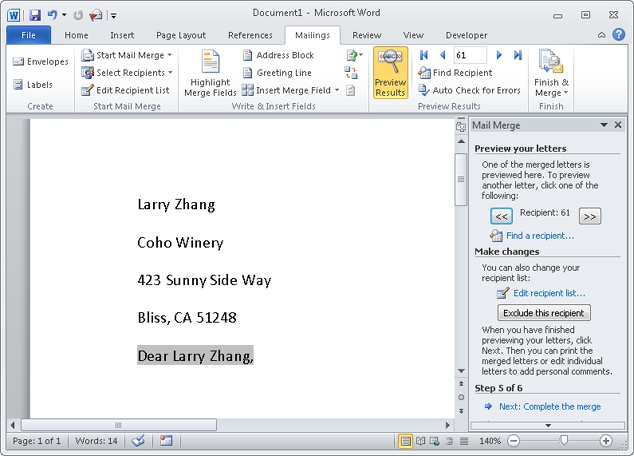
Write the body of your letter. When you finish, click Next: Preview Your Letters to see how the Outlook 2010 contact data looks in your letter. Figure 36-5 shows an example.
Figure 36-5. The address and salutation data in this letter came from an Outlook 2010 Contacts folder.
Note
As Figure 36-5 indicates, you will probably need to do some formatting of the mail merge fields, such as setting line spacing and spacing before or after paragraphs.
In the task pane, click Next: Complete The Merge to finish.
Finish editing your letter (or print it, if you want).
Note
For detailed information about performing mail merges in Word 2010 and using other Word 2010 features, see Microsoft Word 2010 Inside Out, by Katherine Murray (Microsoft Press, 2010).
When you perform a mail merge from Word 2010, you can use selection criteria to determine which of the contacts are included in the mail merge set. For example, assume that you want to send a letter to all your contacts who have addresses in California and whose last names begin with the letter R.
In the Mail Merge Recipients dialog box (see Figure 36-3), each data column includes a drop-down button next to the column heading. To specify selection criteria based on a particular column, click the drop-down button and choose one of the following commands:
All Do not filter based on the selected column.
Blanks Include only those contacts for which the selected field is blank. For example, choose this option under the E-Mail Address column to include all contacts who do not have an email address in their contact record.
Nonblanks Include only those contacts for which the selected field is not blank. For example, select this option under the Last field to include only those contacts whose Last Name field is not blank.
Advanced Click this button to open the Filter And Sort dialog box, explained next.
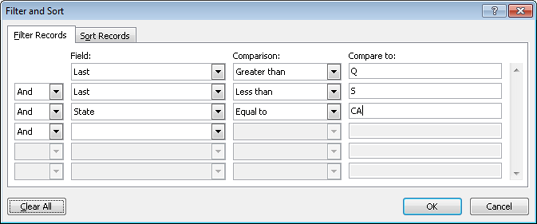
If you click Advanced to open the Filter And Sort dialog box, shown in Figure 36-6, you can specify more-complex selection criteria. The following example includes those contacts whose last names start with R and whose State value equals CA:
In the Mail Merge Recipients dialog box, click the drop-down button beside the Last field. Click Advanced.
From the first Field drop-down list, choose Last, choose Greater Than from the Comparison drop-down list, and then enter Q in the Compare To field.
From the second Field drop-down list, choose Last, choose Less Than from the Comparison drop-down list, and then enter S in the Compare To field.
Select State from the third Field drop-down list, choose Equal To from the Comparison drop-down list, and enter CA in the Compare To field. The dialog box should look similar to the one shown in Figure 36-6.
Click OK to close the Filter And Sort dialog box. After a few moments, the Mail Merge Recipients list shows only those contacts whose last name begins with R and whose State value is listed as CA.
As you might have guessed from Figure 36-6, you can select OR instead of AND in the dialog box for a particular criterion. For example, you would use OR for the third criterion (step 4) to cause Outlook 2010 to include contacts in the mail merge if their names started with R or if they lived in California. A contact would also be included if both criteria were met.
As the previous sections illustrated, it’s easy to perform a mail merge from Word 2010 and pull contact information from Outlook 2010. You can also filter the contacts to include only those that suit your needs.
You can also perform a mail merge from Outlook 2010. Starting from Outlook 2010 gives you a few advantages:
More control over contacts to be included You can merge all the contacts in the current view of the Contacts folder or merge only those contacts you have selected in the folder.
Control over which fields to include You can include all contact fields or only those fields that are visible in the current folder view.
Capability to save the contacts for later use Outlook 2010 gives you the option of saving the contacts to a Word 2010 document to use for future reference or for future mail merges from Word 2010.
To begin a mail merge from Outlook 2010, select Contacts in the Navigation pane, and then click Mail Merge in the Actions group on the Home tab on the ribbon to open the Mail Merge Contacts dialog box. As Figure 36-7 illustrates, Outlook 2010 offers two options to control which contacts are included in the merge:
All Contacts In Current View Use this option to include all the contacts in the view, understanding that all the contacts in the view is not necessarily the same as all contacts. If you create a filtered view of the folder that excludes some of the contacts, those contacts will be excluded from the merge as well.
Only Selected Contacts Choose this option to include only those contacts that you selected in the Contacts folder prior to clicking Mail Merge. To include contacts selectively, in the Contacts folder, hold down the Ctrl key while clicking to select individual contacts, or press Shift+Click to select a range of contacts.
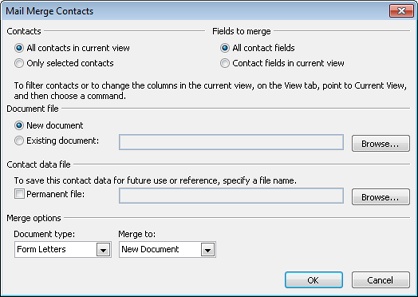
In addition to specifying which contacts are included, you can control which fields are included, excluding those you don’t need. The following two options determine which fields are included:
All Contact Fields Choose this option to include all the contact fields.
Contact Fields In Current View Choose this option to include only the fields displayed in the current view. You can customize the view prior to choosing Tools, Mail Merge to include only specific fields.
Note
Creating custom views to filter items in a folder is covered in detail in the section Creating and Using Custom Views, on page 653.
You can merge the contacts to a new document if you want, or you can choose Existing Document to use a Word 2010 document that you have already created.
The merged contact information can be saved for later or repeated by checking Permanent File under Contact Data File and specifying a file name.
You can choose from a variety of document types for your merged information: form letters, mailing labels, envelopes, and catalogs. The output of the mail merge can be saved as a Word 2010 document, sent directly to a printer, or sent as email to the contacts whom you have selected for the merge.
After you select your options in the Mail Merge Contacts dialog box and click OK, Outlook 2010 opens Word 2010, prepopulating the mail merge contact list and starting the document type that you have specified. The rest of the process depends on the type of document you have selected, as follows:
Form letters or catalogs To complete the mail merge for a form letter or catalog, click the Mailings tab, click Start Mail Merge, and select the Step By Step Mail Merge Wizard. The wizard opens at step 3, in which you choose the contacts to include in the letter. Because you have already generated a contact list, the Use An Existing List option is selected for you. You can then click Edit Recipient List to verify or fine-tune the list, or you can click Next: Write Your Letter to move to the next step.
Mailing labels or envelopes Select options in the Mail Merge Helper dialog box to complete the mail merge and create mailing labels or envelopes. You can change the type of document you are creating or click Setup to choose a specific type of mailing label or envelope size. The data source is already selected, but you can change or edit the data source.
Note
See the section Using Contacts for a Mail Merge in Word, on page 870, for detailed instructions on using the Mail Merge Wizard in Word 2010.
Another way to use Outlook 2010 contact information is to export the data to Access 2010, which is handy if you want to use contact data in database tables or reports. You could spend your time opening individual contact entries in Outlook 2010, copying information from the contact form, and then pasting the information into Access 2010 where you want it. However, Outlook 2010 makes the process much simpler. All you have to do is use the Import And Export Wizard and select Microsoft Access 2010 as the file to export to.
Here’s how to export contact information from Outlook 2010 to Access 2010 (the exported file format is for Access 97-2003, which Access 2010 can also read):
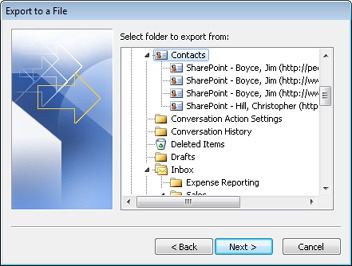
Click File, Open, and then Import to open the Import And Export Wizard.
Select Export To A File and then click Next.
On the wizard page shown in Figure 36-8, select Microsoft Access 97-2003 and then click Next.
Select the folder from which to export data. In this case, select the Contacts folder (see Figure 36-9) or another folder that includes Outlook 2010 contact information. Click Next.
Specify the folder and type a name for the export file. You can click Browse to browse to a folder and then click OK to select that folder. When you do this, the file is given an .mdb extension to denote an Access database file. Click Next.
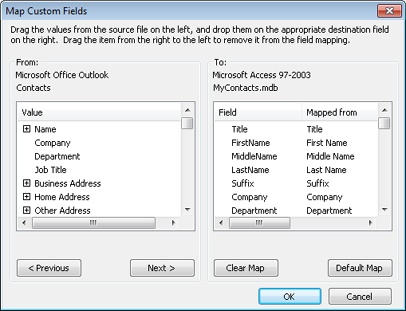
In the Export To A File dialog box, click Map Custom Fields. In this dialog box, you can verify that the Contacts fields are mapped properly to the Access database fields, add or remove field items, or modify the way the Outlook 2010 contacts list is saved in the new exported file (see Figure 36-10). When you finish working with field mapping, click OK.
Click Finish. Outlook 2010 exports the data from the Contacts folder and saves it in the specified file. You can now switch to Access 2010 and open the exported data as a table in that application.

Suppose that you’ve collected and stored contacts in an Access 2010 database, but now you want to use them in Outlook 2010. You can simply import the data to Outlook 2010 by using the Import And Export Wizard. During the import process, Outlook 2010 can see whether duplicate entries are being added to your contacts list and can then create, ignore, or replace them.
TROUBLESHOOTING
After replacing a duplicate entry in Outlook 2010, you see that you’ve lost data
Before you choose to allow Outlook 2010 to replace duplicate entries when importing a file, you should make sure that the items really are duplicates. Entries might erroneously appear to be duplicates, for example, if you have two contacts whose names are the same. For that reason, you might want to allow Outlook 2010 to create duplicate entries and then, after the import process is finished, go into the Outlook 2010 Contacts folder and manually remove any true duplicates.
Before you begin, make sure that the database that you want to import is closed in Access 2010. If it isn’t closed, you’ll receive an error message when Outlook 2010 tries to find the data source.
Then follow these steps to import the data:
Switch to Outlook 2010 and choose File, Open, and then Import to open the Import And Export Wizard.
Select Import From Another Program Or File, and then click Next.
Select Microsoft Access 97-2003 and click Next.
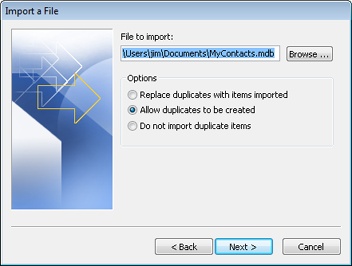
In the File To Import text box (see Figure 36-11), specify the Access file (MDB) that you want to import.
Specify how you want Outlook 2010 to handle duplicates, and then click Next.
Select the destination folder in which you want the imported data to be placed, such as the Contacts folder, and then click Next.
In the Import A File dialog box, click Map Custom Fields. In this dialog box, you can add or remove field items, modifying the way the Outlook 2010 contacts list is saved in the new imported file. When you finish reviewing or modifying the field mapping, click OK.
Click Finish to start the import process.
You might also find it useful to export Outlook 2010 contact information to Excel 2010 worksheets. In Excel 2010, you can include the data in a spreadsheet of names and addresses for a contact management sheet, sort contact data in various ways, or perform other spreadsheet tasks with the data. Again, you simply use the Import And Export Wizard to create this Excel 2010 file.
Here’s how to export contact information from Outlook 2010 to Excel 2010:
Choose File, Open, and then Import to open the Import And Export Wizard.
Select Export To A File, and then click Next.
Select Microsoft Excel 97-2003, and then click Next.
Select the folder from which to export data. In this case, select the Contacts folder or another folder that includes Outlook 2010 contact information. Click Next.
Specify the folder and type a name for the export file. You can click Browse to browse to a folder, and then click OK to select that folder. When you do this, the file is given an .xls file extension to denote an Excel worksheet file. Click Next.
In the Export To A File dialog box, click Map Custom Fields. In this dialog box, you can add or remove field items, modifying the way that the Outlook 2010 contacts list is saved in the new exported file. Click OK when you finish.
Click Finish. Outlook 2010 exports the data from the Contacts folder and saves it in the specified file.
Note
Another reason to export contact information is that you might need to share this data with others who do not use Outlook 2010 but do use Excel. Simply export the data to an Excel worksheet, open the worksheet, and modify or edit any column information. Then save the file and send it to the other users.
You import contact information from an Excel 2010 worksheet the same way that you do from an Access 2010 database. Suppose that your coworker wants to send you contact information but is not running Outlook 2010. Ask the coworker to save the data in an Excel 2010 worksheet and send that file to you. You can then use the Import And Export Wizard to import the new contact information into Outlook 2010.
Before you begin the process, make sure that the worksheet that you want to import is closed in Excel 2010. If it isn’t closed, you’ll receive an error message when Outlook 2010 tries to find the data source.
Then follow these steps to import the data:
Switch to Outlook 2010. Click File, Open, and then Import to open the Import And Export Wizard.
Select Import From Another Program Or File, and then click Next.
Select Microsoft Excel 97-2003, and then click Next.
In the File To Import text box, type the name of the file or browse to the Excel 2010 file (XLS) that you want to import.
Specify how you want Outlook 2010 to handle duplicates, and then click Next.
Select the destination folder in which you want the imported data to be placed, such as the Contacts folder, and then click Next.
In the Import A File dialog box, click Map Custom Fields. In this dialog box, you can add or remove field items, modifying the way in which the imported items are saved in your Contacts list. When you finish verifying or modifying your field mappings, click OK.
Click Finish to start the import process. You might want to review your contacts to ensure that the data was imported the way you need it. If it wasn’t, modify it as necessary in Outlook 2010.
You can use the Import And Export Wizard to export other Outlook 2010 items. For example, you might want to export tasks to a Word 2010 or Excel 2010 file to view past or future assignments in a table format that can be edited easily. You can then use this data in business correspondence, historical documents (such as a travel itinerary), event planning, work assignments, or presentations.
Follow these steps to export tasks from Outlook 2010 to an Excel 2010 file:
Choose Click File, Open, Import to open the Import And Export Wizard.
Select Export To A File, and then click Next.
Select Microsoft Excel 97-2003, and then click Next.
Select the folder from which to export data. In this case, choose the Tasks folder or another folder that includes Outlook 2010 tasks. Click Next.
Specify the folder and type a name for the export file. You can click Browse to browse to a folder, and then click OK to select that folder. When you do this, the file is given an .xls file extension to denote an Excel 2010 worksheet file. Click Next.
In the Export To A File dialog box, click Map Custom Fields. In this dialog box, you can add or remove field items, modifying the way that Outlook 2010 task items are saved in the new imported file. Click OK when you finish.
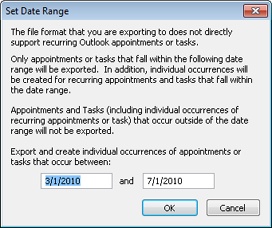
Click Finish to start the export process and open the Set Date Range dialog box (see Figure 36-12).
Specify the date range for exported tasks. Some types of tasks are not exported or included directly, such as recurring tasks with recurrences that fall outside the date range you set. Modify the date range as necessary to include the tasks that you want exported.
Click OK to start the export process. When it finishes, you can open the worksheet to review your tasks in Excel 2010.
Outlook 2010 notes are great when you need to create electronic “sticky” notes as a reminder of things to do in a document or project or of messages to send out. However, you are limited in how you can store information in notes and how you can use that information in other documents.
One way to reuse the information that you placed in notes is to export the Notes folder and use the note files in another application. Suppose that you have several notes that you want to archive and then remove from the Notes folder. Simply export the Notes folder to a tab-separated file and open the file in Word 2010, creating a document that contains the information.
Here’s how to export the file:
Click File, Open, and then Import And Export to open the Import And Export Wizard.
Select Export To A File, and then click Next.
Select Tab-Separated Values (Windows), and then click Next.
Select the folder from which to export data. In this case, select the Notes folder or another folder that includes Outlook 2010 notes. Click Next.
Specify the folder and type a name for the export file. You can click Browse to browse to a folder and then click OK to select that folder. When you do this, the file is given a .txt extension to denote a text file (which you can open in Word 2010). Click Next.
In the Export To A File dialog box, click Map Custom Fields. In this dialog box, you can add or remove field items, modifying the way that Outlook 2010 note items are saved in the new imported file. For example, you might want to remove the Note Color field (just drag it out of the To: list of fields) because this field exports as a numeric value. When you finish verifying or modifying the field mappings, click OK.