Sending Messages 957
Recalling a Sent Message Before It Is Read 961
Copying Global Addresses to Your Contacts Folder 962
THIS chapter focuses on some common messaging topics related specifically to Microsoft Exchange Server, such as recalling sent messages, setting messages to expire, and working with the Global Address List (GAL). This chapter also covers voting, which you can use with non–Exchange Server accounts as well as Exchange Server accounts, but which is more likely to be used in a larger organization with Exchange Server in place. Other chapters in this book cover many topics that are more specifically applicable to the Microsoft Outlook 2010 messaging capabilities. For example, see Chapter 8, to learn about message composition, replies, and using send/receive groups to synchronize your Exchange Server mailbox. Other chapters cover specific features of Exchange Server accounts as well, such as using the Out Of Office Assistant. So, this chapter isn’t an all-inclusive look at Exchange Server–specific features, but rather covers useful features that have not already been covered elsewhere.
When you send messages in Outlook 2010 while connected to Exchange Server, you have more options than you do when you use a regular Internet mail account—for example, you have the ability to recall messages, and you have access to a Global Address List (GAL).
To send a new message, you have a couple of choices:
In the Inbox or another message folder, click the New button on the ribbon.
In any folder, click New Items on the ribbon and choose E-Mail Message.
Whichever method that you use, a new message form opens, as shown in Figure 40-1.
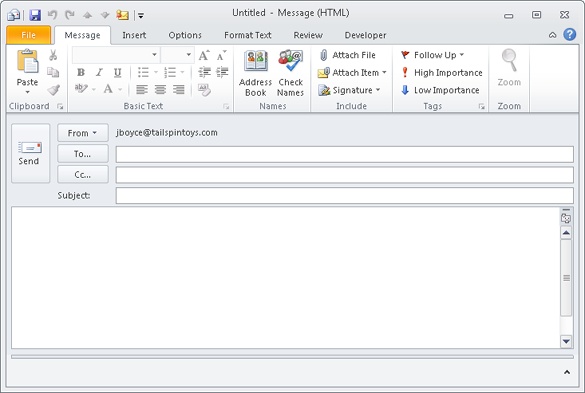
Figure 40-1. Write a message and choose the options for this message using the standard message form.
You can designate the recipients of your message in two ways. The first method is to click To or Cc (or Bcc) to open the Select Names dialog adding recipients tobox, shown in Figure 40-2. By default, the GAL is displayed.
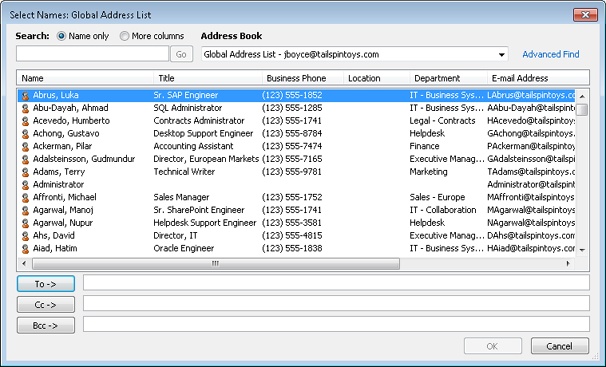
The GAL contains all users in the entire organization, except those who are explicitly hidden. An Exchange Server administrator can define other address lists on the computer running Exchange Server to filter addresses by any criteria, such as location, name, or department.
To add a message recipient, select the recipient in the list, and then click To, Cc, or Bcc. Double-click a recipient in the To, Cc, or Bcc field to view the recipient’s properties so that you can verify his or her contact information.
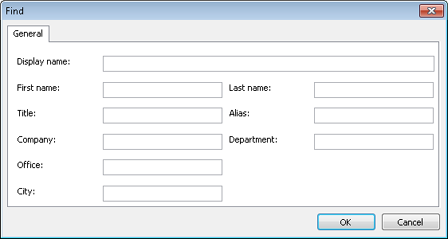
One of the most useful features of the Select Names dialog box is the Find feature. Click Advanced Find to open the Find dialog box, shown in Figure 40-3. You can search the address book by any of the criteria shown, such as Title, Company, or Department. The ability to search the address book is most useful when you have a large organization and no additional address lists are defined.
The second way to add recipients to a message is the simplest: Type the recipient’s name or alias in the To, Cc, or Bcc field on the message form. An Exchange Server alias is another way of referring to an account. The alias might be the user’s Active Directory Domain Services (AD DS) account, or it could be the first part of the email address (which could also be the same as the AD DS account).
Tip
INSIDE OUT Cut your typing time
You don’t have to type the complete name or alias in an address field, so long as the part of the name that you type is unique. For example, if only one name in the address book matches Bob, you can type Bob as the recipient, even if the recipient’s name is Bob Smith and the alias is bob.smith. If the recipient’s name is Robert Smith and the alias is bob.smith, you can type either Rob or bob—both will resolve to Robert Smith.
As soon as you finish typing a recipient’s name and move the insertion point out of the text box, Outlook 2010 checks the name. If the name is not unique or can’t be found, it is underlined in red. When this occurs, you’ll need to check the name manually.
You can also check a recipient’s name by clicking Check Names in the Names group on the Message tab on the ribbon or by pressing Ctrl+K. When a problem arises, the Check Names dialog box appears, indicating whether the name is not unique or not found. When the name is not unique, all matches are displayed so that you can make a selection.
When a message is sent, it is delivered immediately by default. You can, however, delay message delivery until a specified time for an individual message. Delayed delivery is not specific to Exchange Server accounts, but the feature goes hand-in-hand with message expiration (covered next), so it bears discussing here.
To place a message in the Outbox but have it delivered after a certain point, click the More Options button in the More Options group on the Options tab to open the Properties dialog box. Select the Do Not Deliver Before check box, and then set the date and time using the drop-down lists. Click Close, then complete the message and click Send. It will not be sent until after the specified time.
Just as you can delay the delivery of a message, you can also set a message to expire. The message expires and is removed from the recipient’s mailbox after a specified period of time whether or not it has been read. You might want to have a message expire if its contents become outdated after a certain amount of time, or if you want to ensure that the message is deleted. To set this option, open the Properties dialog box by clicking Message Options on the Options tab, select the Expires After check box, and then set a date and time. The message will no longer be available to the recipient after that time.
Note
The capability to set a message to expire is not a security feature; it simply causes the message to be deleted after the specified period. Use Information Rights Management (IRM), covered in Chapter 14, to prevent messages from being forwarded, copied, or printed.
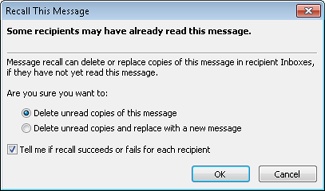
There are many reasons why you might want to recall a message. For example, perhaps the message contains a mistake or is now obsolete. You can recall a message that you have sent so long as the recipient has not read it and the message is still stored on a computer running Exchange Server. Messages sent to recipients using other mail servers cannot be recalled.
To recall a sent message, double-click the message in the Sent Items folder to open it. Click Actions in the Move group on the ribbon, and then click Recall This Message to open the dialog box shown in Figure 40-4. Select whether you want to simply delete all unread copies of the message or delete them and replace them with another message. You can also receive a response reporting the success or failure of each recall attempt.
On occasion, you might want to copy addresses from the GAL to your personal Contacts folder. For example, maybe you use a Personal Digital Assistant (PDA) or smartphone that synchronizes your Contacts folder to your mobile device, and that device does not support Exchange Server directly. The device would not synchronize the GAL, but you might want a few entries available on your mobile device. You can copy those items to the Contacts folder, and from there, they can be synchronized to your mobile device.
You can copy addresses from the GAL to your Contacts folder easily by following these steps:
Click Address Book on the Home tab on the ribbon.
Click the address that you want to add to your Contacts folder. You can also select multiple addresses using the Shift and Ctrl keys.
Choose File, Add To Contacts. The entry from the GAL opens in a contact form.
Make any necessary changes.
Click Save & Close. The contact information is now stored in your Contacts folder.
The Outlook 2010 voting feature is useful when you want to solicit input from a group of message recipients. Perhaps you are looking for approval on a proposal, you are holding an informal election in your organization, or you just want to get the group’s input on an issue.
You can use Outlook’s voting feature with non–Exchange Server accounts as well as with Exchange Server accounts. This feature is typically more useful in a larger organization where Exchange Server is likely to be installed, and that’s why the topic is covered in this chapter. However, the functionality is the same.
Tip
The Voting feature supported by Outlook is certainly useful, but it isn’t a substitute for a formal approval process. If you have Microsoft SharePoint deployed in your organization, consider using workflows in SharePoint to automate approval processes for documents and other items.
With the voting feature, you solicit and tally votes from the group. Outlook 2010 provides predefined voting responses, but you can also create your own. In this section, you’ll learn how to include voting buttons in messages, tally returned votes, and configure voting options.
Here’s how voting works in general: You create a message containing the question or document on which the group will be voting. Next, you add voting buttons to the message. Next, you send the message. Recipients cast their vote by clicking the appropriate button. Outlook 2010 prompts them to confirm the vote and then sends the reply back to you.
Sending a message for a vote is simple. In fact, so long as you want to use one of the Outlook 2010 default sets of voting options, the process takes only a few clicks.
Use the following steps to create a message and add voting buttons to it:
Start Outlook 2010, and then open a new message or open an existing message from your Drafts folder.
On the Options tab, in the More Options group, click Message Options to open the Properties dialog box.
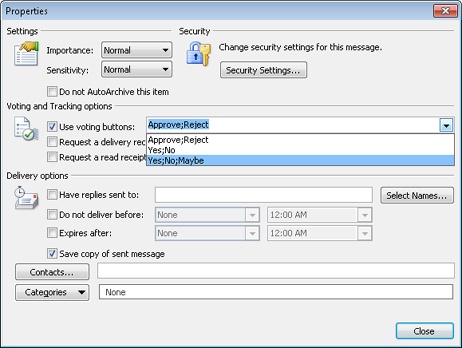
In the Voting And Tracking Options area, select the Use Voting Buttons check box. In the drop-down list, select the group of voting buttons that you want to include, as shown in Figure 40-5.
Click Close.
Edit your message. Include any message attachments and configure message options, such as importance level, if needed.
Click Send to send the message.
Outlook 2010 doesn’t limit you to the default sets of voting options (such as Accept/Reject). You can create your own set that includes the responses that you need for any situation. For example, suppose that you’re planning a company appreciation banquet and need to finalize the menu. You want to give everyone a choice of entree and collect those responses for the caterer. What better way to do that than electronically, through Outlook 2010?
Here’s how:
Compose your message.
On the Options tab, in the More Options group, click Message Options to open the Properties dialog box.
Click the text field in the Use Voting Buttons drop-down list. Delete the existing text. Type your custom vote options separated by semicolons, as shown in Figure 40-6.
Click Close.
Make any final adjustments to the message as needed.
Click Send.

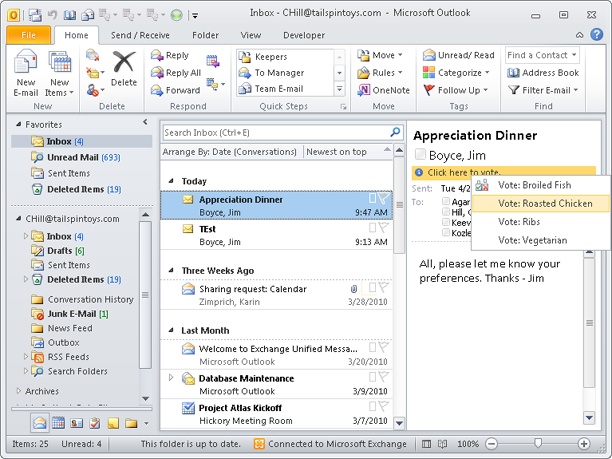
When you receive a message that includes voting buttons, Outlook 2010 displays a message in the InfoBar to indicate that you can vote. Click the InfoBar and then choose an item, as shown in Figure 40-7.
Voting is easy: Just select an option to cast your vote. Outlook 2010 displays a simple dialog box asking whether you want to send the vote now or edit your response. To send the message without modification, select Send The Response Now. To cast your vote and open the message as a reply so that you can include text in your response, select Edit The Response Before Sending.
Note
Outlook 2010 changes the prompt in the InfoBar to indicate that you responded to the voting request, removing your ability to click the InfoBar link and vote again.
When you cast a vote, Outlook 2010 changes the subject of the message to include your vote. For example, if the original subject is Choose An Entree and you click the Broiled Chicken option, the subject of the reply returned to the sender is Broiled Chicken: Choose An Entree.
Votes come back to you in the form of messages. You can view the vote summary in a few ways. If the Reading pane is displayed, you can click the message header, click the summary message in the InfoBar, and then choose View Voting Responses, as shown in Figure 40-8. Alternatively, you can open the Sent Items folder, open the original message, and then click the Tracking button in the Show group on the ribbon. Either method displays the Tracking results, as shown in Figure 40-9.
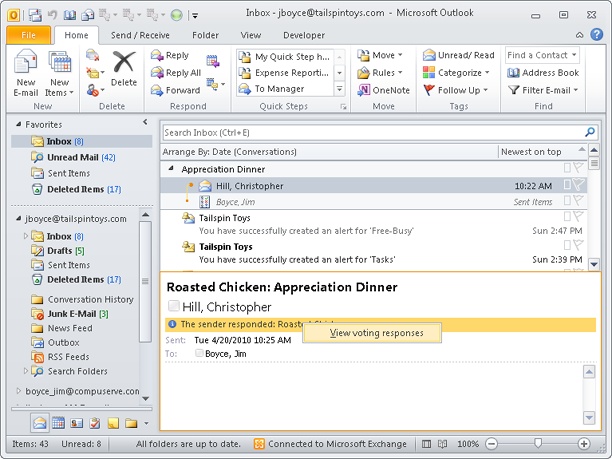
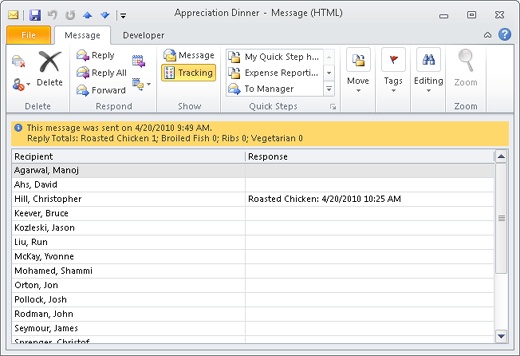
Figure 40-9. Open the message from the Sent Items folder as an alternative way to access the Tracking page.
The Tracking page summarizes the votes, with individual responses displayed one per line. The responses are also totaled in the InfoBar. If you want a printout of the vote responses, print the messages with the Tracking page visible.
Unfortunately, Outlook 2010 doesn’t give you a way to sort the vote tally. You can, however, copy the data to Microsoft Excel 2010 to sort it.
To copy voting data to Excel 2010, follow these steps:
Select the rows that you want to copy. (Select a row, and then hold down the Shift key to select contiguous responses or hold down the Ctrl key to select noncontiguous ones.)
Press Ctrl+C to copy the data to the Clipboard.
Start Excel.
Select a cell in the worksheet and then press Ctrl+V to paste the data.
Choose Data, Sort to open the Sort dialog box, and then click OK to accept the default settings and sort the spreadsheet.
You can set options in Outlook 2010 to configure how it handles voting. To configure these settings, follow these steps:
Start Outlook 2010 (if necessary), and then click File, Options.
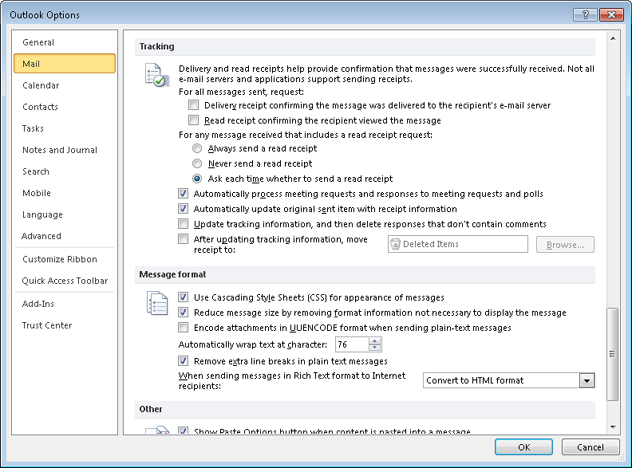
Click Mail in the left pane.
Scroll down to the Tracking group, shown in Figure 40-10.
The Tracking group includes the following options that relate to voting:
Automatically Process Meeting Requests And Responses To Meeting Requests And Polls Outlook 2010 processes and tallies responses when they arrive. If you clear this check box, you must open each response to have Outlook 2010 tally it.
Update Tracking Information, And Then Delete Responses That Don’t Contain Comments Outlook 2010 deletes voting responses that have no additional comments added to them.
Select the options that you want to use, and then click OK to close the Outlook Options dialog box.
Troubleshooting
Votes aren’t being tallied automatically
The Outlook 2010 capability to tally votes automatically, without the user having to open each message, might not be apparent at first. Even on a completely idle system, Outlook 2010 can take several minutes to process the messages. If you need to process the responses more quickly, select all the responses, right-click the selection, and then choose Open Selected Items to open them all at once. Keep in mind, however, that you’ll end up with an open message form for each response, which you’ll then have to close.