Libraries, which debuted in Windows 7, are like folders, with one difference: They can display the contents of other folders from all over your PC—and even from other PCs on your network. In other words, a library doesn’t really contain anything at all. It simply monitors other folders and provides a single “place” to work with all their contents.
Note
If you think that sounds confusing, you’re not alone. So many people were befuddled by libraries that, in Windows 8.1, Microsoft hid this feature!
If you decide to try Libraries out, you can bring them back easily enough. On the View tab of the Ribbon, open the “Navigation pane” pop-up menu and choose “Show libraries.” Now they’re back.
Windows starts you out with four libraries: Documents, Music, Pictures, and Videos. (You can make libraries of your own, too.)
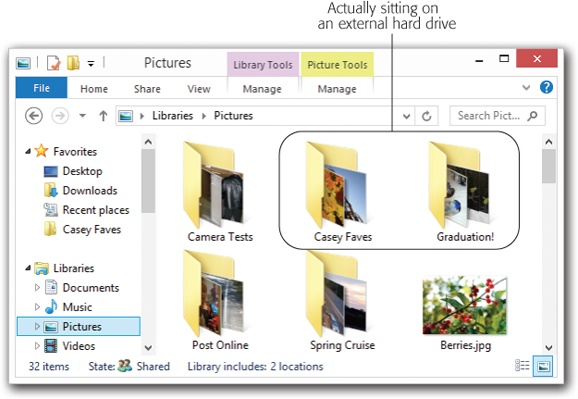
Sure, XP and Vista came with folders bearing those names, but libraries are much more powerful. The Pictures library, for example, seems to contain all your photos—but in real life, they may be scattered all over your hard drive, on external drives, or on other PCs in the house.
So what’s the point? Well, consider the advantages over regular folders:
Everything’s in one spot. When it comes time to put together a year-end photo album, for example, you might be very grateful to find your pictures, your spouse’s pictures from the upstairs PC, and the pictures from your kids’ laptop all in one central place, ready for choosing. Figure 6-14 shows the idea.
Happy laptop reunions. When you come home with your laptop and connect to the network, you’re instantly reunited with all those music, picture, and video files you store on other drives.
Easy backup or transfer. You can back up or transfer all the files corresponding to a certain project or time period in one fell swoop, even though the originals are in a bunch of different places or reside on different collaborators’ computers.
Manipulate en masse. You can work with the contents of a library—slicing, dicing, searching, organizing, filtering—just as you would a folder’s contents. But because you’re actually working with folders from all over your computer and even your network, you can be far more efficient.
To use a library, click its name in your navigation pane. (Try Pictures, for example.)
A few clues tell you that you’re not in a regular folder. First, there’s the appearance of a special Library Tools tab on the Ribbon. The status bar at the bottom of the window, furthermore, says something like “Includes: 2 locations,” letting you know that you’re actually looking at the consolidated contents of two folders.
Tip
Remember, the icons in a library aren’t really there; they’re just a mirage. They’re stunt doubles for files that actually sit in other folders on your hard drive.
Fortunately, when you’re getting a bit confused as to what’s really where, there’s a way to jump to a file or folder’s actual location. Right-click its icon in the library; from the shortcut menu, choose “Open file location” (or “Open folder location”). You jump right to the real thing, sitting in its actual File Explorer window.
A library is nothing without a bunch of folders to feed into it. You can add a folder to a library (like Pictures or Music) in any of four ways, depending on where you’re starting.
You can see the folder’s icon. If the folder is on the desktop or in a window, right-click it. From the shortcut menu, choose “Include in library”; the submenu lists all your existing libraries so you can choose the one you want. Figure 6-15 shows the idea.
You can see the folder’s icon (alternate). Use the right mouse button to drag the folder onto a library’s name in the navigation pane. Release the mouse button when it’s on the library name. From the shortcut menu, choose “Include in library.”
You’ve opened the library window. If you’re already in the library, you can add a folder to it using the dialog box shown in Figure 6-15. Click Add, and then find and double-click the folder you want. You see it added to the “Library locations” list in the dialog box. Click OK.
All the techniques above also work for folders on external drives, USB flash drives, and shared folders on your network. There is, however, some important fine print:
You can add a folder that’s on a USB flash drive, as long as that flash drive’s icon shows up in the navigation pane when it’s inserted, under the This PC/Hard Drives heading. (A few oddball models appear under Devices With Removable Storage; they’re not allowed.) Furthermore, the folder won’t be available in the library when the flash drive isn’t inserted (duh).
You can’t add a networked folder to a library unless it’s been indexed for searching on the PC that contains it; see Results-Listing Tips for details on that process. (If it’s a Windows 7 machine that’s part of a HomeGroup [Three Ways to Share Files], then you’re all set; it’s been indexed.)
As an alternative, you can turn on the “available offline” feature for that networked folder, as described on Offline Files and Sync Center. The good news is that the folder can now be part of your library even when the other PC on the network is turned off. The bad news is that you’ve basically copied that folder to your own PC, which eats up a lot of disk space and sort of defeats the purpose of adding a networked folder to your library.
Getting rid of a folder is pretty straightforward, really. You can use any of these techniques:
If the library window is open: Use the “Manage library” button shown at top in Figure 6-15. Click the folder’s name and then click Remove.
If the library’s name is visible in the navigation pane: Expand the library to show the folder you want to remove. Right-click the folder’s name. From the shortcut menu, choose “Remove location from library.”
Remember: You’re not deleting anything important. A library only pretends to contain other folders; the real ones are actually sitting in other places on your PC or network, even after the library is gone.
The starter libraries (Pictures, Music, Documents, and Videos) are awfully useful right out of the box. Truth is, they’re as far as most people probably go with the libraries feature.
But you may have good reasons to create new ones. Maybe you want to create a library for each client—and fill it with the corresponding project folders, some of which have been archived away on external drives. Maybe you want to round up folders full of fonts, clip art, and text, in readiness for submitting a graphics project to a print shop.

Figure 6-15. Top: To add a regular folder to an existing library, open the library itself. Then, on the Library Tools/Manage tab of its Ribbon, click “Manage library.” Bottom: This dialog box appears. Here you can add new folders or remove existing ones from the library’s concept of the world.
In any case, here are the different ways to go about it:
From the navigation pane. Right-click the word “Library” in any window’s navigation pane, or any blank spot inside a library folder. From the shortcut menu, choose New→Library.
A new, empty library appears, both in the Libraries window and in the list of libraries in the nav pane. It’s up to you to add folders to it, as described earlier.
From a folder. Right-click any folder. From the shortcut menu, choose “Include in library”→“Create new library.” Bing! A new library appears in the Libraries list, named after the folder you clicked. As a handy bonus, this library already contains its first folder: the one you clicked, of course.
Tip
Once you’ve created a library, you can specify which canned library style it resembles most: General Items, Pictures, Music, Documents, or Videos. (Why does it matter? Because the library style determines which commands are available in the Ribbon. Pictures offers a tab that offers slideshow and rotation tools; Music offers choices like “Play” and “Add to playlist.”)
Anyway, to make this choice, open the library. In the Ribbon, on the Library Tools/Manage tab, use the “Optimize library for” pop-up menu. Click the type you want.