Windows doesn’t actually scrounge through every file on your computer. Searching inside Windows’ own operating-system files and all your programs, for example, would be pointless to anyone but programmers. All that useless data would slow down searches and bulk up the invisible index file.
What Windows does index is everything in your Personal folder: email, pictures, music, videos, program names, entries in your People and Calendar apps, Office documents, and so on. It also searches all your libraries (Libraries), even if they contain folders from other computers on your network.
Similarly, it searches offline files that belong to you, even though they’re stored somewhere else on the network. Finally, it indexes everything on the Start screen.
Note
Windows indexes all the drives connected to your PC, but not other hard drives on the network. You can, if you wish, add other folders to the list of indexed locations manually (Adding New Places to the Index).
Windows does index the Personal folders of everyone else with an account on your machine (Chapter 24), but you’re not allowed to search them. So if you were hoping to search your spouse’s email for phrases like “Meet you at midnight,” forget it.
If you try to search anything Windows hasn’t incorporated into its index—in a Windows system folder, for example, or a hard drive elsewhere on the network—a message appears. It lets you know that because you’re working beyond the index’s wisdom, the search is going to be slow, and the search will include filenames only—not file contents or metadata.
Furthermore, this kind of outside-the-index searching doesn’t find things as you type. This time, you have to press Enter after typing the name (or partial name) of what you want to find.
On the other hand, suppose there’s some folder on another disk (or elsewhere on the network) that you really do want to be able to search the good way—contents and all, nice and fast. You can do that by adding it to your PC’s search index.
And you can do that in a couple of ways:
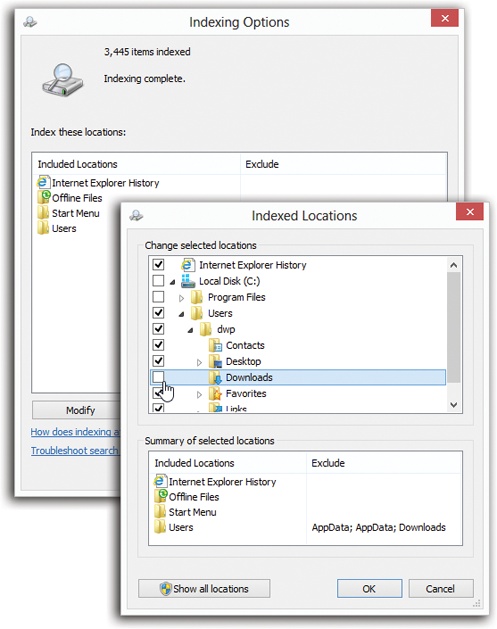
Figure 7-2. In the Indexing Options box, you can add or remove disks, partitions, or folders, thereby editing the list of searchable items. Start by opening Indexing Options (top), and then click Modify. Now expand the flippy triangles, if necessary, to see the list of folders on your hard drive. Turn a folder’s checkbox on (to have Windows index it) or off (to remove it from the index, and therefore from searches). In this example, you’ve just told Windows to stop indexing your Downloads folder. Click OK.
Add it to a library. Drag any folder into one of your libraries (Libraries). After a couple of minutes of indexing, that folder is now ready for insta-searching, contents and all, just as though it were born on your own PC.
Add it to the Indexing Options dialog box. Windows maintains a master list of everything in its search index. That’s handy, because it means you can easily add folders to the index—folders from an external hard drive, for example—for speedy searches.
You can remove folders from the index, too, maybe because you have privacy concerns (for example, you don’t want your coworkers searching your stuff while you’re away from your desk). Or maybe you just want to create more focused searches, removing a lot of old, extraneous junk from Windows’ database.
Either way, the steps are simple. Open the Indexing Options control panel; the quickest way is to open the Charms bar, click Search, click Settings, and start typing indexing into the search box until you see Indexing Options in the search results. Click it, and proceed as shown in Figure 7-2.