You’ve just read about how Search works fresh out of the box. But you can tailor its behavior, either for security reasons or to customize it to the kinds of work you do.
Unfortunately for you, Microsoft has stashed the various controls that govern searching into three different places. Here they are, one area at a time.
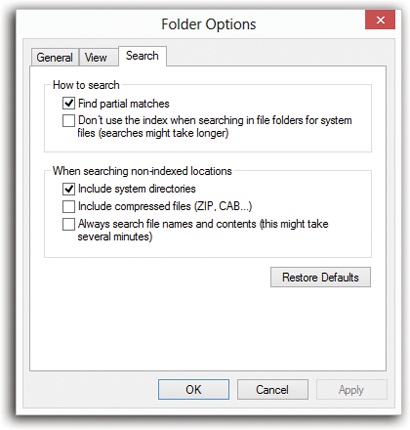
The first source is in the Folder Options→Search dialog box. To open it, find the View tab on the Ribbon in any Explorer window; click Options. In the resulting dialog box, click the Search tab. You wind up at the dialog box shown in Figure 7-3.
Find partial matches. Turn this off if you want Windows to find only whole-word matches, meaning that you’ll no longer be able to type waff to find Mom’s Best Waffle Recipes of the Eighties.doc.
Don’t use the Index when searching in file folders for system files. If you turn this item on, Windows won’t use its internal Dewey Decimal System for searching Windows itself. It will, instead, perform the names-only, slower type of search.
So who on earth would want this turned on? You, if you’re a programmer or system administrator and you’re worried that the indexed version of the system files might be out of date. (That happens, since system files change often, and the index may take some time to catch up.)
Include system directories. When you’re searching a disk that hasn’t been indexed, do you want Windows to look inside the folders that contain Windows itself (as opposed to just the documents people have created)? If yes, then turn this on.
Include compressed files (ZIP, CAB…). When you’re searching a disk that hasn’t been indexed, do you want Windows to search for files inside compressed archives, like .zip and .cab files? If yes, then turn on this checkbox. (Windows doesn’t ordinarily search archives, even on an indexed hard drive.)
Always search file names and contents. As the previous pages make clear, the Windows search mechanism relies on an index—an invisible database that tracks the location, contents, and metadata of every file. If you attach a new hard drive, or attempt to search another computer on the network that hasn’t been indexed, Windows ordinarily just searches its files’ names. After all, it has no index to search for that drive.
If Windows did attempt to index those other drives, you’d sometimes have to wait awhile, at least the first time, because index-building isn’t instantaneous. That’s why the factory setting here is Off.
But if you really want Windows to search the text inside the other drives’ files, even without an index—which can be painfully slow—turn this checkbox on instead.
The dialog box shown in Figure 7-2 is the master control over the search index, the massive, invisible, constantly updated database file that tracks your PC’s files and what’s in them. As described earlier, you can use this dialog box to add or remove folders from what Windows is tracking.
But there are a few more handy options here, too, lurking behind the Advanced Indexing Options button.
To find this third area of search options, start in the Indexing Options dialog box (Control Panel) and click Advanced. Authenticate if necessary. Now you’re ready to perform these powerful additional tweaks.
On the first tab, here’s the kind of fun you can have:
Index encrypted files. Windows can encrypt files and folders with a quick click, making them unreadable to anyone who receives one by email, say, and doesn’t have the password. This checkbox lets Windows index these files (the ones that you’ve encrypted, of course; this isn’t a back door to files you can’t otherwise access).
Treat similar words with diacritics as different words. The word “ole,” as might appear cutely in a phrase like “the ole swimming pool,” is quite a bit different from “olé,” as in, “You missed the matador, you big fat bull!” The difference is a diacritical mark (øne öf mâny littlé lañguage märks).
Ordinarily, Windows ignores diacritical marks; it treats “ole” and “olé” as the same word in searches. That’s designed to make it easier for the average person who can’t remember how to type a certain marking, or even which direction it goes. But if you turn on this box, then Windows will observe these markings and treat marked and unmarked words differently.
Troubleshooting. If the Search command ever seems to be acting wacky—for example, it’s not finding a document you know is on your computer—Microsoft is there to help you.
Your first step should be to click “Troubleshoot search and indexing.” (It appears both here, on the Advanced panel, and on the main Indexing Options panel.) The resulting step-by-step sequence may fix things.
If it doesn’t, click Rebuild. Now Windows wipes out the index it’s been working with, completely deleting it—and then begins to rebuild it. You’re shown a list of the disks and folders Windows has been instructed to index; the message at the top of the dialog box lets you know its progress. With luck, this process will wipe out any funkiness you’ve been experiencing.
Move the index. Ordinarily, Windows stores its invisible index file on your main hard drive. But you might have good reason for wanting to move it. Maybe your main drive is getting full. Or maybe you’ve bought a second, faster hard drive; if you store your index there, searching will be even faster.
In the Advanced Options dialog box, click “Select new.” Navigate to the disk or folder where you want the index to go, and then click OK. (The actual transfer of the file takes place the next time you start up Windows.)
Windows ordinarily searches for just about every kind of useful file: audio files, program files, text and graphics files, and so on. It doesn’t bother peering inside things like Windows operating system files and applications, because what’s inside them is programming code with little relevance to most people’s work. Omitting these files from the index keeps the index smaller and the searches fast.
But what if you routinely traffic in very rare Venezuelan Beekeeping Interchange Format (VBIF) documents—a file type your copy of Windows has never met before? You won’t be able to search for their contents unless you specifically teach Windows about them.
In the Advanced Options dialog box, click the File Types tab. Type the filename extension (such as VBIF) into the text box at the lower left. Click Add and then OK. From now on, Windows will index this new file type.
On the other hand, if you find that Windows uses up valuable search-results menu space listing, say, Web bookmarks—stuff you don’t need to find very often—you can tell it not to bother. Now the results list won’t fill up with files you don’t care about.
Turn the checkboxes on or off to make Windows start or stop indexing them.
Using the “How should this file be indexed” options at the bottom of the box, you can also make Windows stop searching these files’ contents—the text within them—for better speed and a smaller index.