Windows is especially effective at compressing files and folders to reduce the space they occupy on your hard drive—which is ironic, considering the fact that hard drives these days have enough capacity to stretch to Steve Ballmer’s house and back three times.
Even so, compressing files and folders can occasionally be useful, especially when hard drive space is running short, or when you want to email files to someone without dooming them to an all-night waiting session. Maybe that’s why Microsoft has endowed Windows with two different schemes for compressing files and folders: NTFS compression and zipped folders.
Windows 8.1, since you asked, requires a hard drive that’s formatted using a software scheme called NTFS. It’s a much more modern formatting scheme than its predecessor, something called Fat 32—and among its virtues is, you guessed it, NTFS compression.
This compression scheme is especially likable because it’s completely invisible. Windows automatically compresses and decompresses your files, almost instantaneously. At some point, you may even forget you’ve turned it on. Consider:
Whenever you open a compressed file, Windows quickly and invisibly expands it to its original form so you can edit it. When you close the file again, Windows instantly recompresses it.
If you send compressed files (via disk or email, for example) to a PC whose hard drive doesn’t use NTFS formatting, Windows once again decompresses them, quickly and invisibly.
Any file you copy into a compressed folder or disk is compressed automatically. (If you only move it into such a folder from elsewhere on the disk, however, it stays compressed or uncompressed—whichever it was originally.)
There’s only one downside to all this: You don’t save a lot of disk space using NTFS compression (at least not when compared with Zip compression, described in the next section). Even so, if your hard drive is anywhere near full, it might be worth turning on NTFS compression. The space you save could be your own.
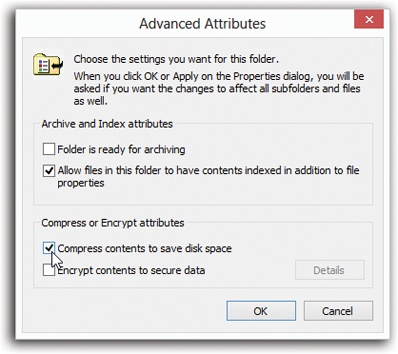
To turn on NTFS compression, right-click the icon for the file, folder, or disk whose contents you want to shrink; from the shortcut menu, choose Properties. Proceed as shown in Figure 7-15.
Tip
To compress an entire hard drive, the steps in Figure 7-15 are even simpler. Just right-click the drive’s icon (in your Computer window); choose Properties; and turn on “Compress this drive to save disk space.” Click OK.
Many Windows veterans wind up turning on compression for the entire hard drive, even though it takes Windows several hours to do the job. (If you plan to go see a movie while Windows is working, though, wait until the appearance of the first message box letting you know about some “open file” that can’t be compressed; then click Ignore All. A few files will remain uncompressed when you get back from the Cineplex, but at least you won’t have had to stay home, manually clicking to dismiss every “open file” complaint box.)
When Windows is finished compressing files, their names appear in a different color, a reminder that Windows is doing its part to maximize your disk space.
Note
If the files don’t change color, somebody—maybe you—must have turned off the “Show encrypted or compressed NTFS files in color” option (see View Tab).
NTFS compression is ideal for freeing up disk space while you’re working at your PC. But as soon as you email your files to somebody else or burn them to a CD, the transferred copies bloat right back up to their original sizes.
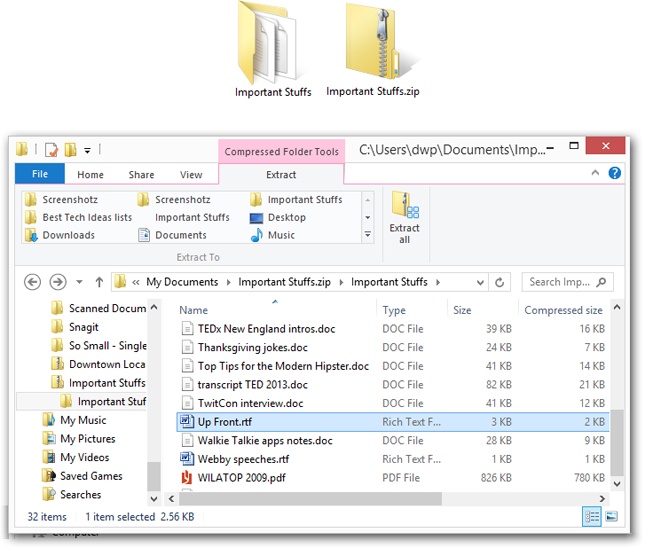
Fortunately, there’s another way to compress files: Zip them. If you’ve ever used Windows before, you’ve probably encountered Zip files. Each one is a tiny little suitcase, an archive, whose contents have been tightly compressed to keep files together, to save space, and to transfer them online faster (see Figure 7-16). Use this method when you want to email something to someone, or when you want to pack up a completed project and remove it from your hard drive to free up space.
You can create a Zip archive in either of two ways:
Right-click any blank spot on the desktop or an open window. From the shortcut menu, choose New→“Compressed (zipped) Folder.” (Or, from the Ribbon’s Home tab, choose “New item”→“Compressed (zipped) Folder.”) Type a name for your newly created, empty archive, and then press Enter.
Figure 7-16. Top: A Zip archive looks just like an ordinary folder—except for the tiny little zipper. Bottom: Double-click one to open its window and see what’s inside. The Size, Compressed Size, and Ratio columns tell you how much space you’ve saved. (JPEG and GIF graphics usually don’t become much smaller than they were before zipping, since they’re already compressed formats. But word processing files, program files, and other file types reveal quite a bit of shrinkage.)
Now, each time you drag a file or folder onto the archive’s icon (or into its open window), Windows automatically stuffs a copy of it inside.
Of course, you haven’t exactly saved any disk space, since now you have two copies (one zipped, one untouched). If you’d rather move a file or folder into the archive—in the process deleting the full-size version and saving disk space—then right-drag the file or folder icon onto the archive icon. Now from the shortcut menu, choose Move Here.
To turn an existing file or folder into a Zip archive, right-click its icon. (To zip up a handful of icons, select them first, and then right-click any one of them.) Now, from the shortcut menu, choose “Send to”→“Compressed (zipped) Folder.” You’ve just created a new archive folder and copied the files or folders into it.
In many respects, a zipped folder behaves just like any ordinary folder. Double-click it to see what’s inside.
If you double-click one of the files you find inside, however, Windows opens a read-only copy of it—that is, a copy you can view, but not edit. To make changes to a read-only copy, you must use the File→Save As command and save it somewhere else on your hard drive first.
Note
Be sure to navigate to the desktop or Documents folder, for example, before you save your edited document. Otherwise, Windows will save it into an invisible temporary folder, where you may never see it again.
To decompress only some of the icons in a zipped folder, just drag them out of the archive window; they instantly spring back to their original sizes. Or, to decompress the entire archive, right-click its icon and choose Extract All from the shortcut menu (or, if its window is already open, click “Extract all files” on the Ribbon’s Compressed Folder Tools/Extract tab). A dialog box asks you to specify where you want the resulting files to wind up.
Tip
Windows no longer lets you password-protect a zipped folder, as you could in Windows XP. But the Web is teeming with Zip-file utilities, many of them free, that do let you assign a password. You might try, for example, SecureZIP Express. It’s available from this book’s “Missing CD” page at www.missingmanuals.com.