In the battle between flexibility and simplicity, Microsoft comes down on the side of flexibility almost every time. Anywhere it can provide you with more options, it will.
Explorer windows are a case in point, as the following pages of sometimes preposterously tweaky options make clear. The good news: If Explorer windows already work fine for you the way they are, you can ignore all of this.
But if you’d like to visit the famed Folder Options dialog box, here’s the new Windows 8 way to do it: On the View tab of the Ribbon, click the Options button. You see the dialog box shown in Figure 6-22.
Here you see an array of options that affect all the folder windows on your PC. When assessing the impact of these controls, earth-shattering isn’t the adjective that springs to mind. Still, you may find one or two of them useful.
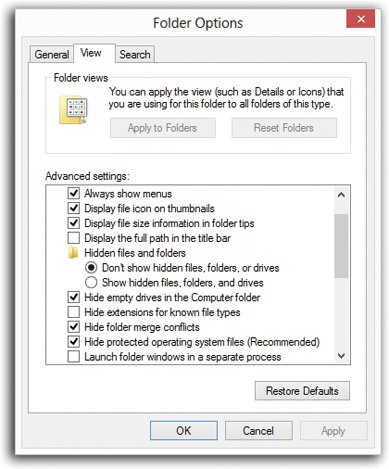
Figure 6-22. Some of the options in this list are contained within tiny folder icons. A double-click collapses (hides) these folder options or shows them again. For example, you can hide the “Don’t show hidden files, folders, and drives” option by collapsing the “Hidden files and folders” folder icon.
On the General tab, you find these intriguing options:
Browse folders. When you double-click a folder, Windows can react in one of two ways. It can either open a second window, overlapping the first; now moving or copying an icon from one into the other is a piece of cake. Or it can replace the original window with a new one. This only-one-window-at-all-times behavior keeps your desktop from becoming crowded with windows. If you need to return to the previous window, the Back button takes you there. Of course, you’ll have a harder time dragging icons from one window to another using this method.
Whatever you decide, you tell Windows using these buttons. Click either “Open each folder in the same window” or “Open each folder in its own window,” as you like.
Click items as follows. This option lets you single-click icons to open them instead of double-clicking—a feature that might make life easier if you have a touchscreen. See Use the Keyboard.
Navigation pane. Here are three handy options that let you customize the navigation pane at the left side of every Explorer window; they’re described starting on Navigation Pane.
Here are the functions of the various checkboxes:
Always show icons, never thumbnails. Windows takes great pride in displaying your document icons as documents. That is, each icon appears as a miniature of the document itself—a feature that’s especially useful in folders full of photos.
On a slowish PC, this feature can make your processor gasp for breath. If you notice that the icons are taking forever to appear, consider turning this checkbox on.
Always show menus. This checkbox forces the traditional Windows menu bar (File, Edit, View, and so on) to appear in every Explorer window, without your having to tap the Alt key.
Display file icon on thumbnails. Ordinarily, you can identify documents (think Word, Excel, PowerPoint) because their icons display the corresponding logo (a big W for Word, and so on). But in Windows’ icon views (medium and larger), you see the actual document on the icon—an image of the document’s first page. So does that mean you can no longer tell at a glance what kind of document it is?
Don’t be silly. This option superimposes, on each thumbnail icon, a tiny “badge,” a sub-icon, that identifies what kind of file it is. (It works on only some kinds of documents, however.)
Display file size information in folder tips. A folder tip is a rectangular balloon that appears when you point to a folder—a little yellow box that tells you what’s in that folder and how big it is on the disk. (It appears only if you’ve turned on the “Show pop-up description” checkbox described below.) You turn off this checkbox if you want to see only the description, but not the size. Talk about tweaky!
Display the full path in the title bar. When this option is on, Windows reveals the exact location of the current window in the title bar of the window—for example, C:\Users\Chris\Documents. See Picture Tools/Manage Tab for more on folder paths. Seeing the path can be useful when you’re not sure which disk a folder is on, for example.
Hidden files and folders. Microsoft grew weary of answering tech-support calls from clueless or mischievous customers who had moved or deleted critical system files, rendering their PCs crippled or useless. The company concluded that the simplest preventive measure would be to make them invisible (the files, not the customers).
This checkbox is responsible. Your personal and Windows folders, among other places, house several invisible folders and files that the average person isn’t meant to fool around with. Big Brother is watching you, but he means well.
By selecting “Show hidden files, folders, and drives,” you, the confident power user in times of troubleshooting or customization, can make the hidden files and folders appear (they show up with dimmed icons, as though to reinforce their delicate nature). But you’ll have the smoothest possible computing career if you leave these options untouched.
Hide empty drives in the This PC folder. For years, the Computer (This PC) window has displayed icons for your removable-disk drives (floppy, CD, DVD, memory-card slots, whatever) even if nothing was in them. Now, though, that’s changed. Now you see icons only when you insert a disk into these drives. (It works like the Mac, if that’s any help.)
Hide extensions for known file types. Windows normally hides the filename extension on standard files and documents (.doc, .jpg, and so on), in an effort to make Windows seem less technical and intimidating. Your files wind up named “Groceries” and “Frank” instead of “Groceries.doc” and “Frank.jpg.”
There are some excellent reasons, though, why you should turn off this option. See Filename Extensions and File Associations for more on this topic.
Hide folder merge conflicts. When you drag a file into a window that contains an identically named file, Windows warns you; it doesn’t want you to replace one file with another accidentally.
When you drag a folder into a window that contains an identically named folder, however, whether or not Windows warns you is up to you. If you turn this box on, you get no warning—just an insta-replace.
Hide protected operating system files. This option is similar to “Show hidden files, folders, and drives”—except that it refers to even more important files, system files that may not be invisible but are nonetheless so important that moving or deleting them might turn your PC into a $2,000 paperweight. Turning this off, in fact, produces a warning message that’s meant to frighten away everybody but power geeks.
Launch folder windows in a separate process. This geekily worded setting opens each folder into a different chunk of memory (RAM). In certain rare situations, this largely obsolete arrangement is more stable—but it slows down your machine slightly and unnecessarily uses memory.
Restore previous folder windows at logon. Every time you log off the computer, Windows forgets which windows were open. That’s a distinct bummer, especially if you tend to work out of your Documents window, which you must therefore manually reopen every time you fire up the old PC.
If you turn on this useful checkbox, then Windows will automatically greet you with whichever windows were open when you last logged off.
Show drive letters. Turn off this checkbox to hide the drive letters that identify each of your disk drives in the This PC window (in the navigation pane, click This PC). In other words, “Local Disk (C:)” becomes “Local Disk”—an option that might make newcomers feel less intimidated.
Show encrypted or compressed NTFS files in color. This option won’t make much sense until you’ve read pages Compressing Files and Folders and Encrypting Files and Folders, which explain how Windows can encode and compact your files for better security and disk space use. Turning on this checkbox turns the names of affected icons green and blue, respectively, so you can spot them at a glance. On the other hand, encrypted or compressed files and folders operate quite normally, immediately converting back to human form when double-clicked; hence, knowing which ones have been affected isn’t particularly valuable. Turn off this box to make them look just like any other files and folders.
Show pop-up description for folder and desktop icons. If you point to an icon, a taskbar button, a found item in Search, or whatever (without clicking), you get a tooltip—a floating, colored label that identifies what you’re pointing to. If you find tooltips distracting, then turn off this checkbox.
Show preview handlers in preview pane. This is the on/off switch for one of Windows’ best features: seeing a preview of a selected document icon in the Preview pane. Turn it off only if your PC is grinding to a halt under the strain of all this graphics-intensive goodness.
Show status bar. This option, new in Windows 8, refers to the horizontal strip that you can summon at the bottom of every Explorer window. It shows you, in tiny type, how many items are in the window. When you select some of them, it tells you how many you’ve highlighted and how much disk space they take up—a great way to anticipate whether or not they’ll fit on some flash drive or CD.
Use check boxes to select items. Now here’s a weird one: This option makes a checkbox appear on every icon you point to with your mouse, for ease in selection. Use the Keyboard explains all.
Use Sharing Wizard (Recommended). Sharing files with other computers is one of the great perks of having a network. As Chapter 27 makes clear, this feature makes it much easier to understand what you’re doing. For example, it lets you specify that only certain people are allowed to access your files, and it lets you decide how much access they have. (For example, can they change them or just see them?)
When typing into list view. When you’ve got an Explorer window open, teeming with a list of files, what do you want to happen when you start typing?
In the olden days, that’d be an easy one: “Highlight an icon, of course!” That is, if you type piz, you highlight the file called “Pizza with Casey.jpg.” And indeed, that’s what the factory setting means: “Select the typed item within the view.”
But Windows 8 has a search box in every Explorer window. If you turn on “Automatically type into the Search Box,” then each letter you type arrives in that box, performing a real-time, letter-by-letter search of all the icons in the window. Your savings: one mouse click.