The last stop on your digital photos’ cycle of greatness is, of course, a showing for other people. Photo Gallery offers several ways to make that happen.
If you highlight some thumbnails and then choose File→Print, the submenu offers you two choices:
Print. Here you can specify what printer, paper, and quality options you want in order to print your own pictures at home—on an inkjet printer, for example.
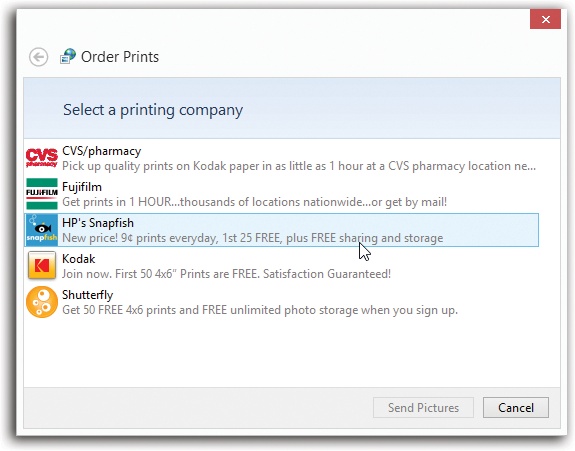
Figure 17-17. Thanks to deals that Microsoft has cut with online photo print shops, you can order prints directly from within Photo Gallery. After you select the size and quantity of the pictures you want, one click is all it takes to transmit your photos and bill your credit card. The rates range from 19 cents for a single 4 x 6 print to about $4 for an 8 x 10. You get photos printed on high-quality glossy paper in the mail.
Order Prints. Even if you don’t have a high-quality color printer, traditional prints of your digital photos are only a few clicks away—if you’re willing to spend a little money, that is. Figure 17-17 has the details.
The best part is that you get to print only the photos you actually want, rather than developing a roll of 36 only to find that just two of them are any good.
Tip
If you plan to order prints, first crop your photos to the proper proportions (4 x 6, for example), using the Crop tool described earlier in this chapter. Most digital cameras produce photos whose shape doesn’t quite match standard photo-paper dimensions. If you send photos to Shutterfly uncropped, you’re leaving it up to Shutterfly to decide which parts of your pictures to lop off to make them fit. (More than one PC fan has opened the envelope to find loved ones missing the tops of their skulls.) You can always restore the photos to their original uncropped versions using the Revert command.
See the box on The Automatic Panorama.
School projects and Valentine’s Day gifts will never be the same. This feature lets you select a bunch of photos, click one button, and wind up with a beautiful, full-poster collage. No gaps, nothing important covered up, softly faded edges.
Just select the photos you want to include (seven or more,
please). On the Ribbon’s Edit tab, click the Auto Collage button—or,
from its  menu, choose the page size and orientation
you prefer. In a few seconds, Photo Gallery asks you to save the finished collage
file to your hard drive. Name it and click Save.
menu, choose the page size and orientation
you prefer. In a few seconds, Photo Gallery asks you to save the finished collage
file to your hard drive. Name it and click Save.
GEM IN THE ROUGH: The Automatic Panorama
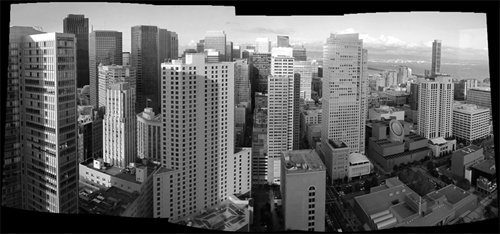
If you’re one of those clever shutterbugs who tries to capture really wide-angle scenes by taking multiple side-by-side photos, Photo Gallery is here to help you. Its automatic panorama-stitching feature can combine those side-by-side shots into one superwide megavista.
To make this work, select all the side-by-side shots in Photo Gallery. On the Create tab of the Ribbon, click Panorama.
After the program crunches away for a while, it proposes a name for the resulting shot (“Flower stitch,” for example); fix the name, if you like, and then click Stitch.
Now the panorama opens up at full size. Sometimes you see that the edges don’t quite align, or that the exposure was slightly different from shot to shot.
Click Edit on the Ribbon and use the cropping tool to shave away the jagged edges. (There’s not much you can do about the mismatched lighting—except to remember that the next time you take panorama shots, it’s best to turn off your camera’s automatic mode. Choose one exposure and stick with it for all the side-by-side shots.)
Now you get to see the finished collage. Lovely!
Of course it’s happened to you: In a group shot, you look good in one take, and your buddy looks good in a different one. Photo Fuse is a feature that can actually combine the faces from different shots into a single, unified shot where everybody looks his best.
See Figure 17-18 for details.
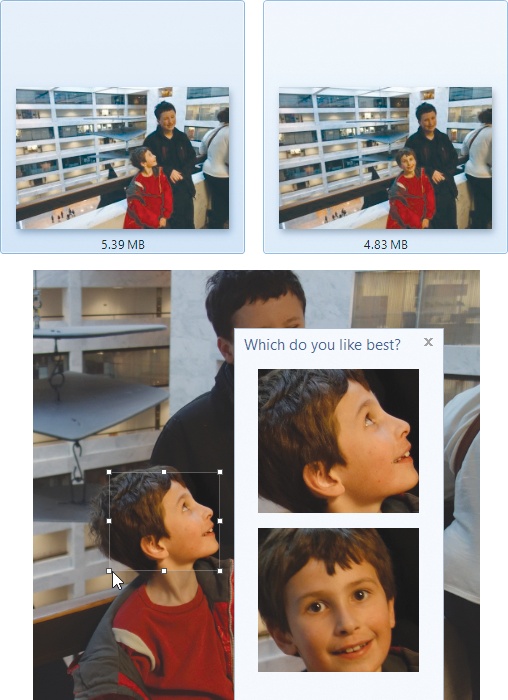
Figure 17-18. To use Photo Fuse, start by selecting the thumbnails of the group photos that need merging (top). They must be images taken of the same people in the same poses with the same lighting at the same angle. It’s software, not Gandalf. On the Create tab of the Ribbon, click Photo Fuse. Now click to place a rectangle on the piece of the photo that looks better in one shot than another—the kid’s face, for example. Drag its handles to change its size and shape. The software shows you the contents of that exact rectangle in every selected photo (bottom). Click the version that looks best—the one where the kid’s not looking away from the camera or not blinking. Repeat as necessary. When you click Save, Photo Gallery creates a new photo that seamlessly combines the preferred head from each photo into a single perfect one. (Usually.)
You can, if you like to live dangerously, select some photos and then, on the
Ribbon’s Create tab, open the “Photo email” icon’s
menu and choose “Send photos as
attachments.”
Unfortunately, full-size photos are usually too big to email. They’re huge files; your recipient’s email system might bounce the message back to you because it exceeds the maximum attachment size.
So when you choose “Send photos as attachments,” Photo Gallery asks how much smaller you want the photo attachments to be. In each case, it throws away size and resolution in order to squish the attachments down in size.
Fortunately, you have an ingenious alternative: Photo Gallery can send a handsome preview message that contains links to the actual, full-resolution photo files that actually reside on your SkyDrive. This feature works if you have a Microsoft account and if Windows Live Mail (Chapter 16) is your email program.
Once you’ve selected the photo(s) you want to email, click “Photo email” on the Ribbon’s Create tab. Photo Gallery hands off the photos to your email program. It prepares an outgoing message with the photos already attached, in preview form; see Figure 17-19.
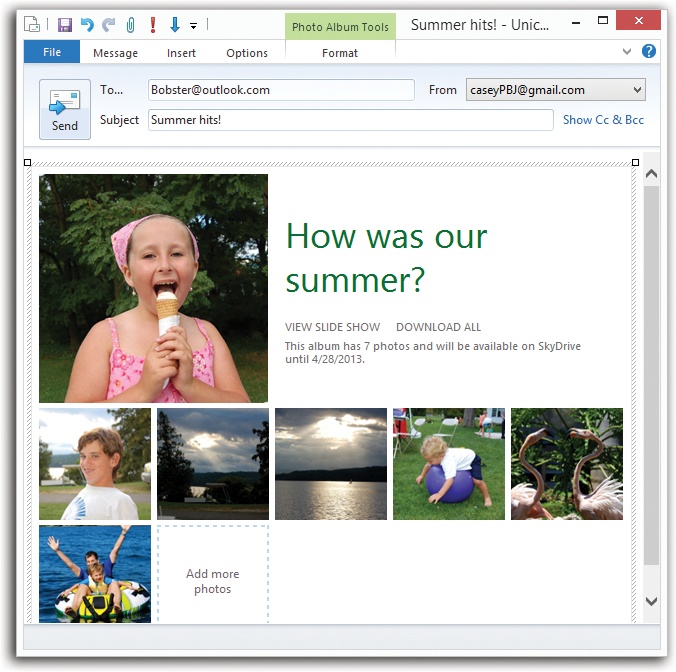
Figure 17-19. When Photoshop Gallery opens your email program, you’re shown a nearly completed outgoing message. You should edit the title to something more descriptive than “Enter album name here.” You can also write your own message above the photos area, or add more photos by clicking “Add more photos.” Your recipients will be able to see a slideshow of these photos or to download the originals—as long as they do so within the three-month deadline.
The beautiful part is that the thumbnails in the message are linked to the full-size originals as they sit on your SkyDrive. Your recipient doesn’t have to worry about attachment sizes—and doesn’t need a Microsoft account or even Windows. She can just click either “View slideshow” or “Download all.”
Address the message, add a note if you like, and click Send.
This button, on the Ribbon, is a quick way to hand off some photos to Windows Live Writer, the blogging software described in Chapter 11. You get a new blog post with the photos already placed, ready to title, write up, and post.
If you highlight some photo thumbnails and then choose Movie, Photo Gallery automatically hands them off to Windows Movie Maker and lays them out in the timeline as a slideshow, all ready to go.
All you have left to do is rearrange them, add music and credits, and save the project as a digital movie file for publishing online or distributing to your hip friends. (Check out the free PDF appendix “Windows Movie Maker” from this book’s “Missing CD” at www.missingmanuals.com.)
If a Movie Maker slideshow project is already open, then this button adds the photos to it.
This set of icons stands ready to “publish” a selected batch of photos to the online service of your choice. The icons represent these services:
Groups refers to address-book groups. (You can set one up here, if you haven’t built any already.) You can define one group for your immediate family, another for your coworkers, and another for friends who like to get your photos. Once you’ve set up a group, you can blast new photos to them with one click on this icon.
SkyDrive. Click this button to copy the selected pictures to your virtual Microsoft hard drive. You’re asked to put them into an album, either an existing one or one you create on the spot. You can also choose whether to post the originals or, to save SkyDrive space, smaller versions.
Facebook, YouTube, Flickr, Vimeo. If you choose one of these free sharing sites, you’re asked to log in with your name and password for that service. In most cases, you have to enter a title, a description, and a category, and you can specify whether your photos are visible to the public or only to you.
When it’s all over, Photo Gallery posts the selected photos. (For the movie sites YouTube and Vimeo, you wind up with an animated slideshow.)
Photo Gallery offers a great way to back up or archive your pictures and movies. Select some photo thumbnails and then choose File→Burn a CD. Insert a blank CD when you’re asked. Photo Gallery copies the full-quality originals you’ve selected to that disc.
This feature is really nice. You can turn any arbitrary batch of photos into your PC’s very own screen saver. After half an hour (or whatever) of inactivity, the screen darkens, thunder rolls, and your friends and family begin to appear, gracefully panning and zooming and crossfading, as your coworkers spill their coffee in admiration and amazement.

Figure 17-20. Begin by choosing File→“Screen saver settings” to open the Screen Saver Settings control panel (top). Make sure the “Screen saver” pop-up menu says “Photo Gallery.” Then click Settings to open the box shown here at bottom. Now you can choose how you want your photos selected. You can specify only the photos with certain tags, only photos without certain tags, photos with certain star ratings, or photos from a particular folder. You can also choose a theme (animation style), a speed, and whether or not you want the photos presented in a random order. When you’ve finished setting up the slideshow—that is, screen saver—click Save. When you return to the Screen Saver Settings dialog box, you can either click Preview to manually trigger the screen saver for your inspection, or click OK and wait 20 minutes for the screen saver to kick in by itself.
The hard part is specifying which pictures you want to be part of the show; you can’t just highlight a bunch of them in Photo Gallery and say, “Use these.” Instead, you have to isolate your screen saver–bound shots, either by giving them a certain tag, applying a certain rating, or confining them to a certain folder. See Figure 17-20 for details.