As you read earlier in this chapter, every document, icon, and preference setting related to your account resides in a single folder: By default, it’s the one bearing your name in the Local Disk (C:)→Users folder. This folder’s friendly name is your Personal folder, but to network geeks, it’s known as your user profile.
Each account holder has a user profile. But your PC also has a couple of profiles that aren’t linked to human beings’ accounts.
Have you ever noticed, for example, that not everything you actually see on your Start screen and on your desktop is, in fact, in your user profile folder?
Part of the solution to this mystery is the Public profile, which also lurks in the Users folder (Figure 24-14). As you can probably tell by its name, this folder stores many of the same kinds of settings your profile folder does—except that anything in (C:)→Users→Public→Desktop appears on everybody’s desktop.
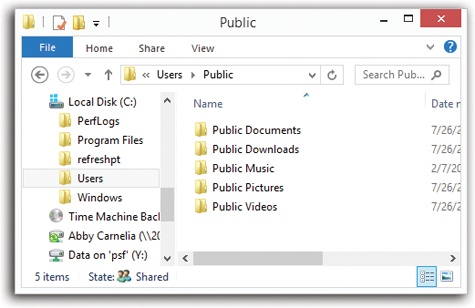
Figure 24-14. Behind the scenes, Windows maintains another profile folder, whose subfolders closely parallel those in your own. What you see—the contents of the Desktop folder, Documents folder, Favorites list, and so on—is a combination of what’s in your own user profile folder and what’s in the Public folder.
All this is a long-winded way of suggesting another way to make some icon available to everybody with an account on your machine. Drag it into the Desktop folder inside the Public folder. (This folder is ordinarily hidden; it appears only when you un-hide Windows’ protected files and folders; see View Tab.)
But if you’re wondering where the common Start screen items are, you’ll have to look somewhere else. If you’re prowling around your hard drive, you’ll find them in (C:)→ProgramData→Microsoft→Windows→Start Menu. (The ProgramData folder is also ordinarily hidden.)
These locations also offer a handy solution to the Whose software is it, anyway? conundrum, the burning question of whose Start screen and desktop reflect new software that you’ve installed using your own account.
Some software installers ask if you’d like the new program to show up only on your Start screen, or on everybody’s Start screen. But not every installer is this thoughtful. Some installers automatically deposit their new software into the ProgramData and Public folders, thereby making its Start screen and desktop icons available to everybody when they log on.
On the other hand, some installers may deposit a new software program only into your account (or that of whoever is logged in at the moment). In that case, other account holders won’t be able to use the program at all, even if they know it’s been installed, because their own Start screens and Desktop folders won’t reflect the installation. Worse, some people, not seeing the program’s name on their Start screens, might not realize that you’ve already installed it—and may well install it again.
One possible solution is to open your Programs folder (into the address bar at the top of an Explorer window, type C:\Users\username\AppData\Roaming\Microsoft\Windows\Start Menu\Programs). Copy the newly installed icon, and then paste it into the “everybody” profile folder (C:\ProgramData\Microsoft\Windows\Start Menu\Programs).
Repeat with the Desktop folder, if you’d like everyone to see a desktop icon for the new program. To open the shared desktop folder, open (C:)→Users→Public→Desktop. (You’ll have to make the Desktop folder visible first—see View Tab—and then make it invisible again afterward.) You’ve just made that software available and visible to everybody who logs onto the computer.
When you create a new account, who decides what the desktop picture will be—and the Start screen configuration, the assortment of desktop icons, and so on?
Well, Microsoft does, of course—but you can change all that. What a newly created account holder sees is only a reflection of the Default user profile. It’s yet another folder—this one usually hidden—in your (C:)→Users folder, and it’s the common starting point for all profiles.
If you’d like to make some changes to that starting point, turn on “Show hidden files, folders, and drives” (View Tab). Then open the (C:)→Users→Default folder and make whatever changes you like.
There’s one final aspect of user accounts that’s worth mentioning: NTFS permissions, a technology that’s a core part of Windows 8’s security system. Using this feature, you can specify exactly which coworkers are allowed to open which files and folders on your machine. In fact, you can also specify how much access each person has. You can dictate, for example, that Gomez and Morticia aren’t allowed to open your Fourth-Quarter Projections spreadsheet at all, that Fred and Ginger can open it but not make changes, and that George and Gracie can both open it and make changes.
Your colleagues will encounter the permissions you’ve set up like this in two different situations: when tapping into your machine from across the network or when sitting down at it and logging in using their own names and passwords. In either case, the NTFS permissions you set up protect your files and folders equally well.
Tip
In Chapter 27, you can read about a very similar form of access privileges called sharing permissions. There’s a big difference between share permissions and the NTFS permissions described here, though: Share permissions keep people out of your stuff only when they try to access your PC from over the network.
Actually, there are other differences, too. NTFS permissions offer more gradations of access. And using NTFS permissions, you can declare individual files—not just folders—accessible or inaccessible to specific coworkers. Read on for details.
Using NTFS permissions is most decidedly a power-user technique because of the added complexity it introduces. Entire books have been written on the topic of NTFS permissions alone.
You’ve been warned.
To change the permissions for an NTFS file or folder, you open its Properties dialog box by right-clicking its icon and then choosing Properties from the shortcut menu. Click the Security tab (Figure 24-15).
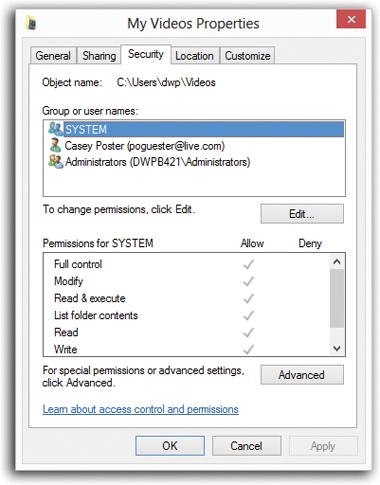
Figure 24-15. The Security tab of an NTFS folder’s Properties dialog box. If you have any aspirations to be a Windows power user, get used to this dialog box. You’re going to see it a lot, because almost every icon on a Windows system—files, folders, disks, printers—has a Security tab like this one.
The top of the Security tab lists the people and groups that have been granted or denied permissions to the selected file or folder. When you click a name in the list, the Permissions box at the bottom of the dialog box shows you how much access that person or group has.
The first step in assigning permissions, then, is to click Edit. You see an editable version of the dialog box shown in Figure 24-15.
If the person or group isn’t listed, then click Edit, then Add to display the Select Users or Groups dialog box, where you can type them in (Figure 24-16).
Tip
Instead of typing in names one at a time, as shown in Figure 24-16, you can also choose them from a list, which lets you avoid spelling mistakes and having to guess at the variations. To do so, click the Advanced button to display an expanded version of the dialog box, and then click Find Now to search for all the accounts and groups on the computer. Finally, in the resulting list, click the names of the people and groups you want to add (Ctrl-click to select more than one at a time). Click OK to add them to the previous dialog box, and then click OK again to add the selected users and groups to the Security tab.
If you’ve used Windows 2000, you might wonder why this process is so much more convoluted in Windows 8. The answer is: Good question!
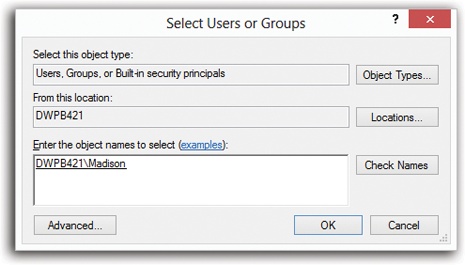
Figure 24-16. Type the names of the people or groups in the “Enter the object names to select” box at the bottom, trying not to feel depersonalized by Microsoft’s reference to you as an “object.” If you’re adding more than one name, separate them with semicolons. Because remembering exact spellings can be iffy, click Check Names to confirm that these are indeed legitimate account holders. Finally, click OK to insert them into the list on the Security tab.
Once you’ve added the users and groups you need to the list on the Security tab, you can highlight each one and set permissions for it. You do that by turning on the Allow or Deny checkboxes at the bottom half of the dialog box.
The different degrees of freedom break down as follows (they’re listed here from least to most control, even though that’s not how they’re listed in the dialog box):
List folder contents, available only for folders, means the selected individuals can see (but not necessarily open) the files and folders inside. That may sound obvious—but believe it or not, if you don’t turn on this option, the affected people won’t even be able to see what’s in this folder. The folder will just appear empty.
Read lets people examine the contents of the file or folder but not make changes. (They can also examine the permissions settings of these files and folders—the ones you’re setting up right now.)
Read & Execute is a lot like Read, except that it also lets people run any programs they find inside the affected folder. When applied to a folder, furthermore, this permission adds the ability to traverse folders. (Traversing means directly opening inner folders even when you’re not allowed to open the outer folder. You might get to an inner folder by double-clicking a shortcut icon, for example, or by typing the folder’s path into the address bar of a window.)
Write is like Read, but it adds the freedom to make and save changes to the file. When applied to a folder, this permission means that people can create new files and folders inside it.
Modify includes all the abilities of the Write and Read & Execute levels, plus the ability to delete files or folders.
Full control confers complete power over the file or folder. The selected person or group can do anything they like with it, including trashing it or its contents, changing its permissions, taking ownership of it (away from you, if they like), and so on.
Of course, turning on Allow grants that level of freedom to the specified user or group, and turning it off takes away that freedom. (For details on the Deny checkbox, see the box below.)
Note
If you’re not careful, it’s entirely possible to “orphan” a file or folder (or even your entire drive) by revoking everyone’s permission to it, even your own, making it completely inaccessible by anyone. That’s why, before you get too deeply into working with NTFS permissions, you might consider creating an extra user account on your system and granting it full control for all your drives, just in case something goes wrong.
Once you understand the concept of permissions, and you’ve enjoyed a thorough shudder contemplating the complexity of a network administrator’s job (six levels of permissions x thousands of files x thousands of employees = way too many permutations), one other mystery of Windows will fully snap into focus: the purpose of groups, introduced on Groups.
On those pages, you can read about groups as canned categories, complete with predefined powers over the PC, into which you can put different individuals to save yourself the time of adjusting their permissions and privileges individually. As it turns out, each of the ready-made groups also comes with predefined permissions over the files and folders on your hard drive.
Here, for example, is how the system grants permissions to the items in your Windows folder for the Users and Administrators groups:
Users | Administrators | |
|---|---|---|
Full Control | X | |
Modify | X | |
Read & Execute | X | X |
List Folder Contents | X | X |
Read | X | X |
Write | X |
If you belong to the Users group, you have the List Folder Contents permission, which means you can see what’s in the Windows folder; the Read permission, which means you can open up anything you find inside; and the Read & Execute permission, which means you can run programs in that folder (which is essential for Windows itself to run). But people in the Users group aren’t allowed to change or delete anything in the Windows folder, or to put anything else inside. Windows is protecting itself against the mischievous and the clueless.
Members of the Administrators group have all those abilities and more—they also have Modify and Write permissions, which let them add new files and folders to the Windows folder (so that, for example, they can install a new software program on the machine).
If you’ve successfully absorbed all this information about permissions, one thing should be clear: People in the Administrators group ought to be able to change or delete any file in your Windows folder. After all, they have the Modify permission, which ought to give them that power.
In fact, they can move or delete anything in any folder in the Windows folder, because the first cardinal rule of NTFS permissions is this:
NTFS permissions travel downstream, from outer folders to inner ones.
In other words, if you have the Modify and Write permissions to a folder, then you ought to have the same permissions for every file and folder inside it.
But in Windows XP, there was something called the Power Users group. It’s been turned off in Windows 8, but for the sake of illustration, let’s say you’re part of it. You’d find that you can’t, in fact, delete any files or folders in the Windows folder. That’s because each of them comes with Modify and Write permissions turned off for Power Users, even though the folder that encloses them has those permissions turned on.
Why would Microsoft go to this trouble? Because it wanted to prevent people in this group from inadvertently changing or deleting important Windows files—and yet it wanted these people to be able to put new files into the Windows folder, so they could install new programs.
This is a perfect example of the second cardinal rule of NTFS permissions:
NTFS permissions that have been explicitly applied to a file or folder always override inherited permissions.
Here’s another example: Suppose your sister, the technical whiz of the household, has given you Read, Write, Modify, Read & Execute, and List Folder Contents permissions to her own Documents folder. Now you can read, change, or delete any file there. But she can still protect an individual document or folder inside her Documents folder—the BirthdayPartyPlans.doc file, for example—by denying you all permissions to it. You’ll be able to open anything else in there, but not that file.
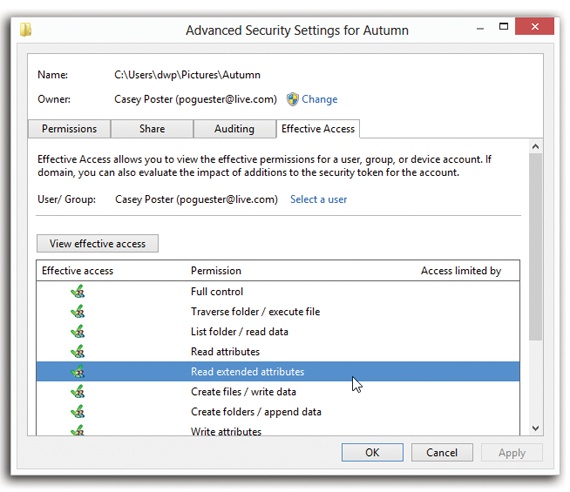
Figure 24-17. The Effective Permissions tab for an NTFS folder. Note that you can’t turn these checkboxes on or off; this is a read-only screen that tells you what permissions the selected user or group has for the file or folder. You can’t modify the permissions here. You can’t tell from this display how these effective permissions have been calculated, either (that is, where the permissions have been inherited from).
Believe it or not, NTFS permissions get even more complicated, thanks to the third cardinal rule:
Permissions accumulate as you burrow downward through subfolders.
Now suppose your sister has given you the Read and List Folder Contents permissions to her Documents folder—a “look but don’t touch” policy. Thanks to the first cardinal rule, you automatically get the same permissions to every file and folder inside Documents.
Suppose one of these inner folders is called Grocery Lists. If she grants you the Modify and Write permissions to the Grocery Lists folder so you can add items to the shopping list, you end up having Read, Modify, and Write permissions for every file in that folder. Those files have accumulated permissions—they got the Read permission from Documents, and the Modify and Write permissions from the Grocery Lists folder.
Because these layers of inherited permissions can get dizzyingly complex, Microsoft has prepared a little cheat sheet, a dialog box that tells you the bottom line, the net result—the effective permissions. To see it, follow these steps:
Click the Advanced button on the Security tab.
The Advanced Security Settings dialog box appears.
Click the Effective Access tab; click “Select a user.”
Now you see the same Select User or Group dialog box you saw earlier when you were creating permissions.
Click the user or group whose effective permissions you want to see, and then click OK.
You return to the Effective Access tab.
Click “View effective access.”
You now see checkmarks next to the permissions that are in effect, taking into account folder-permission inheritance and all other factors for the user or group of that particular file or folder (Figure 24-17).