Let’s suppose there are two PCs in your house. Setting up a HomeGroup is incredibly easy. In fact, it’s as easy as 1, 2, 3, 4, 5, 6.
You can do the whole thing either in TileWorld or at the Control Panel; the following pages walk you through both setup procedures.
Fingers ready? Make sure you’re signed in with an Administrator account. It doesn’t matter which PC you start with, although if you’re in TileWorld, that pretty much means it’s one of your Windows 8 machines.
1. On the first PC, open the HomeGroup panel of PC Settings (Figure 27-1, top).
To get to the right screen, open the Charms bar; select Settings; select “Change PC settings”; select Network, then HomeGroup.
Now then. What you see here could be any of three things, depending on how kind you’ve been to others in the course of your life:
On/off switches for Documents, Music, Pictures, etc.: A HomeGroup already exists, probably because you set one up the day you turned on Windows 8.1.
A Create button: Everything’s set up right, but the HomeGroup hasn’t been created yet. Click Create (Figure 27-1, top).
An error message: “To help keep your stuff safe, sharing…is turned off.” To fix this problem, select Connections (right there on the same Network panel), then click the name of your network. Turn on “Find devices and content” right at the top.
Now return to the HomeGroup pane and click Create.
In each case, now you should see something like Figure 27-1, bottom.
Figure 27-1. Top: Welcome to the HomeGroups—a feature so cool, Microsoft gave it duplicate setup wizards. This illustration depicts the TileWorld version. (Figure 27-4 shows the desktop version.) Bottom: Specify which libraries you want other people on the network to be able to see. Way bottom: Microsoft is telling you the password that will let all your Windows 7 and 8 PCs join this little file-sharing cluster. It’s the only setup you’ll need.
3. Turn on the switches for the stuff you want to share.
You can make your Documents, Photos, Music, and Videos libraries available for the other PCs in your house to use. And you can share whatever printer is connected to your PC—an inkjet, for example.
The “Media devices” heading means: “Let me play my music, pictures, and videos on the Xbox.”
At the bottom of this panel, Windows displays a ridiculously unmemorable password, like E6fQ9UX3uR. Fortunately, you’ll never have to memorize it. You can also change it to something less dorky, as described on Creating a HomeGroup at the Desktop.
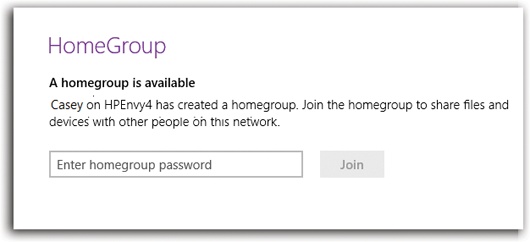
4. Walk to the second PC. Open the HomeGroup panel just as you did in step 1.
This time, the wording is different. It sees the first PC already on the network, already with a HomeGroup initiative under way (Figure 27-2).
5. Enter the membership password and hit Join.
(The membership password is the one shown at bottom in Figure 27-1.)
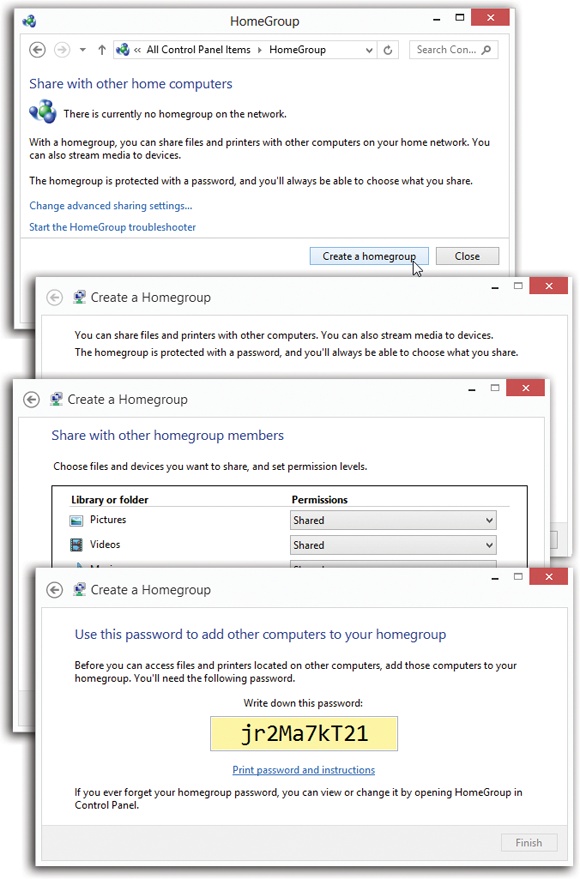
Figure 27-3. Here’s how to use the Control Panel to set up a HomeGroup. On the first PC, open any Explorer window. On the Ribbon’s Share tab (not shown), click “Create or join a homegroup.” (It doesn’t matter which PC you start with, as long as it’s using Windows 7 or 8. The Windows 7 version has to be Home Premium, Professional, Enterprise, or Ultimate. Other versions can join your HomeGroup—just can’t create one.) Top: Click “Create a homegroup.” Second from top: Here’s your complimentary explanation of what a HomeGroup is. Click Next. Third from top: Specify which folders you want to share. Click Next. Bottom: Here’s the password other computers will need to join this HomeGroup.
Now you see a “Libraries and devices” screen that looks just like the one in Figure 27-1 at bottom. This is your opportunity to specify which stuff in your account, on this computer, you want to share with everybody else.
6. Slide the bars to indicate which folders you’d like to share.
If you have a third PC, or a fourth or a fifth, repeat steps 4–6. If you buy another PC a year from now, repeat steps 4–6.

And that’s all there is to it. Your computers are now joined in blissful network harmony.
You can also create a HomeGroup the Windows 7 way—using the Control Panel. You’ll find exactly the same options, just presented in a different graphic style and spread out over more dialog boxes. See Figure 27-3.
Tip
One advantage of the Control Panel method: You have far more options.
Open the main HomeGroup screen (see Figure 27-3, top). Here, the links let you remind yourself of the password, leave the HomeGroup, or view the master sharing control panel for your computer (“Advanced sharing settings”). Best of all, here’s where you can change the password. Click “Change the password,” authenticate if necessary, and make up any new password you like (eight characters or longer). (“Bluefish” is much easier to remember than E6fQ9UX3uR.)
Once a HomeGroup is set up, using it is a piece of cake.
Root through other people’s libraries. On PC #2, click HomeGroup at the left side of any Explorer window. Voila! There are the icons for every PC—in fact, every account on every PC (Figure 27-4).
And if you open one of them, you can see the pictures, music, videos, documents, and whatever else they’ve made available for sharing.
Share each other’s printers. When you go to print, you’ll see that all the printers in the house are now available to all the PCs in the house. For example, if there’s a color inkjet plugged into the USB jack of Computer #1, you can send printouts to it from the Print dialog box of Computer #2. (The other computers’ shared printers even have their own icons in the Devices and Printers folder, as described in Chapter 20.)
Play each other’s music and video. When you’re in Windows Media Player or Media Center, same thing: You’ll see the names of all the other computers listed for your browsing pleasure, and inside, all their music, photos, and videos, ready to play. (The other machines are listed in the navigation pane at left, in a category called “Other libraries.”)
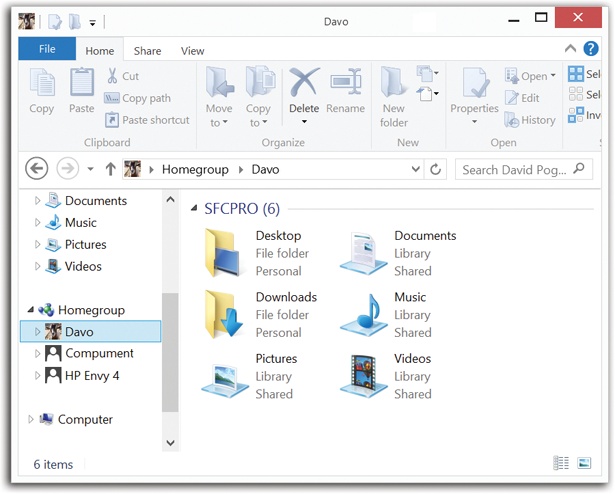
Figure 27-4. Sitting at PC #1, any Explorer window lets you work with the contents of all the other PCs’ libraries. Just expand the Homegroup triangle at the left side of any Explorer window. There they are: individual listings for each account on each PC. You can click the Homegroup heading and see icons for each account holder/PC, or you can open the flippy triangles in the navigation pane. In general, you can’t change or delete their stuff; this is a “look, don’t touch” situation.
Microsoft starts you off by sharing your main libraries—Photos, Videos, Music, Documents. Anything you put in them becomes available immediately.
But that doesn’t mean you’re limited to sharing those folders. You can share any folder you like, making it available for ransacking by everyone else in the HomeGroup.
To do that, open whatever Explorer window it’s in. On the Ribbon’s Share tab, the tiny scrolling list offers every conceivable way to share the contents of this window (Figure 27-5):
Homegroup (view). Everybody else in the group can see and open these files and folders, but can’t delete, change, or add anything.
Homegroup (view and edit). Everybody else in the group can do whatever they like to these files and folders—add, change, delete, whatever. This is a good choice if “everybody” means you, moving between computers, or maybe “you and your perfectly trustworthy partner.”
Robin, Casey, Lee, Dana… You can also share this window’s contents with just one person. Select his name here.
Specific people. This option opens a dialog box that lets you add several people to the lucky-invitees list quickly. It’s a lot less clunky than adding them one at a time as described in the previous paragraph. See Figure 27-8, later in this chapter.
Advanced sharing. When you’ve opened the window for a drive or a system folder, the Ribbon doesn’t show all of those options. Instead, it shows only one option: Advanced sharing. It opens the Properties dialog box for that drive or folder, open to the Sharing tab, where you can fiddle with the more complex passwords and permissions described later in this chapter.

If you’re feeling a little private, you can remove your PC from the big happy network family, either temporarily or permanently. Just click the Leave button shown in Figure 27-1.
You can rejoin at any time—you’ll see a Join button on the HomeGroup panel—but you’ll need the password. (You can find out the password by opening the HomeGroup panel on any other PC.)
Tip
If you’re not using the HomeGroup feature at all, you can also disable it completely. The advantage is that the HomeGroup heading won’t take up space in your navigation bar anymore.
To do that, switch your network to the Public type (“No, don’t turn on sharing”), as shown at lower right on Mapping Shares to Drive Letters. The next time you start the PC, HomeGroup will have vanished from your Explorer windows.
If you ever decide to adjust which folders you’re sharing—to turn off your Music, turn on your Documents, or whatever—no biggie. Open the HomeGroup panel shown in Figure 27-1 again, and just change the switches.