If the Public folder method seems too simple, restrictive, and insecure to you, then you can graduate to what Microsoft cleverly calls the “share any folder” method. In this scheme, you can make any folder available to other people on the network.
This time, you don’t have to move your files anywhere; they sit right where you left them. And this time, you can set up elaborate sharing permissions that grant individuals different amount of access over your files.
Better yet, files you share this way are available to other people on the network and other account holders on the same computer.
Here’s how to share a file or folder disk on your PC:
In an Explorer window, open the window that contains the files or folders you want to share. On the Ribbon’s Share tab, choose the names of the people you want to share with.
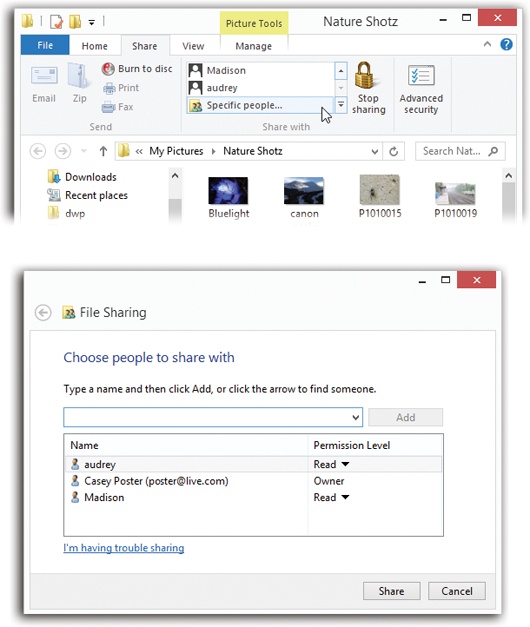
The names of this PC’s other account holders all appear here, in this cramped scrolling list (Figure 27-8, top). You can click to share with one person.
Or, to share with more than one person, click “Specific people” to open the “Choose people to share with” dialog box (Figure 27-8, bottom). You wanted individual control over each account holder’s access? You got it.
Note
The steps for sharing a disk are different. See the box on Sharing Disks.
Figure 27-8. Top: The Ribbon offers insta-sharing with any individual. Or, if you want more than one person to get in on the fun, choose “Specific people” to open… Bottom: …this box. Use the pop-up menu at the top to choose an account holder’s name. Or type it out, if you prefer. After each name, click Add. Then use the Permission Level pop-up menu to specify either Read (“look but don’t touch”) or Read/Write (“you can edit and even delete stuff”) permissions. Click Share when you’re finished.
Choose a person’s name from the upper pop-up menu, and then click Add.
This is the list of account holders (Chapter 24)—or account-holder groups, if someone has created them.
If the person who’ll be connecting across the network doesn’t yet have an account on your machine, choose “Create a new user” from this pop-up menu. (This option is available if the PC is not part of a HomeGroup. Also, “Create a new user” isn’t some kind of sci-fi breakthrough. You are not, in fact, going to create a human being—only an account for an existing person.)
The name appears in the list.
Now your job is to work through this list of people, specify how much control each person has over the file or folder you’re sharing.
Click a name in the list. Click the
 in the Permission
Level column and choose Read or Read/Write.
in the Permission
Level column and choose Read or Read/Write.Read is that “look, but don’t touch” business. This person can see what’s in the folder (or file) and can copy it, but can’t delete or change the original.
Contributors (available for folders only—not files) have much broader access. These people can add, change, or delete files in the shared folder—but only files that they put there. Stuff placed there by other people (Owners or Co-owners) appears as “look, but don’t touch” to a Contributor.
Read/Write means that this person, like you, can add, change, or delete any file in the shared folder.
This stuff may sound technical and confusing, but you have no idea how much simpler it is than it was before Windows 8 came along.
Click Share.
The “Your folder [or file] is shared” dialog box appears. This is more than a simple message, however; it contains the network address of the files or folders you shared. Without this address, your colleagues won’t know that you’ve shared stuff and will have a tough time finding it.
Click “e-mail” or “copy” (Figure 27-9).
The “e-mail” link opens a new, outgoing message in your email program, letting the gang know that you’ve shared something and offering them a link to it. The “copy” link copies the address to the Clipboard so you can paste it into another program—which is your best bet if Mail isn’t your email program of choice.
Tip
To stop sharing a folder or file, click it. Then, from the Share tab of the Ribbon of whatever window contains it, choose “Stop sharing.”
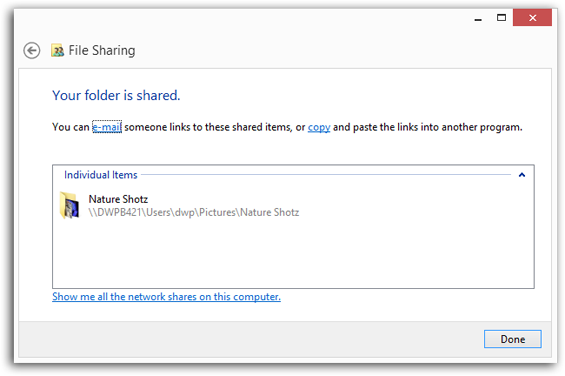
Figure 27-9. Windows wants to make absolutely sure that you know what you’ve done. Wouldn’t want the wrong people sniffing around the wrong personal files, now.
Microsoft made a noble step forward in simplicity with the “share any folder” wizard described in the previous pages. But the older, more complicated—yet more flexible—method is still available. Here’s a quick review of this alternate route (which is, by the way, the only route for sharing entire disks):
Right-click the folder or disk you want to share. If it’s a folder, choose Properties from the shortcut menu, and then click the Sharing tab. If it’s a disk, choose “Share with”→“Advanced sharing.”
At this point, you could click the Share button (if you’re operating on a folder, anyway). You’d arrive at the dialog box shown in Figure 27-8 (bottom) where you could specify the account holders and permission levels, just as described earlier. But don’t.
Turn on “Share this folder.” (See Figure 27-10, top.) Next, set up the power-user sharing options.
For example, you can limit the number of people who are browsing this folder at once. You can click Permissions to fine-tune who can do what (Figure 27-10, bottom). And you can edit the “Share name”—in fact, you can create more than one name for the same shared folder—to make it more recognizable on the network when people are browsing your PC.
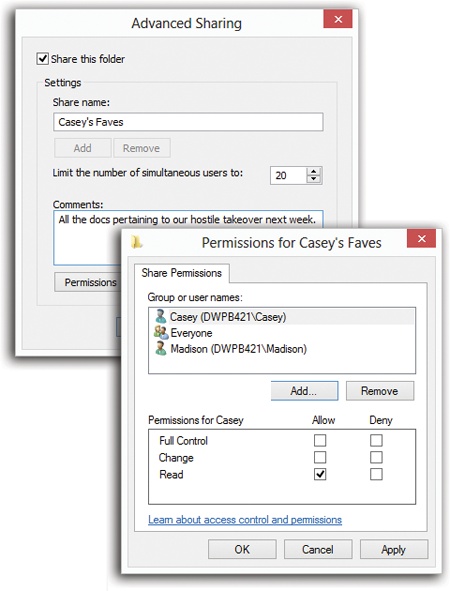
Figure 27-10. Top: Much finer-tuned sharing features are available in this more advanced box. Bottom: For example, you can specify personalized permissions for different individuals.
Tip
For more on Allow, Deny, and other sharing privileges, see Step 1: Specify the person.
And now, the fine print on sharing files:
Sharing a folder also shares all the folders inside it, including new ones you create later.
On the other hand, it’s OK to change the sharing settings of a subfolder. For example, if you’ve shared a folder called America, you can make the Minnesota folder inside it off-limits by making it private. To do this, right-click the inner folder, choose Properties, click Sharing, click Advanced Sharing, and use the dialog box shown in Figure 27-10.
Be careful with nested folders. Suppose, for example, that you share your Documents folder, and you permit other people to change the files inside it. Now suppose that you share a folder that’s inside Documents—called Spreadsheets, for example—but you turn off the ability for other people to change its files.
You wind up with a strange situation. Both folders—Documents and Spreadsheets—show up in other people’s Network windows, as described below. If they double-click the Spreadsheets folder directly, they won’t be able to change anything inside it. But if they double-click the Documents folder and then open the Spreadsheets folder inside it, they can modify the files.
If a certain folder on your hard drive is really private, you can hide the folder so that other people on the network can’t even see it. The secret is to type a $ symbol at the end of the share name (shown at top in Figure 27-10).
POWER USERS’ CLINIC: Unhiding Hidden Folders
As sneaky and delightful as the hidden-folder trick is, it has a distinct drawback—you can’t see your hidden folder from across the network, either. Suppose you went to the upstairs PC on the network to open something in your hidden My Novel folder (which is downstairs in the kitchen). Fortunately, you can do so—if you know the secret.
On the upstairs computer, press  +R. In the Run dialog box, type the path of
the hidden folder, using the format \\Computer
Name\Folder Name.
+R. In the Run dialog box, type the path of
the hidden folder, using the format \\Computer
Name\Folder Name.
For example, enter \\kitchen\my novel$ to get to the hidden folder called “My Novel$” on the PC called “Kitchen.” (Capitalization doesn’t matter.) Then click OK to open a window showing the contents of your hidden folder.
For example, if you name a certain folder My Novel, anyone else on the network can see it (even if they can’t read the contents). But if you name the folder My Novel$, it won’t show up in anybody’s Network window. They won’t even know it exists.