
File Formats, Quality Settings & Resolution


WHEN I STARTED BetterPhoto.com in 1996, I saved all the photos displayed on the site as GIF files. At the time, I didn’t know that the GIF format wasn’t the best way to save photos. Since it’s limited in how many colors it captures, the GIF format is better for flat color graphics, such as cartoons and drawings. For displaying all the color gradations in photographs, the JPEG format is much better. Once I learned this, I began replacing GIFs with JPEGs. For several years, I used JPEGs almost exclusively. Recently, though, I’ve changed my methods again. After learning what I could do with raw files, I now use them for almost all of my photography. Learning about the various file formats, along with all the quality settings and resolution options, will go a long way toward giving you as much control over your camera and your photographic results as possible.

1/60 SEC. AT f/5.6, ISO 100, 100–400MM LENS AT 400MM
IT’S HARD FOR US artistic types to accept the fact that each digital image is nothing more than a neatly arranged series of ones and zeros—a string of technical information that, when interpreted and displayed by certain programs, looks like a picture. These strings of information can be configured in different ways, each being a different picture file format. The three types of formats we’ll examine in this chapter are TIFF, JPEG, and raw.
Many digital cameras give you a choice when it comes to file format. And since you select the format before you take the picture, it’s very important that you choose wisely. As with any choice in digital photography, each format has its advantages and disadvantages. Each is best suited to a particular photographic application. These advantages and disadvantages involve a choice between image quality and image quantity. Capturing images in a large, high-quality format, for example, can cause problems when it comes to space limitations on your memory card, while working with smaller, lower-quality formats can cause problems when it comes to image quality, especially when you print your images.

A Quick Guide to File Format Selection

 If you like to travel, cannot afford to buy a lot of memory card storage, and/or fear another layer of complication when it comes to working with your images on the computer, shoot in the highest quality JPEG mode you can. If you choose this option, as soon as you get your image onto your computer, save it as a TIFF file or PSD (Photoshop Document).
 If you have a way to easily offload images (i.e., onto your laptop or a portable storage device), have a need for ultimate control over the quality of your images, and/or don’t mind adding another layer of complexity onto your digital workflow process, choose the raw file format.

Some cameras only capture images in the JPEG format and don’t offer a format choice. If you have a camera that doesn’t give you a choice (check your owner’s manual), you can jump ahead to the next chapter for now. If you have a camera that offers more than one file format, this chapter will help you make an informed decision before you begin taking pictures. The two most prevalent file format options are JPEG and raw. In a nutshell, the JPEG format is much simpler to use and more economical on space. Raw, also known as “camera raw,” is more flexible, but uses more space. In addition, we’ll also look at one other high-quality option, the TIFF file format.
JPEG (Joint Photographic Experts Group) is by far the most popular image file format. Most people like it because the results from JPEGs are acceptably good and the amount of images you can pack onto a memory card is far greater than when using TIFF or raw files.
The JPEG file format lets you save big image files in tiny packages. For example, if your original digital image is 18 MB (megabytes), a JPEG version of this might be as little as 2 MB, whereas another file format might take up several megabytes of storage space. By discarding information that’s not visible to the human eye, the JPEG format makes files extraordinarily small. Also, JPEGs are easy to use and view. The format is universal, viewable by Web browsers and e-mail programs around the world. If your primary interests are uploading photos to a Web site or sharing photos via e-mail, JPEG format is great.
There’s one problem with JPEGs though. When information is discarded in order to squeeze more images into limited memory card space, this process of compressing the image can have negative side effects.

On a trip through France, I saw this attractive scene of three boats in the Cassis harbor. Because I had a limited amount of memory card space available, I opted to shoot this as a high-quality JPEG.
1/500 SEC. AT f/6.7, ISO 100, 100–300MM LENS AT 260MM, JPEG FORMAT
JPEG compression occurs when the camera saves a JPEG image to the digital media and also when you save a file on your computer. When compressed to the maximum, a JPEG image will usually display defects, called artifacts. The more you compress a JPEG, the more these artifacts will mar the quality of your photo. You control how much your images are compressed with a quality setting (which we’ll get to in a minute). With JPEG, the goal is to minimize these artifacts while keeping the file as small as possible.
Some photographic images show artifacts more readily than others. In my experience, scenes with a polarized blue sky illustrate the negative effects of overcompressing (or over-JPEGing) more clearly than images with details and varied texture, such as a picture of green grass or a forest of trees.

If you look closely at the blue sky in these two images, you can see the negative effects of artifacts. In the second image, the blue tones of the sky begin to band and look blocky or jagged. I shot both of these images as JPEGs. The only difference was how I saved them once I had transferred them to the computer. I saved the first image as a TIFF file and the second at the lowest-quality JPEG setting possible for comparison—in practice, you would rarely, if ever, save at such a low setting. Usually, when I save JPEGs, I keep the quality setting around 7 or 8, unless I absolutely must save the image as a smaller file. So, the lesson here is this: Shooting in a high-quality JPEG format can be safe; just be careful about compressing the image so much that it does noticeable damage to your photo.
1/250 SEC. AT f/5.6, ISO 100, 100–400MM LENS AT 400MM; RIGHT: 1/250 SEC. AT f/4.5, ISO 100, 100MM MACRO LENS
Whenever you shoot or save an image as a JPEG, you can save it at any of a variety of different levels of compression. These compression levels are quality settings. There’s a scale from high compression (lowest image quality) to low compression (highest image quality). When you save your photo as a JPEG, select the highest quality you can. You can make this setting both in your camera and also later on your computer if you resave the file after making modifications to it. Make sure that you’re in the driver’s seat in either option: If you’re taking pictures as JPEGs, learn from your owner’s manual how to set the quality or compression level. If you need to save an image as a JPEG in a software program, again, aim for keeping the quality level as high as you can while making the file as small as you need it to be.
For example, if you have a slow Internet connection, you may opt to compromise the quality a bit to reduce your file size. But avoid the lower quality settings if you want your images to remain sharp, crisp, and clear.
As someone who loves to travel, I’ve found that the JPEG format works extremely well. I’ve taken 3-MB JPEG images and enlarged them to beautiful 13 × 19-inch prints. I’ve also enjoyed how easy JPEGs are to upload to the Web or to e-mail to friends and family. However, knowing what I have now learned about the raw file format, I now prefer to shoot raw files most of the time. More on raw in just a moment, but first, let’s look at the TIFF file format.

While exploring the beach in Carmel, CA, I photographed this little boy watching the waves. I shot this image as a JPEG because, honestly, I hadn’t yet learned the virtues of using the uncompressed file formats, such as camera raw.
1/250 SEC. AT f/11, ISO 100, 16–35MM LENS AT 16MM, JPEG FORMAT.

FILE FORMATS AREN’T EVERYTHING
Don’t be afraid of experimenting with file formats, but don’t overvalue them either. Don’t let yourself get stuck. If file formats are totally confusing to you, simply move on to the next topic and come back to this later. When it comes to overall photo quality, these technical issues are far less important than things like composition, lighting, shutter speed, aperture, and ISO. The creative controls are much more influential when it comes to making powerful, eye-catching images.
TIFF (Tagged Image File Format) stores the image in a high-quality file. TIFF may be a good choice for you if your camera offers it as an option, and:
a you cannot or do not want to save the image as a raw file
b you have a lot of space available on memory cards AND
c you are seriously interested in assuring the highest image quality, especially when printing
Many photographers prefer the TIFF format to JPEG, because TIFFs capture images without the compression that would degrade image quality (compression to which JPEGs are susceptible). We’ve been told that TIFFs produce better color and detail, and that they are the ideal format for printing images. We’ve been told to shoot TIFF files whenever we think we might want to print our images. And, most of us fancy ourselves printing our images someday; very few of us won’t even consider entertaining the idea of turning our favorite photos into big, beautiful prints. So, if we were to follow this thinking, we would choose TIFF or raw format over JPEG.
The problem with uncompressed file formats, such as TIFF, are that they take up huge amounts of memory card and computer storage space. If you were to shoot only TIFFs when using a small memory card, you would quickly run out of room and have to think of creative ways to free up storage space or have to stop taking pictures until you could transfer your images to your computer.
It is far worse to be out in the middle of nowhere, trying to decide which images to delete to free up more memory than it is to have images that suffer from JPEG compression. I have often agonized over which images to delete in order to get enough storage space so that I could shoot a few more pictures. I’ve rarely agonized over artifacts from JPEG compression.
Presently, it seems that the TIFF format is being replaced by raw. Some cameras don’t even bother offering the TIFF format anymore. By my count at press time, out of 274 current cameras 47 have the TIFF option and 31 use raw. I no longer use TIFF, but rather raw and then PSD.
Although I rarely shoot in TIFF, I use this file format from time to time when saving images on my computer. By saving an image as a TIFF, I’m assured that I will not continually degrade the quality of the image as I save and resave it. Also, many editors ask me for TIFF files rather than JPEGs. So, I only use TIFFs when reworking with an image in a program like Photoshop, or when my editor has asked for TIFF format. When setting up my digital camera for a shoot, I choose either raw or JPEG.

1/250 SEC. AT f/5.6, ISO 100, 100–400MM LENS AT 400MM, TIFF FORMAT
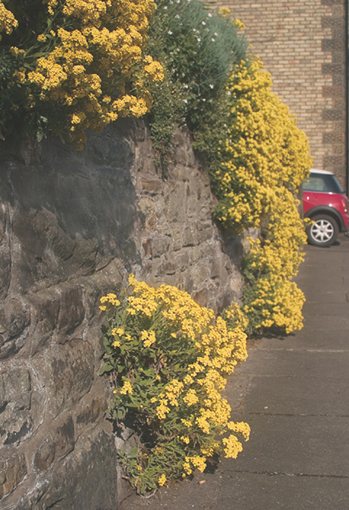
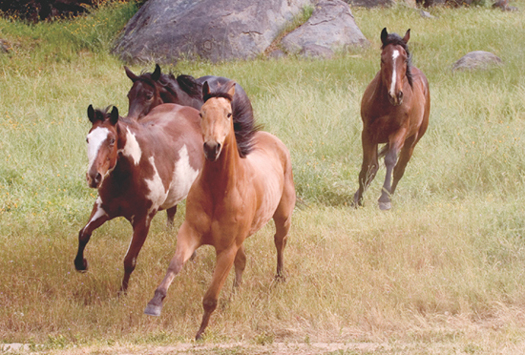
I reworked both these images in Photoshop. For the cowgirl, I made only minor enhancements mostly having to do with sharpness and color correction. The wall with yellow flowers needed some serious work, as the foreground flowers were noticeably out of focus. By making some in-depth Photoshop adjustments, I was able to sharpen the foreground flowers.
When doing this kind of work, one of the first things I do is save the image in a lossless file format, such as PSD or TIFF. This assures me that the quality level of the image will not degrade (due to compression) as I continue to work on it. If you use Photoshop, saving in the PSD (Photoshop document) file format will save space on your computer; but if you don’t have Photoshop, or you want to send the image to someone who doesn’t have Photoshop, then save your file in the TIFF format.
1/250 SEC. AT f/10, ISO 100, 28–105MM LENS AT 28MM, TIFF FORMAT

An important difference to consider when selecting your file format is whether the format is lossy or lossless. JPEG is a lossy file format, meaning that it suffers from a reduction in image quality each time the file is resaved after being opened. TIFF and raw files, on the other hand, are lossless files, meaning that they do not suffer a reduction in image quality. JPEG files are smaller and take up less storage space, however, than TIFFs and raw files, which are much larger. So, you must decide which is most important in your particular situation: file size and maximum storage space, or image quality.

RAW IS A TERM used to describe the proprietary file format that your camera uses. In other words, this is the camera manufacturer’s file format. Nikon has a raw format. Canon has one. And so do other manufacturers.
One manufacturer’s raw file is no better or worse than another’s. The format is simply a proprietary way to save images. Raw captures a pure file without any image processing occurring in the camera.
The raw file format is comparable to a film negative. Negatives, unlike slide film, involve an additional step of printing, and during this step, many adjustments can be made to the image. Similarly, the raw format offers substantial flexibility when processing images in a software program, like Photoshop. For example, when opening up a raw file, you can adjust the color, brightness, shadow details, tint, and the white balance of the image. (See this page for more on white balance.) Instead of these settings being decided upon capture, you get to choose what you would like to see in the image as you open it.
You can change these and other settings long after you’ve captured the image, as these settings are adjustable if you don’t get them perfectly right in the first place. Many photographers prefer shooting in the raw mode because it captures the image without processing the image in the camera. They want to retain full control over what gets changed and what does not. That is the real power of raw—full control. Most people think that the main advantage of shooting raw files is that they can produce large, high-quality image files. This is truly a big advantage, but the best thing about raw is the total control it gives to those digital photographers who want it.
However, this doesn’t necessarily mean that you should always shoot raw files. There are several disadvantages. One is that raw files require special software to open on your computer; you have to use the most recent full version of Photoshop (which has this software in it), or another specialized software program, to transfer your raw images to your computer. This can be a hassle.
If you don’t own this expensive software, you’ll need to find another way to get the images from your camera onto your computer. You may be able to use the software that came with your camera, but this often involves hooking up a cable and using slow transfer rates. Either way, opening up raw files involves one more step in the digital image processing workflow. This can be either a good thing or a bad thing, depending on how you look at it. As previously mentioned, this extra step gives you more control over the final product, but it also adds another layer of complication.
So, working with raw files is generally more tedious, time-consuming, and difficult. Also, shooting in the raw format requires substantially more memory space than shooting JPEGs. You can fit a lot more images onto your memory card if you shoot JPEGs. Like the TIFF format, the raw format produces larger files than JPEG in its effort to capture all those little details that make up the photo. TIFFs are usually larger than raw files, but both are considered major memory hogs. In practice, selecting your file format is very dependent on how many images your memory cards can hold.

ARCHIVE YOUR IMAGES
If you shoot in either the TIFF or raw formats, be sure you have a large amount of free hard drive space on your computer. Also, I highly recommend using a CD-ROM or DVD burner to periodically archive your images. This process of burning your images onto a CD or DVD will allow you to delete those images from your hard drive and free up space.

1/350 SEC. AT f/10, ISO 200, 100–400MM LENS AT 100MM, RAW FORMAT
CORRECTED
This pair of photos illustrates how powerful the raw format can be. The first photo shows the image as I shot it—underexposed, muddy, and cloudy. In Photoshop’s raw converter, I increased the exposure to brighten the image. I also made the blacks richer and darker. This resulted in the second photo, which is clearly much better. Whereas the first photo is obscure and barely visible, the second one looks much better, more accurate and pleasing.
1/350 SEC. AT f/10, ISO 200, 100–400MM LENS AT 100MM, RAW FORMAT

ALTERED
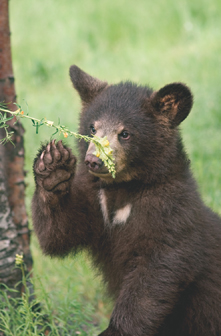
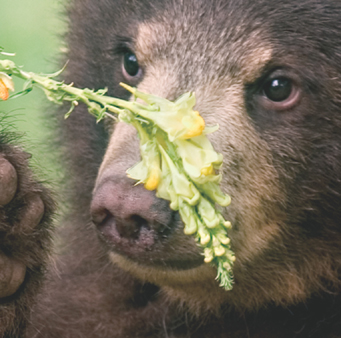
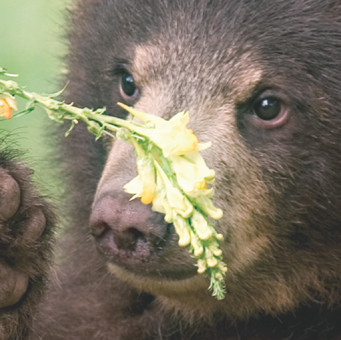
This example illustrates one big advantage of shooting in the camera raw file format. Like a film photographer printing a variety of different images from one negative in the darkroom, a digital photographer using the raw file format can produce different images from one “digital negative.” Since this image of a bear cub was a raw file, I could open it up twice, each time with different exposure settings.
First, I aimed to get most of the picture looking properly exposed—not too dark and not too bright. When I did this, the wildflowers had no detail in them. So, in the second version, I made sure that the wildflowers were darker. Then, in Photoshop, I combined the two images to produce one image that featured good exposure throughout. Had I shot this as a JPEG, I would have been limited as to how much overexposure I could correct; the raw format gave me more control.
While this additional control can be liberating for some people, the complexities it involves can be frustrating for others. Those not yet ready to take on another layer of complexity may be happier shooting JPEGs. Those who already enjoy tweaking images on the computer will likely find the raw file format more satisfying.
1/90 SEC. AT f/5.6, ISO 100, 28–135MM LENS AT 122MM, RAW FORMAT
THE CHOICES when it comes to memory cards include compact flash, SmartMedia, Memory Stick, xD-Picture Card, and more. Some digital cameras only accept one kind of memory card, though, so actually, you might not have much of a choice. If that’s the case, all you need to do is purchase the largest amount of memory storage you can afford.
Some digital cameras, however, do allow you to use more than one type of memory card. If your camera has this feature, simply choose the card that works best for you. Go with whatever option is least expensive, holds the most images, and works with your current computer setup.
The most important thing is the number of megabytes (MBs) in the card. Regardless of which format your camera requires, you want to get the largest cards possible (i.e., ones with the most MBs). This can be a painful decision to make because the larger the card, the greater the cost. But, this is one area in which you don’t want to skimp. On your next road trip, you’ll be glad you got the most you could afford.
If you see yourself doing a great deal of digital photography on the road, invest in a memory card that’s 2 gigabyte (GB) or larger. This will allow you to capture a large number of high-quality images before having to off-load them from your camera to your computer. Big memory cards come in very handy when you’re shooting raw or TIFF files.

DON’T ERASE AS YOU GO
Never delete images while viewing them on your camera’s LCD screen unless you are absolutely sure that they’re absolutely awful. Try to be objective about the quality of your photos, but before you hit the delete button, entertain the notion that you may be wrong. I only consider deleting a photo in the LCD monitor when it is incorrectly exposed—clearly too dark or too bright—or blurry. And even then, I often refrain from erasing the image until I view it on my computer.

Microdrives vs. Solid State Memory Cards

When purchasing Compact Flash memory cards, you may be tempted to get a device called a microdrive, rather than the more typical solid state memory cards. Microdrives usually cost less, and most of the time, they work fine. In my experience, though, they process images more slowly, sometimes causing me to miss a shot. They are also more fragile than the solid state cards. These days, I use solid state memory cards for most of my shooting and carry around my microdrive as back up for when my other cards become completely filled up.

THE WORD pixel comes from picture and element. A pixel is basically one tiny dot of your overall photo. In the same way each tile makes up the overall picture in a mosaic, all the pixels together make up the digital image. Pixel resolution is the count of pixels on the horizontal (the width) and the vertical (the height) axis of your image. Examples would be 3072 × 2048 or 640 × 480.
If you’re interested in producing artistic prints, shoot in the highest pixel resolution available. It’s as simple as that. The only time you might want to reduce pixel resolution is if you’re sure you’ll only need low resolution—if you’re e-mailing the photo, uploading a picture to eBay, or using the photo for job-related stuff. In all other cases, go for as much as your camera can handle.
RESOLUTION: 1536 × 1024

1/250 SEC. AT f/5.6, ISO 400, 100–400MM LENS AT 285MM
RESOLUTION: 2250 × 1500

1/250 SEC. AT f/4.5, ISO 100, 100MM MACRO LENS

Different pixel resolutions result in different print sizes. So, there’s an advantage to shooting with as many pixels as you can. Larger images—with higher pixel dimensions—allow you to make larger prints. Images that have smaller pixel dimensions are more limited when it comes to printing. It’s as simple as that. You can still get high-quality images with cameras that only offer low pixel resolutions; you just can’t make these images as large as the images made with cameras that offer high pixel resolution options.
1/125 SEC. AT f/4.5, ISO 16–35MM LENS AT 16MM

 Shoot JPEG, TIFF, and Raw
There’s nothing better than personal experience when it comes to choosing file formats, quality settings, and pixel resolutions. Try them all out so that you can decide for yourself what works and what doesn’t for you. Shoot a scene in as many different file formats as your camera offers. (Your owner’s manual will tell you which formats you have and how to select them.) If all options are available, do one JPEG, one TIFF, and one raw file.
As you switch between modes, note how many photos you can capture on your memory card in that particular format. You’ll see the number of available images increase greatly when you choose the JPEG format. (You can usually see this number in the LED display on the top of your camera or on the LCD screen on the back. Again, check your owner’s manual if you cannot find this number.)
Once you’ve transferred the images to your computer, open them up in a software program such as Photoshop Elements or the software that came with your camera. If you’re shooting JPEGs, you can also view them in a Web browser like Internet Explorer. Next, compare the actual file sizes as well as the image quality of each format. Do you see a difference in quality? Did you find one format more intuitive and easier to use than the others? If you have a hard time seeing the artifacts in your JPEG file, zoom in on shadows or even-toned areas, such as a blue sky. Magnifying these areas can sometimes make it easier to see the jagged artifacts.
Then, using your firsthand experience and comparing each image side by side, make your decision as to which file format you will use for each application.
