♦ Sit or stand?
♦ The dumb waiter exercise
♦ The hand behind the head exercise
♦ The seated row exercise
♦ The upright row exercise
♦ The shoulder lift exercise
♦ The wall press-ups exercise
♦ How often should I do these exercises?
♦ The science behind the upper body exercises
♦ Are you ready to progress?
Once you have mastered the steps of awareness, posture and the effective breathing technique from the previous chapters, the next step is to learn how to sequence upper body movements in with your breathing. It is all very well to breathe comfortably when you are sitting or standing still and not expending any physical energy. Being physically active is another ball game altogether if you have COPD.
In this chapter, I start off by showing you how very simple arm movements enhance the postural changes you have already made, and how they can minimise the need to actively suck air in, even during gentle types of physical activity.
There are six upper body exercises included in this chapter. They aim to teach you how the muscles in your upper body can help you control your lungs to expand and draw air in passively, and how the direct opposite movement of the arms will allow your lungs to contract naturally, gently forcing the air out again. Combining these exercises with your paced breathing techniques may give you further insight into how easy, natural and stress-free breathing can be using the Brice Method.
Earlier on in this book I provided some health warnings and explained the difference between discomfort, good pain and bad pain. If you have jumped ahead to these exercises in this chapter, please read the Introduction now. However, in addition there are a couple of specific tips I would like to reiterate for you for the exercises that follow.
Choosing whether to sit or stand
The first five exercises can be done either seated or standing and, the final one can only be done standing. It is entirely up to you how you do them. If you are unsteady on your feet, I would advise you start them in the seated position, as there is less for you to think about, and they are no less effective. If you are quite fit and well and find the exercises easy, you can probably do them standing up, as they are likely to be easier to fit into your active daily lifestyle.
Advice to follow if seated
If you choose to do these exercises seated, you are best to use a firm chair, such as a dining chair or office chair. It should have an upright back and be stable, so you don’t slump. If you do not have a firm, upright chair, try perching on the front of the seat you have and keep your body erect with your shoulder blades drawn back and downwards.
Otherwise, sit with your bottom as far back in the seat as possible, so that your body weight is on the top of your hamstrings, below your buttocks. This will stabilise your pelvis, lengthen your back and allow for better posture higher up your back and neck. Do not sit on your tailbone or feel too much pressure on the top of your buttocks, as this will cause you to slump.
Advice to follow if standing
If you prefer to do these exercises standing, you will need to remember to keep your knees slightly bent at all times. Not like a chimpanzee, but with a slight bend at the knee of, say, 3 or 4 degrees. Keeping your knees bent has the effect of making your hips stable, and stops your pelvis from tilting forwards, spilling your intestines forwards, and helps stop you from putting strain on both your abdominals and your lower back.
Keep your head looking straight forwards and ensure that your belly is not lolling forwards and causing your pelvis to tilt forwards excessively.
Dumb waiter exercise
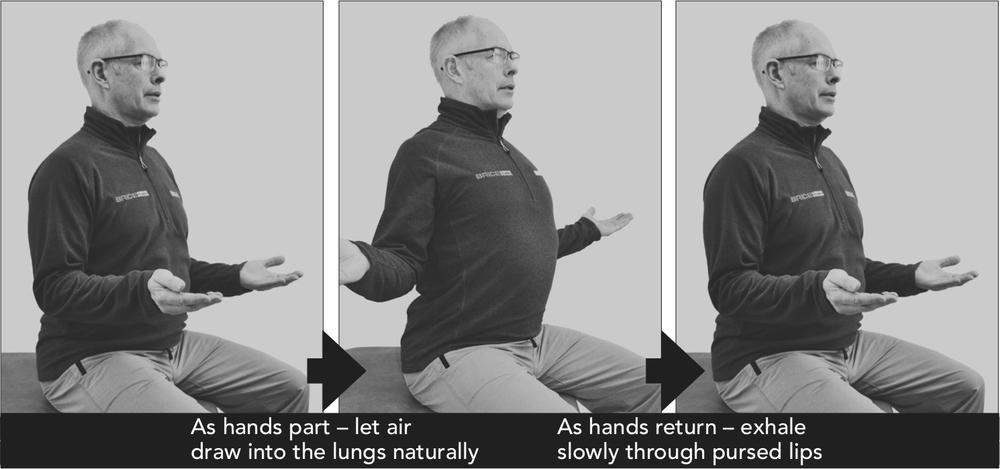
Figure 6.1 The dumb waiter exercise
- Sit or stand tall with your elbows tucked in to the side of your waist.
- Hold your hands in front of you with elbows bent and palms facing up.
- Keep your elbows touching the sides of your waist at all times.
- Spread your hands apart as far as you feel comfortable.
- Squeeze your shoulder blades together and downwards.
- Your chest will expand, and your lungs will automatically want to draw in air.
- Allow your lungs to fill naturally and don’t suck the air in.
- Relax your hands and bring them back to the starting position, exhaling slowly through pursed lips.
Repeat the above sequence four times, inhaling for a ‘parachute count’ of ‘one thousand’, and exhaling for ‘one thousand, two thousand, three thousand’ (see Chapter 5 for more details of exhalation exercises).
Fine-tuning the dumb waiter exercise
- If you experience pain in the top of your shoulder, try repeating it with your palms facing together rather than upwards. If you still get pain, try once more with your palms facing down. This can change the way the bicep ligaments pull on your shoulder joints.
- As you get more used to the exercise you will find your chest and ribcage will expand more freely as your ribs loosen up.
The hand behind the head (Eric Morecambe) exercise
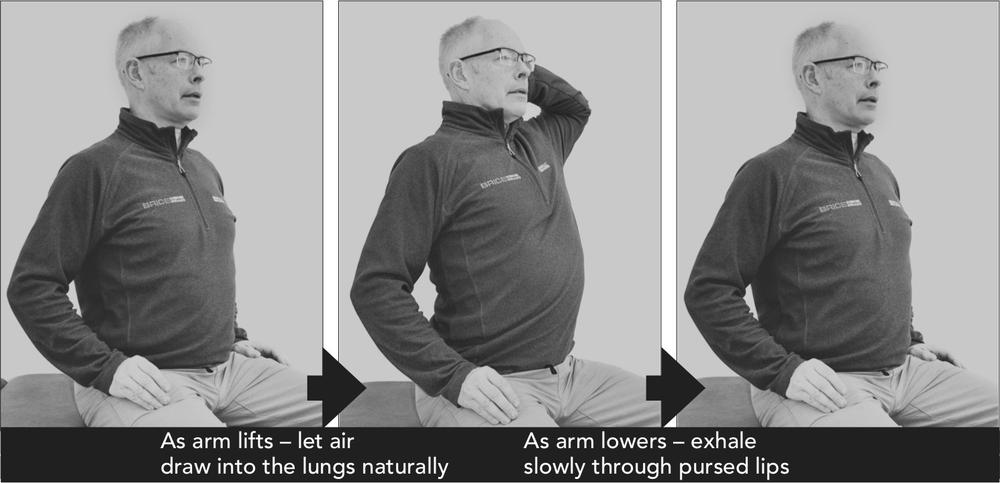
Figure 6.2: The hand behind the head (Eric Morecambe) exercise
- Sit or stand tall with your hands relaxed lying gently on the upper part of your thighs.
- Draw your shoulder blades back and down.
- Sit or stand tall with your eyes looking ahead.
- Put one hand behind your head with the elbow held high and out wide.
- Raising your arm will lift and open that side of your chest.
- The lung on that side will want to draw air in automatically.
- Allow this lung to fill naturally, don’t suck the air in.
- Bring your hand back down to the start position, exhaling slowly through pursed lips.
Repeat the above sequence four times, alternating your arms, inhaling for a ‘parachute count’ of ‘one thousand’, and exhaling for ‘one thousand, two thousand, three thousand’.
Fine-tuning the hand behind the head exercise
- Don’t drop your head forwards making it easier for your hand to reach behind it, as this defeats the object of the exercise and is a cheat.
- If raising your elbows high is very painful, it is best to try doing the upright row (see below, page 74) and dumb waiter exercises to loosen up the shoulder girdle first. You might then like to attempt this exercise when you feel more flexible in the shoulder.
Seated row exercise
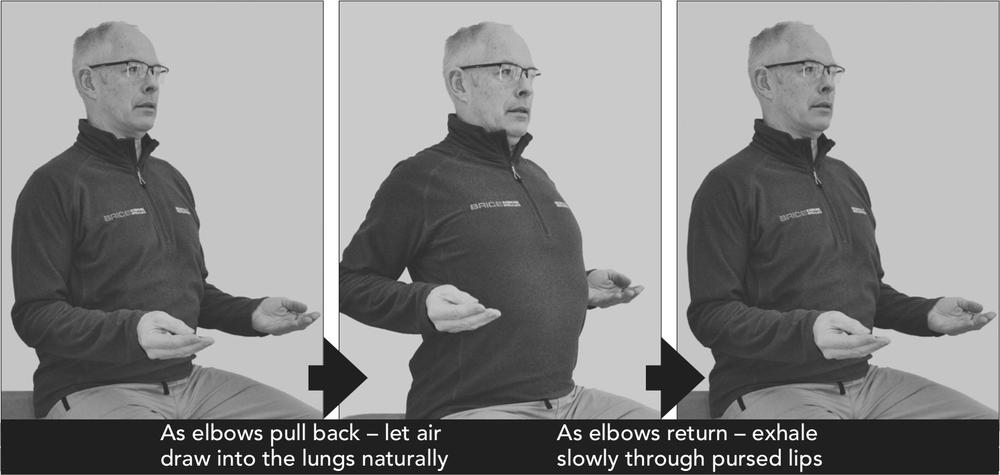
- Sit or stand tall with your hands held in front of you and with your thumbs up.
- Pull your elbows backwards and together.
- Squeeze your shoulder blades together as your elbows draw back.
- Your rib cage will expand, drawing air into your lungs.
- Allow your lungs to fill naturally; don’t suck the air in.
- Relax your hands and bring them back to the starting position, exhaling slowly through pursed lips.
Repeat the above four times, inhaling for a ‘parachute count’ of ‘one thousand’, and exhaling for ‘one thousand, two thousand, three thousand’.
Fine-tuning the seated row exercise
- Don’t drop your head forwards, as this defeats the object of the exercise.
- If you feel pain, don’t pull your elbows back so far. You should gradually try to increase the range of motion over time, and you should feel your body loosen up.
The upright row (stirrup pump) exercise
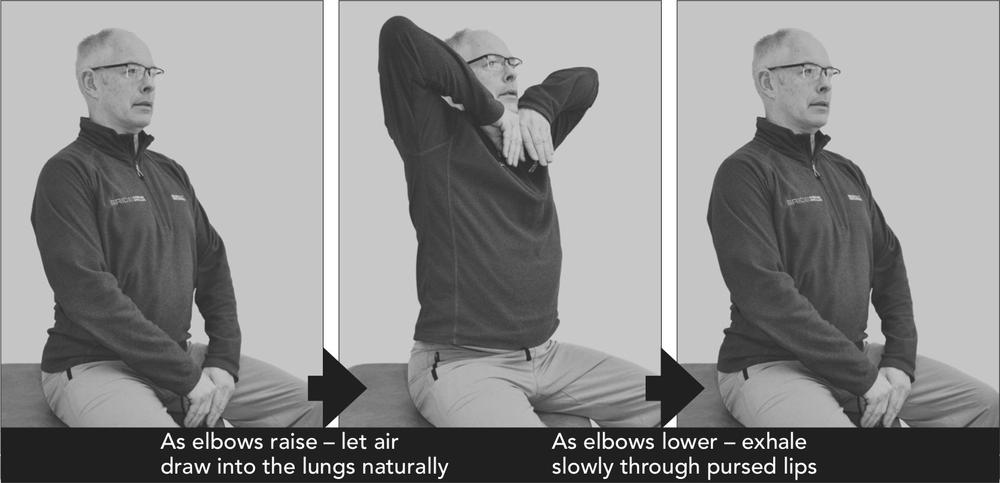
Figure 6.4: The upright row (stirrup pump) exercise
- Sit or stand tall, keeping your head held high, looking horizontally ahead.
- Grip hold of one thumb with the other hand.
- Slowly, draw your thumbs under your chin, pulling your elbows upwards and backwards.
- Finally squeeze your shoulder blades together.
- These actions all expand your chest and your lungs will want to draw air in.
- Allow your lungs to fill naturally, and don’t suck the air in.
- Bring your hands back to the starting position, exhaling slowly through pursed lips.
Repeat the above four times, inhaling for a ‘parachute count’ of ‘one thousand’, and exhaling for a ‘parachute count’ of ‘one thousand, two thousand, three thousand’.
Fine-tuning the upright row exercise
- If both shoulders are painful, ensure your shoulder blades are squeezed back and down, and re-try. It may be your shoulders are hunched forwards. If they still hurt, don’t lift your elbows as high to start with and gradually increase the range of motion, as you feel capable.
- If only one of your shoulders is painful and squeezing your shoulder blades back and down does not help, try doing the exercise with only one arm at a time.
The shoulder lift exercise

- Stand or sit tall with your eyes looking ahead.
- Have your hands on your hips or hanging at the sides of your body, shoulders drawn down.
- Raise the point of one shoulder near to the same height as your ear.
- This will expand the top part of your chest on that side of your body.
- Your chest will expand, drawing air into the lung on that side automatically.
- Allow this lung to fill naturally.
- Bring your shoulder back down to the starting position, exhaling slowly through pursed lips.
Repeat this sequence four times, alternating your shoulders, inhaling for a ‘parachute count’ of ‘one thousand’, and exhaling for ‘one thousand, two thousand, three thousand’.
Fine-tuning the shoulder lift exercise
- If you feel pain or discomfort in your lower back, ensure that you are not slumping the opposite shoulder down rather than lifting the active shoulder up. This can pinch the nerves between the vertebrae. Ideally you should feel lifted and extended rather than compressed.
The wall press-ups exercise
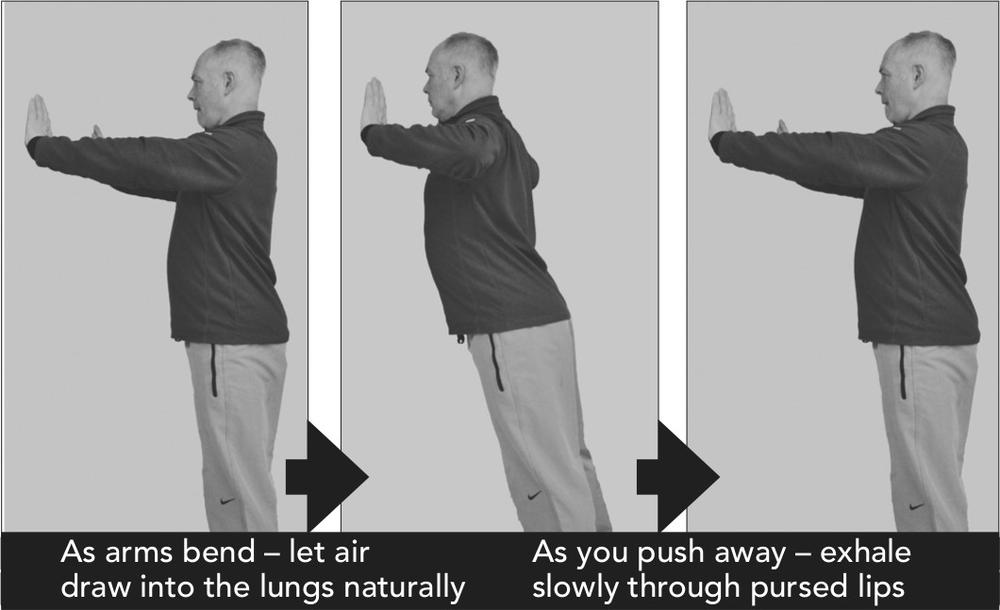
- Stand facing towards a wall, with your feet an arm’s-length from the wall.
- Place both hands on the wall in front, shoulder width apart, at chest height.
- Bend your arms slowly, letting your elbows draw apart.
- As you lean forwards, squeeze your shoulder blades together behind you.
- Your chest will expand, and your lungs will automatically draw in air.
- Allow your lungs to fill naturally and don’t suck the air in.
- Exhale actively through pursed lips as you straighten out your arms to return to the starting position.
Repeat this up to 10 times, inhaling for a ‘parachute count’ of ‘one thousand’, and exhaling for ‘one thousand, two thousand, three thousand’.
Fine-tuning the wall press-ups exercise
- If your wrists or hands are inflexible and cannot bend backwards enough to keep the palm of your hand on the wall, you can try using a clenched fist against the wall. If that is uncomfortable, the most forgiving way of doing this exercise is to stand in a doorway and put your palms on the doorframe at either side, with your fingers pointing inwards. This will enable you to do the exercise without having to bend your fingers back at 90 degrees and has the added benefit of directing your elbows up and outwards as you lean forwards.
How often should you do these exercises?
If I were to ask you to learn a short saying in another language, and for you to repeat it a week later, you would need to practise the saying daily, or risk getting it wrong. Obviously, the consequences of forgetting a random saying are minimal, but forgetting how to breathe and exercise well have massive potential implications for you. That means you need to do the exercises regularly!
I usually encourage my patients to do these exercises on a regular basis by being firm. I have found that only with repetition can you undo your old breathing habits. Often, we are trying to undo habits that will have formed over a considerable period of time.
You should aim to do:
- four of the upper body exercises (choose those you prefer)
- four repetitions of each exercise (wall press-ups, you can do 10)
- four times a day to help you remember them.
Do not try to do more repetitions as you will over-breathe and feel unwell.
As you do the arm exercises, you will most likely find that your joints will gradually start to feel less ‘rusty’. It might take a couple of sessions, a couple of days or a couple of weeks for you to really feel the full benefit. I find that it helps enormously if you visualise your joints lubricating themselves as you move, especially at the start when movement feels a bit like a joint that has been taken out of the fridge. As your body starts to warm up and regain some of its natural range of motion you will be thankful that you put in the time and effort to do so. You are likely to be surprised at how wonderful it feels when your joints are looser and more relaxed. You should remember your body is designed to self-heal. It is simply amazing!
All five of these arm exercises are designed to be very simple and very gentle. They should not be hard work. The aim is first to re-learn how to sequence the breath along with movement, and secondly to realise that the correct movements will automatically allow your lungs to fill and empty without having to suck or blow too hard.
One thing you can remember as you practise, we humans are exactly like other members of the animal kingdom, and it is nature’s way for the structure and function of the body to drive normal respiration. If only we had not invented the sofa, things might be a little better for our lungs.
The science behind the upper body exercises
If you want to understand in more depth what is happening to your body with these upper body exercises, you can read this section. If you feel you want to skip this section, you will not be any less able to complete the exercises effectively.
- By sitting or standing tall, the postural benefits of expanding the rib cage are maximised.
- The arm movements all pivot about the collarbones’ (clavicles’) attachment to the sternum at the front of the chest, causing the shoulder blade to find its rightful place to the rear and lower down the rib cage than would normally happen.
- The squeezing together of the shoulder blades as the elbows are drawn back in the dumb waiter, the Fonzie and the press-ups exercises, places further pressure on the rib cage to push forwards and expand, further expanding the lungs, drawing more air in. The opposite is the case as the arms and shoulder blades return forwards to their starting position and the air is expelled naturally. This sequencing of movement and breathing is a key skill that you will hopefully re-learn, with thoughtful and careful practice.
- The raising of the shoulder blades as the elbows are drawn upwards in the Eric Morecambe, upright row and shoulder lift exercises, acts by drawing up the ribs as the shoulder blade is lifted. This expands the rib cage and opens the lungs in a different fashion from the first two exercises. This means that the exerciser does not exhale as he/she does the active part, but lets the air draw in as he/she lifts. The air is then expelled as the arms and shoulder blades return back down to their starting position and the rib cage lets air flow out of the gradually compressed lung.
- Allowing air in through both the nose and the mouth during the various movements helps to reduce the air resistance as the air is drawn in. Doing this means that inhaled air resistance is reduced by a third, enabling the expanding lungs to do their work without having to rely as heavily on the muscles of inhalation, especially those that are normally overactive in nose-only breathing, such as the scalenes in the neck. By reducing the reliance on these small, weak muscles, you will feel the air travelling into your lungs naturally and without undue effort.
- By exhaling through pursed lips, the flow of air slows down, and this allows the breathing rate to reduce. If the exhalation is executed evenly over the count of ‘one thousand, two thousand, three thousand’, there is less likelihood of the out breath being stressful. If all the air is pushed out in the first ‘one thousand’ of the count, the third ‘one thousand’ count will undoubtedly be hard work, as the exerciser will try to over-exhale.
- By exhaling through pursed lips rather than an open mouth, there is a slight increase in the residual pressure inside the lungs, and this can help prime the lungs. Priming the lungs is where there is enough pressure inside them to push the air into some of the collapsed alveoli, deeper within. This can have the effect of allowing air to travel deeper into the lungs. (There is one possible side effect from this, which is that air gets deeper into the lung than the areas where the mucus gathers, and it can make the exerciser want to cough more than usual.)
- By using pursed-lip breathing and controlling the exhaled breath, it is possible to influence the intra-abdominal pressure which helps to engage the core muscles of the stomach and back to provide stronger, better coordinated movements.
All of the above techniques will be essential basic skills that can be related to more dynamic or more intensive types of activity as you progress and get fitter, and your breathing allows you to do more.
Are you ready to progress?
Your body is designed to breathe as you move. These upper body exercises impact directly upon your rib cage to help you control the amount of air that goes in and out of your lungs. This should result in a gentle and natural breath, and you should not feel uncomfortable or get breathless doing them.
Once you feel that you have gained the full benefit of coordinating these simple upper body movements along with your inhalation and exhalation, you should think about moving on to Chapter 7 of the Brice Method – Synchronising lower body movements with breathing.
If you do get breathless doing these exercises, or start feeling woozy or at all uncomfortable, don’t try to move on. My advice is to go back and practise these upper body exercises a little more, listening to your body and mastering the techniques before your try to progress.