♦ Conventional recovery positions for breathlessness
♦ The Brice Method recovery position
♦ Emotional breathing and COPD
♦ Panic breathing
♦ Hyperventilation syndrome
♦ Ssshh’ing technique to overcome hyperventilation
♦ Making natural, comfortable breathing a habit
♦ Being mindful
♦ Maintaining these habits for your lifetime
♦ Congratulations
Throughout the Brice Method, there is one theme that is consistent at each stage. This is that you should avoid getting out of breath to the point of discomfort. As you went through the simple postural exercises, the breathing exercises and sequencing the physical movements, you should have managed to feel calm and comfortable, rather than terribly short of breath. There will, however, be times when you do get breathless, either because you have overdone things, you are having an exacerbation, or you simply forgot to breathe as you have been trained to do. In this case, you will try to find a position of ease to recover.
Most COPD patients lean forward to catch their breath. This ‘forward leaning posture’ is the most commonly-taught recovery position, either if you are sitting or you are standing. It is true that the forward lean techniques can be of use, but their effectiveness is greatly reduced, if not nullified, if the exercises are not executed correctly. I have rarely seen anyone assume a completely effective lean forward posture, and feel that there is a need for the teaching points to be explained fully, or for another alternative to be taught. I will explain the relative benefits of each technique, as well as the fine-tuning teaching points that you will need to execute them well. I will also show the limitations of the techniques, and the alternative method I prefer to teach my patients using the Brice Method.
Conventional recovery positions for breathlessness
If you have already been shown recovery positions to help you get over a shortness of breath due to physical over-exertion, you are likely to have been shown one of the three forward leaning postures shown in Figure 10.1.
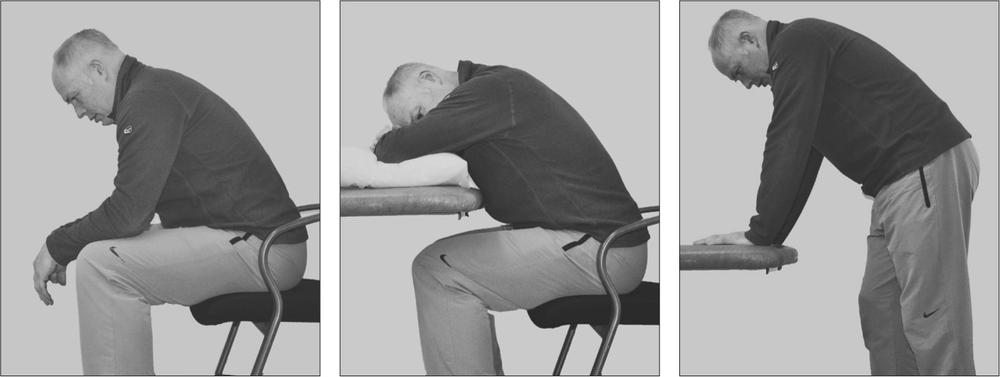
The seated forward lean posture
This is where you rest your elbows on your knees.
Potential benefits
- The idea is to lean forwards tilting the pelvis to allow the abdominal mass to topple forwards and give space for the diaphragm to work in.
- Resting the elbows on the knees is designed to take the weight of the arms off the neck muscles and partially lift the shoulder blades to open the rib cage a little more.
What many patients do wrong
- Most patients will bend forwards from the waist and not from the hips. If you tilt forwards from the waist the pelvis is fixed; as the pelvis does not rotate forwards the spine has to compensate by bending. This action forces the abdominal mass to push upwards into the diaphragm, preventing the diaphragm from working as it should. Bending forwards from the hips allows for a straighter spine enabling the pelvis and the abdominal mass to tilt forward as one, effectively reducing the upward pressure on the diaphragm.
- As shown in Figure 3.2 on page 41, a forward head position increases the stress on the muscles of the upper neck. Leaning forwards, close to 45 degrees from vertical, means that the strain on the trapezius and the four smaller ‘capitis’ muscle groups can exceed 22.5 kg – a physical stress that is hardly relaxing at any stretch of the imagination.
- As patients are unlikely to have been told to open their legs wide apart before they bend, they will usually keep their knees too close together. This is especially the case for women who have been taught decorum! Closed thighs not only limit the space for the abdominal mass to tip forwards, but increase the stress on the hamstring muscles, tilting the pelvis backwards, rather than forwards. Again, working totally against the object of the exercise.
The supported-head seated posture
This is where you lean forwards, arms on pillow on table, and head on arms.
Potential benefits
- If the exercise is executed properly, the abdominal mass is tilted forwards and can hang down between the legs, allowing the diaphragm space to contract and draw air into the lungs.
- By lifting the arms, the shoulder blades are drawn up, helping to expand the rib cage, and allowing the head to rest on the arms enables the neck muscles to relax temporarily and further reduces the stress to the body.
What many patients do wrong
- As with the exercise before, patients nearly always bend forwards, pivoting from the waist and not from the hips. Waist bending means the pelvis does not tip forwards and the abdominal mass is then pushed upwards towards the ribs, preventing the diaphragm from working.
- Again, as with the previous exercise, patients will rarely have been told to open their legs wide apart before they bend. Closing your thighs together prevents your abdominal mass from tipping forwards and stresses your hamstring muscles, tilting your pelvis backwards.
The standing forward lean posture
This is where you rest your hands on a table top or on your knees.
Potential benefits
- Similar to the seated lean, the standing lean forward aims to tilt the pelvis to allow the abdominal mass to topple forwards and give space for the diaphragm to work in.
- Resting the hands on a table or on the knees is designed to take the weight of the arms off the neck muscles and partially lift the shoulder blades to open the rib cage.
What many patients do wrong
- Most patients will bend forwards from the waist and not from the hips. If the back is not kept straight and the tilt done from the hips, the pelvis does not tip forwards and the abdominal mass pushes upwards, preventing the diaphragm from doing its job – completely counterproductive!
- As with the seated lean position, the forward head position increases the stress on the muscles of the upper neck, increasing the work the neck muscles have to do by as much as 350%.
These are relatively subtle differences, but because these exercises are rarely taught to take these issues into account, they can, and do, become bad habits in their own right.
The Brice Method recovery position
If you have already learned one of the leaning forward positions shown above, you may find this next exercise quite difficult to adopt at first; that is unless you have already truly mastered the postural exercises in this book. The reason it may be hard for you to unlearn the leaning techniques has been mentioned already: they may have become habitual to you. Habits such as these can be hard to break, so I suggest working on using this new technique at times when you are only slightly breathless from activity or stress. Once you have practised the technique, you can then progress to using it to overcome more physically or emotionally stressful situations. If you have worked through the book to this point, the technique should be simple for you.
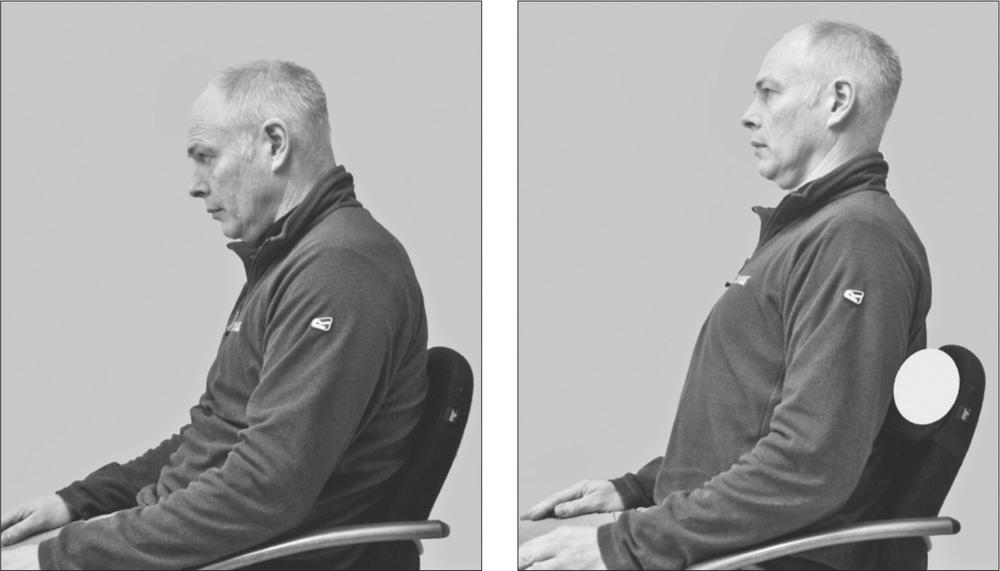
Figure 10.2: The Brice Method recovery positon: Slumping (left) can cause restriction and tension in the chest, whereas sitting tall with a support under the shoulder blades (right) can open up the chest.
- Sit down on a firm, high-backed chair, with your bottom right back into the seat, or stand against a wall.
- Place a rolled-up towel or back support pad, below and between your shoulder blades. The rolled-up towel or pad should be big enough for you to feel it push against your ribs as you lean backwards, but not so big that you are being pushed so that you lean forwards excessively.
- Draw your shoulder blades backwards and downwards, whilst simultaneously drawing the nape of your neck backwards. The towel or back support will act as a pivot point, allowing your ribs to open up like a fan, and will artificially expand your chest in the process.
- As you draw your shoulders backwards and downwards, you may find that your hands will need to fall by your hips or slide back on the arms of your chair. Work with this by putting your hands on your hips if your chair has no arm rests, or drawing your elbows back if your chair has them. If you are standing you can place your hands on your hips or behind your lower back.
- Once you are able to sit or stand in this position comfortably, you should then practise the usual paced breathing that you have used throughout the book. This is to count ‘one thousand, two thousand, three thousand’ as you breathe out, and ‘one thousand’ as you breathe in.
How this recovery position works
- With the head balanced on top of the spine, the stress placed on the muscles in the back of the neck is only 5 kg. This is 17.5 kg less than the leaning forward head positions, enabling the upper body to be more relaxed, rather than tight and stressed.
- The back support helps act as a pivot point on the spine to allow the ribs to open up, which in turn draws the rib cage up and outwards. This means that there is extra space for the diaphragm to move downwards on inhalation. Inhalation will feel relatively easy, and be more comfortable.
- The upright stance means that the top two ribs are already elevated. This means that the accessory muscles of the neck do not need to be activated during inhalation, again reducing the level of muscular tension and stress.
- The shoulder blades are both drawn back, down and inwards towards the middle of the back, placing additional leverage on the posterior part of the rib cage, further flaring and elevating the ribs.
- The weight of the arms is behind the centre of gravity, helping counterbalance the whole shoulder girdle against the anterior rib cage and pectoral muscles.
- The paced breathing technique of ‘three thousand’ and ‘one thousand’ helps slow down the respiration rate to approximately 15 breaths per minute, allowing effective transfer of oxygen in the lungs and controlling the release of carbon dioxide.
- Most of the actions described above directly increase the volume of the lungs, and help reduce air pressure in the lungs relative to the external environment. This one simple reaction will not only reduce the amount of effort and energy required to inhale, but will also help the patient to relax and breathe more naturally.
Emotional breathing and COPD
It will be of little surprise to any person with severe breathlessness, be it related to COPD or not, that emotional upsets can set off an exacerbation.
Many of the causal factors that lead to severe breathlessness are found in patients who are relatively inactive, who have long-term medical complaints or who find themselves in a lot of pain. Many of my patients have stress from work or unemployment, and others are high achievers with perfectionist tendencies. Some of my patients find that boredom, phobias or anxiety are enough to set off a bad turn. Whilst there are many emotional triggers that can induce a bout of breathlessness, the three issues that my COPD patients consistently talk to me about are: fear, frustration and embarrassment.
- Fear: I can think of no emotion that is more powerful and more frightening than not being able to breathe. The human body can survive without water for many hours, and without food for days, but it can only last a couple of minutes without breathing. The body’s emergency response mechanism kicks in quite quickly.
- Frustration: The anger at not being able to do what would have appeared to be a simple task a few years before, is another emotion that patients say makes them feel really frustrated. It is another deep emotion that can drive the physical manifestation of discomfort when they are breathless.
- Embarrassment: For some it can be mortifying to start having an exacerbation in public. This emotion can fan the flames of breathlessness, especially in an area where people are watching or crowding round to help you by asking you questions.
The answer to coping with the emotional issues that accompany breathing problems is to be able to recognise the issues and then learn how to manage your response to them. Your response might be to think in advance of doing any activity that you know will put physical strain on your body and begin to increase your breathing depth relative to the exercise you are about to do rather than wait to get breathless. It might be that you anticipate emotional cues that you know will elicit a physical response of breathlessness, and either avoid the situation or try to mitigate the effect of the stressor by adopting a more upright and powerful body position prior to the stress occurring. If you have already become breathless it might mean that you need to use the recovery position to reduce the physical stress on your body, and focus on paced breathing to slow your breathing down to comfortable levels quickly and easily.
Panic breathing
For those of us that have never had an exacerbation, or been unable to breathe due to over-exertion, the closest thing you are likely to have experienced is having your head dunked in water without warning. This feeling of fear and dread is primal, so it is little wonder that the body tells you to avoid anything that will cause a repeat episode at all costs. Sheer panic is the emotional response that we experience when we can’t get enough air in, and by panicking, the body automatically and uncontrollably increases the rate of breathing, This makes our breath shallower, further reducing the amount of air reaching the depths of our lungs.
More often than not, panic will drastically affect breathing rate and depth detrimentally. The increase in breathing rate and depth that panic induces seems to have little or no impact on the amount of oxygen that reaches the bloodstream. This is partly due to the fact that a fast breath means any air that goes into the lungs has very little time in the alveoli to enable it to be absorbed into the bloodstream, and partly due to the fact that quick breaths tend to be more shallow, so the air does not actually go as deep into the lung as it otherwise would. Combine this with the fact that in a panic situation, most people will tend to hunch forwards to protect themselves (as if in the foetal position), reducing the capacity of the lungs and further reducing the effectiveness of the breath. As this effect continues to reduce the amount of oxygen in the bloodstream, the breathing rate is gradually sped up, and a spiralling feedback loop of ever-reducing oxygen levels only stops when the person is able to regain control of their breathing, or they get taken to accident and emergency under blue lights.
By their very nature, panic attacks happen with little or no warning, so it is unlikely that you will be able to plan ahead or rationalise the issues that have caused the problem. The immediate threat that your body feels it is under when its supply of oxygen is restricted can be very severe. From my experience, if you start to use the Brice Method recovery position, along with the paced breathing technique, you should be able to learn how to overcome panic breathing relatively easily. If you successfully manage to overcome panic-induced breathlessness a few times, it is likely that you will soon become less frightened of it happening and gain confidence that you can overcome it without having to require medical support. Having this confidence acts to reassure you that whilst at the time the panic is real, the consequences are far less problematic than your body’s warning signals are telling you.
Hyperventilation syndrome
Having consistent, acute bouts of over-breathing is known clinically as ‘hyperventilation syndrome’. This is recognised as a condition that is initiated by over-breathing, and is where too much carbon dioxide is being exhaled from the lungs. Just as the body wants to balance the blood oxygen levels, it also needs to maintain the correct amount of carbon dioxide in the bloodstream to balance the blood pH to 7.365. The body responds to imbalances in blood pH and relatively low levels of carbon dioxide not as you would think, by slowing down the breath, but by speeding the rate of breathing up!
Controlled, paced, deep nasal breathing normally combats hyperventilation. Here you breathe in through your nose for a count of 4, hold your breath momentarily and then let the air out for a count of 4. Whilst I have argued the case against nasal breathing elsewhere in this book, hyperventilation is an instance where you can and should use the technique, especially if you feel yourself to be very panicky or distressed. Slowing your breathing rate down to this pace is a little stressful, but it does bring your respiration rate down to between 10 and 12 breaths per minute, which is enough time to allow carbon dioxide levels to rebalance themselves.
Whilst controlled nasal breathing can work well when you are really panicking and breathless, I have found that I rarely need to use these methods with my patients, as I do not work them to the point where they get truly out of breath. In fact, I have found the most effective way of overcoming hyperventilation is to calm your breathing down by using what I call the ‘ssshh’ing technique’ (see Figure 10.3).
Ssshh’ing technique to overcome hyperventilation
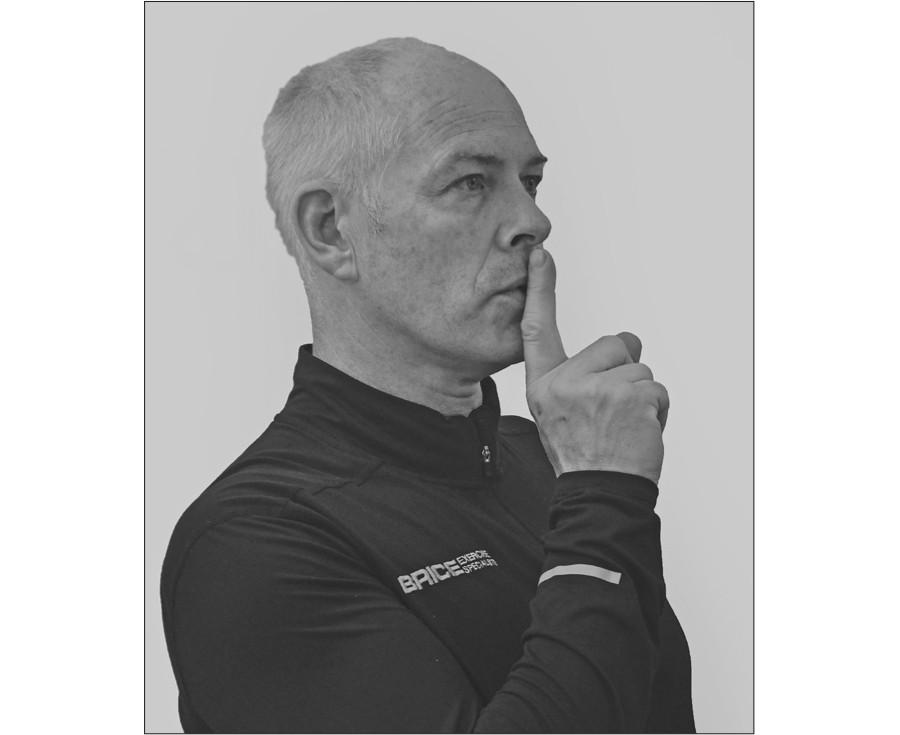
Figure 10.3: Ssshh’ing exercise
- You will need once again to adopt the upright body position to help de-stress your whole body system.
- You will need to use the paced (count ‘one thousand, two thousand, three thousand’ out, ‘one thousand’ in) breathing method to slow down your breathing rate to approximately 15 breaths a minute.
- Put one finger in front of your pursed lips, as if you are telling yourself to ssshh….
- You then actively hiss ‘ssshh’ as you count your ‘three thousand’ exhalation. This works really well to increase the pressure of all the gases in your lungs, and helps you to be actively thinkng that you are quietening your breathing down.
- You should continue to do this upright posture, ssshh, paced breathing technique unitl your breathing has settled down.
It may seem odd, that such a simple technique as this should work so effectively on what is a highly charged and extremely emotional situation. It appears that the ssshh’ing acts to help soothe you, in exactly the same way that a deep sigh makes you feel relaxed.
Making natural, comfortable breathing a habit!
Now that you have got to this stage in the Brice Method, you should be armed with the tools to continue to develop your own breathing coping strategies for whatever you want to do in your day-to-day life. You will obviously be restricted to the remaining capacity of your lungs, and the other bodily limitations you have. I work on a daily basis with a great many patients who thought they were on their last legs but who have not only stopped the decline of their physical abilities, but have also managed to regain considerable levels of fitness.
Being mindful
To maintain your progress, you will have to continue to be mindful of your body and of how much your breathing will limit you if you forget to breathe! You should now know how you can amend your posture, and avoid slumping back into your old ways. You should remember that you have to consider the breathing methods you need to use in advance of any activity you do. You will also need to focus on pacing your breath if you have to be active for a protracted length of time, and that you will have to synchronise your breath with the movements you do.
Failure to be mindful of any of these factors is likely to end up with you feeling dissatisfied with your breathing.
Maintaining these new habits for your lifetime
What you can do to help you maintain your improved breathing techniques is remember the listening exercise you did right at the beginning of the programme and at each stage of the Brice Method.
- Notice where your head is in relation to your body.
- Notice how you are holding your shoulders.
- Think about the pace and speed of your breathing.
- Recognise how deep the breath is going into your lungs.
- Think about how satisfying each breath is.
When you can feel the difference, this will help you visualise what you are doing and make a mental map of your breathing. Visualising your body alignment and breathing pattern will help you to remember what you should do if you get breathless in the future and gives you a coping strategy that works for you. Even if you have been fixed in a slumped position due to inactivity caused by illness, injury or simple laziness for years, you can usually improve your posture by being self-aware of how much better your breathing is when you do not slump, and by doing the exercises that you feel work best for you several times a day.
Congratulations
You have now completed the final active part of the Brice Method. There are three addenda to this book that are designed to help provide additional support to patients with COPD who will need motivation and information to continue to benefit from the Brice Method.
- Addendum 1 shows the results and feedback from my patients who have undertaken the Brice Method, gathered during the 12 months before completing this book.
- Addendum 2 gives information about suitable equipment that can be used to help you get the most out of your exercises, plus details of how you can get more personalised assistance if you want to take the Brice Method further.
- Addendum 3 is purely a list of the diagrams in the book. This quick reference guide might assist you if you want to look back at any of the images, especially if you are a person who finds visual cues and feedback useful.
I then only have left to say, very best wishes for continuing improvements in your breathing and fitness.