It’s not just the kiddos who love treats—we all do! I have always loved sweets, and through my years of learning and experimenting with plant-powered foods, I’ve found ways to make treats much healthier, without the hefty amounts of sugar and processed ingredients usually found in traditional desserts. But are they still tasty? Yes! In fact, some of the very best desserts I have tasted use the simplest, most natural ingredients.
This section shows you how to make sweets from the more wholesome snack squares (many are nut-free and perfect for school lunches) to puddings (that are healthy enough for a breakfast!) to party cakes and cookies and frozen treats. Dessert delights for everyone!
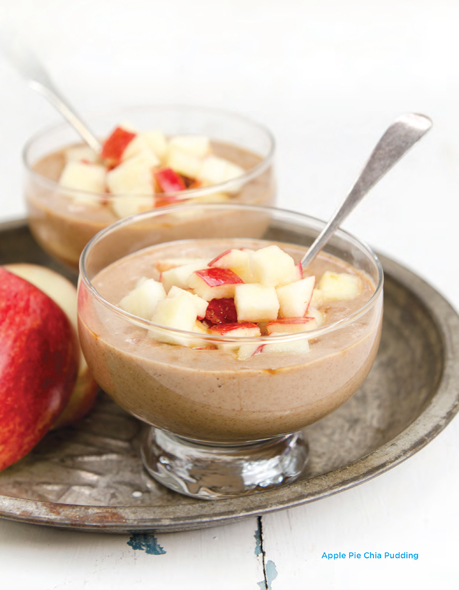
I created this recipe on a whim when the girls wanted a special after-school snack. They love chia pudding, but I wanted to change it up. This autumnal version hit the blender, and the girls were asking for seconds!
Serves 2–3
¾ cup unsweetened organic applesauce
 ½ cup frozen banana slices
2 tablespoons white chia seeds (see note)
1½–2 tablespoons coconut sugar, plus more for finishing or pinch stevia (see note)
½ teaspoon cinnamon, plus more for sprinkling
¼ teaspoon ground cardamom
⅛ rounded teaspoon sea salt
⅛ teaspoon freshly grated nutmeg (optional)
½ cup plain or vanilla unsweetened nondairy milk (see note)
⅓ cup diced unpeeled apple, tossed in 1 teaspoon lemon juice (optional)
In a blender, add the applesauce, banana, chia seeds, coconut sugar, cinnamon, cardamom, sea salt, nutmeg, and milk. Blend for a minute or more (depending on blender), until the seeds are fully pulverized and the pudding begins to thicken (it will thicken more as it refrigerates).
Taste, and if you’d like it sweeter, add a teaspoon or two more sweetener. Transfer the mixture to a large bowl or dish, and refrigerate until chilled, about ½ hour or more (it will thicken more with chilling, but really can be eaten straight away).
Serve, sprinkling with the diced apple, cinnamon, and coconut sugar if desired.
Chia Seeds Note: In this recipe it’s best to use white chia seeds, as black seeds will discolor the pudding.
Sweetener Note: Adjust sweetness to taste. You may enjoy the pudding without any coconut sugar or stevia. Stevia can be very overpowering, so use sparingly.
Milk Note: I typically use unsweetened almond milk (either plain or vanilla) when I make this pudding. If you are using a sweetened vanilla milk, reduce the sweetener to taste.
If you love pumpkin flavors in baking, you’ll love this “instant” pumpkin pudding! The chia seeds are the magical ingredients that thicken the pudding, and when pureed they are not visible for any little palates that might be, ahem, picky!
Serves 2–3
¾ cup pure pumpkin puree (see note)
3 tablespoons whole white chia seeds
1–2 tablespoons coconut sugar or pinch stevia (see note)
1 teaspoon cinnamon
¼ teaspoon freshly grated nutmeg
⅛ rounded teaspoon sea salt
⅛ teaspoon allspice
1–2 pinches ground ginger (see note)
¾ cup plain or vanilla nondairy milk (see note)
¼ cup pure maple syrup
½ teaspoon pure vanilla extract or vanilla seeds from 1 bean
Optional toppings:
dark chocolate shavings
coconut whipped cream
vegan cookie crumbles
In a blender, add all ingredients except the optional toppings. Blend until the chia seeds are fully pulverized and the pudding begins to thicken.
Taste, and if you’d like it sweeter, add a teaspoon or two more of coconut sugar or maple syrup (do not add too much maple syrup or it will become loose) and blend to combine.
Serve immediately, sprinkling with optional toppings, or refrigerate until chilled, about ½ hour or more (it will thicken more with chilling).
Pumpkin Note: Canned pumpkin can really vary in consistency. I use Farmer’s Market brand, which is very thick and dense, and bonus—organic. You can always double this recipe if you want to use up that extra ½ can of pumpkin!
Sweetener Note: I love coconut sugar, and I think it adds a buttery-sweet note to recipes. You may not need or want it in this pudding, though, as the maple syrup may add enough sweetness for your taste (and the type of milk used will also affect sweetness). If you’d rather use stevia, add just a pinch or two and test along the way, as too much stevia can ruin the flavor.
Ginger Note: A touch of ginger is tasty, but you can omit it for the kiddos.
Milk Note: I typically use unsweetened almond milk (either plain or vanilla) when I make this pudding. If you are using a sweetened vanilla milk, reduce the sweetener to taste.
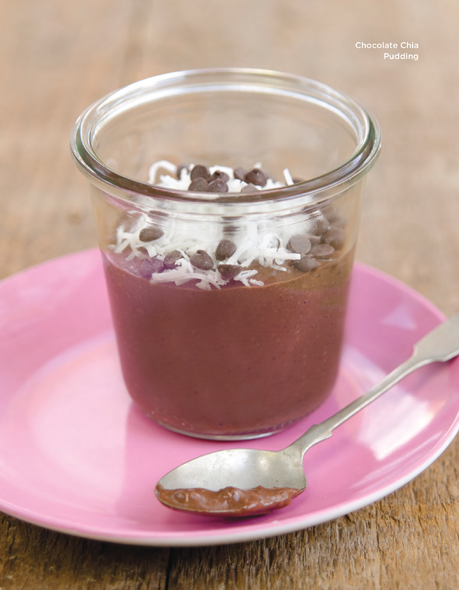
This chia pudding sets up quicker than other versions, since the seeds are blended first. It sets up in just about 30 minutes, making it almost instant! Our girls love this pudding, and I am always surprised by just how much!
Serves 2–3
½ packed cup pitted dates (see note)
3 tablespoons black or white chia seeds
1½ tablespoons cocoa powder
⅛ rounded teaspoon sea salt
1 cup plain or vanilla nondairy milk (see note)
½ teaspoon pure vanilla extract
2–3 tablespoons unsweetened shredded coconut, plus more for garnish
2 tablespoons mini nondairy chocolate chips (optional)
Add the dates, chia seeds, cocoa powder, sea salt, milk, and vanilla extract to a blender. Blend for a minute or more (depending on blender), until the seeds are pulverized. Taste, and if you’d like it sweeter, adjust with more dates or sweetener (see note).
Transfer the mixture to a large bowl or dish, stir in the coconut and chocolate chips, and refrigerate until chilled, about ½ hour or more (it will thicken more with chilling, but really can be eaten straight away—especially if using the dates, as they also thicken the mixture).
Serve, sprinkling with more coconut, and topping with fresh berries or other fruit if desired.
Sweetener Note: I wasn’t sure I’d like dates as much as using something like maple syrup to sweeten, but I love them here! If you’d like extra sweetness, you can puree in another 2–3 dates, adding a splash of extra milk if needed to blend, or a couple of teaspoons of maple syrup.
Milk Note: I typically use unsweetened milk when I make this pudding. If you are using a sweetened vanilla or chocolate milk, you may want to remove 1 or 2 dates. You can always adjust to taste, bumping up the sweetness after.
Serving Suggestion: On its own, this pudding serves two people. But, if paired with fruit or layered in a parfait with another pudding (like the Pumpkin Chia Pudding, page 173), or nondairy yogurt and fruit, it can be stretched to serve 3–4. Try pairing with fresh berries or pitted fresh cherries!
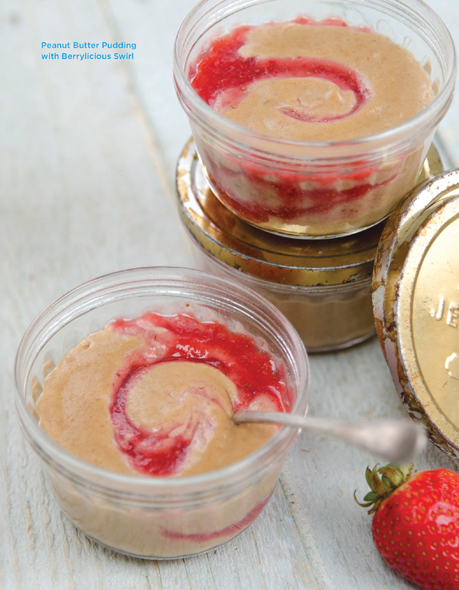
This idea came to me one day after school. I wanted to give the girls a treat, but something nutritious—and quick! This pudding came together in a flash, and their eyes sure lit up!
Serves 3
Peanut Butter Pudding:
¾ cup pitted dates
⅓ cup unsalted peanut butter or other nut butter (see notes)
1 tablespoon white chia seeds
⅛ teaspoon sea salt
¾ cup plus 1 tablespoon nondairy milk
1½ teaspoons pure vanilla extract
2–4 teaspoons pure maple syrup for extra sweetening (optional)
Berrylicious Swirl:
1 cup fresh or frozen strawberries or raspberries (see note)
2–3 tablespoons pure maple syrup or agave nectar
Pinch sea salt
To make the peanut butter pudding:
In a blender, puree the dates, peanut butter, chia seeds, sea salt, milk, and vanilla extract until smooth (if using a high-speed blender, this will be quick; with a standard blender, you may need to scrape down the sides of the blender a few times). If you’d like additional sweetener, add the maple syrup, a teaspoon or two at a time, to taste.
To make the berrylicious swirl:
Using a blender or immersion blender, puree the berries, maple syrup, and sea salt until semi-smooth. If using frozen berries, it will take a little longer.
To assemble:
Dollop the berry mixture on the peanut butter pudding, or “swirl” it through!
Peanut Butter Note: Peanut butters often have salt added, even the natural varieties. Check the ingredients—if it does, reduce or omit salt.
Nut Butter Note: If substituting a nut butter like almond, try adding a touch of orange zest. It pairs beautifully with almond butter!
Berries Note: If using seasonal fresh berries, they may be sweeter than frozen. Puree with just 1 tablespoon of maple syrup, and add extra to taste. With frozen berries, I usually use 2 tablespoons syrup.
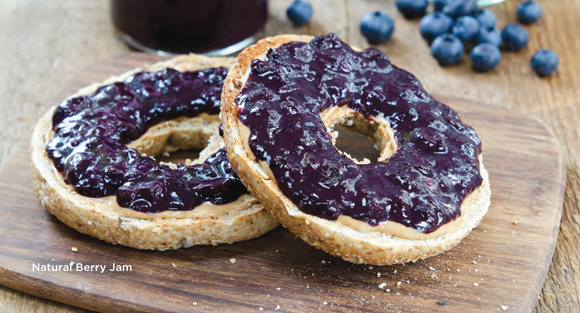
This jam is naturally sweetened with berries and dates, and tastes phenomenal!
Makes 1¾–2 cups
3–3½ cups (roughly 1 lb) sliced/chopped strawberries, whole blueberries, or raspberries (or a combination of the three; see note)
½ packed cup finely chopped dates (see note)
2–3 pinches sea salt
2 teaspoons ground white chia seeds
½–1 teaspoon lemon zest to taste
Extra sweetener to taste (optional; see note)
Combine the berries, dates, and sea salt in a saucepan over medium-low heat. Once the fruit breaks down and the mixture begins to bubble, reduce heat to low. Cover, and let simmer for 10 minutes. Add the chia and lemon zest, and cook for another 3–5 minutes until the jam thickens. Add extra sweetener to taste. Let cool, then refrigerate.
Berries Note: Since large berries can throw off proper measuring, slice or roughly chop larger berries before measuring 3 cups. For reference, a 1-pound clamshell container of strawberries is 3–3½ cups chopped strawberries.
Dates Note: The dates will darken the mixture slightly (mostly noticeable with strawberries). They also help thicken the jam, so give this sweetening twist a try!
Sweetener Note: For me, the dates usually lend enough sweetness. However, depending on the variety and ripeness of berries, you may want to sweeten. Options include a few tablespoons of coconut sugar, a drizzle of pure maple syrup, or a few pinches of stevia.
One day I wanted a thick, milky chocolate sauce for ice cream. I whipped this up and, after a few tweaks, had just the right sauce. It becomes quite a lot thicker after standing and refrigerating, so thin it out with extra milk as you like.
Makes about 1¼ cups
½ cup coconut sugar
3 tablespoons cocoa powder
2 tablespoons macadamia nut butter
1 tablespoon oat flour
¼ rounded teaspoon sea salt
¾ cup plus 1–3 tablespoons plain unsweetened nondairy milk
1 teaspoon pure vanilla extract
Place the coconut sugar, cocoa powder, macadamia nut butter, oat flour, sea salt, milk, and vanilla extract in a blender and puree until very smooth.
Transfer the mixture to a small saucepan over medium-low heat. Let the mixture slowly come to a boil, whisking frequently so that the sauce doesn’t thicken too quickly and scorch; reduce heat if needed. Once it comes to a slow bubbling boil, remove from heat.
Whisk in additional milk as needed to thin to desired consistency. Serve over ice cream, fruit, or any dessert you like!
Idea: Once this sauce cools, it thickens so much that it becomes like a pudding, so it can be two desserts in one!
See photo on page 168 (drizzled over Banana Butter Ice Cream).
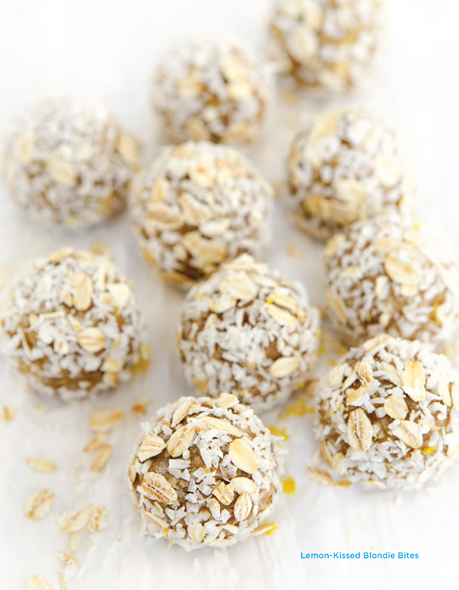
 LEMON-KISSED BLONDIE BITES
Occasionally I want a sweet treat that isn’t chocolate. Rare, but true. These little bites fit the bill perfectly—sweet, with a kiss of zesty lemon!
Makes 14–16 balls
1 cup pitted dates
¾ cup rolled oats
½ cup raw cashews
1½ teaspoons lemon zest
Seeds scraped from 1 vanilla bean (see note) or ¼–½ teaspoon pure vanilla extract or ½ teaspoon vanilla bean powder
Couple pinches sea salt
1½ teaspoons freshly squeezed lemon juice
2 tablespoons unsweetened shredded coconut
Optional Coating:
3–4 teaspoons shredded coconut
3–4 teaspoons rolled oats
½ teaspoon lemon zest
In a food processor, add the dates, oats, cashews, lemon zest, vanilla bean seeds, sea salt, and lemon juice and process. At first it will appear as if nothing is happening and the mixture is just whirring around crumbs, but it will soon start to become sticky.
When the mixture starts to become a little sticky, add the shredded coconut and process again. Continue to process until the dough forms a ball on the blade. Stop, and then remove the dough.
Take 1–1½ tablespoon scoops of the dough and roll in your hand. Repeat until you have used all of the dough.
To make the coating:
In a small bowl, combine the shredded coconut, rolled oats, and lemon zest. Toss or roll the balls in the coating if desired, and refrigerate.
Vanilla Note: To remove the vanilla seeds from the bean, slice down the outer side of the bean to open up lengthwise. Press open the sides, and using a blunt knife, scrape out the tiny seeds from both sides. The pod can be discarded or kept to infuse flavor in other dishes.
Kitchen Tip: The texture of these bites is somewhat soft, but firms with chilling. For a firmer texture, add another 2 tablespoons of rolled oats.
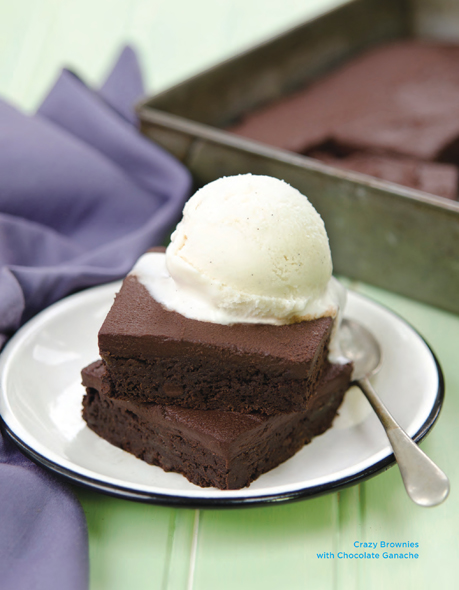
These brownies are incredible! They are fudgy and dense and sweet. Make them and see whether your family can even GUESS what’s in them!
Makes 16 brownies
½ cup kidney beans
½ cup pitted dates
⅓ cup peeled, precooked, and cooled yellow or red potato (see note)
2 tablespoons tahini or nut butter (see note and nut-free option)
2 tablespoons coconut butter (see note)
¼ cup pure maple syrup
3 tablespoons nondairy milk
½ cup plus 2 tablespoons cocoa powder
½ cup coconut sugar
2 tablespoons arrowroot powder
1 teaspoon vanilla bean powder or 1½ teaspoons pure vanilla extract
½ teaspoon baking powder
½ teaspoon baking soda
½ teaspoon sea salt
3 tablespoons nondairy chocolate chips (mini are nice)
Preheat oven to 350°F. Line an 8" × 8" brownie pan with parchment paper.
Using a small or mini food processor, puree the beans, dates, potato, tahini, and coconut butter until smooth, and then add the maple syrup and milk and puree again.
Add the cocoa powder, sugar, arrowroot, vanilla bean powder, baking powder, baking soda, and sea salt to the processor and puree until combined. (If your processor is too small, transfer the date mixture to a bowl, and use a spatula to incorporate the dry ingredients.) Stir in the chocolate chips.
Transfer the mixture to the brownie pan, and spread evenly with a spatula. Bake for 22–24 minutes (brownies will firm with cooling and are more fudgy with less baking, so don’t overbake). Remove, let cool completely, frost if desired, and cut into squares.
Potato Note: Potatoes add moisture and density when combined with the beans. If you don’t have cooked potato, substitute ¼ cup of potato starch and increase the milk to 5 tablespoons.
Nut-Free Option/Tahini Note: I use a good-quality tahini, with a mellow, buttery flavor and smooth texture. If you don’t have nut allergies, try substituting macadamia or almond butter. Another 1 tablespoon of nondairy milk may be needed if the nut butter is quite thick/dense.
Coconut Butter Note: If you don’t have coconut butter, you can substitute another 1½ tablespoons of a nut butter like macadamia, almond, or cashew butter—or more tahini.
Frosting Note: Chocolate Ganache, page 211, is wickedly good on these brownies!
This may be a new fave chocolate chip cookie recipe for you—it is for us! The flavor of the vanilla bean powder is really beautiful. Though somewhat expensive, a little vanilla bean powder goes a long way!
Makes 17–20 cookies
½ cup coconut butter (see note)
½ cup pure maple syrup
1 cup plus 2 tablespoons oat flour
2 tablespoons coconut sugar
½–¾ teaspoon vanilla bean powder or 1–1½ teaspoons pure vanilla extract
¼ rounded teaspoon sea salt
1 teaspoon baking powder
¼ teaspoon baking soda
⅓ cup nondairy chocolate chips (mini or regular)
In a mixer fitted with the paddle attachment, add the coconut butter and maple syrup. Mix, slowly to start, then at a higher speed until smoothed out.
Add the oat flour, coconut sugar, vanilla bean powder, and sea salt to the coconut butter mixture, and sift in the baking powder and baking soda. Mix at slow speed (so the dry ingredients don’t poof!), and then bring up to medium speed and mix until everything just comes together.
Add the chocolate chips and mix to just incorporate. The mixture should be a little sticky, not dry, but not too wet either. Scrape down the bowl with a spatula, then transfer to the fridge to chill for ½ hour.
Preheat oven to 325°F. Line a baking sheet with parchment paper. Place 1–1½-tablespoon scoops of the batter on the prepared baking sheet. Slightly flatten each cookie with a spatula or your hand. Bake for 11 minutes, then remove from oven and let cool for 2–3 minutes on the pan. Transfer to a cooling rack to cool completely.
Coconut Butter Note: It can be tricky to measure coconut butter when it is very hard. Use a butter knife to work out small chunks/slivers when hard. It’s better to measure in small pieces than in larger chunks, so the actual measure is more accurate.
Idea: Use this batter to make cookie dough ice cream! Save a little batter when making the cookies, maybe ⅓ cup. Roll into tiny balls and mix through a pint of softened vanilla or chocolate nondairy ice cream!
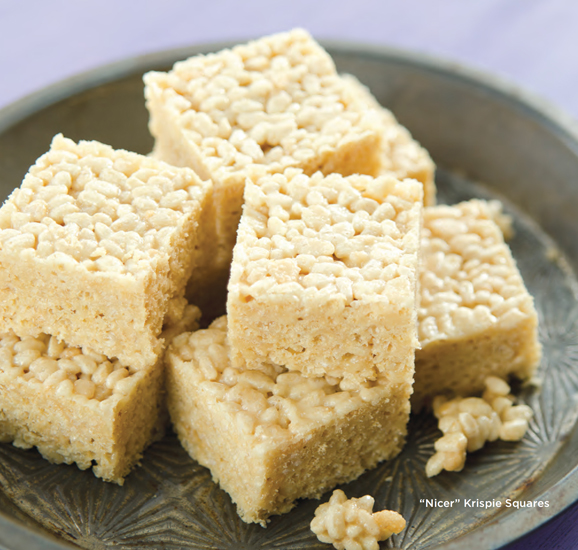
“NICER” KRISPIE SQUARESThis recipe first appeared in my cookbook Eat, Drink & Be Vegan, and it is such a well-loved, kid-friendly recipe that I had to share a nut-free version here! These squares taste phenomenal, with the buttery richness of the macadamia nut butter and the sweetness of brown rice syrup. They aren’t sticky or gooey like traditional Rice Krispie squares, but the flavor is remarkably similar!
Makes 16 squares
½ cup macadamia nut butter (see note for nut-free options)
1–2 tablespoons coconut sugar or other unrefined sugar (see note)
¼ teaspoon agar powder
¼ teaspoon sea salt
½ cup brown rice syrup
1–1½ teaspoons pure vanilla extract
4 cups natural brown rice crisp cereal (see note)
Line an 8" × 8" pan with parchment paper.
In a large saucepan over medium-low heat, combine the macadamia nut butter, coconut sugar, agar powder, sea salt, brown rice syrup, and vanilla extract. Stir continually as the mixture heats, until the agar powder is fully dissolved (reduce heat if mixture starts bubbling).
Remove from the heat and stir in the cereal, making sure to fully incorporate with the nut butter mixture. Transfer the mixture to the prepared pan and press in evenly (use a nonstick spatula or a piece of parchment to press the mixture without sticking). Refrigerate to cool completely, then cut into squares.
Nut-Free Options:
•With coconut butter: This is my suggested nut-free option; it may even rival the macadamia nut version, simply because it has a similar mellow flavor but holds together even better— and agar is not needed! Simply replace the macadamia nut butter with ⅓ packed cup coconut butter (not oil). Omit the agar. The remaining ingredients stay the same.
•With sunflower seed butter: Sunflower seed butter has a stronger nutty taste, almost peanut-y. With this substitution the squares taste different than a traditional Rice Krispie square, but it’s still a nice option. Use ½ cup of sunflower seed butter, 3–4 tablespoons of coconut sugar, and add ¾ teaspoon of cinnamon and ¼ teaspoon of cardamom to balance the seed butter flavor. Use the full 1½ teaspoons of vanilla extract, and retain the sea salt and agar. A sprinkle of mini chocolate chips just before transferring to the pan is also good!
Sugar Note: I don’t always add the coconut sugar to these squares. For me, the brown rice syrup adds sufficient sweetness. If you think you’d like them a little sweeter, use the added touch of sugar.
Brown Rice Crisp Cereal Note: These squares use the crisp rice cereal similar to Rice Krispies. There are a few organic and brown rice brands available; one of my favorites is by Erewhon.
Chocolate Version: To make a chocolaty version, add 2 tablespoons of cocoa powder while melting the ingredients. Whisk through to get out any small lumps. You may want the additional sweetener if using cocoa powder, since it will introduce some bitterness.
These have the dense, sticky, decadent texture and quality of a traditional blondie, yet are made with wholesome ingredients—positively delicious! Recipe from Plant-Powered 15.
Makes 16 blondies
½ lightly packed cup pitted dates
1 tablespoon ground white chia seeds
¼ cup pure maple syrup
½ tablespoon freshly squeezed lemon juice
1½ teaspoons pure vanilla extract
½ teaspoon blackstrap molasses
½ teaspoon baking soda
⅜ teaspoon sea salt
Few pinches freshly grated nutmeg
2½ cups almond meal
½ cup coconut sugar
2–3 tablespoons nondairy chocolate chips (optional; see note)
Preheat oven to 325°F. Lightly oil an 8" × 8" brownie pan and line with a strip of parchment paper.
In a mixer fitted with the paddle attachment (see kitchen tip note), add the dates, ground chia, maple syrup, lemon juice, vanilla extract, and molasses. Mix on low speed to first incorporate, and then increase speed slightly to fully pulverize and smooth the dates.
Once smooth, turn off the mixer and add the baking soda, sea salt, and nutmeg. Mix just briefly and then add the almond meal and coconut sugar. Process on low speed until the mixture just comes together.
Transfer the mixture to the brownie pan, and use a spatula or a piece of parchment to press the mixture without sticking. If using chocolate chips, lightly press into the top of the batter. Bake for 20 minutes. When done, blondies will be golden and slightly crispy around the edges. Remove, let cool completely, and cut into squares.
Kitchen Tip: If you don’t have a stand mixer and/or don’t have a paddle attachment, then do the first step using a mini food processor. Combine the dates, ground chia, maple syrup, lemon juice, vanilla extract, and molasses in the food processor, pureeing until smooth. Then you can either finish with a mixer as per the instructions, or finish mixing in a bowl by hand.
Chocolate Note: I usually make these without chocolate chips, and sometimes I’ll simply sprinkle a few chips over the top of half the batch—either way, these are crazy-good!
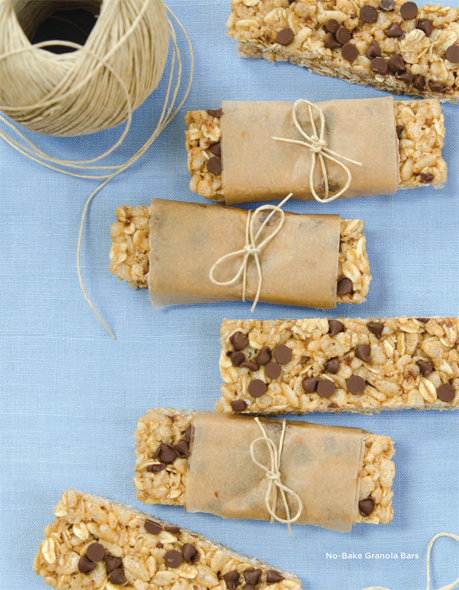
NO-BAKE GRANOLA BARSThese bars are perfect for school lunches because they are nut-free and pack very well. Plus, they are pretty simple to put together!
Makes 8–10 bars or 16 squares
½ cup brown rice syrup
¼ packed cup coconut butter (see note)
1 teaspoon pure vanilla extract
¼ teaspoon sea salt
¼ teaspoon cinnamon
1 cup rolled oats
¼ cup oat flour
2 tablespoons unsweetened shredded coconut (optional)
1½ cups natural brown rice crisp cereal
3 tablespoons nondairy chocolate chips (optional)
Line an 8" × 8" pan with parchment paper.
In a medium saucepan over medium/medium-low heat, add the brown rice syrup, coconut butter, vanilla extract, sea salt, and cinnamon. Stir until well combined and the coconut butter has melted. Add the rolled oats, and stir through, allowing to cook for 2–3 minutes in the low heat. Add the oat flour and shredded coconut, and stir through.
Remove the pot from the stove. Swiftly stir in the cereal and transfer the mixture to prepared pan. Press mixture evenly into the pan (using a nonstick spatula or piece of parchment paper). Wait just a minute, and then sprinkle on the chocolate chips and press those into the base. Refrigerate until fully chilled (at least ½ hour), then cut in squares or bars.
Coconut Butter Note: Coconut butter works well here because it is so dense and helps bind the bars. Because coconut is not botanically a nut, these are also perfect for school lunches. However, if you want to substitute a nut butter, choose one that is very dense, like cashew butter.
Idea: Try some of these flavor variations:
•Raisin-spice: Stir in 3–4 tablespoons raisins, omit the chips, increase the cinnamon to ½ teaspoon, and add ¼ teaspoon of nutmeg and ⅛ teaspoon of allspice.
•Cranberry–pumpkin seed: Stir in 3–4 tablespoons of dried cranberries and substitute pumpkin seeds for the coconut.
•Cocoa-hemp: Substitute 2 tablespoons of hemp seeds for the coconut, and add 2 tablespoons of cocoa powder (when mixing in the oat flour). Keep the chocolate chips, oh yes!
NUT-FREE “FROSTED BRAWNIES”My Frosted Brawnies recipe was such a hit that I created this nut-free version. These brownies aren’t completely “raw” like the original, but they taste just as delicious— and are now safe for school parties! Adapted from Let Them Eat Vegan.
Makes 16–20 brownies
Base:
¾ cup unsweetened shredded coconut
½ cup hemp seeds
½ cup rolled oats
¼ cup raw or regular cocoa powder
¼ teaspoon sea salt
1½ cups pitted dates
1½ teaspoons pure vanilla extract or seeds from 1 vanilla bean
Frosting:
½ cup coconut butter (see note)
¼ cup pure maple syrup
2 tablespoons raw or regular cocoa powder
Pinch sea salt
Line an 8" × 8" cake pan with parchment paper.
To make the base:
In a food processor, add the coconut, hemp seeds, and oats, and process until very fine. Add the cocoa powder and sea salt and pulse through. Add the dates and vanilla extract, and process until the mixture comes together, starting to form a ball or sticky enough to hold together when pressed. If it isn’t this sticky, process again or, if dates were very dry, add a few drops of water.
Once mixture is ready, transfer to the prepared pan. Press evenly and firmly into the pan (using a nonstick spatula or piece of parchment paper).
To make the frosting:
In a mini food processor, process the coconut butter and maple syrup briefly, until smooth. Add the cocoa powder and sea salt, and pulse again until just incorporated (see note). Without a mini food processor, you can stir by hand in a bowl, following the same steps.
To assemble:
Smooth the frosting over the base, and refrigerate for an hour or more until set. Cut into squares and serve. You can also freeze the squares after cutting and enjoy them out of the freezer!
Coconut Butter Note: If you don’t have nut allergies, then a dense nut butter like cashew will substitute well for the coconut butter.
Kitchen Tip: Avoid overprocessing, as the heat generated brings out the oils out of the hemp seeds and coconut, making the brownies a little oily to the touch. They will still taste fine, if it does happen!
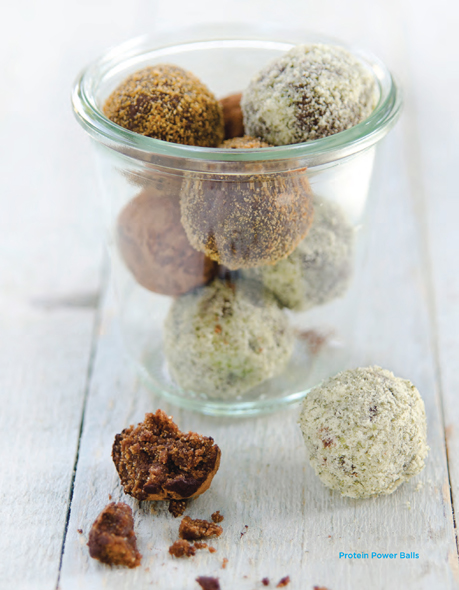
PROTEIN POWER BALLSOur girls are pretty busy with hockey and sometimes they take off to games for hours and need some power-packed snacks. I created this treat for them—it sneaks in a little extra protein boost!
Makes 25–28 balls
½ cup pumpkin seeds
½ cup coconut flour (see note)
⅓ cup hemp seeds
¼ cup sunflower seeds
1½ cups pitted dates
3 tablespoons cocoa powder
2–3 tablespoons Vega Choc-a-lot Protein Smoothie powder (see note)
¼ scant teaspoon sea salt
1 teaspoon pure vanilla extract or ½ teaspoon vanilla and ¼ teaspoon almond extract
In a food processor, process the pumpkin seeds, coconut flour, hemp seeds, and sunflower seeds until fine and crumbly.
Add the dates and process through until they are worked into the mixture and are crumbly.
Add the cocoa powder, Vega powder, sea salt, and vanilla extract and process again for a minute or two. It will appear as if nothing is happening for a few minutes! The mixture will just be whirring around in crumbs, but soon it will start to become sticky and form a ball on the blade. Stop the machine and remove the dough.
Take 1–1½-tablespoon scoops of the dough and roll in your hand. Repeat until you have rolled all of the dough.
Coconut Flour Note: If you don’t have coconut flour, you can substitute ¾ cup rolled oats.
Protein Powder Note: This protein powder has some stevia, so adjust to taste for sweetness. Start with 2 tablespoons, and stop to taste the mixture before it is in a sticky ball. If you’d like to add more, try another ½–1 tablespoon. If you have another favorite chocolate protein powder you would like to add—go for it. If you don’t want to use any protein powder, omit it, and make these simple changes: increase the cocoa powder to ¼ cup total, add another 2 tablespoons of hemp or sunflower seeds, and another 2–4 dates, to taste.
Idea: You can leave these balls uncoated, or roll in a dusting of coconut sugar, cocoa powder, ground pumpkin seeds, or a combo!
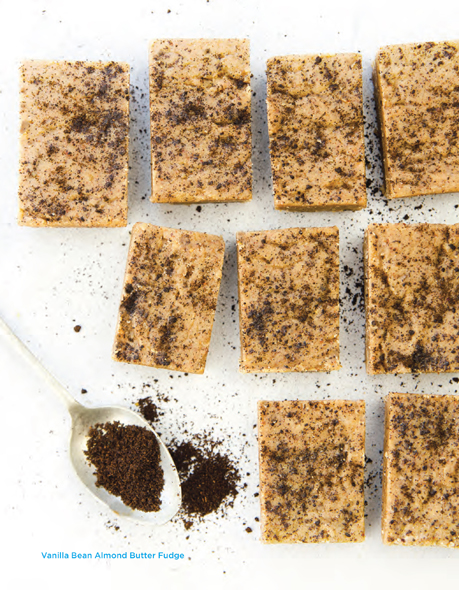
I’ve always loved the idea of fudge, yet always find it too intensely sugary. This fudge is dense, satisfying, and sweet, but not sickly—and is made with much healthier ingredients than traditional fudge. The addition of vanilla powder is divine—try to use it if you can!
Makes 14–18 bars/squares
½ cup raw almond butter (see note and nut-free option)
½ cup coconut butter
¼ cup coconut sugar
¼ cup brown rice syrup
¼ rounded teaspoon sea salt
1 teaspoon vanilla bean powder, divided (see note)
Line a glass loaf dish with parchment paper and wipe the parchment lightly with coconut butter or oil.
Set a heatproof bowl over a pot of simmering water to create a double boiler. Add the almond butter, coconut butter, coconut sugar, rice syrup, sea salt, and ½ teaspoon of the vanilla bean powder. Stir through gently until the coconut butter melts and the ingredients come together smoothly.
Transfer the mixture to the prepared loaf dish. Use a nonstick spatula or a piece of parchment paper to gently smooth/even out the mixture. Then, take pinches of the remaining vanilla bean powder and dust it over the top of the mixture. Refrigerate until completely firm. Cut into bars or squares and enjoy! Keep chilled until serving.
Almond Butter Note: Raw almond butter really tastes best in this fudge. You can substitute regular (roasted) almond butter, but be sure it’s unsalted—or you will want to reduce/omit the sea salt used in the fudge. Raw cashew butter would also work well.
Nut-Free Option: If you have a nut allergy, increase the amount of coconut butter to 1 cup and omit the almond butter. The texture will be slightly different, but still very delicious!
Vanilla Note: If you don’t have vanilla bean powder, you can scrape the seeds from a vanilla bean. You won’t yield 1 teaspoon from one bean, so use it in either the mix or for the topping. When dusting, note that the vanilla bean powder doesn’t distribute evenly—it looks lovely that way!
Kitchen Tip: These squares will soften at room temperature, so it’s best to keep them chilled until just before serving. You can also freeze extras to enjoy later.
Our girls love ice pops, and they are easy to make. I call them fruitsicles, because in the recipes that follow, only fruits and natural fruit juices are used to sweeten. You can always bump up the sweetness with a touch of pure maple syrup if you like, though most don’t need it!
Fruitsicle Notes:
•A high-powered blender (ex: Blendtec) works best for smooth purees, but a standard blender will work (just may need longer to puree).
•Use seasonal and ripe organic fruits—or choose frozen organic. If using frozen fruits, allow them to sit at room temperature for a few minutes before blending (frozen bananas excepted), for easier pureeing.
•Freeze overripe bananas in batches (see Batch Food and Recipe Preparation, page 15).
•Most ice pop molds will hold ⅓–½ cup of liquid. These recipes will yield between 2–3 cups of liquid to accommodate most ice pop sets. For most molds, this will give you about 6 pops (if they are smaller molds, you might get 8; if they are larger, maybe 4 or 5).
•Individually set molds are easier to use than molds that group the pops together. You can remove one at a time and run under warm water to release, rather than trying to remove a single pop from a joined tray.

•A funnel is useful. Most blenders have a pouring spout, but if using an immersion blender and deep cup to puree, consider using a funnel to fill ice pop molds.
•Opt for molds that are BPA-free. Do not choose dollar-store molds. While they may be inexpensive, they likely contain cheap plastics that will leach BPA. You may find these higher quality, BPA-free molds in stores—if not, they are easy to purchase online.
•When filling molds, leave about ¼" of space at the top of the mold, as the mixture will expand slightly when freezing.
•Have leftover puree? Combine with sparkling water for refreshing drink, or pour into an ice cube tray to make “fruit cubes!”
•On average, pops take 4–5 hours to set.
Now, some fruitsicle recipes!
Piña-Cooladas
Makes about 6 pops (see notes)
1½ cups chopped pineapple
¾ cup sliced overripe banana
½ cup “lite” coconut milk or regular nondairy milk
⅓ cup freshly squeezed orange juice
1–3 teaspoons pure maple syrup (optional)
Puree the pineapple, banana, milk, and orange juice in a blender until smooth. Taste, and sweeten if desired, and puree again. Pour into ice pop molds and freeze until set.
Pink-sicles!
Makes about 6 pops (see notes)
2 cups watermelon cubes
1 cup sliced strawberries or raspberries
Seeds from 1 vanilla bean (optional)
1–3 teaspoons pure maple syrup (optional)
Puree the watermelon and berries in a blender until smooth. If using the vanilla bean seeds, use a sharp knife to slice the bean lengthwise. Open the bean and use a dull knife to scrape out the seeds. Add to the blender and briefly pulse/puree to incorporate. Taste, add sweetener if desired, and puree again. Pour into ice pop molds and freeze until set.
Makes about 6 pops (see notes)
2½ cups cubed honeydew melon or cantaloupe
3 tablespoons freshly squeezed orange juice
1 tablespoon freshly squeezed lime juice
1–3 teaspoons pure maple syrup (optional)
3–4 tablespoons sliced or halved red or green grapes (optional)
Puree the melon, orange juice, and lime juice in a blender until smooth. Taste, add sweetener if desired, and puree again. Pour into ice pop molds, adding grapes at this time if using. Freeze until set.
Peach-Split!
Makes about 6 pops (see notes)
1½ cups cubed peach
1 cup sliced overripe banana
⅓–½ cup natural unsweetened organic mango or apple juice (see note)
2–3 pinches ground cardamom or freshly grated nutmeg (optional)
1–3 teaspoons pure maple syrup (optional)
Puree the peach, banana, juice, and cardamom in a blender until smooth. Taste, add sweetener if desired, and puree again. Pour into ice pop molds and freeze until set.
Juice Note: If using frozen fruit, you will need ½ cup; if using fresh fruit, you will need ⅓ cup or less.
Mango-Tango Pops
Makes about 6 pops (see notes)
2½ cups cubed fresh or frozen mango
½ cup freshly squeezed orange juice
1–3 teaspoons pure maple syrup (optional)
3–4 tablespoons raspberries (optional)
Puree the mango and orange juice in a blender until smooth. Taste, add sweetener if desired, and puree again. Pour the mixture partially into ice pop molds. If using the raspberries, break up the raspberries just slightly, and add them to the molds in layers, alternating with pouring in the mixture. (The effect will look like raspberry “gems” in the pops!) Finish using all the mixture, and then freeze until set.
Makes 5–6 pops (see notes)
1 cup sliced strawberries
1 cup raspberries
⅔–¾ cup natural unsweetened blueberry or apple juice
1–3 teaspoons pure maple syrup (optional)
3–4 tablespoons small blueberries or larger berries cut in half
Puree the strawberries, raspberries, and juice in a blender until smooth. Taste, add sweetener if desired, and puree again. Gently stir in the blueberries. Pour into ice pop molds and freeze until set.

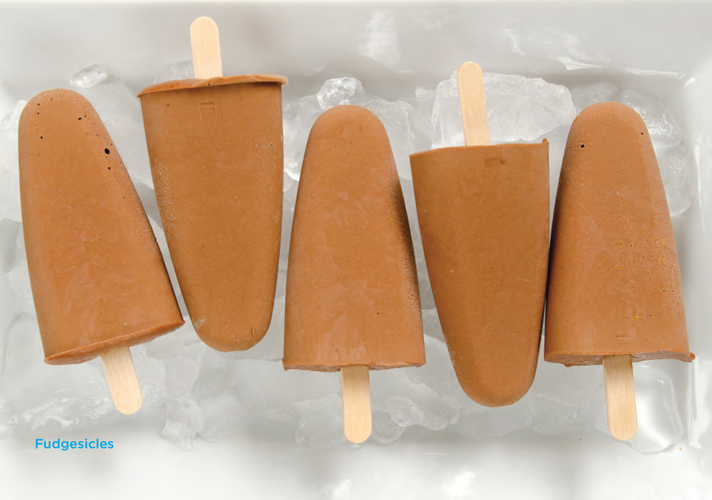
Fudgesicles were one of my favorite treats as a kid. Now, I make a much healthier version for my own kiddos, and they love them just as much!
Makes 5–6 fudgesicles
⅓ cup macadamia nut butter or raw cashew butter
¼ cup coconut sugar
3 tablespoons cocoa powder
⅛ teaspoon sea salt
½ cup nondairy milk
½ teaspoon pure vanilla extract
1½ cups frozen banana slices
In a blender, puree the macadamia nut butter, coconut sugar, cocoa powder, sea salt, milk, and vanilla extract until smooth. Add the bananas and puree again. You will need to scrape down the blender a few times while pureeing. Once the mixture is smooth and liquid, pour into ice pop molds and freeze until set.
No ice cream maker needed! Don’t omit the nut butter; it makes the ice cream exceptionally delicious. Recipe adapted from Eat, Drink & Be Vegan.
Makes about 2½ cups
3 cups frozen overripe banana slices (4–5 bananas)
⅓–½ cup raw cashew butter (or macadamia butter; see note)
¼–½ teaspoon vanilla bean powder or
½ teaspoon pure vanilla extract
⅛ teaspoon sea salt
¼ cup pure maple syrup (see note)
In a food processor, puree the bananas until they have turned into small frozen crumbles. Then, add the cashew butter, vanilla bean powder, sea salt, and maple syrup and puree until very smooth, scraping down the sides of the bowl as needed. (If you have a high-speed blender, you can simply add everything at once and pulse/puree.) Serve immediately, or transfer to a container to freeze.
Nut Butter Note: The nut butter not only adds flavor but also contributes texture for freezing and easier thawing/scooping later. I prefer raw cashew butter or macadamia nut butter, but you can try almond or other nut butters, too.
Sweetener Note: The sweetness of the ice cream depends on how overripe the bananas are. The ¼ cup maple syrup is usually a good amount, but you can use less if you like. Keep in mind the ice cream will taste slightly less sweet after freezing.
Optional Add-Ins: I enjoy the simplicity of this ice cream as is, but you can add these (or other) flavorings and extras to this ice cream:
•cinnamon or grated nutmeg
•chocolate chips
•crumbled cookies or brownies
Idea: For a chocolaty drizzle, try my Milk Chocolate Fudge Sauce, page 179. Also, try freezing a small amount with a layer of fudge sauce on top!
See recipe photo on page 168.
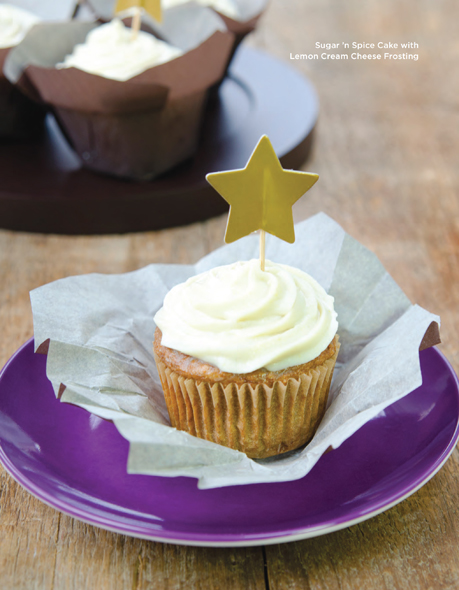
This cake is beautifully fragrant with a moist crumb thanks to the addition of macadamia nut butter. It’s sweet, but not too sweet . . . perfect for parties of all ages!
Makes two 8" round cake layers
2 cups plus 2 tablespoons whole-grain spelt flour
½ cup coconut sugar
½ teaspoon cinnamon
¼–½ teaspoon cardamom (see note)
¼ rounded teaspoon sea salt
2–3 pinches freshly grated nutmeg
2 teaspoons baking powder
½ teaspoon baking soda
¾ cup unsweetened organic applesauce
1 cup plus 2 tablespoons plain or vanilla nondairy milk
3 tablespoons macadamia nut butter
2 tablespoons pure maple syrup
1½ teaspoons vanilla extract
1 teaspoon lemon zest
Preheat oven to 350°F. Lightly coat two 8" round cake pans with a dot of oil, and then line the bottoms with a circle of parchment paper.
In a large bowl, combine the flour, coconut sugar, cinnamon, cardamom, sea salt, and nutmeg, and then sift in the baking powder and baking soda. Stir through until well combined.
In a medium bowl, combine the applesauce, milk, macadamia nut butter, maple syrup, vanilla extract, and lemon zest. Stir well to ensure the macadamia nut butter is thoroughly combined with the other wet ingredients.
Add the wet mixture to the dry and stir through, mixing until just well combined (do not overmix).
Pour into the prepared cake pans. Bake for 21–24 minutes, until lightly golden and a toothpick inserted in the center comes out clean. Let cool completely before frosting.
Spice Note: Children aren’t always fond of much “spice” in foods, even sweeter spices. Our girls enjoy this cake, but if you don’t use cardamom often, then perhaps start with ¼ teaspoon.
Cupcake Option: Divide the mixture among 16–17 cupcake liners in a muffin pan. Fill the liners about half full (so there is room for frosting). Bake for 15–16 minutes.
Serving Suggestion: Try frosting with the Lemon Cream Cheese Frosting (page 208).
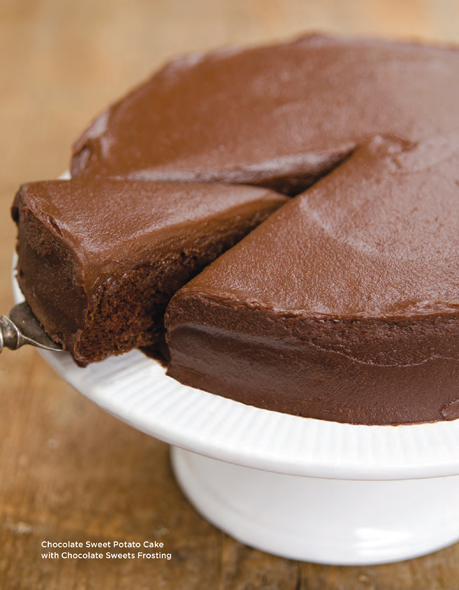
This cake is sweetened partially with cooked sweet potato, which also adds moisture and a tender texture. It isn’t overly sweet, but just sweet enough for a snack cake for after school, or even recess. But, pair it with the Chocolate Sweets Frosting (page 209), and you have a cake fit for a special occasion!
Makes 1 cake layer (double the batch for a 2-layer cake)
¾ cup peeled, cooked, and cooled orange sweet potato (see note)
½ cup plus 1 tablespoon water, divided
¼ cup pure maple syrup
1 tablespoon balsamic vinegar
2 teaspoons pure vanilla extract
1 cup whole-grain spelt flour
⅓ cup coconut sugar
¼ cup mini or regular nondairy chocolate chips
½ scant teaspoon sea salt
¼ cup cocoa powder
1 teaspoon baking powder
1 scant teaspoon baking soda
Preheat oven to 350°F. Lightly coat an 8" × 8" brownie/cake pan or a 9" round cake pan with coconut or other oil, and fit the bottom of the pan with a small piece of parchment paper.
In a blender (or using a handheld blender and a deep cup or vessel), puree the sweet potato, ½ cup of the water, maple syrup, balsamic vinegar, and vanilla extract until completely smooth.
In a large bowl, combine the flour, coconut sugar, chocolate chips, and sea salt, then sift in the cocoa, baking powder, and baking soda.
Add the wet ingredients to the dry (be sure to scrape out all the blended ingredients with a spatula, and use the remaining 1 tablespoon of water to rinse the blender jar and get out any remaining puree). Mix until just well incorporated.
Transfer to the prepared pan, bake for 21–23 minutes, remove, and let cool on a cooling rack.
Sweet Potato Note: Orange sweet potato is a little sweeter and also a little looser than yellow sweet potato. I prefer orange in this recipe, but if you’d like to use yellow, add another 1–2 tablespoons of water and another 1 tablespoon of maple syrup to the wet ingredients to loosen slightly.
While I’ve had a sweet tooth since childhood, I’ve never really cared for über-sweet frostings. Over the years I’ve come up with recipes that are rich, luscious, and just sweet enough! Feel free to amp up the sweetness as suggested in the note.
Makes about 3 cups, enough to frost one 2-layer cake
2½ cups soaked and drained cashews (see note)
2 tablespoons freshly squeezed lemon juice
½ cup refrigerated coconut cream (from canned coconut milk; see note)
⅓ cup coconut butter
1 cup natural confectioners’ sugar (see note)
2½–3 teaspoons lemon zest (see note)
½ scant teaspoon sea salt
Seeds from 1 vanilla bean or ¼ teaspoon vanilla bean powder (optional)
¼ rounded teaspoon xanthan gum (optional; see note)
In a food processor or high-speed blender, puree the cashews with the lemon juice until slightly smooth. This may take several minutes; stop to scrape down the processor/blender as needed.
Add the coconut cream, coconut butter, sugar, lemon zest, salt, and vanilla bean seeds. Puree until very smooth. Taste, and add extra sugar if you like. Transfer to a container and refrigerate (it will thicken after chilling). If you’d like a little thicker/stable frosting, add the xanthan gum, up to ¼ rounded teaspoon, before chilling.
Cashews Note: It’s important not to have excess water on the cashews or the frosting will be loose. Be sure to drain the cashews well; you can pat dry with a paper towel, too.
Coconut Milk Note: Use regular coconut milk (rather than light) from a can in this recipe. Before using, refrigerate it overnight or for a few days. The thick cream will rise to the top and be easy to scoop and measure. Use only the thick cream.
Sweetener Note: You can buy confectioners’ sugar made from organic, evaporated cane juice, or you can make it! Blitz the sugar in a high-speed blender. Add 1 tablespoon arrowroot for every 1½ cups sugar if using a standard blender. Note that if using coconut sugar, your powdered sugar will have a caramel color.
Lemon Note: If you have lemon extract, you can add a few drops to taste, for an even more enhanced lemony flavor!
Xanthan Gum Note: Xanthan adds extra stability to the frosting, but is totally optional. See Pantry Primer, page 11.
See recipe photo on page 205.
Yes, this frosting is made with cooked sweet potatoes! Once blended with rich nut butter and a few other magical ingredients, it turns into a thick, irresistible frosting!
Makes about 2¼ cups
1 loosely packed cup peeled, cooked, and cooled sweet potato (see note)
⅔–¾ cup coconut sugar or other unrefined sugar (see note)
½ cup cocoa powder
½ scant cup raw cashew butter or almond butter
¼ rounded teaspoon sea salt
2–5 tablespoons nondairy milk (see tip)
1 teaspoon pure vanilla extract
Place the sweet potato, coconut sugar, cocoa powder, cashew butter, sea salt, 1–2 tablespoons of the milk, and vanilla extract in a blender or food processor and puree until very smooth.
Taste, and add more sweetener if desired, and another 2–3 tablespoons of milk if needed to thin (you may need more milk using yellow sweet potato as they aren’t quite as moist as the orange). Puree until very smooth, scraping down the blender/ processor bowl as needed.
Transfer to a container and refrigerate until ready to use. Or, get a spoon and dig in!
Sweet Potato Note: I prefer using yellow sweet potato in this recipe, but orange sweet potato is still okay!
Coconut Sugar Note: Because coconut sugar does not have a fine texture, it’s useful to first process in a blender to make it powdery. If you have a high-speed blender, simply pulse a cup or more until powdery (reserve the extra for another use). If using a regular blender, process 1½–2 cups of sugar with 1–1½ tablespoons of arrowroot powder, until it becomes powdery.
Kitchen Tip: This is a thick frosting. Thin with more milk if desired. After refrigerating, you can fluff frosting using a mixer with a whisk attachment.
Idea: Add 1–1½ teaspoons of orange zest or ½ teaspoon of pure almond extract for a slight cherry flavor.
Serving Suggestion: Try with Chocolate Sweet Potato Cake, page 207.
See recipe photo on page 206.
This is a ridiculously simple way to make a thick chocolate ganache that can be used for cakes, brownies, or cookies, or kept thicker for truffles.
Makes just under 1½ cups
½ cup coconut butter
6 tablespoons cocoa powder
⅛ teaspoon sea salt
6–7 tablespoons nondairy milk (see note)
6 tablespoons pure maple syrup
In a small saucepan, combine the coconut butter, cocoa powder, sea salt, milk, and maple syrup over very low heat (or use a double boiler for better heat control). Whisk through until the coconut butter is melted and all the ingredients are smooth.
Transfer to a glass dish to let cool. Refrigerate until completely chilled, then use for spreading between cookies for cookie sandwiches, as a thick frosting for cakes or brownies, or if kept thicker (see note) you can roll into truffles and then dust with cocoa powder, coconut sugar, coconut, etc.
Milk Note: For a thicker, firmer ganache, use less milk—use the 6-tablespoon measure. For a ganache that will spread a little easier, use the 7-tablespoon measure. I prefer plain soy or almond milk in this recipe.
Serving Suggestion: Try this as a frosting for Crazy Brownies, page 182. If you have leftover, use to scoop into mini truffles!
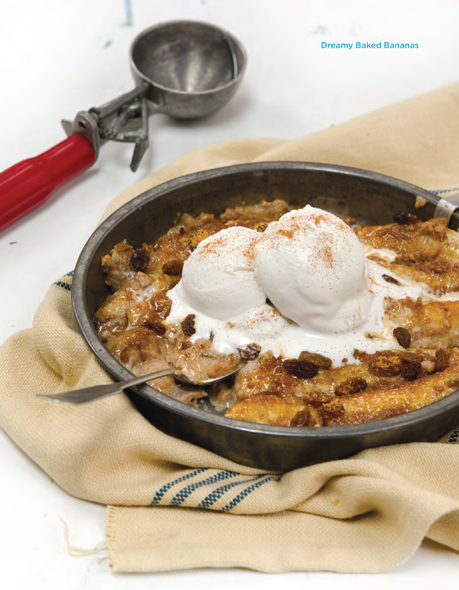
It seems silly that something so basic, so “real,” and so effortless can taste so impossibly dreamy. But dessert food dreams do come true. This one is especially memorable when paired with a nondairy ice cream!
Serves 2–3
2 tablespoons macadamia nut butter (see note)
¼ rounded teaspoon cinnamon
⅛ teaspoon freshly grated nutmeg (optional)
⅛ teaspoon sea salt
¼ cup nondairy milk
2 teaspoons freshly squeezed lemon juice
½ teaspoon pure vanilla extract
3 ripe bananas
2 tablespoons raisins or chopped dates (optional; see note)
1–2 tablespoons coconut sugar (optional)
Preheat oven to 400°F.
In a small bowl, whisk together the macadamia nut butter, cinnamon, nutmeg, sea salt, milk, lemon juice, and vanilla extract. The mixture will be thick, but it should be smooth. Transfer to a pie plate.
Peel the bananas and slice in half lengthwise. Place the slices in the mixture, then gently flip so both sides are coated. Sprinkle on the raisins (embedding them in the sauce), followed by the coconut sugar, if desired. Bake for 17–20 minutes. Serve hot or warm.
Nut Butter Note: This dessert is particularly good with macadamia nut butter, because it is so smooth and buttery. You can make it yourself (see page 253) if you cannot find it in stores. Other nut butters that substitute well are raw cashew butter and raw almond butter.
Dried Fruit Note: If you aren’t fond of dried fruit, you can omit or substitute with chopped nuts.
Kitchen Tip: When I make this, our girls polish off the entire dish in a blink. So, I’d say it can serve three, but you may want to double the batch, just to be safe!
Serving Suggestion: While good cool, this dessert is definitely best a little warm—with a scoop of ice cream to slowly melt over the top!
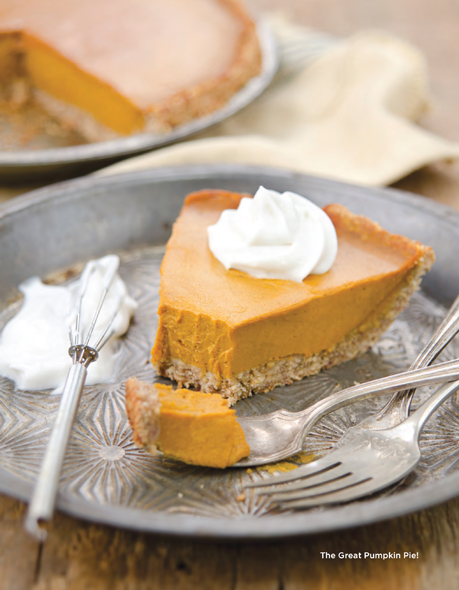
This pumpkin pie is indeed GREAT! The crust is buttery and nutty, and the filling is irresistibly creamy. A must for your holiday menu!
Makes 1 pie
Crust:
2 cups rolled oats
½ packed cup pitted dates
⅛ teaspoon sea salt (see note)
⅓ cup unsalted almond butter
2 tablespoons nondairy milk
Filling:
1 can (15 oz) pure pumpkin puree
¾ cup raw cashews
1 tablespoon arrowroot powder
1½ teaspoons cinnamon
¼ teaspoon freshly ground nutmeg
¼ teaspoon allspice
¼ rounded teaspoon sea salt
2–3 pinches ground cloves
½ cup plus 1 tablespoon pure maple syrup
⅓ cup plain unsweetened nondairy milk (see note)
1 tablespoon fresh lemon juice
½ teaspoon pure vanilla extract or ¼ teaspoon vanilla bean powder
Preheat oven to 400°F. Lightly coat a pie plate with a dab of oil.
To make the crust:
In a food processor, add the oats, dates, and sea salt. Puree until crumbly. Add the almond butter and puree for about a minute. Add the milk and pulse until the mixture becomes sticky (that is, can hold together when pressed). Transfer to the prepared pie plate, pressing in evenly around the base and up the sides of the plate.
To make the filling:
In a blender (high speed works best; if using a regular blender you will need to blend longer and scrape down the blender several times), combine the pumpkin puree, cashews, arrowroot powder, cinnamon, nutmeg, allspice, sea salt, cloves, maple syrup, milk, lemon juice, and vanilla extract. Puree until very smooth, scraping down the sides of the bowl as needed.
To assemble:
Pour the mixture into the pie crust. Gently tip the pan back and forth to evenly distribute the filling. Bake for 10 minutes, then reduce heat to 350°F and continue to bake for 25 minutes, until golden and set (the center may be soft, but it will set further as it cools). Remove from the oven and transfer to a cooling rack. Let cool completely before slicing and serving.
Salt Note: If your almond butter is already salted, you can omit the sea salt added to the crust.
Milk Note: I prefer almond or soy milk in this recipe.
Serving Suggestion: This pie is positively irresistible with vanilla nondairy ice cream or whipped cream.
These caramel apples get top marks for taste and nutrition!
Makes about 2 cups caramel, enough for 4–6 apples (or more depending on size)
1½ packed cups pitted dates
½ cup plain nondairy milk
3½–4 tablespoons raw cashew butter (see note and nut-free option)
⅛ rounded teaspoon sea salt
2 pinches freshly grated nutmeg (optional)
1 teaspoon pure vanilla extract or the seeds scraped from 1 vanilla bean
4–6 apples (see note)
Ice pop sticks or spoons
Optional coatings (a few tablespoons of either or several):
Unsweetened shredded coconut
Grated chocolate
Mini chocolate chips
Chopped dried cranberries
Almond meal
Chopped pecans
Combine the dates with the milk in a bowl. Let soak for an hour. Drain the dates, gently pushing excess milk through sieve.
In a food processor, combine the dates with the cashew butter, sea salt, nutmeg, and vanilla. Process until very smooth, scraping down the processor bowl as needed, and puree again. This will take several minutes.
Transfer to a container and refrigerate. When ready to coat apples, insert an ice pop stick into the stem end of each apple (if you don’t have sticks, try inverting a spoon so you hold the rounded end). Use a butter knife or spatula to coat your apples with the caramel. Sprinkle toppings on a plate or piece of parchment. Roll the apples in the toppings.
Place on a tray or baking sheet lined with parchment paper. Serve!
Cashew Butter Note: I really like raw cashew butter here. It is very thick and dense, helping make the caramel thicker. It also has a mellow, soft flavor. Still, you can substitute regular cashew butter, or raw or regular almond butter.
Nut-Free Option: Opt for sunflower seed butter (add some cinnamon or pumpkin pie spice to the puree to improve flavor), or omit altogether and just have a date paste.
Apple Note: If you have small apples, you can coat more than six. See kitchen tip and serving suggestions (on the next page) if you have leftover caramel.
Kitchen Tip: This makes a softer caramel. If you’d like a caramel that can be used as candy, simply omit the milk and combine the dates (unsoaked) with the cashew butter (or other nut butter), using the full ¼ cup. The mixture will form into a ball in the food processor. Form into chewable caramels, and roll in grated chocolate!
Serving Suggestions: Instead of coating apples, try as a dip with sliced apples or pears, or as a spread for toast! Leftover date caramel can be kept in a container, refrigerated, for a week or more.

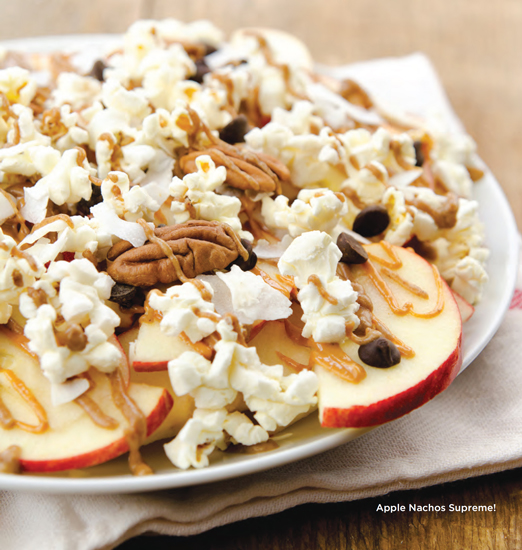
These will be a hit with your kids, and you can customize with toppings you love the most—just don’t skip the popcorn!
Serves 3–4
Spiced Caramel (see note for quick-fix option):
½ cup pitted dates
¼ teaspoon cinnamon
¼ teaspoon nutmeg
¼ scant teaspoon sea salt
⅛ teaspoon allspice (optional)
¼ teaspoon vanilla bean powder or ½ teaspoon pure vanilla extract
⅓ cup plus 2–3 teaspoons water
Apple Base:
3 apples, cored and sliced into thin rounds
2 teaspoons lemon juice
Nacho Toppings:
3–4 tablespoons nut butter (see note)
1½–2 cups popped popcorn
3–4 tablespoons nondairy chocolate chips
2–3 tablespoons chopped nuts (optional)
2 tablespoons cranberries or raisins (optional)
2 tablespoons unsweetened shredded coconut
1 recipe prepared Spiced Caramel (or brown rice syrup, as in note)
To make the spiced caramel:
Puree the dates, cinnamon, nutmeg, sea salt, allspice, vanilla bean powder, and ⅓ cup of the water in a blender or small food processor (I use the Blendtec twister jar, which is the perfect size for this small batch—you can also use a mini food processor but it may not get as smooth). If it’s difficult to get the mixture moving, add another teaspoon of water, and more if needed. (Try not to add too much at once, or the mixture could become too thin.) Puree until completely smooth. Once smooth, transfer to a small zip-top bag (to later pipe onto the nachos).
To make the apple base:
Toss the apples in the lemon juice. Arrange on a large plate.
To assemble with toppings:
Add the nut butter to a small zip-top bag. Seal the bag, and twist all the nut butter to one end. Snip a corner and then pipe the nut butter over the apples. Alternatively, you can gently warm the nut butter and drizzle with a spoon. Distribute the popcorn, chocolate chips, nuts, cranberries, and shredded coconut over top. Finally, drizzle on prepared caramel (same process as nut butter), and serve!
Caramel Note: For a quick fix, substitute brown rice syrup for the caramel. Use ¼–⅓ cup, and you can choose to stir in some of the spices, or leave as is.
Serving Suggestion: I like to drizzle one layer of nut butter on top of the apples, to help the toppings stick, and then a drizzle of the caramel last—it looks so lovely! You can switch it up, using the caramel first and then the nut butter last if you like. Also, another option is to make a nut caramel, blending the nut butter straight into the date caramel. You may need to add a touch more water to get it moving in the blender (depending on your blender).
Kitchen Tip: These are best served immediately. The lemon juice helps preserve the color of the apples, but not for long. You can always prep the components in advance and simply assemble before serving.