APPETIZERS AND SMALL BITES
Pampagana may be the Filipino word for appetizer, but merienda (snack), pulutan (bar food), or pica-pica (finger food) suggest the same qualities of an appetizer—such as their small size and ability to kick-start the appetite. However, an appetizer implies a meal served in courses, a Western custom that Filipinos don’t typically follow. Filipinos instead place equal importance on every dish so that all offerings, from salad to soup to the main dish, are brought to the table at the same time. Despite the lack of an appetizer course, per se, Filipinos still embrace every occasion to partake in small dishes, appetite teasers, and grazing tidbits of finger food enjoyed with a beer or glass of wine. The focus of this chapter is on recipes that in the American tradition make good appetizers, casually passed or shared in a large group during the cocktail hour or served individually in a more formal setting.
If you have ever experienced the excitement of Chinese dim sum with the traffic jam of carts wheeling towers of ministeamers to your table, presenting everything from chicken feet to dumplings to silken tofu, you’ll recognize several of the dishes in this chapter. Although not originally Filipino cuisine, centuries of trade with China have deposited dim sum on the islands as an adopted presence, similar to the way pizza has become a transplanted American staple. You’ll see Shumai pork dumplings, best served piping hot directly from the steamer; lumpia egg rolls in different incarnations, from crispy, fried Lumpia Shanghai to the tender and elegant Lumpia Sariwa; and Siopao, steamed buns filled with curry chicken, although the possibilities of fillings are deliciously endless.
One homeland tradition supplanted by the ubiquitous busy schedule is the taking of merienda, the midmorning and midafternoon refreshment that Filipinos enjoy in between main meals. I often think of merienda fare in terms of what my parents would serve to their friends during a lazy, Sunday afternoon mahjong game. Literally translated from Spanish as “snack,” merienda can be sweet or savory, light or heavy, and may include something as modest as Saging, fried bananas sprinkled with sugar, or a more filling snack of Empanadas, hand-held meat pies. One item that merienda will typically not include is steamed white rice, which presumes serving a heavy meal that would interfere with the anticipation of lunch or dinner. However, I have included in this chapter one of my favorite rice snacks, Suman, small pouches of sticky rice steamed in banana leaves that are eaten as a snack instead of the anchor of a meal.
Filipinos, like much of the world, appreciate their drink. And just as rice is essential in a Filipino meal, pulutan, or finger food, is crucial to the enjoyment of a cold bottle of San Miguel beer, tuba coconut wine, or Tanduay rum. Pulutan is the Filipino equivalent of “bar food” and can vary in range from simple snacks featured in this chapter, such as Adobo-Flavored Pecans, spicy Spiced Anchovy Crisps, or Grilled Chicken Wings, to more elaborate stir-fried dishes like sigsig, a native delicacy of stir-fried crispy pig skin with onions and chiles, or even the exotic snake, turtle, or monitor lizard pulutan desired for its supposed aphrodisiac qualities. Whatever the pulutan may be, the point is that it’s best served with a potent beverage equally suited for toasting the joys of life and clearing the throat for the second (or third) round.
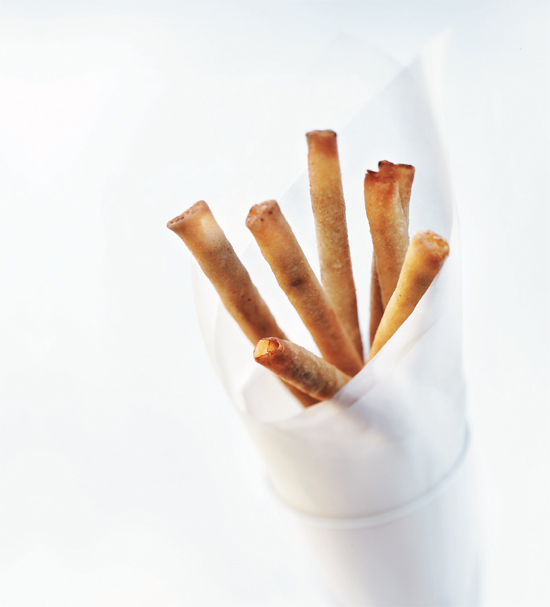
SHANGHAI EGG ROLLS LUMPIA SHANGHAI
These egg rolls are unique for a few reasons. The pencil-thin rolls have an elegant striking appearance very different from the thick stuffed egg rolls typically seen at the local Chinese takeout restaurant. They are primarily filled with a thin line of seasoned pork and wrapped with a special lumpia wrapper, which once cooked, has a perfectly smooth surface and an extra crispy crunch.
Makes 30 8-in/20-cm lumpia
1 lb (450 g) lean ground pork
1 clove garlic, minced
1½ teaspoons peeled and minced fresh ginger
2 tablespoons oyster sauce
1 tablespoon soy sauce
Dash of freshly ground black pepper
½ cup (50 g) finely shredded Napa cabbage
1 package (11 oz/310 g/25 sheets) lumpia wrappers (substitute frozen Chinese-style spring roll wrappers or Vietnamese rice paper wrappers)
1 large egg, beaten
Make the filling: Combine the pork, garlic, ginger, oyster sauce, soy sauce, and pepper in a large bowl and mix very well so that the seasonings are evenly distributed throughout the meat. Add the cabbage and mix again to evenly distribute through the meat. Set aside in the refrigerator until ready to use.
Prepare the wrappers: Using a sharp serrated knife, cut the square of wrappers in half through the center so that you have two stacks of rectangular wrappers. Gently pull apart each wrapper. They are much easier to separate once they have been cut into smaller sheets. Once separated, keep the wrappers stacked together and covered with a towel or in a plastic freezer bag so that they do not become dry.
Form the egg rolls: Place one rectangular wrapper horizontally on your workspace with the long edge facing you. Take a tablespoon of filling and, using your fingers, form it into a thin continuous line about ½ inch (1 cm) above the wrapper’s bottom edge. Lightly moisten your fingertips with water to prevent the meat from sticking to them. Pull the wrapper’s bottom edge over the filling and roll it up like a cigarette. Brush the top edge with the beaten egg to seal the egg roll. Lay the egg roll seam side down on a cookie sheet or tray lined with parchment or wax paper. Continue rolling egg rolls with the remaining meat and wrappers.
Once you’ve filled the tray, place a sheet of parchment or wax paper on the first layer of egg rolls and place a second layer on top. Do not stack more than two layers on one tray. The weight of a third layer will flatten the first. To freeze lumpia, cover your tray of egg rolls with plastic wrap and place the entire tray in the freezer for 2 to 3 hours until firm. Once firm, remove from the tray and store in freezer bags for up to 3 months.
Cook the egg rolls: Fry in 350°F (175°C) oil for 3 to 5 minutes, until golden brown on all sides. Drain on paper towels and cut in half to form 4-inch (10-cm) pieces. If lumpia are frozen, fry 5 to 7 minutes until golden brown on all sides and the meat filling is cooked through.
These crunchy egg rolls are best served immediately while hot. It is possible to fry lumpia 2 to 3 hours ahead of time and still serve them hot and crisp at a gathering. Place previously fried egg rolls in a single layer on a baking sheet. Place in a preheated 250°F (120°C) oven for 25 minutes to recrisp the wrappers before serving. Serve immediately with commercially-prepared or homemade sweet chili sauce (page 18).

PORK AND GINGER DUMPLINGS SHUMAI
Two of my loyal Rambutan customers, Jennifer and Langdon Vaningen, lovingly coined these open-faced dumplings “Oh my! Shumai,” which instantly became the restaurant’s unofficial name for these bite-sized gems packed with a mouthful of flavor. I use the same meat filling in my Lumpia Shanghai (page 24)—long, cigar-thin egg rolls that, despite sharing a common filling, taste very different due to their being fried instead of steamed. Be patient with the dumpling-making process, which can be frustrating at first. Once the learning curve kicks in, usually by the fifth or sixth dumpling, you’ll be making them with impressive speed. Although these dumplings are served more as an appetizer or midday snack, the simple addition of rice and a vegetable turn shumai into a complete and satisfying meal.
Makes 30 dumplings
1 lb (450 g) lean ground pork
1 clove garlic, minced
1½ teaspoons peeled and minced fresh ginger
2 tablespoons oyster sauce
1 tablespoon soy sauce
Pinch of freshly ground black pepper
½ cup (50 g) finely shredded Napa cabbage
1 package (50 pieces) round dumpling wrappers
Make the filling: Combine the pork, garlic, ginger, oyster sauce, soy sauce, and pepper in a large bowl and mix very well so that the seasonings are evenly distributed throughout the meat. Add the cabbage and mix again to evenly distribute through the meat.
Form the dumplings: Start by very lightly moistening the edges of a dumpling wrapper using a pastry brush and water. Turn the wrapper over and on the dry side spread 1 heaping teaspoon of pork filling evenly toward the edge using the back of your spoon.
If you are right-handed, place the tips of your left thumb and forefinger together to form a circle. Use your right hand if left-handed. Center the dumpling wrapper, meat side up, on top of your fingers so that the center of the wrapper is in the circle of your fingers. With your spoon, gently push the center of the wrapper into the circle of your fingers while tightening your fingers around the dumpling to give it its tulip shape, leaving the top of the dumpling open. Take a little more filling and pack it in the top to give it more shape if necessary and smooth the meat.
Place the dumpling on a tray lined with parchment or wax paper. Continue with the remaining dumplings. It is important that the dumplings are not touching each other on the tray; they will stick together.
Cook the dumplings: Place the formed dumplings in a steamer. Steam for 8 to 12 minutes until the dumplings are firm when gently squeezed with tongs. Serve immediately with the dipping sauce.
DIPPING SAUCE
2 tablespoons soy sauce
1 teaspoon mashed roasted garlic
¼ teaspoon palm or coconut vinegar (substitute rice vinegar)
¼ teaspoon sambal ulek or dried red pepper flakes
Combine all the ingredients together in a small dish. Serve alongside the hot shumai.
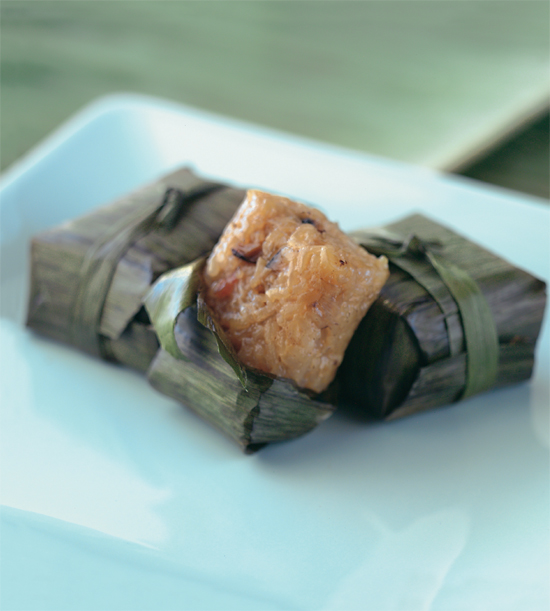
STEAMED RICE CAKES WITH BACON AND CARAMELIZED ONIONS SUMAN NGA BABOY
One of my earliest kitchen memories is of my mom regularly enlisting my sister and me (it was actually more like a forced draft) to help her roll what seemed like hundreds of sweetened, steamed rice snacks on Saturday mornings. She was famous for her suman and often gave it to friends and co-workers, especially around the holidays. Back then, we rolled the sticky rice like egg rolls in small sheets of aluminum foil before they went into a large steamer for an hour. Now, when I wrap suman I often use banana leaves, which impart a leafy green flavor to the rice. Suman can take on a few incarnations: sweet or savory, plainly served with sugar or dipped into hot chocolate, or heavily adorned with meat and vegetables. I have presented here one of my favorite savory suman recipes, heartily flavored with musky dried mushrooms, smoky bacon, and caramelized onions. Two nontraditional accoutrements that pair exceptionally well with this dish are sweetened Edam butter (page 17) and mushroom soy dipping sauce (page 20), something a little different than the typical dipping sauces of soy and garlic or fish sauce and vinegar.
Makes 8 suman squares
3 dried shiitake mushrooms
½ cup (125 ml) rice wine
⅔ cup (150 ml) hot Chicken Stock (see page 15)
3 slices bacon, diced
1 small yellow onion, diced
1 cup (200 g) uncooked glutinous rice
1 cup (250 ml) coconut milk
¼ teaspoon salt
¼ teaspoon freshly ground black pepper
1 (10-oz/280-g) package banana leaves, thawed
Soak the mushrooms: Combine the dried mushrooms, rice wine, and hot chicken broth in a medium bowl. Soak the mushrooms for 15 to 20 minutes until caps are tender. Remove the mushrooms and squeeze the excess liquid back into the bowl. Cut off and discard the mushroom stems. Slice the mushroom caps thinly. Set the mushrooms and soaking liquid aside.
Cook the rice: Heat a medium skillet (2 to 3 quarts/liters) over medium heat. Add the diced bacon. Cook and stir the bacon for 4 to 5 minutes until much of the fat is rendered out. Add the onion and sauté another 5 to 7 minutes until the onion begins to caramelize and turns a golden color. Add the glutinous rice and stir to coat with oil. Deglaze the pan with the mushroom soaking liquid, scraping off any browned bits from the bottom of the pan.
Add the coconut milk, sliced mushrooms, salt, and pepper. Simmer the rice for 12 to 15 minutes, stirring frequently, until the rice has absorbed all of the liquid. The rice should be very thick and sticky but still firm when you bite into it.
Form and cool the rice: Turn the rice out into a 9 by 9-inch (23 by 23-cm)-square baking dish and press it into a 2-inch (5 cm)-thick block. Molding the rice this way will allow you to cut even blocks, which makes for easy wrapping. Cool the rice completely. Use a knife to cut 8 equal-sized blocks just slightly over 2 by 2 inches (5 by 5 cm)-square.
Wrap the suman: Step 1. Prepare the banana leaves by running both sides of each leaf under hot water and wiping dry with paper towels. Lay one leaf horizontally in front of you. Starting from the bottom edge closest to you, cut the leaf into 4-inch (10 cm)-wide strips, at least 6 inches (15 cm) tall from top to bottom. Each strip will be used to wrap a single suman block so make sure you have enough strips for the number of blocks. Step 2. Cut an equal number of ¼-inch (½-cm) leaf strips. These thin strips will be used to tie the suman closed, like a ribbon. Step 3. Center 1 rice block on the bottom edge of a leaf strip. Pull the bottom edge over the rice and roll the block in the leaf like a gift. Fold in the sides and hold them secured with your fingers. Tie the ¼-inch (½-cm) leaf strip around the block so that it holds the sides and top edge closed. Tie the “ribbon” into a knot. Continue wrapping the remaining blocks of suman.
Steam the suman: Place the wrapped blocks in your steamer and steam for 50 minutes. Cool slightly before serving. Serve with Edam butter (page 17) and mushroom dipping sauce (page 20).
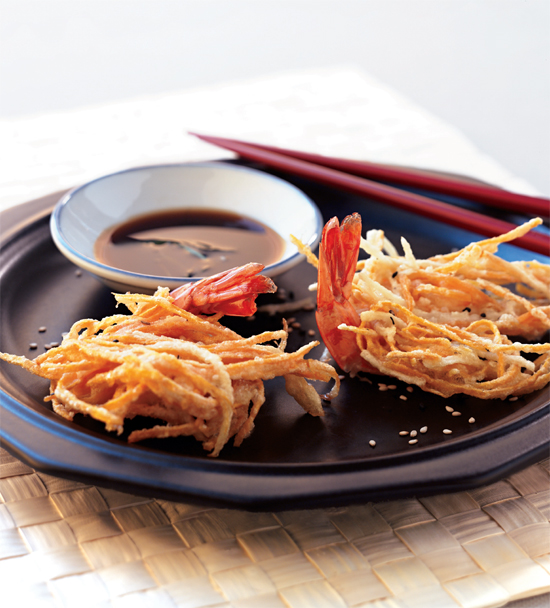
SHRIMP AND SWEET POTATO FRITTERS UKOY
This is what I like to consider a bare-bones ukoy recipe upon which other variations are built. These fritters are light and crunchy with just barely enough batter to keep the sweet potato and cassava clinging to the shrimp. Other variations may include the addition of chopped green onions (scallions), bean sprouts, or water chestnuts mixed with flour and water into a pancake batter consistency. Such modifications detract from the crunchiness of the basic recipe, but the textural softening is replaced with heightened flavor. One key procedural note is to use a slicing tool that will cut long, ½ to 1-inch (13 to 25-mm) matchsticks of sweet potato and cassava. A mandoline works beautifully to slice wiry vegetable threads that cook quickly into shoestring fries surrounding the shrimp.
Makes 10 to 12 fritters
1 small sweet potato, peeled and cut into matchsticks (approximately 1½ cups/340 g)
1 small fresh cassava, peeled and cut into matchsticks (approximately 1½ cups/400 g)
½ cup (50 g) cornstarch
2 to 3 large egg whites
10 to 12 jumbo shrimp, peeled, deveined, and butterflied with tails left on
2 to 3 cups (500 to 750 ml) oil, for frying
Make the batter: Combine the sweet potato, cassava, and cornstarch in a large bowl. Toss the vegetables to evenly coat with the cornstarch. Add the egg whites little by little and mix with the vegetables until just moistened and gluey. The vegetables should be thick and sticky when pressed together.
Form the fritters: Sandwich the body of a butterflied shrimp in between two spoonfuls of sweet potato batter and press the fritter together. The tail should be left sticking out. Lay the formed fritters on a cookie sheet. Continue with the remaining shrimp. Chill the formed fritters in the refrigerator for 20 minutes before frying. This will allow the batter to firm so that it doesn’t separate from the shrimp during cooking.
Fry the fritters: Heat the oil to 350°F (175°C) in a deep skillet. The oil should be 1½ to 2 inches (4 to 5 cm) in depth. Gently place 2 to 3 fritters in the oil and fry until golden brown on each side, 3 to 4 minutes. Dry on paper towels and serve immediately with the dipping sauce. Continue with the remaining ukoy.
UKOY DIPPING SAUCE
3 tablespoons soy sauce
½ teaspoon rice vinegar
1 teaspoon mirin
1 small clove garlic, minced
Mix all the ingredients together in a small dish. Serve with ukoy.
Filipinos are terribly clever when it comes to inventing new uses for everyday ingredients. I am particularly fond of the use of liver in sauces and stews. Quite a few Filipino dishes call for liver or liver pâté as an ingredient, which not only imparts rich flavor but also acts as an elegant sauce thickener. Traditionally, canned liverwurst was the product of choice. However, this simple recipe far outweighs the taste and quality of a canned product and can be served in a number of ways. Alone, it is a delicious pâté served with your favorite crusty bread or sliced pears. And finally, if frozen and cut into small bouillon-sized blocks, it can be used as a flavoring or thickener in place of a traditional roux. You will be pleasantly surprised by the sultry depth that a little of this mousse will give your sauces and stews.
Makes 6 to 8 appetizer portions
2 teaspoons butter
1 yellow onion, sliced
1 clove garlic, chopped
¼ teaspoon dried thyme
¼ teaspoon ground red pepper
½ cup (125 ml) sherry
¼ lb (125 g) chicken livers
1 tablespoon soy sauce
1½ cups (375 ml) heavy whipping cream
Cook the livers: Melt the butter in a medium skillet (2 to 3 quarts/liters) over medium-high heat. Add the onion and cook, stirring occasionally, for 5 to 7 minutes until the onion turns golden brown. Add the garlic, dried thyme, and ground red pepper and cook another 3 minutes. Deglaze the pan with the sherry. Using a wooden spoon, scrape any of the caramelized onion bits off the bottom and sides of the pan into the sauce.
Add the livers, soy sauce, and ½ cup (125 ml) heavy cream. Reduce the heat to a simmer for 7 to 10 minutes until the mixture is almost dry and the livers are tender and fully cooked.
Remove the pan from the heat and place liver mixture in a food processor.
Prepare the mousse: Process the liver well until completely smooth. Spoon into a large bowl and set aside to cool.
Whip the remaining 1 cup (250 ml) heavy cream with an electric mixer until it reaches stiff peaks. Using a large spatula, fold the whipped cream into the cooled duck liver puree. Spoon the mixture into ramekins or a pâté crock. Chill the mousse completely in the refrigerator for at least 4 to 6 hours before serving.
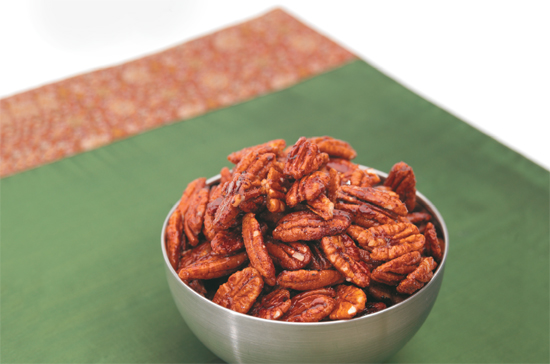
Having a drink in the Philippines always goes hand in hand with the taking of pulutan, the term for Filipino bar food. Simple pulutan include a wide range of dishes from grilled sweet potato (kamote-cue) to fried tofu (tokwa) to these easy-to-eat adobo nuts. If the salty tang of these finger-licking snacks isn’t enough to tempt you, the added layer of sweet will ensure that they won’t last long in your kitchen. They are wonderful as a snack, an appetizer, or as a garnish for salads.
Makes 2 cups (200 g)
2 cups (200 g) pecans (substitute peanuts, cashews, almonds, or walnuts)
3 tablespoons brown sugar
4 teaspoons soy sauce
2 teaspoons vinegar
1 teaspoon calamansi juice (substitute lime juice)
½ teaspoon garlic powder
½ teaspoon freshly ground black pepper
Preheat the oven to 325°F (160°C).
Combine all the ingredients in a large bowl and mix until the pecans are well coated. Pour the nuts onto a parchment-lined or lightly oiled baking sheet, separating the nuts as much as possible into a single layer. Bake for 15 minutes until the nuts are golden brown.
Cool the nuts before handling, 10 to 15 minutes. They will be crispy with a brown shiny glaze. Store in your cupboard in an airtight container for up to 2 weeks.

Empanadas are a global food found in many countries under different monikers. What they all have in common is the same tidy convenience of a half-moon handheld pie. These turnovers are the classic Spanish addition to Filipino cuisine typically made with a sturdy dough that remains tender and golden when fried. This recipe offers you a baked empanada option using puff pastry dough to create a wonderfully light and flaky turnover, easily served as casual finger food or as elegant appetizers. The picadillo filling of ground beef, toasted almonds, and green olives is purposely generous; leftovers can be recycled into one of my comfort-food favorites, Arroz a la Cubana (page 85), served with rice and sweet plantains.
Makes 12 empanadas
Almondine
¼ cup (40 g) green Spanish olives
¼ cup (50 g) toasted almonds
¼ cup (40 g) raisins
Meat Filling
2 teaspoons olive oil
1 small yellow onion, diced
1 clove garlic, minced
1 lb (450 g) lean ground beef
3 tablespoons soy sauce
¾ cup (175 ml) Chicken or Beef Stock (see pages 15 and 14)
½ teaspoon dried oregano
½ teaspoon dried thyme
4 oz (125 g) frozen peas
1 small potato, peeled and diced
1 lb (450 g) store-bought puff pastry, thawed
1 large egg, beaten
Prepare the almondine: Place the green olives, almonds, and raisins in a food processor. Pulse the blade several times, until the mixture is finely chopped but not a paste. Set the mixture aside.
Cook the filling: Heat the oil in a medium sauté pan (2 to 3 quarts/liters) over medium heat. Add the onion and garlic. Cook and stir for 2 minutes until the onion becomes translucent. Add the ground beef and cook for 5 to 7 minutes until well browned. Drain and discard the rendered fat from the pan. Add the soy sauce, stock, oregano, and thyme. Reduce the heat to a simmer for 5 to 7 minutes. Add the peas, potato, and almond mixture. Cover and simmer for another 7 to 10 minutes until the potatoes are tender. Cool the meat before filling the empanadas.
Form the empanadas: Lay the thawed sheets of puff pastry on a lightly floured surface. Using a 3 1/6-inch (80-mm) round cookie cutter, cut 5 rounds of dough from each sheet. Puff pastry scraps can be cut and pressed together to form another sheet large enough to cut another 2 dough circles. Use a rolling pin to gently roll each dough circle into a slightly oval shape. Place a heaping tablespoon of meat in the center of an oval. Using a pastry brush, lightly moisten the dough’s edge with water. Fold the top half of dough over the filling, lining up the edges to form a half-moon. Using the back of a fork, press the tines along the edge of the empanada to seal it shut and make a decorative edge. Repeat this process with the remaining dough. Place the finished empanadas on a baking sheet. The empanadas can be frozen at this point. Place the entire tray in the freezer for 2 to 3 hours. Once the empanadas are firm, transfer them from the baking tray to plastic freezer bags for easier storage.
Bake the empanadas: Preheat the oven to 400°F (200°C). Lightly brush the tops of the empanadas with beaten egg. Place an herb leaf, such as fresh coriander leaves (cilantro) or flat-leaf parsley, on top of each empanada as a garnish. The egg wash will “glue” the leaves to the dough. Bake for 20 to 25 minutes until the empanadas have puffed and turned golden brown.
Variation: Mushroom Empanadas. Mushrooms give the empanadas a full flavor and meaty texture without the meat. Follow the same recipe, substituting 1 pound (450 g) assorted fresh mushrooms (such as shiitake, oyster, portobello, crimini, button, chanterelles), stems removed, for the ground beef. For a truly vegetarian empanada, use vegetable broth instead of chicken broth.
FRIED SWEET BANANAS PRITONG SAGING
There’s no bad time to serve ripe pan-fried bananas. An everyday merienda staple, they are a perfect midmorning or midafternoon snack to wash down with coffee or hot chocolate (tsokolate). Easily found in Latino markets and many conventional grocery stores, the plaintain is a good substitute for the saba, the variety of banana used in the Philippines for Pritong Saging. The ripeness of your plantain will certainly make a notable difference in the cooked result. A hard unripe or semiripe plantain has a lot of starch and a ¼-inch (6-mm) slice will cook into a tough rubbery plank. The riper the plantain, the more its starch is replaced by sugar and you can be sure that it will fry into a tender sweet slice. As with all fried foods, serve these while they’re still hot. Leftover saging can be chopped and sautéed with your fried rice for a natural sweetener in Arroz a la Cubana (page 85) or picadillo (page 35).
Serves 6
3 large (approximately 2 lbs/900 g) ripe but firm plantains, peeled
1 cup (250 ml) vegetable oil, for frying
½ cup (100 g) granulated sugar
Cut the bananas through the center crosswise to make short halves. Next cut the banana halves lengthwise into thirds. Continue with the remaining bananas so that you have 18 slices, roughly 3 to 4 inches (7½ to 10 cm) in length. Heat the oil in a large skillet over medium-high heat. When the oil is hot, fry the bananas 4 to 5 minutes per side until golden brown. Dry the bananas on paper towels and immediately sprinkle with the sugar while still hot.
Variation: Banana Fritters. These are dipped in a lightly sweetened batter and fried. Cut plantains the same way as when making fried bananas, per the instructions for Fried Sweet Bananas. In a bowl, combine 2 cups (275 g) all-purpose flour, 1 large egg, 1½ teaspoons baking powder, 1 teaspoon cinnamon, 1 tablespoon honey or pure maple syrup, ¼ cup (50 ml) milk, and a pinch of salt. Stir the batter until well combined. Dip the plantain slices in the batter until well coated and fry until golden brown on all sides. Dry the fried banana slices on paper towels. Serve hot.

GRILLED CHICKEN WINGS
One of Cebu City’s claims to culinary fame is Carbon Market, Cebu’s largest outdoor market, a claustrophobic maze of open-air and covered stalls selling everything from pristine kangkong (water spinach) to ocean-fresh kuhol (snails) or handwoven banig (pandan mats). Carbon is also home to multiple food stalls, one particularly that sells the most delectable grilled chicken wings with sizzled skin and smoky meat. For this recipe I’ve replicated those flavors with the typical adobo marinade proportionately stretched into a seasoned brine that will plump the wings with flavor and keep them tender as they cook over the hot coals. The kicker for these wings is the barest sprinkle of calamansi juice right at the end that makes each bite an explosion of flavor.
Makes approximately 25 wings
Brine
6 cups (1½ liters) boiling water
1 cup (250 ml) soy sauce
1 cup (200 g) brown sugar
1 head garlic, cut in half horizontally to expose the cloves
1 cup (250 ml) vinegar
½ cup (125 g) salt
2 bay leaves
6 cups (1½ liters) ice water
Wings
5 lbs (2¼ kg) chicken wings, approximately 25 wings
2 tablespoons sesame oil
2 teaspoons paprika
1 teaspoon freshly ground black pepper
5 to 6 fresh calamansi (substitute 1 lime), halved
Make the brine: Combine the hot water, soy sauce, brown sugar, garlic, vinegar, salt, and bay leaves in a large stockpot (7 to 8 quarts/liters). Stir to combine. Add the ice water to cool the brine. Set aside.
Prepare the chicken and marinade: Prepare the wings. Chicken wings have three sections: the large drummette, the middle section, and the wing tip. Use a sharp knife to cut between the joints, separating the wing into three parts. Reserve the wing tips for chicken stock. Place the drummette and middle sections into the cooled brine. The wings should be completely covered. Refrigerate for at least 1 hour and up to 3 hours.
Drain the wings and rinse under cold water. Pat the wings dry with paper towels. Toss the wings with sesame oil, paprika, and pepper until well coated.
Cook the wings: To cook the wings on a grill, follow Step 1; to cook them under a broiler, follow Step 2.
Step 1. Preheat the grill and oil grates. Grill the wings 5 to 7 minutes per side until cooked through. The larger drummettes may take 7 to 9 minutes per side. Place the cooked wings on a serving platter and sprinkle with squeezed calamansi or lime juice. Serve hot.
Step 2. You can achieve similar results using your broiler. Of course, your wings will lack that incomparable charcoal flavor, but substituting smoked paprika for hot paprika on the wings will give the chicken a smoky finish. Position your oven rack directly under the broiler. Preheat your broiler. Place the wings in a single layer on a baking sheet and place under the broiler for 6 to 8 minutes per side until the wings are cooked through.
Variation: Tangy Wings. For a tangy barbecue sauce to baste on your wings, combine ¼ cup (50 ml) hoisin sauce, ¼ cup (50 ml) ketchup (banana ketchup works best), 1 tablespoon honey, 1 tablespoon vinegar, and 2 teaspoons Worcestershire sauce in a bowl. Mix well and baste on wings as they cook.
STEAMED BUNS FILLED WITH CURRY CHICKEN CURRY CHICKEN SIOPAO
I remember feeling very special as a child when my mother packed these meat-filled buns in my lunch. My classmates were fascinated by the fluffy white snowballs that made their peanut butter and jelly sandwiches wither in comparison. Found everywhere from dim sum restaurants to roadside food stalls, siopao is the perfect example of how China’s vast influence has integrated into everyday Filipino cuisine. These steamed buns are made with a yeast dough that can be filled with any variation of meats, poultry, fish, or vegetables to make the perfect portable snack or light meal. I recommend that any filling you use be fully cooked before forming the siopao. The final steaming of the buns is relatively short and meant only to cook the dough and heat the stuffed center.
Makes 10 Siopao
Dough
2½ tablespoons sugar
1¼ cups (300 ml) warm water (98 to 115°F/37 to 46°C)
2¼ teaspoons dried yeast, equivalent to 1 yeast packet
2 tablespoons olive oil
3½ cups (475 g) all-purpose flour
1 teaspoon salt
Chicken Curry Filling
1 tablespoon olive oil
1 clove garlic, minced
1 small tomato, diced
2 green onions (scallions), finely chopped
1 teaspoon yellow curry paste or 1½ teaspoons curry powder
½ lb (225 g) chicken breast, skinned and diced
½ cup (125 ml) coconut milk
¼ cup (50 ml) Chicken Stock (see page 15)
1 teaspoon soy sauce
1 teaspoon shrimp paste
1 teaspoon freshly squeezed lime juice
2 tablespoons chopped fresh coriander leaves (cilantro)
Dash of freshly ground black pepper
Make the dough: In a small bowl, mix together the sugar, warm water, and yeast. Allow the yeast to activate for 5 minutes. The yeast should bubble and become foamy. Add the oil to the yeast mixture and set aside.
Combine the flour and salt in a large bowl and stir to combine. Pour the yeast mixture over the flour and mix together with a spoon until the dough comes together. Turn the dough out onto a lightly floured surface and knead the dough 5 to 6 minutes until smooth. Lightly oil the bowl and replace the dough in the center. Cover the bowl with plastic wrap or a towel and allow the dough to rest and rise in a warm place for 2 hours.
Prepare the filling: Heat the olive oil in a medium skillet (2 to 3 quarts/liters) over medium heat. Add the garlic, tomato, and green onions (scallions). Cook and stir for 2 minutes until the tomato softens. Add the curry paste, chicken, coconut milk, chicken stock, soy sauce, and shrimp paste. Cover and simmer 8 to 10 minutes until the chicken is fully cooked. Remove the cover and cook over high heat 5 to 6 minutes until the sauce thickens. Remove from the heat and stir in the lime juice, fresh coriander leaves (cilantro), and pepper. Cool the filling for 5 minutes before filling the buns.
Form the siopao: Uncover the dough and punch it down. Turn it out onto a lightly floured surface and roll the dough into a foot-long (30-cm) log. Divide the dough into 10 pieces. Lightly cover the unused portions of dough until you are ready to use them so that they do not become dry. Take a portion of dough and using the palm of your hand press it into a 6-inch (15-cm) circle approximately ¼ inch (6 mm) thick. Place 2 tablespoons of filling in the center of the dough, drawing up the sides of the circle together at the top of the bun. Pinch and twist the top to securely seal in the filling. Place the bun seamside down on a 3 by 3-inch (7½ by 7½-cm) square of wax or parchment paper. Continue this process with the remaining buns.
Cook the siopao: Arrange the buns in a steamer and steam for 12 to 15 minutes until the buns have expanded and the centers are warm.

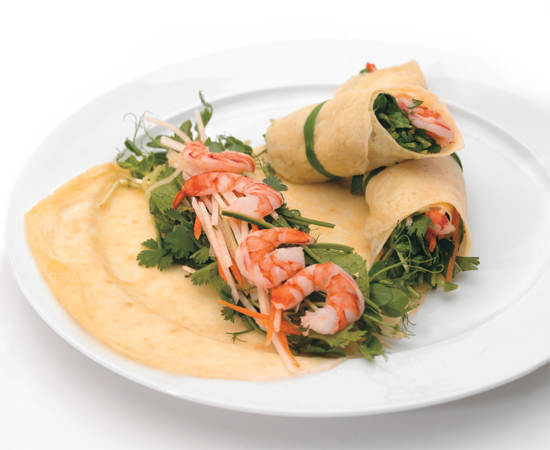
CRÊPES WITH SHRIMP AND GREEN PAPAYA LUMPIA SARIWA
Lumpia is the general Filipino term for “egg roll.” Sariwa means “fresh.” Together lumpia sariwa is a spring roll made with a delicate egg crêpe filled with any combination of meats, seafood, pickled vegetables, and herbs.
I have to admit that lumpia sariwa was never an everyday dish in our home but a specialty served at celebrations and gatherings. However, nothing more than a little organization is required to make this recipe any day of the week. I’ll often have components of the dish already prepared so that when I decide to serve these delicious spring rolls, the preparation time is cut in half. The pickled vegetables can be made the week before and the crêpes can be made a month in advance, stacked between sheets of wax or parchment paper, refrigerated or frozen, and revived as needed. To revive the crêpes, steam them for a few minutes until they becomes tender and pliable before laying down the filling. The dipping sauce can be made a day ahead and reheated in the microwave. Assembly is then just a simple matter of gathering all of the ready-made components. Although the completed rolls ideally should be served immediately, they can be made up to a day ahead of time and stored in the refrigerator covered with lightly moistened paper towels and plastic wrap.
Makes 12 spring rolls
Crêpes
4 large eggs
3 tablespoons olive oil
2 cups (250 g) cornstarch
¾ teaspoon salt
2¼ cups (550 ml) water
Filling
1 small cucumber, deseeded and cut into matchsticks
1 small carrot, peeled and cut into matchsticks
½ cup (50 g) peeled and deseeded and cut into matchsticks green papayas
2 tablespoons Five-Spice Vinegar (see page 18)
2 tablespoons mirin
2 teaspoons soy sauce
½ lb (225 g) mesclun salad greens
1 cup (25 g) fresh mint leaves
1 cup (25 g) fresh coriander leaves (cilantro)
24 medium-sized shrimp, cooked and peeled
12 to 15 long chives
Make the crêpes: Combine all the crêpe ingredients in a medium bowl. Mix the batter well with a whisk. Heat an 8 or 9-inch (20–22 cm) skillet over a medium flame. Lightly grease the pan with cooking spray or an oiled paper towel. When the skillet is hot but not smoking, ladle 2 ounces (50 ml) of batter into the pan and immediately swirl the batter to evenly and completely coat the bottom of the pan. Cook the crêpe until set, 2 to 3 minutes. The edges will pull away from the side of the pan and when you firmly shake the skillet the crêpe will loosen and move freely. Using a spatula, turn the crêpe over and cook the other side, 1 to 2 minutes. Slide the crêpe onto a plate.
There is no need to re-oil the pan unless the batter from the first crêpe has stuck to it. Wipe off any stuck bits of batter. Using your ladle, stir the batter to reincorporate the cornstarch, which has a tendency to settle on the bottom of the bowl. Pour another ladle of batter into the pan and repeat the process. Stack the crêpes on top of one another until you have used all of the batter. Keep the crêpes loosely covered with a towel or plastic wrap until they have completely cooled.
Pickle the vegetables: In a large bowl toss together the cucumber, carrot, and green papaya with the vinegar, mirin, and soy sauce until well mixed. Set aside to marinate for at least 10 minutes. Note: If refrigerated, vegetables will store up to one week in pickling marinade.
Assemble the rolls: Place a crêpe in the center of your work surface. Lay 3 to 4 mesclun leaves in a horizontal row just below the center of the wrapper. This layer of greens will protect the crêpe from absorbing excess moisture from the marinated vegetables. Arrange a tablespoon of marinated vegetables in a row atop the salad greens. Place 2 to 3 leaves each of mint and cilantro over the vegetables. Finally place 2 pieces of shrimp on top of the herbs. Fold the bottom edge of the crêpe over the row of filling and tightly roll up the crêpe. Secure the spring roll closed by tying a chive around the center. The two ends of the roll will stay open. Place the spring roll on a platter and continue this procedure with the remaining crêpes.
Serve with traditional Lumpia Sariwa dipping sauce (page 20), a store-bought chili sauce, or the Hoisin-Tamarind Glaze (page 145).
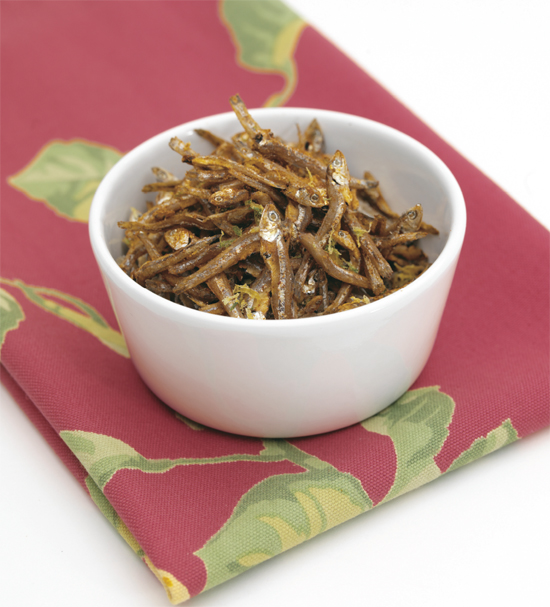
SPICED ANCHOVY CRISPS PRITONG DILIS
Teeming off the miles of Philippine coastline are tiny anchovies called dilis that are dried and eaten the way all good pulutan finger food should be enjoyed—with plenty of beer to wash it down. It’s easy to get hooked on these fried seasoned dilis that are simultaneously salty, sweet, spicy, and crunchy. Dilis are most often eaten plain with just a simple dipping sauce of vinegar or soy to add extra flavor. However, I found that combining dilis with other munchables—roasted peanuts, sunflower seeds, or even dried fruit such as banana chips—makes a uniquely addictive snack that satisfies both sweet and salt cravings (see Dilis Mix, below). You’ll find a large assortment of dried anchovies at the Asian market packaged in small plastic pouches. I prefer the smaller anchovy varieties that measure 1 to 1½ inches (2½ to 3¾ cm) in length; they cook faster and fry crispier than larger anchovies.
Makes 4 ounces (125 g)
1 package (4 oz/125 g) small dilis, dried anchovies
1 cup (250 ml) oil, for frying
1 teaspoon lemon juice
Seasoning Mix
1 teaspoon each lemon and lime zest
½ teaspoon salt
½ teaspoon granulated sugar
½ teaspoon ground red pepper
In a small bowl, combine the lemon and lime zest, salt, sugar, and ground red pepper. Stir to combine. Set aside.
Heat the oil in a medium pan over high heat. When the oil is hot but not smoking, add the anchovies and fry until the anchovies are firm and evenly crisped, 3 to 5 minutes. Drain the dilis on paper towels and place in a bowl. While still hot, sprinkle the dilis first with lemon juice and then the dry seasoning mix. Toss gently to combine.
Variations: 1. Oven-Baked Dilis. Although the anchovies won’t have quite the same crispiness as the deep-fried version, this oven-baked alternative leaves you with all the flavor and just a fraction of the fat.
Preheat the oven to 350°F (175°C). Toss the anchovies in a bowl with 1 teaspoon (5 ml) olive oil and season with citrus zest, salt, sugar, ground red pepper, and lemon juice. Spread the fish in a single layer on a baking sheet and bake for 25 to 30 minutes until firm and dry.
2. Smoky Dilis. To give you ample heat with the added bonus of a light, wood-smoked flavor, replace the ground red pepper in the seasoning mix with ½ teaspoon smoked paprika.
3. Dilis Mix. For a festive and original party snack, mix together 1 cup fried dilis (in your favorite flavor), ½ cup (75 g) roasted peanuts or cashews, ½ cup (50 g) dried banana chips, ½ cup (50 g) sunflower seeds, and ¼ (25 g) toasted coconut flakes. You might also try experimenting with toasted pumpkin seeds and dried puffed rice (pinipig).
WONTON SOUP PANCIT MOLO
HOT-AND-SOUR MUSHROOM SOUP MUSHROOM SINIGANG
BREAD AND CHORIZO SOUP SOPA DE PAN A LA DIABLA
CHICKEN AND RICE PORRIDGE ARROZ CALDO
MEATBALL SOUP WITH BEAN THREAD NOODLES ALMONDIGAS
SARDINE AND TOMATO NOODLE SOUP MISUA
OXTAIL AND VEGETABLE SOUP NILAGA
YOUNG COCONUT SOUP WITH CORN AND SHRIMP BINAKOL
FROG LEGS SOUP WITH GREEN PAPAYA FROG LEGS TINOLA
MUNG BEAN SOUP WITH CHORIZO AND SQUASH MONGOS