If using your hands, place them over or under their feet; you can either touch their feet or let your hands hover a few inches away. It doesn’t matter if they are wearing socks or shoes; the healing energy gets through.
The wound is the place where the Light enters you.
RUMI
As subtle energy healers demonstrate on a regular basis, the keys to our health are literally in our hands. Simply by rubbing our hands together, we can experience the heat and energy that is easily generated. When we add the power of intention—transmitting energies such as love, care, hope, and optimism—the results can be remarkable.
In this chapter, we will explore a rich variety of hands-on healing techniques that you can use to support the health and wellbeing of your clients, and also to tune up and amplify your own healing powers. Some of these techniques use our hands to transmit energy or move energy within the subtle body. For others, we use our hands to press, tap, massage, or otherwise manipulate the acupoints and meridians in order to promote a healthy, balanced flow of energy through these channels.
In her exceptional book Healing Touch: Essential Energy Medicine for Yourself and Others, my colleague Dorothea Hover-Kramer, EdD, RN, DCEP, provides clear and inspiring instruction in the practice of Healing Touch (HT), an energy therapy in which practitioners consciously use their hands in a heart-centered and intentional way to support healing. Similar to practices outlined in the previous chapter, HT affects the auric field, the chakras, and other aspects of the energetic biofield. As Dorothea says in her book, “Healing Touch is literally as close as the presence of a caring person.”1
The first technique that Healing Touch students learn is called Magnetic Passes. As a practitioner, you visualize your hands as small magnets that draw out congestion and energetic stagnation and restore balance to a client’s field. Magnetic Passes work well for releasing headaches and other types of bodily pain. Although HT is used for many purposes, relief from pain is probably the most appreciated outcome that people report.
There are two parts to Magnetic Passes, and their names describe what your hands do in relation to your client’s field: Hands in Motion and Hands Still. When your hands are in motion, you will be moving them in a circular fashion, either clockwise or counterclockwise. Clockwise often brings energy in, while counterclockwise often ushers energy out. When your hands are still, you’re simply holding them motionless and allowing them to sense and receive energy.
You can position your hands directly on the body, with your client’s permission, or over the body in the auric field. If your hands are on the body, apply a light pressure, just enough that the client is aware of your presence. If your hands are in the auric field, you can intuitively gauge how far away from the body to hold them, or return to chapter 11’s descriptions of the auric layers and select a specific layer to work in. Most practitioners assess intuitively, and they will move from a hands-on to a hands-off position during a session. Many also work with a twelve-chakra system, and five of these chakras (and corresponding auric layers) are found outside of the body (see chapter 4). Wherever you place your hands, you are using them as gentle but potent healing magnets.
The following step-by-step process for headaches can be easily adapted to eliminate pain in other parts of the body as well.
1.Prepare inwardly by centering, grounding, and creating an atmosphere of calm and safety. (See chapter 9 for suggested techniques.)
2.Obtain consent from your client to proceed.
3.Attune to your client and intuitively assess the area of discomfort around their head. (Refer to “Intuition and Trust” in chapter 6 for tips about how to apply your intuitive faculties to perceiving energy.)
4.Using Hands in Motion, move your hands lightly over the painful area. If the area is large, start at one end and work your way to the other, continually moving your hands in a circular motion. Your hands can be on the client’s head or just over it, unless you sense that some of the causes of the headache lie in one of the outer energy fields, in which case you will want to shift to this auric layer and work there for a while as well.
5.Follow with Hands Still to further calm the disturbed area. You will know when to stop because you will feel a shift in your client’s body.
6.Once you complete the Magnetic Passes, use your hands or your intention to ground your client.
If using your hands, place them over or under their feet; you can either touch their feet or let your hands hover a few inches away. It doesn’t matter if they are wearing socks or shoes; the healing energy gets through.
If using intention, intuitively link your client’s feet with the deep earth or any of the elements of the earth. (See chapter 20 for more on the elements.)
7.Complete the treatment by asking your client for feedback about how they are feeling.
In the case of migraine symptoms, your hand movements may need to be done several feet away from your client’s head. Find a distance where your client feels no discomfort from the presence of your hands. Use Hands in Motion to clear out congestion, continuing with it until you can move both hands closer to your client’s head. Then change to the Hands Still position, holding your hands directly above your client’s head and continuing until a sensation of symmetry and balance is established.
Reiki is a holistic spiritual healing practice developed in 1922 by Japanese Buddhist Mikao Usui, and it has since been adapted and changed by different teachers. Drawing from ancient traditions, Reiki employs both hands-on and hands-off healing.
Reiki uses life-force energy to heal and balance the subtle body, and the practitioner is the conduit for this universal energy. Reiki also uses mystical symbols that channel the energy toward a directed end. For decades, these symbols were kept secret, which is why different traditions explain them differently, but they are now available over the Internet and in many publications. Many people believe that the symbols are merely focus points for the practitioner and do not have power unto themselves.
FIGURE 12.1 THE REIKI SYMBOL CHO KU REI
Cho Ku Rei (pronounced choh-koo-ray) can be drawn clockwise to bring in or generate energy, or counterclockwise to cleanse and discharge energy.
One of the Reiki symbols you can use when practicing Reiki on yourself or someone else is Cho Ku Rei, which acts like a light switch to invite manifestation, increased power, and accelerated healing. The symbol consists of a horizontal line, which represents the Reiki source; a vertical line, which represents energy flow; and a spiral that touches the middle line seven times, representing the seven chakras (see figure 12.1). Cho Ku Rei is very versatile. You can draw it with your finger or your hand or visualize it in your mind. You can draw it on each of your palms before you do hands-on healing. You can draw it on a chakra, in an auric layer, or on a meridian acupoint. It can be sketched directly over an impaired or wounded area or traced on an object, on an image or picture, or into food or water. This symbol is often used in the beginning or the end of a healing session.
Here is a simple exercise you can use to catalyze healing and manifest a new reality using this power symbol.
Step 1: Decide which version of the symbol to use. When traced clockwise, the Cho Ku Rei symbol moves energy from spirit into matter, empowering, enabling manifestation, and promoting healing. When drawn counterclockwise, or in reverse, the symbol shifts energy from matter into spirit, discharging and releasing negative energy and cleansing.
Step 2: Set your intention. Select what you will activate and why. The most important part of the work is coming up with an intention (where to draw the symbol and why) and deciding if you should sketch the symbol clockwise or counterclockwise.
Step 3: Activate the symbol with intention. While tracing the symbol, focus on your intention. Imagine that the symbol works like a light switch, turning on the flow of life-force energy.
A few simple ideas for using Cho Ku Rei:
Use it with other symbols or healing techniques. The Cho Ku Rei symbol can be used to bolster any other healing intention or process. For instance, you can add the clockwise symbol to the aura-charging technique explained in chapter 11 in order to energize the process, or you can use the counterclockwise symbol when releasing energetic impurities when cleansing your aura, as also explained in chapter 11.
Use it to open or seal a healing. You can open a healing session for yourself or someone else with this symbol. Use the clockwise version if you or the client need to bolster energy at the beginning or the end of a session, and use the counterclockwise if you need to release negativity or impurities.
Draw the symbol directly over a wounded area to promote pain relief.
Sketch it over an image of something you want to encourage the object in question to manifest.
Draw in front of you (in the air) with an intention of protection.
Draw the symbol over your home’s windows or doorways with an intention of protection.
Sketch it on or over a chakra or into an auric field layer to promote healing for that area of the subtle anatomy.
Sketch it on your hand or your client’s hand with a desire, such as empowering your writing or opening to healing energy.
Bless your food and water by drawing the symbol above them. You can use a clockwise motion to add vitality or a counterclockwise motion if you are using the food or water to cleanse your body.
Draw the symbol on and focus an intention into a crystal or a piece of jewelry for healing or magnetizing a wish.
You can also incorporate the Cho Ku Rei symbol into the essential energy techniques described in chapter 9.
For example, when using the Spirit-to-Spirit technique, after affirming your own spirit and that of another, ask the Greater Spirit to work through the Cho Ku Rei symbol to perform healing or manifesting.
You can also bolster the symbol with a healing stream of grace. As covered in chapter 9, healing streams of grace are powerful energies for change. When calling in a healing stream of grace to replace a block or impurity in a client’s energy field, intuitively perceive the unhelpful energy being released and stream of grace attaching to the field, filling the void left by the unhelpful energy. Then perceive the connection point being sealed with the Cho Ku Rei symbol.
In the five-phase theory of traditional Chinese medicine, the human body is a reflection of the universe and the primary five elements—earth, metal, water, wood, and fire. These same five elements are reflected in and directed through each of our fingers. In the system developed by the Taoist master Mantak Chia, whose tradition is thousands of years old, each finger corresponds with the following elements:
Thumb: earth
Index finger: metal
Ring finger: wood
Little finger: water
In traditional Tibetan healing, the five elements are seen as space, wind, fire, water and earth. Each is similarly reflected in each finger, as is the color associated with that element:
Thumb: space/white
Index: wind air/green
Middle finger: fire/red
Ring finger: water/blue
Little finger: earth/yellow
Whether your focus is acupressure, massage, Healing Touch, or another hands-on healing modality, being aware of these two systems and invoking the healing energies of the elements can increase the effectiveness of your healing practice.
In deciding which finger or set of fingers to use for a subtle energy practice, consider the following questions as they relate to your client (or yourself, if you’re engaged in self-healing):
Traditional Chinese medicine theory (Taoist):
Is this issue about worry or the stomach? If so, use your thumb to bring in the earth element.
Is this issue about sadness, grief, or depression, or the lungs and/or large intestine? If so, use your index finger to bring in the metal element.
Is this issue about impatience or hastiness or the heart, small intestine, or circulatory and/or respiratory systems? If so, use your middle finger to bring in the fire element.
Is this issue about anger or the liver, gallbladder, or nervous system? If so, use your ring finger to bring in the wood element.
Is this issue about fear or the kidney(s)? If so, use your pinky finger to bring in the water element.
Traditional Tibetan system:
Is this issue about higher ideals or principles? If so, use your thumb to bring in the element of space.
Is this issue about ideas, thoughts, or beliefs? If so, use your index finger to bring in the element of wind/air.
Is this issue about inflammatory conditions, passions, or the need to manifest? If so, use your middle finger to bring in the element of fire.
Is this issue about emotions, creativity, or intuitive flow? If so, use your ring finger to bring in the element of water.
Is this issue about practical concerns, physical healing, ancestors, or a need for groundedness? If so, use your pinky finger to bring in the element of earth.
You can also use your fingers themselves as diagnostic tools, employing each finger, one at a time, as you explore the following questions:
As you begin to work on your client, are you drawn to use any of your fingers?
Does a particular finger evoke a sense of strong feelings?
Do certain fingers call forth images, words, or other intuitive messages?
Do you feel compelled to use certain fingers more than once or use two or more fingers in any particular sequence?
The fingers that “talk” the loudest might be the ones that carry the most healing potential for you or your client.
Using either the Traditional Chinese (Taoist) understanding of your fingers or the Tibetan understanding (or any other system you are comfortable with), you can bring instant relief to an issue by simply wrapping the fingers of your right hand around the left-hand finger related to the present issue and squeezing three to six times. You can then do the same on the opposite hand.
If you are employing the Chinese system, for instance, and you’re dealing with anger, you can use your right hand to hold the ring finger of your left and squeeze it. In the Tibetan system, you’d hold your left index finger. If you feel overwhelmed and cannot figure out the problem, squeeze each finger, one by one, three to six times, and then reverse hands. Want to increase the effectiveness? Do deep abdominal breathing simultaneously.
Acupressure is an ancient healing art in which the fingers press and hold key acupoints in order to stimulate the body’s natural self-healing abilities. Sometimes referred to as acupoint massage, the acupressure that we will focus on in this chapter is derived from traditional Chinese medicine. As we explored in chapter 3, chi circulates throughout the body through energy channels called meridians. Each meridian corresponds to a different internal organ. Pressure points lie along the meridians, and these points are the focus of both acupuncture and acupressure. While acupuncture employs needles, acupressure uses gentle to firm finger pressure. When these acupoints are stimulated, they release muscular tension; promote circulation of chi, blood, and lymph fluid; and enhance the body’s overall balance of life-force energy to aid healing.
Acupressure accomplishes two primary goals.
When you massage a point in a small, circular motion, you release any blocked chi along the meridian and release tension in the related organ.
When you press and hold the point, you draw chi more abundantly into the meridian, invigorating the organ system.
Out of the nearly 500 acupoints that exist within the human body, ten points are considered to be the points—the ten golden points that are most important for preventing and treating illnesses and imbalances of all kinds. At the center of acupuncture, acupressure, shiatsu, and other meridian-based therapies are the following acupoints:
Stomach 36 (ST 36): Revered by ancient physicians for its ability to treat all disease states, ST 36 restores and builds digestive energy in the stomach and the spleen. It is known to alleviate digestive disturbances, including constipation, gas, bloating, nausea, diarrhea, and abdominal pain and distention. It is also used to treat arthritis and weakness associated with aging.
Large Intestine 11 (LI 11): This is one of strongest points for boosting immunity to heal persistent infections. It expels excess heat, such as the heat associated with high fevers, hot flashes, and burning diarrhea. It alleviates damp-heat skin eruptions, such as acne, hives, and herpes zoster. It is useful for blood-circulation issues, such as anemia. Finally, it can be used to treat tremors and tennis elbow.
Large Intestine 4 (LI 4): This is one of the best analgesic points for any type of pain, including headaches and pain in the shoulder and arm. It is one of the most well-known points and is often referred to by the name Hoku. It is very helpful for clearing the excess heat in the body that can cause nosebleeds and fevers. It strengthens the body’s defensive chi and is used for alleviating allergies, sinus congestion, colds, sneezing, runny nose, sore throat, sore eyes, and toothaches. Use of this point is contraindicated during pregnancy.
Bladder 40 (BL 40): This point is very useful in easing back pain (including acute low-back pain), muscle spasms, sprains, knee stiffness, and leg pain. It is also used to treat arthritis, skin-related issues (itching, inflammation), and heat conditions such as heat exhaustion and heatstroke.
Liver 3 (LR 3): This is a primary point for the liberation of chi, for releasing pent-up energy that can contribute to irritability, aggression, anxiety, depression, tension headaches, and premenstrual syndrome (PMS, including painful breasts). It nourishes tendons and ligaments by alleviating overall tightness and tension. Liver 3 is also known as a potent point for alleviating hypertension, insomnia, and even diabetes.
Gallbladder 34 (GB 34): This point controls the wind rising up to the head that causes insomnia, migraines, and anxiety. It is also used to treat indigestion, nausea, vomiting, and bitter tastes in mouth, and to prevent gallstones. It is useful for treating cramping, pain, spasms, sciatica, and other issues with the low back, hips, knees, and leg muscles.
Lung 7 (LU 7): This is a very good point for relief from asthma and breathlessness. It is also a key point for any conditions involving the head and posterior neck, including migraine headaches. It addresses the internal wind that can cause spasms, twitching, and Bell’s palsy. And it is also effective for treating exterior wind issues such as alternating chills and fever, runny nose, scratchy and sore throat, sneezing, and body aches.
Heart 7 (HE 7 also known as HT 7): This point calms the mind and invites relaxation when overactive thinking has induced anxiety. It relieves insomnia due to overexcitement. It also reduces heart palpitations and regulates the heart by harmonizing its function, balancing emotions, and strengthening the spirit (or shen).
Spleen 6 (SP 6): Nourishing the spleen and building the blood, this point is important for addressing all gynecological, sexual, urinary, digestive, and emotional imbalances. It is often used to treat anxiety, insomnia, headaches, and menstrual cramps. And it’s valued for relieving the feeling of heaviness and tiredness. Use of this point is contraindicated during pregnancy.
Kidney 1 (KI 1): This is a powerful point for grounding and connecting with earth energy. In this way, it is useful for calming and soothing someone who is highly anxious or has experienced a shock. It is used to treat headaches, hypertension, diarrhea, and insomnia. And it is also a vital point for nourishing the inner fire, especially in the elderly.
Thanks to the team of NaturalNews Network for inspiring this adapted roundup of acupoints. Identifying the top ten points from the vast number that exist is an invaluable distillation for the subtle energy healer.2
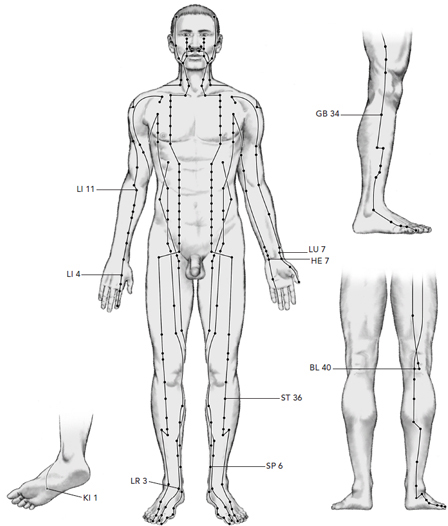
Here are brief descriptions of the locations of your golden points, which are pictured in figure 12.2. A cun is the width of your thumb. Acupoints are found in depressive or slightly indented areas, often near the bones. You’ll often feel tenderness in the spots that are blocked. (Note: Several of these points should not be used when pregnant or low on energy. Discuss these matters with a professional meridian specialist if you are concerned.)
Stomach 36 (ST 36): Three cun below your kneecap, one fingerbreadth toward the anterior crest of your tibia.
Large Intestine 11 (LI 11): Found at end of crease line on the outer side of your bent elbow.
Large Intestine 4 (LI 4): Press together your thumb and first finger to form an elevation. The point is at the highest point of the mound.
Bladder 40 (BL 40): Behind the knee, at the center of the crease.
Liver 3 (LR 3): On the top of your foot between your first (largest) and second toe bones, about three cuns in from large toe.
Gallbladder 34 (GB 34): On the outside of the leg just below your knee, in the tender depression about one cun below the head of the fibula.
Lung 7 (LU 7): Extend your thumb with the nail up, away from the palm of your hand. Find the depressed area at the base of your thumb, near your wrist. About another thumb-length (not a cun, which is the width) down this left side, you’ll find another bone that sticks out. LU 7 is in between those two tendons.
Heart 7 (HE 7 also known as HT 7): At the wrist joint on the inner side, palm up, at the side of the pisiform bone. (About one cun from pinky side of wrist.)
FIGURE 12.2 THE TEN GOLDEN ACUPOINTS
These ten acupoints are the most important for treating a broad range of maladies.
Spleen 6 (SP 6): On the inside of the lower leg, one hand width above the tip of the anklebone and on the back of the shin bone.
Kidney 1 (KI 1): On the sole of your foot between the second and third toes, about one-third of the distance between the base of the second toe and the heel—in the depression that appears when your foot is extended or bent downward.
The following guidelines for using acupressure are inspired by Michael Reed Gach, PhD, founder of the Acupressure Institute in Berkeley, California, and author of several books, including Acupressure’s Potent Points.2
Tools of the trade. The middle finger is typically the longest and strongest of your fingers and is well suited for self-acupressure and applying acupressure with your clients. You can also use your knuckles, fist, or other tools, such as a tennis ball or a pencil eraser. Additionally, refer to the information on the five elements and the fingers (earlier in this chapter) to potentially increase the power of your application.
Finger pressure and holding acupoints. Use gradual, steady, and penetrating pressure directly on an acupoint for approximately two to three minutes. (You can increase the amount of time as you wish, but spend no longer than ten minutes on a single point.) While you might want to gently massage the point before applying direct pressure, avoid massaging the entire area around a point. When your finger or fingers are comfortably positioned on the spot, gradually lean your weight into the point, without straining.
Sensitivity and pain. Each point will feel somewhat different when you press it. You will likely encounter a few points that feel tender or sensitive when touched. If you feel extreme (or increasing) sensitivity, gradually decrease the pressure until you find a balance between pain and pleasure.
Mindfulness when applying and releasing pressure. Applying and releasing pressure gradually allows the tissues time to respond, which promotes healing. Moving your fingers into and out of the point with awareness will increase the effectiveness of your acupressure treatment.
Signs of chi. Hold a point for a few minutes until you feel a regular pulse (the pulsation of energy) or until the soreness at the point decreases. Then gradually release the pressure, finishing with a soothing touch.
Timing. Avoid working on a single area of the body, such as the face, head, or abdominal area for longer that fifteen minutes at a time. The effects of acupressure can be quite strong, and too much energy being released in one area can cause complications, such as a headache. And limit your self-acupressure sessions to one hour at the most.
Frequency. Practicing acupressure routines daily offers the best results. However, using acupressure two or three times a week is also highly beneficial.
Environment. Find a comfortable, private environment that is conducive to deep relaxation.
Body position. Choose whatever position you find most comfortable and convenient, either sitting or lying down.
Clothing. Loose, comfortable clothing is ideal.
Food and beverages. Avoid practicing acupressure on a full stomach or right before eating a large meal. Avoid iced drinks, as the extreme cold can counteract the benefits of acupressure. After a session, a cup of hot herbal tea is very good, along with a period of deep relaxation.
The following seven acu-exercises are for self-care. They will help you do everything from easing anxiety to eliminating headaches to getting rid of neck pain. Given the accessibility and simplicity of each exercise, you can also use them with clients, including teaching them to clients, whenever that is appropriate. They include some acupoints beyond the top ten points featured above. For these, you will find a clear explanation of the location and benefits of each point.
Good digestion involves much more than the stomach alone. A powerful way to fire up your metabolism is to liberate your liver chi (eliminating what is known as liver chi stagnation). The two acupoints you want to locate are Liver 3 (LR 3), also known as the “Great Surge,” and Liver 2 (LR 2), known as “Moving Between.” (See The Subtle Body, figure 4.15, page 198, for the location of LR 2.) Just find the depression on the top of each foot between the big toe and second toe. Press down gently but firmly, and either hold the spot or massage it for a few minutes. Using three fingers, you will be sure to contact both points simultaneously.
Note: Both LR 2 and LR 3 points will also help to relieve irritability, headaches, and poor circulation to the hands and feet (all signs that liver chi is blocked).
When irritation, tension, and anger build up, it is common to experience body aches and stiffness, along with the emotional upset. One of the best acupoints for releasing and melting this angst away is Conception Vessel 17 (CV 17), also know, aptly, as “Sea of Tranquility.” At the center of your chest, above the sternum (level with the nipples, for many people), you will find CV 17 (see The Subtle Body, figure 4.16, page 199). One especially peaceful way to hold this point is to place your palms together in a prayer position, and then press the knuckles of your thumbs into the point. Remember to use your breath as your ally, breathing in deeply, and exhaling fully. Hold the point until it’s no longer tender or until you feel some relief.
In truth, this simple acupressure exercise will not only help to relieve neck pain, but it can also relieve neck stiffness, headaches, mental stress, nervous tension, irritability, eye strain, hypertension, tinnitus (ringing in the ears), and insomnia. By holding the pair of points known as Gallbladder 20 (GB 20), also called “Gates of Consciousness,” you are helping to regulate chi circulation for the brain, relaxation, and the release of endorphins. They are very easy to find, and most of us intuitively rub these points from time to time. Just below the base of your skull, you will feel the two indentations or large hollows that are between the two vertical neck muscles. Using your fingers or knuckles (whichever is comfortable), press firmly but gently into those two hollows underneath the base of your skull. Your fingers will be approximately four finger widths (or three inches) apart. Close your eyes, tilt your head back very slowly, and take slow, deep breaths for two minutes or so. Repeat as necessary.
Not surprisingly, one of the most effective stress-relief acupoints is found along the Heart meridian. Heart 7 (HE 7 or HT 7), also called “Spirit Gate,” helps to relieve stress and anxiety at the level of the emotions. Whether you’re experiencing a mild wave of worry or fear, or even outright panic, you can hold this point, which is easily found on the inside of your wrist.
Turn one of your hands so that your palm is facing upward. Now trace your little finger (pinky) down to the bottom of your hand, to the crease where your palm meets your arm—and just inside your wrist bone. With one to three of your fingertips, gently hold this point for a few minutes, remembering to breathe in deeply and exhale fully. When you are ready, switch to Heart 7 on your opposite wrist, holding and breathing for a few more peaceful minutes.
Although there are several acupoints that are very useful for alleviating anxiety, there is one that is exceptional in its overall balancing and uplifting abilities—Kidney 1 (KI 1), also called “Gushing Spring.” Nourishing to the whole being, Kidney 1 roots the body, refreshes the brain, and calms mind and spirit (shen). This point is easily found on the sole of your foot. Place your finger between your second and third toes and trace over the ball of your foot until you come to the natural indentation about one-third of the way along the sole of your foot. Holding the point with one to three fingertips, breathe deeply for a few minutes and then switch to your other foot and repeat.
An elegantly simple approach to relieving headaches is readily available with this special acupressure point. Located in the center of your forehead, between your eyebrows, is the point that is associated with the third eye—the outer source point of one’s inner vision. In traditional Chinese medicine, this point is known as Yin Tang (or “Hall of Impression”). It is interesting to note that although the point is located along the course of the Governor Vessel, it doesn’t officially belong to that meridian. Instead, it belongs to a category of points known as the extraordinary points. Gently applying pressure to this point, and breathing consciously, you can allow headaches to dissipate, along with any anxiety or worry that may be the root of the tension.
An easy and effective way to find relief from low-back pain, whether chronic or acute, is to apply acupressure to the Bladder 40 (BL 40) acupoints. Also known by the name “Bended Middle,” these points are located at the back of each knee, in the center, at the middle point of the depression when your knees are bent.
Find a comfortable place to either lie down on your back with your knees bent or to sit in chair—whichever way will give you easiest access to the BL 40 points behind each knee while feeling as relaxed as possible. Hold the points for two to five minutes, using your breath to breathe in a color or image that symbolizes ease and openness for you. Let your out-breath release any tension in your back, legs, and any other part of your body where you may have pain.
Livestrong.com, the online resource cofounded by Lance Armstrong, is devoted to helping people to create their own health and wellness success stories. The acupressure exercises above were inspired by their compendium of resources and adapted to best support the subtle body.4
Although there are many methods for addressing past wounds and present-day symptoms, Emotional Freedom Techniques (EFT) offers an elegant and often permanent solution. EFT comprises a series of tapping techniques that help individuals release stressful feelings. Created by Stanford University engineer Gary Craig, EFT dissolves the pain attached to grief, sadness, anger, or fear. Based on acupuncture and acupressure principles, it involves tapping meridian points on the head, chest, and underarms to free blockages from the meridian system while you think about a specific issue and voice a key phrase, often a reminder phrase about the cause of a negative reaction. Some practitioners follow this reminder phrase, which emphasizes your desire to change, with a positive affirmation. This combination clears emotional blocks from your subtle energy field and restores the energetic balance needed for health and wellbeing.
SHIATSU MADE EASY
SHIATSU IS A Japanese word that means “finger pressure.” However, a shiatsu treatment typically involves the use of thumbs, palms, knees, forearms, elbows, and feet, in addition to finger pressure. The goal is to apply pressure to the meridians and acupoints of the body, promoting vibrant health by stimulating chi—or ki, as the energy flow is known in Japanese healing.
A shiatsu session is typically done on a floor mat, allowing freedom of movement for the therapist. As a tool for self-healing and self-development, shiatsu can be done almost anywhere and at any time. The following simple exercises are accessible methods for practitioners and their clients to give themselves an energy tune-up when needed.
Head-to-toe energy flow. Unleash your ki energy by separating your toes with one hand, then squeezing each toe between your thumb and index finger. This allows energy to flow from your feet all the way to your chest.
Relieve neck and back stiffness. Free yourself from the stiffness that is caused by sitting at a desk too long. Stand up and place your hands on your waist. With thumbs pointing upwards on your back, steadily apply pressure in an up-and-down motion on either side of your spine. Feel the inherent strength of your back as energy is allowed to move again.
Escape anxiety, restore courage. To reduce anxiety and revitalize the energy of courage, use your knuckles to mildly tap across the top of your head. You’ll be awakening the energy of several acupoints as you do this. While keeping a steady rhythm, remember to be gentle.
For this section, I called on the expertise of colleague Valerie Lis, an EFT Universe certified expert and trainer.5 Valerie and other EFT practitioners have found that this approach is highly effective regardless of the intensity of the problem and often works in minutes. In addition to releasing stress, EFT is known to dissolve emotional pain (including phobias and trauma), abolish cravings, reduce chronic physical pain, resolve headaches and acid indigestion, provide freedom from food and chemical sensitivities, and improve physical performance (such as in sports and other athletic endeavors).
To try EFT right now, just follow these steps.
1.Focus on a specific bothersome memory. Notice how much stress you feel and where you feel that stress in your body. You want to experience the emotional distress of the issue while tapping in step 3; the more intense your reaction, the better and faster EFT will work. You can even create a phrase to encapsulate the issue, such as “anger at my mom” or “hurt at being ignored.”
2.Prepare to tap. You can tap on both sides of your face at the same time, but this is not necessary, and according to Valerie, most people don’t. Instead, tap on one side of your face or the other. It is okay to cross over, and you can use either hand.
3. While continuing to focus on the memory, gently tap with your fingertips four to seven times on each of the following locations. Following is a suggested order, although Valerie says the order is less important than your intention:
Top of the head
Inside of the eyebrow
Outside of the eye
Under the eye
Under the nose
On the collarbone—at the beginning where your breastbone, collarbone, and first rib meet
Under the arm, on the side of the body, at a point even with the nipple for men or in the middle of the bra strap for women, about four inches below the armpit
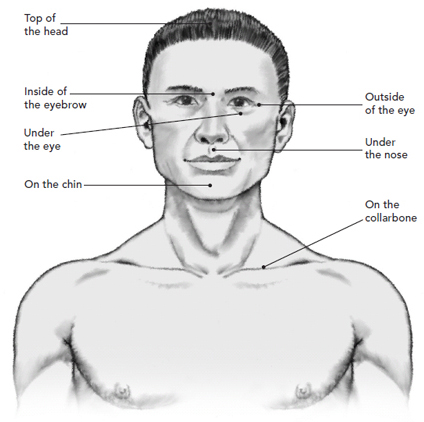
See figure 12.3 for a diagram of the first seven points.
4.Continue to focus on the memory and repeat the tapping procedure, tapping on each point in succession.
5.When you notice a shift, adjust your focus and start over. For example, if you still feel stressed but at a reduced level, focus on the feelings and thoughts that remain in your awareness (what is left of the problem). If the emotion has changed from stress to fear, focus on the fear and begin again. If the energy has moved from your stomach to your neck, adjust your focus and tap again.
This simplified process may be all you need to permanently eliminate your reaction to this memory. Although there are extended versions of EFT that may be more effective for deeply rooted memories, this quick-relief process provides the opportunity for anyone to experience its stress-relieving benefits.
In the following exercise, we will explore what happens when we add a specific phrase to the process of tapping.
Using EFT, we can face difficult memories and related limiting beliefs head-on by adding a statement to the tapping. This statement should be a positive one, such as “I am so happy,” that brings up a negative reaction, such as causing you to feel unhappy. The tapping is used to clear the negative charges preventing you from accepting the positive belief or statement.
To clear resistance to joy, use the basic tapping points and technique outlined above while repeating aloud the statement, “I am so happy!” Say the statement out loud and with great enthusiasm; repeat it at every tapping point. After a few rounds, change it to, “I am such a happy person.” Tapping with one or both of these statements usually begins the recovery process and resolves the underlying hurt, sadness, and other emotions that can crowd out peace and happiness.
FIGURE 12.3 TAPPING POINTS OF EFT
Shown are the first seven points; the eighth point is underneath the arm, on the side of the body, at a point even with the nipple for men or in the middle of the bra strap for women, about four inches below the armpit.
Using phrases such as these is the beginning point for some people; to clear depression that may be felt more strongly, more tapping should be done, for up to ten more minutes.
Thai massage is a dynamic type of bodywork that brings together elements of yoga, stretching, and compression practices, a form of exercise therapy that combines pressure and massage, to elongate the muscles, increase blood flow throughout the body, and to allow chi to move freely and vibrantly.
Thai massage has its roots in Indian Ayurvedic healing techniques and is believed to have been developed by the physician to the Buddha more than 2,500 years ago. For centuries, Thai massage was performed by monks as a primary component of Thai medicine. Today, Thai massage is normally conducted by licensed massage therapists who have received this specialized training. If you are not specifically trained in this method, you can still try the following simple Thai massage techniques at home with a partner.
Before you begin, make sure you’re dressed comfortably. Since Thai massage is a very active practice, you and your partner should dress in loose clothing that does not restrict movement. Also choose a location on the floor that gives you ample room to move, either on very soft carpet or a comfortable exercise mat that is large enough to provide support for both of you. If using a mat, you will need to be able to freely move around your partner’s body without leaving the mat. Ask your partner to remain loose and fluid throughout this exercise; you should keep reminding them to remain so and to let you do the work during the massage.
Step One: Starting position and compression. Begin with your partner lying on their stomach, face down. Start with a compression, which is one of the key strokes in Thai massage. Using the heel of your hand, press down on your partner’s back, arms, and legs. Work with your partner to determine a comfortable level of pressure. According to the Associated Bodywork and Massage Professionals, this touch increases circulation, promotes the drainage of lymph fluid, and relaxes tense or overused muscles.
Step Two: Range of motion—arms and hands. This exercise can be done with your partner either face down or face up. Actively move your partner’s limbs. Start by moving each arm through its range of motion. Bring the arm over their head and gently pull it away from their body to provide a stretch. Also rotate the hands and feet through their ranges of motion.
Step Three: Simple bent knee stretch. With your partner face up on the mat, sit near their feet, your legs around their legs. Raise one of their legs so that their knee is facing up toward the ceiling. Tuck their foot under their hamstring near the buttock. Fold your hands together and place them on the far side of your partner’s knee, wrapped around so that your partner can see them. Now gently lean back, pulling upward and toward you so as to stretch your partner’s leg near the knee. You can then shift your hands a few inches further up your partner’s thigh and lean back, pulling softly for a quick stretch. Raise your hands another few inches and repeat this motion. Each of the stretches lasts no more than a couple of seconds. Once you have reached mid-thigh, reverse a few inches and repeat this stretch until you return to the knee. Repeat this stretch with the other leg. Talk and work with your partner to determine other areas that can be comfortably stretched. Remember to go slow and easy.
Step Four: The torso life stretch. A common movement in Thai massage is called the torso life. With your partner lying face down, on their stomach, you kneel on the ground between their legs, enabling you to hold their arms and gently pull them up and back. Lifting their torso, head, and neck off the ground and pulling them backwards provides a lovely stretch for the back, shoulders, and abdominal muscles.
Be sure to communicate with your partner, always finding out what feels like the right amount of pressure and stretching for them. Thai massage should never be painful. If stretches are taken too far, they can cause injury. Encourage your partner to speak up if they feel uncomfortable, and keep reminding them to relax. And both of you should remember to make use of the cleansing, healing power of the breath throughout the practice.