Chronic fatigue and nervous exhaustion
May what I do flow from me like a river, no forcing and no holding back, the way it is with children.
RAINER MARIA RILKE
Remember childhood? For most of us, it was a time when we ran like the wind, climbed trees, rode bicycles, rolled around in the damp grass, jumped in puddles of water, and swam in just about any body of water we could, from blow-up kiddy pools to grand lakes. We may genuinely not want to climb trees now, but somehow we intuitively sense that we would be nourished and rejuvenated by more movement, the way we were as kids.
This chapter is devoted to the styles and types of healing movement that are exceptionally effective when working with subtle energies. In brief, we will explore yoga, acu-yoga, qigong, tai chi, mudra practice (for working internally with increased energy), and the unmatched wonders and joys of walking. Whether it is slow and subtle or fast and vigorous, each of the styles of movement outlined here has been chosen for its unique ability to open the chakras and meridians, clear the electromagnetic fields, and invoke and build up the life-force energy that heals. (Please consult your licensed professional if you have any questions before doing these or any other exercises.)
Acu-yoga is the brilliant pairing of acupressure and yoga. Modified asanas (yoga postures) are utilized to gently stimulate specific acupressure/acupuncture points, meridians, and various parts of the body that are prone to holding tension. The postures, combined with breathing and relaxation exercises, are a form of physical self-therapy and practical tools for enhancing health. Acu-yoga is a subtle energy maintenance practice focused primarily on prevention of illness and imbalances.
As an adjunct to other holistic tools, the following are just some of the conditions that acu-yoga can help relieve:
Chronic fatigue and nervous exhaustion
Cold and flu
Backache
Hyperacidity and acid reflux
Hypertension
Heart disease
Diabetes
Obesity
Depression
Insomnia
Impotence
Two acu-yoga poses that are known for their overall rejuvenating effects are Bridge Pose and Wing Lifting Pose, outlined below. For maximum benefit, practice these two poses two or three times a day for one week, eventually establishing acu-yoga as a daily routine. Gradually increase the length of time spent in each pose. Most importantly, follow your practice with ten minutes of deep relaxation, lying on your back with your eyes closed.
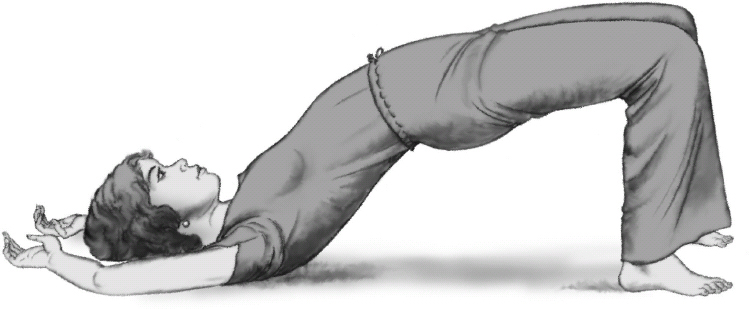
This acu-yoga version of Bridge Pose is done with the arms overhead. The completed pose is shown in figure 14.1. Here’s how to do it:
1.Lie on your back.
2.Bend your knees so the soles of your feet are flat on the floor.
3.Put your arms above your head on the floor and let them relax.
4.Inhale, arching your pelvis up. Hold for several seconds.
5.Exhale as you slowly bring your pelvis down to the floor.
6.Continue to inhale up and exhale down for one minute.
7.Remember to relax on your back with your eyes closed for a few minutes when you are done.
Lying on your back with bent knees and arms extended overhead, inhale and lift up your pelvis. Hold for several seconds, then exhale and lower.
Another common version of this pose involves keeping your arms at your sides. While staying on the floor, lift your hips and torso while inhaling for several seconds. Exhale as you slowly bring your pelvis back down.
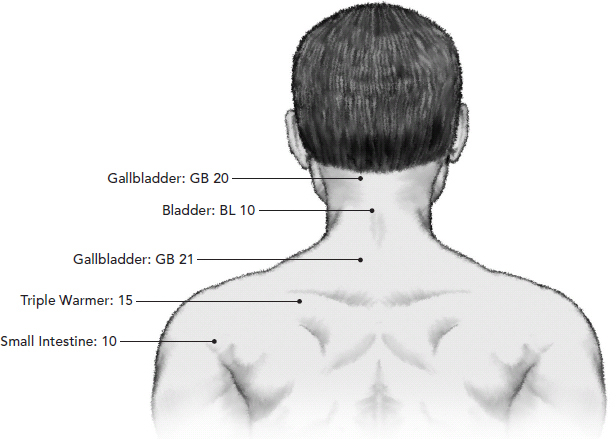
Bridge Pose provides benefits by stimulating the following acupoints, shown in figure 14.2, for healing effects:
Triple Warmer 15 (TW 15): Relieves stiff neck, shoulder and neck pain, and elbow pain.
Gallbladder 20 (GB 20): Relieves anxiety, shoulder and neck pain, rheumatism, eye tension, and excess heat and heaviness in the upper parts of the body.
Gallbladder 21 (GB 21): Relieves shoulder and neck pain, hyperthyroidism, and rheumatism.
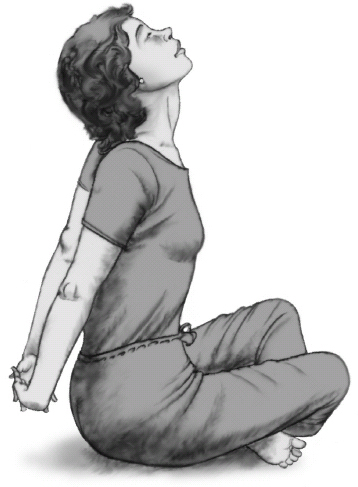
Sitting comfortably, with your hands clasped behind your back, press your shoulder blades together. Inhale, raise your shoulders, and drop your head back. Straighten your arms. Exhale and let your arms and shoulders float down. Repeat five times.
Bladder (BL 10): Relieves sore throat, neck spasms, and a feeling of fullness in the head.
Small Intestine (SI 10): Relieves muscular pain, numbness, swelling, and arthritis in the shoulder-scapula region.
This pose is demonstrated in figure 14.3. Here is how to do it:
1.Sit comfortably and clasp your hands behind your back, palms facing each other. You can sit on the floor cross-legged or with your legs extended. You can also sit in a chair.
2.Press your shoulders back so that your shoulder blades are squeezed together.
3.Inhale, raise your shoulders up toward your ears, and gently let your head drop back.
4.Straighten your arms and lift them away from your back and buttocks.
5.Exhale, and come to the resting position with your hands still clasped behind your back.
6.Repeat steps 2 through 5 five times. Work up to continuing the exercise for one minute.
7.Unclasp your hands and let your arms relax, and lightly shake your shoulders.
8.Remember to relax on your back with your eyes closed for a few minutes when you are done.
DIAPHRAGMATIC BREATHING FOR QIGONG
DIAPHRAGMATIC OR YOGIC breathing is one of the most important aspects of qigong practice. It maximizes the healing and balancing potential of the movements by
 stimulating blood circulation,
increasing oxygen to the brain and throughout the body,
building internal strength by generating chi energy, and
promoting relaxation and receptivity.
Simply breathe through your nose, with your tongue placed in a natural resting position against the upper teeth and palate, and with your lips pressed lightly together. When your tongue is pushing against the palate, it acts as a bridge that allows the chi energy to travel down from the top of your head and into your body.
When practicing diaphragmatic breathing, pause between your inhalation and exhalation to give the chi energy time to collect and build. (See chapter 18 for additional breathing techniques.)
Wing-Lifting Pose is the go-to acu-yoga posture for preventing or alleviating hypertension (high blood pressure). Stretching and releasing the shoulders allows the physical and emotional tension that can contribute to hypertension to melt away. You can take the positive effects of the pose with you throughout the day by reminding yourself to breathe, relax, and open.
What is the subtle energy “secret” that more than sixty million people in China, and countless others around the globe, know about and practice? It is qigong, the ancient discipline that coordinates the movement of the body with deep-breathing exercises and mind-focusing disciplines. In other words, qigong is a form of exercise created to mentally generate and direct chi through movement. Qigong exercises often imitate the natural motions of animals, such as the crane, deer, or monkey, and are accompanied by simple breathing techniques.
Qigong can
strengthen the connection between body and mind,
enhance the nervous system,
reduce stress hormones,
ease depression and anxiety,
boost the immune system,
ease headaches and allergies, and
facilitate deeper sleep.
Pulled from the treasure trove of qigong exercises, here are step-by-step instructions for two of the most useful and effective choices for personal and professional care—one for overall energy tune-ups and the other specifically for easing back pain.
This is a simple go-to qigong exercise that you can do anywhere, any time, for both relaxation and an energy boost. For practitioners, Ringing the Temple Gong is an invaluable practice. Not only can you use it to increase your own energy and wellbeing, but you can also use it to prepare for your working sessions and can recommend it to clients when appropriate.
1.With your arms at your sides, stand with your feet shoulder width apart and your knees slightly bent.
2.Turn your torso as far as you can comfortably go to the right, allowing your arms to follow with a gentle swing. Then turn your torso and arms to the left.
3.Finding your own rhythm, keep turning right, then left. Gently build momentum until your hands lightly strike the abdomen and back at the end of each rotation. If it’s comfortable, turn your head to look over each shoulder as you rotate.
4.Breathe normally throughout the movement, occasionally taking a deep breath to invite deeper relaxation.
Do this exercise for as long as you would like. After a few seconds or minutes, begin to gradually slow down, coming to a gentle stop. Allow yourself to stand still for a moment, consciously lengthening your spine and noticing the sensations of increased subtle energy throughout your body.
Qigong Horse is a targeted, therapeutic exercise for easing back pain. To build up strength in your back, begin with the seated version.
1.Sit on the edge of a chair. Only your buttocks should be on the seat, not your thighs. Plant your feet flat on the ground, placing them shoulder-width apart with toes pointed forward and parallel to each other. Bend your knees to a ninety-degree angle. Keep your back straight, but not rigid, and your shoulders relaxed.
2.Notice the backs of your thighs, allowing any tension there to be released.
3.Lengthen your spine by visualizing a golden thread at the top of your head being gently pulled skyward. Raise your torso slowly and gently, until you are standing.
As you rise up each time, place your attention on the backs of your thighs and buttocks. If they are still tense, repeat the exercise from the sitting position on the edge of a chair. Repeat as many times as is comfortable.
Once you have built up strength in your back and legs, the standing version of Qigong Horse will increase the benefits of the exercise, bringing further relief to back issues.
1.Stand with your feet shoulder-width apart. The toes are pointed slightly inward. The knees are slightly bent. The crease at the groin area where your hip and thighs meet, known as the kua in Chinese, should be slightly indented.
2.Lengthen your spine by visualizing a golden thread at the top of your head being gently pulled skyward. Then tuck in your tailbone and imagine your torso and lower body sinking down, as if you were going to sit down on an imaginary chair. If you are standing in proper alignment, the backs of your thighs and buttocks will be totally relaxed.
3.Repeat as often as desired.
Practicing Qigong Horse frequently, standing and/or seated, will support the realignment of vertebrae and correct posture. This exercise can also help to relieve scoliosis and back injuries when practiced regularly.
Tai chi chuan (more commonly called just tai chi) is considered an internal martial art, done solo for the purpose of improving one’s internal self. Originating in China, tai chi promotes vibrant health and a long life through the cultivation of chi. In fact, tai chi means “the ultimate” and involves progressing toward the ultimate existence, in part through a series of movements that move chi through the body.
There are many different styles of tai chi, such as Yang, Wu, and Chen styles. The traditional tai chi routine of 108 postures (referred to as long-form tai chi) would typically take a student between one and three years to learn. Over time, short forms have been developed, from a 37-posture form to an 8-posture form.
In all forms of tai chi, practitioners employ a variety of stances and movements that stimulate chi. These postures are based on the meridians and serve as both exercises and parts of a therapeutic healing process. Tai chi is ideal for people who have limited mobility, whether temporarily or permanently, as the movements can be easily adapted for anyone. In this low-impact, slow-motion exercise, the movements are gentle and usually circular in motion. Muscles are relaxed, joints are not fully extended or bent, and connective tissues are not stretched. As you move, the focus is on breathing deeply and naturally and noticing any sensations in your body.
The benefits of tai chi include:
Reduced pain and stiffness
Improved flexibility and strength
Improved coordination and balance (which means a lower risk of falls for older people)
Enhanced sleep
Increased sense of calm and wellbeing
Greater awareness and spiritual clarity
The aim of this exercise is to combine hand and foot movements for a single, fluid, full-body movement. The movement takes you through a 180-degree turn in which you have your left hand raised as you face left and your right hand raised as you face right. Imagine yourself looking at a cloud that floats from one side of you to another, while you lightly follow the cloud with your arms, scooping water from the cloud on each side.
1.Begin standing with your arms at your sides. Your weight should be on your left leg, and your head is slightly pointed to the left. Your right heel is elevated off the floor.
2.With your palm facing outward, raise your left hand to shoulder level, extending it out from your side. Move your right hand just under your left elbow, palm facing up. Both elbows are slightly bent.
3.Flow from left to right in a circular manner, shifting your hands gently, until you are facing right, in a mirror image of your starting position: your right hand at shoulder level, palm facing out, and your left hand just under your right elbow, palm facing up. When facing right, your weight will be on your right leg and your head slightly pointed to the right. Your left heel will be elevated off the floor.
4.Flow back and forth, from right to left and back again. Conclude by resting your hands at your sides and taking a deep breath. Repeat the entire cycle three times.
CHAKRA MUDRAS: THE ART OF SUBTLE INTERNAL MOVEMENT
In the practice of yoga and other meditative forms of movement, there is an ancient complementary practice utilizing hand gestures known as mudras (a Sanskrit word meaning “sign” or “seal”). Mudras allow us to cultivate control of the flow of our energy or life force (prana or chi) and seal in that energy with specific hand positions that invite higher states of consciousness.
When we practice a hand mudra, intentionally connecting the fingertips, palms, and hands in specific ways, we activate, recharge, and redirect the subtle energy of our entire being. As each area of the hand corresponds to a certain part of the mind or body, using specific configurations between fingers and hands enables us to have an energetic conversation between the two.
In a sense, our relationship with the entire universe is represented in our fingers and hands. Each finger represents an element, a chakra, a planet, a body organ, an emotion, and the end point of a meridian.
The thumb represents willpower and logic and is connected to the fire element, the Lung meridian, and the planet Mars, the planet named for the ancient god of war. Use of the thumb restores equilibrium and creates order.
The index finger represents the mind, the power of thought, and inspiration. It is associated with the air element, the Stomach meridian, and the planet Jupiter, which represents the eternal nature of change.
The middle finger represents our spiritual path and is often called “the heavenly finger,” in that it radiates to infinity. It is associated with the ether element, the Pericardium and Gallbladder meridians, and the planet Saturn, which is metaphysically compared to the gates of heaven.
The ring finger reflects vitality and health and is associated with the earth element, the Liver and Triple Warmer meridians, the sun, and Apollo, the god of healing and prophecy.
The little finger, which signifies communication, sexuality, and personal relationships, is associated with the water element, the Heart and Small Intestine meridians, and the planet Mercury.1
In traditional Hatha yoga, there are twenty-five mudras that are taught and practiced. Here we will focus on the seven chakra mudras as a way to activate the energy of the nadis and chakras and seal in the energy of each.
1.Start each chakra mudra session by energetically washing your hands. Simply rub your hands together approximately ten times, and then hold your hands in front of your second chakra (sacral chakra) for a few moments.
2.Sit with your back straight, either in a chair or comfortably on the floor with your legs crossed. Take a few slow, deep breaths to center.
3.Using the images and descriptions under “The Chakra Mudras” to guide you, place your fingers together as described for each mudra. Exert just enough pressure to feel the flow of energy (no need to press hard).
4.There is a suggested single-word Sanskrit chant correlated with each chakra mudra. As you hold each mudra, repeat the chants seven times each, or more if you would like. (These chants/words are included in the following descriptions.)
You can further enhance your mudra practice by surrounding yourself with healing music, color, essential oils, or candles.
Tip: When focusing on activating and balancing the chakras, it is best to work from the first chakra upward (from root to crown), unless you are only working with one or two chakras at a time.
THE OM MUDRA
THE MOST WELL-KNOWN and frequently practiced mudra around the world, the OM mudra (figure 14.4), is one that we intuitively use to reconnect with our higher consciousness. It uses the same hand symbol used for the first chakra in the chakra mudra practice. The OM mudra is so universal, however, that we can elegantly and efficiently use it to connect us in entirety with body, mind, and spirit.
The thumb is considered the gateway to divine will (represented by the seventh chakra), and the index finger correlates to the ego (represented by the second chakra). Touching the thumb and first finger tip to tip allows the energy of heaven and earth to cycle through our systems.
As you do this mudra, chant OM (just as we do with the sixth chakra mudra) to further invite this reconnection. Or repeat the following affirmation: as you breathe in, say, “I am one with the Universe,” and as you breathe out, say, “The Universe and I are one.”
See figure 14.5 for pictures of all the chakra mudras.
First Chakra: Touch the tip of your thumb with the tip of your index finger. Concentrate on your first chakra (root chakra) located at the base of your spine. At your own pace and volume, chant the sound Lam (pronounced “lum”) and visualize the color red.
Second Chakra: Place your hands in your lap with your palms facing up, softly cupped together; your left hand is underneath, its palm touching the back of the fingers of your right hand. Lightly touch the tips of your thumbs together. Concentrate on the second chakra (sacral chakra), which is three finger widths below the navel. Chant the sound Vam (pronounced “vum”) and visualize the color orange.
Third Chakra: Hold your hands in front of your solar plexus, between your heart and your stomach. With your fingers straight and pointing away from you, allow all of your fingertips to touch and cross your thumbs. Concentrate on your third chakra (solar plexus chakra). Chant the sound Ram (pronounced “rum”) and visualize the color yellow.
Fourth Chakra: Place the fingers of both hands in the same position, with the tips of your index fingers and thumbs touching. Now place your left hand on your left knee, palm down, and your right hand in front of the lower part of your breast bone (slightly above the solar plexus). Concentrate on the fourth chakra (heart chakra). Chant the sound Yam (pronounced “yum”) and visualize the color green.
Fifth Chakra: With your palms facing up, interlace your fingers on the inside of your hands, allowing your thumbs to be free. Let your thumbs touch at the tops and pull them slightly upwards to create a circle. Concentrate on the fifth chakra (throat chakra). Chant the sound Ham (pronounced “hum”) and visualize the color blue.
Sixth Chakra: Place your hands in front of the lower part of your breast area. Point your straightened middle fingers forward and let the fingertips touch. Each of your other fingers is bent and touching at the knuckles. Your thumbs point toward you and touch at the tops. Concentrate on your sixth chakra (third-eye chakra) slightly above the point between your eyebrows. Chant the sound OM (“ohm”) and visualize the color purple (or indigo).
Seventh Chakra: Place your hands in front of your stomach and let your ring fingers point upward, touching at their tips. Cross the rest of your fingers, with your left thumb underneath the right thumb. Concentrate on the seventh chakra (crown chakra) at the top of your head. There are two popular sounds to choose from: Visarga is often spoken as a breathy sound, like “ahhh.” Other sects employ the sound “NG,” which sounds like the end of the word “sing.” While sounding, visualize the color violet (or the colors gold or white).
Walking is one of the most vital ways to reenergize yourself and clear your energy, if you convert it into a subtle energy practice through intention. Here are four steps for walking in a wise, healthy way that also bolsters your energetic system.
Step 1: Charge your breath. Before walking, stand still and take a deep breath. Allow this breath to charge every cell in your body with the vitality of life.
Step 2: Align your spine. Tense your body and then relax, allowing your shoulders to fall and your arms to hang loosely. Plant your feet about a shoulder’s length apart and swivel your hips until they come to rest in a stable position. Lengthen your spine, draw your shoulders back, loosen your knees, and gently bounce up and down on the balls of your feet. When your body settles into a comfortable position, you are in alignment, and you are ready to walk.
Step 3: Walk from your navel. Your second chakra is the center of emotions as well as your lower Triple Warmer or Burner. It also contains the hara line, the Japanese center of your spiritual essence. Walk forward while concentrating on your navel, your legs swinging as if joined in the second chakra. Your emotions will flow in and through you as you move forward. Your soul’s dreams arise from your navel and travel up your spine, entering your heart and continuing to journey to your shoulders and down your arms, which hang loosely. This same energy continues up your neck and into your head, opening you to the sunlight of enlightenment from above.
Step 4: Open to your body’s wisdom. As you walk, let your mind flow to any places of discomfort in your body. Breathe into the tension while asking your body to uncover the greater wisdom that has been hidden under this blockage. Focus on each blockage until all tension has been released and you feel only joy or peace as you walk.