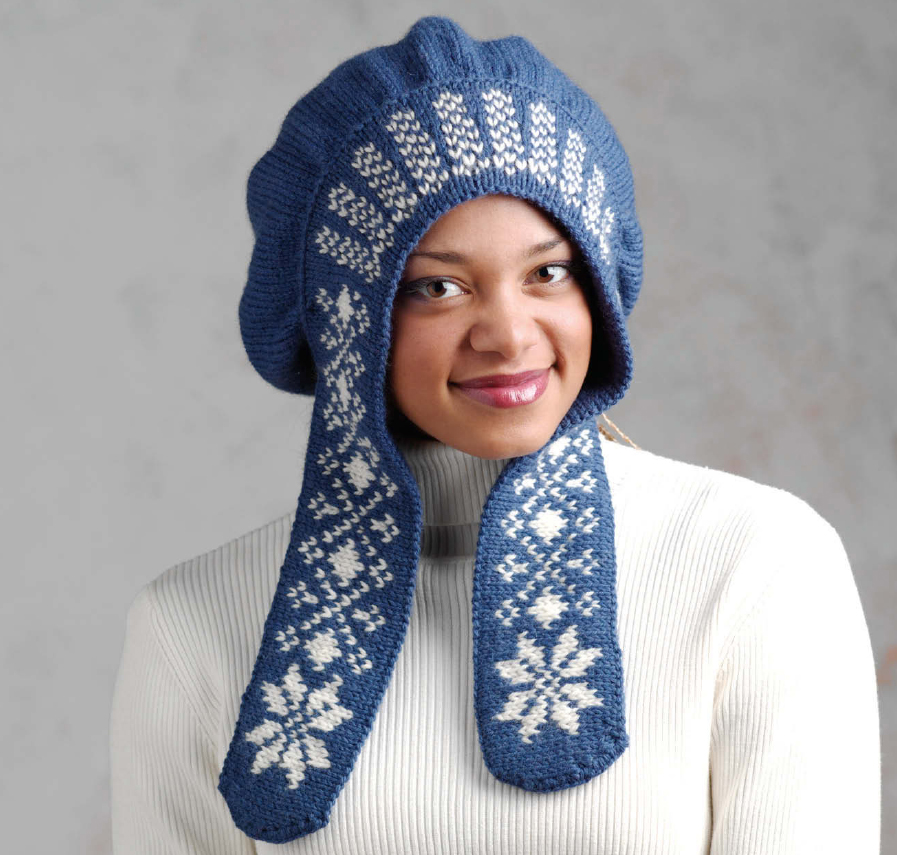

Sisu is the Finnish word for courage and strength. Almost one-third of the Finnish land mass is north of the Arctic Circle, and it takes a people of strong character to thrive in winters whose average temperature is –8°F (–22°C). The aurora borealis—flashes of light in the night sky—is a dramatic feature of Finnish winters, and for my hat I’ve combined the look of lights in a dusky sky with the traditional snowflakes of Scandinavian knitting design. I’ve shaped the snowflake band to fit the contours of the head and frame the face, and I’ve softly gathered the full crown into a braided tassel. Winter Snowflakes is an elegant take on Scandinavian tradition.
This hat begins with the facing for the Fair Isle band (worked back and forth in rows), followed by the patterned band. Stitches are then added for the back of the hat and the loose-fitting crown is worked in the round and shaped with decreases. A braid decorates the hat back. The hat is worn with front band draped around the face (which holds the hat in place) and the crown at the back of the head.
Finished Size: About 30" (76 cm) circumference and 11½" (29 cm) wide, measured from center front to center back, including front band.

Yarn: About 440 yd (402 m) of main color and 220 yd (201 m) of contrast color of worsted-weight (Medium #4) yarn.
We used: Cascade Cascade 220 (100% wool, 220 yd [201 m]/100 g): #9327 blue, 440 yd (402 m); #8010 off-white, 220 yd (201 m).
Needles: Size 7 (4.5 mm): 24" (60-cm) circular (cir) and set of 4 or 5 double-pointed (dpn). Size 6 (4 mm): 24" (60-cm) cir. Size 2 or 3 (2.75 or 3.25 mm): 24" (60-cm) or longer cir. Adjust needle size if necessary to obtain the correct gauge.
Notions: Markers (m); tapestry needle.
Gauge: 20 sts and 24 rows = 4" (10 cm) in St st on larger needles.

With blue, larger cir needle, and using the long-tail method (see Glossary, page 131), loosely CO 174 sts. Work back and forth in rows as foll:
Row 1: (WS) Purl to last st, p1f&b—175 sts.
Row 2: (RS) Knit to last st, k1f&b—176 sts.
Repeat these 2 rows 2 more times—180 sts. Next row: (WS) P62, place marker (pm), p56, pm, p62. Next row: (RS) K62, sl marker (sl m), k2, [k3, k2tog] 10 times, k4, sl m, k62—170 sts rem. Work even in St st until piece measures 2" (5 cm) from CO, ending with a WS row. Next row: (RS) K2tog, k60, sl m, k2, [k2, k2tog] 10 times, k4, sl m, k62—159 sts rem. Next row: (WS) P2tog, purl to end of row—158 sts rem. Cont in St st, dec 1 st at beg of next 4 rows in this manner, ending with a WS row completed. Remove markers—154 sts rem; piece should measure about 3" (7.5 cm) from CO.
Turning ridge: Change to smaller cir needle, knit 1 row. Next row: (WS) Knit 1 row on WS to create turning ridge.
Color work band: With RS facing, work Row 1 of Snowflake chart, placing 2 markers as shown on chart (for later BO reference). Change to larger needles. Work Rows 2–17 of chart, joining white on Row 3, and working increases, decreases, and color patt as indicated—176 sts after Row 17. Leave working yarn attached.
Join facing to band: With smallest cir needle, pick up (but do not knit) 174 loops from CO edge of facing. (Note: When working the following instructions, it is easier to knit the CO loops through the back loop when joining the loops tog with the sts from the snowflake side.) With WS side of snowflake toward you, fold facing along turning ridge so that WS face tog. With needle holding the 174 CO loops in front, and needle holding the 176 snowflake sts in back (the working yarn will be on the back needle), use the three-needle method (see Glossary, page 129) to BO the CO loops tog with the live sts as foll: BO 50 sts, then without BO more sts, k1 st from each needle tog to m (11 sts on right needle), sl m, knit 1 loop from front needle tog with 2 sts from snowflake needle (1 st dec from snowflake side), *knit 1 st from each needle tog; rep from * to 2 sts before next m on snowflake needle, knit 1 loop from front needle tog with 2 sts from snowflake needle (1 st dec from snowflake side; 52 sts between m on snowflake side), sl m, k1 st from each needle tog until there are 11 sts from m.
Prepare for BO: Knit 1 st from each needle tog 2 more times, and using the first of these 2 sts, BO rem sts to end of row—74 sts rem on needle. Cut yarn and draw tail through rem st to secure.
Note: Use the backward loop CO (see Glossary, page 130) for all increases (inc 1). Lay snowflake band out flat, with snowflakes facing up to refer to left and right side of needle. With blue, larger needle, and using the long-tail method, CO 30 sts onto left needle tip as shown above. Turn work and purl these 30 sts. Next row: (RS) [K3, inc 1] 9 times across 27 of the 30 new sts, k3; cont across next 74 sts as foll: [k2, inc 1] 37 times—150 sts total. Pm, and join for working in the rnd. Work even in rnds for 8" (20.5 cm).

Decrease for back:
Rnd 1: *K1, k2tog; rep from * to end of rnd—100 sts rem.
Rnds 2 and 5: *K1 blue, k1 white; rep from * to end of rnd.
Rnds 3 and 6: Knit all sts with blue.
Rnd 4: With blue, *k2tog; rep from * to end of rnd—50 sts rem.
Rnd 7: Rep Rnd 4—25 sts rem.
Rnd 8: *K1 blue, k1 white; rep from * to last st, end k1 blue (the first and last sts are blue). Cut off white.
Rnd 9: With blue, *k2tog; rep from * to last st, k1—13 sts rem.
Cut yarn, thread tail on a tapestry needle, draw through rem sts, and pull tight to secure.
Embroidery: With blue threaded on a tapestry needle, work blanket st edging around the short curved sides of the snowflake “strap” as described in box on page 81.
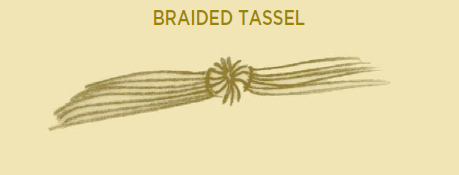
Braided tassel: Cut 4 strands of blue and 2 strands of white, each 36" (91.5 cm) long. Working at center back where all loops have been drawn up to close back of hat, thread all strands on tapestry needle and insert needle and threads through to WS just right of exact center, and back through to RS just left of exact center as shown at right. Divide the strands into one section of 4 white strands and two sections of 4 blue strands each, and work the three groups into a braid for 6" (15 cm). Tie an overhand knot at end of braid to secure the ends. Trim ends to 3" (7.5 cm).
Lightly steam snowflake band and gathered back. Gently pull on braid to encourage gathers to radiate from the snowflake band into the hat fabric. Let dry to set.
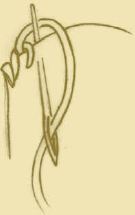
With RS facing and leaving a tail to work in later, insert needle from back to front at left corner of curve. Work 1 whipstitch in the same corner to anchor the yarn. Insert needle just to right of whipstitch from front to back making sure needle passes in front of yarn to create edge (Figure 1). Cont in this manner, working from left to right along curved edge (Figure 2). Secure last st by inserting needle into work just behind last st (Figures 3 and 4). Hide yarn tails under WS of blanket st.


Lapland lies in the extreme northern part of Finland. It’s a remote country that stretches from northern Norway to northern Russia. Lapp costume is one of the most ancient of western Europe that resisted cultural change because of the country’s isolation. Both weather and way of life make the Lapp folk costume strictly practical.
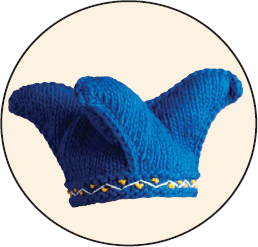
The Four-Cornered Hat represents the four corners of the earth, which the ancient Lapps thought was square. Traditionally the hat was made in blue wool to symbolize the sky, and the headband was often made of reindeer fur or embellished colorfully with red, yellow, and white wool. The four points were stuffed with down to maintain their shape and keep out the cold.
Knitting this hat is an adventure using some familiar shaping and construction techniques in an innovative way. I have devised a way to shape and connect all four points with only two ends to weave in when the knitting is complete. The band embroidery is extra. Blue is traditional, but you’ll be the envy of other fans if you use the colors of your favorite athletic team.
This hat is worked in the round in one piece from the lower edge to the base of the points, then the points are worked separately to the tip, and shaped with short rows.
Finished Size: About 22" (56 cm) circumference and 7½" (19 cm) tall.

Yarn: About 132 yd (120 m) of chunky (Bulky #5) yarn and a few yards (meters) of two contrasting colors of worsted-weight (Medium #4) yarn.
We used: Brown Sheep Burly Spun (100% wool; 132 yd [120 m]/8 oz): #BS-79 blue boy, 132 yd (120 m).
Brown Sheep Lamb’s Pride Superwash Worsted (100% wool; 200 yd [183 m]/100 g): #SW11 white and #SW14 yellow, a few yards (meters) each.
Needles: Size 11 (8 mm): 24" (60-cm) and 16" (40-cm) circular (cir) and set of 4 or 5 double-pointed (dpn). Adjust needle size if necessary to obtain the correct gauge.
Notions: Markers (m); tapestry needle; small amounts of polyester stuffing to fill hat points.
Gauge: 9 sts and 14 rnds = 4" (10 cm) in St st, worked in the rnd (see Glossary, page 134, for working gauge swatches in the rnd).
With shorter cir needle, CO 52 sts. Place marker (pm) and join for working in the rnd, being careful not to twist sts. Purl 1 rnd. Knit 1 rnd, ending 1 st before m (to avoid purl jog), sl 1 kwise, insert right needle tip into back loop of st below st on left needle, lift this loop and knit it and the slipped st on right needle together through back loops (as for ssk), temporarily removing marker to do so. Knit 2 rnds. Purl 1 rnd. Mark 4 sections as foll:
Rnd 1: [K6, sl 1 pwise, k6, pm] 4 times, working last st as before to avoid purl jog.
Rnd 2: Knit.
Rnd 3: [K6, sl 1 pwise, k6] 4 times.
Rnd 4: [Knit to 1 st before slipped st, work left lifted inc (see Glossary, page 136), sl 1, right lifted inc (see Glossary, page 136), knit to marker] 4 times—60 sts; 15 sts in each marked section.
Rnd 5: Knit.
Rep the last 2 rnds until there are 100 sts—25 sts in each marked section. Next rnd: [Ssk, knit, working lifted inc 1 st before and 1 st after center slipped st, knit to 2 sts before marker, k2tog] 4 times—still 100 sts. Change to longer cir needle. Knit 1 rnd even.
Cont working 2 lifted incs on RS rows as established, work short rows (see Glossary, page 136) as foll:
Short-row 1: (RS) Knit to 3 sts before first marker, wrap next st, turn.
Short-row 2: (WS) Purl to 3 sts before marker, wrap next st, turn.
Short-row 3: Knit to 5 sts before marker, wrap next st, turn.
Short-row 4: Purl to 5 sts before marker, wrap next st, turn.
Short-row 5: Knit to 7 sts before marker, wrap next st, turn.
Short-row 6: Purl to 7 sts before marker, wrap next st, turn.
Next row: Knit to marker, working 2 lifted inc, and working wraps tog with wrapped sts as you go—end of first section; 33 sts in first section. Some wraps are still in place and will be hidden later.
Rep from Short-row 1 for the other 3 sections—132 sts total; 33 sts in each section.
Connect points: *Knit to center st of first section, working wraps tog with wrapped sts as you go, place 16 sts just worked onto a dpn, rotate dpn counterclockwise behind cir needle so WS of sts face each other, slip center st to empty dpn and use this needle and the three-needle method (see Glossary, page 129) to BO all sts to next marker (1 st rem on right needle from BO), k1 in next section (2 sts on right needle), BO last st of previous section—1 point complete. The next section beg with 1 st rem on right needle from BO; this st counts as the first of the 16 sts knit to the center st. Rep from * for each of the other 3 sections, knitting first st in each section to BO last st of previous point—1 st rem. Cut yarn, draw tail through rem loop, and pull tight to secure. With yarn threaded on a tapestry needle, close top opening by sewing top “seam” of each point tog at center. Weave in loose ends.
Embroidery: With white threaded on a tapestry needle, work long running sts to create zigzag along lower edge as foll: *insert threaded needle from WS near lower purl ridge, insert needle to WS near upper purl ridge 2 sts to the left, skip 2 sts; rep from *. Reverse direction and work long sts that slant in the opposite direction, matching point insertions. With yellow, make French knots (see Glossary, page 133) centered over center st in each triangle section created by zigzags. Weave in loose ends.
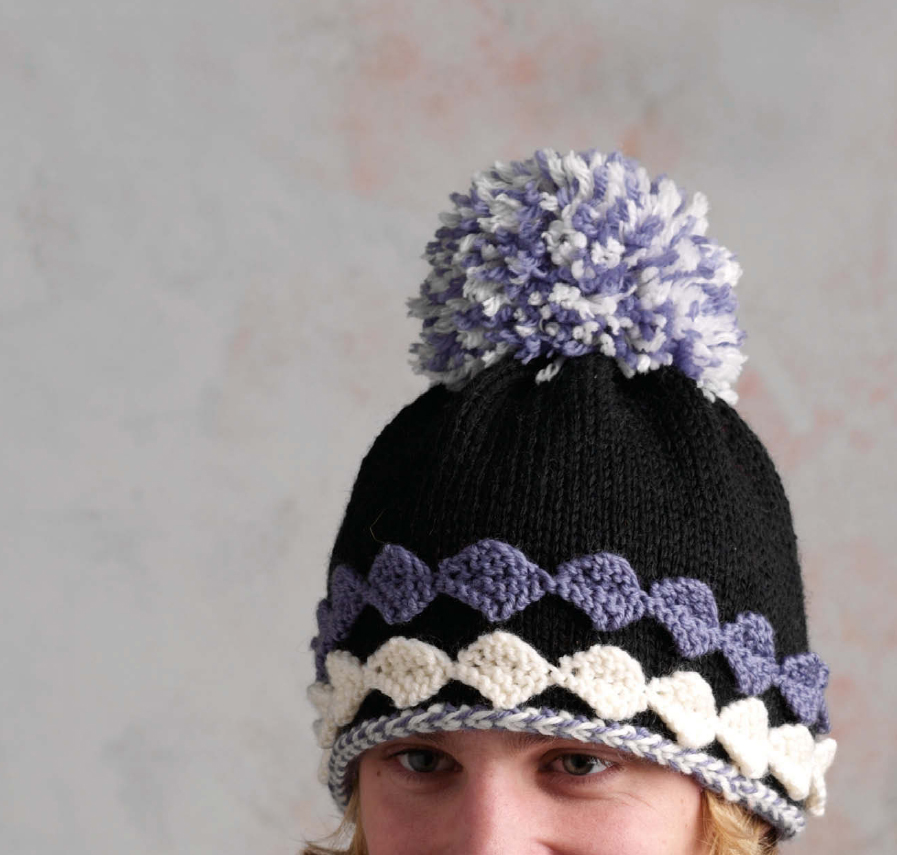

Bright yellow, red, and blue are the featured colors in hats from Lapland, with a pom-pom as a standard part of the regalia. The zigzag markings can be traced back to ancient Siberia, where primitive tailors cut similar designs from tanned skins and colored them.
I opted to apply the color banding as a separate piece in the overall design. Because they’re sculptural and not knitted in, the small squares turned on point pick up on the ancient theme of the zigzag and add movement. I present this hat with large pom-pom in the traditional Lapp colors of yellow, red, and blue, as well as a more contemporary color palette that reminds me of a still winter evening.
This hat is worked in the round from the lower crown to the top. The diamond-shaped strips are knitted separately, then sewn to the hat.
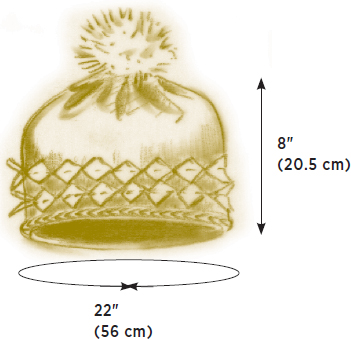
Finished Size: About 22" (56 cm) circumference and 8" (20.5 cm) tall.
Yarn: About 174 yd (159 m) of one main color and 87 yd (80 m) each of two contrasting colors of worsted-weight (Medium #4) yarn.
We used: Dale of Norway Free Style (100% wool, 87 yd [80 m]/50 g). Version 1: #0090 black (MC), 174 yd (159 m); #5533 blue (A) and #0010 white (B), 87 yd (80 m) each.
Version 2: #5444 blue (MC), 174 yd (159 m); #4018 red (A) and #2427 yellow (B), 87 yd (80 m) each.
Needles: Hat—Size 7 (4.5 mm): 16" (40 cm) circular (cir) and set of 4 or 5 double-pointed (dpn). Garter-stitch diamond strip—Size 6 (4 mm): straight. Adjust needle size if necessary to obtain the correct gauge.
Notions: Tapestry needle; long sewing pins with colored heads; 4½" (11.5-cm) piece of cardboard to make pom-pom.
Gauge: 18 sts and 24 rnds = 4" (10 cm) in St st worked in the rnd on larger needles (see Glossary, page 134, for working gauge swatches in the rnd).
Braided trim: (worked on WS of hat) With A and B held tog and leaving 6" (15 cm) tail, make a slipknot and place on cir needle. Slipknot does not count as a st. With the working end of A over your thumb and B over your index finger, use the long-tail method (see Glossary, page 131) to CO 100 sts (B will form sts on the needle; A will form the ridge beneath the needle). Remove slipknot, slip the first st onto the right needle tip, bring both working yarns A and B to the front, return this st to left needle tip, turn work, hold yarn in back. Place marker (pm) and join, being careful not to twist sts. With WS facing, cont as foll:
Rnd 1: K1 A, *pick up B from under A and k1 B, pick up A from under B and k1 A; rep from * to end of rnd, twisting yarn at every color change.
Rnd 2: *Pick up A from over B and k1 A, pick up B from over A and k1 B; rep from * to end of rnd, picking up colors from over one another each time, thus un-twisting yarns as you go.
Slip first st of rnd onto right needle, bring both working yarns A and B to the front of work, return this st to left needle, turn work to RS. Cut off A and B.
Sides: Join MC and knit every rnd until piece measures 7½" (19 cm) from beg.
Dec for top as foll: Next rnd: *K2tog; rep from *—50 sts rem. Next rnd: *K2tog; rep from *—25 sts rem. Cut yarn, thread tail on a tapestry needle, draw through rem sts, and pull tight to secure.
With B and smaller needle, CO 6 sts. Knit 8 rows. Next row: *BO 5 sts—1 st rem. Turn work and use the backward loop method (see Glossary, page 130) to CO 5 more sts—6 sts total. Knit 7 rows. Rep from * until 16 diamonds have been made, ending by binding off all sts. Cut yarn, draw tail through last st, and pull tight to secure. Make another strip the same with A.
Pin diamond strip B to hat just above braided edge. With B threaded on a tapestry needle, use a backstitch (see Glossary, page 138) to sew in place as foll: Working through center of diamonds from side point to side point, make line of backstitches parallel to braided edge; top and bottom points of diamonds remain free and un-stitched. Pin diamond strip A to hat just above strip B so that points match, and sew in place as for strip B.
Pom-pom: Holding A and B tog, wrap yarn around 4½" (11.5 cm) piece of cardboard 100 times. Cut 2 strands of A, each 18" (45.5 cm) long, and lay on flat surface. Slide pom-pom wraps off cardboard and lay perpendicularly over the 2 strands of A. Tie A strands tightly in a square knot around pom-pom wraps. Shake out pom-pom and trim to even, round shape. Fasten pom-pom to crown of hat with the 2 strands of A, and tie the 2 strands tog in a square knot on the WS of hat. Weave in loose ends.


