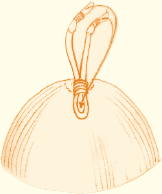
In the Xinjiang Province of northwest China, many remote minority tribes continue to favor old dress forms, accessorized with brightly colored stockings, and little hats called kolas. Bright scarves, many hand embroidered, are wrapped around the head over the kola. Tiny tots wear the little hats, too, in a palette of rich primary reds, blues, and yellows.
The motifs in this little pillbox are loosely based on Persian-style rugs from nearby Central Asia. Something about the pint-sized version of this hat just tugs at the heart.
The sideband of this hat is worked sideways in rows, then grafted into a ring. Stitches for the top crown are picked up along one edge of the sideband ring and worked in the round to the center. The charted pattern is worked in the Fair Isle method (see Glossary, page 137), except for the spots of orange, which are worked intarsia-style (see Glossary, page 137).
Finished Size: About 20" (51 cm) circumference and 3" (7.5 cm) tall.

Yarn: About 191 yd (175 m) each of five colors of fingering-weight (Super Fine #1) yarn.
We used: Dalegarn Baby Ull (100% machine washable wool; 191 yd [175 m]/50 g): #5581 navy, #4018 red, #3718 tomato red, #2908 orange, and #4227 burgundy, 191 yd (175 m) each. A few yards (meters) waste yarn for provisional cast-on.
Needles: Size 1 (2.25 mm): 16" (40-cm) circular (cir) and set of 5 double-pointed (dpn). Adjust needle size if necessary to obtain the correct gauge.
Notions: Stitch holder; tapestry needle; marker (m); size D/3 (3.25 mm) steel crochet hook.
Gauge: 34 sts = 4" (10 cm) and 30 rows = 3" (7.5 cm) in St st.


With navy, cir needle, and using the crochet chain method (see Glossary, page 130), provisionally CO 23 sts, leaving an 18" (45.5-cm) tail for seaming later. Do not join into a rnd. Cut navy and slide sts to opposite end of needle to begin chart on RS row. Work Rows 3–64 of Sideband chart once, then work Rows 1–64 two times—piece should measure about 20" (51 cm) from CO. Place live sts on holder. With WS facing, steam-block piece to prevent curling. Let air-dry. Remove waste yarn from provisional CO, and place live sts on one spare dpn and held sts on another spare dpn. With navy threaded on a tapestry needle, join the crown sides strip into a ring by grafting live sts tog to form garter ridge as foll: With WS tog, navy behind and burgundy in front, insert needle purlwise into first st on front needle and leave st on the needle. *Insert needle knitwise into first st on back needle, slip st off needle, insert needle purlwise into second st on back needle and leave this st on needle. Insert needle into first st on front needle knitwise, slip st off needle, insert needle purlwise into second st on front needle and leave this st on needle. Rep from * until 1 st rem on each needle. Insert needle knitwise into last st on back needle and slip st off, insert needle knitwise into last st on front needle and slip st off. Weave in loose ends.
Lower edging: With orange, cir needle, and RS facing, pick up and knit 160 sts evenly spaced around left selvedge edge of crown ring, picking up between 26 and 27 sts in each of the 6 panels. Place marker (pm) and join for working in the rnd. Purl 1 rnd. Change to navy. Knit 1 rnd. BO all sts pwise. Lightly steam-block WS to help uncurl edges.
With tomato red, cir needle, and RS facing, pick up and knit 160 sts evenly spaced around other selvedge edge of crown ring. Pm and join for working in the rnd. Purl 1 rnd. Change to navy. Knit 1 rnd. Purl 1 rnd. Change to tomato red and cont as foll:
Dec rnd 1: [K14, k2tog] 10 times—150 sts rem.
Dec rnd 2: [K13, k2tog] 10 times—140 sts rem.
Knit 1 rnd even.
Dec rnd 3: [K12, k2tog] 10 times—130 sts rem.
Knit 1 rnd even.
Cont to dec 10 sts every other rnd in this manner, working 1 st fewer between decs every dec rnd until 20 sts rem. Next rnd: [K2tog] 10 times—10 sts rem. Cut yarn, thread tail on a tapestry needle, draw through rem sts, and pull tight to secure.
Steam-block lightly as follows: Turn hat inside out and lay crown as flat as possible over end of ironing board. Lightly touch iron to back of work, being careful not to flatten sts. Turn hat RS out and place over a biscuit tin or 20" (51-cm) diameter cylinder. Spray with water. Let air-dry completely.

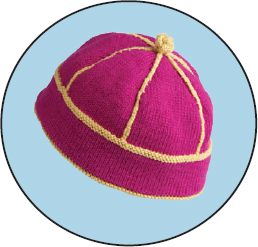
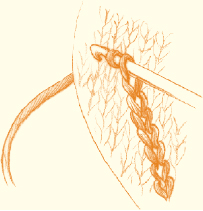
A deep black skullcap, the calotte is one of the most common type of headpiece worn by Chinese men. It has a wide lower band, with a crown sectioned in four to six triangular shapes designed to hug the head. Its only distinguishing feature is a colorful cord knot placed on top for identification and good luck. Knots were used in ancient times to record events, and eventually knotting evolved into a decorative art for use on clothing and jewelry. I have knot-topped this calotte with a pale gold, over a hat of light magenta, a luscious color used frequently in Chinese silks.
This hat is worked in the round from the base to the crown, and finished off with a knitted cord top-knot.
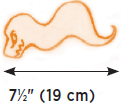
Finished Size: About 23" (58.5 cm) circumference and 7½" (19 cm) tall, excluding top-knot.

Yarn: About 218 yd (199 m) of main color and 109 yd (100 m) of contrast color in sport-weight (Fine #2) yarn.
We used: Cascade Pima Silk (85% pima cotton, 15% silk; 109 yd [100 m]/50 g): magenta, 218 yd (199 m); light gold, 109 yd (100 m).
Needles: Size 4 (3.5 mm): 16" (40-cm) circular (cir) and set of 4 or 5 double-pointed (dpn). Spare cir needle the same size or smaller.
Notions: A few yards (meters) waste yarn for provisional cast-on; marker (m); removable marker; size F/5 (3.75 mm) crochet hook; tapestry needle.
Gauge: 23½ sts and 32 rnds = 4" (10 cm) in St st worked in the rnd (see Glossary, page 134, for working gauge swatches in the rnd).
With waste yarn and magenta, and using the crochet chain method (see Glossary, page 130), provisionally CO 138 sts. Place marker (pm) and join for working in the rnd, being careful not to twist sts. Work St st (knit every rnd) until piece measures 2" (5 cm) from beg.
Change to light gold. Knit 1 rnd. Purl 3 rnds. Change to magenta and work the light gold rows into a “corded” edge as foll: Fold light gold section with WS tog, insert right needle tip into first light gold st on left needle then into first light gold purl bump on WS of corresponding st 4 rows below needle, and knit these 2 sts tog. Working each st on needle with the corresponding purl bump 4 rows below, join sts tog to end of rnd. Cont with magenta, knit even until piece measures 2" (5 cm) from cording row. Remove provisional yarn from CO and place live facing sts on spare cir needle. Fold facing to WS. Change to light gold. Join facing to hat as foll: *K1 from front needle tog with 1 st from facing needle; rep from * (do not BO) to end of rnd—138 sts rem. Cont with light gold, purl 2 rnds. Change to magenta and work even in St st until piece measures 4¾" (12 cm) from the light gold cording row at lower brim edge.
Rnd 1: With magenta, *k20, work vertical double decrease (sl 2 tog kwise, k1, p2sso; see Glossary, page 133); rep from * to end of rnd—12 sts dec’d; 126 sts rem.
Rnd 2 and all even-numbered rnds: Knit to end of rnd, remove m, k1 of next rnd, replace m—the first st of previous rnd becomes last st of this rnd.
Rnd 3: *K18, work vertical double dec; rep from * to end of rnd—114 sts rem.
Rnd 5: *K16, work vertical double dec; rep from * to end of rnd—102 sts rem.
Rnd 7: *K14, work vertical double dec; rep from * to end of rnd—90 sts rem.
Rnd 9: *K12, work vertical double dec; rep from * to end of rnd—78 sts rem.
Rnd 11: *K10, work vertical double dec; rep from * to end of rnd—66 sts rem.
Rnd 13: *K8, work vertical double dec; rep from * to end of rnd—54 sts rem.
Rnd 15: *K6, work vertical double dec; rep from * to end of rnd—42 sts rem.
Rnd 17: *K4, work vertical double dec; rep from * to end of rnd—30 sts rem.
Rnd 19: *K2, work vertical double dec; rep from * to end of rnd—18 sts rem.
Rnd 21: *Work vertical double dec; rep from * to end of rnd—6 sts rem.
Cut yarn, thread tail on a tapestry needle, draw through rem sts, and pull tight to secure.
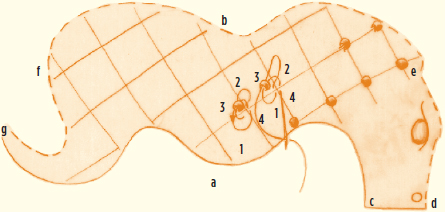
Couching: Beg at crown top and working from center st of vertical double dec, follow the vertical line of dec sts down to the first St st rnd just above the upper edge of light gold border. Mark this st. Thread tapestry needle with 24" (61-cm) length of light gold, *bring needle up from WS of work on the left side of marked st, then down to WS at the right side edge of the same st so that the light gold couching sts will lie horizontally across this vertical line of magenta sts. Do not tighten yarn, but leave a small space beneath the light gold st to later thread the light gold strands that will lay over the magenta knitted surface. Rep from * every 3 or 4 rows up, covering another vertical double dec st (see couching), rethreading needle as necessary. Work from the upper light gold edge of the hat, over the top of the crown and down the opposite side of crown to the upper light gold edge. Rep the horizontal couching sts along each of the dec lines (6 lines total). Cut 3 strands of light gold, each 15" (38 cm) long. Thread all 3 strands on a tapestry needle and thread them under each of the prepared couching stitches, working from the upper light gold brim edge to the opposite upper light gold brim edge, pulling strands snug, but not so tight as to pucker the hat. Tighten couching sts over strands. Weave in loose ends.
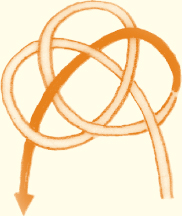
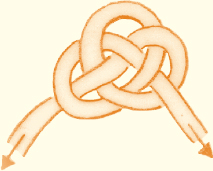
Chinese knot: With light gold and dpn, CO 3 sts. Work 3-st knitted cord (see Glossary, page 137) until piece measures 5" (12.5 cm) from beg. K3tog—1 st rem. Cut yarn, and pull tail through rem st to fasten off. Following Figures 1 and 2 at right, twist cord into double-coin knot, pulling gently to form a round “ball.” Thread tail end of cord on tapestry needle and insert to WS on one side of intersection at top. Rep for other tail of cord to center knot on top of hat. Tie the two tails into a square knot on inside of hat. Weave in loose ends. Spray with water outside and inside to block and set sts. Place hat over a bowl and let air-dry.


Sa wat dee! Maintaining tradition and delighting the eye, the hill tribes of northern Thailand greet each other wearing colorful handwoven and heavily embroidered daily costume. The intense, saturated color of striped fabrics and a Thai hat that resembles a folded bloom were my inspirations for this tasseled pillbox. The linen’s rich texture provides a lovely drape in the folds and a firm stability in the sculptural sides. This hat transforms a flat piece of knitted fabric into a showcase of folds.
The crown top is worked sideways in rows and sewn into a ring, then stitches for the sides are picked up from the ring and worked downwards in the round.
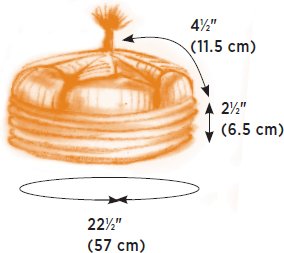
Finished Size: About 22½" (57 cm) circumference and 7" (18 cm) tall.
Yarn: About 135 yd (123 m) each of four colors of sport-weight (Fine #2) yarn.
We used: Euroflax Originals (100% linen; 135 yd [123 m]/50 g) #18.20 emerald, #18.45 violet, #18.35 mustard, and #18.27 crabapple blossom (pink), 135 yd (123 m) each.
Needles: Size 3 (3.25 mm): 16" (40-cm) circular (cir), another cir needle same length but 1 or 2 sizes smaller to use as spare. Size 5 (3.75 mm): set of 4 or 5 double-pointed (dpn). Adjust needle size if necessary to obtain the correct gauge.
Notions: Size D/3 (3.25 mm) crochet hook; marker (m); tapestry needle; 2" (5-cm) square of cardboard for making pom-pom.
Gauge: 23 sts = 4" (10 cm) and 8 ridges (16 rows) = 1" (2.5 cm) in garter st on size 3 (3.25 mm) needles.
With emerald and size 3 (3.25 mm) cir needle, CO 25 sts. Set-up row: (WS) Knit. Working color progression in garter st (knit every row), work Rows 1–72 of Crown chart (see page 116) 4 times (binding off 17 sts at beg of Row 70 each time, then using the cable method [see Glossary, page 130] to CO 17 sts at beg of Row 72). Then work Rows 1–69 once more. Next row: (Row 70 of chart) BO all sts—5 sections completed. With emerald, crochet hook, and holding RS tog, work slip st crochet (see Glossary, page 132) to join short edges of strip tog for 1" (2.5 cm) from lower edge as shown in Figure 1.
With pink, RS facing, and size 3 (3.25 mm) cir needle, pick up and knit 26 sts in each section along lower edge of crown—130 sts total. Place marker (pm) and join for working in the rnd. Purl 1 rnd. Knit 6 rnds.
Outer ridges: With WS facing, use spare smaller cir needle to pick up the back loop of each st along the pick-up row. Fold work with WS tog so that needles are parallel and join the sts by working 1 st from each needle tog as k2tog, connecting the sts together and forcing the fold to project sculpturally on the RS of work. Purl 1 rnd. Change to emerald. *Knit 6 rnds. With spare smaller cir needle, pick up back loops of previous color at color change. Fold work with WS tog and work 1 st from each needle tog as k2tog. Purl 1 rnd. Change to violet and rep from *. Work 6 more bands in the same manner, 1 each in the foll colors: pink, emerald, mustard, violet, emerald, pink—9 bands total. BO all sts on the purl rnd foll the last pink band.
Fold crown: Mark mid-point on upper edge of each of the 5 crown sections as shown in Figure 2. With WS tog, fold Section 1 and 2 tog. With violet threaded on a tapestry needle and using a backstitch (see Glossary, page 138), sew along dashed line as shown in figure. Fold rem half of Section 2 with Section 3, and backstitch along dashed line. Fold rem half of Section 3 with Section 4, and backstitch along dashed line. Fold rem half of Section 4 with Section 5, and backstitch along dashed line. Fold rem half of Section 5 with Section 1, and backstitch along dashed line. Steam-block lightly, using your fingers to press seams open. The WS of crown piece will fold to the RS of the hat.
Join rem section seams: Where 2 sections meet at top of crown, fold under the excess fabric so that the pieces fit the crown, folding under about ½" (1.3 cm) at outer edge and tapering to about ⅛" (3 mm) at the top of the crown (Figure 3). With violet and using the invisible weaving for garter st method (see Glossary, page 138) and working toward the top of the crown, sew seam. Note: Colors will not match at this seam. Rep for other sections.
Top cord: With 2 strands of pink held tog and dpn, CO 4 sts. Work 4-st knitted cord until piece measures 1¼" (3.2 cm) from beg. [K2tog] 2 times—2 sts rem. Cut yarn, leaving 10" (25.5-cm) tails. Draw tails through rem 2 sts and pull tight to secure.
Pom-pom: Wind 2 strands of pink around a 2" (5-cm) piece of cardboard about 25 times. Slide strands off cardboard and use the two 10" (25.5 cm) yarn tails from the top cord to tie the center of this group to the end of the cord in a tight square knot. Cut loops, shake out pom-pom, and trim even if necessary. Using a whipstitch (see Glossary, page 139), sew cord tightly to top of crown so that it stands vertically.


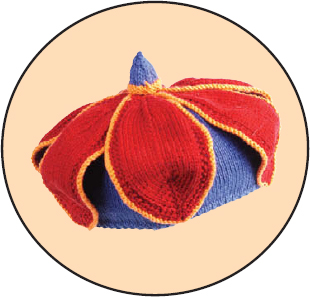
Dance has always been an integral part of Japanese culture, whether one watches or participates. Early dances expressed the need to revere a god or spirit, celebrate a good harvest, pray for a good catch, or exorcise evil spirits. To this day, Japanese folk dances are performed at festivals and special occasions.
Since bright colors always feature prominently in the costumes for these dances, I have chosen the intense and saturated colors of red and blue in a yarn with a silk-like sheen, and I’ve edged the leaf shapes with bright marigold. This sculptural affair will be a real conversation showpiece.
This hat is worked in the round from the base to the top. The decorative leaves are worked separately (back and forth in rows), then sewn to the hat, and topped off with a “gumdrop” point.
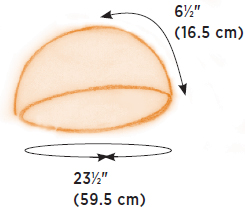
Finished Size: About 23½" (59.5 cm) circumference and 6½" (16.5 cm) tall, excluding gumdrop.


Yarn: About 218 yd (199 m) of main color and 109 yd (100 m) each of two contrasting colors of sport-weight (Fine #2) yarn.
We used: Cascade Pima Tencel (50% pima cotton, 50% tencel; 109 yd [100 m]/50 g): #7478 red, 218 yd (199 m); #1694 blue and #3183 orange, 109 yd (100 m) each.
Needles: Size 4 (3.5 mm): 16" (40-cm) circular (cir) and set of 4 or 5 double-pointed (dpn). Adjust needle size if necessary to obtain the correct gauge.
Notions: Marker (m); tapestry needle; small amount of polyester fiberfill (or a cotton ball) to stuff top gumdrop; long sewing pins with large colored heads.
Gauge: 23 sts and 28 rnds = 4" (10 cm) in St st worked in the rnd.
With blue and cir needle, CO 134 sts. Place marker (pm) and join for working in the rnd, being careful not to twist sts. Work k1, p1 rib for 2 rnds. Change to St st (knit every rnd), inc 1 st at beg of first rnd—135 sts. Work even in St st until piece measures 4" (10 cm) from CO.
Dec for top:
Rnd 1: *K7, k2tog; rep from * to end of rnd—120 sts rem.
Rnd 2 and all even-numbered rnds: Knit.
Rnd 3: *K6, k2tog; rep from * to end of rnd—105 sts rem.
Rnd 5: *K5, k2tog; rep from * to end of rnd—90 sts rem.
Cont in this manner, dec 15 sts every other rnd and working 1 st fewer between decs on dec rnds until 30 sts rem. Next rnd: *K2tog; rep from * to end of rnd—15 sts rem. Cut yarn, thread tail on a tapestry needle, draw through rem sts, and pull tight to secure.
Note: Use the backward loop CO (see Glossary, page 130) for all increases (inc 1).
With red, CO 3 sts. Purl 1 WS row. Inc as foll:
Row 1: (RS) K1, inc 1, sl 1 kwise (center st), inc 1, k1—5 sts.
Row 2: K1, p3, k1.
Row 3: K1, p1, inc 1, sl 1 kwise, inc 1, p1, k1—7 sts.
Row 4: [K1, p1] 3 times, k1.
Row 5: K1, p1, k1, inc 1, sl 1 kwise, inc 1, k1, p1, k1—9 sts.
Rows 6, 8, 10, 12, 14, 16, and 18: K1, p1, k1, purl to last 3 sts, k1, p1, k1.
Row 7: K1, p1, k2, inc 1, sl 1 kwise, inc 1, k2, p1, k1—11 sts.
Row 9: K1, p1, k3, inc 1, sl 1 kwise, inc 1, k3, p1, k1—13 sts.
Row 11: K1, p1, k4, inc 1, sl 1 kwise, inc 1, k4, p1, k1—15 sts.
Row 13: K1, p1, k5, inc 1, sl 1 kwise, inc 1, k5, p1, k1—17 sts.
Row 15: K1, p1, k6, inc 1, sl 1 kwise, inc 1, k6, p1, k1—19 sts.
Row 17: K1, p1, k7, inc 1, sl 1 kwise, inc 1, k7, p1, k1—21 sts.
Row 19: K1, p1, k8, sl 1 kwise, k8, p1, k1.
Row 20: K1, p1, k1, p15, k1, p1, k1.
Rep Rows 19 and 20 until piece measures 5½" (14 cm) from CO. Dec as foll:
Row 1: K1, p1, knit to 1 st before slipped center st, work vertical double dec (sl 2 sts tog kwise, k1, p2sso; see Glossary, page 133), knit to last 2 sts, p1, k1—19 sts rem.
Row 2 and all even-numbered rows: K1, p1, k1, purl to last 3 sts, k1, p1, k1.
Row 3: Rep Row 1—17 sts rem.
Rep Rows 2 and 3, keeping continuity of seed st edges and working vertical double decrease every other row until 5 sts rem, ending with a WS row as foll: k1, p3, k1. Next row: (RS) K1, work vertical double dec, k1—3 sts rem. Next row: P3tog—1 st rem. Cut yarn, draw tail through rem st, and pull tight to secure.
Border: With orange and RS facing, pick up and knit 4 sts for every 5 rows along one side of leaf. BO all sts evenly, being careful not to BO too tight (use a larger needle if necessary). Rep for other side of leaf. Thread orange tail on tapestry needle and connect orange borders invisibly at each leaf tip. Weave in loose ends. Steam-block each leaf and let dry completely before handling.
Attach leaves: Using long sewing pins, mark 6 points evenly spaced around lower edge of hat. Center the CO point (this will be the lower CO leaf edge) of one leaf at each of these 6 points, aligning them with the lower edge of hat, and pin in place. Pin the opposite end (the p3tog end) of each leaf at top of crown. Place another pin in each leaf 2" (5 cm) up from base of crown. Working one leaf at a time, remove pin at base of leaf and fold leaf tip back to the 2" (5 cm) pin mark, with WS showing and red threaded on a tapestry needle, sew center of leaf (along slipped st “stem”) to hat by inserting tapestry needle under a hat st close to the fold, then under 1 or 2 purl bars on WS of leaf, ending with CO point of leaf at base of hat. The leaf tip will roll in direction of the seam as you sew. Work a whipstitch over last seam stitch to secure thread. Weave in end on WS of leaf, thus keeping inside of crown tidy. Rep seam process for the upper 2" (5 cm) of each leaf, working toward top of cap crown.
Gumdrop: With orange and dpn, CO 21 sts. Divide sts evenly on 3 dpn. Pm and join for working in the rnd, being careful not to twist sts. Purl 3 rnds. Change to blue. Knit 1 rnd. Dec as foll:
Dec rnd 1: *K4, work vertical double dec; rep from * to end of rnd—15 sts rem. Knit 2 rnds even. Remove m, knit first st of next rnd onto last needle, replace m (beg of rnd is moved forward by 1 st). Rotate sts so that there are 5 sts on each of 3 dpn.
Dec rnd 2: *K2, work vertical double dec; rep from * to end of rnd—9 sts rem.
Knit 2 rnds even. Remove m, knit first st of next rnd onto last needle, replace m (beg of rnd is moved forward by 1 st). Rotate sts so that there are 3 sts on each of 3 dpn.
Dec rnd 3: *Work vertical double dec; rep from * to end of rnd—3 sts rem.
Cut yarn, thread tail on a tapestry needle, draw through rem sts, and pull tight to secure into a point. Stuff gumdrop lightly with fiberfill (or cotton ball). With orange, sew gumdrop to top of hat.
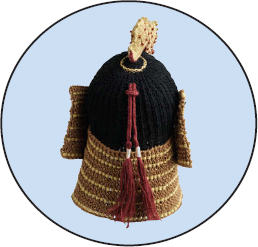
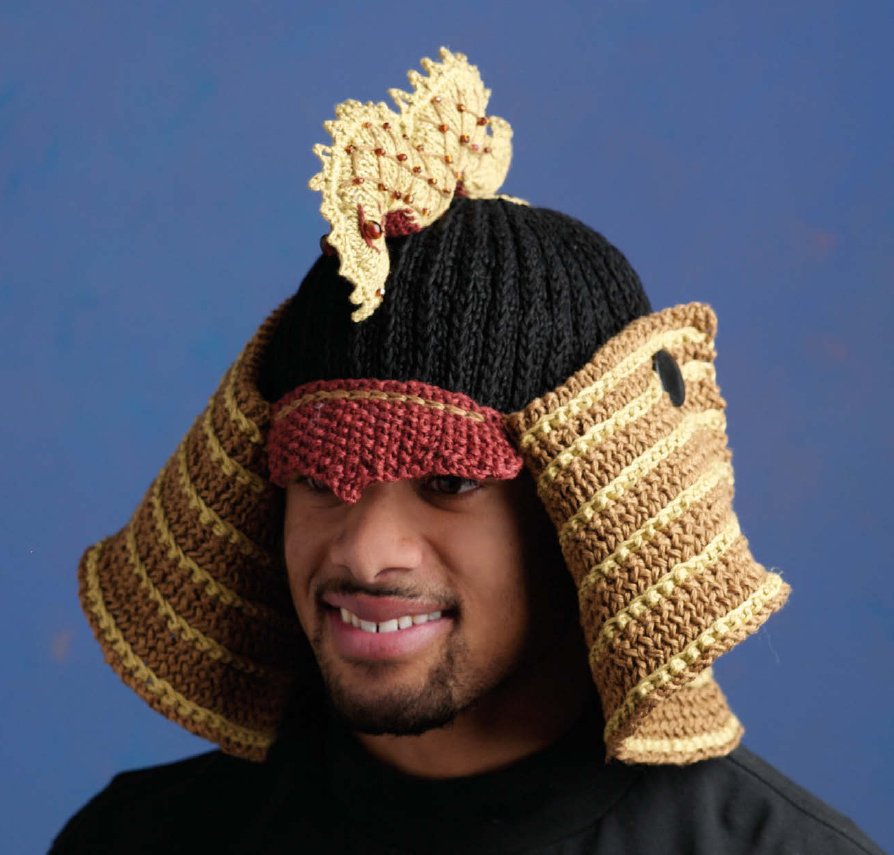
As the hereditary warrior class in feudal Japan, samurai often engaged in hand-to-hand combat on the battlefield. The winner of an engagement would decapitate his opponent and keep the head as a trophy. This brutal ritual gave rise to the heavy protective nature of the samurai helmet. The crown, the visor, the neck protector, the side wings, and the symbolic regalia adorning the front crown all worked together to protect the samurai and promote a ferocious appearance.
I’ve used linen in a combination of ribbing and button stitch to mimic the heavy decorative cord and metal construction of a samurai neck protector; the palette mimics the patina of metal. The dragon on the front crown of my helmet serves as the warrior’s crest.
The crown of this hat is worked in rounds from the bottom to the top. The neck protector and brim are worked separately in rows, then sewn to the crown. The top of the hat is decorated with a knitted cord tassel and a three-dimensional embroidered, beaded dragon. Most of the hat is worked with two strands of yarn held together.
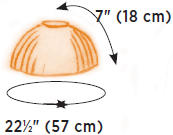
Finished Size: About 22½" (57 cm) circumference, 7" (18 cm) high along black crown, and 12½" (31.5 cm) long from top of crown to bottom of neck piece.


Yarn: About 270 yd (247 m) each of two colors and 135 yd (123 m) each of two other colors of sport-weight (Fine #2) yarn.
We used: Euroflax Originals (100% linen; 135 yd [123 m]/50 g): #18.22 black and #18.02 ginger, 270 yd (247 m) each; #18.35 mustard and #18.46 mahogany, 135 yd (123 m) each.
Needles: Size 4 (3.5 mm): 16" (40-cm) and 24" (60-cm) circular (cir) and set of 4 double-pointed (dpn). Size 3 (3.25 mm): set of 4 dpn. Size 1 (2.25 mm): straight or cir. Adjust needle size if necessary to obtain the correct gauge.
Notions: Size 3 (2.1 mm) steel crochet hook; markers (m); tapestry needle; small amount of polyester fiberfill to stuff dragon; about 50 size 6° round brown silver-lined seed beads to embellish couching; sharp-point sewing needle; beeswax (for strengthening sewing thread); two ¼" (6-mm) oval-shaped beads for dragon eyes; two 1⅛" (3-cm) black smooth-surface shank buttons.
Gauge: Crown: 20 sts and 30 rnds = 4" (10 cm) in sl st knit rib st on larger needles with 2 strands held tog. Neck protector/wings: 26 sts and 24 rows = 4" (10 cm) in k1, p1 rib and button stitch combo on larger needles with 2 strands held tog. 6 sts and 8 rows = 1" (2.5 cm) in St st on size 1 (2.25 mm) needles with a single strand of yarn.
Button Stitch: (worked over 2 sts)
*Bring right needle in front of next 2 sts on left needle and insert right needle tip between the second and third sts on left needle. Wrap working yarn around right needle, draw up a loop, slip this loop pwise onto left needle tip, and knit it through the back loop (1 new st on right needle), slip right needle into the 2 wrapped sts on left needle (these are the first and second sts on left needle), then slip them pwise to right needle, then pass the new st on right needle over the top of the 2 sts slipped sts and off needle; rep from * as directed for each button stitch.
Seed Stitch: (odd number of sts)
Row 1: *K1, p1; rep from * to last st, k1.
Repeat Row 1 for pattern.
Slip Stitch Knit Rib: (worked in rnds)
Rnd 1: *K2, sl 1; rep from * to end of rnd.
Rnd 2: Knit.
Repeat Rnds 1 and 2 for pattern.
With 2 strands of black held tog and longer size 4 (3.5-mm) cir needle, CO 108 sts. Place marker (pm) and join for working in the rnd, being careful not to twist sts. Work slip st knit rib as foll:
Rnd 1: *K2, sl 1; rep from * to end of rnd.
Rnd 2: Knit.
Rnds 3–42: Rep Rnds 1 and 2—piece should measure about 5½" (14 cm) from CO after Rnd 42.
Rnd 43: *K2tog, sl 1; rep from * to end of rnd—72 sts rem.
Rnd 44: Knit.
Rnd 45: *K1, sl 1; rep from * to end of rnd.
Rnd 46: Knit—piece should measure about 6" (15 cm) from CO (if not, cont to rep Rnds 45 and 46 as necessary).
Rnd 47: *K2tog; rep from * to end of rnd—36 sts rem.
Rnd 48: Rep Rnd 47—18 sts rem. Drop yarn but do not cut. Change to 2 strands of mustard held tog. Knit 1 rnd. Purl 1 rnd. Cut mustard. Pick up black, knit 1 rnd, purl 1 rnd. Next rnd: *P1, p2tog; rep from * to end of rnd—12 sts rem. Next rnd: *P2tog; rep from * to end of rnd—6 sts rem. Cut yarn, thread tail on a tapestry needle, draw through rem sts, and pull tight to secure.
Note: Use the backward loop CO (see Glossary, page 130) for all increases (inc 1).
With 2 strands of ginger and longer size 4 (3.5 mm) cir needle, CO 186 sts. First row: (WS) *K1, p1; rep from * to end of row. Work 2 more rows in rib as established. Do not cut off yarn. Change to mustard. Button st row: (RS) K1, *work button st (see Stitch Guide) around next 2 sts; rep from * to last st, k1. Cut mustard. Slide all sts to other end of needle, pick up ginger yarn still attached, and work another RS row as foll: K43, pm, k4, [inc 1, k10] 9 times, inc 1, k6, pm, k43—196 sts. Beg with WS row, work k1, p1 rib for 3 rows, ending with a WS row completed. With RS facing, rejoin mustard and rep button st row. Slide sts to other end of needle, pick up ginger yarn still attached, and work another RS row as foll: Knit to first m, slip m (sl m), k4, [inc 1, k11] 9 times, inc 1, k7, sl m, knit to end—206 sts. Beg with WS row, work k1, p1 rib for 5 rows. Pick up mustard and rep button st row. Slide sts to other end of needle, pick up ginger yarn still attached, knit to first m, sl m, k6, [inc 1, k12] 9 times, inc 1, k6, sl m, knit to end—216 sts. Beg with WS row, work k1, p1 rib for 5 rows. Pick up mustard and rep button st row. Slide sts to other end of needle, pick up ginger yarn still attached, knit to first m, sl m, k6, [inc 1, k13] 9 times, inc 1, k7, sl m, knit to end—226 sts. Beg with WS row, work k1, p1 rib for 5 rows. Pick up mustard and rep button st row. Slide sts to other end of needle, pick up ginger yarn still attached, knit to first m, sl m, k7, [inc 1, k14] 9 times, inc 1, k7, sl m, knit to end—236 sts. Beg with WS row, work k1, p1 rib for 7 rows. Pick up mustard and rep button st row. Slide sts to other end of needle, pick up ginger yarn still attached, and BO all sts in ribbing. Lay flat and lightly steam any rippling edges. Let air-dry completely.
With 2 strands mahogany and size 4 (3.5 mm) needles, CO 27 sts. Work seed st (see Stitch Guide) until piece measures 1" (2.5 cm) from beg. P2tog at beg of next 2 rows—25 sts rem. K2tog at beg of next 2 rows—23 sts rem. BO 7 sts at beg of next 2 rows, slipping first st in row to make a smooth curve—9 sts rem. BO 2 sts at beg of next 2 rows, also slipping first st for a smooth curve—5 sts rem. BO 1 st at beg of next 2 rows, also slipping first st—3 sts rem. Sl 1, k2tog, psso—1 st rem. Cut yarn, draw tail through rem st, and pull tight to secure.
Cord and tassel: With 2 strands of mahogany held tog and size 3 (3.25 mm) dpn, CO 3 sts, leaving 8" (20.5-cm) tails for later finishing. Work 3-st knitted cord (see Glossary, page 137) until piece measures 11" (28 cm) from beg. Next row: Sl 1, k2tog, psso—1 st rem. Cut yarn, leaving 8" (20.5-cm) tails, and draw tails through last loop to secure. *Cut 20 strands of mahogany, each 14" (35.5 cm) long for the tassel. Spread out one pair of 8" (20.5-cm) knitted cord tails on a flat surface. Place the 20 tassel strands perpendicular to and centered between the tails. Use the tails to tie a square knot at the halfway point of the 14" (35.5-cm) tassel strands. Rep from * to make a tassel on the other end of the knitted cord.
Tassel wrap: Cut 2 strands of mustard, each about 12" (30.5 cm) long. Beg about 1¼" (3.2 cm) down from top of tassel, wrap mustard strands around the tassel head (see Glossary, page 134) for about ¾" (2 cm). Fasten off.
Dragon: Dragon is worked with a single strand of yarn on size 1 (2.25 mm) needle. The entire bottom section (belly, etc.) of dragon is worked in garter st, beginning at the nose.
Bottom section: With a single strand of mahogany and size 1 (2.25 mm) needle, CO 2 sts. Work even in garter st until piece measures 1" (2.5 cm) from CO. Inc row: K1f&b (see Glossary, page 135), knit to end of row—1 st inc’d. Rep inc row 5 more times—8 sts. Cont in garter st until piece measures 3" (7.5 cm) from CO. Dec 1 st (k2tog) at beg of next 2 rows—6 sts rem. Work even until piece measures 5" (12.5 cm) from CO. K2tog at beg of next 2 rows—4 sts rem. Work even until piece measures 6½" (16.5 cm) from CO. Next row: [K2tog] 2 times—2 sts rem. Work even until piece measures 8" (20.5 cm) from CO. K2tog—1 st rem. Cut yarn, thread tail through rem st, and pull tight to secure.
Left side body: With a single strand of mustard and size 1 (2.25 mm) needle, CO 64 sts. Purl 1 row. Cont as foll, using the backward CO method for all increases (inc 1):
Row 1: (RS) [K2tog, k1] 3 times, k10, [k2tog] 3 times, place marker (pm), k25, [inc 1, k1] 5 times, pm, k9—63 sts rem.
Row 2: P9, slip marker (sl m), p10, [p2tog, p1] 5 times, p10, sl m, p10, [p2tog, p1] 3 times—55 sts rem.
Row 3: Sl 1, k2tog, psso, [k2tog, pass previous st over dec’d st] 3 times, [k1, k2tog] 2 times, k1, sl m, [k1, inc 1] 5 times, k5, [k2tog] 5 times, k10, sl m, [k1, inc 1] 2 times, k7—47 sts rem.
Row 4: Purl to last st (do not work last st), turn work.
Row 5: Sl 1 (2 sts on right needle), pass last unworked st from previous row over the slipped st, k2tog, pass previous st over dec’d st, k2, sl m, [k1, inc 1] 7 times, k5, [k2tog, k1] 3 times, [k1, inc 1] 5 times, k4, sl m, k11—53 sts rem.
Row 6: Purl to last st (do not work last st), turn work.
Row 7: Sl 1 (2 sts on right needle), pass last unworked st from previous row over the slipped st, k1, sl m, k18, [k2tog] 3 times, k15, sl m, [k1, inc 1] 3 times, k8—52 sts.
Row 8: BO 6 sts, purl to m, sl m, purl to end—46 sts rem.
Row 9: Sl 1, k1, psso, remove m, k1, BO 1 st, knit to end—44 sts rem.
Row 10: Slipping first st, BO 7 sts, remove m, purl to end—37 sts.
Row 11: Sl 1, k1, psso, [k2, inc 1] 6 times, k1, [k2tog] 3 times, k3, [k1, inc 1] 9 times, k3 (1 st unworked), turn—48 sts.
Row 12: Sl 1 (2 sts on right needle), pass last unworked st from previous row over the slipped st, purl to end of row—47 sts.
Row 13: Slipping first st, BO all sts.
Right side body: With single strand of mustard and size 1 (2.25 mm) needle, CO 64 sts. Purl 1 row. Cont as foll, using the backward loop CO for all increases (inc 1):
Row 1: (RS) K9, pm, [k1, inc 1] 5 times, k25, pm, [k2tog] 3 times, k10, [k2tog, k1] 3 times—63 sts rem.
Row 2: [P2tog, p1] 3 times, p10, sl m, p10, [p2tog, p1] 5 times, p10, sl m, p9—55 sts rem.
Row 3: K7, [k1, inc 1] 2 times, sl m, k10, [k2tog] 5 times, k5, [k1, inc 1] 5 times, sl m, k1, [k1, k2tog] 2 times, [k2tog] 4 times, k1—51 sts rem.
Row 4: Slipping first st, BO 4 sts purlwise, purl to end of row—47 sts rem.
Row 5: K11, sl m, k4, [k1, inc 1] 5 times, [k2tog, k1] 3 times, k5, [k1, inc 1] 7 times, sl m, k2, k2tog, k1 (1 st unworked), turn—55 sts.
Row 6: Sl 1 (2 sts on right needle) pass last unworked st from previous row over the slipped st, p1, psso, purl to end—53 sts rem.
Row 7: K8, [k1, inc 1] 3 times, sl m, k15, [k2tog] 3 times, k18, sl m, k2 (1 st unworked), turn.
Row 8: Sl 1 (2 sts on right needle), pass last unworked st from previous row over the slipped st, p1, psso, purl to end of row—51 sts rem.
Row 9: Slipping first st, BO 6 sts kwise, knit to last st (1 st unworked), turn—45 sts rem.
Row 10: Remove m, sl 1 (2 sts on right needle), pass last unworked st from previous row over the slipped st, p1, psso, purl to last st (1 st unworked), turn—43 sts rem.
Row 11: Sl 1 (2 sts on right needle), pass last unworked st from previous row over the slipped st, BO 6 more sts knitwise, knit to end of row—36 sts rem.
Row 12: Sl 1, p1, psso, [p2, inc 1] 6 times, p1, [p2tog] 3 times, p3, [p1, inc 1] 9 times, p2, (1 st unworked), turn—47 sts.
Row 13: Sl 1 (2 sts on right needle), remove m, pass last unworked st of previous row over the slipped st, knit to last st (1 st unworked), turn—46 sts rem.
Row 14: Sl 1 (2 sts on right needle), pass last unworked st from previous row over the slipped st, BO all sts purlwise to end of row.
Weave in all loose ends. Steam-press each dragon side body (you may touch the iron to the knitted surface). Lightly steam dragon bottom body, but do not touch iron to the knitting. Let dry completely.
Couching: (see Glossary, page 133) With a single strand of ginger, lay couching grid on dragon according to Figure 1 on page 127, each parallel line spaced about ½" (1.3 cm) apart on each dragon side body. Cut a length of sewing thread and draw through a disk of beeswax to coat. “Press” the thread by quickly pulling it under a hot iron. With sewing needle and waxed thread, secure couching intersections with beads as foll: Insert sewing needle up from WS at point #1, through bead, down to WS at point #2, up at point #3, through bead, and down at point #4.
Face: With single strand of mahogany threaded on a tapestry needle, work eyebrow in stem stitch (see Glossary, page 134). Sew on large bead for eye and small bead for nostril. Steam lightly to set, let dry.
Assembly: With a single strand of mahogany and using a whipstitch (see Glossary, page 139), sew each side body lower edge (solid line a on Figure 1) to edge (a) of dragon bottom body (Figure 2). With WS tog, pin nose, head, and first back curve (dotted line b) of each side body tog. With single strand of ginger and crochet hook, work single crochet (sc; see Glossary, page 131) from right to left across nose (see Figure 2), beg at (c) and work to (d). Then crochet along nose/head from (d) to (e) as foll: *Ch 5, sc in next 2 sts; rep from * to (e). Insert a bit of fiberfill into the nose/head to shape the head. Cont along back curves from (e) to (f) as foll: *Ch 7, sc in next 2 sts; rep from *, and inserting more fiberfill into the body as you go. Cont from (f) to (g) as foll: *Ch 5, sc in next 2 sts; rep from *. After last 2 sc, end the tail with ch 7, for a final longer point, and anchor work with sc in next st. Weave in loose ends. Working on the very edge of an ironing board, steam-press dragon points, but do not press the stuffed body. Use your fingers to pinch the points into sharp tips. Let dry.
Brim: Fold crown in half and mark center front and center back. Place center of brim onto center front crown, ½" (1.3 cm) up from lower edge of crown. With double strand of mahogany and using a whipstitch, sew brim in place. With single strand of mustard, work a decorative line of crochet chain st embroidery (see page 127) through both brim and crown layers, working about ¼" (6 mm) from top edge of brim.
Neck protector and wings: Mark neck protector piece center back and again at 6" (15 cm) from each front edge along inner curve. Match center back and pin 6" (15-cm) marks just barely overlapping brim. Ease neckpiece inner curve onto crown and pin in place. With single strand of yarn to match neckpiece and using a whipstitch, sew neckpiece to crown. Mark halfway between center front and center back on each side, about 3½" (9 cm) to 4" (10 cm) up from neckpiece sewn edge. Fold side wings back to marked points and secure in place by sewing shank buttons through both layers.
Tassel: Mark center back of crown 2" (5 cm) down from mustard purl ridge at top. Fold tassel cord in half. Make a loop at fold, and with one strand of mustard threaded on a tapestry needle, work whipstitches very close together to sew in place about 1" (2.5 cm) down from fold. Fold both ends through loop (Figure 1) and gently pull ends down (Figure 2) toward the neckpiece.
Dragon: Thread tapestry needle with single strand of mustard and whipstitch dragon at nose, belly, and tail to front of crown.