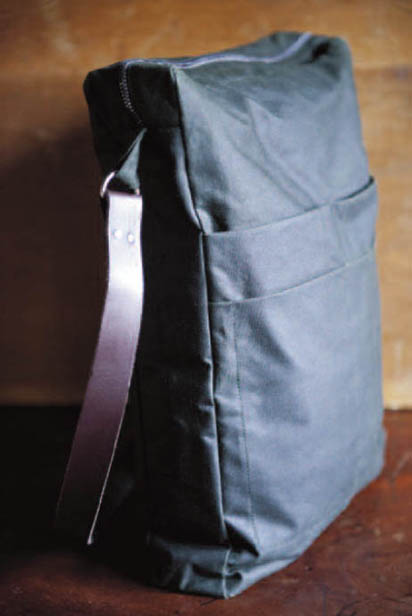
Our flight bag likes to travel. It has outer slip pockets for magazines and the things you like to keep handy, while the shoulder strap keeps your hands free to rummage for your passport and boarding pass. It is equally happy to travel by bus or bicycle and makes a strong style statement wherever it goes. It is inspired by PVC Pan Am wonders of the Seventies and updated to a contemporary take in lovely oilskin.

Make a bold style statement wherever you go with the retro-inspired flight bag.
1. Following the measurements given in Fig 1, use the tip of a small pair of scissors to mark the main bag pieces directly onto the oilskin including notch marks (there is no need to use chalk or a pencil); cut out. Clip all notches after cutting out.
Fig 1
2. Mark out the canvas for the lining following the measurements given in Fig 2 and remembering to mark the notches. Cut out the pieces and clip the notches. Also cut two bag gusset pieces from the buckram.
Fig 2
1. Pin the zipper right side up between two of the zipper gusset pieces, right sides facing. Taking a 3/8-in/1-cm seam allowance and using the zipper foot, sew together, then fold the zipper gusset pieces back on themselves (Fig 3a). Repeat to attach the remaining two zipper gusset pieces on the other side of the zipper (Fig 3b). You will now have a zipper sandwich with the zipper facing right side up (Fig 3c).
Fig 3a
Fig 3b
Fig 3c
2. Working on the right-hand side of the zipper, move the back of the sandwich out of the way and edge stitch as close as you can to the zipper (Fig 4a), then fold the back of the sandwich to its original position. Repeat on the other side of the zipper (Fig 4b).
Fig 4a
Fig 4b
3. Now edge stitch all the way around the outer edges to hold the gusset pieces together as shown in Fig 5 (note, this stitch will not show on the final bag).
Fig 5
4. Change back to your standard presser foot and make two ring tabs using the tab pieces (see Document Bag, Step 1, page 130). Thread the D rings onto the tabs. Fold the tabs in half with the seam on the inside and pin in the center at each end of the zipper gusset; sew in place (Fig 6).
Fig 6
5. Take the main bag gussets, and sew the buckram to the wrong side of each, stitching close to the edge so that the stitch line will not show on the final bag (Fig 7).
Fig 7
6. With the right sides facing, sew the gusset pieces together (Fig 8).
Fig 8
7. Pin and sew the gusset ends to the zipper gusset (Fig 9).
Fig 9
1. Place the two pocket pieces together, right sides facing and, taking a 5/8-in/1.5-cm seam allowance, sew around the pockets as shown (Fig 10).
Fig 10
2. Fold the pockets down and pin the four corners of each pocket through to the front of the bag (Fig 11). Following the same stitching line that made the pockets, sew through both pieces; this will create the topstitching on the front of the pocket section as seen in Fig 12.
Fig 11
3. Zigzag along the top of the pocket section, then fold over at the notch marks (Fig 12).
Fig 12
4. Pin the completed pocket section to the main bag front, lining up the bottom edges (Fig 13).
Fig 13
1. Fold over the short side of the back of the main bag and make a notch to mark the center along the top edge. Also mark the center of the zipper gusset section with a notch. With right sides facing and lining up the notches, pin the zipper gusset section to the main bag back. Taking a 5/8-in/1.5-cm seam allowance, sew from the center notches outwards, stopping 5/8 in/1.5 cm short of the edge of the main bag (Fig 14). Backstitch to reinforce the corner.
Fig 14
2. Lift the presser foot and raise the needle out of the fabric; snip the gusset to the end of the stitching using a sharp pair of scissors (Fig 15a). Put the needle back into the fabric at the same place, turn the bag 45 degrees and carry on sewing; remember to backstitch to reinforce the corner and make sure you move the gusset fabric out of the way before you start sewing (Fig 15b).
Fig 15a
Fig 15b
3. Continue to stitch the gusset strip to the main bag back, repeating steps 1 and 2 at each corner (Fig 16). Repeat steps 1–3 to attach the main bag front to the gusset strip. Trim the corners.
Fig 16
1. Sew the lining gusset pieces together (Fig 17a). Fold over the short side of one of the lining pieces and make a notch to mark the center along the bottom edge. With right sides facing, line up the gusset seam with this notch and sew from the gusset seam to the notch on the long side of the lining piece, which will be 5/8 in/1.5 cm short of the end of gusset, first on one side (Fig 17b), then on the other. (For sewing the corners, see step 2, page 141.)
Fig 17a
Fig 17b
2. Repeat step 1 to attach the second lining piece to the lining gusset, but this time leave a gap of about 8 in/20 cm in the side seam to turn the bag through (Fig 18).
Fig 18
3. Place the main bag inside the lining. Match up the zipper gusset with the lining gusset and taking a 5/8-in/1.5-cm seam allowance, sew all the way around (Fig 19). Make sure that the ends of the gussets remain unstitched. Trim the corners. Turn the bag out through the lining and poke the corners out well.
Fig 19
4. Turn the finished bag lining side out. Turn the ends of the lining gusset over the ends of the zipper gusset (Fig 20a). Slip stitch into place (Fig 20b). Turn the bag right side out to put the strap on.
Fig 20a
Fig 20b
1. Using the revolving hole punch, punch two pairs of holes in each end of the leather strap so that the lower holes are 1/2 in/1.3 cm and the upper holes 2 in/5 cm from the strap end. The distance between each pair of holes is 1/2 in/1.3 cm (Fig 21).
Fig 21
2. Fold the strap ends through the D rings on the zipper gusset and thread the rivets through the holes; hammer the rivets together to secure the strap, following the manufacturer’s instructions (Fig 22).
Fig 22