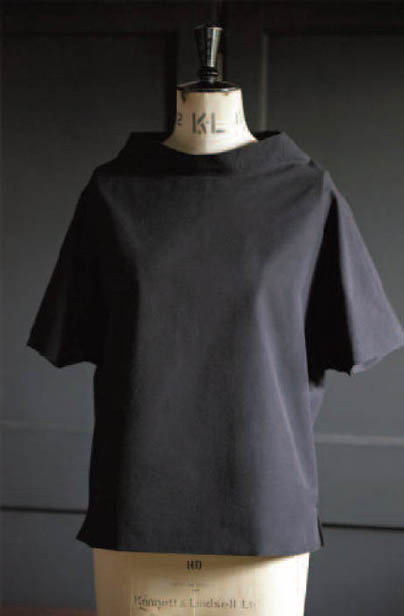
Inspired by the working men of a seabound, fish-eating nation, this is an easy-to-make, lightweight top with a simple boatneck collar and small slits at the sides. It is best made with a crisp cotton for an architectural silhouette or a soft linen for a more relaxed statement. The top is loose fitting like a T-shirt and slips over the head in a jiffy.
1. Using the pattern sheet, cut out the following garment pieces:
Top Back: cut 2
Top Front: cut 1 on the fold
Back Collar: cut 1 on the fold
Front Collar: cut 1 on the fold
2. Transfer pattern markings to the fabric pieces and snip the notches.
3. Finish all shoulder and side seams on the top back and top front pieces with a zigzag stitch (alternatively, overlock).

The fisherman’s top, shown here in black mid-weight organic cotton.
1. Place the top back pieces together with right sides facing; pin and sew up the back seam, then press the seam open (Fig 1).
Fig 1
2. Pin the back collar to the joined back piece, right sides facing, taking care to align the notches. Sew the collar onto the back piece and press the seams open really well (Fig 2). Now join the front collar to the front piece in the same way.
Fig 2
3. Working on both the back and front pieces, trim the inside collar seam down to 1/4 in/5mm (Fig 3), before pressing both seams up onto the collar.
Fig 3
4. Pin the front and back shoulder and collar seams together with right sides facing. Make sure that the collar and neck seams are both facing upwards (Fig 4) and line up the front and back perfectly. Pin right through the seam to ensure that it will be held securely in place as you stitch. The neckline is such an important feature of the finished top that you want to make sure you get this right.
Fig 4
5. Stitch the front and back shoulder and collar seams together, first along one side, then the other, removing pins as you go (Fig 5).
Fig 5
6. Snip a large V into the V section at either side of the collar – this will reduce the bulk when the collar is folded over (Fig 6a). Press all seams open and flat. Press really well (Fig 6b).
Fig 6a
Fig 6b
7. Fold over the collar and press into position (Fig 7).
Fig 7
1. Sew the side seams, stopping at the first notch (Fig 8).
Fig 8
2. Turn over the bottom edge by 3/8 in/1 cm and topstitch into place (Fig 9). Clip the underarm seam to remove bulk.
Fig 9
3. Turn the top to the right side. Turn over the hem at the bottom notches. Pin and sew the slits (Fig 10). Trim off the bottom corners. Turn through and carefully poke out the corners. Press nice and flat.
Fig 10
4. Turn the top inside out. Turn under the edge of the collar by the 5/8-in/1.5-cm seam allowance and edge stitch to hold the seam allowance in place (Fig 11a). Slip stitch to the neck seam (Fig 11b).
Fig 11a
Fig 11b
5. Zigzag stitch (or overlock) to finish the edges of the sleeves, turn over a 5/8-in/1.5-cm hem and slip stitch into place. Working on the wrong side, slip stitch the bottom hem into place (Fig 12).
Fig 12