JSP pages are the most common way of building a presentation layer in a JavaServer Faces application. Indeed, most of this book assumes the use of JSP for the view description language of JSF applications. The designers of JSF technology acknowledged, however, that JSP is far from being the only game in town, and carefully avoided creating any dependencies on JSP in the core JSF specification. The ViewHandler API, and its helper objects, enable the default JSF view description technology to be customized or replaced entirely. This chapter examines the rationale behind providing a custom ViewHandler, the principles and mechanics of writing one, and closes with an example of an exciting real-world alternate page description technology known as Facelets.
The term view description technology covers anything related to how you arrange a collection of user interface component instances into a coherent user interface. For Web applications, this generally means the following:
• Use of a markup language, usually HTML or XML
• A mechanism for aggregating chunks of markup together from separate pages to form one logical page, such as JSTL’s c:import or XML’s XInclude
• An extension mechanism that allows arbitrary markup to be associated with a user interface component, such as the JSP Custom Tag Library mechanism, or the TagLibrary concept in Facelets
• Some way to correctly handle intermixing markup that represents components and noncomponent markup, also known as “template text”—for example, freely mixing raw HTML and UI components in a page
With the preceding definition, it’s easy to see that JSP is certainly a view description technology, but that it also constitutes a lot more when JSP’s myriad custom tag libraries are considered. It’s also fair to say that JSP is the most popular view description technology in the Java Enterprise platform, in terms of the number of sites deployed using the technology. Even so, good software design focuses on abstractions and loose coupling, so the design of JSF makes no assumptions about using JSP to describe a view.
EXPERT GROUP INSIGHT Just in case good software design wasn’t enough, the Expert Group considered user feedback as a motivator for allowing a pluggable view description technology. Many Web content developers prefer to author using plain HTML. JSP, although providing abstraction from lower-level Servlet development, can still have its technical challenges for nontechnical Web designers. Facelets view description technology allows view descriptions in plain HTML to be first-class JSF pages. Finally, several emerging view description technologies, such as Mozilla XUL and W3C XForms, may gain ground. It would be a great boon to developers if their existing JSF applications were able to take advantage of these things if they catch on.
Now let’s examine the responsibilities of the ViewHandler and its relation to the rest of the JSF system in order to provide a conceptual foundation for building a custom ViewHandler.
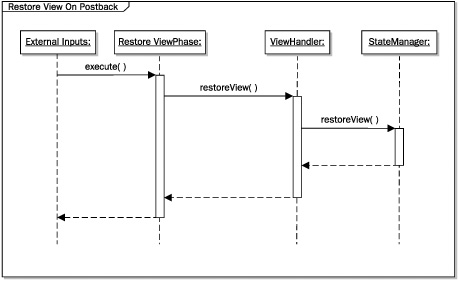
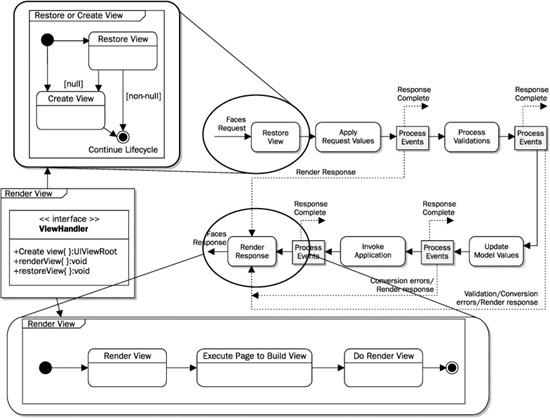
As mentioned in Chapter 3, the ViewHandler plays an important role in fulfilling the requirements of the Restore View and Render View lifecycle phases. Thus, the ViewHandler must interface with the other parts of the system that take part in these phases. The role of the ViewHandler in the request processing lifecycle is shown in Figure 13-1.
As Figure 13-2 shows, the concept of the ViewHandler is intimately related to the concept of the RenderKit, though it is certainly not necessary to have a new ViewHandler every time you want to use a different RenderKit. In some sense, a ViewHandler is like a programming language compiler. It takes a page written in some language, usually a markup language, and turns it into a tree of UIComponent instances. If you want to use a different programming language, say in moving from C++ to Java, then you need a different compiler. By analogy, if you want to use a different page description language, using XHTML instead of JSP for example, you need a different ViewHandler.
The ViewHandler is responsible for deriving the proper renderKitId from the incoming request in its implementation of the calculateRenderKitId( ) method. This determines which RenderKit is used to process this request. The incoming request also contains information about the natural language to be used to render this response in the form of the Accept-Lang HTTP header. The ViewHandler must perform an algorithm on the request and derive the correct Locale in the calculateLocale( ) method. Finally, the ViewHandler is also responsible for returning rendering technology–specific URLs for actions and resources when given a viewId. For example, the renderer for the UIForm component calls viewHandler.getActionURL( ) to aid in rendering the HTML action attribute on the <form> tag, while the renderer for the UIGraphic component calls viewHandler.getResourceURL( ) to aid in rendering the HTML src attribute on the <img> tag.
FIGURE 13-1 The role of the ViewHandler in the request processing lifecycle
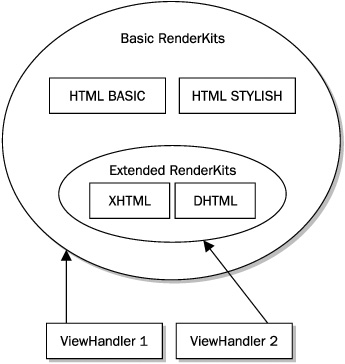
FIGURE 13-2 The relationship between ViewHandler and RenderKit
As covered in Chapter 10, all renderers must write their markup using the ResponseWriter or ResponseStream classes. The specific instances of these classes must be installed on the FacesContext during viewHandler.renderView( ), and the current RenderKit is where the ViewHandler turns to create instances of a ResponseWriter or ResponseStream.
EXPERT GROUP INSIGHT The specification of the ViewHandler was intentionally loose to allow for a wide range of implementation possibilities. For example, the default implementation of the createView( ) method simply creates an empty UIViewRoot, with no children, and returns it. This is because the default ViewHandler is designed for JSP, which must execute the page in order to construct the view. Because rendering and page execution must occur simultaneously, or nearly simultaneously, in JSP, this action is deferred to the renderView( ) method. Other view description technologies may not have this restriction. For example, imagine a simple XML-based view description technology where the createView( ) method simply loads the XML file for this view, and creates a view of UIComponent instances from it.
Figure 13-3 shows the relationship between the ViewHandler and the StateManager. The StateManager API was covered in detail in Chapter 12, but it makes sense to review it from the perspective of the ViewHandler. The restoreView( ) method is responsible for returning a UIViewRoot that is the root of a view which is identical to the view rendered to the client the last time the renderView( ) method was called.
The default implementation of restoreView( ) calls through to StateManager API to accomplish this task, but it is not required to do so. On the state saving side, the writeState( ) method of the ViewHandler is called by the rendering system to inject the state into the rendered output. Naturally, the manner in which this is accomplished is very specific to the rendering technology which can cause some tight coupling between the ViewHandler and StateManager implementations.
This section shows how to build a simple ViewHandler. This ViewHandler will not actually perform any of the view functions itself. Instead, it delegates all of its functionality to the default ViewHandler. This approach makes it easy to illustrate the steps required to create a custom ViewHandler. It also gives you a skeleton that you can use to develop your own ViewHandler.
As with many things in the Java EE platform, a custom ViewHandler is declared using XML. The ViewHandler is declared within the <application> element of the faces-config .xml file. There must be, at most, one ViewHandler declaration in this element because there is only one ViewHandler per Faces application instance. As you will see in Chapter 18, the ordering of elements in the faces-config.xml file is important. If the <application> element is present, it must be the first child element of the <faces-config> element, as shown next.
<faces-config>
  <application>
    <view-handler>com.jsfcompref.vtlib.util.
      TrainerViewHandler</view-handler>
  </application>
  <!-- the rest of the faces-config content -->
There are two approaches to providing a custom ViewHandler to JSF, known as decoration and replacement. These concepts are explained next.
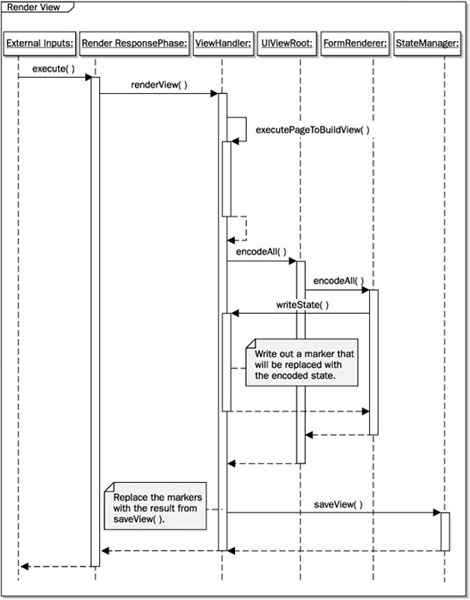
FIGURE 13-3 The relationship between ViewHandler and StateManager
As you learned in Chapter 12, many of the replaceable components in Faces allow the user to extend the existing implementation using the decorator design pattern. To recap this concept, the decorator design pattern enables a developer to override as much or as little functionality of an existing object as desired. The Faces specification requires the JSF runtime to guarantee that a custom ViewHandler declared in the faces-config.xml file be passed the default ViewHandler in its constructor when the JSF runtime is starting up. The following example shows how this is done in Faces 1.1.
import javax.faces.application.ViewHandler;

public class TrainerViewHandler extends ViewHandler {
  private final ViewHandler parent;

  public TrainerViewHandler(ViewHandler parent) {
    this.parent = parent;
  }

  public Locale calculateLocale(FacesContext context) {
    return this.parent.calculateLocale(context);
  }

  public String calculateRenderKitId(FacesContext context) {
    return this.parent.calculateRenderKitId(context);
  }

  public UIViewRoot createView(FacesContext context, String viewId) {
    return this.parent.createView(context, viewId);
  }

  public String getActionURL(FacesContext context, String viewId) {
    return this.parent.getActionURL(context, viewId);
  }

  public String getResourceURL(FacesContext context, String path) {
   return this.parent.getResourceURL(context, path);
  }

  public void renderView(FacesContext context,
                         UIViewRoot viewToRender)
    throws IOException, FacesException {
    this.parent.renderView(context, viewToRender);
  }

  public void restoreView(FacesContext context,
                          String viewId) {
    this.parent.restoreView(context, viewId);
  }

  public void writeState(FacesContext context) throws IOException {
    this.parent.writeState(context);
  }
}
This ViewHandler does nothing itself. Instead, it simply delegates to the previous implementation for all methods. However, you can adapt this skeleton to create your own ViewHandler by implementing one or more of the methods. The important thing to observe about the preceding code is that it has a constructor that takes one argument, the existing ViewHandler. Observe that there are eight public methods defined on ViewHandler. In practice, a custom ViewHandler may delegate to the previous implementation for most of those methods. The methods for which delegation is not practical are covered in the section later in this chapter titled “The Design, Architecture, and Implementation of Facelets.”
To clarify how the decorator pattern is implemented, let’s examine how the JSF runtime handles the processing of the preceding faces-config.xml file with the custom ViewHandler declaration.
Figure 13-4 shows the steps taken by the JSF runtime to implement the decorator pattern. Before the JSF runtime loads any faces-config.xml files from the user, the runtime initializes its own set of default implementations for all the replaceable objects, including ViewHandler. For this discussion, we’ll refer to the default ViewHandler as DefaultViewHandler. During startup, whenever the JSF implementation comes across a faces-config.xml file with a <view-handler> element, it inspects that class for a public constructor that takes one argument of type ViewHandler. In this case, the TrainerViewHandler does have such a constructor. The JSF runtime invokes the constructor and passes DefaultViewHandler as the argument. Because TrainerViewHandler wants to leverage the DefaultViewHandler instance to do the work of all the methods, it keeps a reference to DefaultViewHandler in an instance variable. The JSF runtime replaces its reference to DefaultViewHandler with a reference to the new TrainerViewHandler. As far as the runtime knows, DefaultViewHandler no longer exists. In other words, the custom ViewHandler may choose to observe the decorator pattern or not. If it doesn’t keep a reference to the DefaultViewHandler, the custom ViewHandler is said to “replace” the DefaultViewHandler rather than “decorate” it.
Another way for a custom ViewHandler to handle replacement is to offer only a public no-argument constructor. In this case, the JSF runtime will simply use that constructor to make the new instance and replace the DefaultViewHandler. This process continues as the faces-config.xml files are loaded until all startup processing is complete.
As the preceding section shows, the decorator pattern greatly reduces the difficulty of providing a custom ViewHandler, but you still have to provide implementations for every abstract method on the ViewHandler class. In Faces 1.2, an additional convenience to ease decoration is provided: the wrapper pattern. This pattern obviates the need to laboriously override all the abstract methods of ViewHandler. For example, consider the following.
import javax.faces.webapp.ViewHandlerWrapper;

public class TrainerViewHandler extends ViewHandlerWrapper {

  private ViewHandler oldViewHandler = null;

  public TrainerViewHandler(ViewHandler oldViewHandler) {
    this.oldViewHandler = oldViewHandler;
  }
  public ViewHandler getWrapped() {
    return oldViewHandler;
  }
}
You still must provide a public one-argument constructor that takes a ViewHandler, and a corresponding getWrapped( ) method that returns that argument. The ViewHandlerWrapper class provides implementations of all the abstract methods on ViewHandler that call your getWrapped( ) method, as in the following:
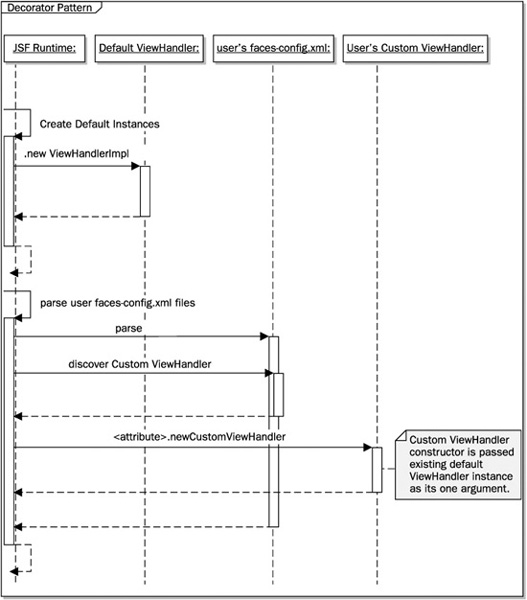
FIGURE 13-4 How the decorator pattern is implemented in JSF
public void renderView(FacesContext context, UIViewRoot viewToRender)
  throws IOException, FacesException {
  getWrapped().renderView(context, viewToRender);
}
This little trick of object-oriented programming eliminates the need to manually override all the ViewHandler abstract methods.
JSF 1.2 TIP The 1.2 version of the JSF specification also provides wrappers for StateManager and ResponseWriter, in addition to ViewHandler.
The previous discussion covered the mechanics of building a custom ViewHandler. The interesting part, of course, is in the details of what methods to override, and what to do in those methods. These details are described in the chapter’s later section titled “The Design, Architecture, and Implementation of Facelets.”
Because ViewHandler is a singleton (a class that allows only one object instance per application), its methods are accessed by many threads simultaneously. Therefore, the developer must take the usual precautions to ensure thread safety. In particular, they should take great care not to store any per-request state as instance variables, and protect any initialization steps by either putting them in the constructor, known as eager initialization, or in a synchronized block that effectively executes only once per request, known as lazy initialization. Before we jump into the specifics of Facelets, let’s look at an example that illustrates a thread safety consideration. In general, Facelets uses lazy initialization where possible to allow for faster startup times. The following is an example of thread safety from the FaceletViewHandler.
private boolean initialized = false;

public void renderView(FacesContext context, UIViewRoot viewToRender) {
  throws IOException, FacesException {
  // Lazy initialize so we have a FacesContext to use.
  if (!this.initialized) {
    this.initialize(context);
  }
  // Rest of method omitted.
}

protected void initialize(FacesContext context) {
  synchronized (this) {
    if (!this.initialized) {
      log.fine("Initializing");
      // rest of initialization logic omitted
      this.initialized = true;
      // Rest of method omitted.
  }
}
Let’s examine the thread safety implications of this code. To guard against the unlikely possibility of two different browsers accessing the site simultaneously before requests from any other browsers access the site, the checking and setting of the initialized instance variable is done inside a synchronized block.
This section presents a brief but thorough guide to using Facelets view description technology, invented by JSF Expert Group member Jacob Hookom. It also examines the implementation of Facelets to illustrate the details of creating a custom view description technology in Faces. (Additional information on Facelets can be found at https://facelets .dev.java.net/.)
The terms “templating” and “composition” are used interchangeably to describe building a single logical page view for the user out of several separate files. Consider the following pseudo-code in a fictional markup language:
<!-- This is the main page for the application

<f:view>
<include name="menubar" file="menubar.xml" user="#{currentUser}" />

<include name="sidebar" file="sidebar.xml" user="#{currentUser}"/>

<include name="summary" file="summary.xml" user="#{currentUser}"/>
</f:view>
This shows the power of using a composition mechanism. The constituent parts—menubar, sidebar, and summary—can be reused in multiple pages and their display can be customized by “passing in” parameters, optionally leveraging the EL. Naturally, we expect that any Faces components contained within the included files will be added to the UIViewRoot and function as expected.
While it is possible to use JSP’s jsp:include and <%@ include %>, and JSTL’s c:import to do templating, these approaches have some drawbacks in the current version of the JSP and JSF specs. For example, it is impossible to pass parameters from the host file to the included file. The <jsp:param> feature doesn’t work for JSF because it stores its content in page scope, which is not supported in JSF. Furthermore, the current implementations of the containers can cause unexpected replication of the included content. These drawbacks go beyond being mere bugs in a particular container’s implementation.
Facelets addresses these problems by providing a simple, EL-aware, templating mechanism with full support for JSF’s component model that supports parameter passing. So let’s recast the previous pseudo-code using Facelets.
<!DOCTYPE html PUBLIC "-//W3C//DTD XHTML 1.0 Transitional//EN"
"http://www.w3.org/TR/xhtml1/DTD/xhtml1-transitional.dtd">
<html xmlns="http://www.w3.org/1999/xhtml"
      xmlns:ui="http://java.sun.com/jsf/facelets"
      xmlns:h="http://java.sun.com/jsf/html">
<!-- This is the main page for the application
<ui:include src="menubar.xml">
  <ui:param name="user" value="#{currentUser}"/>
</ui:include>

<ui:include src="sidebar.xml">
  <ui:param name="user" value="#{currentUser}"/>
</ui:include>

<ui:include src="summary.xml">
  <ui:param name="user" value="#{currentUser}"/>
</ui:include>
We’ll cover templating using Facelets in depth later in the chapter; however, for now, this example is a template that can be used by any page in the application. It provides for a menu bar, a side bar, and a summary. It shows that included documents are passed a user parameter to customize their display. Now let’s examine some similarities and differences between JSP and Facelets to build a conceptual understanding of the technology.
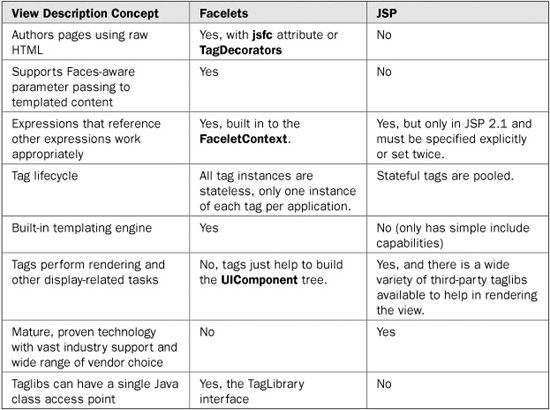
From a high level, Facelets and JSP are very similar. As far as core JSF is concerned, they are both just view description technologies. In fact, you can use both JSP and Facelets in a single application because the Facelets ViewHandler will delegate any requests it doesn’t understand to the default ViewHandler, which uses JSP. As you’d expect, there are significant similarities between the two, as shown in Table 13-1, but the differences, displayed in Table 13-2, are more telling.
The two most important differences between Facelets and JSP are the ability to author JSF pages in plain HTML, and the ability to do first class templating. In fact, Facelets was created in response to user demand for these two features. The remaining differences reflect how Facelets was designed with JSF in mind, rather than for JSP, which was designed well before JSF was invented. The remainder of this chapter covers the details of Facelets from a perspective of how it differs from JSP.
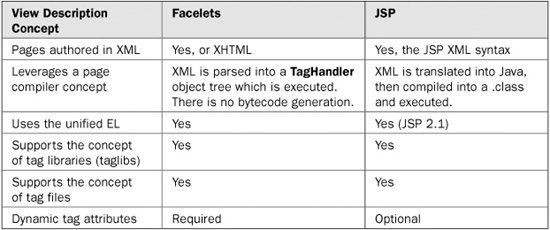
TABLE 13-1 Some Similarities Between Facelets and JSP
TABLE 13-2 Differences Between Facelets and JSP
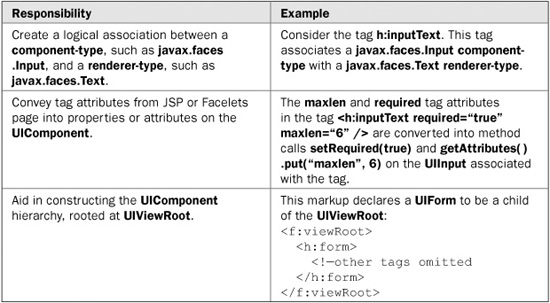
As mentioned in Chapter 10, it is strongly recommended that a JSP custom tag that represents a Faces UIComponent, Converter, or Validator perform only three responsibilities, which are shown in Table 13-3. As you would expect, the same three responsibilities are also asked of a Facelets tag.
Of course, it’s possible for a custom tag to do much more than this, but putting any additional functionality into your JSP tag layer will result in a component that is only usable with JSP. In contrast to JSP tag handlers for UIComponents, Facelets tag handlers for UIComponents are designed to do the preceding three things and nothing more. These constraints allow the Facelets tag library concept to be much simpler than its JSP counterpart.
As mentioned earlier, both Facelets and JSP have the concept of tag libraries. JSP taglibs are declared to the container in a Tag Library Descriptor file, or TLD. The TLD lists the tags in the taglib, describes the valid attributes for each tag, and associates a Java class or tag file with each tag, called a Tag Handler.
Facelets also has a tag library descriptor, but its syntax is much simpler than its JSP counterpart. It’s a good practice to always name your Facelet taglib file with a .taglib.xml extension and place it in the META-INF directory of the WAR file for your application. Facelets also looks in the value of the Servlet context-param named facelets.LIBRARIES for a semicolon-delimited list of context-root relative pathnames to the taglib.xml file. Facelet taglibs can be described in two ways: entirely in XML with no Java code, or mostly in Java code. The sole purpose of a Facelets taglib is to expose UIComponents, converters, and validators to the page author. Facelets also supports exposing EL functions to the page author, but these are beyond the scope of this chapter. The XML syntax for describing a UIComponent, converter, and validator is as follows.
TABLE 13-3 The Responsibilities of a JSP or Facelet Tag in Faces
<!DOCTYPE facelet-taglib PUBLIC
  "-//Sun Microsystems, Inc.//DTD Facelet Taglib 1.0//EN"
  "http://java.sun.com/dtd/facelet-taglib_1_0.dtd">

<facelet-taglib>
  <namespace>http://jsfcompref.com/vtlib</namespace>
  <tag>
    <tag-name>spellCheck</tag-name>
     <component>
      <component-type>vtlib.SpellCheckTextarea</component-type>
      <renderer-type>com.jsfcompref.SpellCheckRenderer</renderer-type>
    </component>
  </tag>
  <tag>
    <tag-name>validateEventRequirements</tag-name>
     <validator>
      <validator-id>com.jsfcompref.vtlib.validator.
                    EventRequirementValidator</validator-id>
    </validator>
  </tag>

  <tag>
    <tag-name>convertWeight</tag-name>
    <converter>
      <converter-id>vtlib.WeightConverter</converter-id>
    </converter>
  </tag>
</facelet-taglib>
No further Java code or XML markup is needed to create a tag library. The Facelets system provides the actual tag handler implementations based on the previous markup. This taglib declares three tags in the vtlib namespace: spellCheck, validateEventRequirements, and convertWeight. You can see that some of the XML elements are exactly the same as in the faces-config.xml file for a custom component (Chapter 10), converter, or validator (Chapter 7). Furthermore, notice that the previous markup fulfills requirement 1 of what a tag must do to support Faces.
If you choose to define your Facelets taglib in Java code, rather than in XML, you must tell the system the fully qualified class name of the Java class that implements the com.sun .facelets.tag.TagLibrary interface:
<!DOCTYPE facelet-taglib PUBLIC
  "-//Sun Microsystems, Inc.//DTD Facelet Taglib 1.0//EN"
  "http://java.sun.com/dtd/facelet-taglib_1_0.dtd">

<facelet-taglib>
  <library-class>
    com.jsfcompref.vtlib.VTLibrary
  </libraryclass>
</facelet-taglib>
This markup declares the class VTLibrary as a Facelets taglib. The TagLibrary interface is very simple:
public interface TagLibrary {
  public boolean containsNamespace(String ns);
  public boolean containsTagHandler(String ns, String localName);
  public TagHandler createTagHandler(String ns, String localName,
  public boolean containsFunction(String ns, String name);
  public Method createFunction(String ns, String name);
}
Facelets provides an abstract class implementation of this interface, com.sun.facelets .tag.AbstractTagLibrary. All that a custom taglib must do is create a subclass of this class with a no-argument constructor that adds the components to the library. The following is an example:
package com.jsfcompref.vtlib;

import com.sun.facelets.tag.AbstractTagLibrary;

public final class VTLibrary extends AbstractTagLibrary {

  public final static String Namespace = "http://jsfcompref.com/vtlib";
  public VTLibrary() {
    super(Namespace);
    addComponent("spellCheck", "vtlib.SpellCheckTextarea",
                 com.jsfcompref.SpellCheckRenderer.class.getName());
    addConverter("convertWeight", "vtlib.WeightConverter");
    addValidator("validateEventRequirements",
      com.jsfcompref.vtlib.validator.EventRequirementValidator.class.getName());

  }
}
This taglib is identical to the XML-declared version shown previously.
Facelets also supports a concept of tag files that’s analogous to JSP’s tag files. In XML, a tag file is declared like the following:
<tag>
  <tag-name> hello</tag-name>
  <source> tags/helloparam.xhtml</source>
</tag>
While the XHTML implementing the tag file may look like that shown next:
<ui:composition xmlns:ui="http://java.sun.com/jsf/facelets">
  hello #{param}
</ui:composition>
And a usage of the hello tag looks like:
<vtlib:hello param="#{user.firstName}"/>
Finally, Facelets does allow you to define custom tag handlers in Java, but the details of doing this are beyond the scope of this discussion.
You can see that the Facelets tag library mechanism, while simple, is very powerful when combined with the JavaServer Faces Framework. Exploiting the full power of Facelets with JSF is also beyond the scope of this discussion, but examples of doing so may be found at https://facelets.dev.java.net/.
Taglibs in Facelets are declared in the page using XML namespaces. Facelets pages may be authored in any XML dialect, but to enable the convenience of direct viewing in a Web browser, it is easy to author them in XHTML. The following is a basic XHTML file that can serve as the basis for your Facelets pages.
<!DOCTYPE html PUBLIC "-//W3C//DTD XHTML 1.0 Transitional//EN"
"http://www.w3.org/TR/xhtml1/DTD/xhtml1-transitional.dtd">
<html xmlns="http://www.w3.org/1999/xhtml"
       xmlns:ui="http://java.sun.com/jsf/facelets"
      xmlns:f="http://java.sun.com/jsf/core">
  <h:form>
    First Name: <h:inputText value="#{user.firstName}" /><br />
    Last Name: <input type="text" jsfc="h:inputText"
                       value="#{user.lastName}" />
    <h:commandButton value="submit" />
  </h:form>
</html>
Note that it declares all the necessary taglibs as attributes in the <html> element. Facelets provides taglibs for the h:, f:, and jstl c: tag libraries. Once the taglib is declared, it operates exactly as in JSP. Note the plain HTML <input type=“text”> element with the jsfc attribute. You can apply this attribute to any piece of markup to associate the component identified by the value of the attribute with that piece of markup in the page. Any attributes present on the plain HTML tag are passed to the underlying component just as if you had used a regular h:inputText style tag. The purpose of the jsfc attribute is similar to the jwcid attribute in Tapestry, and delivers the same value of allowing nondeployed previews of the look and feel of your pages, as well as increased tool friendliness with non-JSP aware tools.
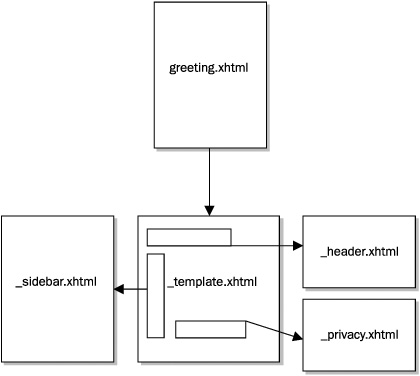
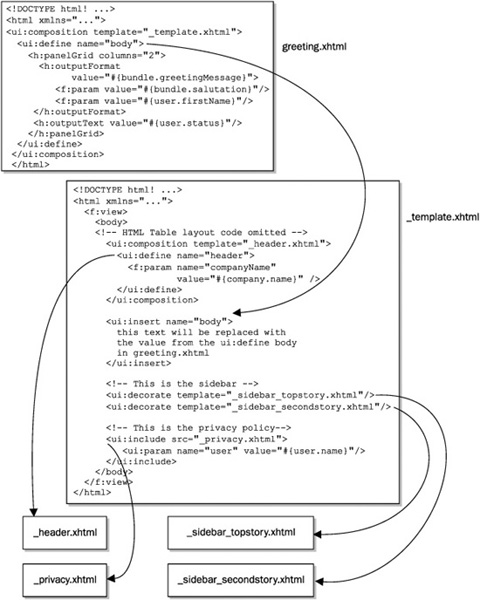
There are two main perspectives in templating with Facelets: the template file and the template client file. These are shown in Figure 13-5.
The template client is the file whose name actually corresponds to a viewId, such as greeting.xhtml. The template client employs one or more templates to achieve reuse of page content.
Let’s illustrate templating with Facelets by rewriting the register.jsp page from the JSFReg application in Chapter 2 using Facelets templates. As indicated at the beginning of this section, one of the main values of templating is the reuse of page designs in multiple pages of your application. Let’s define a simple template that could be used in every page in the Virtual Trainer application: lnf-template.xhtml (which stands for “look and feel” template).
<!DOCTYPE html PUBLIC "-//W3C//DTD XHTML 1.0 Transitional//EN"
"http://www.w3.org/TR/xhtml1/DTD/xhtml1-transitional.dtd">
<html xmlns="http://www.w3.org/1999/xhtml"
      xmlns:ui="http://java.sun.com/jsf/facelets">
<head>
  <meta http-equiv="Content-Type"
        content="text/html; charset=windows-1352" />
  <title><ui:insert name="title">Placeholder Title</ui:insert></title>
  <link href="css/vt.css" rel="stylesheet" media="screen" />
</head>
<body>
  <table width="100%" border="0">
     <tr>
      <td height="89">
        <h1 align="center">
           <img src="images/logo.jpg" width="92"
                height="110" />JSF Virtual Trainer Application</h1>
       </td>
     </tr>
      <tr>
       <ui:insert name="body">Placeholder Body</ui:insert>
     </tr>
    </table>
</body>
</html>
The first thing you’ll notice is that this is a regular XHTML page with an additional namespace of “ui” defined, and two usages of the ui:insert tag from that namespace. These two <ui:insert> tags state that the contents of this element will be replaced with something else when the page is compiled. Let’s now examine the page that contains the markup referred to by the <ui:insert> tags, register.xhtml, the template client to the lnf-template .xml file.
FIGURE 13-5 The template and the template client
<!DOCTYPE html PUBLIC "-//W3C//DTD XHTML 1.0 Transitional//EN"
"http://www.w3.org/TR/xhtml1/DTD/xhtml1-transitional.dtd">
<html xmlns="http://www.w3.org/1999/xhtml"
      xmlns:ui="http://java.sun.com/jsf/facelets"
      xmlns:h="http://java.sun.com/jsf/html"
      xmlns:f="http://java.sun.com/jsf/core">

<body>
<ui:composition template="/lnf-template.xhtml">
<ui:define name="title">
  JavaServer Faces Virtual Trainer Application Registration
</ui:define>

<ui:define name="body">

  <table width="70%">

    <tr>
      <td width="40%">First Name:</td>
      <td width="60%">
        <input type="text" jsfc="h:inputText" required="true"
               id="fname"
               value="#{UserBean.firstname}" />
        <h:message for="fname"/>
       </td>
     </tr>

     <tr>
      <td width="40%">Last Name:</td>
        <td width="60%">
        <input type="text" jsfc="h:inputText"
               value="#{UserBean.lastname}" required="true"
               id="lname" />
        <h:message for="lname"/>
        <span jsfc="h:message" for="fname">Message</span>
       </td>
     </tr>

     <tr>
       <td width="40%">Gender:</td>
       <td width="60%">
        <h:selectOneRadio type="radio"
               value="#{UserBean.gender}" required="true" id="gender">
           <input type="radio" jsfc="f:selectItem"
                 itemLabel="Male" itemValue="male" />
           <input type="radio" jsfc="f:selectItem"
                  itemLabel="Female" itemValue="female" />
         </h:selectOneRadio>
         <h:message for="gender"/>
       </td>
     </tr>

    <tr>
       <td width="40%">Date of Birth:</td>
       <td width="60%">
        <h:inputText value="#{UserBean.dob}" id="dob" required="true" >
          <f:convertDateTime pattern="mm-dd-yy"/>
         </h:inputText>(mm-dd-yy)
       <h:message for="dob"/> </td>
    </tr>

    <tr>
       <td width="40%">Email Address:</td>
       <td width="60%">
        <h:inputText value="#{UserBean.email}" required="true"
          validator="#{UserBean.validateEmail}" id="email"/>
         <h:message for="email"/>
     </td>
    </tr>

    <!-- Remainder of rows deleted for brevity -->

  </table>

</ui:define>
</ui:composition>
  </body>

</html>
The main content of this page is enclosed in a <ui:composition> tag. In a template client page using <ui:composition>, anything outside of the bounds of a <ui:define> tag is ignored and is not included in the rendered output. Also, note that although this example doesn’t show it, a template client file can itself act as a template and leverage other files as template clients.
Facelets provides six tags in the ui: tag library to perform templating, each with special features. This section serves as a guide and reference to these tags. Each section heading lists the general form for the tag.
ui:composition
<ui:composition template=“ optionalTemplate”>
The ui:composition tag is used in files acting as a template client, and is the fundamental enabler for templating in Facelets. This tag indicates to the Facelets system that the enclosing children should be grafted into the UIComponent hierarchy at that point in the page. Optionally, it declares a template to which the enclosed content should be applied using the template attribute. Generally, <ui:composition> causes the child components to be created as direct children of the UIViewRoot, as would be the case in the example in Figure 13-6.
There’s no need to explicitly use the <f:view> tag in Facelets because the Facelet markup serves no other purpose than to generate the UIComponent tree.
As you can see in Figure 13-6, Facelets provides several tags designed for use with <ui:composition>. The details of these are described next.
ui:decorate
<ui:decorate template=“ requiredTemplate”>
The <ui:decorate> tag provides the same feature as <ui:composition>, but it causes any content surrounding the <ui:decorate> tag to be included in the page, rather than be trimmed, as in the case of <ui:composition>. This enables taking any element in the page, and applying it to a template. Also, observe that the template attribute is required in this tag. This tag is useful when you have a series of items in one page that require the same appearance. If you were to use ui:composition, the output around the tags would be trimmed, which is not desirable in this case.
ui:define
<ui:define name=“requiredName”>
The <ui:define> tag is used in files acting as a template client, inside of a <ui:composition> tag, to define a region that will be inserted into the composition at the location given by the <ui:insert> tag with the corresponding name for the <ui:define> tag. Figure 13-7 shows <ui:define> in action.
ui:insert
<ui:insert name=“ optionalName”>
The <ui:insert> tag is used in files acting as a template to indicate where the corresponding <ui:define> in the template client is to be inserted. If no name is specified, the body content of the <ui:insert> tag is added to the view.
ui:include
<ui:include src=“requiredFilename”>
FIGURE 13-6 <ui:composition> in action
The eminently useful tag <ui:include> is combined with the <ui:param> tag to enable the parameterized inclusion of pages. This tag may be present in templates or template clients. For example, consider the following in a template file called header.xml:
<html xmlns="http://www.w3.org/1999/xhtml"
      xmlns:ui="http://java.sun.com/jsf/facelets">
<body>
  <ui:include src="userWelcome.xhtml"><ui:param name="details"
                      value="#{user}"/></ui:insert>
 </body>
</html>
The following is the userWelcome.xhtml file:
<xml xmlns="http://www.w3.org/1999/xhtml"
      xmlns:ui="http://java.sun.com/jsf/facelets"
      xmlns:h="http://java.sun.com/jsf/html"
      xmlns:f="http://java.sun.com/jsf/core">
Welcome, #{details.honorific} #{details.firstName} #{details.lastName}!
</xml>
Note that the <ui:param> tag passes the #{user} expression to the userWelcome.xhtml file.
ui:param
<ui:param name=“requiredName” value=“requiredValue”>
The <ui:param> tag is used exclusively inside of <ui:include> tags to define name/value pairs that are available via the EL in the included page. Both the name and value attributes may be literal strings or EL expressions. See the previous tag for an example.
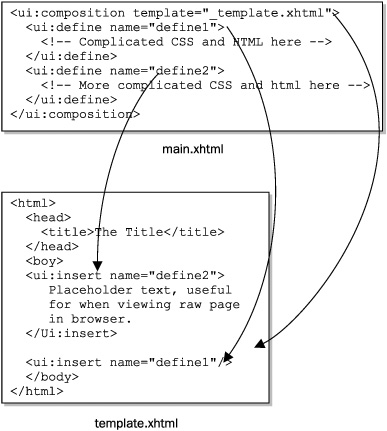
FIGURE 13-7 <ui:define> in action
To complete our discussion of using Facelet tags, let’s examine the remaining four tags in the Facelets ui: tag library—<ui:component>, <ui:fragment>, <ui:remove>, and <ui:debug>.
ui:component
<ui:component id=“optionalComponentId”
binding=“optionalValueExpression”>
As mentioned earlier, the jsfc attribute can be placed on raw HTML markup to indicate that this piece of markup corresponds to a particular UIComponent instance in the tree. The <ui:component> tag has an optional id attribute that will be set into the id property of the component. If not specified, a page-unique ID is generated. The optional binding attribute is a ValueExpression that refers to a JavaBeans property whose type is a UIComponent. This is exactly the same as the binding attribute on JSP JSF component tags. If the ValueExpression has no initial value, an appropriate UIComponent instance is created automatically and set into the ValueExpression. Any markup occurring outside of the <ui:component> tag is not included in the view.
ui:fragment
<ui:fragment id=“optionalComponentId”
binding=“optionalValueExpression”>
The <ui:fragment> tag is the same as <ui:component> except that it wraps a series of components inside a single parent component before the parent is added to the tree.
ui:remove
<ui:remove>
The <ui:remove> tag is mainly used during development to “comment out” a portion of the markup in order to prevent it from actually ending up in the view. <ui:remove> has no attributes and may appear anywhere in the page where it is valid to have a component or something that represents a component.
ui:debug
<ui:debug hotkey=“optionalHotKey” />
This astoundingly useful tag will enable a hot key that pops up a new window displaying the component tree, any scoped variables currently active, and other useful debugging information. You have to set the facelets.DEVELOPMENT context-param in your web.xml to enable this to work. If optionalHotKey is not specified, pressing CTRL-SHIFT-D will pop up the debug window.
Now that you have seen how to use Facelets, let’s examine how Facelets implements an alternate view description technology.
This section explains the design, architecture, and some of the implementation details of Facelets. Understanding how Facelets works is valuable because it enables you to use Facelets as a model when developing your own custom view description technology.
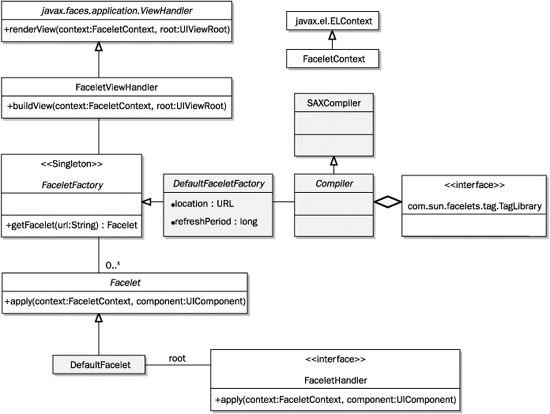
Figure 13-8 shows the UML class diagram of the core com.sun.facelets package. Classes that are not in this package are shown with their fully qualified class names. Classes from the private implementation of Facelets are shown in gray.
FIGURE 13-8 The UML class diagram of the core Facelets architecture
Let’s step through the flow of control for an initial request to render a page defined in Facelets. As described in Chapter 3, during the Render lifecycle phase, the renderView( ) method is called on the ViewHandler. This method takes the argument UIViewRoot, which in the case of an initial request has no children, and does two things with it:
1. Populates it with UIComponent children as defined in the view description technology
2. Renders the newly constructed view to the client
The default ViewHandler in JSF 1.1 did these two things together, which caused many problems described in Chapter 3. The default ViewHandler in JSF 1.2 does these two things separately.
In the case of an application using Facelets, the default ViewHandler has been replaced with an instance of the FaceletViewHandler. Naturally, to fulfill the first requirement of the renderView( ) method the protected buildView( ) method is called. All of the Facelets-specific processing is done inside this method and its helpers. In buildView( ), the FaceletViewHandler calls its FaceletFactory to create an instance of the root Facelet for this viewID. The implementation of this process is handled by the DefaultFaceletFactory instance. This class performs the loading of the XHTML file and compiles it using the Compiler.
The Compiler turns the collection of XHTML files that make up the view into a tree of Facelet instances. You can see from the diagram that the implementation of the Compiler uses the SAX API provided by the Java platform to parse the XML file. Also, note that the compiler contains a list of TagLibrary instances for the application. This list will always include the standard Facelets tag libraries, plus any additional ones in use by the application. Given this tree of Facelet instances, the buildView( ) method simply calls apply( ) on the root Facelet, passing the UIViewRoot. This will cause the UIViewRoot to be populated, thus accomplishing requirement 1 of renderView( ). Figure 13-9 illustrates how a collection of Facelet pages corresponds to a hierarchy of Facelet instances, but it is sufficient to know that when buildView( ) returns, the UIViewRoot has been fully populated with the child components for that view, templates and all.
Once the view has been constructed, the FaceletViewHandler does exactly the same thing done by the default ViewHandler: it renders the view using the standard methods provided by the Faces API.
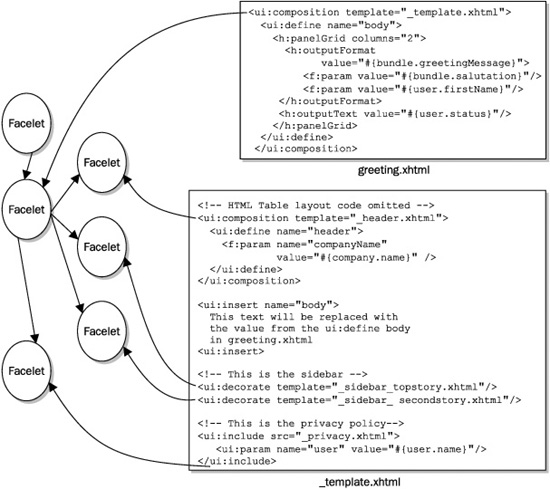
FIGURE 13-9 A collection of template files and how they correspond to Facelet instances
Thanks to the decorator pattern, developers who want to customize JSF with their own ViewHandler need only provide actual method implementations where the functionality to be offered differs from that provided by the default implementation. This section lists the abstract methods of ViewHandler, explains the behavior of the default implementation, gives some ideas for why you’d want to override the method with your own behavior, and indicates whether the method is overridden by Facelets.
Default Behavior Performs a matching algorithm (described in Chapter 12) to find the best match Locale between the supported Locales of the application, and the Locales requested by the user-agent.
Why Override? If the existing algorithm is insufficient or undesirable in some way.
Overridden in Facelets? No.
Default Behavior In JSF 1.1, this method always returned the default RenderKitId. In JSF 1.2, this method consults the request parameter map for a parameter named by the value of the symbolic constant javax.faces.render.ResponseStateManager.RENDER_KIT_ID_PARAM. If present, the value of the parameter is returned. If not present, the default RenderKitId is returned.
Why Override? To supplant the RenderKit selection algorithm with something else. For example, you may want to interrogate the User-Agent header and choose a render-kit based on a particular browser’s capabilities.
Overridden in Facelets? No.
Default Behavior Simply creates an empty UIViewRoot with no children and initializes its locale and renderkit properties using the previously mentioned methods.
Why Override? If your custom ViewHandler wants to leverage a static file to describe the view, such as Mozilla XUL, this method is where a pool of existing views is populated and consulted for maximum performance. This strategy is employed by the Tapestry web framework from Jakarta. Using this strategy prevents the view hierarchy from being altered during runtime, so examine the tradeoffs between performance and flexibility carefully.
Overridden in Facelets? No.
Default Behavior Translates a viewId into a URL suitable for selecting that view as the result of an HTTP request. This method is used when rendering the HTML form element to aid in outputting the value of the action attribute.
Why Override? The JSF Portlet integration library overrides this method to interpose the Portlet ID parameter into the URLs. This is a key enabler for allowing JSF applications to run well inside of Portlets.
Overridden in Facelets? No.
Default Behavior Similar to getActionURL( ), this method translates a path into a URL suitable for resolving against the currently running JSF application.
Why Override? The JSF Portlet integration library overrides this method to interpose the Portlet ID into resource URLs, such as the value of the src attribute for <img> tags.
Overridden in Facelets? No.
Default Behavior This is the most important method in ViewHandler and does the most work. Its job is to take the argument UIViewRoot, which was created by a previous call to createView( ), and render it to the browser. The default implementation in JSF 1.2 leverages JSP to populate the UIViewRoot with children as described in the JSP page, and then traverses the view to render each child to the browser.
Why Override? Most custom ViewHandler implementations will want to override this method; it is the heart of providing an alternate view description technology.
Overridden in Facelets? Yes.
Default Behavior Delegate to the restoreView( ) method of StateManager (described in Chapter 11).
Why Override? If you want to provide custom state management, but do not want to conform to or leverage the StateManager API.
Overridden in Facelets? No.
Default Behavior Due to one of the complexities of handling multiple forms in a single JSF view, this method writes out a state marker into the buffer containing the output of rendering. When the tree is completely rendered, the markers are replaced with the actual state of the view. This enables the view to be properly restored regardless of which form was submitted, because each form contains the complete state of the view.
Why Override? For the same reason one would override restoreView( ).
Overridden in Facelets? Yes.
This chapter has presented the concepts behind providing a custom view description technology, and has explained how Facelets implements these concepts. The next chapter examines, in detail, two significantly less esoteric matters: internationalization and accessibility.