Given the strong tools and development support offered by multiple vendors, it is easy to think that JSF requires a visual Integrated Development Environment (IDE) to be used successfully. This, however, is a misconception. As explained in Chapter 2, it is relatively easy to download and set up a JSF development environment without the use of an IDE. On the other hand, the JSF development experience can be substantially enhanced through the use of an IDE. For this reason, several top-notch Faces-enabled IDEs are examined here. The key strengths of these development environments tend to lie in the following areas:
• Visual design of JSF pages This allows the Faces developer to visually design pages using an editor that provides an approximation of the runtime view of the pages during development.
• Visual design of the navigation model A visual navigation model design tool, or page flow editor, allows the developer to visually design the navigation model of the application by drawing lines and connecting pages as opposed to just editing the faces-config.xml file directly.
• Visual databinding This feature allows the developer to associate UI components with data objects in a visual manner.
• Productive code generation These features improve the productivity of the Faces developer by automatically generating certain pieces of code, such as backing beans.
• Other productivity features Such as an enhanced faces-config.xml console editor.
The remainder of this chapter examines several of the most popular JSF-enabled development environments. These include
• Sun Java Studio Creator
• BEA Workshop Studio
• IBM Rational Web Developer
• Exadel Studio Pro
To show how each development environment compares with the others, a simple Faces application will be built in all of them, with a focus towards addressing the aforementioned key areas. In certain cases, special attention will be given to features that showcase some of the product’s unique strengths.
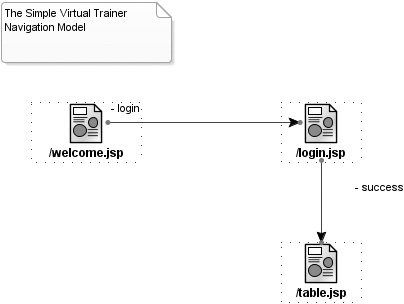
The example application to be built in the different development environments is a subset of the Virtual Trainer application introduced in Chapter 9. In this version, a welcome page (welcome.jsp) provides a navigation to a login page (login.jsp), which checks a user’s credentials. A successful login will forward to a destination page (table.jsp) where tabular data is displayed. This is depicted in Figure 17-1.
To build this application, several Java classes will be made available to each JSF IDE. These include
• TrainingEvent.java Represents a single object or row of a Virtual Trainer training event. The properties include the event name, event type completion date, and so on.
• TrainingEvents.java Has a property of type List that contains TrainingEvent objects.
• TrainingEventsLogin.java Contains code to authenticate a user by checking userid and password properties in an action method.
In addition to the Java classes, master-detail database tables (trainingevents and trainingsessions) that contain similar training event and workout session data are also available for building user interfaces that interact with a backend database. Two files that help define the look and feel (vt.css and vtlogo.jpg) are also provided for this simple application.
FIGURE 17-1 The simplified Virtual Trainer application
We begin our look at JSF IDEs with Sun Java Studio Creator. Java Studio Creator is Sun’s effort to provide a JSF-centric development environment that provides a productive, visual development experience not unlike Microsoft Visual Basic or Visual Studio, without abandoning the most common Java development features you’d expect with any Java IDE. At the time of this writing, the current version of Studio Creator is 2.0, which is easily downloadable using your free Sun Developer Network account. Once installed, it occupies approximately 600 megabytes on the file system. Further details on Java Studio Creator can be found at http://www.sun.com/software/products/jscreator/.
As you first start Studio Creator, you’ll notice the wide variety of tutorials and samples accessible. You’ll also notice that a bundled PointBase database is available, which makes the samples ready to run. To learn the basics of Studio Creator, you can definitely make use of these tutorials and samples. For our purposes, though, we’ll create a new Web Project from scratch.
After completing the New JSF Web Project Wizard, which allows for the selection of project name, location, and default Java package, you’ll notice that the file system has a new empty JSF Web project that contains the following:
• page1.jsp An initial starter JSF-enabled JSP document (XML) with starter code. This empty page comes preloaded with taglib directives for the JSF core, standard, and Sun’s default Web UI component library.
• resources/ A subdirectory with a starter stylesheet.css.
• WEB-INF/ A subdirectory with a web.xml file that defines faces-config.xml with delegate files for the navigation model (navigation.xml) and for the managed beans (managed-beans.xml). The web.xml file also comes preloaded with several additional entries for use with Sun’s default Web UI component library. These include a file upload (FileUpload) filter, ExceptionHandler servlet, and a ThemeServlet.
• sun-web.xml An additional configuration file for use with Sun’s default Web UI components.
In addition to the extra items provided in the Web root directory, Studio Creator also creates several JavaBeans. Three are general-purpose beans registered with the different Faces scope settings as denoted by their names: RequestBean1.java, SessionBean1.java, and ApplicationBean1.java. A backing bean called Page1.java is also created. It serves as the event handler for the JSP page Page1.jsp and has declared UI component instances for Sun’s UI component’s com.sun.rave.web.ui.component.Body, Form, Head, Html, Link, and Page. In general, Studio Creator tightly couples every page with a backing bean Java class, which handles all the user interface events from the page and provides the page with data access to external sources.
A quick inspection of the initial Page1.jsp (or any new JSP page) reveals that Creator uses a JSP (XML) document along with a combination of the Standard components and Sun’s default UI component library, as shown next:
<?xml version="1.0" encoding="UTF-8"?>
<jsp:root version="1.2"
    xmlns:f="http://java.sun.com/jsf/core"
    xmlns:h="http://java.sun.com/jsf/html"
    xmlns:jsp="http://java.sun.com/JSP/Page"
    xmlns:ui="http://www.sun.com/web/ui">
  <jsp:directive.page contentType="text/html;charset=UTF-8"
    pageEncoding="UTF-8"/>
  <f:view>
    <ui:page binding="#{Page1.page1}" id="page1">
      <ui:html binding="#{Page1.html1}" id="html1">
        <ui:head binding="#{Page1.head1}" id="head1">
          <ui:link binding="#{Page1.link1}" id="link1"
                    url="/resources/stylesheet.css"/>
        </ui:head>
        <ui:body binding="#{Page1.body1}" id="body1"
               style="-rave-layout: grid">
          <ui:form binding="#{Page1.form1}" id="form1"/>
        </ui:body>
      </ui:html>
    </ui:page>
  </f:view>
</jsp:root>
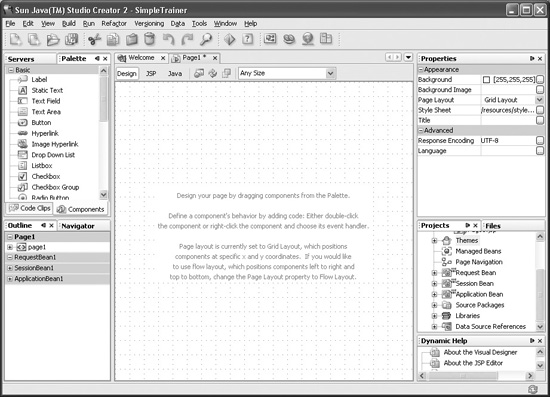
As shown in Figure 17-2, after creating a new project, you’ll notice that the visual design editor is shown in grid layout mode. Studio Creator is unique in this regard in that it defaults to a grid layout, which means that the editor supports absolute positioning of the components on the page. Grid layout and absolute positioning is achieved through usage of CSS styles defining position information for each component on the page. This differs from the more common flow layout that Web applications or HTML, in general, uses as a default.
Creator’s designer also has the option of switching to a more traditional flow layout by toggling the page-layout property in the properties editor for the overall page. Changing this property modifies the style attribute Sun’s body component, as shown next:
<ui:body binding="#{Page1.body1}" id="body1" style="-rave-layout: grid">
A noticeable change seen when you switch to flow layout is that a cursor appears and the visual editor then accepts typing directly onto the canvas.
At the top of the visual editor, you’ll notice three button toggles for switching from Design, JSP, and Java, as shown here. Clicking Java will open the provided backing bean in a Java source editor.

Clicking the JSP toggle switches to a color-highlighted JSP source code editor, which provides JSP code completion along with collapsible code regions (referred to in Sun’s documentation as code folding). The JSP code editor also provides a very helpful tag completion feature, shown in Figure 17-3, where matching tags appear in a menu after typing the initial characters. In addition to tag completion, there is also tag attribute completion where after a tag has been typed, a list of attributes appears in a menu. Creator even provides a help window below on the selected attribute.
FIGURE 17-2 Studio Creator’s visual design environment
Creator’s Java source code editor is also feature-rich with code folding, code completion, syntax coloration, automatic error detection, and several refactoring options.
To start building the simplified version of the Virtual Trainer application, a new welcome page (welcome.jsp) is created. For this page, we will use Creator’s default grid layout with absolute positioning. To build the banner portion of the welcome page, we’ll use Creator’s default set of UI components (although the Standard components are also available on the Palette). For the image, we use <ui:image>, and for the banner text, a <ui:staticText> component. Since the default grid layout has been applied, the components have their style attribute set to define their location on the page:
<ui:image binding="#{welcome.image1}" id="image1" style="left: 24px; top: 24px;
position: absolute" url="/resources/vtlogo.jpg"/>
FIGURE 17-3 Studio Creator’s JSP code editor
Notice also that the binding attribute is set to an auto-generated image1 component of type import com.sun.rave.web.ui.component.ImageComponent, which is declared in the backing bean (Welcome.java), as shown next:
private ImageComponent image1 = new ImageComponent();
This illustrates a very important feature to be aware of: when any UI component is dropped onto the page, it will automatically have its binding attribute set to a component declaration that is automatically generated in the backing bean for the page. Studio Creator prefers to manage these components and even places warnings against modifying the Creator-managed code in the generated code.
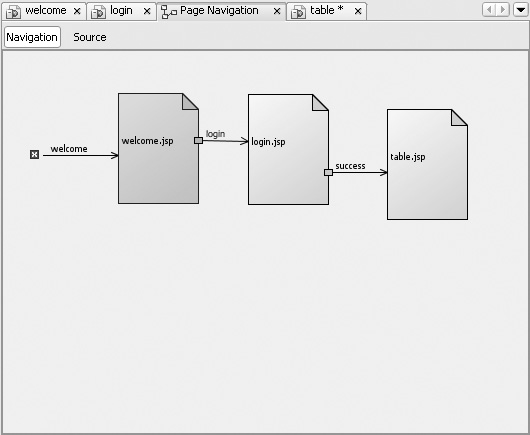
To productively build the Faces navigation model, there is a Faces Page Navigation page flow design view (shown in Figure 17-4). With this view, you can design the overall application navigation model as well as create new pages. From the Page Navigation window, you can create the entire navigation model as well as starter pages (login.jsp and table.jsp). To create a new page in the Page Navigation window, right-click the diagram and select New Page…
Creating navigation rules is simply a matter of dragging lines from one page to another. The navigation view also offers a Source toggle button, which allows direct editing of the navigation model using an XML editor. To quickly edit the new login page, you can double-click the page in the navigation view and jump to the JSP editor.
To build the login form shown in Figure 17-5 on the page, we will use a standard <h:panelGrid> component to contain two Sun <ui:label> components, along with input components: <ui:textField> and a <ui:passwordField>. To complete the page, a <ui:button> tag is added to the page to allow the form to be submitted. A <ui:messageGroup> tag, which renders any system/error messages, is also added.
FIGURE 17-4 The Studio Creator page flow navigator
A nice feature in the visual editor is that when the button is double-clicked, an action method is auto-generated and bound to the button. As shown in Figure 17-6, you are then placed inside of the auto-generated action method. This behavior is reminiscent of Microsoft’s Visual Basic or Visual Studio. For our application, double-click the button and add the simple login code. After manual editing, the completed method checks the values of the two input UI components and returns “success” if they both equal “jake”.
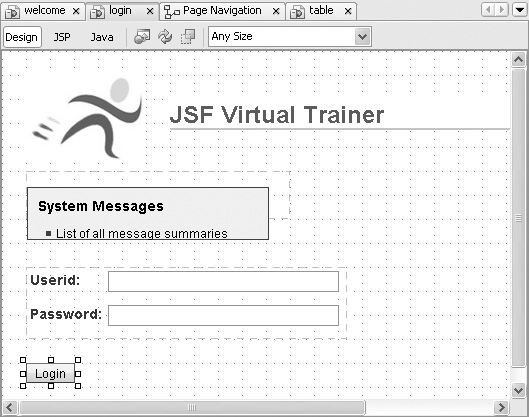
FIGURE 17-5 The Simple Virtual Trainer’s login page in Studio Creator
FIGURE 17-6 Creating an action method that’s bound to a button in Studio Creator
Since Studio Creator is based on Sun’s more general-purpose Java IDE, NetBeans, it has a high-quality Java source code editor with code completion capabilities that include collapsible code regions (also known as code folding).
To build the table.jsp page, we’ll opt for using Sun’s more advanced <ui:table> to display the training event data. As the <ui:table> component is dropped onto the page, it will render in a generic, non-databound form. Then we’ll open the Servers window, which has a registry of Data Sources where connections to databases are stored, and drag a database table (containing training events) and drop it on top of the <ui:table>. This action creates a usable javax.sql.rowset.CachedRowSet object (trainingeventsRowSet) and makes it available to the <ui:table> component on the page. The <ui:table> rendered in the visual editor then takes on an appearance which shows the column data-types of the actual data. This is shown in Figure 17-7. At this point, we can edit the generated table directly, removing or reordering columns in the visual editor.
If any extra editing of the underlying data object for the table (trainingeventsRowSet) is needed, Studio Creator provides a Query Editor that allows for both visual and direct editing of the database query that defines the data provided to the RowSet data object.
As shown in Figure 17-8, the top pane of the Query Editor displays the database tables as well as their relationships. The second pane allows for column selection, while the third pane allows for direct editing of the query. The bottom pane (which is currently empty) will display the results of the query.
To run the application, simply click the green arrow button at the top of the main menu. This makes sure that the application is compiled and deployed to an embedded instance of the Sun application server, which is started in the background if it was not already started. When the application has been successfully deployed to the server, a browser will appear and the default start page will show in the browser. The initial page1.jsp is set as the default start page, but you can reset it to any page you want by selecting it in the projects view window and then right-clicking it and selecting Set as Start Page. To run the application in debug mode, choose Run | Debug from the main menu. This will shut down the server (if running) and restart it in debug mode.
FIGURE 17-7 Databinding the <ui:table> component
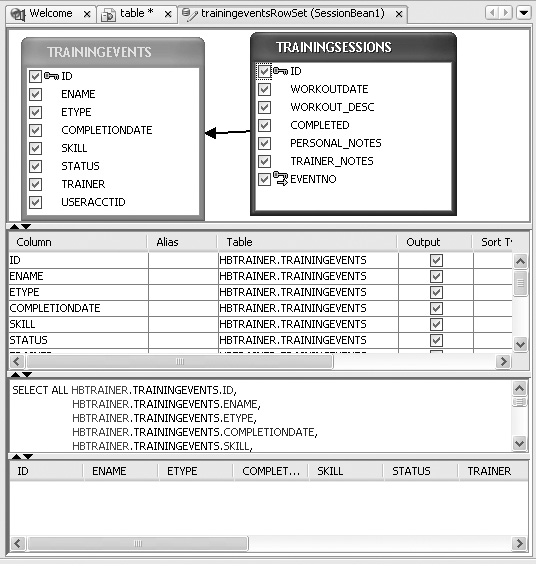
FIGURE 17-8 Java Studio Creator’s Query Editor
It is obvious that Sun has put a substantial amount of effort into Studio Creator by offering many extra features, especially in the area of auto-code generation and choosing to tightly couple its JSP pages with backing beans as well as the three clearly defined scope-managed beans for managing application data. Advanced Java developers may find the high degree of code generation a little excessive, but Sun appears to be positioning this product more to new JSF developers who are coming from a Visual Basic/Studio background where automatic code generation enables very fast creation of the most common types of Web application artifacts. Finally, this example application exercise of building a simple login and databound table application is really just scratching the surface of the features in Studio Creator. Stepping through its many tutorials and example applications is definitely recommended to get a better overall feel for what Studio Creator provides.
In late 2005, BEA acquired the M7 corporation along with its Eclipse-based NitroX development tools. The NitroX tool family has since been renamed to BEA Workshop and includes the tools Workshop for JSF and Workshop Studio. Both of these tools offer visual design support for JSF applications; however, for this review, just Workshop Studio will be used. Further details on BEA Workshop Studio and the overall BEA Workshop product family can be found at http://www.bea.com.
Downloading a 15-day trial version of BEA Workshop Studio is very easy. At the time of this writing, the current version of Workshop Studio was 3.0. It offers a full version 120-megabyte download, which includes the Eclipse IDE, or just the Workshop Studio plug-in, which is only 80MB. When installing the full version, it will occupy less than 200MB, which makes it have one of the smallest footprints of all the JSF IDEs available.
Creating a new Web Application Project in Workshop Studio provides options that allow the user to specify the JSP version (1.2 or 2.0), whether or not you want to use Enterprise JavaBeans version 3.0, as well as whether or not the project will use Hibernate. In contrast to Studio Creator, once a project is created, the files created are fairly minimal. There is, of course, a web.xml file configured with the Faces servlet. There are also some MyFaces configuration entries since MyFaces is one of the default component libraries available out of the box with BEA Workshop Studio. An initial page, index.jsp, is provided by default and it simply has a JSP forward pointing to another auto-created page, /pages/welcome.jsp. The intention being that the location of all JSF pages should be placed under the /page directory, which is actually good coding style especially when establishing security that is based on directory structure. Another nice feature is the resource bundle properties file that is created and added to the project. In fact, the welcome.jsp has several outputText components that refer to resources in the bundle. For persistence support, checking the Hibernate Support checkbox will provide a starter hibernate.cfg.xml file.
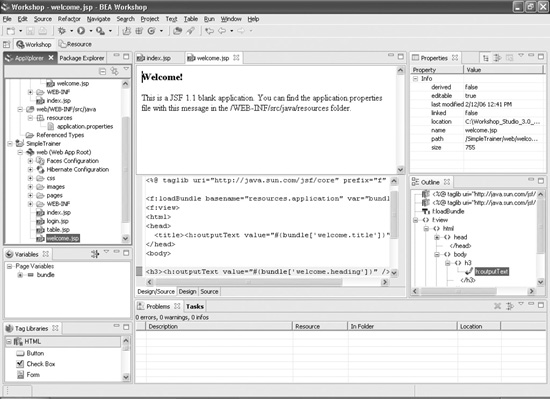
To get started with the new Web project, you can open the /pages/welcome.jsp and you’ll see the JSP visual editor in its default mode, which shows both the JSF source and visual designer. This is shown in Figure 17-9.
FIGURE 17-9 BEA Workshop’s visual design environment
Similar to Studio Creator, it also has three buttons. However, in this case they are Design, Source, and the combined Design/Source (default). The visual editor behaves much like a traditional HTML designer but with JSF component rendering. A grid layout feature using CSS absolute positioning like Studio Creator is not offered.
When working directly with the JSP code editor, you’ll quickly see how helpful it is. Although the JSP code editor lacks collapsible regions (code folding), it does have very snappy tag completion and tag attribute completion capabilities.
Building the pages of the JSF trainer application is done by launching a new Web Artifact Wizard, which can be invoked from the main menu or by the context menu. To create our Web pages, choose the JSF Page Web Artifact to generate a Faces-enabled JSP page. In addition to allowing you to set the name of the page, it also allows you to select a resource bundle, from which it will insert a standard <f:loadBundle> tag into your page.
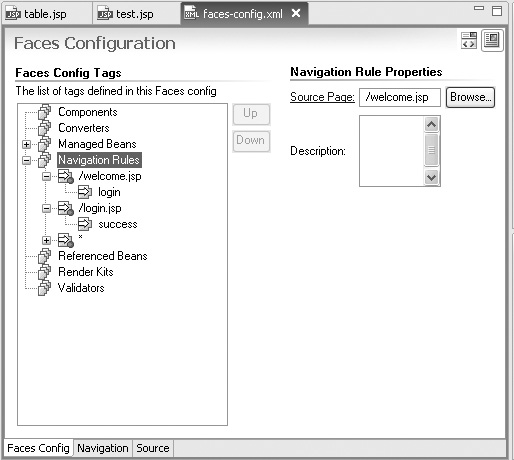
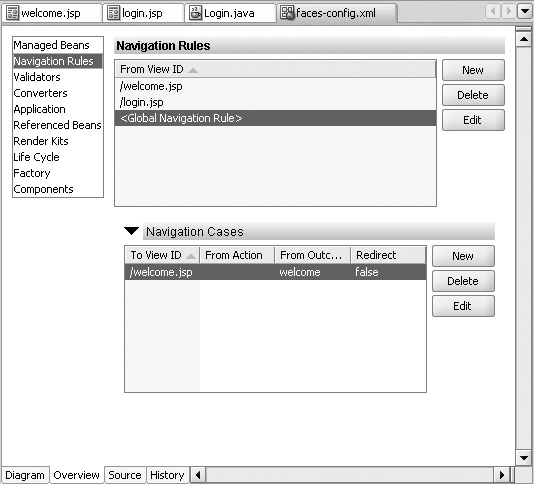
After building the initial pages of the (simple) Trainer application, it is possible to build navigation rules by opening the application’s faces-config.xml file in the Faces Configuration editor, shown in Figure 17-10. This editor provides a console user interface for the efficient editing of the faces-config.xml elements. It is also possible to visually edit the navigation model using a page flow navigation tool that is accessible by clicking the Navigation tab at the bottom left.
FIGURE 17-10 The Faces config and navigation editor in BEA Workshop Studio
Clicking the Navigation tab at the bottom of the editor displays a visual navigation model (shown in Figure 17-11); however, it only displays navigation rules one at a time.
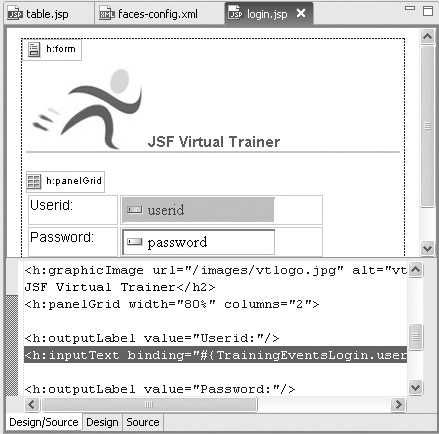
Filling out the rest of the pages in the application is merely a matter of editing them visually and inserting the various JSF components from the Tag Libraries palette. For example, to build the Login page (shown in Figure 17-12), a simple panelGrid was dropped onto the page and the Standard outputLabel, inputText, and inputSecret components were dropped inside of the PanelGrid. Incidentally, Workshop Studio also provides the Apache MyFaces (Tomahawk) tags on its palette in addition to the Standard JSF tags.
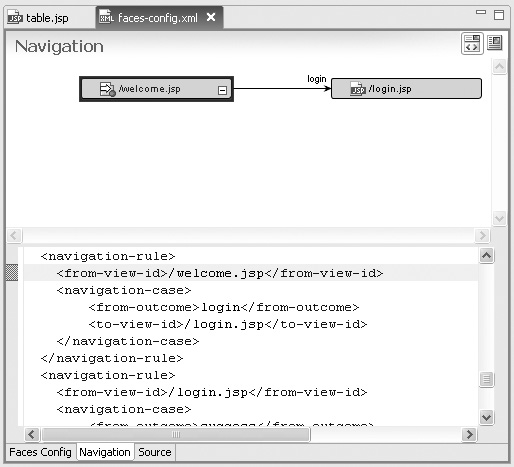
FIGURE 17-11 The visual navigation rule editor
FIGURE 17-12 Designing JSF pages in BEA Workshop Studio
Since the simple Trainer application contains several JavaBeans, we relied on BEA Workshop’s underlying Eclipse-based Java source code editors to build the beans necessary for the application. Using Eclipse for Java editing is extremely easy and the Virtual Trainer beans were quickly created from scratch.
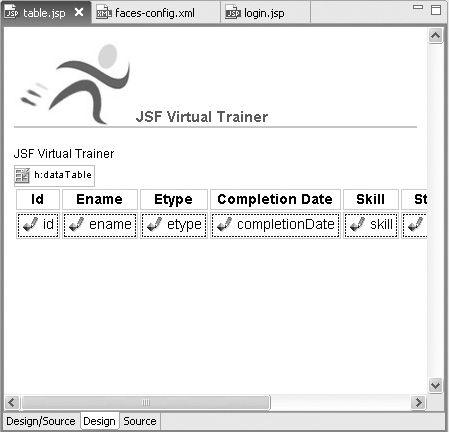
Registering them as Faces-managed beans can either be done directly in the AppXplorer project window, or by using the Faces configuration editor. Once registered, you can use a simple EL binding editor to select properties or methods from the managed bean and apply them to component attributes. For example, in building the final page of the application (table.jsp), simply drop a standard dataTable from the palette onto the page. This causes a wizard to be invoked and allows for the databinding of the table attributes, including the child column components. This wizard relies on a small JSF EL Binding dialog that allows you to select EL accessible items and apply their values to UI component attributes. This is shown in the illustration at right.

As shown in Figure 17-13, once finished, the table is rendered in the JSP page in a single-row approximation of its runtime appearance.
To run the application, an external server such as Tomcat or Weblogic must be configured. BEA Workshop will then use this server to run the applications being developed. This is configured at install time.
FIGURE 17-13 A databound dataTable component
With regard to building multilingual applications, BEA Workshop has a unique feature that is worth mentioning: It is possible to visually design JSF pages in different locales. How does this work? In general, as you design your pages in visual editors, you are actually browsing the components much like a typical browser. This means that the visual editor could have the ability to send locale information in the Request to the components, and in turn have the components respond in the appropriate locale (language).
This is, in fact, what BEA Workshop Studio’s visual editor has the capability to do. It gives you the ability to view the JSP pages in the different languages and immediately fix any localization design issues related to internationalization. Changing the locale in the visual editor can be done by choosing Text | Resource Locale… from the main menu and then selecting a locale from the drop-down list. This is enabled when the page you are editing has an <f:loadBundle> tag in it, and a message bundle, along with separate nondefault locales, are defined in the application’s faces-config.xml.

Recall that to use a resource in a JSF page requires using EL such as:
<h:outputText value="#{bundle['welcome.title']}"/>
Setting this EL value is very easy in Workshop Studio because a special EL picker along with a Resources pane allows for easy selection of resource keys, as shown in the illustration at left.
BEA’s Workshop Studio provides a familiar development experience for those already acquainted with the Eclipse development platform. In contrast to Studio Creator, BEA Workshop does not have the same auto-generation of code and advanced databinding features. Instead, it relies on the developer to create most of the necessary code artifacts. This is not necessarily a bad thing because more experienced Java developers often want to be responsible for all code in their applications.
Overall, despite having an extremely lightweight footprint, Workshop Studio has some very compelling development features, such as its AppXRay feature that tracks and synchronizes changes to all files in a JSF application, as well as the visual development support for different locales.
Having been one of the major backers of Java and JavaServer Faces in particular, Oracle provides a formidable Java development environment, which also has strong support for JSF development. At the time of this writing, Oracle’s current production version of JDeveloper is JDeveloper 10g Release 3 (10.1.3), and it is offered in the following three bundles:
• JDeveloper 10g Studio Contains all the features of the J2EE version, plus the Oracle ADF Framework
• JDeveloper 10g J2EE version Supports enterprise visual J2EE development with support for JSF, EJB version 3, Struts, and even UML modeling
• JDeveloper 10g Java version A lightweight Java source code editor and compiler
Downloading and installing JDeveloper 10g is easily done since it is packaged into a single zip file (the Studio version is approximately 333MB in size). Installation simply requires unzipping the zip file, and since it is free, there is no trial license or expiration. Further details on Oracle JDeveloper can be found at http://www.oracle.com/technology/products/jdev.
In contrast to the previously discussed tools, Oracle JDeveloper (shown in Figure 17-14) is a full-fledged Java IDE. That is, it can be used to build any kind of Java-related object, ranging from Enterprise JavaBeans and Web Services to Java Applets and Swing Applications. In addition to support for general Java-related development, it also has specialized support for JavaServer Faces in the areas of productive visual development of Faces applications.
To get started building Web applications with JDeveloper, invoke the Application Creation Wizard, which creates a workspace serving as a high-level container module that can hold multiple projects. In essence, a JDeveloper workspace is analogous to an enterprise J2EE application which can be archived as an Enterprise Archive (EAR) file and contain multiple JAR files, as well as Web applications archived in WAR files. JDeveloper projects can be considered analogous to J2EE Web applications.
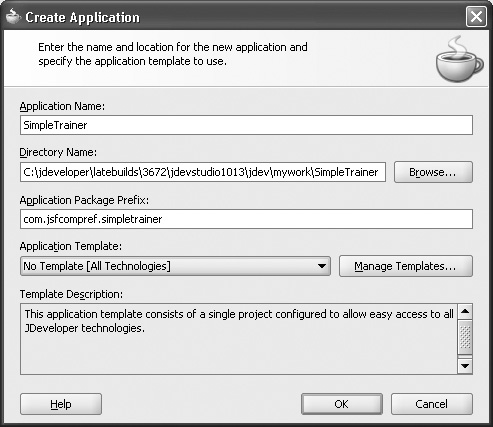
The Application Creation Wizard (shown here) allows you to specify a common package prefix for all classes created in this application workspace. The wizard also allows you to select an application template, which can generate an initial set of subprojects along with starting code.
FIGURE 17-14 Oracle JDeveloper 10g Release 3 (10.1.3)
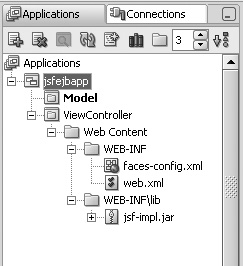
For example, an application template labeled “JSF EJB” exists. When selected, it pre-creates a workspace with two subprojects: Model and ViewController. The Model project is empty upon creation, but in accordance with the MVC design pattern, it is where you would place your EJB (Model) code. The ViewController project contains all View- (and Controller-) related code (this is where your JSF Web application will reside). Notice in the illustration at right that the ViewController project is loaded with a starter faces-config.xml and a preconfigured web.xml.
Since you specified that this application is to use JSF and EJB technologies, it will filter the many wizard selection options down to a subset of wizards that pertain to JSF and EJB development. This makes it a lot easier to select the right code generation wizard since there is a wide variety to choose from in the Studio version of JDeveloper, where the set of code generation/starter wizards range in technologies from Web Services to UML modeling.
For our purposes—creating the simplified version of the Virtual Trainer—we needn’t use an application template. Instead, we can just select No Template [All Technologies] (shown in Figure 17-15). This will create an empty workspace where no specific technologies have yet been chosen for the application.
Once the new workspace has been created, a New Empty Project dialog appears. This is where the Virtual Trainer application will actually reside. Choosing a name of simpletrainer as a project name, we now have an empty project and can begin adding Web application elements to it.
A first task is to write the Java classes: TrainingEvent, TrainingEvents, and TrainingEventsLogin. This is easily done using JDeveloper’s Java source code editor, which has exceptionally strong core Java-editing features, such as refactoring, syntax coloration, code completion, collapsible regions (code folding), automatic error detection, and code improvement features that include prompted package importing.
After creating the Training Event classes in the project, the JSF-enabled JSP pages were added. Creating new JSF JSP pages can be done in two ways in JDeveloper. The traditional way is to invoke the JSF JSP Wizard and create a new JSF-enabled JSP page, as shown in Figure 17-16.
JDeveloper’s JSF JSP Wizard creates a new JSP page but also adds any necessary items required to run it, such as a new faces-config.xml and a web.xml (configured to run a Faces application). The wizard also allows users to specify which J2EE version, JSP/Servlet 1.2/2.3 or 2.0/2.4 depending on whether the project already has defined the J2EE level. Two other smaller features in the JSF JSP Wizard include the ability to choose between creating an XML JSP document with extension, .jspx, or the more commonly used non-XML (.jsp). The second feature allows the user to define whether the JSP will be used in a mobile device. This will preset the visual editor to adhere to the specific screen dimensions of several well-known mobile devices.
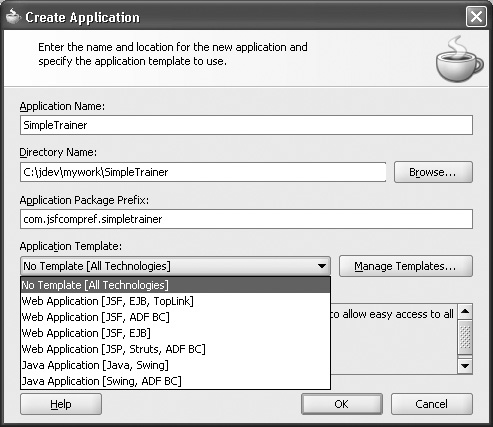
FIGURE 17-15 Creating an application with no templates
FIGURE 17-16 JDeveloper’s JSF JSP Wizard
A feature definitely worth mentioning is JDeveloper’s optional component binding feature. When turned on, it behaves in a manner similar to Studio Creator in that it will automatically create a backing bean for the JSP page, as shown in Figure 17-17.

FIGURE 17-17 JDeveloper’s optional component binding feature
Automatic component binding also means that whenever a UI component is dropped onto a JSF JSP page, a corresponding UI component declaration of a like component instance will be inserted inside the backing bean for the page. For example, if you drop an inputText onto your page name login.jsp, the following code:
private HtmlInputText inputText1;
along with its setter and getter,
  public void setInputText1(HtmlInputText inputText1) {
    this.inputText1 = inputText1;
  }
  public HtmlInputText getInputText1() {
    return inputText1;
  }
is added to the backing bean, Login.java. This bean is also automatically registered with a default name, backing_login, and the inputText component in the page is bound to this declared UI component in the backing bean:
<h:inputText binding="#{backing_login.inputText1}" id="inputText1"/>
In addition to creating a new class for a backing bean, a third option is available where the user can select an already existing backing bean from which to generate the UI component declaration.
In addition to offering the option of automatic component binding to a page at creation time, it is also possible to toggle this option on or off at any time by selecting the Page Properties… item in the Design menu on the main toolbar, selecting the Component Binding tab.
In general, having the component binding feature turned on can be very useful if you always want the components on your page to be bound to declared instances of the component in a backing bean. However, sometimes automatically generating code is not preferable for developers who want to be in full charge of all code in their application. In this case, you can simply opt out and not choose to turn on automatic component binding. You will then assume the responsibility of declaring and manually binding the page components with any backing bean instances of like components. Recall that binding a UI component on a page to a backing bean is not always required and should really only be done when you actually need to do something with the component instance in the backing bean.
Similar to other tools discussed in this chapter, JDeveloper provides a design tool that enables users to create a JSF navigation model entirely visually, from a bird’s-eye point of view, as opposed to editing the navigation rules and cases directly in the application’s faces-config.xml. Accessing JDeveloper’s JSF navigation modeler is done by opening the application’s faces-config.xml file and clicking the Diagram tab on the lower left of the modeler. Pages or navigation elements can either be dropped from the JSF Navigation Diagram palette on the right, or existing pages in the project can be dragged and dropped from the application explorer on the left.
Creating navigation cases simply involves clicking JSF Navigation Case on the palette and then connecting two pages with a line. As opposed to using the JSF JSP Wizard, as shown earlier, creating new JSF JSP pages can also be done by dragging a JSF page from the JSF Navigation Diagram palette onto the diagram. You’ll notice that as you drop a new page onto the diagram, it will appear with a yellow caution sign on it. This simply means that it is a new page that exists only in the diagram and has yet to be generated. This is shown for the table.jsp page in Figure 17-18. To actually generate the page, double-click the page, which will launch the same JSF JSP Wizard as before. Figure 17-18 also shows that notes can be added to the navigation diagram.
As you can see, building the navigation model and the initial pages for the simple Virtual Trainer application is very easy when using the navigation modeler and JSF JSP Wizard. However, there are times when you need to edit the faces-config.xml in a more direct fashion, such as when manually adding managed beans, components, and the like. In this case, JDeveloper also provides a console-type editor for faces-config.xml. This editor, shown in Figure 17-19, can be accessed by clicking the Overview tab (next to Diagram) at the bottom of the page.
As you can see in the figure, creating entries in faces-config.xml can be done by registering them using the Faces configuration editor. For developers who are more comfortable editing XML directly, JDeveloper also provides access to a powerful XML editor by clicking the Source tab. The XML editor offers collapsible code regions as well as tag completion capabilities. It’s shown in Figure 17-20.
Having examined the various faces-config friendly visual design editors in JDeveloper, it’s time to move on to designing the JSF pages.

FIGURE 17-18 JDeveloper’s Faces navigation modeler
FIGURE 17-19 JDeveloper’s Faces configuration editor
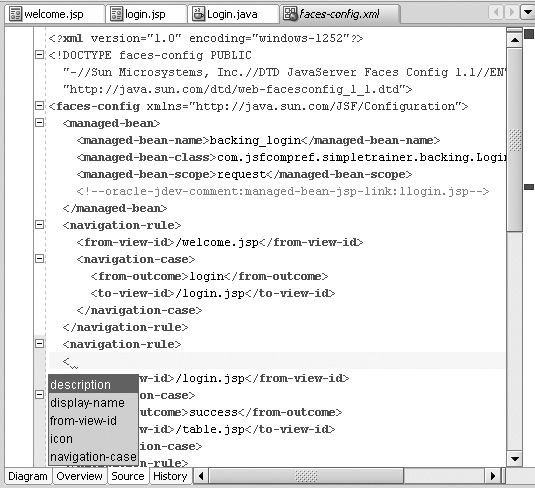
FIGURE 17-20 JDeveloper’s Faces-Config XML source editor
Similar to the other JSF IDEs, Oracle JDeveloper provides a visual design editor for JSP, HTML, and, most importantly, JSF-enabled JSP pages. In general, JDeveloper’s visual editor supports the ability to edit pages with any custom tag library and have the tag appear in its runtime state in the visual editor. This means that you could even develop your own custom tag library and have its runtime appearance be displayed in the visual editor. This ability to render the tags in the visual editor also allows it to display JSF tags and their underlying UI components in the visual editor. This also means that JDeveloper can visualize any JSF tag/component library.
For example, in addition to the Standard Core and HTML JSF libraries, any third-party library, such as MyFaces or Oracle’s own extended ADF Faces component library, can be visualized in the JSP visual editor. Another aspect of the overall visual design environment is that all editing of the elements in either the source editor, visual editor, or even the Structure Window on the lower left and the Property Inspector on the lower right are all synchronized visually. That is, when you select a component in the visual editor, the corresponding source code is selected along with the component in the Structure Pane. This is illustrated in Figure 17-21 where the JDeveloper visual design environment is shown.
You’ll also notice in Figure 17-21 that it is possible to edit both in the source and with the visual editor simultaneously. This is done by selecting Window | Split Document on the main menu.
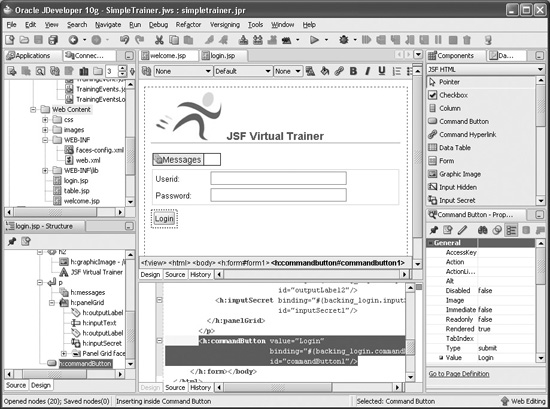
FIGURE 17-21 Oracle JDeveloper’s JSF visual design environment
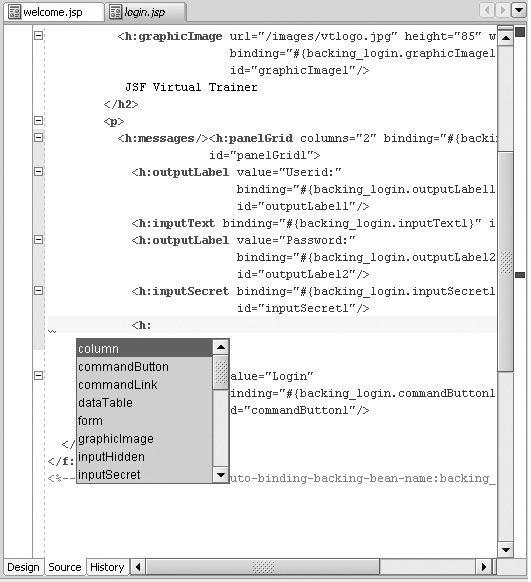
The JSP source editor also supports the most popular features found in the other JSF IDEs. This includes collapsible code regions and tag completion, as shown next.
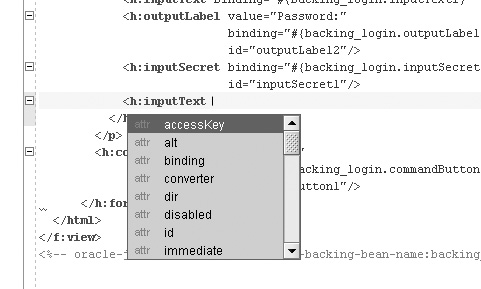
In addition to tag completion, JDeveloper’s JSP source editor provides attribute completion, shown in the illustration at right, where entering a space invokes a selection menu of available choices for attributes of the tag.
Similar to Studio Creator, JDeveloper offers an option to automatically generate event handling code. For example, when a JSF (ActionSource) UI component, such as a commandButton, is double-clicked in the visual editor, a dialog will appear that can auto-generate an action method. This dialog provides an auto-generated method name (commandButton1_action), but the name can also be overridden in the dialog. For the example application, we use login_action. Clicking OK will generate the method; thus, the Java source editor will be invoked and the cursor placed in the new action method code, as shown here.

In addition to generating the action method, the button that was double-clicked will have its action attribute set to the EL expression of the action method:
<h:commandButton id="commandButton1" value="Login"
  binding="#{backing_login.commandButton1}"
  action="#{backing_login.login_action}"/>
Subsequent double-clicks of the same button in the visual editor will cause the Java editor to be invoked and the cursor to be placed in the same action method.
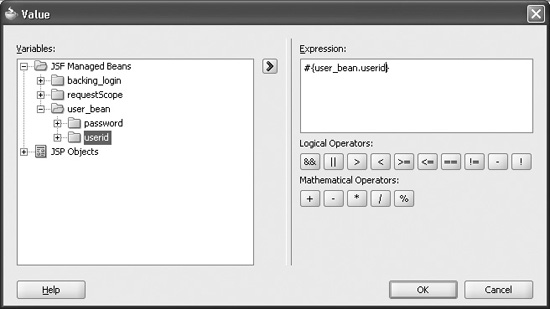
A common feature of most JSF IDEs is to provide a dialog that helps generate the appropriate JSF EL expression based on the data available to the application. This is possible using JDeveloper’s general EL binder dialog, which allows for the easy selection of any EL-accessible data, and will have a corresponding EL expression generated and placed in a UI component attribute. To see the EL binder in action, assume you want to value-bind one of the input components to a property of a separate JavaBean—for example, if you added a new managed bean, UserBean, with properties userid and password. If it was registered as a managed bean with the name “user_bean” you could value-bind it to an input component with this statement:
<h:inputText binding="#{backing_login.inputText1}"
       value="#{user_bean.userid}"/>
To do this with the EL binder, select the input component in the visual editor. Then, in the Property Inspector window on the lower right, locate the value attribute and click the Databind button, which is located at the top of the Property Inspector window and resembles a cylinder. This causes the EL binder dialog to appear, as shown in Figure 17-22.
Once the dialog appears, generating the appropriate JSF EL expression is done by double-clicking any object in the tree on the left. The EL expression can also be hand-coded in the small window on the right.
In general, using the EL binder allows you to quickly generate the appropriate EL expression based on all data accessible to JSF EL, including managed bean properties, methods, or other implicit objects.
In addition to the EL binder dialog, it is also possible to invoke the EL code completion feature simply by typing the EL expression directly into the JSP source and pausing. This causes a code completion EL menu to appear, from which selections can be made, as shown next.

FIGURE 17-22 JDeveloper’s EL binder dialog
Continuing to build the simple version of the Virtual Trainer application, the final page, table.jsp, contains a dataTable of individual training events. Recall from earlier in the book that building a usable dataTable involves binding the parent dataTable component along with providing a set of child column components. Like the other JSF IDEs, JDeveloper has a wizard for generating this code in an efficient manner. Invoking JDeveloper’s dataTable Wizard is done by dragging a dataTable from the palette onto a page. Once invoked, the wizard allows for the selection of the EL source for the value of the table as well as the selection of column component types and table header values, as shown in Figure 17-23.
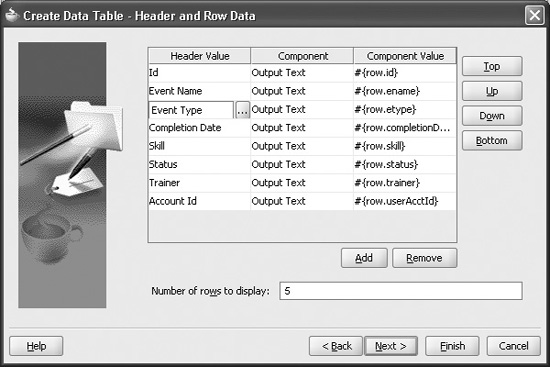
FIGURE 17-23 The dataTable Wizard in JDeveloper
Once the wizard completes, it will generate the appropriate code in the page and the visual editor will render the table in a simulated runtime way, as shown in Figure 17-24.
In addition to the dataTable Wizard, JDeveloper also provides other quick code generation wizards for compound UI components that have children such as the select menus (selectOneMenu, selectManyMenu …) and panelGrid.
A final point worth mentioning about the code generation wizards in JDeveloper is that they are re-entrant. That is, you can select a component that was created by the wizard (such as a dataTable), and then (right-click) select Properties… from the context menu. This will reinvoke the same wizard used to create the component UI component and allow you to update any values.
Before completing this overview of JDeveloper it is worth mentioning that the Studio version of JDeveloper (as opposed to the smaller J2EE and Java versions) contains a middle-tier development framework known as the Application Development Framework, or ADF.
Oracle’s ADF technology provides a way to access and manipulate data from different middle-tier technologies in a simple and consistent way. Oracle ADF supports various middle-tier technologies such as Enterprise JavaBeans, Oracle TopLink, and Oracle Business Components, as well as Web Services and even simple POJO data objects. By supporting these technologies, a developer can visually design middle-tier logic, as well as declaratively build a user interface visually without having to manually write code to interact with these middle-tier technologies. With ADF, the developer essentially performs two tasks: 1) builds a middle-tier with a technology of choice; and 2) uses ADF’s visual tools, such as the Data Control palette, to create a user interface that allows data interaction with the middle-tier.
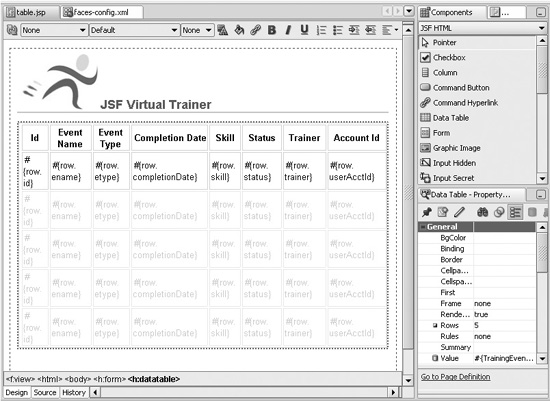
FIGURE 17-24 A rendered dataTable in JDeveloper’s visual editor
To build a middle-tier in JDeveloper, you can choose from technologies such as Enterprise JavaBeans, Oracle TopLink, Oracle Business Components, Web Services, and/or simple Java POJO classes. The details of these technologies go beyond the scope of this book. However, to get a feel for developing an application with ADF, we’ll create an EJB 3 middle-tier to use with ADF.
For quickly generating Enterprise JavaBeans, JDeveloper provides a set of wizards. For our application, assume that you have a database table (trainingevents) containing a list of athletic events you wish to train for. You would create an EJB entity bean using the CMP Entity Beans from Tables Wizard to select the database table and generate the appropriate entity bean code for the table (Trainingevent). You would then use the Create EJB Session Bean Wizard to create a bean that will serve as a façade to the entity bean. This bean will contain the data operations necessary to interact with the Trainingevent entity bean—and its underlying database table. Figure 17-25 shows the EJB Session Bean Wizard generating the data methods for our session bean.
Once the session bean has been created, it can be selected in the application navigator, and an ADF Data Control can be created. This will generate a small XML file behind the scenes that will register the EJB session bean with the ADF framework. This causes the EJB session bean to appear in the ADF Data Control Palette. At this point, a developer can drag and drop any data item from the Data Control Palette, as shown in Figure 17-26, and add it to the page. This will launch a corresponding wizard to generate user interface code depending on what was dropped onto the page. If a single field or property is dropped onto the page, a single input or output field will be generated. If a method such as findAllTrainingevents(), which has a return type of Trainingevent, is dragged onto the page, a corresponding set of wizard options will appear, allowing the user to create a tabular or form type user interface to interact with the data.
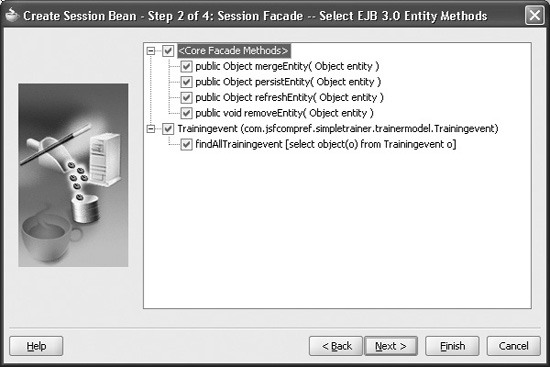
FIGURE 17-25 Generating a session bean façade in JDeveloper
FIGURE 17-26 Drag and drop databinding from the ADF Data Control Palette
Selecting ADF Read-only Table… will launch a simple wizard (shown in Figure 17-27) that gathers information about the ADF table to be generated. Notice the similarity to the more generic dataTable wizard. Also notice that we can choose to enable row selection (Enable selection) as well as column sorting (Enable sorting).
Once the wizard is complete, it will generate the appropriate user interface artifact. In this case, we chose to create a table of data that allows for column sorting and row selection. You may notice that the table already has a certain look and feel associated with it. This is because the default user interface generation technology uses the ADF Faces library of components. ADF Faces has a built-in skinning technology where it is possible to create different types of application-level looks.
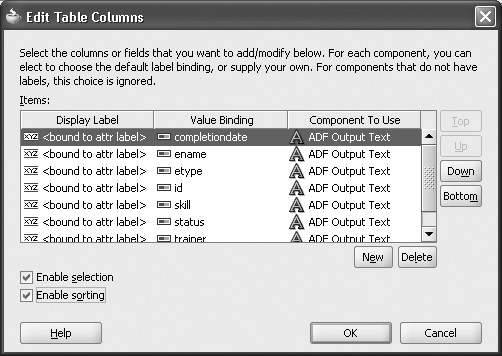
FIGURE 17-27 The ADF Table Wizard
If the developer still prefers to generate only with Standard JSF components (Core, HTML), he or she can set an option in the ADF View options of the project properties to also allow for the generation of user interface artifacts using the standard JSF components.
Once the user interface artifact is generated, it will render in the visual editor, as shown in Figure 17-28.
While the previous example showed an example using Enterprise JavaBeans, it’s important to understand that Oracle ADF can also be used with other middle-tier technologies such as Oracle TopLink, Oracle Business Components, or Web Services, each of which has its own respective code-generation wizards. However, building a user interface to interact with these different data sources follows the same process of using the Data Control Palette and dragging and dropping the data onto the page and generating appropriate user interface artifacts.
Before concluding this discussion of ADF, it’s important to highlight a few things with regard to the default user interface technology used with ADF: ADF Faces. As you saw when creating a databound table with ADF, the actual table component used was an ADF Faces table, which belongs to the ADF Faces component library. A standard dataTable could have also been generated using the drag and drop operation from the Data Control Palette, but the ADF Faces table was chosen instead to illustrate the benefit of features like automatic column sorting, data scrolling, and row selection.
The ADF Faces component library, like any other third-party JSF component library, works within the standard JSF specification but offers additional capabilities over the standard or base components provided in the specification. JDeveloper, however, doesn’t care which JSF component library developers choose to build applications and provides both the ADF Faces library and the standard (JSF Core and JSF HTML) libraries on its palette. You can use any combination of either of these when building applications.

FIGURE 17-28 The finished ADF table
A final thing to mention about the ADF Faces component library and Oracle’s ADF framework: although they work great together, they are not mutually dependent on each other. The ADF Faces JSF component library can stand on its own and can be used with any kind of middle-tier technology. Likewise Oracle ADF framework can work with any Java-based user interface technology. For more information on Oracle’s ADF Faces, please refer to Appendix B.
In addition to offering built-in design support for both the Standard JSF components and ADF Faces, you can also add other custom tag or component libraries to JDeveloper simply by registering the component library’s tag file. JDeveloper allows this by providing a registry of JSP tag libraries, shown in Figure 17-29, from which users can add/edit. The tag library registry is accessed from the main menu by choosing Tools | Manage Libraries… For example, the MyFaces component library can easily be added to the palette by using the JSP tag library registry and registering the jar file of the library. Notice also in Figure 17-29 the checkbox Execute Tags in JSP Visual Editor. This allows JDeveloper to render the components in the visual editor at design time.
To run a JSF application, or any specific JSP page in JDeveloper, you can right-click a JSP page in the Application Navigator window and choose the Run option. To debug a JSP page/application, instead of selecting Run, you would select Debug. (JDeveloper even supports JSP source debugging in addition to Java source debugging, because the JSP source editor allows for the insertion of breakpoints in JSP source code.)
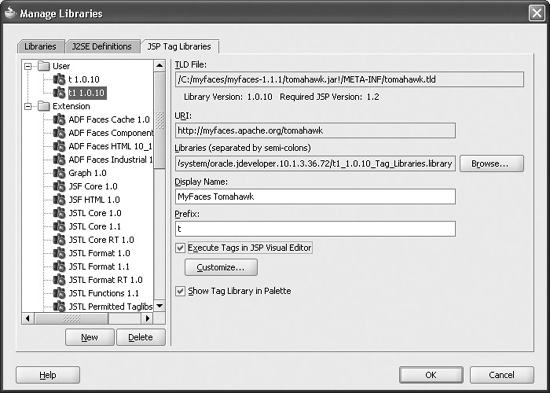
FIGURE 17-29 Managing JSP tag libraries in JDeveloper
Running or debugging a Web application is possible by using JDeveloper’s embedded OC4J J2EE application server, which serves as the heart of the larger Oracle Application server. Once the server is started, an external browser is launched and pointed to the URL of the running page/application. At this point, the server can remain running, or the developer can shut down or restart it whenever needed.
Once the application is tested, it can be deployed to any J2EE-compliant application server in two ways. The first is to deploy the application to a separate WAR (Web Archive) or EAR (Enterprise Archive) file and then use the application server’s management utilities to deploy the application from the saved archive. The other option is to deploy directly to a running instance of an application server. JDeveloper supports direct deployment to Oracle’s Application Server, Stand Alone OC4J, Weblogic, JBoss, and Tomcat.
The preceding walkthrough really serves as an introduction to the JSF-related features in JDeveloper 10g. Remember that JDeveloper 10g is also a complete enterprise Java IDE, as opposed to a JSF-only development environment, and contains many other development features that apply to enterprise Java, Web services, and relational databases.
Among the many products that IBM offers for software development, IBM’s Rational Web Developer Version 6.0 most resembles the other IDEs reviewed in this chapter. Rational Web Developer is the slightly smaller cousin to Rational Application Developer and has evolved from the earlier Websphere Application Developer (5.1.2), which was one of the first IDEs to offer integrated JSF support. As such, it is focused primarily on JSF Web application development as opposed to the more general Rational Application Developer, which has a superset of features including UML design, Crystal Reports development, and so on.
Although Rational Web Developer is smaller than Rational Application Developer, it is the true goliath among the IDEs reviewed in this chapter. You’ll need at least 5GB of free disk space when downloading a 60-day trial version from the Web. This is because you download the software in pieces using IBM’s Download Director.
You then build an image of the software using a downloaded utility. Once the image is built, you can then install from that image—hence the need for 5GB. Once entirely installed, the IDE uses approximately 3.4GB.
For further information on Rational Web Developer and IBM’s other development products, visit http://www.ibm.com/developerworks/rational/products/rwd/.
Once Rational Web Developer is installed, you are treated to a solid JSF visual development environment (shown in Figure 17-30), which has the familiar feel of the Eclipse development environment, along with features somewhat similar to Sun’s Studio Creator.
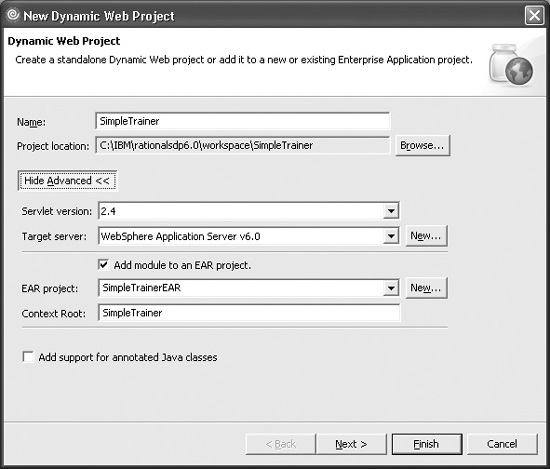
To get started in Rational Web Developer, you create a Dynamic Web Project from the main menu. As shown in Figure 17-31, the Dynamic Web Project Wizard allows you to set a number of project options such as the Servlet version (2.2, 2.3, 2.4), target server (the default is Websphere Application Server v6.0), and a deployment project into which you can package your Web project.
FIGURE 17-30 IBM Rational Web Developer Version 6.0
After creating a new Dynamic Web Project, Rational Web Developer does not yet assume you will be building a Faces application, so there is no default faces-config.xml, nor a starter Faces page. In the application’s WEB-INF directory, you’ll see a standard web.xml file as well as some extra IBM databinding files, ibm-web-bnd.xmi and ibm-web-ext.xmi. These additional files help enable databinding features in the application. The Faces-specific items of the project (such as the faces-config.xml) will be added once a Faces JSP page is created.
Since the Java source editing features are basically the same as the other Eclipse-based IDEs, for this review we will just import existing Java sources from the file system as opposed to creating any application-related Java sources from scratch.
To get started we import some existing Virtual Trainer Java classes using the Import… feature, which is common to all Eclipse-based tools. For this application, we can pull in the Java sources from a file system–based location.
FIGURE 17-31 Creating a new Dynamic Web Project in Rational Web Developer
The vt.css style sheet and vtlogo.jpg image files can also be imported using the same file importation utility.
To Faces-enable the project and build our first JSF page, we use the Faces JSP File Wizard. Once a Faces-enabled JSP page is created (for example, welcome.jsp), the project is then configured as a Faces application with a faces-config.xml file and a configured web.xml file. In addition to creating the JSF JSP page, Rational Web Developer also automatically creates a backing bean (Welcome.java) and registers it as a managed bean.
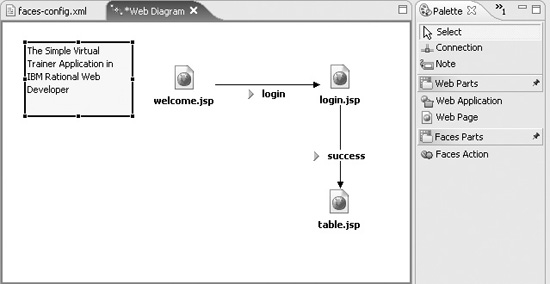
Again similar to the other JSF IDEs, there is a visual editor for designing the navigation rules for the entire application. This is referred to in Rational Web Developer simply as the Web Diagram, as shown in Figure 17-32. When open, you can design the navigational page flow in almost exactly the same way as the other navigation page flow editors.
Once the Web Diagram is open, you can drag and drop any JSP pages from the Project Explorer or you can create it by dragging a Web page from the Palette and double-clicking it to launch the Faces JSP File Wizard. You can create navigation rules (and cases) by connecting pages using a Connection item on the Palette.
In contrast to Exadel Studio Pro and JDeveloper, there are no tabs on the Web Diagram that allow you to switch to editing faces-config.xml in a console-type editor (or XML source editor).
Rational Web Developer’s JSP Visual Editor is a very solid HTML and JSP visual editor regardless of JSF. It most resembles JDeveloper’s visual editor because it allows for pure HTML design and formatting as well as providing rendering for Faces components in the visual editor.
FIGURE 17-32 Creating JSF pages and navigation rules in Rational Web Developer
At the base of the visual editor are three tabs: Design, Source, and Preview. Not surprisingly, the JSP source editor resembles Exadel’s and BEA’s. It lacks the code folding feature of JDeveloper and Studio Creator, but does have basic tag completion.
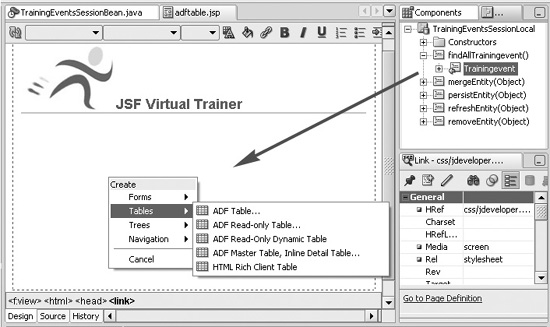
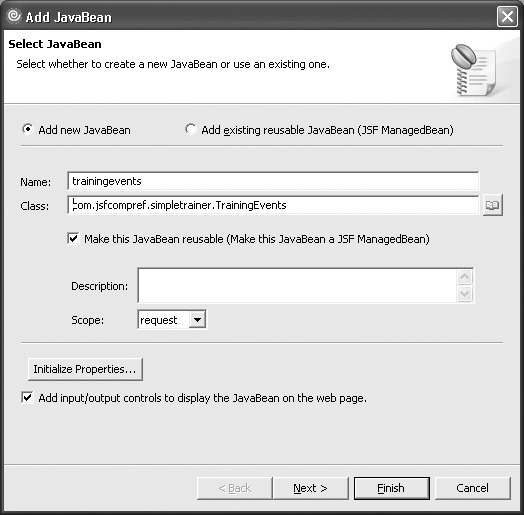
A login form can be built in a fashion similar to that used by the other IDEs. However, Rational Web Developer has a slightly unique approach to both registering a Java class as a managed bean and making its data accessible from the JSF page. In contrast to tools like BEA Workshop Studio and Oracle JDeveloper, where you first register a Java class as a managed bean and then bind one of its properties to a UI component attribute, Rational Web Developer offers an option on its palette where you can drag a JavaBean item from the Palette onto the JSP page in the visual editor. This invokes a wizard (shown in Figure 17-33) that both registers a Java class in the faces-config.xml, as well as creates a set of methods in the page’s backing bean to access the managed bean. In addition to this, it also launches a wizard that allows you to define a user interface in the page based on the bean’s properties.
In the same wizard, you can then auto-generate a form in your page based on the bean’s properties, as shown in Figure 17-34. This will generate a form with prebound input fields based on what was chosen in the wizard.
For the Virtual Trainer page, table.jsp, it is possible to drag and drop a JavaBean from the palette onto the page and create a prebound dataTable using the same Add JavaBean Wizard. In the wizard, you would select the TrainingEvents bean that has a method that returns a list of TrainingEvent objects. As mentioned earlier, this action both registers the bean as a managed bean in the faces-config.xml file and makes the managed bean accessible to the backing bean of the page. This is achieved by inserting a method into the page that accesses the managed bean. It’s shown next:
public com.jsfcompref.simpletrainer.TrainingEvents getTrainingevents() {
  if (trainingevents == null) {
    trainingevents = (TrainingEvents) getFacesContext().getApplication()
     .createValueBinding("#{trainingevents}").getValue(getFacesContext());
  }
  return trainingevents;
}
FIGURE 17-33 Adding a JavaBean to a page, as well as the faces-config.xml
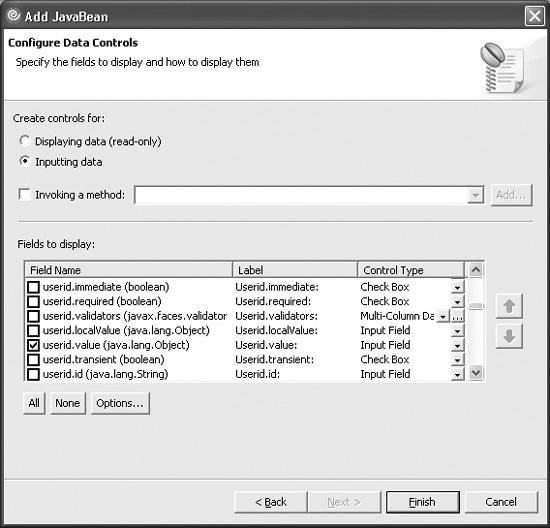
FIGURE 17-34 Creating a “data control” based on a JavaBean
Now that the backing bean (page code in IBM’s terminology) has a method that accesses the managed bean, any UI component can then be bound to it. For example, a dataTable could be created and manually bound to this method from the backing bean. Or using the same Add JavaBean Wizard in the next step, it is possible to generate a dataTable to display the TrainingEvent List objects. This is shown in Figure 17-35.
Once complete, the JSP page will then have generated the dataTable UI component on the page, as shown in Figure 17-36.
In the same way that a JavaBean was used to generate a user interface, dynamic data from a database can also be used to generate a user interface artifact. In addition to JavaBean, the palette also contains Relational Record and Relational Record List, which makes data from either a single database row or a set of rows (respectively) usable on a page.
Dragging Relational Record List onto the page invokes a wizard that first allows you to select a database table from a named connection. You can then select columns to display in the page, as shown in Figure 17-37.
Once the generated dataTable is inserted into the JSP page, it can then be customized using the Properties view window at the bottom. In the example shown in Figure 17-38, a Paging option is added to the table, which lets you page through multiple pages of data at runtime.
Running the application, or any specific page, is done by right-clicking a JSP in the Project Explorer and selecting Run | Run On Server. This will launch the embedded Websphere Application Server and point a built-in browser window to the page that was chosen to run (as shown in Figure 17-39).

FIGURE 17-35 Generating the dataTable code using the Add JavaBean Wizard
FIGURE 17-36 A generated dataTable based on a JavaBean
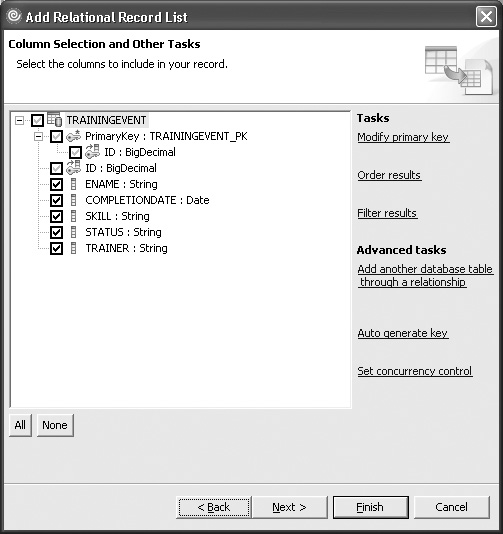
FIGURE 17-37 Adding a relational record list
FIGURE 17-38 A databound dataTable in IBM Rational Web Developer

FIGURE 17-39 Running the table.jsp page which queries data from a database
Like the other Eclipse-based tools, it is possible to register other server configurations in addition to the preconfigured Websphere server. However, native configuration support is only offered for Websphere server types (as opposed to other vendor’s servers).
The databound pages work using a middle-tier technology called Service Data Objects (SDOs). An SDO is not so different from Oracle’s ADF framework since it is designed to simplify and unify the way in which applications handle data. Using SDO, applications can interact and manipulate data from different types of data sources, including relational databases, XML data sources, and Web services.
By using the wizards in Rational Web Developer, the underlying SDO plumbing is automatically created behind the scenes, but a quick look at the backing bean code as well as the file system shows that for each data entity (such as the TrainingEvents database table) there is a metadata file which contains information about the database object. For example, trainingevents.xml has the following structure:
<?xml version="1.0" encoding="UTF-8"?>
<com.ibm.websphere.sdo.mediator.jdbc.metadata:Metadata xmi:version="2.0"
 xmlns:xmi="http://www.omg.org/XMI"
 xmlns:com.ibm.websphere.sdo.mediator.jdbc.metadata=
"http:///com/ibm/websphere/sdo/mediator/jdbc/metadata.ecore"
 rootTable="//@tables.0">
  <tables schemaName="TRAINER" name="TRAININGEVENT">
    <primaryKey columns="//@tables.0/@columns.0"/>
    <columns name="ID" type="9"/>
    <columns name="ENAME" type="4" nullable="true"/>
    <columns name="COMPLETIONDATE" type="10" nullable="true"/>
    <columns name="SKILL" type="4" nullable="true"/>
    <columns name="STATUS" type="4" nullable="true"/>
    <columns name="TRAINER" type="4" nullable="true"/>
  </tables>
</com.ibm.websphere.sdo.mediator.jdbc.metadata:Metadata>
The necessary SDO plumbing code is also added to the page’s backing bean so it will be able to pull data from the data source and render/update it from the page.
Overall IBM’s Rational Web Developer provides a compelling Faces development environment. In addition to offering a strong visual page editor and navigation modeler, it has some powerful features for auto-generating data-bound page artifacts. Again, like the other IDE reviews, the features mentioned here just scratch the surface of all of what is available in Rational Web Developer, and users are encouraged to look into the many tutorials available in the product.
Besides the Java heavyweights Sun, BEA, Oracle, and IBM, smaller companies are having success in providing a sleek and productive development environment for JSF. Much like the previously independent M7 Corporation, the Exadel Corporation succeeds in providing an exceptionally nimble and flexible development environment worthy of notice.
Exadel Studio Pro is another Eclipse JSF+ development environment with strong support for productive and visual development of JSF applications. Exadel Studio Pro represents Exadel’s latest tool offering which is a merging of previous products geared for Struts and JSF development separately. The previous products were named Exadel Struts Studio and Exadel JSF Studio, respectively. At the time of this writing, the current products available from Exadel are Exadel Studio (version 3.0), which is free, and Exadel Studio Pro (version 3.5), which currently costs $199 (USD). The Pro version contains the visual page editor and Hibernate mapping tools and is described in the following section.
To try out Exadel Studio Pro on your own, a 15-day trial version is easily downloaded and occupies less than 300MB once installed. Further details can be found at http://exadel.com/.
As with other Eclipse-based development environments, Exadel Studio Pro’s JSF design environment, shown in Figure 17-40, has that same familiar Eclipse feel.
The Exadel Studio Pro JSF design environment resembles other JSF IDEs; however, its default design mode shows both the JSP source and visual designer .
To appreciate a similar development experience for comparison purposes, let’s create the same simplified Virtual Trainer application in Exadel Studio Pro.
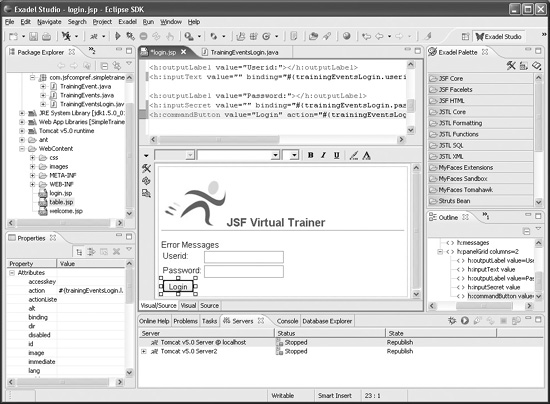
FIGURE 17-40 The Exadel Studio Pro JSF design environment
Creating a new JSF project is done by selecting the new JSF Project Wizard from the main menu. This is shown in Figure 17-41.
Exadel’s JSF Project Wizard allows JSF developers great flexibility in their choice of JSF environments. These include
• JSF 1.0 Reference Implementation (from Sun)
• JSF 1.1_01 Reference Implementation (from Sun)
• JSF 1.1_01 with Facelets
• MyFaces 1.1.1
• MyFaces 1.1.1 with Shale
The JSF Project Wizard also provides two application templates, JSFBlank and JSFKickStart, to help you get started. For our purposes, let’s use the JSFBlank template, because it will generate a J2EE Web project along with a faces-config.xml file and a configured web.xml file.
As you may have noticed, Exadel distinguishes itself from the other JSF IDEs by offering integrated support of the popular open-source Facelets technology. For Facelets enthusiasts, this is a real bonus. More information on Facelets can be found in Chapter 13.
Similar to other Eclipse-based development environments, building or importing the Virtual Trainer application Java classes (TrainingEvent, TrainingEvents, and TrainingEventLogin) can be done very easily by using the core Java development features or the Import feature.
JSF-enabled JSP pages can be built either directly from a wizard or from the Faces-config Graphical Editor, which provides similar page flow editing, as well as console-based editing of faces-config.xml. Exadel’s Faces-Config Graphical Editor most closely resembles JDeveloper’s faces-config editor in that it has three panes: Diagram, Tree, and Source.

FIGURE 17-41 Invoking Exadel’s JSF Project Wizard
To build a JSF page using a wizard, Exadel provides a generic JSP File Wizard, which can create a JSP page with support for any of the technologies handled by Exadel Studio. This is specified in a wizard page that allows for the selection of the JSP tag libraries provided by the different technologies (JSF, Struts, Shale, and so on). To preload a JSP with the necessary JSF <f:view> tags, the developer chose to create the page from a JSF template called JSFBasePage.
The other method of creating JSF pages is to edit the faces-config.xml file in the graphical editor. To do so, in the Diagram view, click the View Template button on the left. This will prompt a quick JSF (or View) page creation wizard where a new JSF page can be created. Similar to JDeveloper, pages that have already been created can easily be added to the faces configuration (navigation) diagram by simply dragging and dropping them from the file explorer on the left onto the diagram. Also similar to JDeveloper, adding a navigation rule (and case) can be done by first clicking the Create New Connection button on the left side of the diagram and then connecting two pages in the diagram. This inserts a new navigation rule and case into the application’s faces-config.xml source.
For our simple Virtual Trainer application, quickly building the initial pages and navigation rules can be done very easily using the page wizard and Faces-Config Graphical Editor, as shown in Figure 17-42.
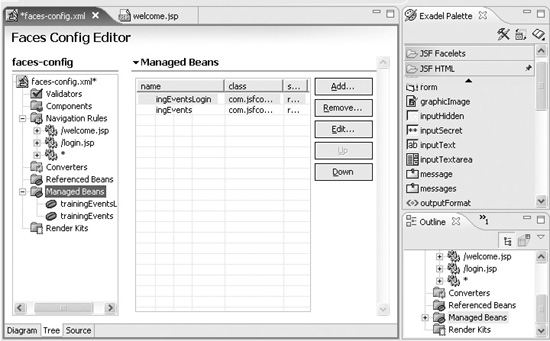
Similar to JDeveloper and BEA Workshop Studio, Exadel Studio Pro provides a console-based way to edit the faces configuration file. This is accessed by clicking the Tree tab at the bottom of the page when editing a faces-config.xml file. This action invokes a similar configuration console, as shown in Figure 17-43.
Using the Faces Config Editor, we can register the three training event classes as managed beans. Finally, clicking the Source tab opens the Faces configuration file in an XML editor which also supports tag completion (but not collapsible code regions).
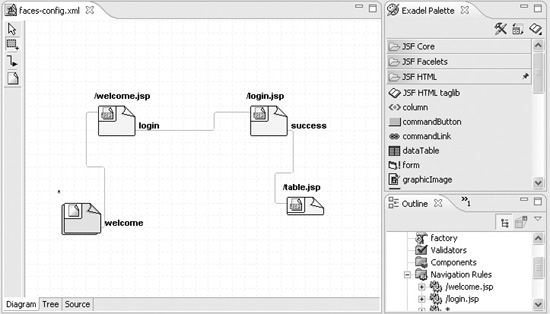
FIGURE 17-42 Building JSF pages and navigation rules in Exadel Studio Pro
FIGURE 17-43 Exadel Studio’s Faces configuration editor
To design the actual content in the pages, like the other JSF tools, Exadel Studio Pro provides an exceptional visual editor for JSP. After creating new empty JSF pages using the JSFBasePage template, UI components are added by dragging the components from the palette onto the page. Also like JDeveloper, components can be dragged and dropped from the palette onto the Outline view (window). Sometimes it is easier to drop directly to the outline window because it ensures the exact position of the component relative to the other components. Dropping on the page sometimes causes the component to be in an incorrect position. This is a not a big problem because the JSP source editor is never far away. Similar to BEA Workshop Studio, Exadel’s JSP editor has three tabs: Visual/Source, Visual, and Source.
In contrast to JDeveloper, Workshop Studio, and Studio Creator, Exadel’s JSP source editor does not offer collapsible code regions (code folding) but it does offer both tag completion (shown next):
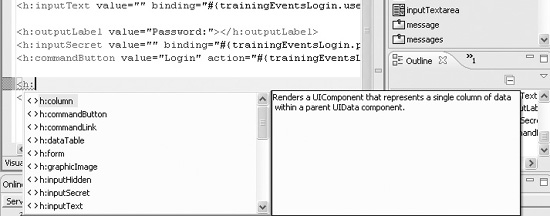
and JSF tag attribute completion for EL, as shown here.
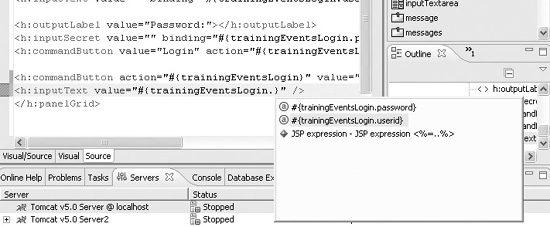
In addition to using the attribute completion feature in the source editor, it is easy to bind attributes in the visual editor. First, click a component in the visual editor. Then, shift over to the Properties window and click the property to which you want to add an EL expression. A small “…” button appears on the right side of the property. Clicking it invokes a simple JSF EL dialog window, as shown in the illustration at right, which allows you to select the appropriate EL accessible object. Clicking OK excuses the window and inserts the JSF EL expression into the attribute’s value field.

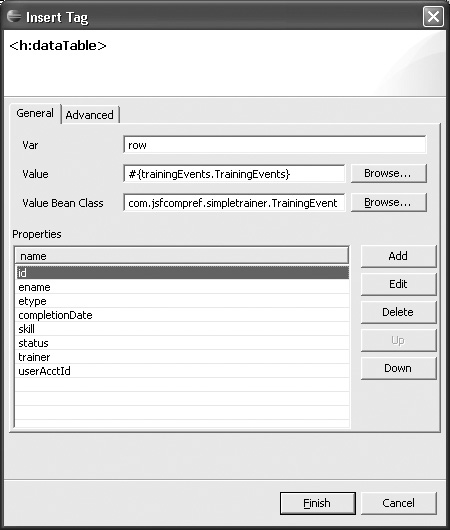
Similar to JDeveloper and BEA Workshop Studio, dragging and dropping a compound component such as a dataTable invokes a wizard that has the ability to bind the dataTable itself, as well as the generating child columns. Exadel’s dataTable dialog, shown in Figure 17-44, allows for the generation of columns but does not permit you to specify the column’s component type. Instead, it defaults to outputText for all the columns. It does, however, allow you to add, edit, or remove columns as well as change their order.
Unlike JDeveloper, Exadel’s dataTable dialog is not re-entrant. You would have to delete the existing dataTable and re-create it. Also, the dialog does not have an option to generate table headers (or footers).
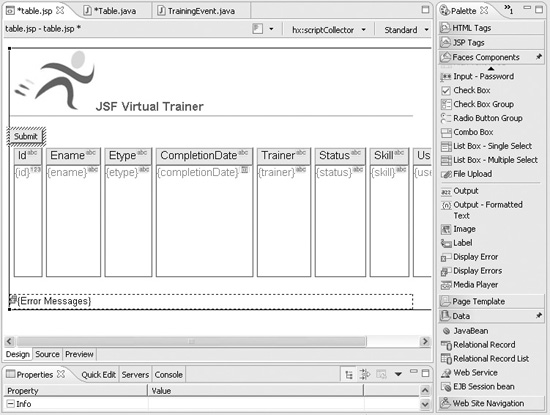
As shown in Figure 17-45, once the dialog is finished, the new dataTable is generated and is rendered in the JSP page with a single row showing its column value attributes.
FIGURE 17-44 Exadel’s dataTable dialog
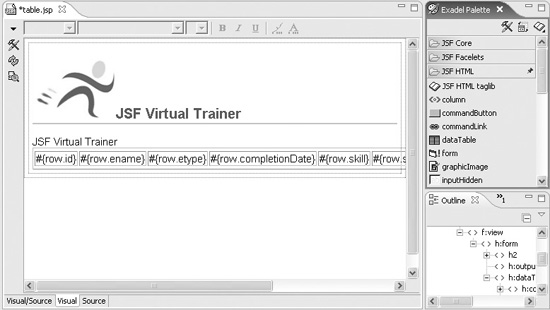
FIGURE 17-45 A databound dataTable in Exadel Studio Pro
To run the application, Exadel maintains a registry of JSP containers while providing a default Tomcat-based runtime environment. Exadel supports configurations for many of the popular J2EE Servers, as shown in Figure 17-46.
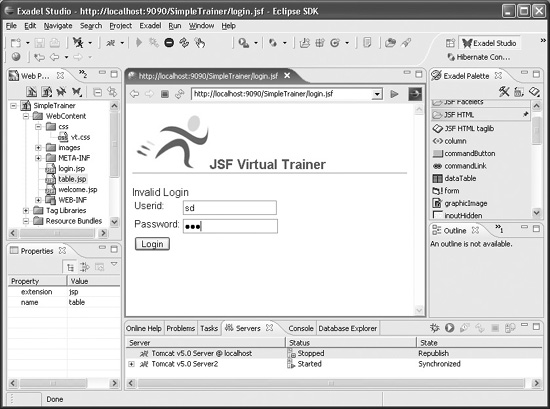
Once a server has been configured, it can be started. A built-in Web browser is invoked as the server starts. Accessing a Web page from the server is done by entering the URL of the page into the browser, as shown in Figure 17-47.
It should be mentioned that like BEA Workshop Pro, Exadel Studio Pro integrates Hibernate Tools support into the IDE. This allows developers to use the Eclipse-based tools for creating Hibernate-based persistence. Some of the Hibernate features include the capability to automatically generate Data Access Object classes for persistent entities, the capability to automatically generate DDL files, and an easy configuration user interface for both XML and Hibernate configuration files.
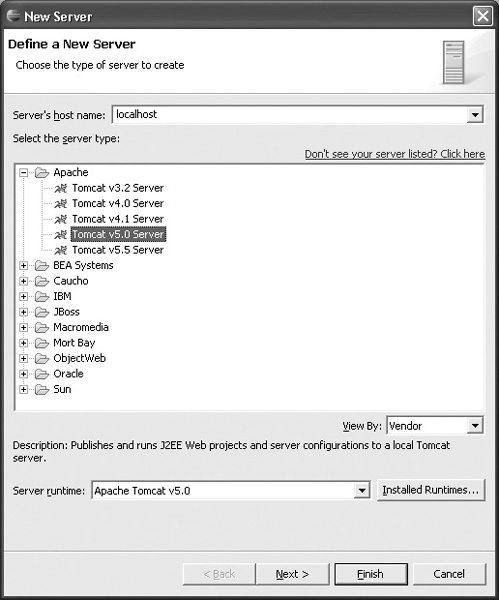
FIGURE 17-46 Exadel Studio Pro’s JSP server registry
FIGURE 17-47 Running the simple JSF Virtual Trainer application in Exadel Studio Pro
Overall, Exadel Studio Pro provides a solid and extremely flexible JSF development environment without a large footprint. Similar to BEA Workshop, Exadel Studio Pro is probably more geared towards Java developers who want maximum control of their code and who feel comfortable writing most of it. It does strike a happy medium though, by offering simple code generation features such as the dataTable generation dialog. Also, its integrated support of Facelets is no doubt one of its most compelling features.