
Sacroiliac Joint Derangement
Sacroiliac (SI) joint derangement is one of the most underdiagnosed, undertreated, and exceedingly painful back problems. Many medical professionals have a poor understanding of it, and many otherwise excellent practitioners are downright skeptical of its existence. Those who feel the pain, however, are far from doubtful. It’s the sort of sudden, severe pain that provides great incentive to find relief. Thankfully, once you have ruled out other conditions and are convinced this is the problem, there is something you can do about SI joint derangement.
The sacroiliac joints are located on each side of your back, not far below the waist, in line with the inner margins of kidneys. Unlike your knee and ankle joints, which are flat and horizontal and make structural sense because they hold you up and steady, the sacroiliac joints are almost vertical. All the weight in the upper body, all our twisting movements and other types of action must be supported by these vertical joints. Because of their structure and placement, these joints need powerful ligaments to hold them in the proper position. The ligaments typically withstand tremendous forces. Unfortunately, partly because of their shape and placement, and because of their dependency on ligaments, these joints are prone to trouble.
The three-dimensional structure of the SI joint is complex and irregular, and it works like a complicated key in a lock with many notches and tabs that must fit exactly into one another. The normal range of motion of this joint is very small—so small it must be measured in millimeters. Unfortunately, when it is out of alignment it doesn’t easily return to its proper position the way a shoulder that has lurched out of place may just slide back where it belongs. Instead, the very ligaments whose strength is a powerful ally in strenuous activities become formidable adversaries, holding the joint in misalignment, concentrating all the forward pressure on tiny areas of the joint, causing great pain. Often the joint must move little by little to become realigned. I have found that yoga is a good way to accomplish and maintain realignment. Theory seems to agree.1
How do you know if you have SI derangement? The pain is usually fairly localized. It’s right there, a sharp pain on one side or both sides of your back, below your waist about two inches on either side of the midline. The pain usually doesn’t radiate at all, and never below the knee, but gives you a twinge when you move or when you go from a sitting to standing position. Exiting the backseat of a car can be extremely unpleasant. There’s no weakness, no numbness, no tingling, or other neurological symptom. One hallmark of SI joint pain is that it is usually associated with a specific injury, like stepping into a pothole or overenthusiastically paddling a canoe. If you have one leg that is slightly longer than the other, you may be prone to SI derangement. A long bout of this condition may also cause changes in posture and musculature that can result in a leg-length discrepancy. SI joint derangement often coexists with piriformis syndrome (see chapter 12).
You can do a simple test on yourself for SI joint derangement. Lie down flat on an elevated, hard surface like a table, with one side of your body and one buttock slightly off the edge. Use a wall or other furniture for balance. Let one leg hang down over the edge. If it hurts below the small of your back, you may have this problem.
The pain of SI joint derangement is always in the lower back, but some patients mistakenly think the pain is in their hips. If you do have a derangement of this joint, the more quickly it is diagnosed and treated, the better. A relatively new derangement is easier to deal with than one that has been going on for a long time.
If you think you have SI joint derangement, the yoga poses in this chapter will not make the problem worse. The asanas may help in five distinct ways:
• Reduce tone and spasticity of muscles around the joint so that it is less likely to become fixed in the wrong position and stay there.
• Loosen joints near the SI joint, relieving stress on the SI joint in acute episodes and helping to avoid reaggravation that could lead to chronic derangement.
• Improve posture. Poor posture is a major cause of SI joint derangement.
• Open and allow movement of joint into proper position if it is out of alignment.
• Teach accurate, meaningful, functional body awareness so that you may avoid pushing the joint out of position.
The SI joint can be difficult to realign once it has shifted out of its proper position. There is no sensible surgery that is widely practiced with beneficial results. Chiropractic, osteopathy, and physical therapy use the legs as levers in order to move this recalcitrant joint into the correct position. Yoga is much more than just an alternative method for treating SI joint derangement; it can be crucial. Along with the medical interventions I’ve mentioned, oral nonsteroidal anti-inflammatories and even injections of lidocane and steroids, yoga may be the key to relieving your pain.
1. FLOATING TADASANA
Floating Mountain
BENEFIT: Promotes realignment of SI joint.
CAUTION: Use soft or thick chair backs (unlike those pictured) to avoid wrist injury or carpal tunnel syndrome.
PROPS: Two chairs.
NOTE: This pose can also be done while sitting in an armchair.
FLOATING TADASANA MODIFIED AND REGULAR Put two chairs back to back, far enough apart so that you can stand comfortably between them. Keeping elbows straight, press the heels of the hands onto the tops of the chair backs. Bend the knees slightly so that some weight is transferred from your feet to your hands. Relax abdominal muscles. This release of tension in the stomach muscles is crucial to doing this pose successfully. Without that relaxation, the pose will not work to relieve SI joint pain.
Allow gravity to pull your hips down while you hold your chest up. This enables the SI joints to readjust. Keep abdominal muscles soft, and relax your back muscles as much as possible. Breathe normally for ten to fifteen seconds. This pose may be repeated any number of times during the day. You don’t need to do it on an empty stomach.
To come out of the pose, gradually bend your elbows and straighten your knees.

2. VERTICAL DANDASANA
Vertical Staff
BENEFITS: Realigns SI joint in all three dimensions.
CAUTION: Use a chair with broad arms.
NOTES: When you are in a stable position in this pose, you can move your torso from side to side and from front to back; you can also use your shoulders to revolve clockwise and counterclockwise. That is the three-dimensional element that helps realign the joint and relieve pain.
This pose is good for office workers; you may be able to do it at your desk.
VERTICAL DANDASANA MODIFIED Sit comfortably in a chair, with your forearms and palms on the chair arms and your back straight. Look directly ahead. Move palms back so they are in line with your hips and shoulders. Press down on your palms and straighten your elbows a little to take some of the weight off your buttocks. Keep your feet on the floor. Relax your stomach and back muscles. Let gravity pull your hips down. Breathe with your mouth closed for ten to fifteen seconds. Repeat as often as you wish.
To exit this pose, lower yourself to a sitting position.
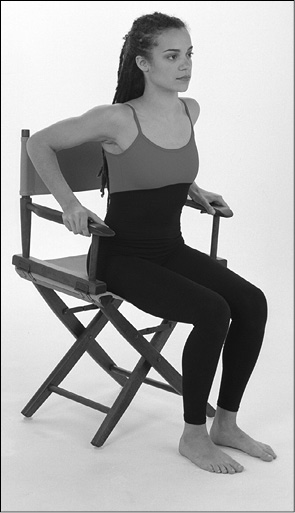
VERTICAL DANDASANA REGULAR Begin as above. Straighten your elbows enough so that you raise your buttocks about an inch off the seat. Your feet may be on the floor, but do not put any weight on them. Breathe with your mouth closed for up to half a minute. Experiment with slightly inclining your torso to the right and left, forward and back and rotating it clockwise and counterclockwise. By working with combinations of these movements you may feel a dull or intense ache in the lower back, and then a significant to total relief from pain.
To exit this pose, lower yourself to a sitting position.
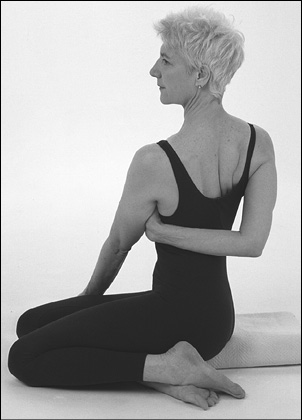
3. BHARADVAJASANA
Father of a major character in the Maharabata
BENEFITS: Opens SI joints one at a time; improves range of motion in lumbar spine, which reduces stress on SI joints.
CAUTION: Do not do this pose after having total hip replacement surgery.
PROP: Blanket.
BHARADVAJASANA MODIFIED Sit comfortably on the floor with your knees bent. Bring both legs to the right, bending the knees farther. You will be sitting on your left hip joint. Bring your right hand behind you and to the left. Slide your left hand, palm out, along your right thigh and toward the floor. Bring your shoulders back. The top of your chest moves slightly forward and up. Relax the muscles of the abdomen, pelvis, and thighs. Breathe with your mouth closed for ten to fifteen seconds.
To exit this pose, bring your right hand to your side as you take your left hand away from your right thigh. Repeat on the opposite side.

BHARADVAJASANA REGULAR Begin as above but tuck your left hand under your right thigh. Bend your right elbow, reach behind you and grasp your left biceps. Your spine must be quite straight to do this, even though it is turned to the right. Bring both shoulder blades down and together. Raise the upper chest and pull in your stomach. Breathe with your mouth closed for ten to fifteen seconds.
To exit this pose, release your left biceps and bring your right hand to your side. Take your left hand from under your right thigh. Return to a normal sitting position. Repeat, bringing both legs to the left.
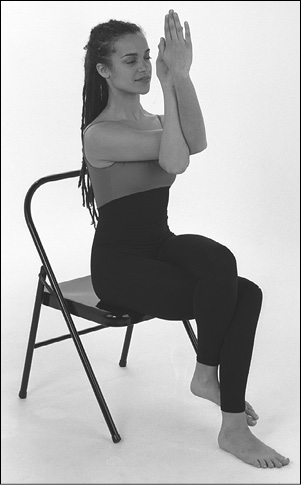
4. GARUDASANA
Eagle
BENEFIT: Stretches connective tissues and muscles of entire back.
CAUTION: If you have had hip surgery less than a year ago, do not do this pose.
PROP: Stable card-table chair.
GARUDASANA MODIFIED Sit in a chair with your feet flat on the floor. Cross your left thigh over your right thigh. Hook your left foot behind the right calf. Slide back in the chair, get comfortable, and relax. By slightly extending your left knee you can pull your left thigh farther to the right, opening the left SI joint. Hold for ten to fifteen seconds.
To exit this pose bring your palms to the chair seat or beside your hips. Release your ankle. Return to a normal sitting position. Then do the pose on the other side. This pose may be done from the standing position if strength and balance permit.
GARUDASANA REGULAR While in the modified pose, bend your elbows and raise them so they are at chest level. Put your right elbow into the crook of your left elbow. Bring your hands together and interlace your fingers. Breathe evenly for ten to fifteen seconds.
To exit the pose, bring your palms down to the chair seat beside your hips. Release your ankle and hips. Return to a normal sitting position. Repeat the pose on the opposite side.
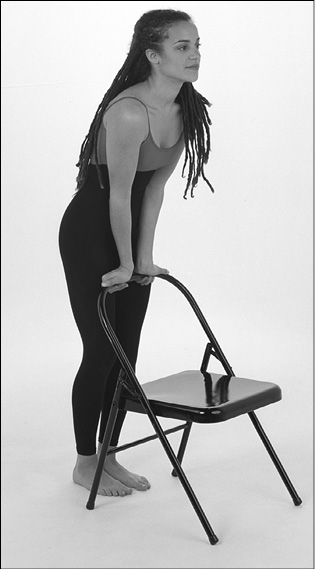
5. MAYURASANA
Peacock
BENEFITS: Uses gravity to readjust SI joint. Strengthens abdominal muscles and back extensor muscles.
CAUTION: Doing this pose may cause injury to your ribs if you have severe osteoporosis. Avoid doing this pose if you have gastric reflux syndrome or extreme hypertension. The modified version of this pose is safe for pregnant women; do not do the regular version of this pose if you are pregnant or have carpal tunnel syndrome. The regular version is only for chronic sacroiliac joint derangement. It is nearly impossible to do in the acute stage.
PROP: You may want to use a chair or block or thick book for support for the regular pose.
MAYURASANA MODIFIED Stand close enough so that you are almost touching a kitchen counter, desk, chair, or object of comparable height. Your feet should be comfortably apart. With palms facing away from your body, fingers pointing down, lean forward slightly until the heels of your hands come to rest against the edge of the chair. As you lean forward, dig your elbows into your lowest ribs so that your forearms support of much of but not all of your weight. Your legs do less weight bearing as you lean forward and your heels lift slightly off the floor. Relax your abdomen. You will know you are doing this pose correctly if you feel a stretch or dull ache in your lower back. Keep your abdominal muscles relaxed. Do not move your elbows. Breathe quietly for ten to fifteen seconds.
To exit this pose, gradually straighten your elbows and return your heels to the floor. Release your hands.
MAYURASANA REGULAR Kneel on all fours with fingertips facing knees. Bring elbows in so they press against the lower ribs, and elbows support your torso. Place the top of your head on the floor. You now have five points of support. Lift and extend your right leg so that it is parallel to the floor. Balancing carefully, extend your left leg so that it is parallel to the right leg. Raise your head so it is in line with the rest of your body. Your hands are now the major points of support. Breathe through your nose. Hold the pose for ten to fifteen seconds.
To come out of this pose, bring your left knee to the floor; then bring your right knee to the floor.

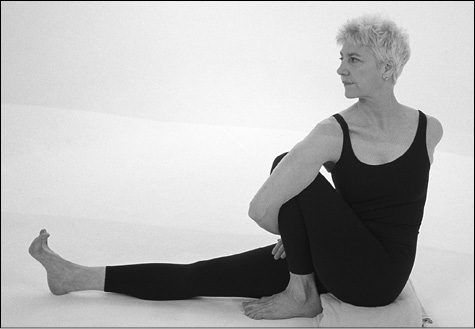
6. MARICHYASANA III
Son of Brahma, Creator of the Universe
BENEFITS: Helps rotate joints into proper position.
CAUTION: Do not do this pose during pregnancy.
PROP: Blanket.
MARICHYASANA MODIFIED Sit on a blanket on the floor with your legs extended in front of you. Bend your left knee and bring your left heel close to the perineum and the foot alongside the right thigh. The left shin should be firm and vertical, the right knee straight. Balance your weight evenly on your sit bones. Bend your right arm and revolve your torso counterclockwise until the outside of your forearm and upper arm are flush with the outside of the bent left knee.
Walk your left fingertips behind you and to the right. Use a little pressure against the outside of the left knee to revolve the torso even farther. Keep your shoulders horizontal and your spine straight. Bring your right chest forward and to the left and your left shoulder back and to the right. Breathe quietly for ten to fifteen seconds.
To get out of this pose, release both hands and return to a normal sitting position. Release your left leg carefully. Now reverse your legs and do the pose on the other side.

MARICHYASANA REGULAR Sit on the floor with your legs extended in front of you. Bend your left knee and bring your left heel close to the perineum, the foot parallel to the right thigh and in contact with it. The right foot should be firm and vertical, the right knee straight. Balance your weight evenly on your sit bones. Bend your right arm beyond ninety degrees and revolve your torso counterclockwise until the outside of your right upper arm is in contact with the outside of the bent left knee. Slide the right arm as far as possible beyond the left knee until the back of the right armpit is against it.
Walk your left fingertips behind you and to the right. Bend the right elbow more as you rotate the arm inward, bringing the hand back toward you on the right side of the left shin. Walk even farther behind and to the right with the left fingertips to revolve the torso even more. Then bend your left elbow, bringing it forward toward the right hand. Reach backward and to the right with the right hand. Arch your back to permit the left hand to come forward and grasp the right wrist. Keep your shoulders horizontal and spine straight. Breathe slowly and symmetrically, inflating and deflating both lungs equally for ten to fifteen seconds. To accomplish this pose, begin by bringing the back of the right armpit as close as possible to the outside of the left knee. However, keep the right shoulderblade back to improve your leverage and the pose. Now use your left hand to turn your torso more. The right side of your chest comes forward and to the left; the left shoulder goes right and back. Arch your back to permit your left hand to come forward and grasp the right hand more firmly. Breathe slowly and deeply for fifteen seconds.
To get out of this pose, release both hands and return to a normal sitting position. Release your left leg carefully. Repeat the pose with the left leg bent.
There are some poses that are described and pictured elsewhere in the book for other diagnoses that may also be helpful for sacroiliac joint complaints. These poses are, in order of acute to chronic pain:
ANANTASANA—Vishnu’s Couch
SUPTA PADANAGUSTHASANA—Holding Big Toe While Supine
ARDHA PADMA PASCHIMOTTANASANA—Half Lotus Forward Bend
BADDHA KONASANA—Bound Angle