
Weight Control
While Western medicine and science concentrate on how the mind affects the body—how we decide to move a finger or turn our heads—yoga puts more focus on feedback from the body to the mind. Signals from the joints, muscles, ligaments, and so on have a great influence on our moods, our impressions of how we feel, our muscle tone, and many other basic elements of our state of being at any given moment. A conscious person becomes more sensitive to these signals through the steady practice of yoga.1
It is hardly necessary to mention that one of the signals from body to mind that many people either miss or misread is the one indicating that the stomach is full, or that it is full enough to be satisfied. One reason for this is that many of us just don’t pay attention to what our stomachs are telling us. We get the message, but we ignore it and go right on eating. This recreational eating is encouraged by an increase in portion size both at home and in restaurants, by heavy concentrations of fats in many of the foods we enjoy, and by the large amounts of carbohydrates to which we’ve become accustomed.
In addition, it’s important that the stomach is smooth muscle. It is able to expand to contain just about whatever is put into it. Once you have eaten enough to make your stomach larger than it was, then the next time it’s empty it sends demands for food to fill it to its greater size. This, of course, becomes a vicious cycle. Too much food expands the stomach, which then needs more for you to feel satisfied than it did before and possibly, though thoroughly filled, it expands further. The waistline quickly follows suit.
When weight stretches out in front of your body, in your arms and torso and certainly in your abdomen, the muscles in your back have to work harder than they would otherwise. If you hold even an egg in its shell out in front of you for long, it becomes heavier and heavier. The same happens when you eat too much and gain weight. The more you gain, the more is stretched out in front of you. This increases both the weight on your spine and the mechanical disadvantage of the spine—the body’s axis of support.
Carrying more weight out in front of you makes the muscles of the lower back stronger. Actually it may cause those muscles to become overly strong, disproportionately stronger than the abdominal muscles, which flex the trunk and bend it forward. This imbalance will stiffen the spine to maintain balance and will also make the muscles contract so tightly that one or more may go into extremely painful spasm. This causes other crucial muscles, for example those that help you twist, to become deconditioned through disuse. Actually, all the spinal muscles that aren’t working to hold that weight out in front of you, keeping you from toppling forward, may become quite weak, unable to oppose effectively the painful spinal extensor muscles.
Yoga has three solutions: It helps you learn to pay attention to those signals your stomach is sending up to your brain; it helps strengthen spine flexors, abdominal musculature that can limit extensor spasm in the lower back; and it may increase your self-control so that you are able to leave the table, or at least to stop eating, when you’re still 5 or 10 percent unsatisfied. Although this may be very slightly uncomfortable at first, you will lose four to five pounds a month, and safely, without risk, without medication, and without counting calories. You can eat anything you want.
The beauty of the simple diet I’ve outlined above is that your caloric intake will fall, and the size of the organ that is the stomach will gradually decrease. Because your stomach is smaller, you will feel that you require less food. After having followed this routine for a couple of months and losing four to five pounds a month, you will find that your stomach is small enough to make it difficult to regain the weight you have lost so safely and easily.
In addition, almost all the yoga poses, but especially the ones here, help focus the mind on feedback from the body. Conscious pursuit of yoga postures helps you gain the mastery over yourself that makes pushing away from the table before you are full much easier. As time goes on, you will become more aware of your body’s internal signals and more able to follow its “instructions.”
A secondary problem associated with being overweight is foot pain. Feet are only so big, and although weight may increase, the area of support provided by those two feet will not increase proportionately. Too many pounds per square inch on the bones and soft tissues of the foot often causes difficulties with arches, joints, and ligaments, bruising the bones and causing a lot of discomfort. Simple weight reduction is frequently the answer to foot pain. When a person has lost weight, the pressures on feet come back to normal and they provide support without any pain whatsoever, if being overweight has not previously contributed to deformities.
All yoga poses promote the proper adjustment of weight. Some are particularly beneficial in focusing the mind on the stomach’s signals, such as Viparita Karani (4, chapter 6, “Musculoskeletal Pain,” p. 72) and Bhujangasana (2, chapter 7, “Herniated Nucleus Pulposis,” p. 88).
A number of special factors come into play when a person is trying to control weight. Endurance may decrease. Fatty tissue is quite vascular, yet the size of the heart muscles and their pumping capacity will not rise beyond certain limits, which they reach through steady, vigorous exercise, but not necessarily through the type of yoga poses presented here. Balance may be impaired. Girth may make assuming certain positions difficult.
People who are overweight often have diabetes and physical problems that arise from this condition, such as neuropathy, impaired balance and coordination, pain with exercise, restricted range of motion, and other difficulties. All the poses in these pages are intended for people who are not more than twenty to thirty pounds above their “ideal” weight. Others should consult a clinician before beginning yoga.
1. VIRABHADRASANA I
Warrior I
BENEFITS: Promotes awareness of the stomach (the organ) and of the small intestine. Enhances balance of hip abductors and adductors and strengthens legs. Asymmetrically coordinates internal and external rotators. Improves carriage and back muscle strength, which has the effect of reducing fatty accumulation visible around the hips.
CAUTION: Do not do this pose if you have had total hip replacement surgery or abdominal surgery in the last three months. Do it carefully if you have severe knee problems.
POSSIBLE PROPS: Two stable card-table chairs, placed back-to-back but far enough away from each other so that you can stand between them.
VIRABHADRASANA I MODIFIED You can do this pose as described below: Begin with two chairs (not pictured) back to back, one in front of you and one behind you. Stand with your legs five feet apart. Turn your left foot out ninety degrees and your right foot in thirty degrees. Bring your left hip back and your right hip forward so that your torso is turned counterclockwise ninety degrees and your navel is facing the same direction as your left foot. If you are using chairs, place your hands on the tops of the chair backs. If you are not using chairs, raise your arms over your head until they are vertical. Bend your left knee until you get it as close to a right angle as possible. The right knee stays straight. Keep your torso vertical. Look straight ahead. Breathe with your mouth closed for ten to fifteen seconds.
Continue with your arms in their current position. Then slowly straighten the left knee. If you are using chairs, release your hands. Now turn your left foot in thirty degrees and your right foot out ninety degrees and revolve the torso 180 degrees clockwise, moving the left hip forward and to the right and the right hip backward and to the left. To exit the pose, straighten the right knee. Bring your feet to a parallel position. Repeat the pose on the other side.
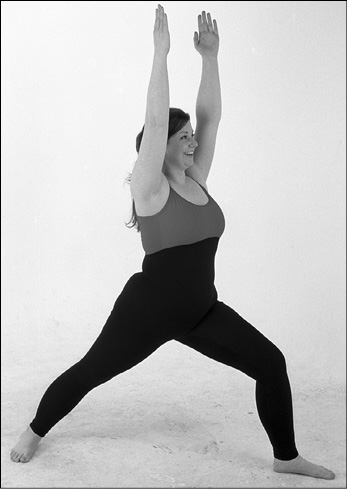
VIRABHADRASANA REGULAR Stand with your legs five feet apart. Turn your left foot out ninety degrees and your right foot in thirty degrees. Bring your left hip back and your right hip forward so that you rotate your torso ninety degrees counterclockwise, and your navel is in line with your left big toe. Unless you are experiencing severe low back pain, raise your arms to vertical so your biceps are behind your ears and your palms are facing each other. If you have severe low back pain, keep your arms at your sides. Look straight ahead, stretching the entire torso upward, especially the chest, forearms, and thumbs.
Bend your left knee to a right angle. Your shin is vertical and your thigh is horizontal. Pull your stomach in. Keep your torso vertical. Stretch up still farther with your fingertips while your lower body supports you. Breathe with your mouth closed for ten to fifteen seconds. Then, holding the position of your torso and arms, straighten the left knee.
Reverse by turning your right foot out ninety degrees and your left foot in thirty degrees. Revolve your torso 180 degrees clockwise so that the navel is in line with the right big toe. Repeat the process outlined for the left side, bending the right knee to ninety degrees, maintaining an erect torso, with arms stretched upward while breathing with your mouth closed for ten to fifteen seconds.
Following this, to exit the pose, slowly and steadily straighten the right knee and turn the feet and torso to a normal, forward-facing position. Repeat the pose on the other side.
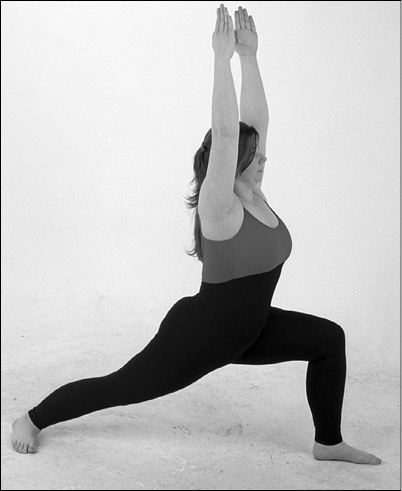
2. VIRABHADRASANA III
Warrior III
BENEFITS: Strengthens extensor muscles of the entire back and legs. Increases awareness of the stomach and small intestine, balances and shapes leg muscles, strengthens shoulder flexor muscles.
CAUTION: Do not do this pose if you have high blood pressure; it may raise your blood pressure ten points or more. Requires a modicum of balance.
PROP: Stable card-table chair.
NOTE: This pose, in its modified and regular versions, begins where Virabhadrasana I ends.
VIRABHADRASANA III MODIFIED Place your chair at your right side three feet beyond your right fingertips. After you have held Virabhadrasana I for ten to fifteen seconds, straighten your left knee by about half. Incline your torso forward to an angle of forty-five degress. Your arms should be a direct extension of your torso. Grasp the chair back as you straighten your left knee completely. Your extended right leg rises until it is in line with your buttocks. Flatten the back of your body as much as possible by lowering the right buttock to horizontal. Use the chair for support. Breathe as normally as possible for ten to fifteen seconds.
To exit this pose, bend the left knee again so that it is close to a right angle. Your torso comes to vertical; your right foot comes back to the floor behind you. Then straighten your left knee. Bring your feet back to parallel. Return to a normal standing position. Repeat on the other side.

VIRABHADRASANA III REGULAR This also follows from the Regular Virabhadrasana I. After you have completed that pose, breathing in it for ten to fifteen seconds, straighten your left knee by about half. Bring your torso forward and down at a forty-five-degree angle. Keep your arms elevated, parallel, and in the same extended position relative to your torso. Straighten your left knee as you bring your torso forward and down to horizontal. At the same time raise your right leg so that it is in line with your buttocks. Stretch your fingertips forward and your right heel backward. Spread out the toes of your right foot. The whole back of your body should be in a horizontal plane, including the buttocks. This is an arduous but exhilarating pose. Stay as still as possible as you breathe calmly for ten to fifteen seconds. Gradually extend the time you hold the position to a full minute.
To exit the pose, bend the left knee. Raise the shoulders and chest. Keep the right knee straight as you bring the right foot to the floor and bend your left knee to a ninety-degree angle. At the same time raise your torso and arms to vertical. Then straighten your left knee. Bring your feet back to parallel and lower your arms. Return to a normal standing position.
Also, be sure to do Virabhadrasana I and III facing the right side. If time is at a premium, either the modified or regular version of Virabhadrasana I on the right side can lift directly into Virabhadrasana III on the right. Thereafter, Virabhadrasana I on the left side can lift into the left version of Virabhadrasana III. Alternatively, if strength is the goal, it is better to do Virabhadrasana I on both the right and the left, and then repeat that pose on each side as the first part of Virabhadrasana III.
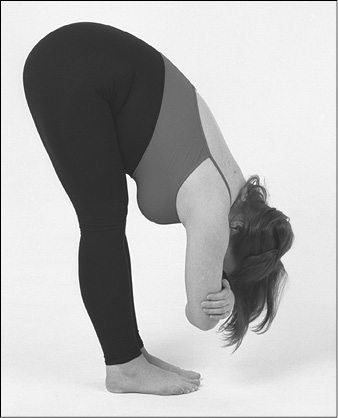
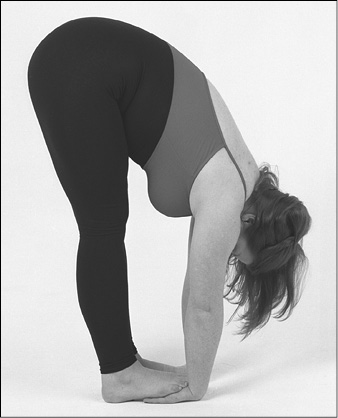
3. PADAHASTASANA
Foot, Hand
BENEFITS: Painlessly brings attention to sensations in stomach and intestine, reducing appetite.
CAUTION: Don’t do this pose on a full stomach. Be careful when coming out of this pose to avoid further injury to your back.
PADAHASTASANA MODIFIED Stand with feet parallel and directly beneath hips. Balance your weight evenly on your feet. Take a breath in, opening your upper chest and pulling your shoulders back. Your spine should be slightly concave as you bend forward from the hips. Bring your chest down as close to the floor as possible. Do not hunch your upper back or neck. To avoid doing so, fold your arms in front of your head. Hold for ten to fifteen seconds. Gradually increase the time you hold this pose to half a minute.
Before exiting this pose, let your back and shoulders bend forward a little. Your spine should be slightly convex. Walk your way up your legs with your hands as you raise your torso and return to the standing position.
PADAHASTASANA REGULAR Stand with feet parallel and directly beneath your hips. Knees should be straight. With your back slightly concave, bend forward from your hips, placing your palms on the soles of your feet and the backs of your hands on the floor. To intensify this pose, bend elbows to apply pressure with your palms against the soles of your feet. Find a modestly challenging degree of stretch, hold it, and breathe calmly for ten to fifteen seconds.
Exit as you do in the modified version of this pose, first making shoulders and spine somewhat convex, then releasing your hands and using them to walk up your thighs until you rise to vertical.
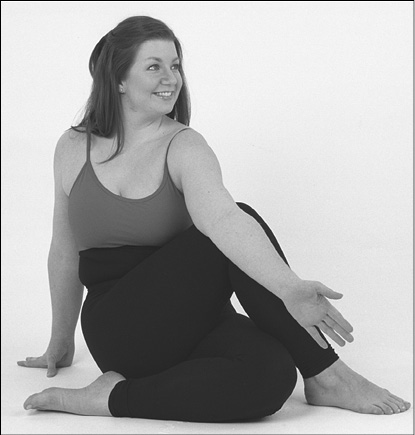
4. ARDHA MATSYENDRASANA (VARIATION)
Sage
BENEFITS: Squeezes and stretches stomach, liver, gallbladder, pancreas and small and large intestines.
CAUTION: Do not do this pose if you are pregnant. Wait four to five hours after eating to do this pose.
PROP: Blanket.
ARDHA MATSYENDRASANA MODIFIED Sit on the floor. Turn your left leg inward and bend the left knee so that the left foot is just in front of the right buttock. Raise your right leg and bend your right knee, lifting the right foot over the left thigh and placing it on the floor. Your right foot is on the floor, shin vertical. Weight is evenly balanced on the sit bones. Grasp the top of your right knee with your left hand. Slide the back of your left arm past the outside of your right knee as far as you can. Walk your right hand behind you, moving your left shoulder back while pulling your left chest toward the right. Keep the spine straight and vertical. Your left arm is like a lever; your right knee is the fulcrum. Do not use it to bring the left shoulder forward, but rather the right chest. Your shoulders should be in line with your right shin.
Hold the position for ten to fifteen seconds, inflating the lungs equally as you breathe. It is important to keep your weight balanced on the sit bones during this time.
To exit the pose, gradually release the pressure of the left arm on the knee as you bring your right arm to your side.
ARDHA MATSYENDRASANA REGULAR Sit on the floor. Bend your left knee inward, moving the left foot close to the right buttock. Bend the right knee and raise the right foot over the left thigh, placing the right foot squarely on the floor. Incline the left torso forward and to the right, sliding the outside of the left arm as far as possible forward along the outside of the right knee. Bring the outside and back of the left armpit as close to the outside of the right knee as possible. Tuck your left hand under the right knee and slide the forearm to the left. Walk behind and to the left with right fingertips. Use your right arm to pull your right shoulder back and to the left. Clasp your hands. Use your left arm as a lever to push your left chest forward and to the right. When you have a maximum twist, relax your abdominal muscles. Inflate lungs as symmetrically as possible and breathe evenly for fifteen to thirty seconds.
To exit this pose, release your left hand and bring it, palm down, to the floor beside your left hip. Walk your right fingertips to the right. Inhale as you come out of this pose. Do on the other side.

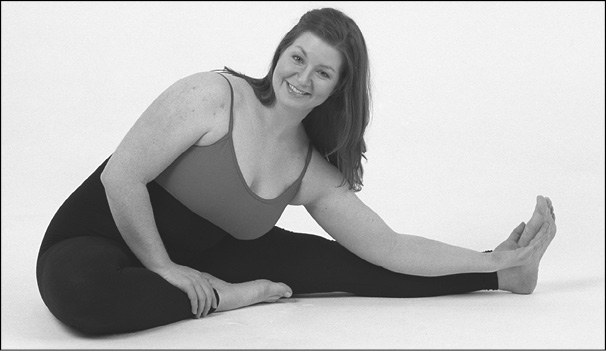
5. PARIVRTTA JANU SIRSASANA
Twisted Head to Knee
BENEFITS: Increases awareness of sensations from the stomach and duodenum. Tones smooth muscles of the stomach. Stretches hamstrings one side at a time.
CAUTION: Do not do this pose if you are pregnant. Wait five hours after eating to do this pose. Do not do this pose if you have active gastritis or esophageal varices.
PARIVRTTA JANU SIRSASANA MODIFIED Sit on the floor with legs extended in front of you. Bend your right knee and place it on the floor as far to the right as possible. The outside of the ankle, calf, and thigh should be on the floor. The heel is as close to the thigh as possible. Your toes should be touching your left thigh. Turn your torso to the right and extend your left arm. Turning clockwise so the back of your arm is against your left knee, place your right hand on your right thigh. Press against the thigh so that your torso inclines toward the left leg. Slide your left arm forward until you can grasp the top of the left foot with your little finger and the arch of the foot with index finger and thumb. Breathe with your mouth closed for ten to fifteen seconds. It is difficult to breathe slowly in this position, but do your best, while holding your abdominals in.
To exit the pose, slide your right hand to the outside of the right thigh. Release your left hand, placing the left palm on the left shin. At the same time, press up with the left arm and come up to a sitting position. You can pull with your right hand to aid the process. Reverse legs and do the pose on the other side.
PARIVRTTA JANU SIRSASANA REGULAR Sit on the floor with legs extended in front of you. Bend your right knee as much as possible and widen the angle between the right and left thighs to 135 degrees. Turn your torso to the right and revolve your left arm counterclockwise as you extend it along the inner left leg. The outside of the upper arm and deltoid region should be in contact with the inner thigh. Grasp your left big toe with the little finger and the arch of the foot with the thumb and index finger. Use your left elbow to put pressure on the inside of your left knee and rotate your trunk counterclockwise. Bring your back ribs down to the left leg.
Now bring your right arm over your head to grasp the little-toe side of the foot. The little finger is at the top of the foot and the other fingers are closer to the floor. Breathe in and bend your elbows as much as possible. Put pressure on the left knee with the left elbow and pull the right shoulder back, twisting still farther. This is an exhilarating pose. It will be difficult to breathe slowly and impossible to breathe deeply, but try for ten to fifteen seconds.
To exit the pose, release the right hand and then the left hand. Turn your torso to the left as you come to a sitting position. You can support your ascent with your left hand on your left shin, knee, or thigh. Reverse and do this pose on the other side.

Plow
BENEFITS: Improves perception of abdominal organs. Stretches buttock musculature and hamstrings. Takes pressure off pudendal nerves in the area between genitals and anus.
WARNING: Do not do this pose if you are pregnant or have glaucoma or hypertension. If you have your period, a full stomach, or shoulder dislocation do not do this pose.
PROPS: Stable card-table chair and one or more blankets
HALASANA MODIFIED (VERSION I) Lie diagnonally with your right hip a few inches in front of the right front leg of a chair. Bend your knees halfway and bring your thighs up until they are vertical. Gradually move your legs up and over to the right so that your calves are on the seat of the chair. Your back, arms, and the backs of your hands should be on the floor. Raise your legs to vertical. If you stretch your arms over your head at this point, with your palms up, and pull your abdomen in, you are doing Urdva Prasarita Padasana (Upright Extended Foot Pose, known for reducing abdominal fat). This is also a modified version of Viparita Karani, the first pose in chapter 6, “Musculoskeletal Pain.” In either pose, or in all, breathe easily for ten to fifteen seconds.
To exit, bend your knees so your shins are once again on the seat of the chair. Bring your left leg off the chair seat. Inch your way to a diagonal position with your left foot so that you can bring your right leg to the floor on the same side of the chair.

HALASANA MODIFIED (VERSION 2) Lie on the floor with a blanket or blankets under your shoulders (not your head). A chair should be placed a foot behind your head. Your hands are placed at your sides. As you bring your knees up to your chest, press your palms down on the floor and straighten your legs slightly to bring your thighs over your face and your shins onto the seat of the chair. Straighten your elbows, keeping them on the floor. Support your back with your palms. Bring your elbows in and press your hands against your back near your kidneys in order to keep your back more elevated. Arch your entire back slightly and raise your sit bones as high as possible.
Breathe with your mouth closed for ten to fifteen seconds. Keep your neck relaxed. While your shins are on the chair seat, gradually straighten your knees. As you get more proficient at this pose, you will be able to straighten them with less and less shin support.
To exit the pose, disengage your hands, but keep your arms extended behind you, hands far enough apart for your back to descend between them. Gradually bring your torso back to the floor, using arm pressure and abdominal strength to restrain and control the process. Keep your legs on the chair until you are quite a ways down. Then lift your feet only as far as necessary, continuing your descent until the sacrum is firmly on the floor. Only then should you lower your legs to the floor. You might want a helper the first few times you do this.

HALASANA REGULAR Do not use a chair. Lie on your back, arms at your sides, palms down beside your hips. Bend your knees as you raise your thighs to vertical. Then straighten the knees and push down on the floor with your palms to push your hips up as you lower your feet over your head. Keep pushing as the sacrum and lower back leave the floor and begin to rise. The weight of your feet will cantilever your pelvis higher and higher. The balance changes when your extended legs pass the horizontal and the feet descend as the pelvis rises. Continue until the toes touch the floor beyond your head.
Place the heels of your hands at the kidney region of the lower back, fingers pointed upward, elbows as close together as possible. Remember to arch your back slightly and raise the sit bones. Start at ten to fifteen seconds in this position, breathing as deeply as possible. Eventually you can stay in this pose for several minutes. One way to improve your inverted posture is to interlock your fingers and straighten out your elbows, pressing your entire arms against the floor. This rolls you onto the apex of your shoulders and further elevates the sit bones.
To exit, release your hands, bend your elbows, and replace your hands on your back in the vicinity of the kidneys. Let your torso descend into your hands, keeping your feet as close to the floor as possible. The feet will probably rise a little as your lower torso and pelvis come to the floor. Keep them low. Swing your legs up and over your head to vertical. Only after your back is securely on the floor should you bend your knees after your thighs come to vertical, then lower your thighs. Support yourself with your arms and hands while bringing your legs and feet down, but keep your neck fully relaxed.
Your head shouldn’t leave the floor until you have finished the pose.

There are some poses that are described and pictured elsewhere in the book for other diagnoses that may also be helpful for weight control. These poses are listed in order of acute to chronic pain:
TRIKONASANA—Triangle Pose
TRIANGA MUKHAIKAPADA PASCHIMOTTANASANA—Three Limb Stretch to the West
MARICHYASANA I—Son of Brahma, Creator of the Universe
JATHARA PARIVARTANASANA—Rolling Stomach