2. WORKING WITH AVAILABLE LIGHT
I often use flash or additional light to enhance the available light. However, I first look to see whether it’s possible to use only the available light. That’s so much simpler. When you have control over the shooting scenario and your subject, the way you use the light should be a conscious decision. “Using the light” shouldn’t mean “just going along with the light.”
THE WAY YOU USE THE LIGHT SHOULD BE A CONSCIOUS DECISION.
Plate 2-1. BAD! In this pose, the overhead lighting is unflattering on Shawna’s face. (
![]() second, f/4, 800 ISO, 70–200mm f/2.8 lens)
second, f/4, 800 ISO, 70–200mm f/2.8 lens)
Plate 2-2. GOOD! A refined pose resulted in a more appealing lighting effect. (![]() second, f/4, 800 ISO, 70–200mm f/2.8 lens)
second, f/4, 800 ISO, 70–200mm f/2.8 lens)
MATCH THE POSE TO THE LIGHTING
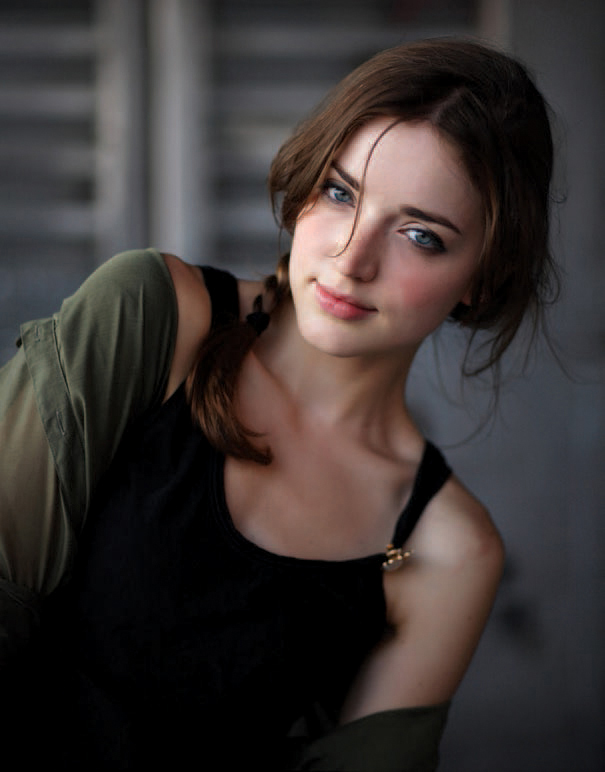
Plates 2-1 and 2-2, photos of Shawna, illustrate the fundamental idea in this book. Before you press the shutter button, you first need to consider the direction and quality of the light you have or are creating. You then need to adapt either your lighting or your way of shooting to complement the subject. This consideration of lighting remains the same, regardless of what light source is being used.
In these photos, the overhead light came from an incandescent spotlight in the ceiling of a hotel lobby. Having Shawna look directly at the camera with no consideration of the lighting created an unattractive photo (plate 2-1). The uneven lighting on her face is not flattering. To correct the problem, I needed either to bring in additional lighting, such as a video light, or—as I did in this case—to pose her so that the light fell onto her face in a more flattering way. I needed to get more light onto her face so that her eyes were not completely in shade.
With just a slight shift in her pose, I achieved my goal (plate 2-2). Now, there’s a sense of drama, a little bit of mystery—and we have a photograph that captures the beauty and personality of the model. This is all because I simply considered the available light and examined its direction and quality in relation to how I posed my subject.
In postproduction, the info in the RAW file revealed that I shot this at a white balance of 3250K, making the shot too warm. A simple adjustment to the RAW file gave me the right color balance. I point this out to emphasize that it is essential to shoot in RAW. It isn’t possible to make large adjustments to the exposure, white balance, and contrast of an image shot in JPEG format.
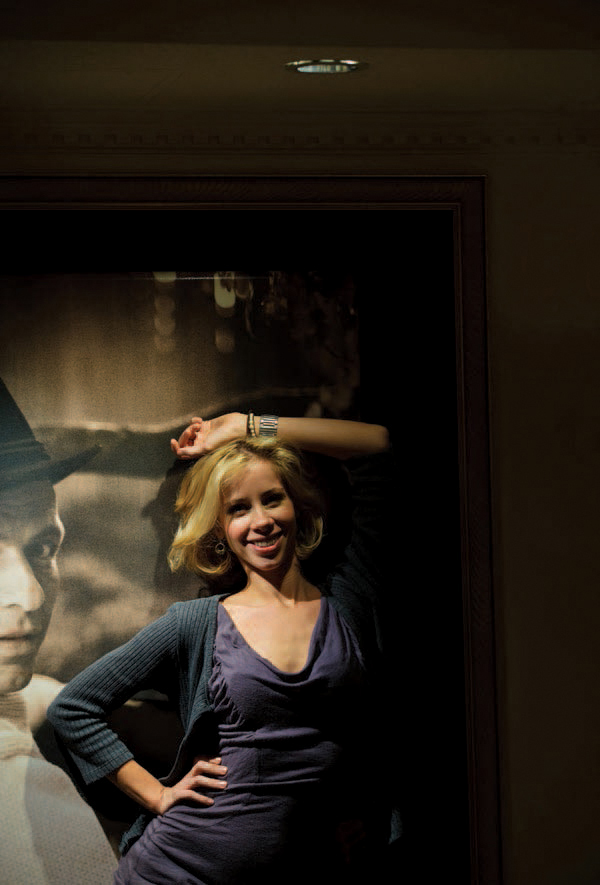
I used exactly the same approach for plate 2-3, a portrait of Rachel on her wedding day. I had shot a few portraits of her in the hotel room where she was preparing for her wedding, but I wanted to add some variety. After scouting around, I found this bright wallpaper and thought that it would make for an intriguing backdrop. From there, it was just a question of lighting.
Plate 2-4 is a pull-back shot that shows the setting. I really prefer to get as simple a background as possible in order to minimize distractions. A fast f/2.8 telephoto zoom lens was essential here to compress the perspective and eliminate background clutter. The large fluorescent panels above her provided soft lighting, but (in terms of its direction) the light was also top-heavy. For that reason, it was important to adjust Rachel’s gaze slightly upward until there were no shadows under her eyebrows. The result was clean, flattering light. This specific approach helps define a style of simplicity and elegance.
Plate 2-3. A portrait of Rachel on her wedding day. (
![]() second, f/2.8, 1600 ISO, 70–200mm f/2.8 lens)
second, f/2.8, 1600 ISO, 70–200mm f/2.8 lens)

Plate 2-4. A pull-back shot showing the setting for Rachel’s bridal portrait.
All of this brings us to a crucial point: using available light is not a random thing. As you saw in the previous examples, I directed the posing and gaze of each subject to have the light fall on them from a direction that was flattering.
In the first example, I dealt with a small, incandescent, overhead light source that produced hard light. In the second example, I had a flood of even, overhead light. Though the light sources were different, the approach was consistent.
FIND THE OPTIMAL SUBJECT POSITION
The composition of the bridal portraits of Jennifer is supremely simple and uncluttered (plates 2-5 and 2-6). The receding lines lead your eye toward her. The way I posed her was also straightforward yet elegant. One thing to note is that I directed her to “pop” her front knee sideways; this creates a slimming effect on anyone. Conversely, popping the rear knee forward creates the impression of a larger shape.
For these photographs, I used only the available light—not even fill flash. However, the location where I posed Jennifer was carefully selected. I stood her near the entrance to a row of trees, just past the first tree. Plate 2-7 might explain it better. Positioning her here ensured that the light would come primarily from the front and be very soft. Because of the branches overhead, most of the overhead light was blocked. This immediately reduced the chance of heavy shadows under her eyes. The light now came from a specific, desirable angle.
I BASICALLY MIMICKED THE LIGHTING EFFECT OF A MASSIVE SOFTBOX IN THE STUDIO.
By having her stand in this spot, I basically mimicked the lighting effect of a massive softbox in the studio—one that was placed 45 degrees or so above the subject. By controlling her placement in the scene, I was also controlling the direction from which most of the light would come. The same idea would work if you posed your subject in a doorway, for example.

Plates 2-5 and 2-6. For these available light portraits, the selection of Jennifer’s position was critical to the successful lighting. (
![]() second, f/3.5, 400 ISO, 70–200mm f/2.8 lens)
second, f/3.5, 400 ISO, 70–200mm f/2.8 lens)
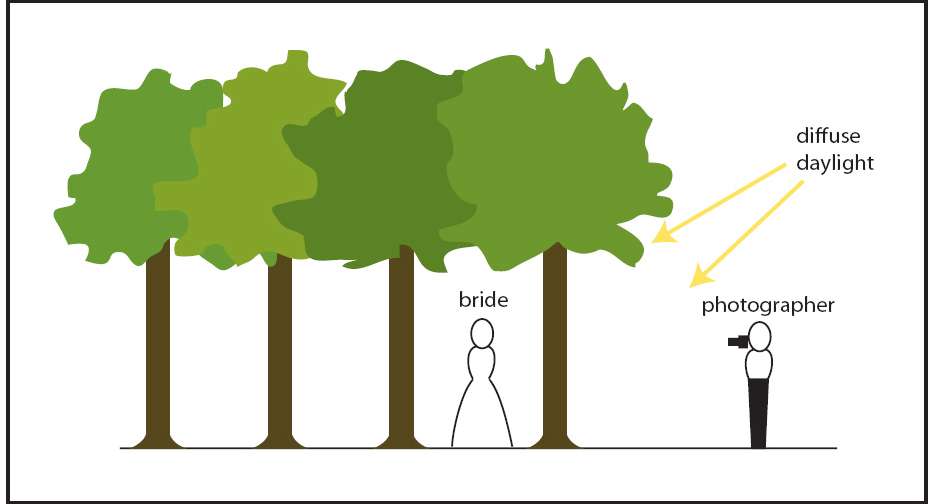
Plate 2-7. The position of Jennifer for plates 2-5 and 2-6.
If the background had permitted it, I could also have moved to the side and had a more directional quality to the light. Remember, if you change your position relative to the light and your subject, the light changes completely! We’ll come back to this concept through the course of this book. I used the histogram of my camera to determine correct exposure. We’ll cover this in chapter 3.
I photographed Ekaterina (plate 2-8) using available light only, positioning her so the light had to come in at a flattering angle. I posed her against the doorway under the canopy of a building, so the soft light entered the frame mostly from 30 to 45 degrees above her, providing a natural softbox effect. In fact, this is the mental shortcut I take most often when working with available light. I ask myself, “Where do I want my light to come from? Where would I place my softbox if I were working in a studio?”
IF YOU CHANGE YOUR POSITION RELATIVE TO THE LIGHT AND YOUR SUBJECT, THE LIGHT CHANGES COMPLETELY!

Plate 2-8. An available-light portrait of Ekaterina against a doorway, under a building canopy. (
![]() second, f/3.2, 400 ISO, 70–200mm f/2.8 lens)
second, f/3.2, 400 ISO, 70–200mm f/2.8 lens)
Plate 2-9. An available-light portrait of Anelisa under an awning. (
![]() second, f/2, 100 ISO, 85mm f/1.8 lens)
second, f/2, 100 ISO, 85mm f/1.8 lens)
THIS PRODUCED AN INTERESTING AND FLATTERING LIGHTING PATTERN ON HER FACE.
Let’s look at another example. Plate 2-9, an image of Anelisa, shows my typical approach to working with the available light. Because she was posed under an awning, there was little light coming from above. This “forced” the light to fall on her from a flattering angle. By positioning her so that the available light came in from an angle, I mimicked the look of lighting from a large softbox placed to the side.
In this case, I also adjusted the model’s position in relation to the light for a different effect. With Anelisa leaning to the side, I asked her to lift her chin a little and move her head toward the side where the majority of the light was coming from. This produced an interesting and flattering lighting pattern on her face. The light came in over her shoulder, illuminating the far side of her face. Again, this is called short lighting.
DIRECTION OF LIGHT AND CHOICE OF BACKGROUND
When working with a subject, we have the opportunity to control at least a few aspects to make the final photograph more successful. I take care to position myself and my subject so that the background is complementary, or at least neutral. I normally try to avoid a background that is cluttered and will distract the viewer’s attention.
When working in an urban environment, this can be challenging—but the various elements in the frame still need to work together to make the image successful. Some street photographers have a genius for pulling disparate elements in the frame together to make their images fresh and striking. They achieve a balance even when the frame is busy.
I NORMALLY TRY TO AVOID A BACKGROUND THAT IS CLUTTERED AND WILL DISTRACT THE VIEWER’S ATTENTION.
Let’s look at an example of a session shot on a city street. Plate 2-10 shows how the wider street scene looked for my portrait of Catherine. From all that clutter in the background, I recognized that with a longer focal length I could use the repetitive pattern of the shop-fronts as a defocused background. I then composed tightly with a 70–200mm f/2.8 zoom.
The lighting in the final photograph (plate 2-11) is all available light—no flash. I noticed that the awning we were working under blocked the light from above. This meant the light would not be top-heavy, but would mostly be coming in from an angle. From there, I only had to pose my model so that her shoulder and face were pointed toward the light. The way her head was positioned created the short lighting pattern.
We can now work toward recognizing these situations and using the resulting light patterns to achieve flattering light. Reinforcing the ideas covered so far, we’re going to look for that intersection where everything comes together:
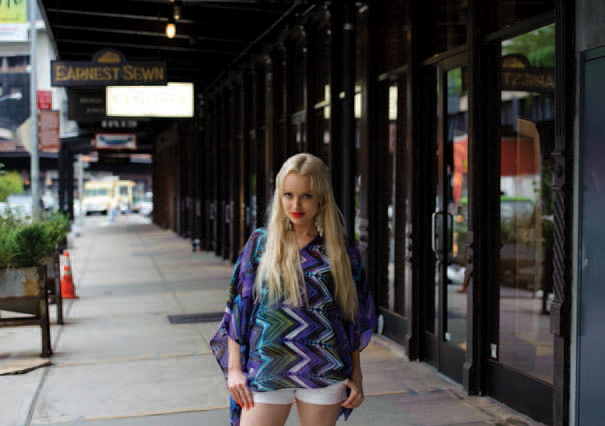
Plate 2-10. Here’s the wider street scene used as the background for my portrait of Catherine.
Plate 2-11. The final image of Catherine. (
![]() second, f/2.8, 640 ISO, 70–200mm f/2.8 lens)
second, f/2.8, 640 ISO, 70–200mm f/2.8 lens)
2. Choice of background
3. Subject position
4. Camera position
So what happens if there’s still room for improvement in your natural-light portrait after you’ve gone as far as you can with those four controls? That’s when it’s time to modify or augment the light.
One of the easiest ways to manipulate available light, without having to use additional light sources, is with a reflector—as seen in plate 2-12.
I HAD MY ASSISTANT HOLD UP A WHITE REFLECTOR TO BOUNCE SOME LIGHT DIRECTLY ONTO THE MODEL.
While a reflector is often used for a bit of fill light on a subject, here the light from the reflector became the main source of light. I had my assistant hold up a white reflector to bounce some light directly onto the model, Johannie. This created the tightly focused area of light on just her face and the upper part of her body. Light that is reflected from the sun like this can be fairly harsh, so I made sure that my model didn’t have to look directly into the reflected light. I also had my assistant throw the light onto her for very short moments, during which I’d shoot a burst of images.
Notice the change in color balance across the model’s body. Her face was lit by sunlight, while the rest of her body was in the shade. To keep the color balance identical across her face and body, I would have needed two different white balance settings—which, of course, is impossible to accomplish in-camera. But I like the effect here; it helps direct attention to her. (However, even though I used the lens at a very wide aperture, the way the background area is rendered is intrusive because of the harsh bokeh from this particular lens. A smoother look would have been better.)
Plate 2-12. The final image of Johannie. (
![]() second, f/1.4, 200 ISO, 50mm f/1.4 lens)
second, f/1.4, 200 ISO, 50mm f/1.4 lens)
Plate 2-13. The final image of Elmira. (![]() second, f/1.4, 3200 ISO, 35mm f/1.4 lens)
second, f/1.4, 3200 ISO, 35mm f/1.4 lens)

Plate 2-14. A pull-back shot for the image of Elmira.
I SCOUTED AROUND UNTIL I FOUND A PLACE WHERE THE LIGHT FELL ON ELMIRA IN A FLATTERING WAY.
EVEN WITH HIGH ISO SETTINGS, YOU NEED GOOD LIGHT
When I photographed Elmira in Grand Central Station, I had to deal with low light levels. I was using the Canon 5D Mark III, which has incredible high-ISO noise performance. I was also using the Canon EF 35mm f/1.4L lens, which allowed me to shoot at a wide aperture. Even with the combination of high ISO and wide apertures, however, I still had to consider my light. I wanted flattering light (plate 2-13). Therefore, I posed Elmira turned toward a light source so that the light would come in from an angle over her shoulder (plate 2-14). With the fluorescent light coming through the frosted glass on the door, I knew I had a large light source. In using it, I purposely controlled the available light falling on her. Again, this has to be a conscious choice.
The same idea was applied in plate 2-15. I scouted around until I found a place where the light fell on Elmira in a flattering way. It is important not to become complacent—even with cameras that perform well in low light. You still need to carefully consider the direction and quality of your lighting.

Plate 2-15. Another image of Elmira from Grand Central Station. (
![]() second, f/1.6, 3200 ISO, 35mm f/1.4 lens)
second, f/1.6, 3200 ISO, 35mm f/1.4 lens)