OFF-CAMERA FLASH VS. DIRECT ON-CAMERA FLASH
In chapter 6, we saw how good on-camera flash can look when the light is bounced—with some careful consideration given to the direction of the light. But the question inevitably arises: what if there is nothing to bounce off? With flash, we have two options: using direct on-camera flash or switching to off-camera flash. Plates 7-1 through 7-3 show the results of this decision.
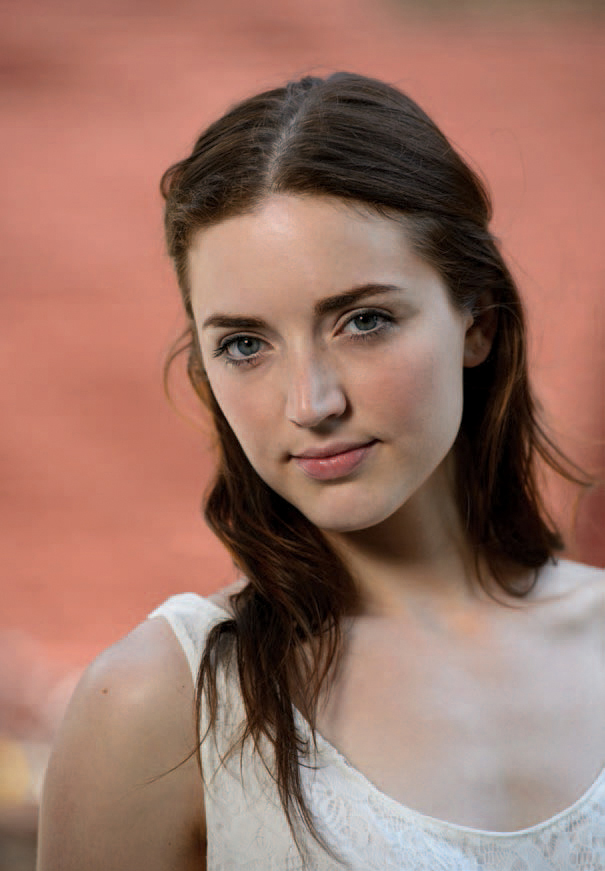
For plate 7-1, I posed Anelisa in an area where the ambient light on her was quite uneven, leaving her eyes shaded. The exposure is correct, but the light isn’t flattering. For plates 7-2 and 7-3, I underexposed the ambient light by 1 stop, so that the effect of the flash could be seen more easily. Plate 7-2 shows the typical result from direct on-camera flash, where the flash is dominant. There is a tell-tale hard shadow under her chin and we can see specular reflections on her skin. The on-axis flash also produced flat light that isn’t dynamic. Plate 7-3 was created with an off-camera flash in a double-baffled softbox placed to camera left. Because the light was now coming from a different angle than the camera’s point of view, the effect is more dynamic; there is now a nice interplay between light and shadow on Anelisa’s face. I think we can all agree that the diffused off-camera flash clearly produces better results and a more flattering look.
Plate 7-1. Anelisa in uneven available light. (
![]() second, f/2.8, 200 ISO, 70–200mm f/2.8 lens; available light only)
second, f/2.8, 200 ISO, 70–200mm f/2.8 lens; available light only)
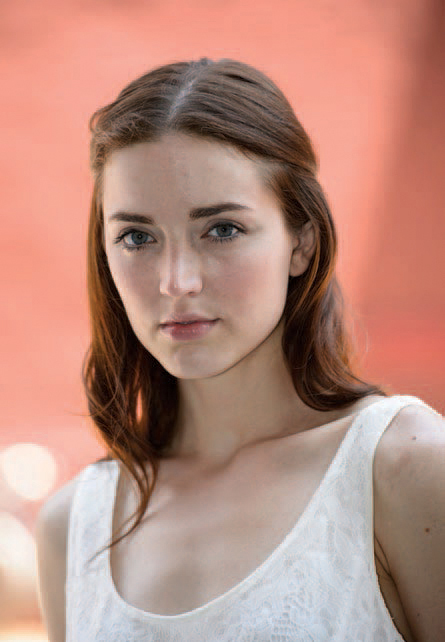
Plate 7-2. On-axis flash produced a flat, unappealing look. (![]() second, f/4, 200 ISO, 70–200mm f/2.8 lens; direct, on-camera TTL flash)
second, f/4, 200 ISO, 70–200mm f/2.8 lens; direct, on-camera TTL flash)
Plate 7-3. Off-camera flash in a softbox yielded a much more flattering portrait. (![]() second, f/4, 200 ISO, 70–200mm f/2.8 lens; off-camera TTL flash in a softbox)
second, f/4, 200 ISO, 70–200mm f/2.8 lens; off-camera TTL flash in a softbox)
THERE IS NOW A NICE INTERPLAY BETWEEN LIGHT AND SHADOW ON ANELISA’S FACE.
As we’ve seen throughout the book so far, light that is directional is usually more interesting because it gives our subjects form and shape. The interaction of light and shadow is what gives our photographs a three-dimensional effect. We can get directional light by posing our subjects in a specific way in relation to the available light or with directional bounce flash. But the easiest and most predictable way of getting directional light is with off-camera flash—whether it’s direct (undiffused) or modified (diffused with an umbrella, softbox, etc.).
I won’t be going into hardware choices here, because I strongly believe that once we understand the underlying techniques, the equipment matters less. Even though the gear available to us constantly changes as technology improves, the fundamental techniques for how we use light remain constant. So let’s focus on that.
GREAT LIGHTING—ANYWHERE, ANYTIME
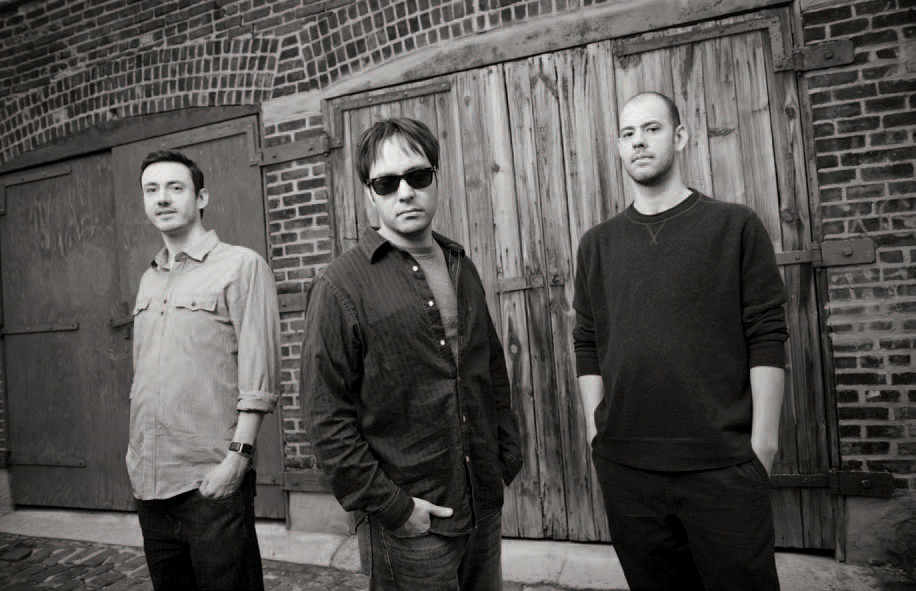
For plate 7-4, a promotional photograph of a band, I used just the available light in the train station. I had the band members positioned so that they were turned into the light streaming through the high windows.
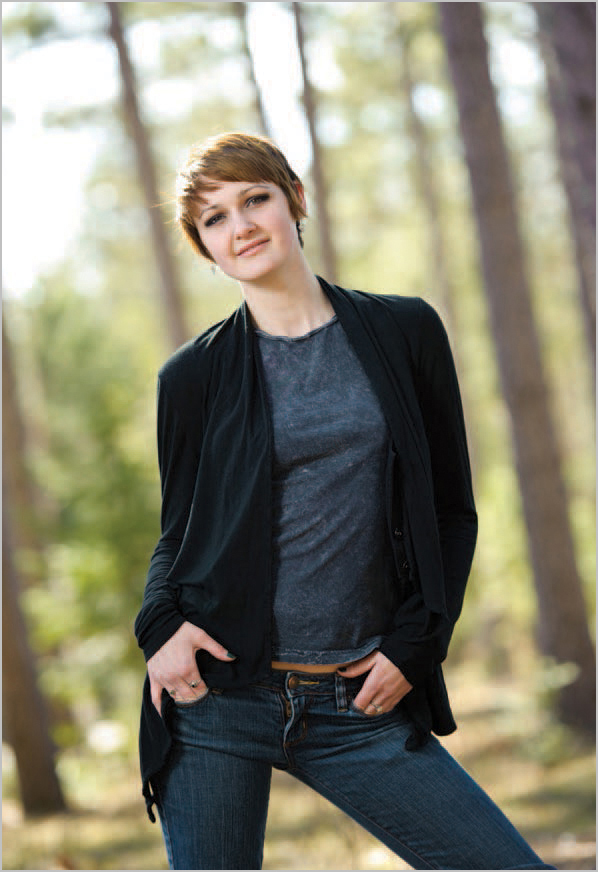
Working like this can give excellent results, but it makes you dependent on finding great light and using it effectively—which, in turn, limits your compositional and background choices. This is where the use of off-camera flash is liberating. With off-camera flash, you can position your subjects wherever you like, then add great light. For this reason, off-camera flash is very often a more practical choice.
By using off-camera flash, you are assured that the lighting will be flattering and interesting. That’s taken care of. This frees you up to concentrate on interacting with your subjects and designing an effective composition in any location you choose. For plate 7-5 the lighting setup was supremely simple. Plate 7-6 shows where I placed the light and the overall setup for the image. As you can see, it required only very basic and portable gear—a light-stand, a shoot-through umbrella, and a radio transmitter to trip the flash (in this case, the PocketWizard TT5).

Plate 7-4. Shooting with available light makes you dependent on finding good light. (
![]() second, f/8, 800 ISO, 24–70mm f/2.8 lens; available light only)
second, f/8, 800 ISO, 24–70mm f/2.8 lens; available light only)
Plate 7-5. Adding off-camera flash liberates you to use any location. (![]() second, f/5, 800 ISO, 24–70mm f/2.8 lens; off-camera TTL with FEC at –1EV)
second, f/5, 800 ISO, 24–70mm f/2.8 lens; off-camera TTL with FEC at –1EV)

Plate 7-6. The lighting setup for plate 7-5.
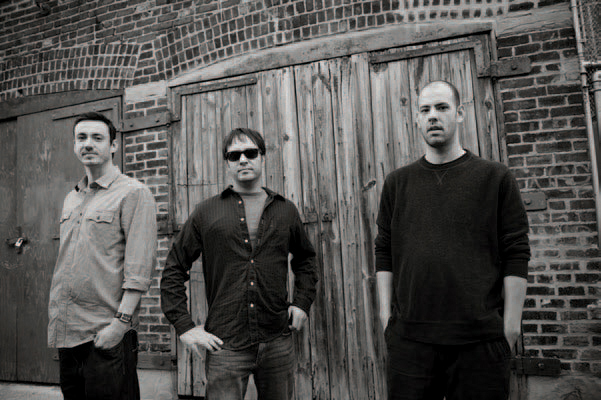
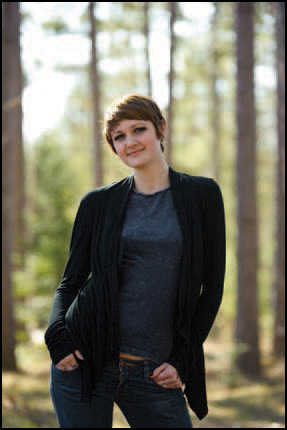
Plate 7-7. The same setup as in plate 7-5, but with the flash disabled. (![]() second, f/5, 800 ISO, 24–70mm f/2.8 lens; available light only)
second, f/5, 800 ISO, 24–70mm f/2.8 lens; available light only)
Plate 7-7 is a comparison image from the same sequence, but with the flash disabled. Note the uneven light and the shadows under the subjects’ eyes.
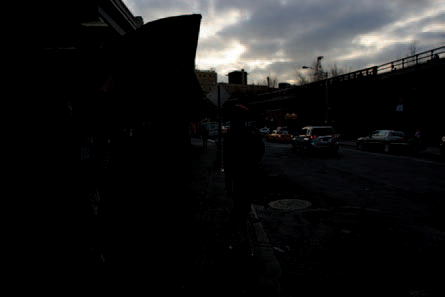
Plate 7-8. Exposing for the sky made the street scene go completely dark. (
![]() second, f/11, 200 ISO, 24–70mm f/2.8 lens; ambient light only)
second, f/11, 200 ISO, 24–70mm f/2.8 lens; ambient light only)
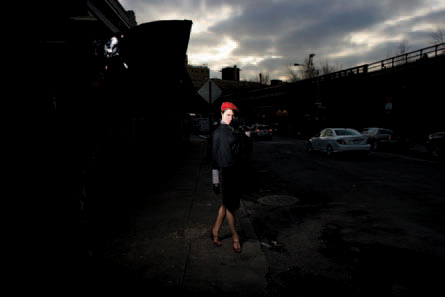
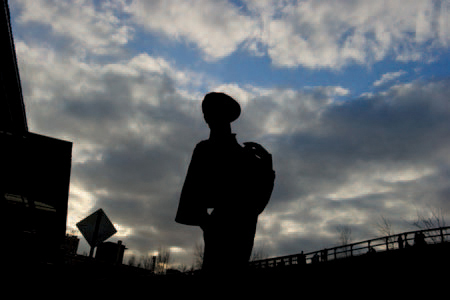
Plate 7-9. Simply adding flash illuminated Alex in a sea of black—the background makes no sense. (![]() second, f/11, 200 ISO, 24–70mm f/2.8 lens; off-camera manual flash)
second, f/11, 200 ISO, 24–70mm f/2.8 lens; off-camera manual flash)
With on-location flash photography, you nearly always start off by figuring out what you want to do in relation to the available light. You may need fill flash only, or the flash may need to do the “heavy lifting” and expose correctly for the subject in relation to the available light on the background.
When you have a subject in (relative) shade and need to figure out the flash exposure, you first need to decide what part of the background is important. Often, you can’t expose correctly for all the background areas, so you have to choose which part to use and position the subject/camera in relation to that. That area will provide the basis for your ambient light exposure setting.
OFTEN, YOU CAN’T EXPOSE CORRECTLY FOR ALL THE BACKGROUND AREAS.
Let’s run through that thought-process using an image of Alex. The background for this series of images was a street scene in Manhattan. However, if I exposed for the sky, the street went completely dark (plate 7-8). Since I couldn’t expose correctly for both the sky and the street scene; I had to decide which element of the background would be exposed correctly, then add flash to expose my subject. Unfortunately, simply adding flash to the current composition to expose correctly for Alex left me with an image that didn’t make sense (plate 7-9). She was lost in a pool of black surroundings.
Positioning myself so that I could shoot at an upward angle and use the sky as my background made much more sense (plate 7-10). I also dropped my exposure to really saturate the sky. There is no specific “correct” exposure here for the sky; I simply chose how I wanted the sky to appear by manipulating my exposure settings. Adding manual off-camera flash to this mix immediately gave the final image a dramatic look (plate 7-12). Plate 7-11, a pull-back shot, shows the position of the light.
Plate 7-10. Changing my camera angle to include more of the sky improved the background immensely. (![]() second, f/16, 200 ISO, 24–70mm f/2.8 lens; ambient light only)
second, f/16, 200 ISO, 24–70mm f/2.8 lens; ambient light only)
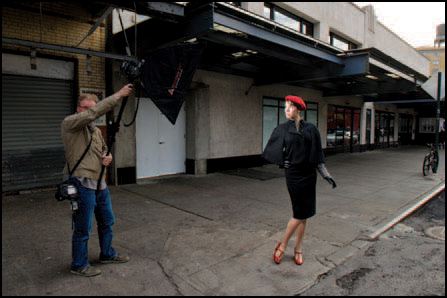
Plate 7-11. The setup for this shot.
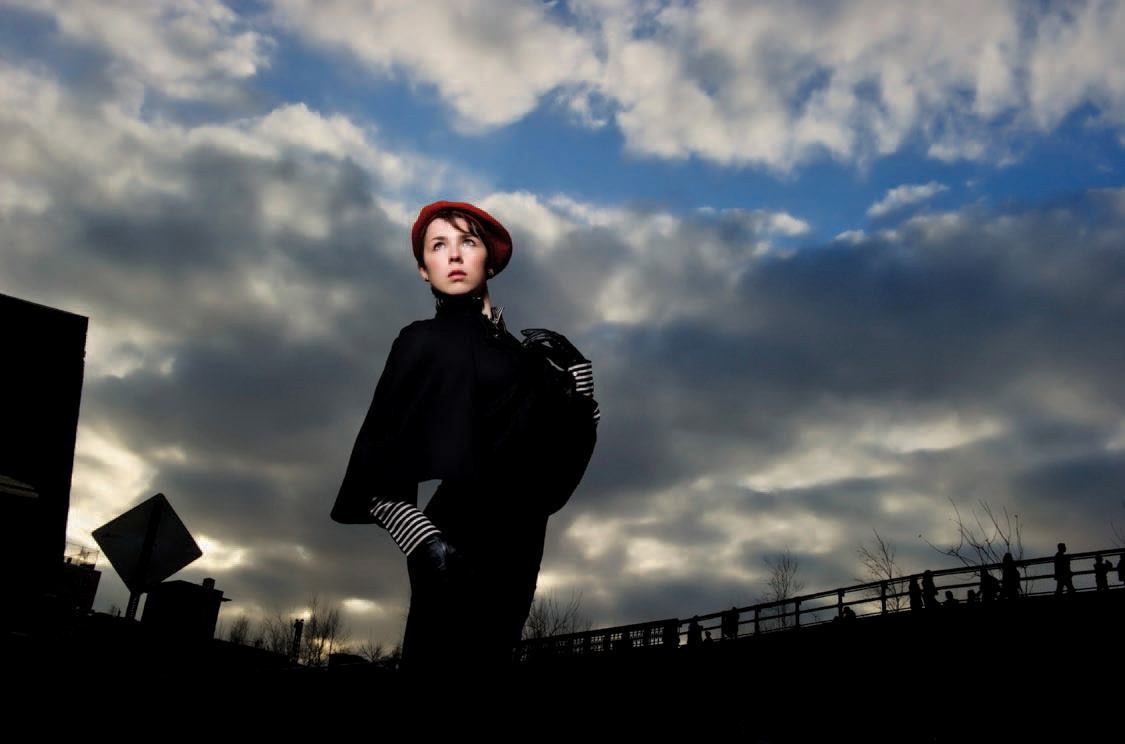
Plate 7-12. Adding manual flash completed this image of Alex. (![]() second, f/16, 200 ISO, 24–70mm f/2.8 lens; off-camera manual flash)
second, f/16, 200 ISO, 24–70mm f/2.8 lens; off-camera manual flash)
So how did I meter this shot to balance the background and the manual flash? Here’s a step-by-step look at the process:
1. I decided on the aperture I wanted to use, based on what I wanted to do with the background.
2. Since I was shooting in bright light, a low ISO was the best option and gave me the best image quality. Since I already knew I would be shooting at a fairly small aperture, I didn’t need to bump up the ISO.
3. I decided to shoot at the maximum flash sync speed, giving me the most flash range at my aperture setting.
4. I decided to use manual flash, meaning the aperture and ISO were fixed values in this scenario. That left the distance and power of the flash as the other variable controls.
5. Knowing I needed to get an output of f/16 at 200 ISO from the flash, I placed a Quantum T4D in a softbox and set it to full manual output. Essentially, the power setting for the flash was decided for me by the bright sky.
6. Finally, I used a light meter to measure the flash’s output, adjusting the position of the softbox closer and closer to the subject until it read f/16. (Remember: the distance we’re concerned about here is the distance from the light to the subject, not from the photographer to the subject!)
SO HOW DID I METER THIS SHOT TO BALANCE THE BACKGROUND AND THE MANUAL FLASH?
At this point, all of my settings for a proper flash exposure were correct in relation to the chosen background. All I had to worry about was directing the model and nailing the composition.
Plate 7-13, an image of Amy, is a straight-forward location portrait using off-camera flash. It is ideal for an overview of how easy the ambient and TTL flash metering is for off-camera flash. The basic approach was to expose for the ambient light in the background, making sure my subject was somewhat underexposed. I then added off-camera flash with a softbox. Let’s look at this process in more detail, though.
Plate 7-13. A simple location portrait of Amy. (
![]() second, f/2.8, 200 ISO, 70–200mm f/2.8 lens; off-camera TTL flash with FEC set to +0.7EV)
second, f/2.8, 200 ISO, 70–200mm f/2.8 lens; off-camera TTL flash with FEC set to +0.7EV)
DECIDE ON YOUR BACKGROUND AND THEN DETERMINE HOW YOU WANT TO EXPOSE IT.
The first step was metering the available light. In this scenario, there were two main areas in the background that I could have chosen to expose for: the brighter sky area and the less-bright tree area. Because of the difference in the lighting, it was not possible to expose for both of those areas correctly; I had to pick just one. When designing your composition, it is always important to decide specifically on your background and then determine how you want to expose it.
In this case, I chose to expose for the trees in the background. This meant my model would not be underexposed to a great extent (as she would have been if I had exposed for the very bright sky area). That meant it was easy to bring the subject exposure up to the desired levels using off-camera flash. Choosing the trees as my background meant that the brighter sky area would blow out, so I made sure that this was a relatively small portion of the background in my final composition. My main background area was the patch of out-of-focus trees. Again, you have to be calculating when choosing the background for your photos.
Having decided on the trees as my background, I metered by looking at the camera’s display while eliminating the bright sky areas from the frame. Then, I dialed my settings in manual exposure mode to anchor the exposure, ensuring that no composition adjustments I might make would affect the camera settings. I purposely chose to overexpose a bit with this image, taking the exposure ⅔ stop up from the zero point shown on my camera’s built-in meter. Why ⅔ stop? Because that’s how I wanted it. In a sense, there is a no “correct” exposure for the background in this specific scenario. You could choose to make it bright and airy with pastel tones or to underexpose it for a moodier, darker look. It’s your choice as the photographer.
YOU HAVE TO BE CALCULATING WHEN CHOOSING THE BACKGROUND FOR YOUR PHOTOS.
The next step was to meter for the flash. However, the surprising truth is that I didn’t meter for the flash—because you can’t really meter for TTL flash. You have to rely on the technology. That’s the beauty of using TTL flash; you can largely rely on the technology to get you there. Using the metering circuitry in the camera, the flash exposure is calculated based on a pre-flash that the flash emits just before the actual pulse of light that produces the proper exposure (plate 7-14).
With TTL flash, you just need to check your camera’s LCD display to decide whether you like the flash exposure, then dial the FEC down or up to get the desired exposure for the next sequence of images. For a situation where you need to work fast, this makes TTL flash very easy to use. But for a situation where you need numerous photographs that are consistently exposed, you will have much more to do in postproduction than if you had shot with manual flash (which is completely consistent from frame to frame; see chapter 4).
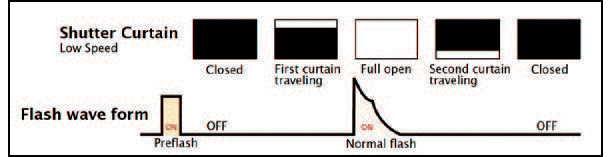
Plate 7-14. A short pre-flash is used to determine the correct flash settings by the TTL metering.
Plate 7-15. Ambient light only. (
![]() second, f/2.8, 200 ISO)
second, f/2.8, 200 ISO)
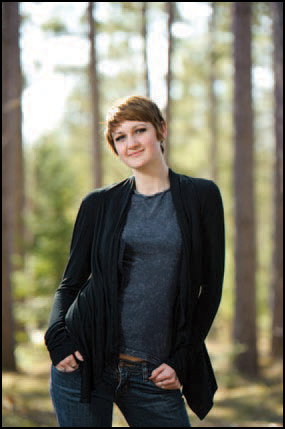
Plate 7-16. With TTL flash. (![]() second, f/2.8, 200 ISO)
second, f/2.8, 200 ISO)
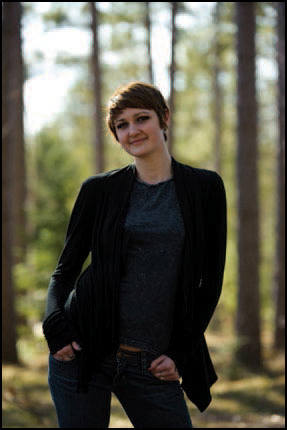
Plate 7-17. Ambient light only. (![]() second, f/2.8, 200 ISO)
second, f/2.8, 200 ISO)
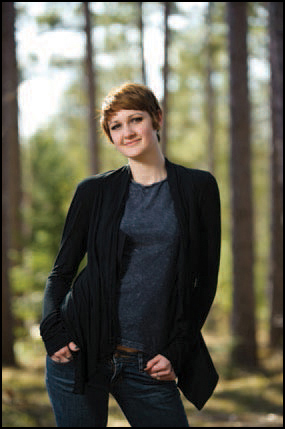
Plate 7-18. With TTL flash. (![]() second, f/2.8, 200 ISO)
second, f/2.8, 200 ISO)
Plates 7-16 and 7-18 show the results of changing my settings between shots. Plates 7-15 and 7-17, show the coordinating ambient-only exposures. There’s not a large change in the ambient exposure (just ⅔ stop), but it still shows how the TTL flash exposure picked up the slack and gave me a correct overall exposure for the model. The TTL flash simply followed the camera settings. It’s simplicity itself.
The key point I want to emphasize is how easy it is to use off-camera flash—especially with TTL. Being able to rely on the TTL flash technology to give you the correct flash exposure lets you be less concerned about fussing with specific settings and devote more of your attention to the other essential elements of the final photograph—things like directing the model, composing the shot, and determining the best direction and quality for the light.
The easiest starting point for placing the off-camera flash is about 30 degrees up from your subject’s eyes and about 30 to 45 degrees off to the side. For the previous image sequence, a softbox was positioned to camera left. By positioning your softbox like this, you get great light that isn’t too dramatic—but there’s still enough of a gradient to the shadows that it will enhance the form and shape of your subject.
A SOFTBOX IS EASIER TO USE SINCE IT IS MORE FORGIVING IN TERMS OF PLACEMENT THAN DIRECT FLASH.
You would get similar results with an unmodified off-camera flash in the same position, but the light would be less soft. Direct off-camera flash has a harder look with sharper shadows. This can look really good, but a softbox is easier to use since it is more forgiving in terms of placement.
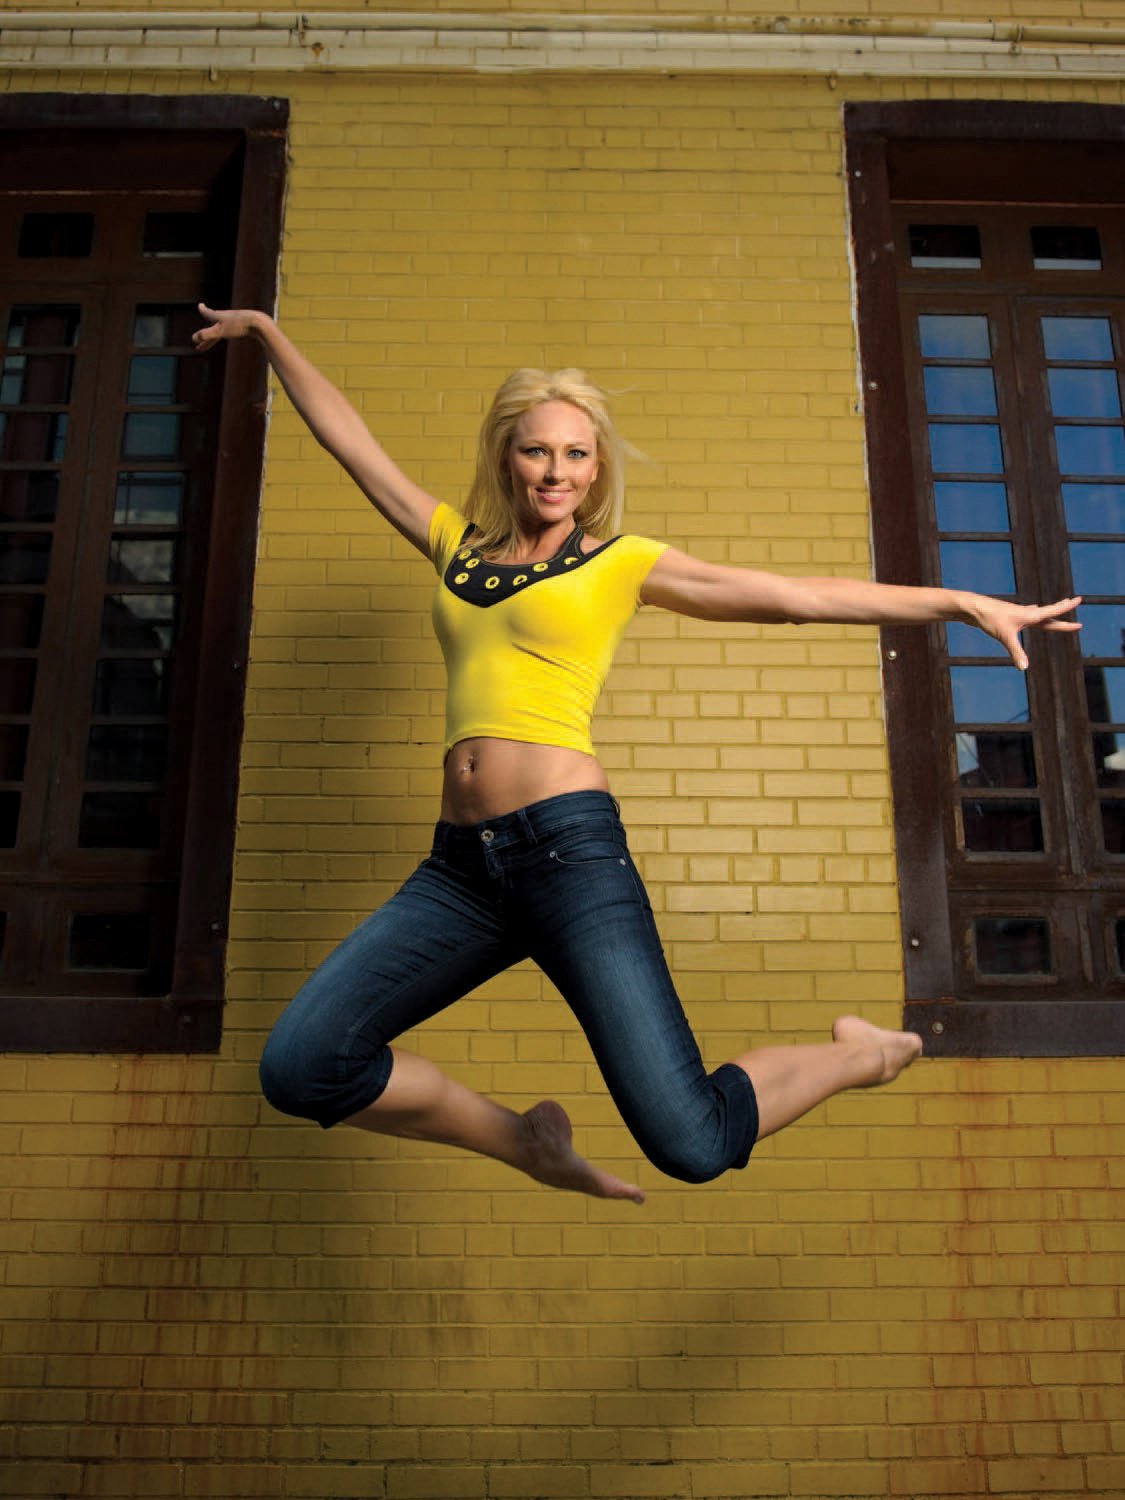
As you may have guessed from the shutter speeds, which exceed the normal range of maximum flash sync speeds, plates 7-13 and 7-15 through 7-18 were created using HSS. As noted in chapter 4, there’s a loss of power/range/efficiency from your flash when you go in to this mode. In this case, though, the softbox was close enough to the model that I still got a correct exposure. Had I shot at a smaller aperture or been working at the extreme range of what the flash was capable of putting out, I would definitely have seen underexposure. That is the key to working with HSS: use your softbox close to your subject, or use direct (undiffused) flash.
Plate 7-19, a fun image of Aleona, was also created using HSS. To capture her in mid-air, I needed a fast shutter speed to effectively freeze the movement. Fortunately, my flash in a softbox was close enough to Aleona that I was able to get a good flash exposure on her—even at the high shutter speed. I did remove the one baffle from the softbox to increase the amount of light that the softbox would be capable of producing.
Plate 7-19. Choosing a fast enough shutter speed to freeze Aleona in mid-air meant switching to HSS. (
![]() second, f/4, 800 ISO, 24–70mm f/2.8 lens; off-camera TTL flash with FEC at +0.3EV)
second, f/4, 800 ISO, 24–70mm f/2.8 lens; off-camera TTL flash with FEC at +0.3EV)
So here’s a quick overview of when you would use HSS in your off-camera flash photography:
1. When you need a shallow depth of field (wide aperture), or
2. When you need a fast shutter speed, and
3. When you have flash power to spare.
That about sums it up! Use HSS when you truly need the higher shutter speed or shallower depth of field—and when you can afford the subsequent loss in power.
DIRECTION OF LIGHT VS. YOUR POSITION
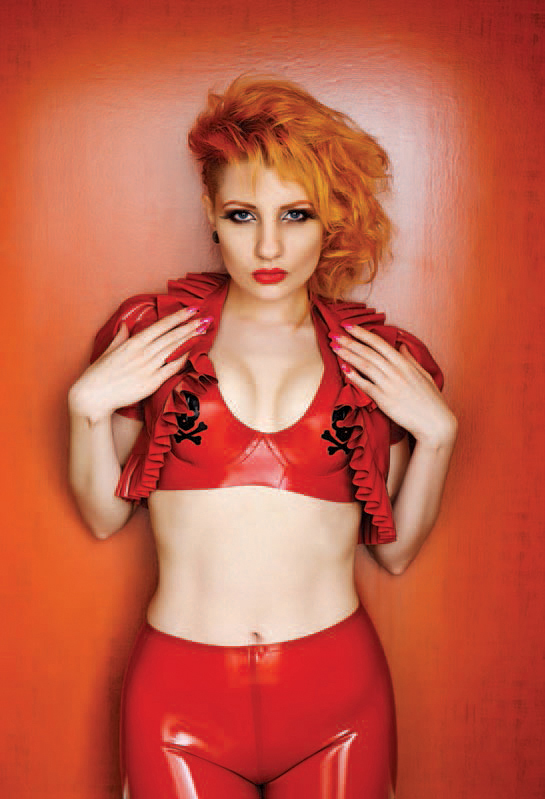
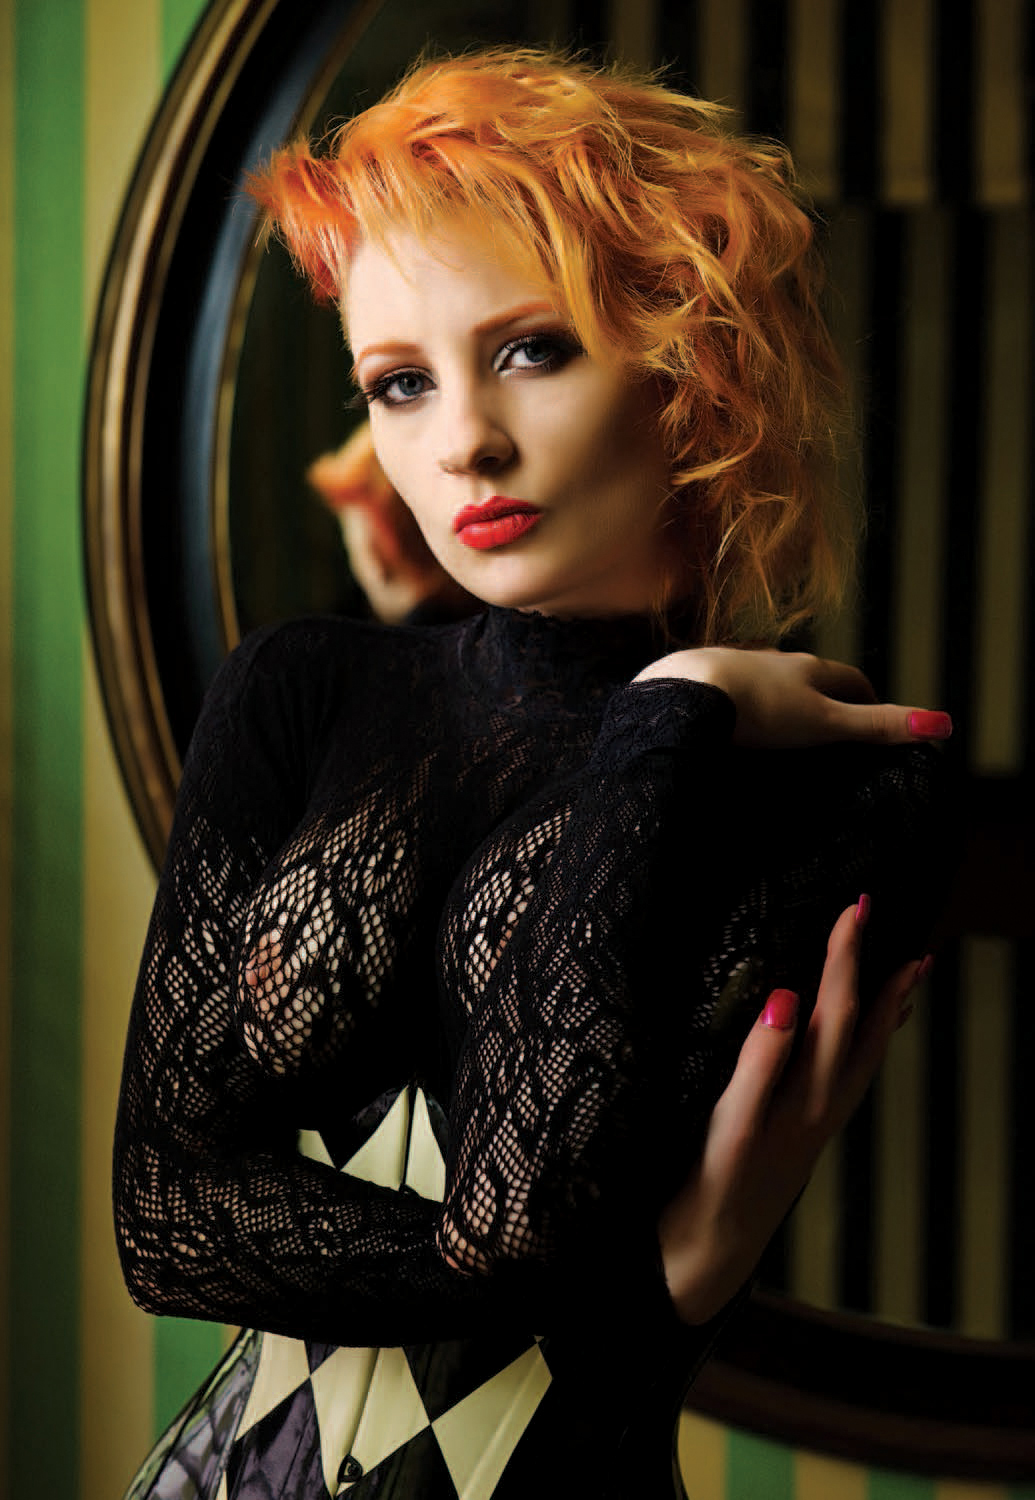
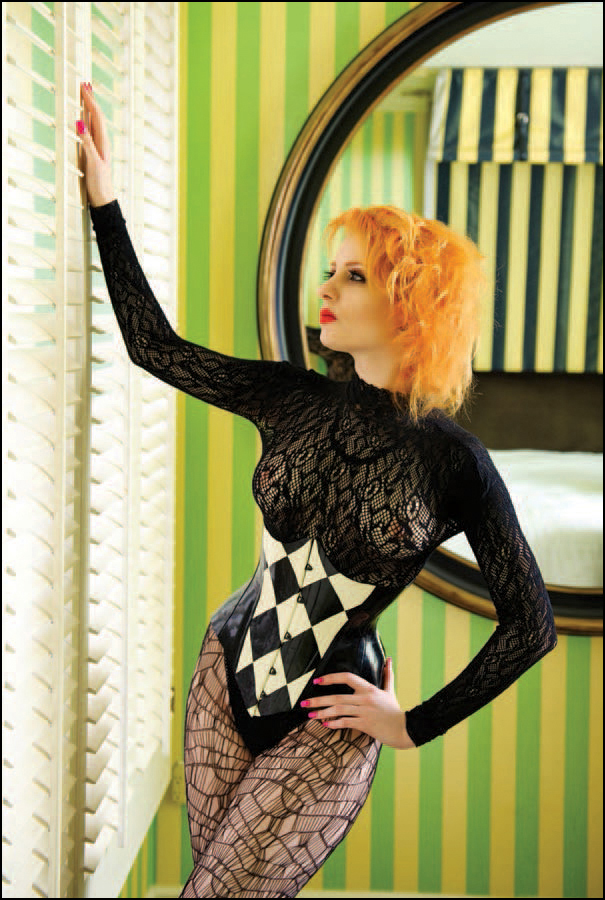
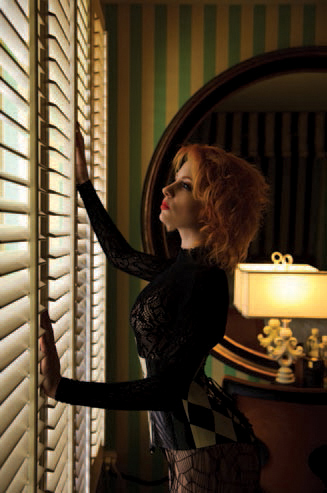
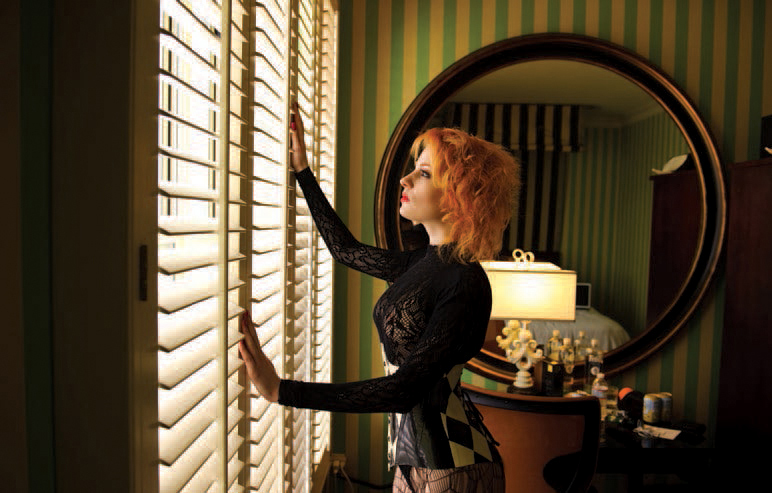
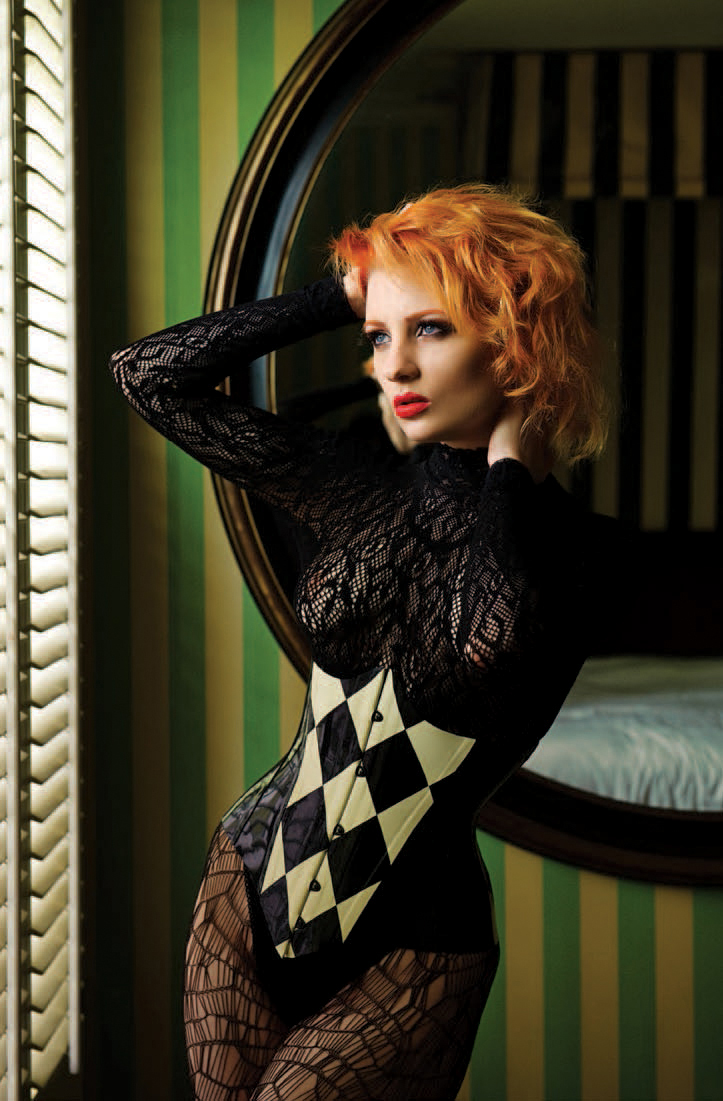
Ulorin Vex is a model with such striking looks that I jumped at the chance to photograph her. What is most interesting about plates 7-20 and 7-21 is that they were both created using exactly the same lighting. This brings us to a key concept with light—one that is true whether you use available light, off-camera flash, or even when you control the direction of your bounce flash: you can change the direction of the light by changing your own position.
For both images, Ulorin Vex remained in the same spot, only rotating her pose to follow the camera as I moved. The light is so dramatically different because I changed my position—and that, in turn, entirely changed the direction of light. (Note: While I kept the flash to the same output, I did have to change my aperture as I changed my position.)
These photographs are from a sequence we did in the passage outside of a hotel room. The lighting was surprisingly simple, but I had to improvise with the limited space we had. For the main light, I used a single flash bounced into the exit stairwell on that floor. I propped the door open with my camera bag. I bounced my flash into the left of that area, behind the wall and out of the model’s line of sight. I wanted to make the light streaming through that doorway as diffuse as possible, minimizing the potential for hot-spots.
YOU CAN CHANGE THE DIRECTION OF THE LIGHT BY CHANGING YOUR OWN POSITION.
Plate 7-20. The model posed with her back to the wall. (
![]() second, f/4, 400 ISO, 24–70mm f/2.8 lens; off-camera manual flash)
second, f/4, 400 ISO, 24–70mm f/2.8 lens; off-camera manual flash)
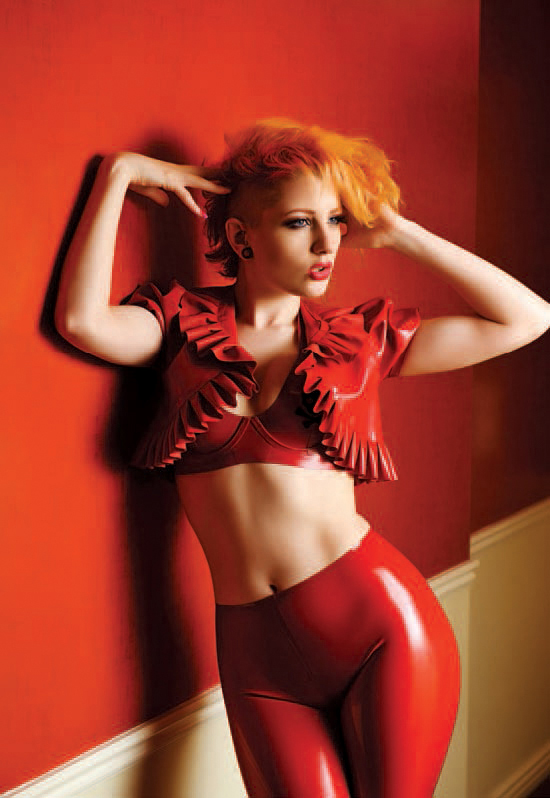
Plate 7-21. As the camera changed position, the model turned with it—but the light remained in the same position as in the previous image. (![]() second, f/5, 400 ISO, 24–70mm f/2.8 lens; off-camera manual flash)
second, f/5, 400 ISO, 24–70mm f/2.8 lens; off-camera manual flash)
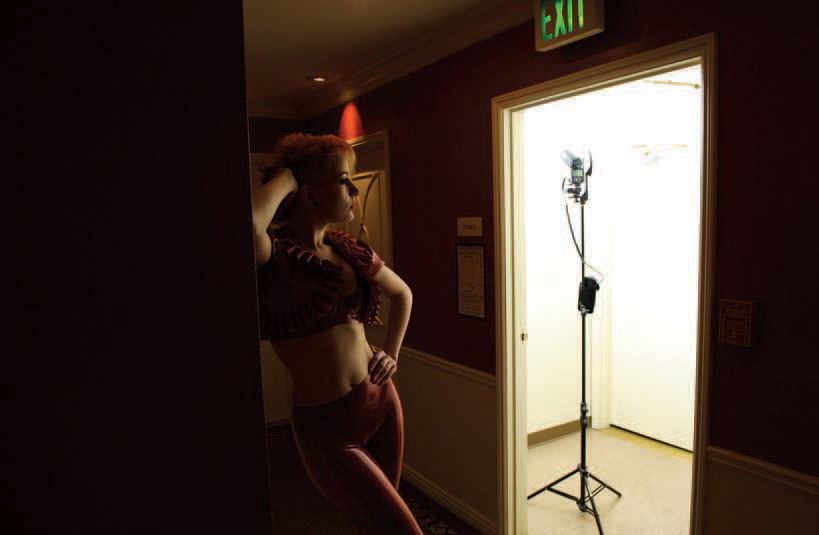
Plate 7-22. The setup for these images.
Plate 7-23. Positioning myself so the wallpaper glare was right behind the model gave me a look close to lighting with a ring flash. (![]() second, f/5, 400 ISO, 24–70mm f/2.8 lens; off-camera manual flash)
second, f/5, 400 ISO, 24–70mm f/2.8 lens; off-camera manual flash)
I TRIED TO POSITION MYSELF SO THAT THE GLARE SPOT WAS DIRECTLY BEHIND HER.
In this instance, the flash was controlled via a PocketWizard FlexTT5 on which the flash was mounted. The output of this flash was controlled in manual mode via the FlexTT5 and AC3 ZoneController on the camera. It was very simple. Any manual flash on a light stand would have worked, as well.
In plate 7-23, another image from this series, I love the way the light glares off the wallpaper, creating an effect that looks somewhat like the image was shot with a ring flash. To capture this look, I tried to position myself so that the glare spot was directly behind her, producing that kind of halo.
Hopefully, this will convince you that you don’t need complex lighting to get striking results. The setting where you photograph can also be quite simple. From there, it is up to you as the photographer to add lighting that complements your subject and/or the idea you want to communicate in your images.
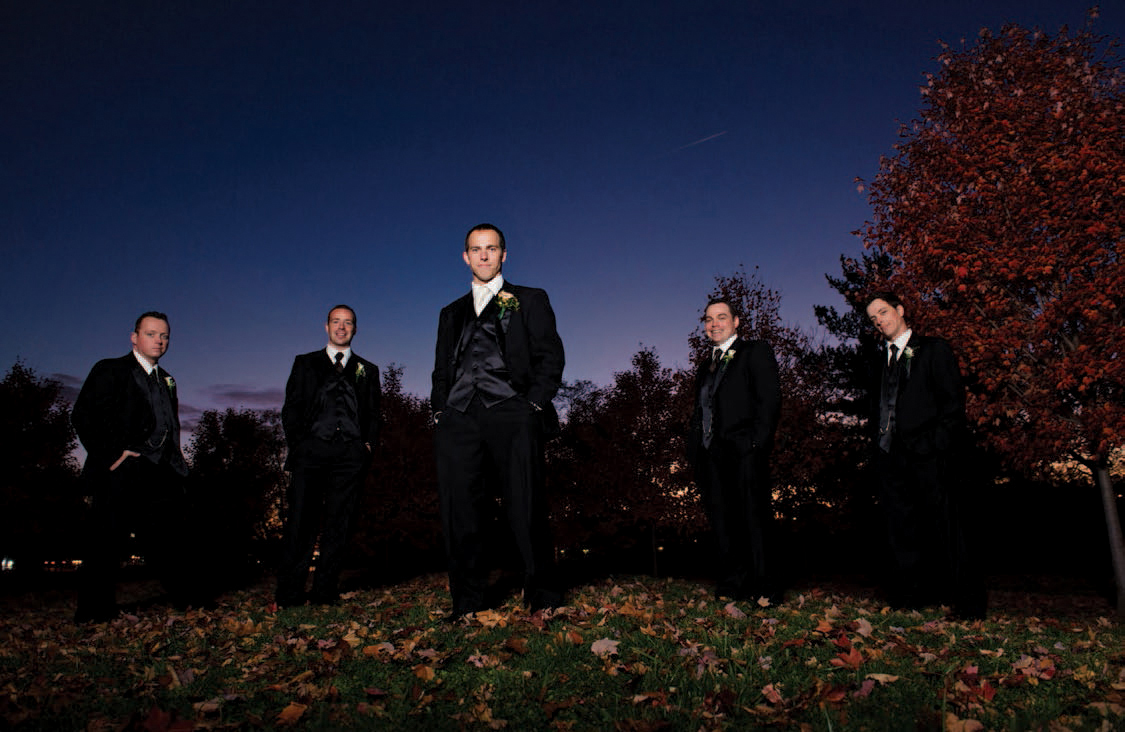
Comparing plates 7-24 and 7-25, you should notice two things immediately. First, the sky is brighter in plate 7-24. Second, the grass in front of the group is more lit in plate 7-25. In other words, in plate 7-24, the accent is more on the guys, since the grass in front of them is less well lit.
Both images were lit by a single off-camera flash in a softbox. An on-camera flash was set to master (to trigger the off-camera flash) but its output was disabled, so it didn’t add to the final exposure. Only the slaved flash in the softbox was lighting the group. In my initial test images, the subjects were blown out because of the predominantly darker tones in the image, so I had to pull down the TTL’s FEC setting to –2EV.
Now, let’s return to our two initial observations about these images. Looking at plate 7-24, the sky is brighter because I dropped the shutter speed from ![]() second to
second to 
![]() second (the setting used for plate 7-25). I did this because I wanted more of the color in the early evening sky to register. This is a classic example of dragging the shutter to allow more ambient light in.
second (the setting used for plate 7-25). I did this because I wanted more of the color in the early evening sky to register. This is a classic example of dragging the shutter to allow more ambient light in.
Plate 7-24. The sky is brighter in this image. (![]() second, f/5.6, 800 ISO, 24–70mm f/2.8 lens; off-camera TTL flash with FEC at –2EV)
second, f/5.6, 800 ISO, 24–70mm f/2.8 lens; off-camera TTL flash with FEC at –2EV)
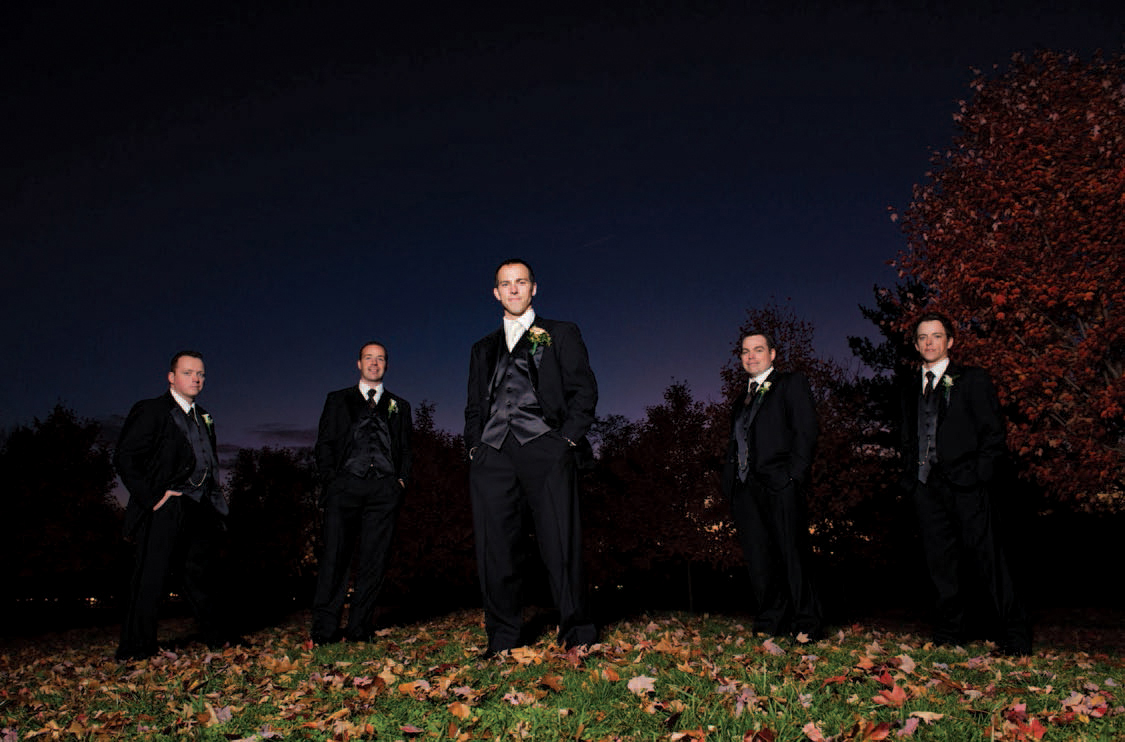
Plate 7-25. The grass is brighter in this image. (![]() second, f/5.6, 800 ISO, 24–70mm f/2.8 lens; off-camera TTL flash with FEC at –2EV)
second, f/5.6, 800 ISO, 24–70mm f/2.8 lens; off-camera TTL flash with FEC at –2EV)
The way the light falls off in plate 7-24 was also intentional. Plate 7-25 was actually shot first, but I felt the ground was over-lit and was taking attention away from the guys. To correct for this, I directed my assistant to tilt the softbox upward for the next shot. Tilting the softbox so that the central area was pointing up, instead of directly at the guys, resulted in less light spill on the ground. (I still got enough light on the groomsmen, though, since the TTL flash exposure maintained the correct exposure based on the FEC that I set.) Directing the light away from your subject like this—using just the edges of the cone of light—is called “feathering” the light. You can do this to control the way the light spills or to adjust how the light spreads across your subject.
For these images, the softbox was placed to camera left, above and a little behind the camera position. The light falloff was gradual because the distance from the groom to the groomsmen behind him wasn’t much of a jump relative to their mutual distances from the softbox. When the distance ratio isn’t too extreme, the light falloff isn’t too noticeable.
Despite the long shutter speed, there was no reason to worry about camera shake or subject movement. In fact, I could have pulled my shutter speed down even more, if I had wanted to. Flash is a near-instantaneous burst of light that will freeze most average movement—whether of the subject or the camera. As long as the subject’s ambient exposure is at least 3 stops below the ambient light level (without the flash, they would be completely underexposed), you simply won’t notice any camera/subject movement.
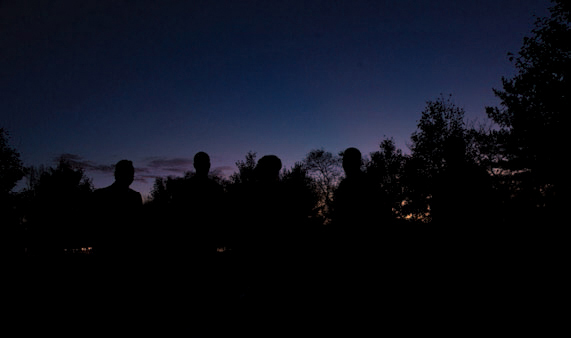
Plate 7-26. This image was taken less than two minutes after the previous ones, and you can see that the sky was already a bit darker. It gives you an idea, though, of just how dark it was at the camera settings used. Without flash, it’s black; nothing registers but the sky.
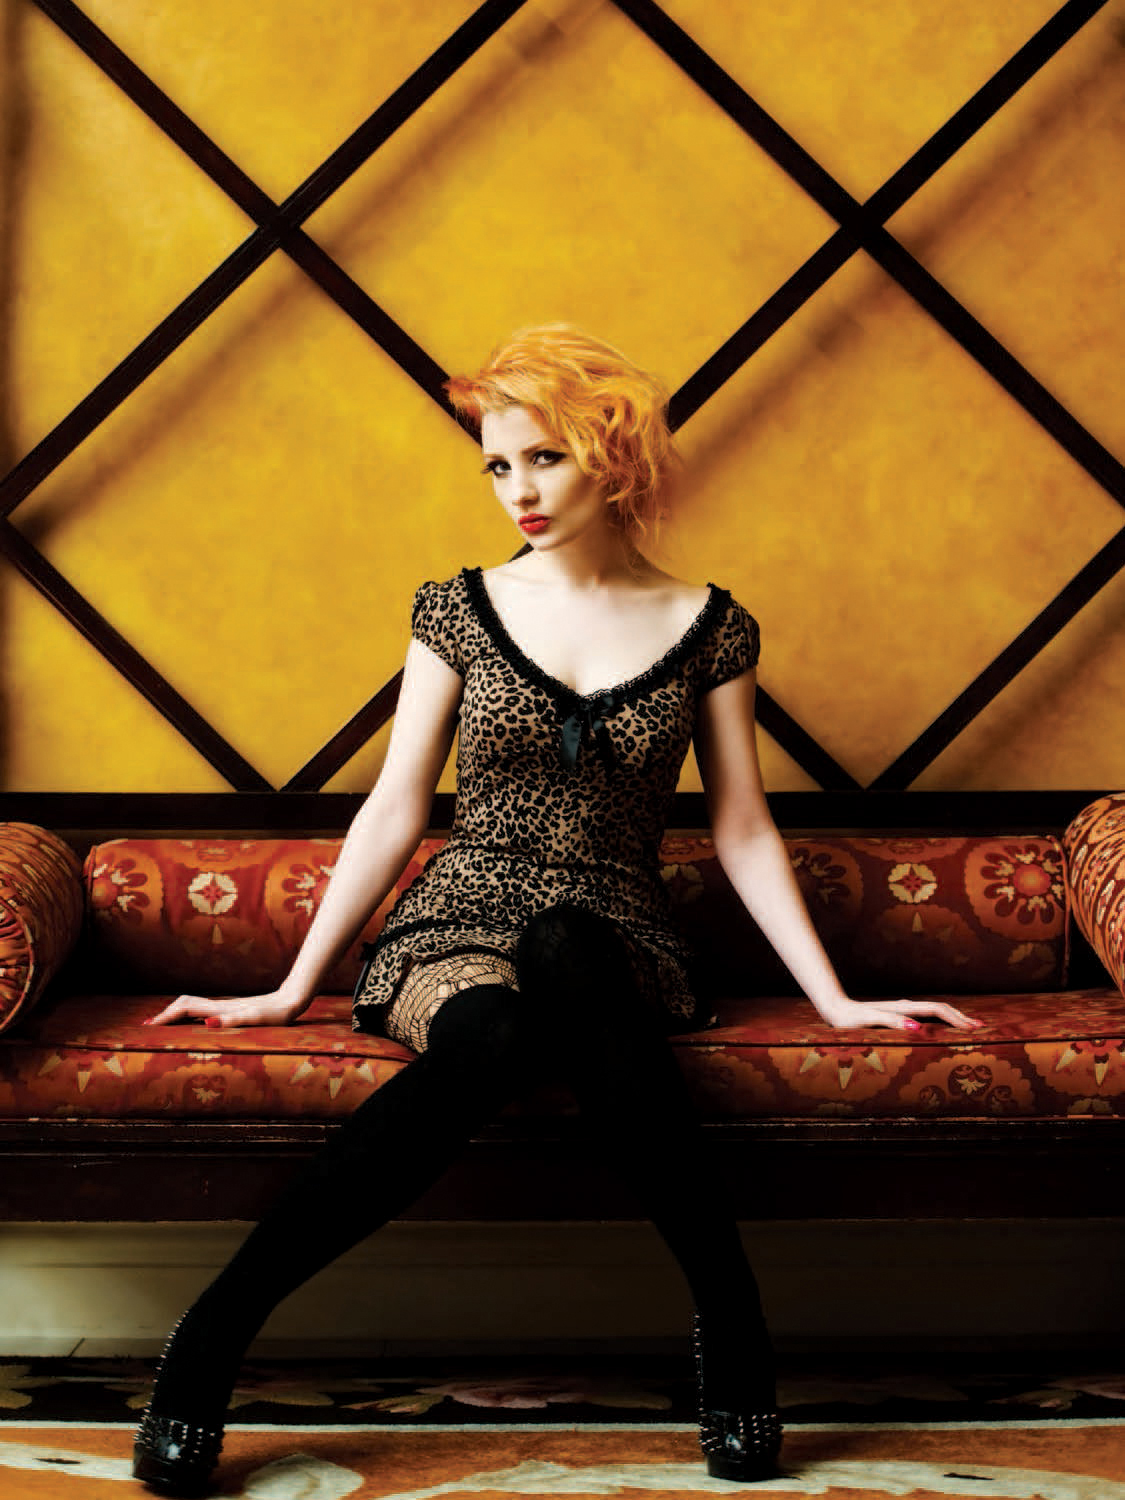
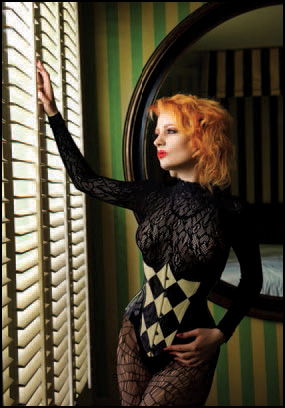
Colorful Portrait in a Lobby. During a photo session with model Ulorin Vex, we worked in the foyer area of a hotel. When I saw the bench and wall shown in plates 7-27 and 7-28, I knew that it would work as a simple backdrop—but with colors that would pop. The pose was mostly Ulorin Vex’s idea; she is supremely professional and easy to photograph, bringing so much to the photo session. All I needed to provide was gentle fine-tuning for the positioning of her hands and legs. I wanted a nearly symmetrical image, with her posture just slightly breaking up the symmetry.
In lighting this, I went for a super-simple setup, bouncing an off-camera flash into the ceiling and away from her. The light in the lobby was predominantly incandescent, so I added a ½ CTS gel on my flash (more on this in chapter 9). Looking at some test shots without flash, I saw that very little of the ambient light registered, so it wouldn’t have made much of difference. Still, it makes more sense to keep the flash as close as possible to the color balance of the predominant ambient light source.
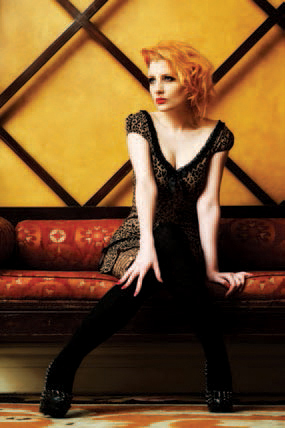
Plates 7-27 and 7-28. Ulorin Vex was photographed in the lobby area of a nightclub. (![]() second, f/3.2, 640 ISO, 70–200mm f/2.8 lens; off-camera bounce flash)
second, f/3.2, 640 ISO, 70–200mm f/2.8 lens; off-camera bounce flash)

Plate 7-29. A pull-back shot showing the lighting setup.
Plate 7-30. A high-key maternity portrait created in the couple’s bedroom using off-camera bounce flash. (![]() second, f/4, 800 ISO, 70–200mm f/2.8 lens; TTL off-camera bounce flash)
second, f/4, 800 ISO, 70–200mm f/2.8 lens; TTL off-camera bounce flash)
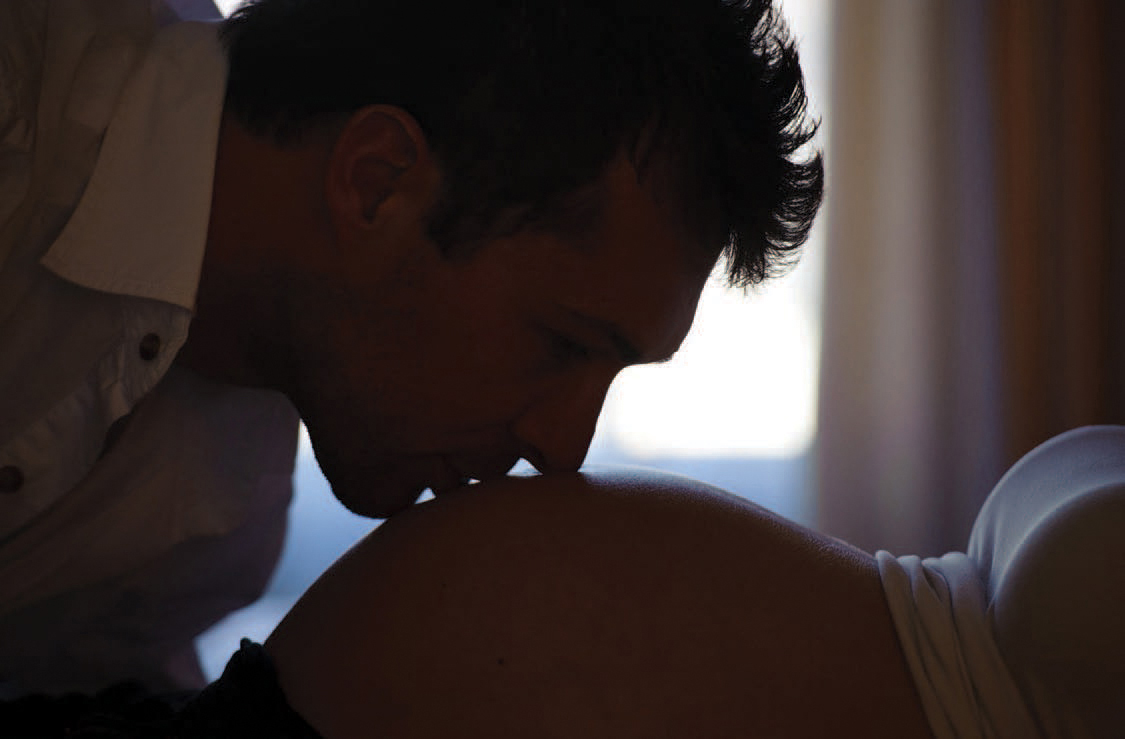
Plate 7-31. For comparison, the same image with the flash disabled. (![]() second, f/4, 800 ISO, 70–200mm f/2.8 lens; available light only)
second, f/4, 800 ISO, 70–200mm f/2.8 lens; available light only)
High-Key Portrait in a Bedroom. Part of what makes wedding photography so rewarding is keeping contact with clients over the years. Maternity photo sessions, baby photos, and children’s portraits are all part of many couples’ lives after the wedding. If we’re fortunate as photographers, we remain part of their lives, too.
So it was with great pleasure that I had a maternity photo session with Renee and David. For this particular photograph (plate 7-30), I used a flash on the floor behind their bed, aiming it up at the ceiling to flood the room with light. The reflected flash spilled around David and Renee, wrapping them in soft light. Everything behind them, including the curtains, was overexposed—and that was the intention; the couple was my subject, not the out-of-focus area behind them. I wanted the look of high-key lighting.
The flash behind them on the floor was the only additional light that I used here (plate 7-31 shows how the scene looked with it disabled). The flash was controlled by an on-camera PocketWizard FlexTT5 radio transceiver, which controlled the FlexTT5 on the slaved TTL flash. TTL flash is fairly unpredictable in how it will behave with a backlit shot like this. Normally, rim lighting is best controlled as a manual flash, since the camera can’t really meter for it. However, in this scenario there was a mix of dark tonal areas and brighter tonal areas, so the TTL flash did very well in giving me correct exposure.
THE COUPLE WAS MY SUBJECT, NOT THE OUT-OF-FOCUS AREA BEHIND THEM.
Regarding the camera settings, I knew these settings would underexpose the available light. I didn’t specifically meter for it. Then, I let the TTL flash technology take care of the exposure. That’s the beauty of TTL; it will follow your settings. That’s the technical implementation of the photograph.
The artistic intent was to capture a simple, tender portrait of a dad-to-be. These things, the intent and the implementation, go hand-in-hand to create a photograph that works. By simplifying my composition to include only David and his baby-daughter-to-be, the connection between them was highlighted. The lighting was merely a supplement.
OFF-CAMERA FLASH AS WINDOW LIGHT
For another part of my photo session with Ulorin Vex, we worked in a hotel room. Photographing inside the room, I initially tried to shoot with the window light only. However, I hit a small snag: the indirect light through the window kept changing as clouds moved in and out. Instead of try to change my settings continually to match the light, I decided to use flash to mimic window light, and thereby get a consistent look and exposure level.
Plate 7-32 shows the quality of light I was after: soft, directional light that still added a sense of drama. The light in the photo is mostly flash, with just a bit of ambient. It took a few adjustments, though, to get to a point where I really liked the look.
The next sequence shows where we started. In these test shots (plates 7-33 and 7-34), you can see the table and clutter in the background before we moved it out of the way. What is also immediately noticeable is that the exposures here are different—even though my camera remained at the same settings for both images. The available light in plate 7-34 looked good, but it was too inconsistent for a sequence of images. I would rather concentrate on the subject than have the rhythm of the photo session be broken up by constant exposure adjustments.
I then mimicked the window light by placing an off-camera flash in the window frame (plate 7-35). The flash pointed up toward the window, bouncing off the glass pane directly opposite her. I had the flash-head zoomed wide. The result was a flood of light into the room. I guess this would have looked like window light on a sunny day, but it just wasn’t the feeling I wanted.
Plate 7-32. Ulorin Vex was photographed using flash to simulate window light. (![]() second, f/5.6, 800 ISO, 24–70mm f/2.8 lens; manual off-camera bounce flash)
second, f/5.6, 800 ISO, 24–70mm f/2.8 lens; manual off-camera bounce flash)
Plates 7-33 and 7-34. The available light changed from frame to frame. (![]() second, f/4, 640 ISO, 24–70mm f/2.8 lens; available light only)
second, f/4, 640 ISO, 24–70mm f/2.8 lens; available light only)
Plate 7-35. Adding bounce flash gave me a consistent exposure level, but not the look I wanted. (![]() second, f/5.6, 800 ISO, 24–70mm f/2.8 lens; manual off-camera bounce flash)
second, f/5.6, 800 ISO, 24–70mm f/2.8 lens; manual off-camera bounce flash)
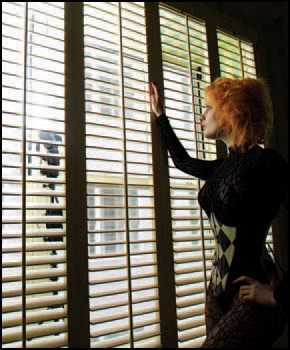
Plate 7-36. Changing the direction of the bounce, and narrowing the beam, resulted in a big improvement. (![]() second, f/5.6, 800 ISO, 24–70mm f/2.8 lens; manual off-camera bounce flash)
second, f/5.6, 800 ISO, 24–70mm f/2.8 lens; manual off-camera bounce flash)
The next step was the “big adjustment” that made all the difference. I moved the light to the left in the window frame and rotated the flash so it pointed more to the left (plate 7-36). Now, the light bounced off the glass toward the top of the window pane. Yes, even though I was pointing the flash outward, enough light bounced off the glass to make the difference. The direction of the light was exactly what I was after. I also zoomed the flash head to a tighter angle to make the swathe of light less broad. I wanted the light to accentuate Ulorin Vex’s face.
The manual off-camera flash was controlled via a PocketWizard FlexTT5 transceiver on which the flash was mounted. The output of this flash could be controlled as manual flash via the FlexTT5 and AC3 ZoneController on the camera. Plates 7-32, 7-37, and 7-38 show the final results. Plate 7-39 is a comparison that was shot without flash. It convincingly shows that bouncing the flash off the glass had the desired effect.
Plates 7-37 and 7-38. Final images from my session with Ulorin Vex. (![]() second, f/5.6, 800 ISO, 24–70mm f/2.8 lens; manual off-camera bounce flash)
second, f/5.6, 800 ISO, 24–70mm f/2.8 lens; manual off-camera bounce flash)
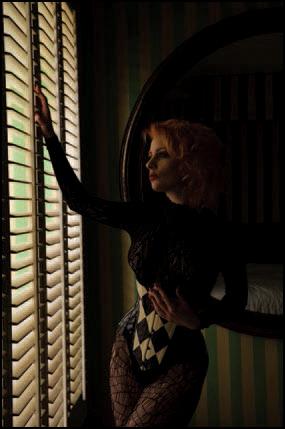
Plate 7-39. The same scene without flash. (![]() second, f/5.6, 800 ISO, 24–70mm f/2.8 lens; available light only)
second, f/5.6, 800 ISO, 24–70mm f/2.8 lens; available light only)
As photographers, we need to visualize what we want to achieve with our lighting and work toward it by figuring out where we need to place our light(s). If you compare this shoot to the previous one with Ulorin Vex (plates 7-20 through 7-23) you can see that each lighting setup was actually quite simple. In this, and the other examples in this chapter, a simple flash offered unexpectedly good results. You just need to put some thought into where you want to go with the lighting.
To close this chapter, let’s look at a couple more ways we can implement off-camera flash in our wedding and portrait photography.
AVAILABLE LIGHT WITH FLASH RIM LIGHTING
Whatever kind of light you’re using—available light, flash, video light, etc.—you need to take a moment and observe it. Where does the light come from? What is the quality of the light? Again, these are questions you need to ask yourself for every photograph you create (that’s why I keep coming back to them over and over again!). Let’s look at a couple of location shoots where I added off-camera flash, walking through the thought process step by step.

Plate 7-40. The scene and lighting to camera left.

Plate 7-41. The scene and lighting to camera right.
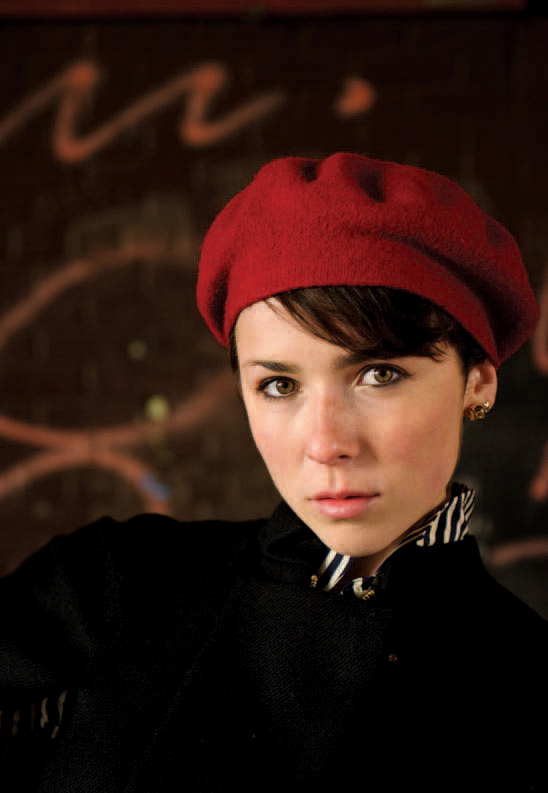
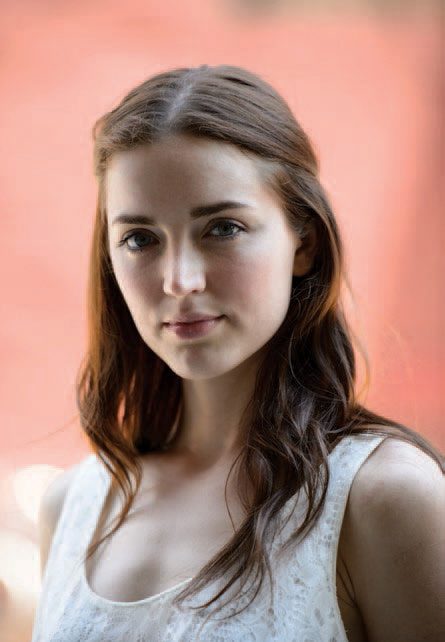
Plate 7-42. Alex was posed with her face turned toward the brighter of the two light sources. (
![]() second, f/3.5, 800 ISO, 24–70mm f/2.8 lens; available light only)
second, f/3.5, 800 ISO, 24–70mm f/2.8 lens; available light only)
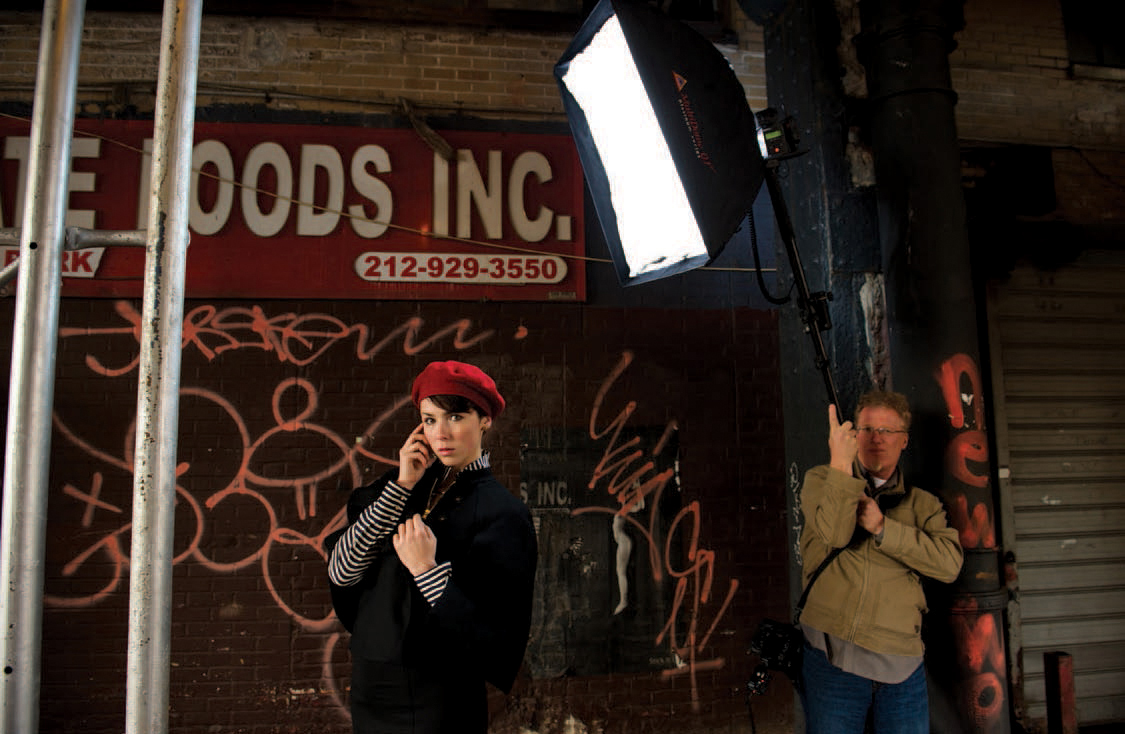
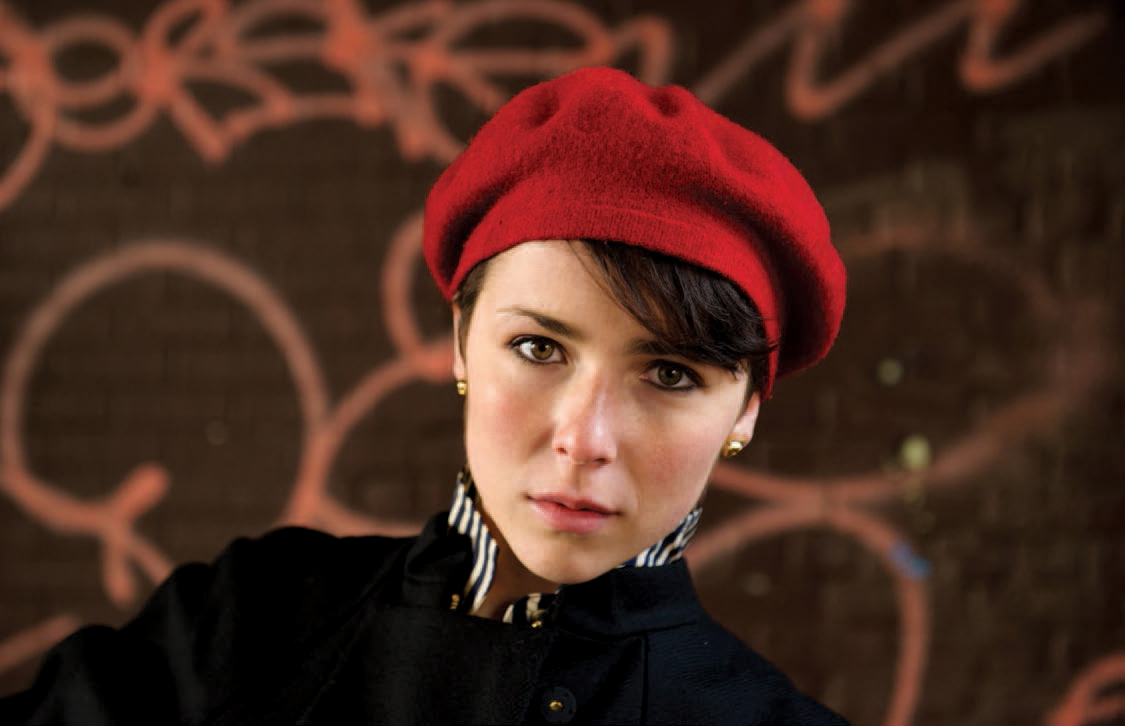
Plate 7-43. A softbox was added for rim lighting on Alex’s hat and shoulder.
Working under part of the Highline in Manhattan, the available light was “forced” to come into the scene from two directions. To my left was the brightest part of the sky, which was slightly overcast (plate 7-40). This acted like a massive softbox—just like you might use during a studio session. To my right (and slightly behind me) was another large light source, but this area of the sky was less bright in comparison (plate 7-41).
Turning Alex’s face slightly to camera left made the brighter source of available light work as the main light; the less intense light from camera right worked as the fill. Looking closely at Alex’s face in plate 7-42 you can see the interplay between the two light sources; one side of her face is more brightly lit than the other. Notice that this created short lighting (the side of her face turned away from the camera is more lit than the part of her face turned toward the camera). The light looks good—and the background is a complementary warm color. I still felt there was room for improvement, though.

Plates 7-44 and 7-45. A kiss of light from an off-camera softbox improved the separation between Alex and the background. (![]() second, f/3.5, 800 ISO, 24–70mm f/2.8 lens; available light enhanced with off-camera flash in a softbox)
second, f/3.5, 800 ISO, 24–70mm f/2.8 lens; available light enhanced with off-camera flash in a softbox)
To give some separation from the background, I decided to add a bit of flash for a hair-light effect. I used a Quantum flash in a softbox, with the flash’s power turned all the way down to 
![]() power. The radio transmitters were the manual-only PocketWizard Plus II transceivers. You can see the placement of the softbox in plate 7-43. I asked that the softbox be feathered away from me so that just the edge of its light spilled onto Alex’s beret and shoulders (plates 7-44 and 7-45).
power. The radio transmitters were the manual-only PocketWizard Plus II transceivers. You can see the placement of the softbox in plate 7-43. I asked that the softbox be feathered away from me so that just the edge of its light spilled onto Alex’s beret and shoulders (plates 7-44 and 7-45).
When creating location photography, I evaluate the existing light, then ask myself whether I could improve it with flash (or a video light). Does it need something more to make it even better? If so, what do I need to add? This is based on an iterative thought process, each step taking me closer to my objective, rather than a compelling desire to use every flash that I own. In fact, when I add flash it’s frequently just enough to enhance the available light.
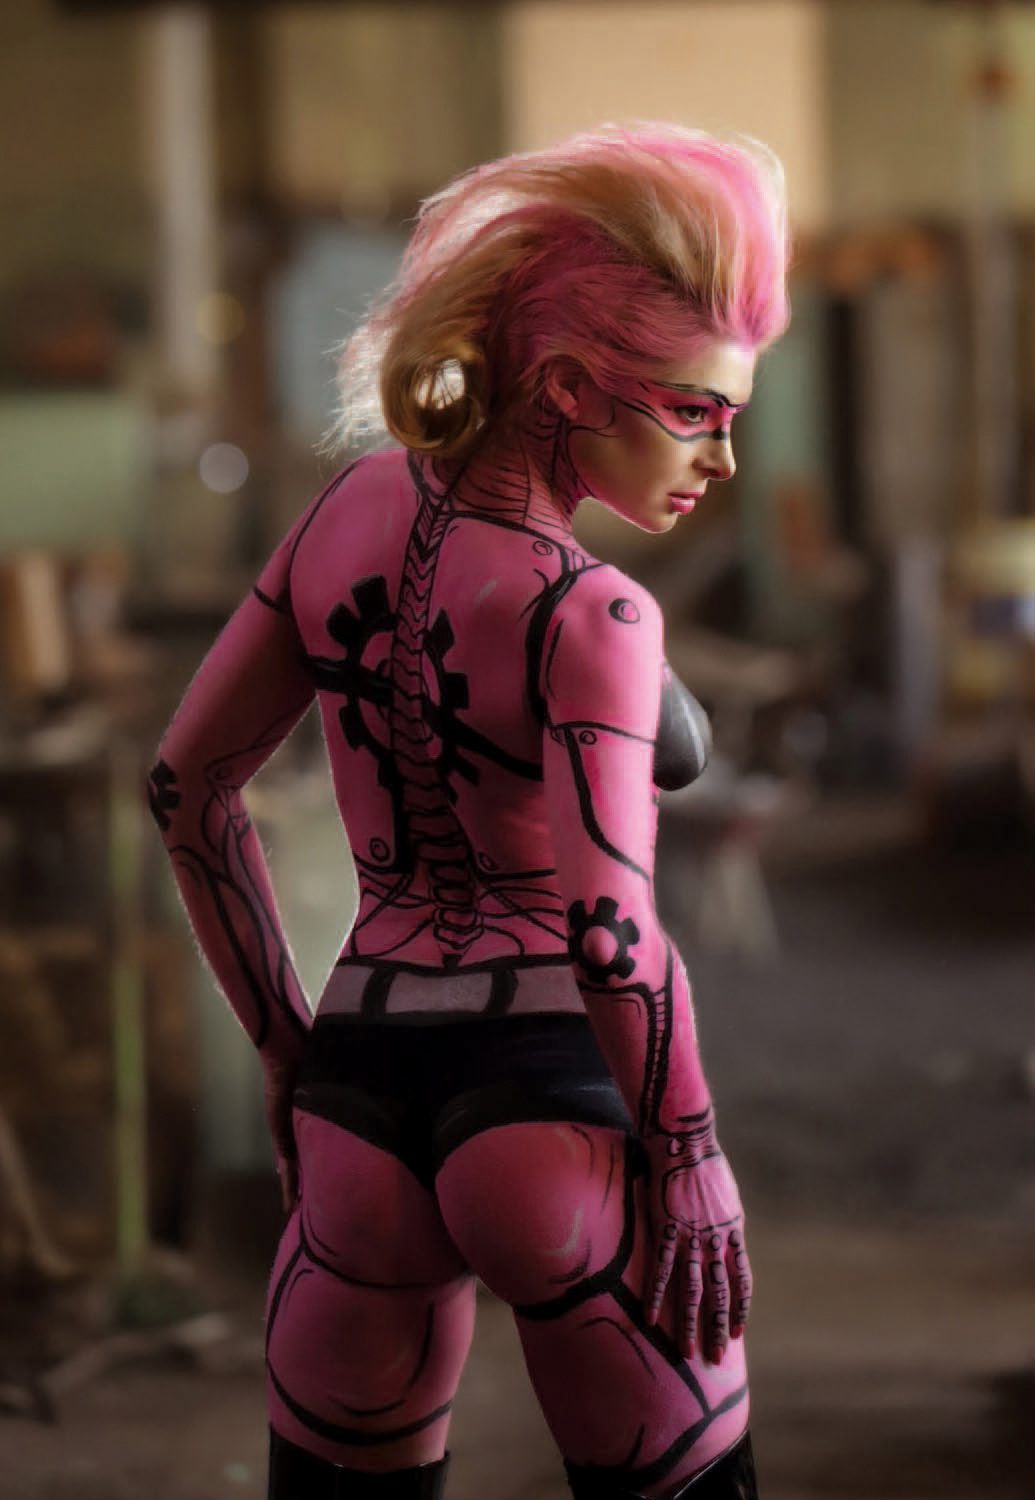
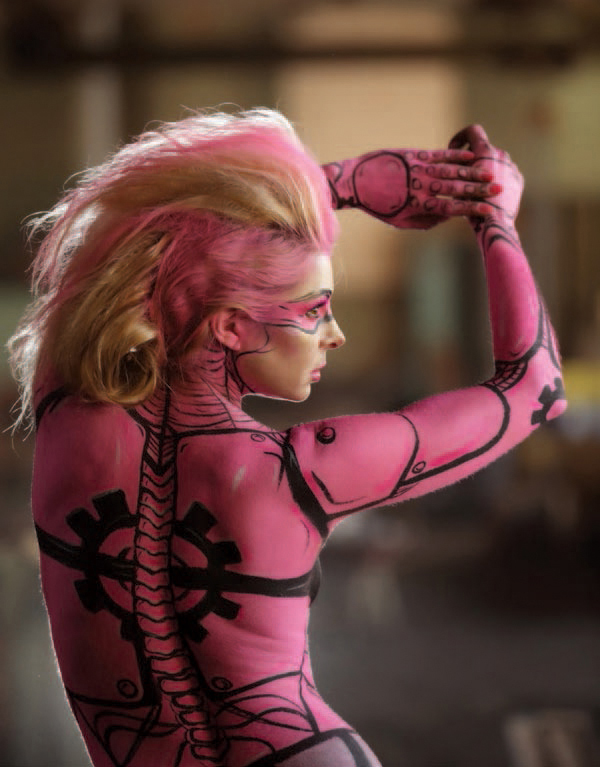
That was my approach at a retro-futuristic cyberpunk shootout arranged by Hudson Valley Click. At this session, I had the pleasure of photographing Karyn in full-body paint (by NY Body Art). In plates 7-46 through 7-48, the majority of the light on Karyn was from the late afternoon light streaming through the windows of the unused factory. I posed her into the light and then added a Canon 600EX-RT for a splash of rim light and a subtle hot-spot behind her (plates 7-47 and 7-48). The flash was controlled by an on-camera Canon 600EX-RT as the master. I had the output of the master flash disabled so it didn’t put any light on the subject. The addition of this light really helped etch her outline against the out-of-focus background. The dust in the area also produced a slight halo effect around her body.
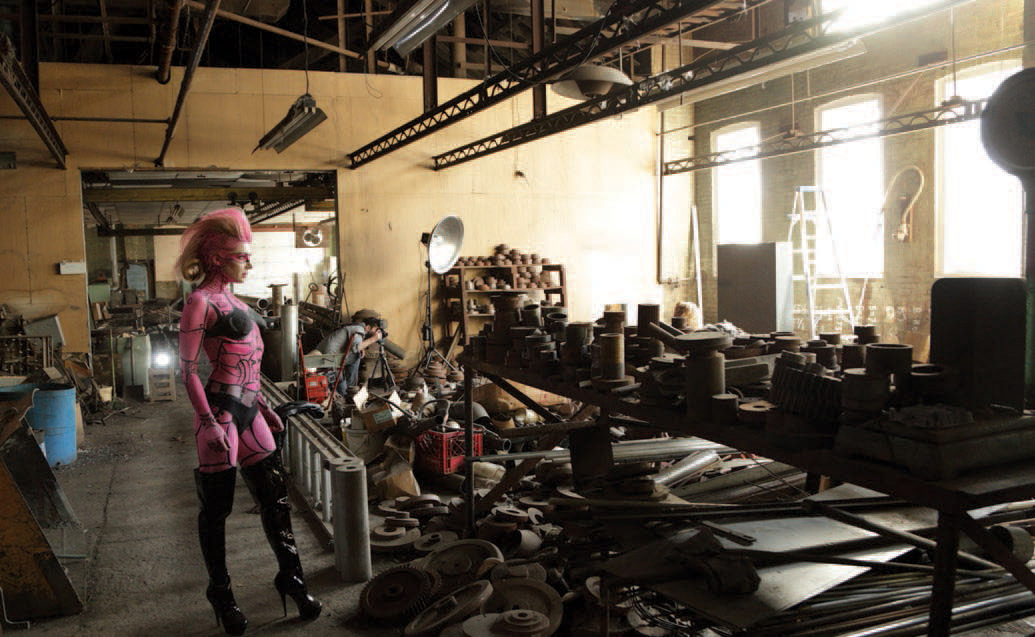
Plate 7-46. A pull-back shot showing the windows and the position of the flash for my shoot with Karyn.
Plates 7-47 and 7-48. A splash of light from an off-camera flash enhanced the available light in these images of Karyn. (
![]() second, f/3.5, 1600 ISO, 70–200mm f/2.8 lens; available light enhanced with off-camera flash)
second, f/3.5, 1600 ISO, 70–200mm f/2.8 lens; available light enhanced with off-camera flash)
THE ADDITION OF THIS LIGHT REALLY HELPED ETCH HER OUTLINE AGAINST THE OUT-OF-FOCUS BACKGROUND.
This is the kind of setup where just using the built-in optical wireless system of a flash like the Canon 580EXII would have been a problem, because the flash was just a bit out of line-of-sight. This meant I needed to use radio transmitters of some kind—which generally implies more cables, connectors, cradles, batteries, and flash settings. Fortunately, the Canon 600EX-RT Speedlites have built-in radio transmitters, making them much easier to set up and control.