For most of the examples so far in this book, we have relied on a single additional light source—either for simplicity (such as when using on-camera bounce flash) or because we had an existing light source to use as the main light.
We’ve looked at several examples where subjects were positioned with their backs to the sun (or other ambient light source). This approach produces some form of rim light to enhance the separation between the subject and background. However, sometimes there simply is no ambient light to light the background or give that rim-light effect. In that case, it makes sense to use an additional light source in your setup. To provide the desired separation, you might place a second flash (or other light source) to illuminate the background or to add rim light to the subject. You might even decide to do both, adding one light on the background and positioning another for rim lighting on the subject.
SOMETIMES THERE SIMPLY IS NO AMBIENT LIGHT TO LIGHT THE BACKGROUND OR GIVE THAT RIM-LIGHT EFFECT.
A different reason to use another light in addition to the main light is when more fill is needed. If the main light is too contrasty, bounce flash or a flash in softbox can help to open up the shadows for a more appealing look.
Therefore, in setting up multiple flashes, you need to consider which of the following lights are needed:
1. Main light
2. Fill light
3. Background light
4. Rim light
The decision you make will have to be based on the specific shooting scenario in which you find yourself shooting. Some situations might need all four types of lighting added to the scene. Others might just need one additional light—whether to act as fill, or rim light, or as background light.
The key to using multiple flashes successfully is to start as simply as possible, with just one light. Then, and only then, should you add other lights, one by one, as necessary. It’s a mistake to approach every situation as if it needed all the lighting you have at your disposal. The only reason to use additional light sources is if it actually helps you create more dynamic lighting or lets you fix a problem in the scenario. In the rest of this chapter, we will look at various examples of multiple flash lighting in practice—and how the decision was made to use specific lights.
Manual or TTL? With Shawna as a model, I set up a photo session in one of the numerous lobbies of a Las Vegas hotel. Since the ambient light levels in this area were very low, I decided to rely on a multiple flash setup to create interesting light (plate 8-1). To control the flash units, I used a few PocketWizard FlexTT5 radio transmitters. The FlexTT5 on my camera also had an AC3 controller piggy-backing on it. Plate 8-2 shows the basic setup.
SINCE THE AMBIENT LIGHT LEVELS WERE VERY LOW, I DECIDED TO RELY ON A MULTIPLE FLASH SETUP.
My main light (to camera left) was a flash inside a small Lastolite Ezybox. I initially had this set to TTL, but I changed it to manual output early on during the shoot because the background flash was affecting my TTL metering too much, leading to erratic exposures. When you find that you have to ride your TTL flash too much via FEC, it just becomes simpler to switch to manual flash.
The rim light was from a flash on a stand directly behind Shawna. This had to be set to manual flash, since the camera can’t effectively meter a light in this position.
The background light was a flash on a monopod behind the frosted glass; this was held up by my assistant. To avoid a hot-spot on the glass, the flash had to be held off to the side, out of the frame. The background light’s power was dialed in by checking the exposure on my camera’s LCD preview. It wasn’t something I could meter for with a handheld meter, since the background was a frosted glass pane that was lit up from behind with a flash. This is the beauty of digital photography; I simply chimped until I liked what I saw on the back of my camera.
Plate 8-1. Shawna was photographed in the lobby of a Las Vegas hotel. (
![]() second, f/5.6, 800 ISO, 24–70mm f/2.8 lens; multiple off-camera flash units)
second, f/5.6, 800 ISO, 24–70mm f/2.8 lens; multiple off-camera flash units)
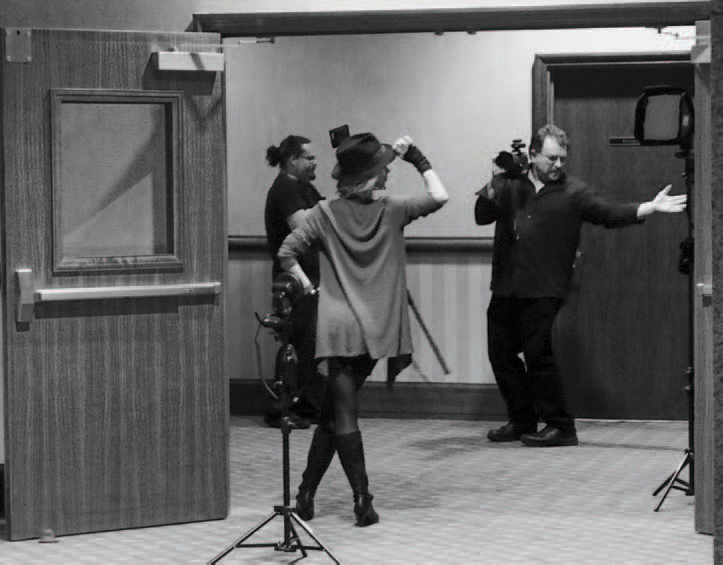
Plate 8-2. A snapshot showing the position of the rim light, my own position (as well as my oh-so-graceful way of posing a model), and the main light in the softbox.
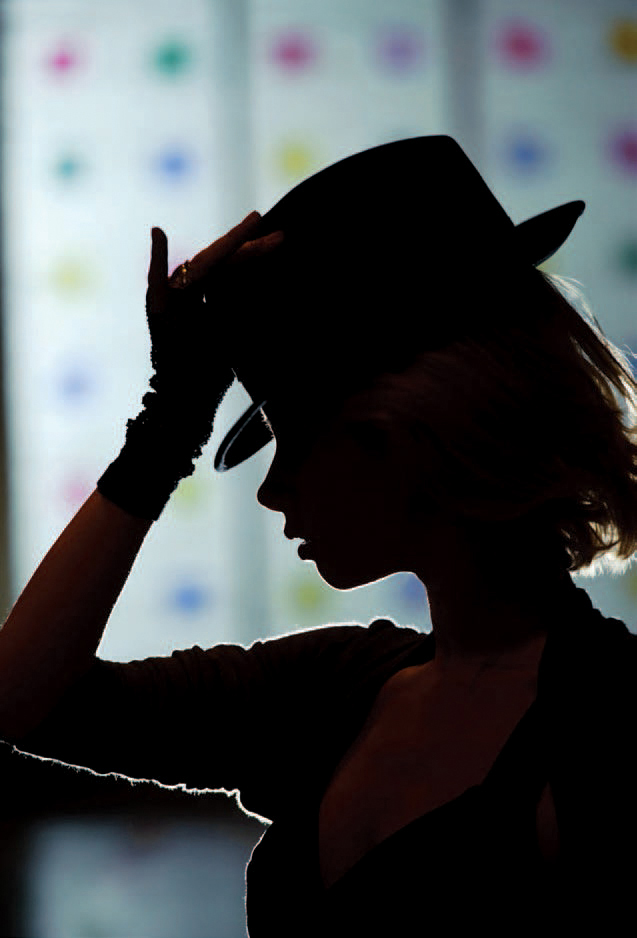
Plate 8-3. I disabled the main light to create a silhouette effect. (![]() second, f/5.6, 800 ISO, 24–70mm f/2.8 lens; multiple off-camera flash units)
second, f/5.6, 800 ISO, 24–70mm f/2.8 lens; multiple off-camera flash units)
MANUAL FLASH ABSOLUTELY MAKES MORE SENSE IF YOU’RE SHOOTING IN ONE PARTICULAR SPOT WITH A SPECIFIC SETUP.
In the end, I had all three flash units set to manual. Simplicity is key—especially for a static setup like this. I am happy to use TTL flash when I need to work fast. In that case, the technology helps me get to a correct exposure more quickly. However, manual flash absolutely makes more sense if you’re shooting in one particular spot with a specific setup. It gives you consistency in exposure that TTL flash doesn’t. TTL flash, like any automatic metering mode, can be influenced by the subject’s clothing, the brightness of the background, and the composition of the image.
For plate 8-3, I disabled the main light to get a silhouette effect. The two flashes that were enabled were the flash behind Shawna (for a rim-light effect) and the flash on the frosted glass pane (to light up the background).
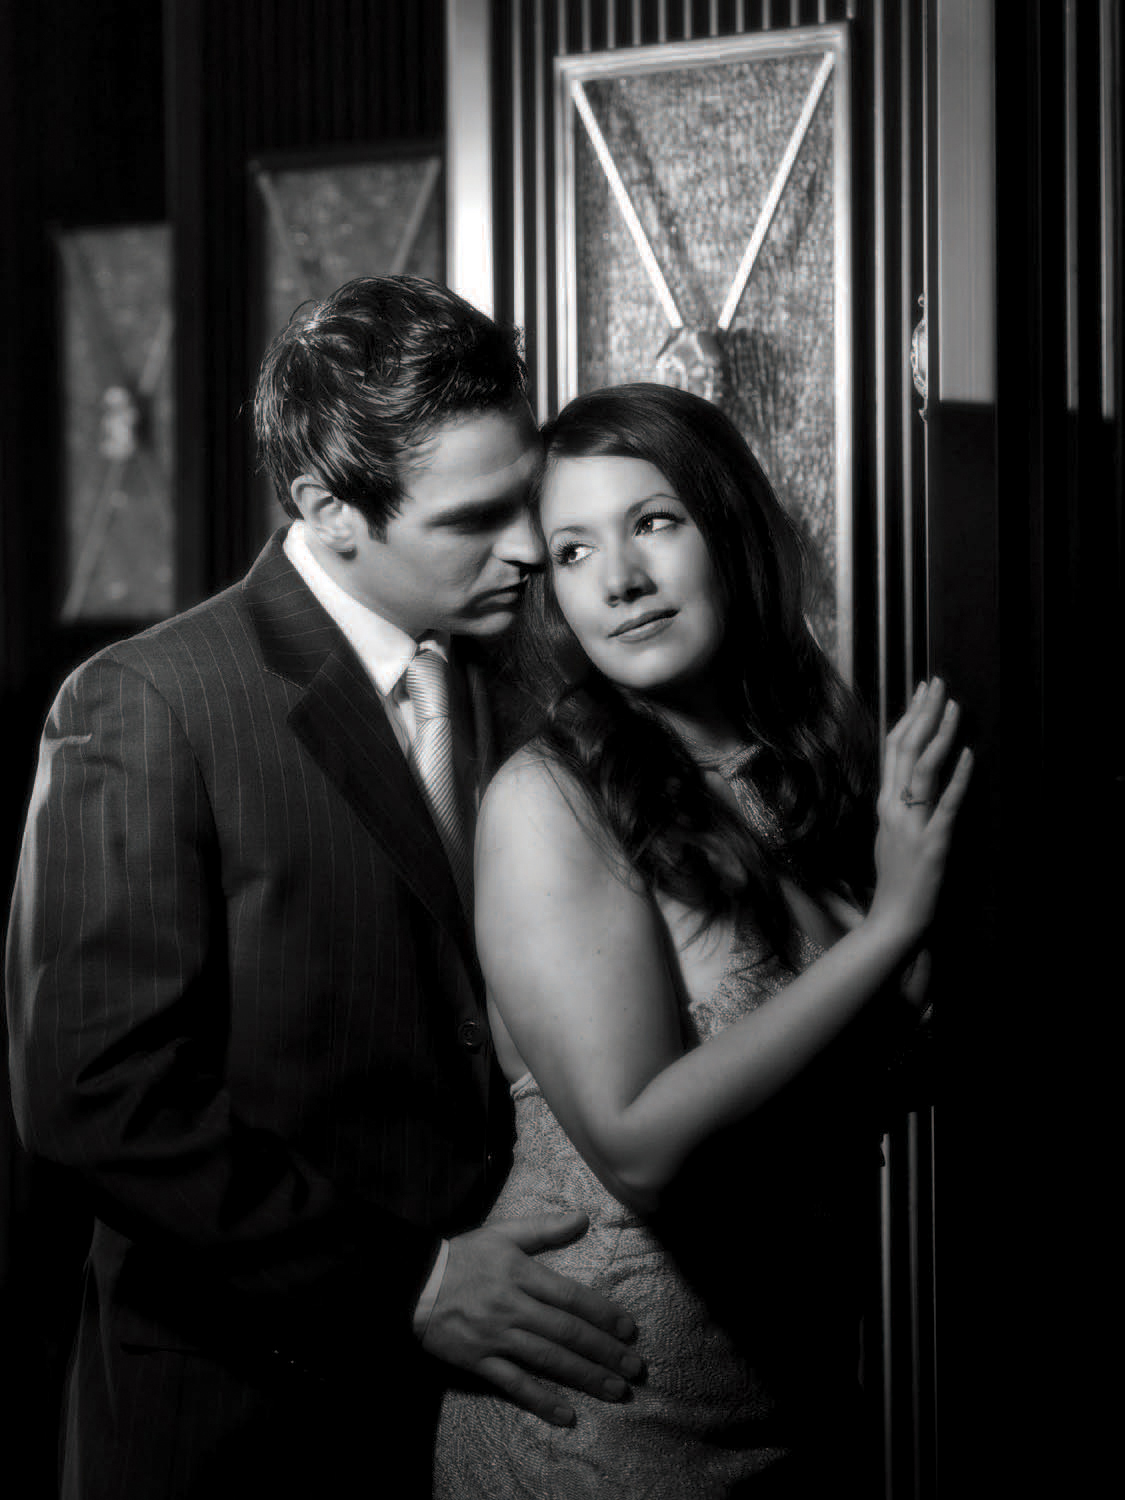
Hollywood Glamour. For this portrait of Natalie and Chris (plate 8-4), I wanted to create something dramatic—something reminiscent of the old Hollywood-style glamour portraits. The classic Hollywood portraits, as done by the masters, were lit with Fresnel spotlights, which are continuous lights. I decided to create some of that same mood using a few flash units.
I have a distinct preference for soft lighting, but if you look at the way the old Hollywood masters (George Hurrell, C. S. Bull, Laszlo Willinger, etc.) lit their classic portraits of movie stars, there are distinct shadows. They had a dramatic approach that made specific use of light and shade. To approximate this light quality, I used a small softbox, the 8.6-inch Lastolite Ezybox. I placed it on a light stand to camera left, fairly close to Natalie and Chris. I also wanted to accentuate their faces, with distinct light falloff toward the bottom of the frame. To accomplish this, I feathered the softbox upward and away from Natalie so that only the edge of the light from the softbox caught her face. The flash was set to manual output and triggered with a PocketWizard FlexTT5 transceiver.
I WANTED TO ACCENTUATE THEIR FACES, WITH DISTINCT LIGHT FALLOFF TOWARD THE BOTTOM OF THE FRAME.
From there, the lighting setup was similar to what I used with the photo session with Shawna (see plates 8-1 and 8-2). The rim light on Chris was created with a direct flash. From the direction of the light you can see that this was wasn’t directly behind Chris, but more off to the side. This produced the highlights in his hair and the rim light on his clothing, separating him from the darker background. This flash, set on a light stand, was in manual mode and controlled with a FlexTT5 transceiver.
To keep the dark wooden paneling in the background from falling completely into blackness, I lifted the exposure there with a flash shining directly on it. This flash, controlled with another FlexTT5 unit, was also set to manual output. I had it zoomed to 28mm and turned away from Chris’s back.
Because it was so dark in this lounge area, I used a Nikon SB-900 as a master on top of the FlexTT5 mounted on the camera. This gave me the autofocus-assist from the SB-900.
Plate 8-4. Feathering the main light helped me create the look I wanted in this portrait of Natalie and Chris. (![]() second, f/5.6, 800 ISO, 24–70mm f/2.8 lens; multiple off-camera flash units)
second, f/5.6, 800 ISO, 24–70mm f/2.8 lens; multiple off-camera flash units)
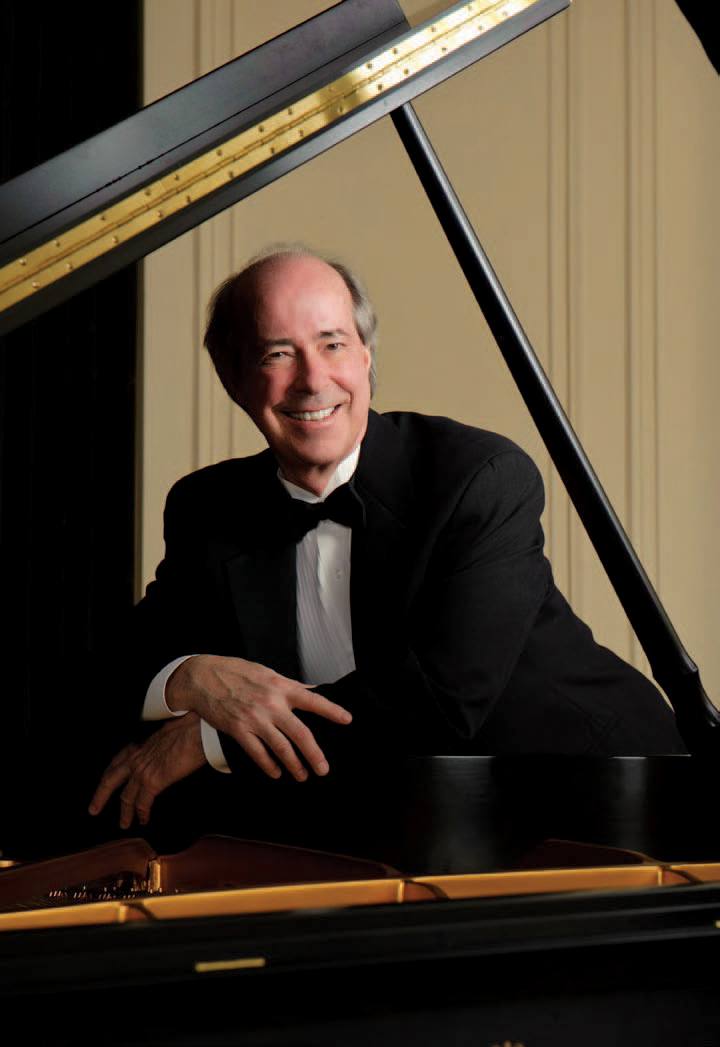
Plate 8-5. Robert Wyatt photographed at the Steinway offices. (
![]() second, f/8, 400 ISO, 24–70mm f/2.8 lens; multiple off-camera flash units)
second, f/8, 400 ISO, 24–70mm f/2.8 lens; multiple off-camera flash units)

Plate 8-6. The lighting setup for plate 8-5.
One Location, Several Options. I had the opportunity to photograph pianist Robert Wyatt at the Steinway offices in New York City. Here, I’ve included two examples of the setups I created for his session using three Nikon SB-900 Speedlights. These were fired by PocketWizard FlexTT5 transceivers controlled by a FlexTT5 and a master flash used on-camera. Being able to change the power of each flash from my camera made the shoot easier. Also, it makes me look so much more in control (and cool!) in front of a client when I’m not running around, hurriedly adjusting my flash units’ individual outputs throughout the session.
For these portraits, all of the flash units were set to manual output. Because black surfaces, such as the tuxedo and piano, were so predominant in the final composition of the portraits, this was the only practical approach. Using TTL flash would have made my job much more difficult, requiring constant FEC adjustment for each flash as I changed my compositions.
I WANTED MY MAIN LIGHT TO BE SOFT BUT STILL CONCENTRATED ON MY SUBJECT.
Let’s start by looking at plates 8-5 and 8-6. The light to camera right was a flash that was bounced into the large room. This flash was there simply to lift the overall contrast. By increasing this flash’s power, I could open up the shadows; by reducing it, I could increase the overall contrast. This light was set to around ¼ power for most of the shoot, but I did vary it at times, taking it down to ⅛ power and even up to full power for some photos. I controlled this as group C.
The light to camera left was a flash in a 24-inch Lastolite Ezybox. It was there to add soft fill on the subject. It was set to around ⅛ power. I controlled this as group B.
I wanted my main light to be soft but still concentrated on my subject so that it didn’t light up too much of the surroundings. An umbrella or a large softbox would have produced too wide a swath of light. Instead, I used a gridded softbox. This gave a soft look, but the grid more narrowly directed the light.
Some makes of flash triggers actually allow you to change the individual power settings of your flash units directly from a trigger in the camera’s hot shoe. This is much easier (and more elegant) than having to manually adjust each flash wherever it happens to be positioned in the room.
Plate 8-7. An alternate look from the same session. (![]() second, f/8, 400 ISO, 24–70mm f/2.8 lens; multiple off-camera flash units)
second, f/8, 400 ISO, 24–70mm f/2.8 lens; multiple off-camera flash units)
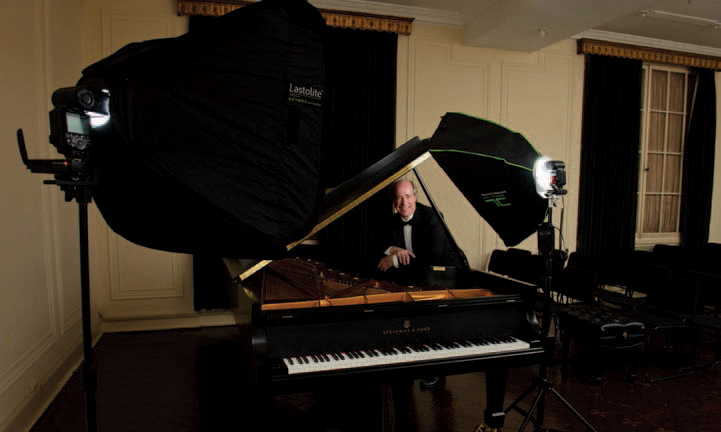
Plate 8-8. Out of sight here (to camera right) is the flash that bounced light into the rest of the room to help control the contrast.
After the photo session was already done, we ended up making a final image (plate 8-9) as we were leaving. I was immediately drawn to the symmetry of the architecture and the lavish foyer below. The pose and framing were deliberately centered to take advantage of this background. For the lighting setup, I quickly pulled out a softbox and used it as the main light to camera left. This was all that I needed to create a simple portrait in this location.
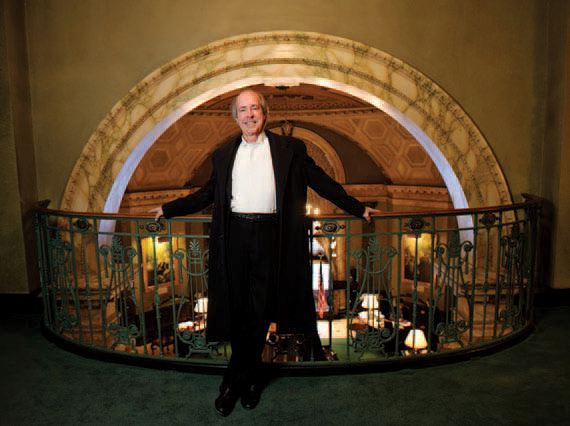
Plate 8-9. This image was created at the end of the session, as we were leaving the Steinway offices. (
![]() second, f/4, 800 ISO, 24–70mm f/2.8 lens; off-camera TTL flash with FEC at –1EV)
second, f/4, 800 ISO, 24–70mm f/2.8 lens; off-camera TTL flash with FEC at –1EV)
THIS GAVE A SOFT LOOK, BUT THE GRID MORE NARROWLY DIRECTED THE LIGHT.
For plate 8-7, I changed the subject’s pose and my camera position, but the lighting setup remained fairly similar (plate 8-8). If you look at the top-right corner of the image, you can see the edge of the gridded softbox. This could easily have been cloned out in Photoshop, but I decided not to. I feel the small black triangle there helps with the composition, containing the geometric patterns within the frame.
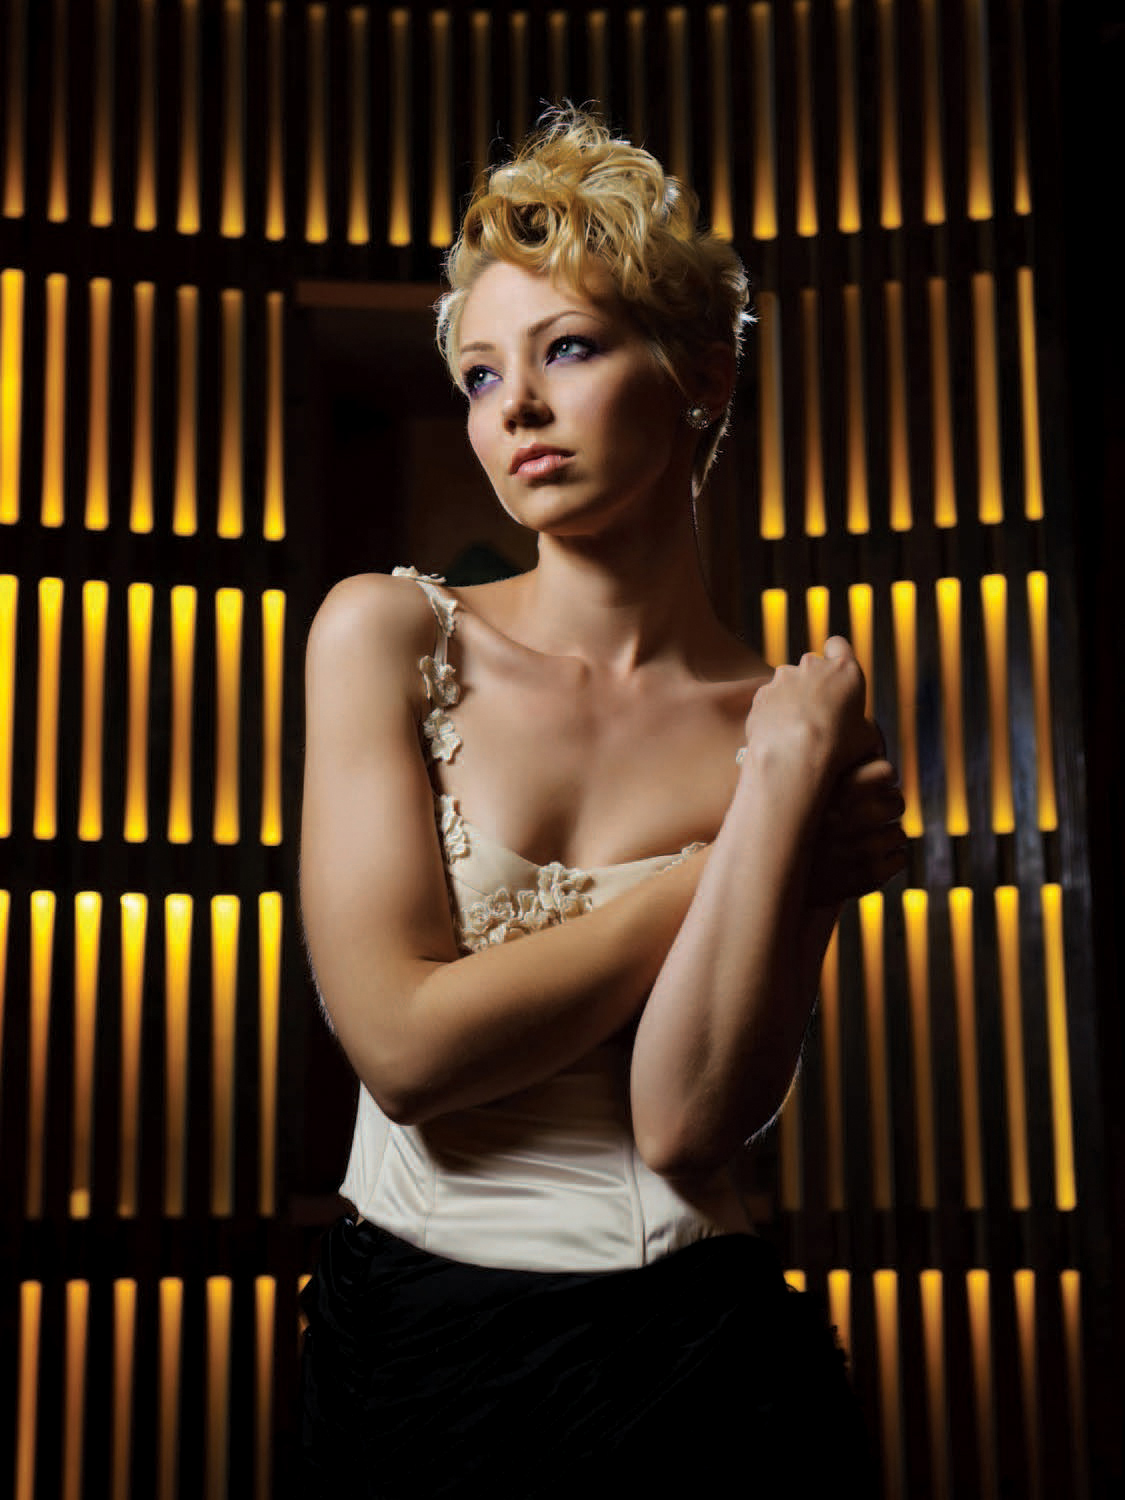
Separation with Backlighting. Plate 8-10, an image of Bethany, was shot in the lobby area of a nightclub. I knew the wooden panelling and subdued incandescent lighting would make an interesting background because of the repetitive pattern and glow. A slow shutter speed allowed more of the background light in, and then I used flash to light her. I didn’t gel my flash, specifically because I wanted to keep that golden glow in the background (see chapter 9).
As you can see in plate 8-11, the main light was a flash in a Lastolite softbox. To separate Bethany from the background, I added a second flash for backlighting.
The main light was originally set to TTL, but as she moved, the exposures varied. This was because the changing balance of darker/lighter tones in the frame changed the metering system’s interpretation of the overall image. As I zoomed in and out, my TTL exposures would also change. Therefore, I had to set my main flash to manual to achieve better consistency.
The flash in the softbox was mounted on a PocketWizard FlexTT5 transceiver. I started at 
![]() power on the main light, then adjusted it from there via the FlexTT5 radio transmitter and master flash on my camera. (Note: I used a flash on the camera’s FlexTT5, since I needed its autofocus-assist in that dark lobby area.) If you look carefully at plate 8-11, you can see that I did feather the softbox so that there would be no glare on the wooden area to camera left.
power on the main light, then adjusted it from there via the FlexTT5 radio transmitter and master flash on my camera. (Note: I used a flash on the camera’s FlexTT5, since I needed its autofocus-assist in that dark lobby area.) If you look carefully at plate 8-11, you can see that I did feather the softbox so that there would be no glare on the wooden area to camera left.
The background light was a flash that was also set to manual output (around 
![]() power since it was direct flash). Any backlight like this is best controlled as a manual flash. Since the backlight doesn’t actually contribute to the overall exposure (it only adds rim lighting) it doesn’t make sense to have it as TTL flash. This flash was also triggered via a PocketWizard FlexTT5 transceiver.
power since it was direct flash). Any backlight like this is best controlled as a manual flash. Since the backlight doesn’t actually contribute to the overall exposure (it only adds rim lighting) it doesn’t make sense to have it as TTL flash. This flash was also triggered via a PocketWizard FlexTT5 transceiver.
Plate 8-10. Bethany was photographed in the lobby area of a nightclub. (
![]() second, f/4, 400 ISO, 24–70mm f/2.8 lens; two off-camera manual flash units, main light in a softbox)
second, f/4, 400 ISO, 24–70mm f/2.8 lens; two off-camera manual flash units, main light in a softbox)
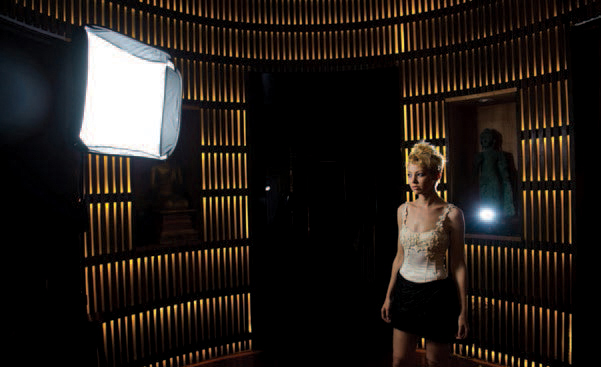
Plate 8-11. A pull-back shot showing the simplicity of the lighting.
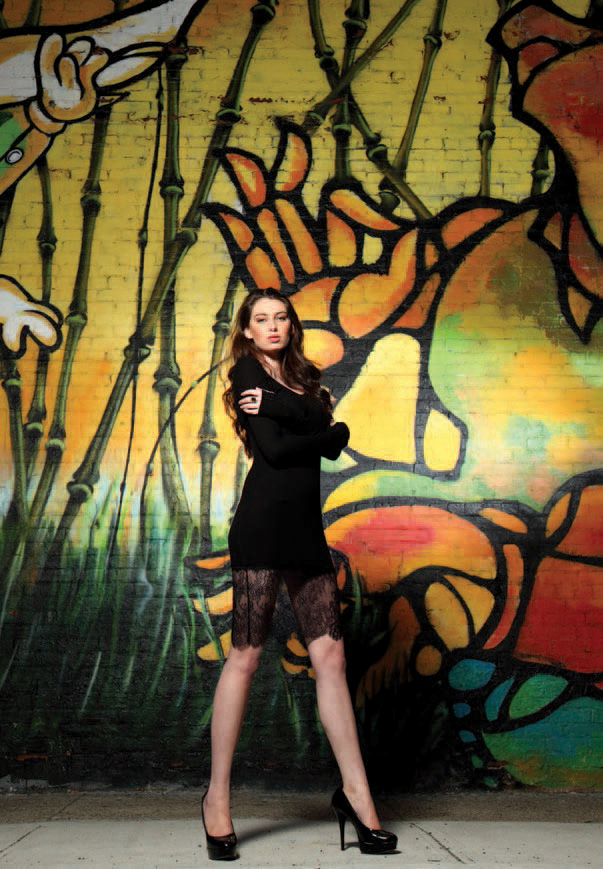
Plate 8-12. Molly was posed in front of a graffiti-cover wall. (
![]() second, f/7.1, 400 ISO, 24–70mm f/2.8 lens; multiple off-camera flash units)
second, f/7.1, 400 ISO, 24–70mm f/2.8 lens; multiple off-camera flash units)
I left the posing mostly up to Bethany, since she is an experienced professional model. I did, however, ask her to direct her gaze toward the softbox so that the light would fall on her face from a flattering angle and produce a nice gradient of light across her cheek. I also had her angle her body slightly away from the softbox, so that the main light did not fall directly on the front of her.
In the previous examples given in this chapter, we looked at multiple-flash setups that were done indoors. As such, the ambient light didn’t play much of a factor in the final exposure; I simply added light to the background via a flash.
Most off-camera flash triggers can trigger different groups of flashes. These are usually marked as Group A, B, or C. How you decide to assign those groups is usually up to you. In other words, group B need not be the fill light if you need to use it as a rim light.
The same thing can be done outdoors. If the available light isn’t too powerful, you can create an image where the lighting is pretty much all just from the off-camera flash units. This gives you total control over the look of the final image; you can balance all the light levels and also control exactly how the light is spread over your scene and subject.
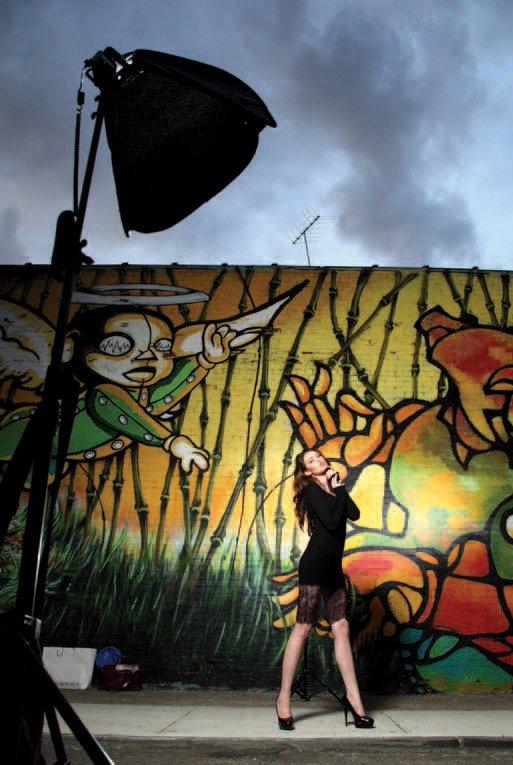
For this session (beginning with plate 8-12), I met up with a model, Molly, in an area of Brooklyn with amazing graffiti that is commonly used as a backdrop by photographers. My objective was to test out the Canon 600EX-RT Speedlite, which has a built-in radio transceiver. This makes life simpler for flash photographers, since it eliminates the extra cables and batteries and paraphernalia—all of which increase the chances of something malfunctioning or not being set up properly.
For my setup (plates 8-13 and 8-14), I wanted to use three Speedlites, all controlled by the Canon ST-E3-RT flash controller. I used the three flash units in manual mode, set up as A: B C. The main light on the model (A) was diffused with my favorite 24-inch Lastolite Ezybox. The B and C flashes were undiffused (bare). One of these (B) lit up the background to create a highlight behind her. I flagged this flash with a BFT to ensure no direct light fell on her from it. The C flash was placed directly behind her as a rim light.

Plates 8-13 and 8-14. Setup shots of my portrait with Molly.
As I was documenting my lighting setup, I took a vertical shot (plate 8-14) that brought the dramatic sky to my attention. I decided to use this for another setup, so we moved up the street for plate 8-15. A flash with a softbox lit the model, while a bare flash behind her helped create separation from the dark background. Both flashes were set to manual output.
A FLASH WITH A SOFTBOX LIT THE MODEL, WHILE A BARE FLASH BEHIND HER HELPED CREATE SEPARATION.
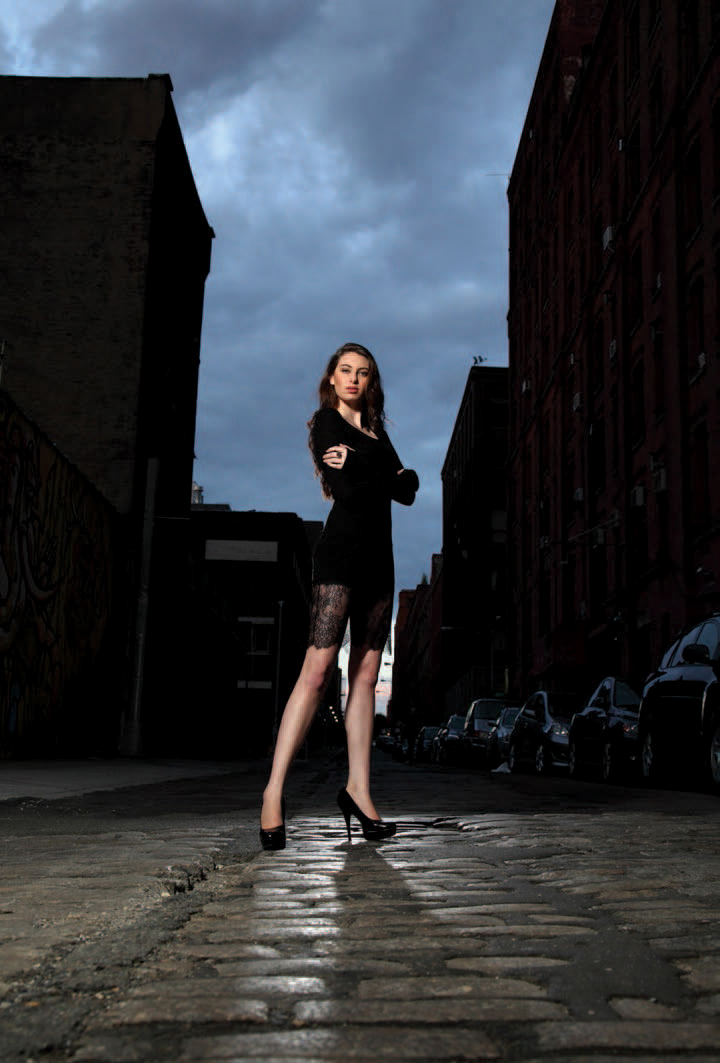
Plate 8-15. The dramatic sky inspired me to create a street shot with Molly. (![]() second, f/7.1, 400 ISO, 24–70mm f/2.8 lens; multiple off-camera flash units)
second, f/7.1, 400 ISO, 24–70mm f/2.8 lens; multiple off-camera flash units)