10. PHOTOGRAPHY IN HARD SUNLIGHT
Creating portraits of people in hard sunlight will always be one of the more daunting challenges photographers encounter. But since you will regularly encounter this need, I wanted to dedicate an entire chapter to just this topic: ways to deal with the challenge of harsh sunlight.
Without additional lighting, or the use of scrims, there are a few basic ways of dealing with the harsh sun:
1. Turn the subject toward the light, or
2. Turn the subject away from the light, or
3. Just suck it up and accept that our photos will look bad.
Of course, that last option isn’t really the way to go if you have any pride in your work. That leaves the two other options.
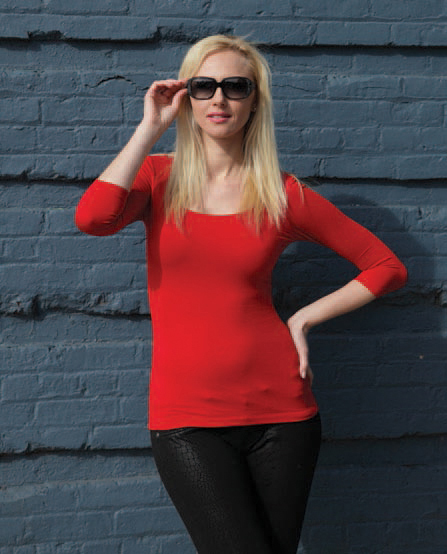
Turn the Subject Toward the Light. During a photography workshop with Aleona, we worked in bright sunlight. I posed her into the light, as seen in plate 10-1, and used her shadow as a compositional element. Since I like her too much to have her sear her retinas by looking right at the sun, she wore sunglasses.
Plate 10-1. Aleona was turned toward the sun. (
![]() second, f/5.6, 200 ISO, 24–70mm f/2.8 lens; available light)
second, f/5.6, 200 ISO, 24–70mm f/2.8 lens; available light)
Plate 10-2. Changing Aleona’s angle to the sun totally changed the lighting on her face. (![]() second, f/5.6, 200 ISO, 24–70mm f/2.8 lens; available light)
second, f/5.6, 200 ISO, 24–70mm f/2.8 lens; available light)
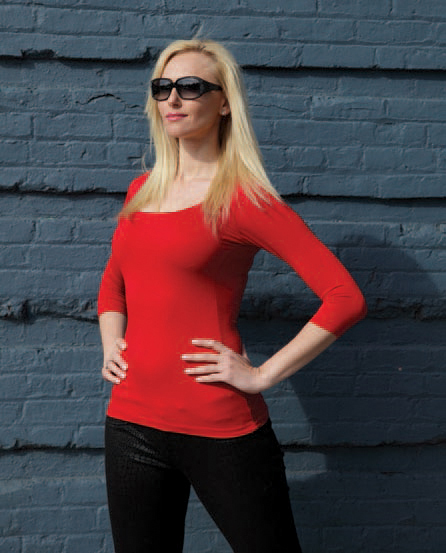
Plate 10-3. Adding a dynamic pose completed the portrait. (![]() second, f/5.6, 200 ISO, 24–70mm f/2.8 lens; available light)
second, f/5.6, 200 ISO, 24–70mm f/2.8 lens; available light)
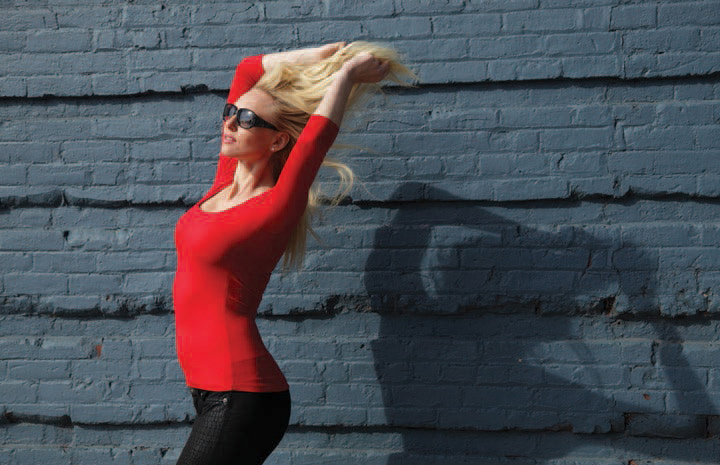
In plate 10-2, you can see how the lighting pattern on her face changed simply by having her move her head toward the sun. Now add a dramatic gesture or pose, and we have a striking photograph like plate 10-3. It’s as simple as that; pose your subject “into” the light, and watch how the lighting pattern changes—especially how the shadow of the nose falls (see chapter 1).
Turn the Subject Away from the Light. Another way to deal with the harsh sun, without resorting to additional lighting, is simply to turn your subject away from the sunlight. To do this, you expose correctly for the shady side of the subject and just allow the background to blow out.
Of course, any sunlit areas of the subject will also blow out, so you will lose detail—but depending on how high the sun is, the blown-out areas will hopefully just act as rim lighting that enhances the subject. Even if there are larger areas blowing out, it’s still better than having the subject’s face partially lit by sun and partially in shadow.
POSE YOUR SUBJECT “INTO” THE LIGHT, AND WATCH HOW THE LIGHTING PATTERN CHANGES.
This is exactly how I went about photographing Katie, in the hard sunlight of a winter’s day (plate 10-4). Even though I lost much of the background, there is just enough detail to give the portrait some context. The important thing is that the light on Katie’s face is even and soft.
WE ALL KNOW THAT OVERHEAD SUN ISN’T IDEAL FOR TAKING PHOTOS—ESPECIALLY PORTRAITS!
This simple method also works well in situations where your subject is turned away from the light and their shaded side is toward open shade (plate 10-5). It especially helps if your subject is turned toward omnidirectional reflected light—light that’s coming in from everywhere.
Let’s look at another example. For the location portrait session seen in plate 10-6, the sun was overhead. We all know that overhead sun isn’t ideal for taking photos—especially portraits! When I arrived at the estate’s gardens, my heart sank. The sun was harsh and there were very few places to hide from it. But I had to do better than just cope; I had to come up with great photographs for my clients in less-than-ideal light. This meant I had to work harder on how I positioned them for the photos. Again, the simplest approach was to have them turn their backs to the sun, putting even (shaded) light on their faces. If possible, finding some way to shield the subjects from the hard sun helps, too. In this case, I did use some of the dappled light from the blossoming trees to help break the hard light, but I had the couple lean slightly forward to avoid any of the dappled light falling on their faces.
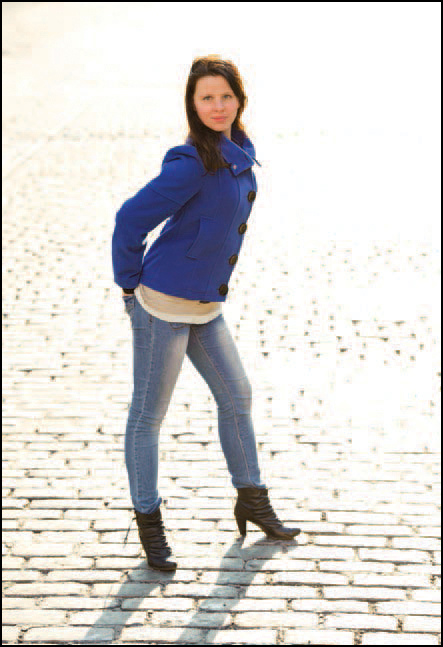
Plate 10-4. Katie was turned away from the sun. (
![]() second, f/4.5, 200 ISO, 70–200mm f/2.8 lens; available light)
second, f/4.5, 200 ISO, 70–200mm f/2.8 lens; available light)
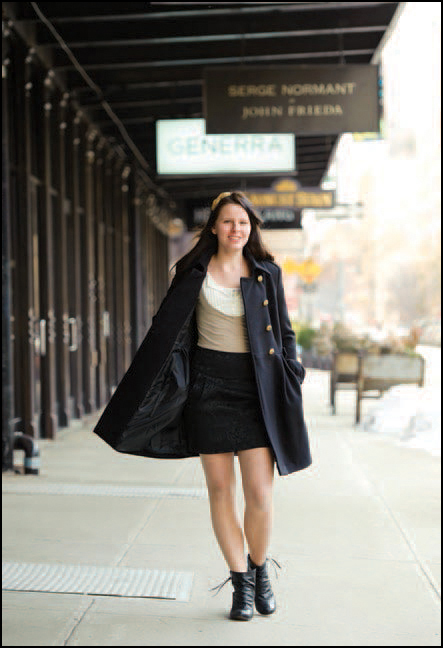
Plate 10-5. Backlighting and open shade to one side transforms harsh sunlight into a flattering portrait look. (![]() second, f/3.2, 800 ISO, 70–200mm f/2.8 lens; available light)
second, f/3.2, 800 ISO, 70–200mm f/2.8 lens; available light)
The sunlight does appear as rim light on them, as seen in plate 10-7. In this case, it isn’t a subtle effect, and does mean that certain parts are blown out—such as their shoulders and the tops of their heads. However, this is acceptable as long as the light falling on their faces is flattering.
THIS IS ACCEPTABLE AS LONG AS THE LIGHT FALLING ON THEIR FACES IS FLATTERING.
This is a situation when I most often use a touch of on-camera fill flash, dialing my TTL flash’s FEC setting down to around –3EV. Using off-camera lighting does make it easier to position your subject, since you don’t have to be concerned about finding perfect light for your subject—you can simply create it. More on adding flash in harsh sunlight appears later in this chapter.
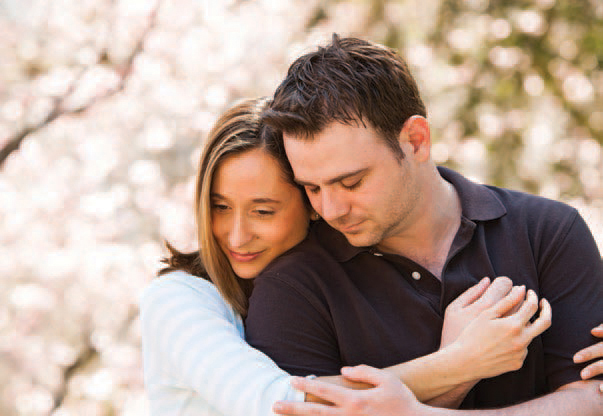
Plate 10-6. Careful subject positioning can help you produce great results even in harsh, overhead sunlight. (![]() second, f/4, 250 ISO, 70–200mm f/2.8 lens; available light)
second, f/4, 250 ISO, 70–200mm f/2.8 lens; available light)
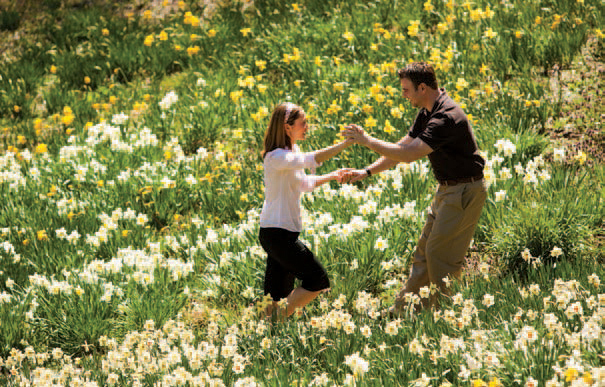
Plate 10-7. Direct sunlight produced rim lighting on the subjects. (![]() second, f/4, 100 ISO, 70–200mm f/2.8 lens; available light)
second, f/4, 100 ISO, 70–200mm f/2.8 lens; available light)
Let’s look at another image of Aleona (plate 10-8). While this photo isn’t much more than a test shot, it will help illustrate a shortcut that I use to arrive quickly at a bright-sunlight exposure setting that is approximately right.
My shortcut is based on the Sunny 16 Rule, which states that when you photograph something in bright sunlight, a correct exposure can be attained by using an aperture setting of f/16 and a shutter speed setting that is the inverse of the ISO setting (i.e, 
![]() ). For example, if you are shooting with a 100 ISO setting in bright sunlight, then the right shutter speed is
). For example, if you are shooting with a 100 ISO setting in bright sunlight, then the right shutter speed is 
![]() second for an aperture of f/16—or
second for an aperture of f/16—or 
![]() second for 200 ISO at f/16. These are simple, round numbers that are easy to remember.
second for 200 ISO at f/16. These are simple, round numbers that are easy to remember.
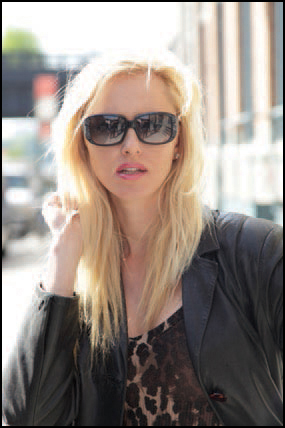
Plate 10-8. A quick shot of Aleona to test my exposure shortcut. (![]() second, f/4, 100 ISO, 70–200mm f/2.8 lens; available light)
second, f/4, 100 ISO, 70–200mm f/2.8 lens; available light)
I like to base my exposure on two combinations of settings extrapolated from this rule:
1. Instead of setting ![]() second at f/16 and 100 ISO, I usually go to
second at f/16 and 100 ISO, I usually go to ![]() second (or
second (or ![]() second) at f/11 and 100 ISO. The higher shutter speed helps with subject movement and camera shake. It’s also the maximum flash sync speed for most cameras. This works out great when I do want to use flash.
second) at f/11 and 100 ISO. The higher shutter speed helps with subject movement and camera shake. It’s also the maximum flash sync speed for most cameras. This works out great when I do want to use flash.
2. Alternately, to get a shallow depth of field, I just take my camera to these equivalent settings: 
![]() second at f/4 and 100 ISO.
second at f/4 and 100 ISO.
In my experience, if you’re shooting in bright sunlight, then the shaded side is around 3 stops under the sunlit area. Therefore, when photographing a subject turned away from the sun, the shortcut is that I set my camera to ![]() second at f/4 and 100 ISO (3 stops down from
second at f/4 and 100 ISO (3 stops down from ![]() second at f/11 and 100 ISO)—and this is close enough a lot of times. From this point, I can nail the exposure with just one or two test shots.
second at f/11 and 100 ISO)—and this is close enough a lot of times. From this point, I can nail the exposure with just one or two test shots.
The benefit of this is that I can step out of a building into sunlight and have camera settings at hand that save me a lot of dial-twiddling. With these simple guidelines, you’ll hopefully find that you are better able to cope when shooting in harsh sun.
FOR BRIGHTLY SUNLIT AREAS

![]() second, f/11, 100 ISO
second, f/11, 100 ISO

![]() second, f/4, 100 ISO
second, f/4, 100 ISO
FOR SHADED AREAS
![]() second at f/4, 100 ISO
second at f/4, 100 ISO
The simplest approach to photography in bright sun is just not to deal with the hard sunlight at all. If you can find some shade, use it!
With this portrait of Rachel (plate 10-9), I had to deal with sun coming in and out behind a thin layer of clouds. The light alternated between bright and very bright, so I posed her in the narrow shadow of one of the pillars. Because I didn’t want to use any additional lighting, and I had to make sure I exposed correctly for my subject, the bride. I used the histogram method described in chapter 3. Exposing for the bride and her dress meant that the background exposure was out of my control—so I simply had to let the tonal values for the background fall where they may. However, I did make sure that the background was not distracting.
I HAD TO DEAL WITH SUN COMING IN AND OUT BEHIND A THIN LAYER OF CLOUDS.
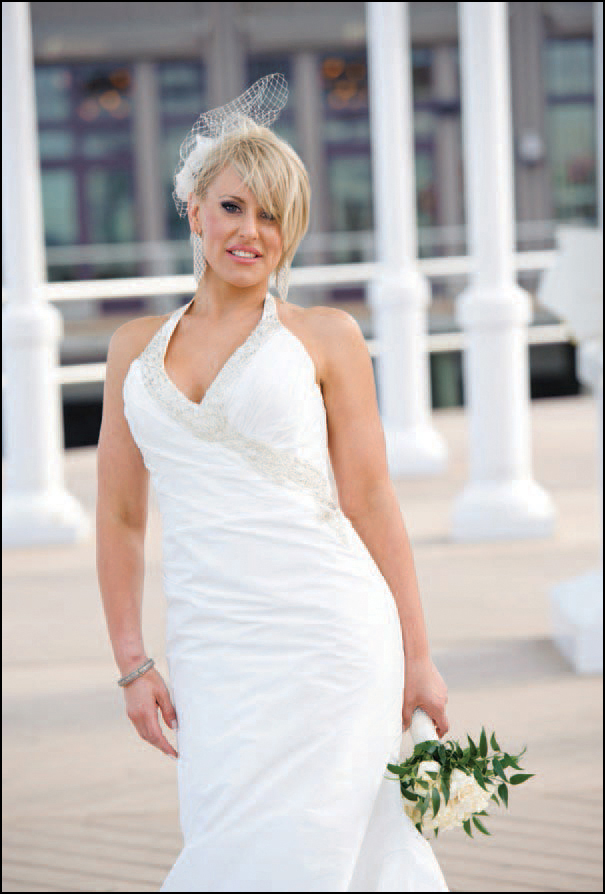
Plate 10-9. If you can find it, get your subject into some shade. (
![]() second, f/4.5, 400 ISO, 70–200mm f/2.8 lens; available light only)
second, f/4.5, 400 ISO, 70–200mm f/2.8 lens; available light only)
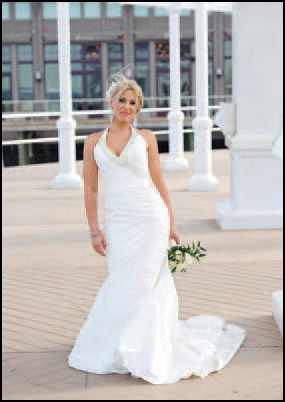
Plate 10-10. Here you can see the narrow band of shade in which Rachel was posed. (![]() second, f/4.5, 400 ISO, 70–200mm f/2.8 lens; available light only)
second, f/4.5, 400 ISO, 70–200mm f/2.8 lens; available light only)
Plate 10-11. If you can find it, get your subject into some shade. (![]() second, f/4, 100 ISO, 70–200mm f/2.8 lens; manual off-camera flash with a softbox)
second, f/4, 100 ISO, 70–200mm f/2.8 lens; manual off-camera flash with a softbox)

Plate 10-12. The narrow band of shade in which she was posed. (![]() second, f/4, 100 ISO, 70–200mm f/2.8 lens; manual off-camera flash with a softbox)
second, f/4, 100 ISO, 70–200mm f/2.8 lens; manual off-camera flash with a softbox)
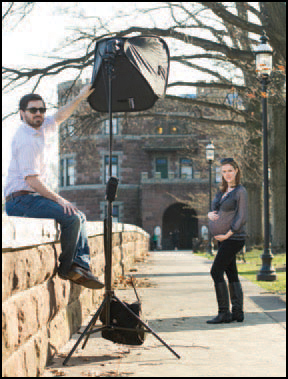
Plate 10-13. The lighting setup.
I used a similar approach when I did a maternity portrait session with Amy on a bright day (plate 10-11). I wanted to avoid having her squinting in the bright light—and I also wanted to avoid hard shadows on her face. The first step was to pose her in the even light in the shade of a tree trunk. A slender bit of shadow is enough (plate 10-12). In this case, I also decided to add some flash on Amy, just to sweeten the available light. Plate 10-13 shows the simplicity of the off-camera flash setup. My manual flash was diffused with a 24×24-inch Lastolite softbox and triggered with PocketWizard TT5 units.
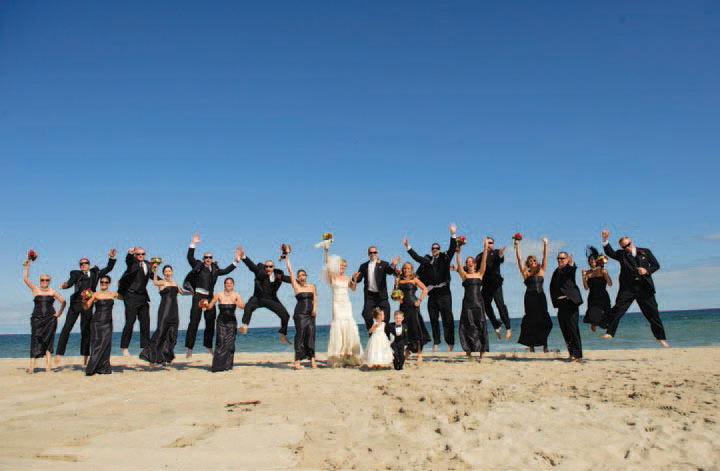
Plates 10-14 through 10-16 are typical examples of how I work with a bridal party in hard sunlight on the beach. With their backs to the sun, I had the bridal party walk toward the beach area. This put their faces and nearly every part of their attire are in open shade—lit mostly by the nice, open light reflected from the sky and sand. The sunlight became a kind of (irregular) rim light on them. I tried my best to make sure the light from the sun didn’t produce harsh cross-shadows on their faces.

Plate 10-14. Subjects posed against the sun. (![]() second, f/5, 200 ISO, 24–70mm f/2.8 lens; TTL on-camera flash with FEC at –3EV)
second, f/5, 200 ISO, 24–70mm f/2.8 lens; TTL on-camera flash with FEC at –3EV)
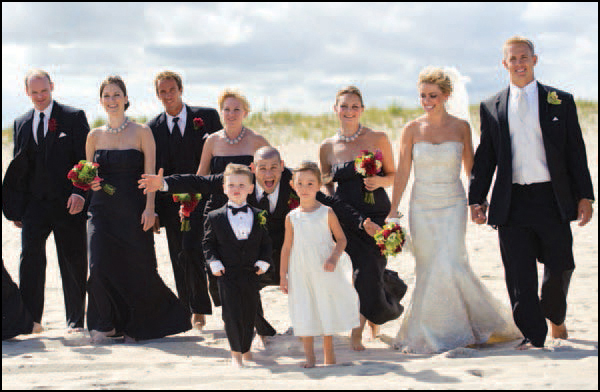
Plate 10-15. Subjects posed against the sun. (
![]() second, f/4, 200 ISO, 70–200mm f/2.8 lens; TTL on-camera flash with FEC at –3EV)
second, f/4, 200 ISO, 70–200mm f/2.8 lens; TTL on-camera flash with FEC at –3EV)
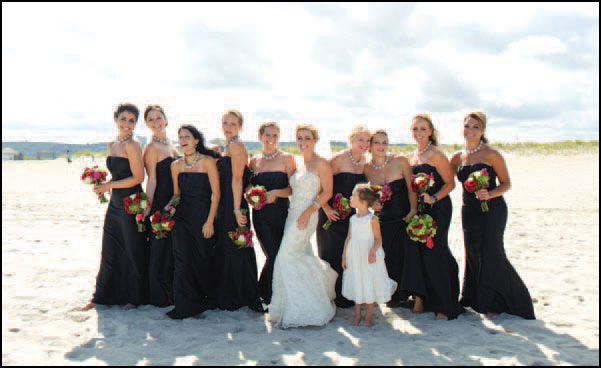
Plate 10-16. Subjects posed against the sun. (
![]() second, f/5.6, 200 ISO, 24–70mm f/2.8 lens; TTL on-camera flash with FEC at –3EV)
second, f/5.6, 200 ISO, 24–70mm f/2.8 lens; TTL on-camera flash with FEC at –3EV)
Plate 10-17. Posing the subjects in direct sun sometimes works well—especially when the shot is more about large gestures than subtle expressions. (![]() second, f/5.6, 200 ISO, 24–70mm f/2.8 lens; available light only)
second, f/5.6, 200 ISO, 24–70mm f/2.8 lens; available light only)
In this scenario, a little bit of fill directly from your on-camera flash can work to help subtly with the contrast. I’ve found that using a lot of direct flash to lift the shaded areas to the same exposure level as the sunlit areas (i.e., “fixing” the light) often results in images that don’t look as good—more on this later in the chapter.
You will lose some detail, but that is inevitable with a shoot like this that isn’t entirely controlled. I’d rather go for the spontaneity and fun than have a few photographs that are perfectly lit—especially since that option isn’t entirely practical with a large group of people moving around on a beach.
The other option is to actually use the full direct sun—and that’s something you can do for some images (see plate 10-17). One problem with direct sun is that people squint when they look into it. Additionally, their eyes are often shrouded in hard shadow. In this instance, however, many of the subjects wore sunglasses, so these issues simply weren’t issues. Even for those without sunglasses, squinting and shadowing weren’t a concern at all; photos like these are about movement and energy, not nuanced expressions.
ONE PROBLEM WITH DIRECT SUN IS THAT PEOPLE SQUINT WHEN THEY LOOK INTO IT.
The bridal party was keen on doing a photo where they all jumped, so I set my camera to continuous drive, firing it at the full nine frames per second for three such jumps. With such a large group, there really is no “decisive moment,” so machine-gunning it is the easiest way. On Monday morning, with your feet on the desk and a cup of coffee in your hand, you can select the images that work.
Finally, take a look at my camera settings for this image: ![]() second at f/5.6 and 200 ISO. At this distance, and at nine frames per second, and in HSS mode, the flash wouldn’t have had any effect. Hence, no flash was used.
second at f/5.6 and 200 ISO. At this distance, and at nine frames per second, and in HSS mode, the flash wouldn’t have had any effect. Hence, no flash was used.
I CONTINUED TO WORK IN FULL SUN BUT WITH A TOUCH OF FILL FLASH TO LIFT THE SHADOW DETAIL.
Let’s check out some more images from the same event (plates 10-18 and 10-19). For the portraits of the bride and groom, Bridget and Matt, I continued to work in full sun but with a touch of fill flash to lift the shadow detail. However, I had the FEC turned down so that the flash would lift the contrast a bit. When posing the couple, I made sure that they didn’t have to squint into the sun. That’s never attractive. I also posed them so that the light on them was as even as possible.
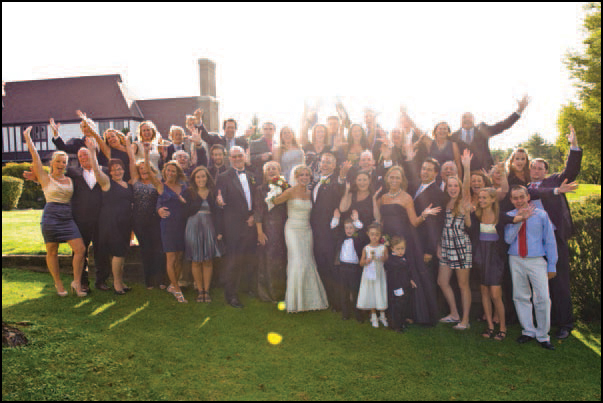
The same approach also works for group photographs (plate 10-20). Here, the sun was getting to be quite low. If I had shot at 90 degrees to the sun, I would have had to deal with very harsh shadows. If I had shot with everyone facing the sun, they would have been squinting with tears in their eyes from the bright light. Having the sun behind their backs was really the only practical solution. (And, happily, there was a low wall handy to help stagger the group.) Some detail was lost to lens flare, but that was acceptable to me because this photo was more about the fun of “having been there” for the guests.
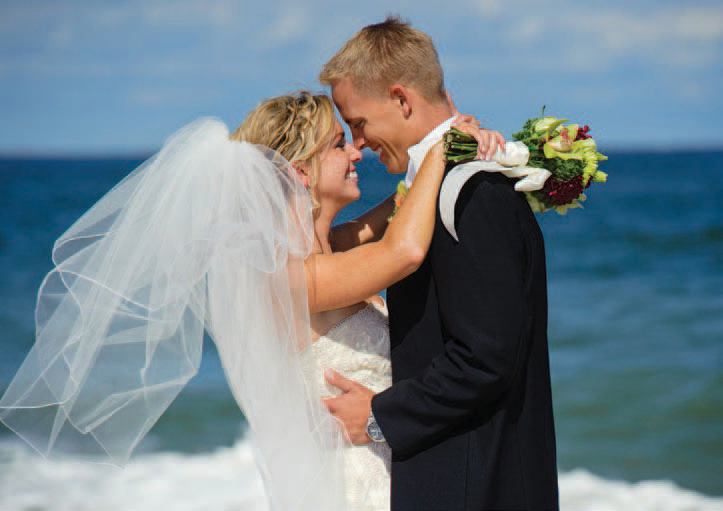
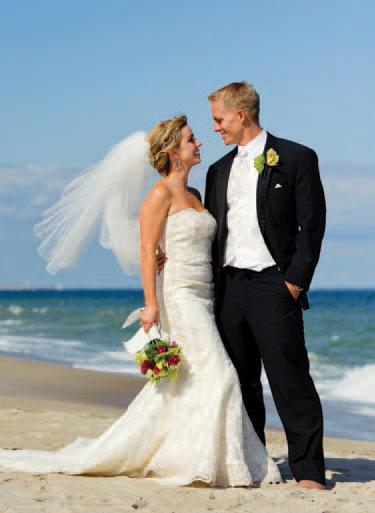
Plates 10-18 and 10-19. The bride and groom were posed in bright sunlight for the most even lighting possible. (
![]() second, f/5, 200 ISO, 24–70mm f/2.8 lens; on-camera TTL flash with FEC at 0EV)
second, f/5, 200 ISO, 24–70mm f/2.8 lens; on-camera TTL flash with FEC at 0EV)
Plate 10-20. A group portrait made later in the day, but still in full sun. (
![]() second, f/6.3, 500 ISO, 24–70mm f/2.8 lens; on-camera TTL flash)
second, f/6.3, 500 ISO, 24–70mm f/2.8 lens; on-camera TTL flash)
YOU MAY HAVE TO RESORT TO BRUTE FLASH TO SOLVE THE PROBLEM.
Hopefully these images clearly show the way that I deal with bright sun. It is a simple approach, but it still gives high-quality results when you are strapped for time and don’t have the opportunity to build grand off-camera lighting setups. In short, the approach works and it’s efficient!
When you can’t position your subjects so that you can get more pleasing light than hard sunlight, you may have to resort to brute flash to solve the problem. When off-camera flash is the only way to fix the problem, there is a simple recipe:
1. Go to your camera’s lowest ISO setting.
2. Set your camera to the maximum flash sync speed.
3. Find the aperture at which you still hold detail in your subject (i.e., the aperture where you don’t overexpose the ambient light on the subject).
At those settings, add enough flash to give you a correct exposure. This is where the flash’s guide numbers come in handy; with these, you know what your flash is capable of (more on this in the next section). Alternately, a light meter is good—although some don’t meter flash properly in very bright ambient light.
For the scenario in plate 10-21, the direct sunlight created an unflattering pattern on the model’s face. I added the output of two flashes to match the sunlight and help lift the shadows for a more pleasing photograph (plate 10-22). The result isn’t necessarily the best I could imagine, but it is still a huge improvement over the available light only. The brute power of the flash made it possible to work in a tough situation. Even though it appears as though a softbox was used, I had removed the baffles, so the two flashes were direct and unmodified in final image (plate 10-23).
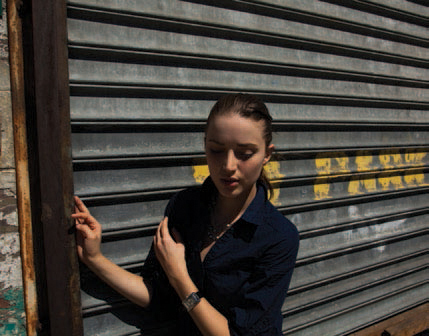
Plate 10-21. The existing light created an unflattering pattern. (![]() second, f/16, 100 ISO, 24–105mm f/4 lens; ambient light only)
second, f/16, 100 ISO, 24–105mm f/4 lens; ambient light only)
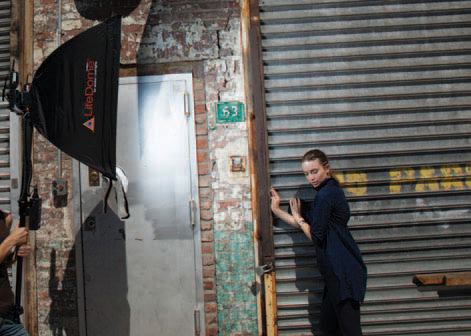
Plate 10-22. Two direct flashes improved the light significantly. (![]() second, f/16, 100 ISO, 24–105mm f/4 lens; two manual off-camera flashes)
second, f/16, 100 ISO, 24–105mm f/4 lens; two manual off-camera flashes)

Plate 10-23. The front baffle of the softbox was removed to get the most output from the lights. (![]() second, f/16, 100 ISO, 24–105mm f/4 lens; two manual off-camera flashes)
second, f/16, 100 ISO, 24–105mm f/4 lens; two manual off-camera flashes)
So what should you do if you want to shoot at a wider aperture in direct sunlight? Here are a couple more tips:
1. Only if you are sure that your flash has enough power in reserve should you take it to high speed flash sync (HSS) to get a wider aperture. Remember: you lose around 2 stops of light when you switch to this mode, so you shouldn’t immediately go to HSS to solve a problematic lighting situation like this.
2. You could use a neutral density filter to cut about 3 stops of light (both the ambient and the flash) and attain a wider aperture for a shallower depth of field.
The most power you’re going to get from your flash is at full output in manual mode—that’s when the flashgun burst dumps everything the flash can produce. You could zoom your flash a little tighter and get a bit more power (and, hence, range), but, essentially, you’re at the limit of what your flash is capable of pushing out.
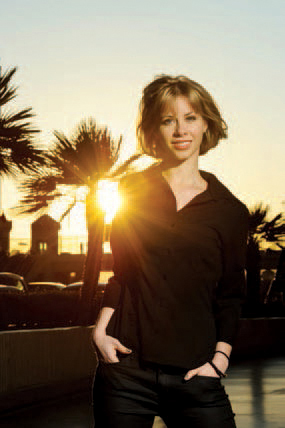
Plate 10-24. Shawna on the Las Vegas strip. (![]() second, f/11, 200 ISO, 70–200mm f/2.8 lens; manual off-camera flash with ½ CTS gel)
second, f/11, 200 ISO, 70–200mm f/2.8 lens; manual off-camera flash with ½ CTS gel)
This is useful to know when you are trying to balance flash with bright sunlight. With this portrait of Shawna out on the Las Vegas strip (plate 10-24), I wanted that sun-flare look, but I also wanted to balance the super-bright background with flash. Since I was using only a single flash, a softbox would not have worked; it would have cut down the flash’s output too much. Therefore, I used direct, unmodified flash. I moved it off the camera so the light would be more interesting than direct on-camera flash would have been.
The technique I used to get to a correct exposure here was essentially the same as the one described in chapter 6, where I used on-camera bounce flash to photograph Shawna.
1. Find an interesting background.
2. To use flash in very bright ambient light, choose your lowest ISO and maximum flash sync speed.
3. Find the aperture to produce the desired exposure on the background.
4. For that aperture, find the distance for which the flash (in full manual output) gives you correct exposure on the subject.
This is where knowing the guide number (GN) of the flash comes in handy. The guide number is a simple formula that describes the power of your flash. It is calculated by determining, at ISO 100, the distance at which the flash produces a correct exposure at a given aperture. (Note: There can be discrepancies here, as manufacturers tend to be optimistic about their flashes’ abilities. Zooming the flash will also change the guide number.)
GN = distance x aperture
So, in the final flash exposure calculation for plate 10-24, I could have determined the right distance to place the flash from my subject by dividing my flash’s guide number by the current aperture setting.
THE GUIDE NUMBER IS A SIMPLE FORMULA THAT DESCRIBES THE POWER OF YOUR FLASH.
For example, the specs for the Nikon SB-900 Speedlight list a guide number of 111.5 feet (34m) at ISO 100 with the flash at the 35mm zoom head position. So if the GN (in feet) is 111.5 and the aperture is set to f/11, the flash will be at full power about 10 feet from the subject (111.5 ÷ 11 = 10.13).
The specs for the Canon 600EX-RT Speedlite list a guide number of 197.5 feet (60m) at ISO 100 with the flash at the 200mm zoom head position. Working through the math again, if the aperture is at f/10 the flash will be at full power about 20 feet from the subject (197.5 ÷ 10 = 19.75). The math isn’t scary. We all have smart phones with us, and they all include a calculator.
Now, however, the question remains: what is the guide number of your flash? Well, it’s time to find that instruction manual again! Of course, firing up Google might just be easier.
There is a shortcut, though. With the flash on your camera (so it can read the ISO and aperture you set), look at the scale on the back of the flash. For this example (plate 10-25), for full power from the Nikon SB-900 at 200 ISO, I have to be 13 feet from my subject for the flash to deliver f/10 worth of flash. (Note that I kept the flash zoomed to 50mm.) The display would have looked like plate 10-26 on the Canon 580EX II Speedlite. Again, for 100 ISO, I have to be around 20 feet from my subject to get correct exposure for f/8. (Note: The 580EX II only displays the aperture setting when the flash is in E-TTL mode. It’s an odd quirk.) Don’t make too much of the difference in distance shown here; the Canon Speedlite’s display is more ambiguous about the specific distance.
Again, keep in mind that the manufacturers tend to be slightly optimistic about the output of their flashguns, so you still need to check the back of your camera to see if your exposure really is correct—or close enough to correct.
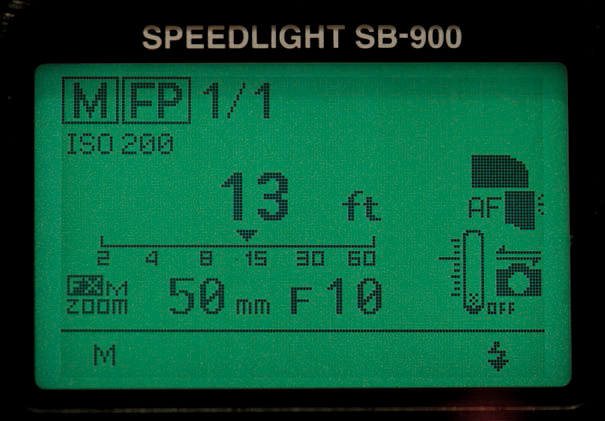
Plate 10-25. Display for the Nikon SB-900 Speedlight.
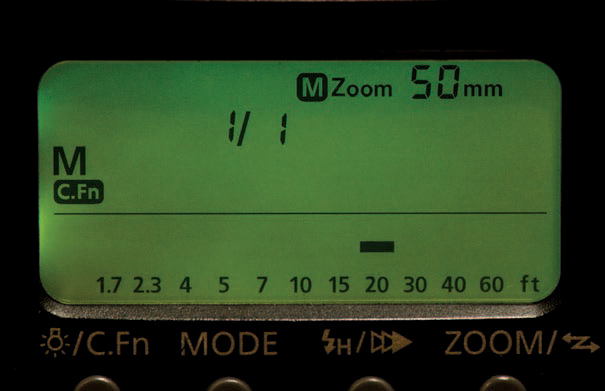
Plate 10-26. Display for the Canon 580EX II Speedlite.