We’ve already looked at how still photographers can work in harmony with the videographer’s lighting, but I consider my own video light to be an essential part of my wedding photography lighting arsenal—especially for romantic portraits of the couple. There are times when a video light is just the easiest lighting tool to use.
Because video light has a rapid fall-off in light intensity at the edges of its beam, it can lend a dramatic look to a photograph. In addition, the video light can seem quite natural when used in the context of an existing-light setting; it may not even look like additional lighting. The incandescent white balance of the video light usually matches the existing light fairly well. Finally, video lights produce a continuous light source, making immediate changes to the lighting more intuitive; what you see is what you get. For these reasons, I believe a video light should have a place in every photographer’s bag.
The two primary types of video light are LED lights and incandescent lights (with a halogen lamp). Each type has its advantages. The LED lights run much cooler, but they generally aren’t as powerful as the incandescent units. On the upside, the LED video lights are usually daylight balanced and shipped with a gel to turn them into incandescent light sources. This makes LED video lights quite flexible.
So why would you opt for video lighting over flash—especially when you can use a flattering, versatile technique like bouncing the flash? Let’s answer that question right now.
When switching on the video light, I hold it so that the light points over my subject’s head. This way I don’t blind them with the blast of direct light. I also warn them not to look at the light. Then, I have my assistant slowly bring the light’s beam down into position.
Plate 11-1. A nice bounce-flash portrait of Shawna. (
![]() second, f/2.8, 800 ISO, 70–200mm f/2.8 lens; TTL on-camera bounce flash)
second, f/2.8, 800 ISO, 70–200mm f/2.8 lens; TTL on-camera bounce flash)
Plate 11-2. Switching to a video light gave me an image with more impact. (![]() second, f/2.8, 1250 ISO, 24–70mm f/2.8 lens; Litepanels MicroPro LED video light)
second, f/2.8, 1250 ISO, 24–70mm f/2.8 lens; Litepanels MicroPro LED video light)

Plate 11-3. The placement of the video light to camera right, directed down toward the model.
A MORE CONTAINED LIGHT SOURCE, SUCH AS A VIDEO LIGHT, CAN CREATE A MORE DRAMATIC LOOK.
As shown in chapter 6, it is easy enough getting nice clean open light with a single on-camera flash when shooting indoors. By bouncing your flash to produce directional light, you can effortlessly get portraits like plate 11-1, an image of Shawna. As usual, I used the BFT to flag my flash and get a bit more light on one side of my subject’s face.
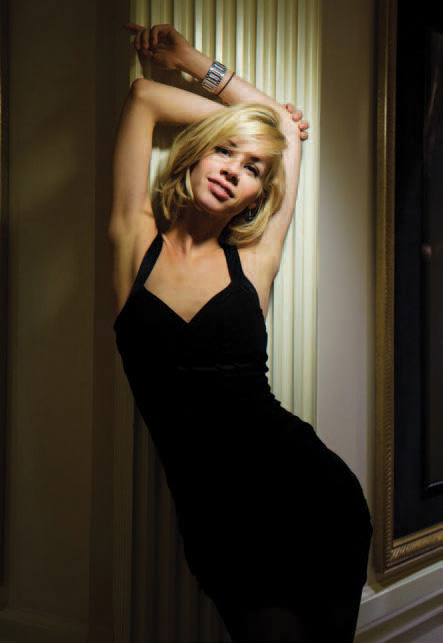
While I love the look of this light, a more contained light source, such as a video light, can create a more dramatic look. Compared to video light, bounce flash tends to flood an indoor location with light—even when the light’s directional quality is enhanced with a BFT. During the same photo session with Shawna, a hand-held video light gave me the type of lighting I wanted (plate 11-2). Plate 11-3 shows how the video light was held in relation to the model.
In the same scenario, plates 11-4 and 11-5 show what the video light gave me in comparison to what the bounce flash gave me. As a portrait, the bounce flash image isn’t particularly bad . . . but it’s not particularly interesting either—even with the beautiful Shawna in the frame. The bounce flash just opened everything too much with a flood of soft light. With the video light’s dramatic light falloff to the edges, the image is more moody and just looks more dramatic than the one with bounce flash.
Plate 11-4. Portrait with bounce flash. (
![]() second, f/2.8, 850 ISO, 24–70mm f/2.8 lens; TTL on-camera bounce flash)
second, f/2.8, 850 ISO, 24–70mm f/2.8 lens; TTL on-camera bounce flash)
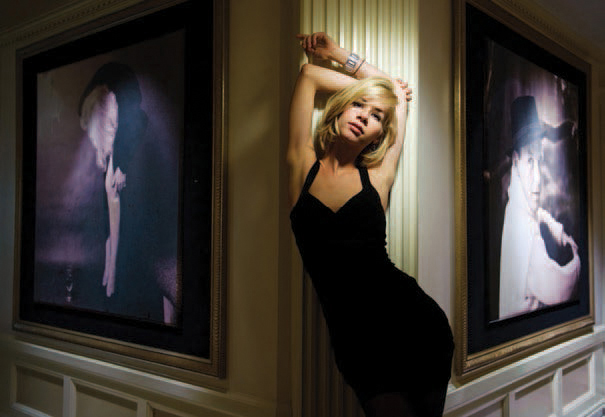
Plate 11-5. Portrait with video light. (![]() second, f/2.8, 1250 ISO, 24–70mm f/2.8 lens; Litepanels MicroPro LED video light)
second, f/2.8, 1250 ISO, 24–70mm f/2.8 lens; Litepanels MicroPro LED video light)
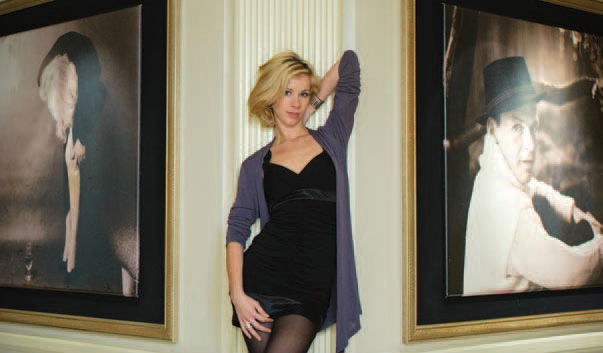
Plate 11-6 was taken in the same location, but with a different backdrop. Here, I specifically wanted the light to be feathered upward, forcing there to be less light on her chest. This accentuated her face. This “what you see is what you get” aspect is part of the appeal of using a video light for photography. You can take minute control over the direction of the light more easily than you can with on-camera bounce flash. (Of course, this minute control means you can also miss your mark; refer back to chapter 1 for some good and bad examples of video-light positioning.)
Plate 11-6. Here, the light placement was adjusted for a different emphasis. (
![]() second, f/2.8, 1250 ISO, 24–70mm f/2.8 lens; Litepanels MicroPro LED video light)
second, f/2.8, 1250 ISO, 24–70mm f/2.8 lens; Litepanels MicroPro LED video light)
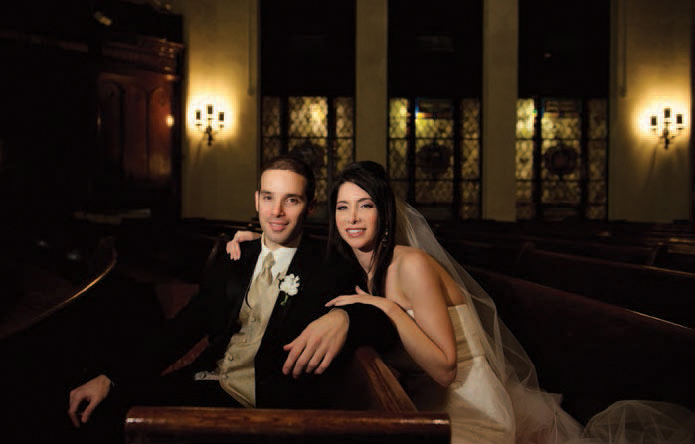
Plate 11-7. Most of Allison and Scott’s romatic portraits were created using a single video light. (
![]() second, f/2.8, 1250 ISO, 24–70mm f/2.8 lens; Lowel ID-Light)
second, f/2.8, 1250 ISO, 24–70mm f/2.8 lens; Lowel ID-Light)
For that dramatic, Hollywood look, a video light is probably the easiest thing to use—especially when you need to work quickly, like on a wedding day. With Allison and Scott’s wedding, the majority of their romantic portraits (plates 11-7 through 11–10) were taken using only a single video light, the Lowel ID-Light. For this shoot, I chose to work with the Lowel ID-Light, instead of the LitePanels MicroPro LED video light, because I wanted a video light that was stronger. I also wanted the ability to diffuse or focus the light, depending on what I needed. It was just the more flexible choice for this event.
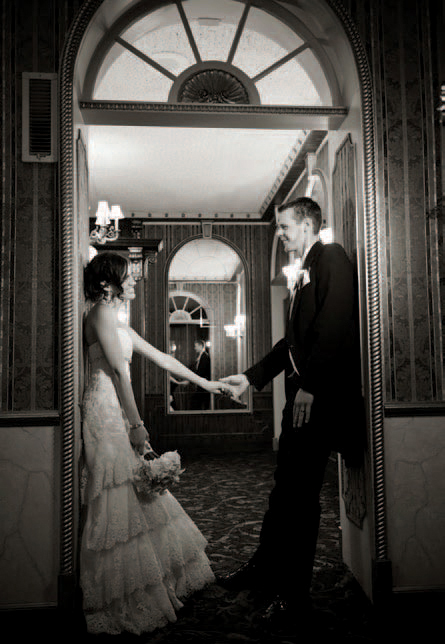
As you can see by the camera settings for these images, I needed to work at high ISO settings and wide apertures. This is because video lights are generally used in lower levels of ambient light where the look of the rapid falloff gives the lighting a dramatic look—and provides a lot of control. For example, in the passageway seen in plate 11-8, the opposing mirrors gave an infinity effect. The video light was ideal here for containing the light spill; it’s basically what made this image possible. I could have created the same image with flash, but it would have been difficult to do it in the short time available.
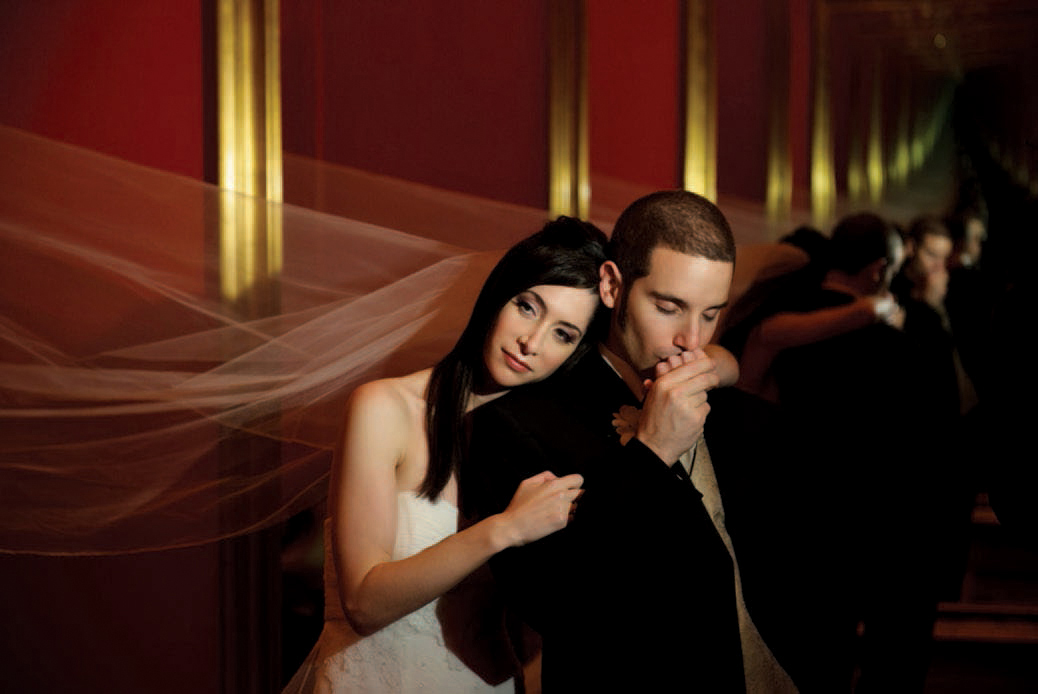
Plate 11-8. The controlled spread of the video light was useful in this mirrored hallway. (
![]() second, f/3.2, 1600 ISO, 24–70mm f/2.8 lens; Lowel ID-Light)
second, f/3.2, 1600 ISO, 24–70mm f/2.8 lens; Lowel ID-Light)
Plates 11-9 and 11-10. Reducing the intensity of the video light enabled me to hold the detail in the dark backgrounds. (![]() second, f/3.2, 1600 ISO, 24–70mm f/2.8 lens; Lowel ID-Light)
second, f/3.2, 1600 ISO, 24–70mm f/2.8 lens; Lowel ID-Light)
For plates 11-9 and 11-10, I turned down the brightness of the video light to hold the detail in the background. If I had used a brighter light on the couple, I would also have had to use a faster shutter speed, smaller aperture, or lower ISO, which would have made the background go darker—or even black.
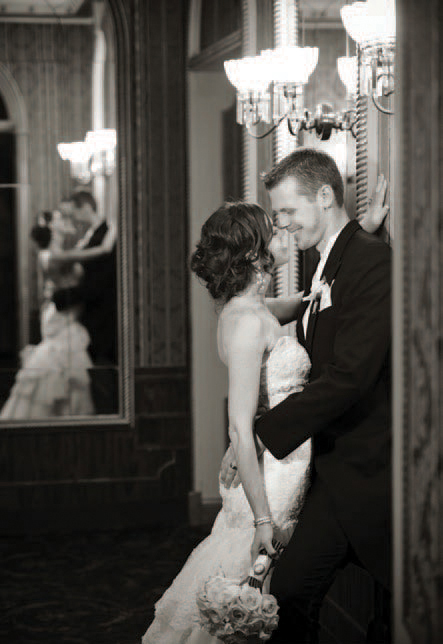
THE DRAMATIC LOOK OF VIDEO LIGHT WORKS BEAUTIFULLY WITH BLACK & WHITE PHOTOGRAPHS.
As can be seen in plates 11-11 and 11-12, images of Tatiana and Brandon at their wedding, the dramatic look of video light works beautifully with black & white photographs. If I had wanted to ease the contrast and bring in more shadow detail, it would simply have been a matter of bouncing my on-camera flash behind me. This would have to be done with the FEC turned way down—to around –3EV—so that it just acted as a fill light. The flash would also have to be gelled with a CTS or CTO gel to avoid introducing a blue tint to the fill light.
Let’s bring it all together by looking at how both bounce flash and video lighting might be used within a single photo session, increasing the variety of looks you can produce for the client.
When you work in tighter, more intimate locations, deciding whether or not to include the surroundings will greatly affect how you shoot. With this photo session of Carly-Erin (plates 11-13 through 11-16), I decided I didn’t want the location to be identifiable. Because I was shooting close and tight, the end result isn’t entirely “boudoir”—it’s a little more portrait-like. Yet, it is still sexy and intimate. That was the mood of gentle sensuality I wanted for this sequence of images. For my lighting, I ended up using either video light or bounce flash.
Plates 11-11 and 11-12. Video light works beautifully for black & white images. (![]() second, f/3.2, 1600 ISO, 24–70mm f/2.8 lens; Litepanels MicroPro LED video light)
second, f/3.2, 1600 ISO, 24–70mm f/2.8 lens; Litepanels MicroPro LED video light)
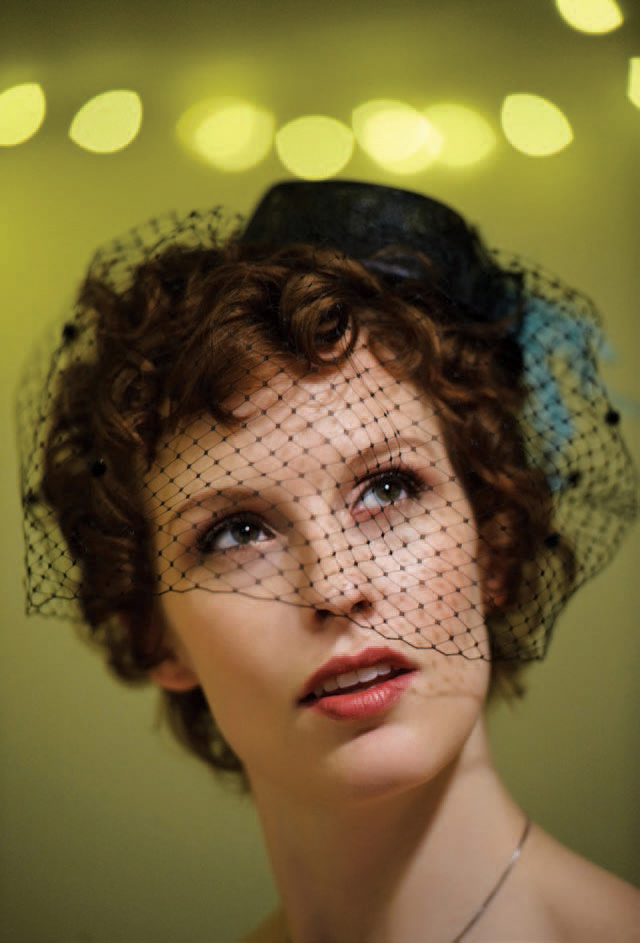
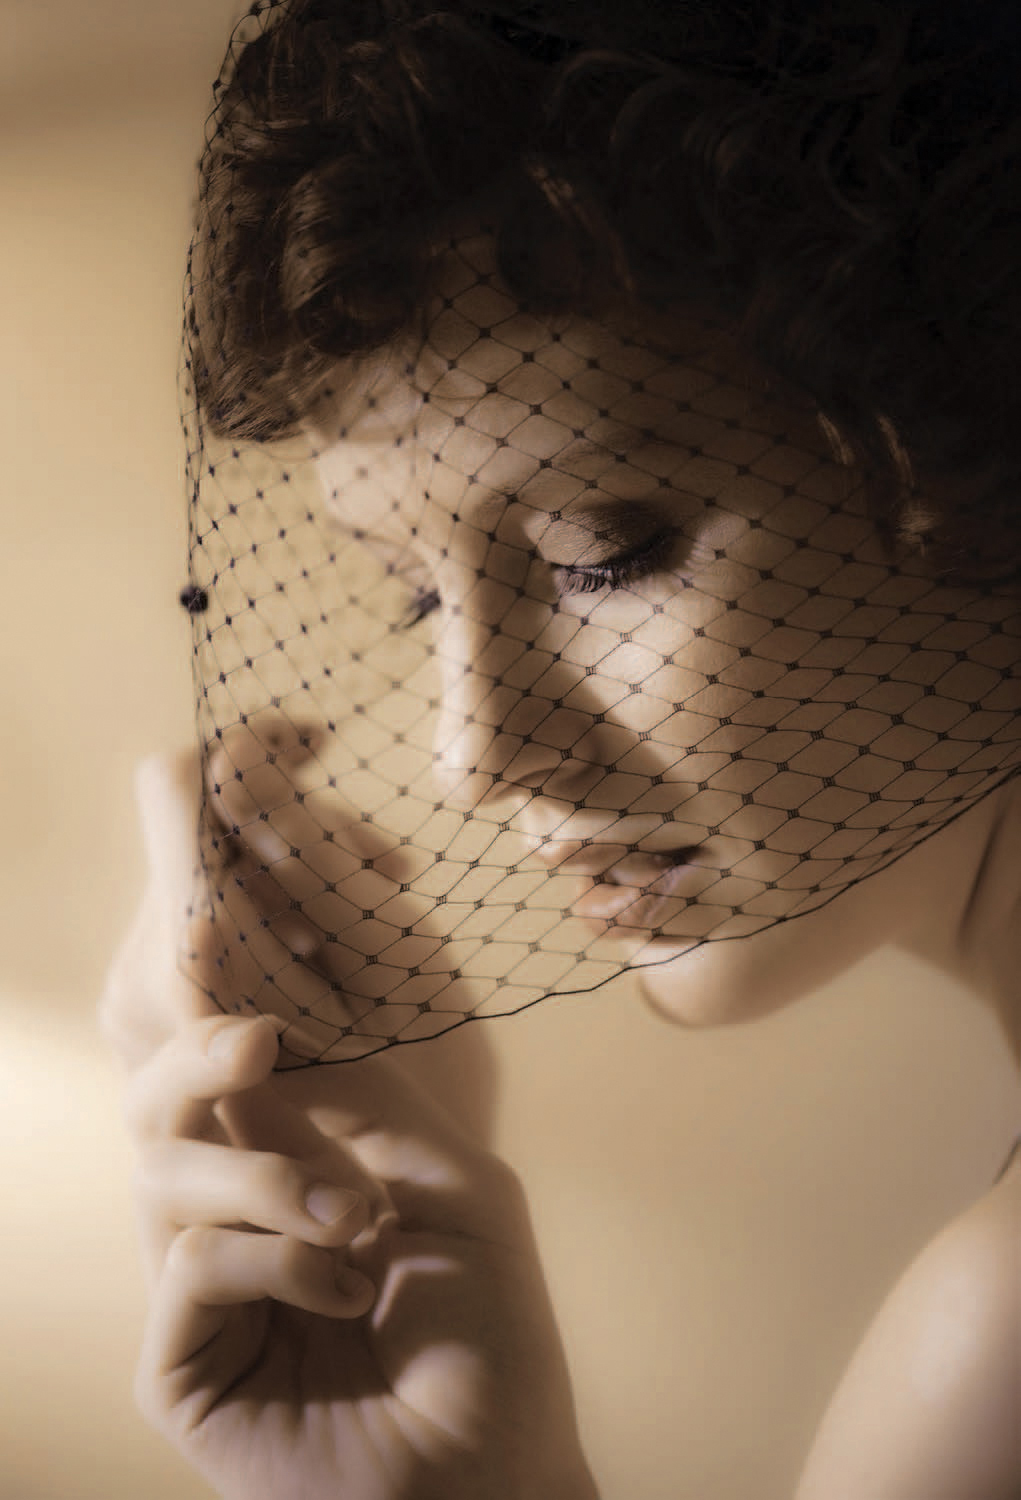
Plate 11-13. An intimate portrait shot with video lights. (![]() second, f/2.8, 1250 ISO, 70–200mm f/2.8 lens; video lights, ambient fluorescent light)
second, f/2.8, 1250 ISO, 70–200mm f/2.8 lens; video lights, ambient fluorescent light)
The photo with the birdcage veil (plate 11-13) was done with one video light on my model and another, less bright, video light on the background. The fluorescent lights in the ceiling and elsewhere in the room did register to an extent, giving a green color cast to the background. To control what I included, I used a shallow depth of field and composed the image so that the out-of-focus Christmas lights framed her.
I mostly used my 70–200mm lens in the 150–200mm range here. I tried the 85mm f/1.4 for a few images, but found that the field of view was not tight enough. For boudoir photography, I often use the 24–70mm lens (mostly at 50mm to 70mm). Then I use apertures around f/4 or wider. However, that would obviously be for less tightly framed photos.
Plate 11-14. Another video-light portrait of Carly-Erin. (![]() second, f/2.8, 1250 ISO, 70–200mm f/2.8 lens; video light)
second, f/2.8, 1250 ISO, 70–200mm f/2.8 lens; video light)
Plate 11-15. Here, I switched to bounce flash for a different look. (
![]() second, f/2.8, 1000 ISO, 70–200mm f/2.8 lens; on-camera TTL bounce flash, with BFT)
second, f/2.8, 1000 ISO, 70–200mm f/2.8 lens; on-camera TTL bounce flash, with BFT)
Plate 11-16. A wider view of an image with just the gentle sensuality I was after in this series. (![]() second, f/2.8, 1000 ISO, 70–200mm f/2.8 lens; on-camera TTL bounce flash, with BFT)
second, f/2.8, 1000 ISO, 70–200mm f/2.8 lens; on-camera TTL bounce flash, with BFT)
For the other images in the series, I continued with the shallow depth of field and often shot tight from above so that the sheets became a compositional element. Other times, I shot from a low viewpoint to eliminate what I didn’t want to include. We went a little retro with the bird-cage veil at the start of the photo session, but soon lost that for some sensual portraits.