CONCEPT 43
Layers of Butter Make Flaky Pastry
Butter makes countless baked goods taste great. But butter is also a key factor in creating a flaky texture in biscuits as well as the pastry used in tarts and pies. Knowing how to handle the butter means the difference between biscuits and pastry that are flaky and light and biscuits and pastry that are dense and heavy.
HOW THE SCIENCE WORKS
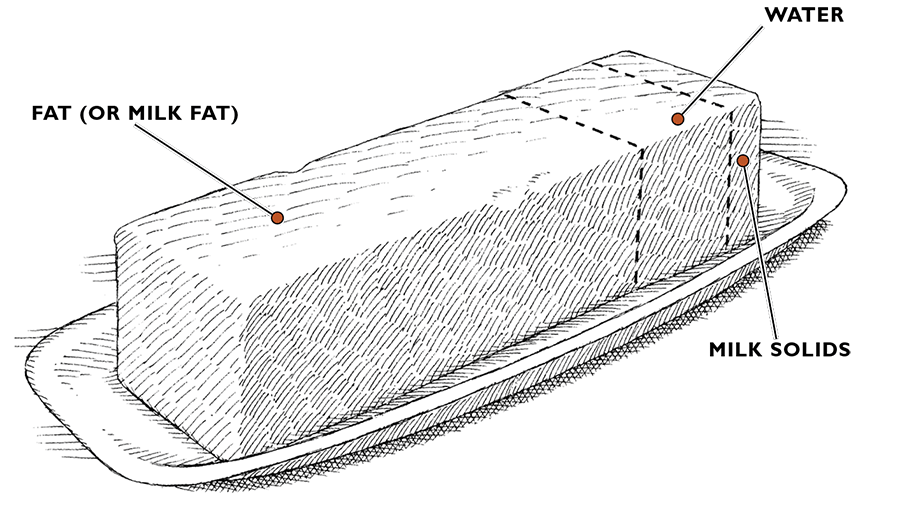
So how exactly does butter make biscuits and pastry flaky? Butter isn’t just fat—it’s fat and water. When butter is heated, the water turns to steam. This steam lifts the dough and helps create a flaky texture in biscuits, tart shells, and pie crusts. But for the steam to have a significant effect, the butter must be evenly dispersed in layers throughout the dough. This way, when the butter layers melt, the steam helps separate the super-thin layers of dough into striated flakes.
The challenge, then, is getting the butter evenly dispersed throughout the dough while still leaving it in distinct layers. If the butter becomes fully incorporated (as it does when making a cake, for instance) the flakes won’t form. Starting with cold butter is essential but handling the dough is just as important.
Let’s start with temperature. Butter begins to soften when it reaches 60 degrees Fahrenheit, begins to melt at 85 degrees, and liquefies completely by 94 degrees. When melted, butter easily works its way into the other ingredients, removing the possibility of forming layers and promoting the formation of flakes in the oven. To keep butter below the melting point while preparing biscuit and pastry doughs, we use a few different methods.
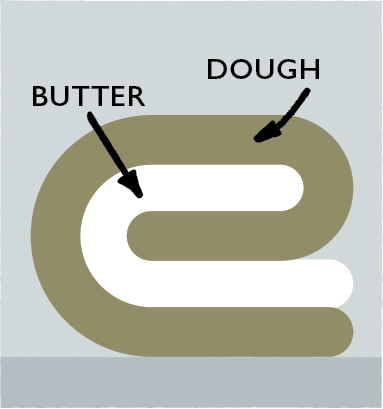
The first technique we will cover in this concept is called lamination. Puff pastry, croissants, and the flaky pastry for many tart doughs all rely on a mathematical phenomenon to achieve their many-layered structure. These so-called laminated pastries, which are made up of alternating layers of dough and fat, are created by repeatedly rolling and folding the dough over itself, typically in thirds (like a business letter). Each set of folds is called a turn, and with each turn the number of layers increases exponentially rather than linearly. Thus, the first turn gives three layers, the next seven, then 19, then 55, and so on. Just six turns creates an astonishing 1,459 layers. This process flattens the butter into thin sheets sandwiched between thin layers of flour. In the oven, the butter melts and steam fills the thin spaces left behind, creating hundreds of flaky, buttery layers.
Next, let’s discuss fraisage. This French mixing method also creates a dough with thin layers of butter that remain distinct. Fraisage refers to the process of smearing the dough with the heel of your hand, thereby spreading the butter pieces into long, thin streaks between skeletal layers of flour and water. This works especially well in tart dough, giving us a sturdy dough (because the melted butter leaves behind no gaping holes) that won’t leak fruit juices. The dough, however, is still flaky.
TEST KITCHEN EXPERIMENT
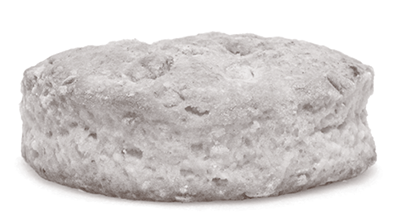
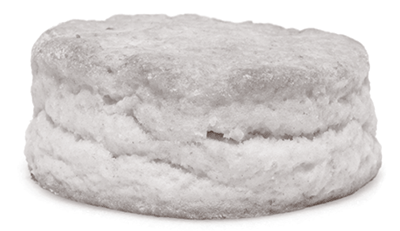
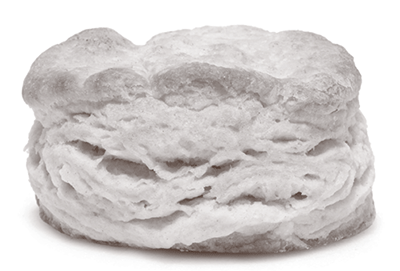
Numerous baked goods (think croissants, pie dough, and biscuits) incorporate super-thin layers of solid butter to develop a flaky texture. To illustrate the importance of getting the butter layers just right, we designed a unique experiment. We started with a traditional rolled and cut biscuit dough and treated the butter three different ways. For the first sample we used the most common method of incorporating butter: We cut cold butter into the flour (using a food processor) until it resembled pebbly pieces. We also made a batch with melted butter and another where we cut thin slices of cold butter and pressed them between well-floured fingers until they resembled nickels. We formed identical doughs with each batch from which we then rolled and cut biscuits.
THE RESULTS
A post-baking lineup told the whole story. The melted-butter biscuits sat squat, dense, and uniform next to the moderately flaky traditional biscuits, both of which paled in comparison to the height and flakiness of the biscuits made with the thin pieces of butter.
THE TAKEAWAY
The key to making flaky biscuits is to get layers of solid fat spread between the layers of dough. This way, the thin layers of fat (butter) will melt when they hit the hot oven. And because butter is part fat and part water, the water turns to steam, filling the now-empty spaces between the dough, and giving rise to flaky layers.
Melted butter, on the other hand, is incapable of forming discrete layers of solid fat between layers of dough; this is why our biscuits made with melted butter turned out dense and flat. Similarly, the standard pebbles of butter can’t begin to form layers of fat between layers of dough until they soften enough to spread out. Even when they do start to spread in the oven, the softening pebbles can’t spread far enough, forming only small regions of fat that will not give rise to much flakiness at all.
The lesson? If flaky biscuits or pastries are what you desire, be sure to use techniques like lamination or fraisage to get thin, long layers of solid fat in the dough.
LAMINATION AT WORK
BISCUITS AND SCONES
Rolling and folding the dough creates a multilayered structure that generates tremendous rise. Lamination is used in everything from puff pastry and croissants to simple items like biscuits and scones.
FLAKY BUTTERMILK BISCUITS
MAKES 12 BISCUITS
The dough is a bit sticky when it comes together and during the first set of turns. Note that you will use up to 1 cup of flour for dusting the work surface, dough, and rolling pin to prevent sticking. Be careful not to incorporate large pockets of flour into the dough when folding it over. When cutting the biscuits, press down with firm, even pressure; do not twist the cutter.
|
2½
|
cups (12½ ounces) all-purpose flour
|
|
1
|
tablespoon baking powder
|
|
½
|
teaspoon baking soda
|
|
1
|
teaspoon salt
|
|
2
|
tablespoons vegetable shortening, cut into ½-inch chunks
|
|
8
|
tablespoons unsalted butter, chilled, lightly floured, and cut into 1⁄8-inch slices plus 2 tablespoons melted and cooled
|
|
1¼
|
cups buttermilk, chilled
|
1. Adjust oven rack to lower-middle position and heat oven to 450 degrees. Whisk flour, baking powder, baking soda, and salt together in large bowl.
2. Add shortening to flour mixture; break up chunks with fingertips until only small, pea-size pieces remain. Working with few butter slices at a time, drop butter slices into flour mixture and toss to coat. Pick up each slice of butter and press between well-floured fingertips into flat, nickel-size pieces. Repeat until all butter is incorporated, then toss to combine. Freeze mixture (in bowl) until chilled, about 15 minutes, or refrigerate for about 30 minutes.
3. Spray 24-inch-square area of counter with vegetable oil spray; spread spray evenly across surface with clean kitchen towel or paper towel. Sprinkle 1⁄3 cup flour across sprayed area, then gently spread flour across work surface with palm to form thin, even coating. Add 1 cup plus 2 tablespoons buttermilk to flour mixture. Stir briskly with fork until ball forms and no dry bits of flour are visible, adding remaining 2 tablespoons buttermilk as needed (dough will be sticky and shaggy but should clear sides of bowl). With rubber spatula, transfer dough onto center of prepared counter, dust surface lightly with flour, and, with floured hands, bring dough together into cohesive ball.
4. Pat dough into approximate 10-inch square, then roll into 18 by 14-inch rectangle about ¼ inch thick, dusting dough and rolling pin with flour as needed. Use bench scraper or thin metal spatula to fold dough into thirds, brushing any excess flour from surface of dough. Lift short end of dough and fold in thirds again to form approximate 6 by 4-inch rectangle. Rotate dough 90 degrees, dusting counter underneath with flour, then roll and fold dough again, dusting with flour as needed.
5. Roll dough into 10-inch square about ½ inch thick. Flip dough over and cut nine 3-inch rounds with floured 3-inch biscuit cutter, dipping cutter back into flour after each cut. Carefully invert and transfer rounds to ungreased baking sheet, spacing them 1 inch apart. Gather dough scraps into ball and roll and fold once or twice until scraps form smooth dough. Roll dough into ½-inch-thick round and cut 3 more 3-inch rounds and transfer to baking sheet. Discard excess dough.
6. Brush biscuit tops with melted butter. Bake, without opening oven door, until tops are golden brown and crisp, 15 to 17 minutes. Let cool on baking sheet for 5 to 10 minutes before serving.
 WHY THIS RECIPE WORKS
Truly flaky biscuits have become scarce, while their down-market imitators (think supermarket “tube” biscuits) are alarmingly common. We wanted to achieve a really flaky—not fluffy—biscuit, with a golden, crisp crust surrounding striated layers of tender, buttery dough. While ingredients (lard versus butter, buttermilk versus milk, and so on) influence texture and flavor, we discovered that the secret to the fluffy/flaky distinction is how the ingredients are handled: Flaky butter equals flaky biscuits.
MAKE LARGE FLAKES When we make pie crusts, we usually cut the butter into cubes, and then put them in the food processor along with the other dry ingredients, turning the butter into small pebbles. The pebble shape is ideal for the small, irregular flakes in a pie crust but not for the pronounced layers we need in a biscuit. Instead, we get “flaky” butter by abandoning the food processor, slicing the butter into very thin squares, and—instead of cutting the squares into the flour with a pastry blender—we press each piece onto the flour with our fingers, breaking them into flat, flaky pieces about the size of a nickel. This is exactly what we want for a biscuit; as we roll out the dough we can see the butter develop into long, thin sheets.
ADD SHORTENING Swapping out some butter for some shortening has a tenderizing effect. Why? For one, butter contains 16 to 18 percent water while shortening is all fat. The use of shortening, then, reduces the level of hydration in the biscuits. (Shortening likewise contains a higher amount of unsaturated oil than butter, which has a higher level of saturated fats. The higher level of liquid oil in the room-temperature shortening more effectively coats the protein in the flour, also reducing the level of hydration.) Less hydration means less gluten formation (see concept 38). A weaker gluten network helps to produce a more tender biscuit.
USE TWO LEAVENERS We use both baking soda and baking powder to leaven our biscuits. The baking soda reacts with the acidic buttermilk in the dough, producing carbon dioxide and helping the biscuits to rise immediately. More importantly, if the baking soda was not added to neutralize the acid in the buttermilk, then the acid would reduce the leavening capability of the baking powder. The baking powder adds its leavening power as soon as the biscuits hit the heat of the oven. (See concept 42 for more on leaveners.) Also, the baking soda reacts with the acidic buttermilk to take the edge off of its flavor, which can become almost too tangy.
CHILL WELL Don’t let the flakes of butter melt. If they soften and mix with the flour during the series of folds, the result will be biscuits that are short and crumbly instead of crisp and flaky. We don’t have the luxury of resting our dough in the refrigerator to firm up the butter because the baking soda in the dough begins reacting the moment the liquid and dry ingredients come together. Chilling the mixing bowl and all of the ingredients (instead of just the butter) before mixing buys us the time needed to complete all of the necessary turns with the cold butter intact.
CREATE A NONSTICK COUNTER Biscuit dough is a Catch-22. It needs to be wet—a dry dough makes a dry biscuit—but it also needs to be rollable. We don’t want to scatter too much flour on the surface of the counter, because then the wet dough will absorb the extra flour and no longer be wet. The solution? We give the countertop a quick blast from a can of vegetable oil spray. It helps the flour adhere more evenly to the counter, letting our dough release easily, and without much flour sticking to it.
PRESS, DON’T TWIST To cut the biscuits, flour your biscuit cutter, dipping it back into the flour after each cut. We invert the biscuits onto the baking sheet with the flat underside on top so that they will rise more evenly. Do not twist the biscuit cutter as you cut the dough. Twisting can seal the edges of the biscuit and prevent it from rising. Press gently.
BLUEBERRY SCONES
MAKES 8 SCONES
It is important to work the dough as little as possible—work quickly and knead and fold the dough only the number of times called for or the scones will turn out tough, rather than tender. The butter should be frozen solid before grating. In hot or humid environments, chill the flour mixture and mixing bowls before use. While this recipe calls for two whole sticks of butter, only 10 tablespoons are actually used (see step 1). If fresh berries are unavailable, an equal amount of frozen berries, not thawed, can be substituted. An equal amount of raspberries, blackberries, or strawberries can be used in place of the blueberries. Cut larger berries into ¼- to ½-inch pieces before incorporating. Serve with Homemade Clotted Cream (recipe follows), if desired.
|
16
|
tablespoons unsalted butter (2 sticks), frozen
|
|
7½
|
ounces (1½ cups) blueberries
|
|
½
|
cup whole milk
|
|
½
|
cup sour cream
|
|
2
|
cups (10 ounces) all-purpose flour
|
|
½
|
cup (3½ ounces) plus 1 tablespoon sugar
|
|
2
|
teaspoons baking powder
|
|
¼
|
teaspoon baking soda
|
|
½
|
teaspoon salt
|
|
1
|
teaspoon grated lemon zest
|
1. Adjust oven rack to middle position and heat oven to 425 degrees. Line baking sheet with parchment paper. Remove half of wrapper from each stick of frozen butter. Grate unwrapped ends (half of each stick) on large holes of box grater (you should grate total of 8 tablespoons). Place grated butter in freezer until needed. Melt 2 tablespoons remaining ungrated butter and set aside. Save remaining 6 tablespoons butter for another use. Place blueberries in freezer until needed.
2. Whisk milk and sour cream together in medium bowl; refrigerate until needed. Whisk flour, ½ cup sugar, baking powder, baking soda, salt, and lemon zest together in medium bowl. Add frozen grated butter to flour mixture and toss with fingers until butter is thoroughly coated.
3. Add milk mixture to flour mixture and fold with rubber spatula until just combined. Using spatula, transfer dough to liberally floured counter. Dust surface of dough with flour and with floured hands, knead dough 6 to 8 times, until it just holds together in ragged ball, adding flour as needed to prevent sticking.
4. Roll dough into approximate 12-inch square. Fold dough into thirds like a business letter, using bench scraper or metal spatula to release dough if it sticks to counter. Lift short ends of dough and fold into thirds again to form approximate 4-inch square. Transfer dough to plate lightly dusted with flour and chill in freezer for 5 minutes.
5. Transfer dough to floured counter and roll into approximate 12-inch square again. Sprinkle blueberries evenly over surface of dough, then press down so they are slightly embedded in dough. Using bench scraper or thin metal spatula, loosen dough from counter. Roll dough into cylinder, pressing to form tight log. Arrange log seam side down and press into 12 by 4-inch rectangle. Using sharp, floured knife, cut rectangle crosswise into 4 equal rectangles. Cut each rectangle diagonally to form 2 triangles and transfer to prepared baking sheet.
6. Brush tops with melted butter and sprinkle with remaining 1 tablespoon sugar. Bake until tops and bottoms are golden brown, 18 to 25 minutes. Transfer to wire rack and let cool for at least 10 minutes before serving.
TO MAKE AHEAD: After placing scones on baking sheet in step 5, either refrigerate them overnight or freeze for up to 1 month. When ready to bake, for refrigerated scones, heat oven to 425 degrees and follow directions in step 6. For frozen scones, do not thaw, heat oven to 375 degrees, and follow directions in step 6, extending cooking time to 25 to 30 minutes.
HOMEMADE CLOTTED CREAM
MAKES 2 CUPS
Ultra-pasteurized heavy cream can be substituted but the resulting cream will not be as flavorful and tangy. This recipe can be halved or doubled as needed.
|
1½
|
cups pasteurized (not ultra-pasteurized) heavy cream
|
|
½
|
cup buttermilk
|
Combine cream and buttermilk in jar or measuring cup. Stir, cover, and let stand at room temperature until mixture has thickened to consistency of softly whipped cream, 12 to 24 hours. Refrigerate; cream will continue to thicken as it chills. (Clotted cream can be refrigerated for up to 10 days.)
 WHY THIS RECIPE WORKS
For our ultimate blueberry scone recipe, we wanted to bring together the sweetness of a coffeehouse confection, the moist freshness of a muffin, the richness of clotted cream and jam, and the super-flaky crumb of a good biscuit. Increasing the amount of butter and adding enough sugar gave the scones sweetness without making them cloying. Cutting frozen butter into the flour and giving the dough a few folds helped the scones rise. Rolling out the dough, pressing the berries into it, and then rolling it up again before flattening to cut out the scones also contributed to making this our ideal scone recipe.
FOLD THE DOUGH We take a hint from puff pastry, where the power of steam is used to separate super-thin layers of dough into striated flakes. In a standard puff pastry recipe, a piece of dough will be turned, rolled, and folded about five times. With each fold, the number of layers of butter and dough increases exponentially. Upon baking, steam forces the layers apart and then escapes, causing the dough to puff up and crisp. We aren’t after the hundreds of layers produced by the standard five-turn puff pastry recipe here, but adding a few quick folds to our recipe allows the scones to gently rise and puff.
GRATE THE BUTTER A good light pastry depends on distinct pieces of butter distributed throughout the dough that melt during baking and leave behind pockets of air. For this to happen, the butter needs to be as cold and solid as possible until baking. The problem with trying to cut butter into the flour with your fingers or a food processor is that the butter gets too warm during the distribution process. We find that freezing sticks of butter and grating them on the large holes of a box grater works best. We start with two sticks of butter, but then, using the wrapper to hold the frozen butter, grate only 4 tablespoons from each.
GET THE FLAVOR RIGHT Too often, berries weigh down scones and impart little flavor. Starting with traditional scone recipes, we increase the amounts of sugar and butter to add sweetness and richness; a combination of whole milk and sour cream lends more richness as well as tang.
ADD BLUEBERRIES Adding the blueberries to the dry ingredients means they get mashed when we mix the dough, but when we add them to the already-mixed dough, they ruin our pockets of butter. The solution is pressing the berries into the dough, rolling the dough into a log, then pressing the log into a rectangle and cutting the scones. You can use fresh or frozen berries.
CREATE A CRISP TOP Brush the tops of the scones with melted butter, and sprinkle them with sugar, before baking to help form a crisp top.
FRAISAGE AT WORK
TARTS
You can “turn” the dough to create thin layers of butter and flour or you can use a French mixing technique called fraisage to create a similar effect. In this case, you roll the dough but don’t fold or turn it. This works well with doughs that must be rolled thin to create a tart or galette—these thin doughs would be tricky to fold.
FREE-FORM FRUIT TART
SERVES 6
Taste the fruit before adding sugar to it; use the lesser amount if the fruit is very sweet, more if it is tart. However much sugar you use, do not add it to the fruit until you are ready to fill and form the tart. Serve with vanilla ice cream or whipped cream.
|
DOUGH
|
|
1½
|
cups (7½ ounces) all-purpose flour
|
|
½
|
teaspoon salt
|
|
10
|
tablespoons unsalted butter, cut into ½-inch pieces and chilled
|
|
4–6
|
tablespoons ice water
|
|
FILLING
|
|
1
|
pound peaches, nectarines, apricots, or plums, halved, pitted, and cut into ½-inch wedges
|
|
5
|
ounces (1 cup) blueberries, raspberries, or blackberries
|
|
4–6
|
tablespoons sugar
|
1. FOR THE DOUGH: Process flour and salt in food processor until combined, about 5 seconds. Scatter butter over top and pulse until mixture resembles coarse bread crumbs and butter pieces are about size of small peas, about 10 pulses. Continue to pulse, adding water 1 tablespoon at a time, until dough begins to form small curds that hold together when pinched with fingers (dough will be crumbly), about 10 pulses.
2. Turn dough crumbs onto lightly floured counter and gather into rectangular-shaped pile. Starting at farthest end, use heel of hand to smear small amount of dough against counter. Continue to smear dough until all crumbs have been worked. Gather smeared crumbs together in another rectangular-shaped pile and repeat process. Press dough into 6-inch disk, wrap it tightly in plastic wrap, and refrigerate for 1 hour. Before rolling dough out, let it sit on counter to soften slightly, about 10 minutes. (Dough can be wrapped tightly in plastic and refrigerated for up to 2 days or frozen for up to 1 month. If frozen, let dough thaw completely on counter before rolling it out.)
3. Roll dough into 12-inch circle between 2 large sheets of floured parchment paper. (If dough sticks to parchment, gently loosen and lift sticky area with bench scraper and dust parchment with additional flour.) Slide dough, still between parchment sheets, onto rimmed baking sheet and refrigerate until firm, 15 to 30 minutes. (If refrigerated longer and dough is hard and brittle, let stand at room temperature until pliant.)
4. FOR THE FILLING: Adjust oven rack to middle position and heat oven to 375 degrees. Gently toss fruit and 3 to 5 tablespoons sugar together in bowl. Remove top sheet of parchment paper from dough. Mound fruit in center of dough, leaving 2½-inch border around edge of fruit. Being careful to leave ½-inch border of dough around edge of fruit, fold outermost 2 inches of dough over fruit, pleating it every 2 to 3 inches as needed; gently pinch pleated dough to secure, but do not press dough into fruit. Working quickly, brush top and sides of dough with water and sprinkle evenly with remaining 1 tablespoon sugar.
5. Bake until crust is deep golden brown and fruit is bubbling, about 1 hour, rotating baking sheet halfway through baking. Transfer tart with baking sheet to wire rack and let cool for 10 minutes, then use parchment to gently transfer tart to wire rack. Use metal spatula to loosen tart from parchment and remove parchment. Let tart cool on rack until juices have thickened, about 25 minutes; serve slightly warm or at room temperature.
FREE-FORM SUMMER FRUIT TARTLETS
MAKES 4 TARTLETS
Divide dough into 4 equal portions before rolling out in step 3. Roll each portion into 7-inch circle on parchment paper; stack rounds and refrigerate until firm. Continue with recipe from step 4, mounding one-quarter of fruit in center of dough round, leaving 1½-inch border around edge. Being careful to leave ¼-inch border of dough around edge of fruit, fold outermost 1 to 1¼ inches of dough over fruit. Transfer parchment with tart to rimmed baking sheet. Repeat with remaining fruit and dough. Brush dough with water and sprinkle each tartlet with portion of remaining 1 tablespoon sugar. Bake until crust is deep golden brown and fruit is bubbling, 40 to 45 minutes, rotating baking sheet halfway through baking.
 WHY THIS RECIPE WORKS
We wanted a simple take on summer fruit pie, one without the rolling and fitting usually required for a traditional pie or tart. A free-form tart—a single layer of buttery pie dough folded up around fresh fruit—seemed the obvious solution. But without the support of a pie plate, tender crusts are prone to leaking juice, and this can result in a soggy bottom. For our crust, we used a high proportion of butter to flour, which provided the most buttery flavor and tender texture without compromising the structure. We then turned to the French fraisage method to make the pastry sturdy yet flaky.
CREATE STRONG BUT FLAKY DOUGH Using too much butter in our crust results in a weak, leaky crust. Too little and we get a crust that is crackerlike and edging toward tough. We settle on 10 tablespoons for 1½ cups of flour. But just as important as the amount of butter is the mixing method. We tried mixing the dough in a food processor, with a stand mixer, and by hand. We found that the latter two methods mashed the butter into the flour and produced a less flaky crust. Quick pulses with the food processor, however, “cut” the butter into the flour so that it remains in distinct pieces. We mix the butter to be about the size of coarse bread crumbs—just big enough to create the steamed spaces needed for flakiness.
SMEAR THE DOUGH Fraisage is a French method of making pastry and involves smearing the dough with the heel of the hand. This spreads the butter pieces into long streaks between thin layers of flour and water.
DON’T ADD SUGAR OR LEMON We tried adding sugar and lemon juice to the crust dough, but lemon juice made the crust too tender, as acid weakens the gluten structure in dough. Sugar improved the flavor of the crust but was detrimental to the texture, even a small amount making it brittle. We sprinkle sugar on top of the dough before baking instead.
KEEP THE FILLING SIMPLE There is no butter needed in our simple fruit filling. We use just ripe fruit sprinkled with 3 to 5 tablespoons of sugar (depending on the type of fruit and its natural sweetness). Though we prefer a tart made with a mix of stone fruits and berries (our favorite combinations are plums and raspberries, peaches and blueberries, and apricots and blackberries), you can use only one type of fruit if you prefer. Peeling the stone fruit (even the peaches) is not necessary. (For more on sugar and fruit, see concept 49.)
ROLL AND FOLD We roll out the dough to about the height of three stacked quarters (or 3⁄16 inch). This is thick enough to contain a lot of fruit but thin enough to bake evenly and thoroughly. After mounding the fruit in the center, leaving a 2½-inch border, we lift the dough up and back over the fruit (leaving the center of the tart exposed) and loosely pleat the dough to allow for shrinkage.
USE HOT OVEN, COOL ON A RACK When testing this recipe, we baked it on the center rack of the oven at 350, 375, 400, and 425 degrees. Baking at the lowest temperature took too long; it also dried out the fruit and failed to brown the crust. At too high a temperature, the crust darkened on the folds but remained pale and underdone in the creases, and the fruit became charred. Setting the oven to 375 degrees generates the ideal time and temperature for an evenly baked, flaky tart. The last small but significant step toward a crisp crust is to cool the tart directly on a wire rack; this keeps the crust from steaming itself as it cools.
APPLE GALETTE
SERVES 10 TO 12
The most common brands of instant flour are Wondra and Shake & Blend; they are sold in canisters in the baking aisle. The galette can be made without instant flour, using 2 cups of all-purpose flour and 2 tablespoons of cornstarch; however, you might have to increase the amount of ice water. Serve with vanilla ice cream or whipped cream.
|
DOUGH
|
|
1½
|
cups (7½ ounces) all-purpose flour
|
|
½
|
cup (2½ ounces) instant flour
|
|
½
|
teaspoon salt
|
|
½
|
teaspoon sugar
|
|
12
|
tablespoons unsalted butter, cut into ¼-inch pieces and chilled
|
|
7–9
|
tablespoons ice water
|
|
TOPPING
|
|
1½
|
pounds Granny Smith apples, peeled, cored, halved, and sliced 1⁄8 inch thick
|
|
2
|
tablespoons unsalted butter, cut into ¼-inch pieces
|
|
¼
|
cup (1¾ ounces) sugar
|
|
3
|
tablespoons apple jelly
|
1. FOR THE DOUGH: Process all-purpose flour, instant flour, salt, and sugar together in food processor until combined, about 5 seconds. Scatter butter over top and pulse until mixture resembles coarse cornmeal, about 15 pulses. Continue to pulse, adding water 1 tablespoon at a time until dough begins to form small curds that hold together when pinched with fingers (dough will be crumbly), about 10 pulses.
2. Turn dough crumbs onto lightly floured counter and gather into rectangular-shaped pile. Starting at farthest end, use heel of hand to smear small amount of dough against counter. Continue to smear dough until all crumbs have been worked. Gather smeared crumbs together in another rectangular-shaped pile and repeat process. Press dough into 4-inch square, wrap it tightly in plastic wrap, and refrigerate for 1 hour. Before rolling dough out, let it sit on counter to soften slightly, about 10 minutes. (Dough can be wrapped tightly in plastic and refrigerated for up to 2 days or frozen for up to 1 month. If frozen, let dough thaw completely on counter before rolling it out.)
3. Adjust oven rack to middle position and heat oven to 400 degrees. Cut piece of parchment paper to measure exactly 16 by 12 inches. Roll dough out over parchment, dusting with flour as needed, until it just overhangs parchment. Trim edges of dough even with parchment. Roll outer 1 inch of dough up to create ½-inch-thick border. Slide parchment with dough onto baking sheet.
4. FOR THE TOPPING: Starting in 1 corner of tart, shingle apple slices into crust in tidy diagonal rows, overlapping them by one-third. Dot with butter and sprinkle evenly with sugar. Bake tart until bottom is deep golden brown and apples have caramelized, 45 minutes to 1 hour, rotating baking sheet halfway through baking.
5. Melt jelly in small saucepan over medium-high heat, stirring occasionally to smooth out any lumps. Brush glaze over apples and let tart cool slightly on sheet for 10 minutes. Slide tart onto large platter or cutting board and slice tart in half lengthwise, then crosswise into square pieces. Serve warm or at room temperature.
 WHY THIS RECIPE WORKS
The French tart known as an apple galette should have a flaky crust and a substantial layer of nicely shingled sweet caramelized apples. But it’s challenging to make a crust strong enough to hold the apples and still be eaten out of hand—most recipes create a crust that is tough, crackerlike, and bland. Our ideal galette has the buttery flakiness of a croissant but is strong enough to support a generous layer of caramelized apples. Choosing the right flour, and using fraisage, gives us exactly what we want.
INSTANT FLOUR Even when we used fraisage to make our dough tender and flaky, we found that when using all-purpose flour, it just wasn’t tender enough. Switching up the flours—and therefore the protein content of the flour—helped. All-purpose flour has a protein content ranging from 10 to 12 percent. When mixed with water, the proteins (gliadin and glutenin) in flour create a stronger, more elastic protein called gluten (see concept 38). The higher the gluten content, the stronger and tougher the dough. Pastry flour, with a 9 percent protein content, made a big difference. But pastry flour is not widely available. Cake flour, with an 8 percent protein content, turned our crust crumbly, however. (It turns out that cake flour goes through a bleaching process with chlorine gas that affects how its proteins and starch combine with water. As a result, weaker gluten is formed—perfect for a delicate cake but not for a pastry that must be tender and sturdy.) The answer? Instant flour. Instant flour is made by slightly moistening all-purpose flour with water. After being spray-dried, the tiny flour granules look like small clusters of grapes. Since these aggregated flour granules are larger than those of finer-ground all-purpose flour, they absorb less water, making it harder for the proteins to form gluten. Replacing ½ cup of all-purpose with instant flour gives us dough that is tender but sturdy enough to cut neat slices of galette that can be eaten out of hand.
ROLL, TRIM, AND TUCK To make the rectangular pastry, first roll out the dough over a floured piece of parchment paper cut to 16 by 12 inches. Dust with more flour as needed. Trim the dough to fit and then roll up 1 inch of each edge, pinching firmly with your fingers to create a solid border.
SHINGLE AND GLAZE Although any apples will work in this recipe, we prefer Granny Smith. To arrange the apples, start in one corner and shingle to form even rows, overlapping by about one-third. The apples are sugared and dotted with butter. (Apples can be drier than summer fruits like the ones in our Free-Form Fruit Tart, and they benefit from some fat as well as some sugar.) Although not all galette recipes call for it, many brush hot-out-of-the-oven tarts with apple jelly. This glaze provides an attractive sheen and helps to reinforce the apple flavor.
USE PARCHMENT AND FAIRLY HOT OVEN This big galette requires a more precise shape than a free-form tart. Using the parchment as a guide (as well as to move the tart around the kitchen) is helpful. We bake the tart at 400 degrees, a temperature that strikes the right balance between intensely caramelized and simply burnt.
