THE THOUGHT PROCESS
George Stidworthy, writing in Rifle magazine, emphasized the need for the shooter to carefully observe all the wind indicators and combine this information with an “objective appraisal of the results of the last shot.”1 This ability to focus on the indicators in detail is echoed throughout the writings of wind-reading experts. The ability to assess the results of the last shot in a dispassionate way is an equally important skill. The shooter needs to follow a logical process of observation and assessment, with no interference from the distractions that an emotional reaction to the outcome of a shot can produce.
In running our courses and teaching many shooters how to read the wind, we have found that very few shooters follow a logical, step-by-step process. Some have a process but are not aware of it, and so they apply it inconsistently. Most make a series of guesses, making virtually every shot a sighter. Some just go off their last shot, resulting in their chasing conditions and chasing errors.
The purpose of this overall procedure and thought process is to help the shooter develop a consistent method of “wind thinking” and decision making. There are two parts to the thought process.
1. The first part helps you to develop a game plan for this shoot and to come to a decision about the sight setting you will use to fire your first shot.2 This procedure prior to the first shot of the match is extensive. It requires an assessment of the range facility, an estimation of the conditions, and a game plan for the match, as well as picking the sight setting you will use for your first sighter.
2. Following the first shot of a given match, the procedure focuses on identifying changes, and for each subsequent shot you have more and better data on which to base your decisions.
Step 1: Observe Conditions
If the range is new to you, you should visit it several times to observe conditions prior to the first time you have an opportunity to fire on it. Find out whether the range is situated in a location that would affect the wind conditions, such as near a body of water. Try to picture where the predominant wind would enter the range, and then picture other possible wind directions. Notice whether there are any barriers (man-made or natural) that would affect the wind. Look at the lay of the land to see if the topography would affect the flow of the wind as it crosses the range floor. Notice if there are any windbreaks along the edges of the range. Look for wind indicators—the flags or flora that would likely provide an accurate reading of conditions you will need to shoot.
On match day, it is absolutely necessary to arrive at your firing point at least 20 to 30 minutes early. Get all the administration out of the way (target assignment, etc.), get lined up behind your firing point, and start analyzing the wind. You are looking to come to two conclusions:
1. What is my game plan for this shoot?
2. What is my initial sight setting for my first shot?
Here are some of the things you need to consider:3
• Decide on the flags you are going to use: for direction, one flag blowing directly at you or directly away from you; and for speed, one or more flags that are upwind and blowing at 90 degrees to your line of sight. Study these flags, memorizing their positions relative to the poles they are attached to, or to some distant horizon or tree line.
• Get your wind meter out and start watching the speed.
• Look for the high and low speeds and values to establish the bookends.
• Get your scope out and study the mirage. Look at it near the firing line, at midrange, and at the targets. Study how the mirage compares to the flags.
• Decide on the primary condition, and memorize what it looks like on the flags.
• Determine what the secondary condition is, and memorize what it looks like on the flags.
• Run a stopwatch to determine how long the primary condition lasts and, when the condition changes, record how long it takes to return to the primary condition.
Pat Vamplew is a double-gold Pan Am medalist, as well as a champion with many other shooting accomplishments. He is also a world-class wind reader and is well known for showing up at the firing point at least one relay ahead, with spotting scope and lawn chair in hand, to study the conditions.
David Tubb uses a similar tactic. He uses his stopwatch to mark the arrival of a significant condition change and then waits to see how long it takes for the cycle to change and return. He watches the cycle: the wind builds up, peaks, drops off, bottoms out, and then builds up again. He times the duration of the cycle, he says, “so I can anticipate these big changes.”4
Charles F. Young advises: “Look for where points are being lost. Is that all around the aiming marks, or is it predominantly left and right? The latter tends to suggest rapidly changing wind speeds, but the former suggests steady winds.”5
“This all falls in the category of reconnaissance, and we know that time spent on that is never wasted.”6
Step 2: Convert Conditions to Sight Settings
Now that you fully understand what the conditions look like, start converting the conditions to measurements that you can use to set your sights. Start with your observations of the flags, the mirage, and the other objects, as well as the wind speed that you measured with your wind meter. Talk to other shooters and ask them what they are thinking about the wind. Watch the current relay of shooters, and when the wind whips up to the maximum bookend (or lets off to the minimum bookend), see if you can get an idea, from their shot placement, just how much wind change there was. Use charts and your previous shooting records to identify the value in minutes of your bookends, your primary condition, and your secondary condition.
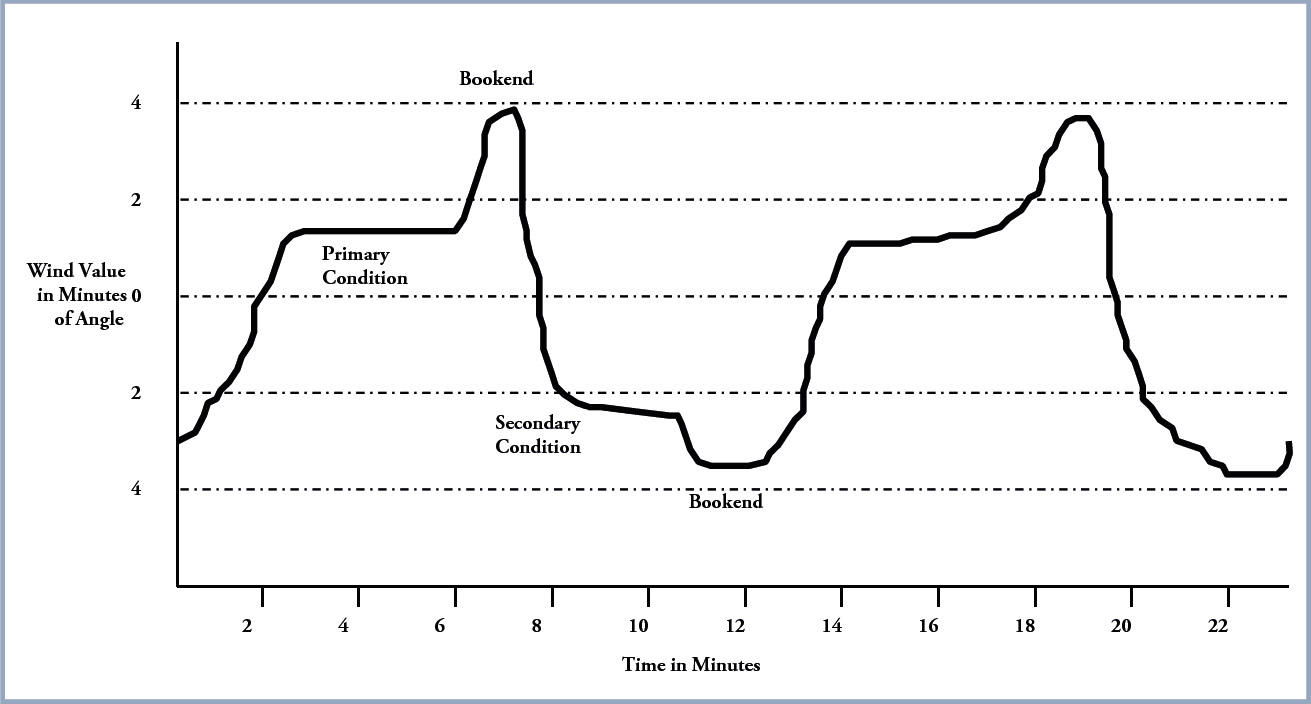
The wind-patterning diagram (Figure 26) represents a fishtailing wind pattern that varies from a maximum bookend of 4 minutes of left wind to a maximum bookend of 3 minutes of right wind. The primary condition is about 1 minute left, and there is a short secondary condition of about 2 minutes right. One whole cycle takes about 12 minutes of time, with the left-wind build taking about 8 or 9 minutes of time. The mean is close to 0, but the wind spends almost no time there.

Figure 26. Wind-patterning diagram.

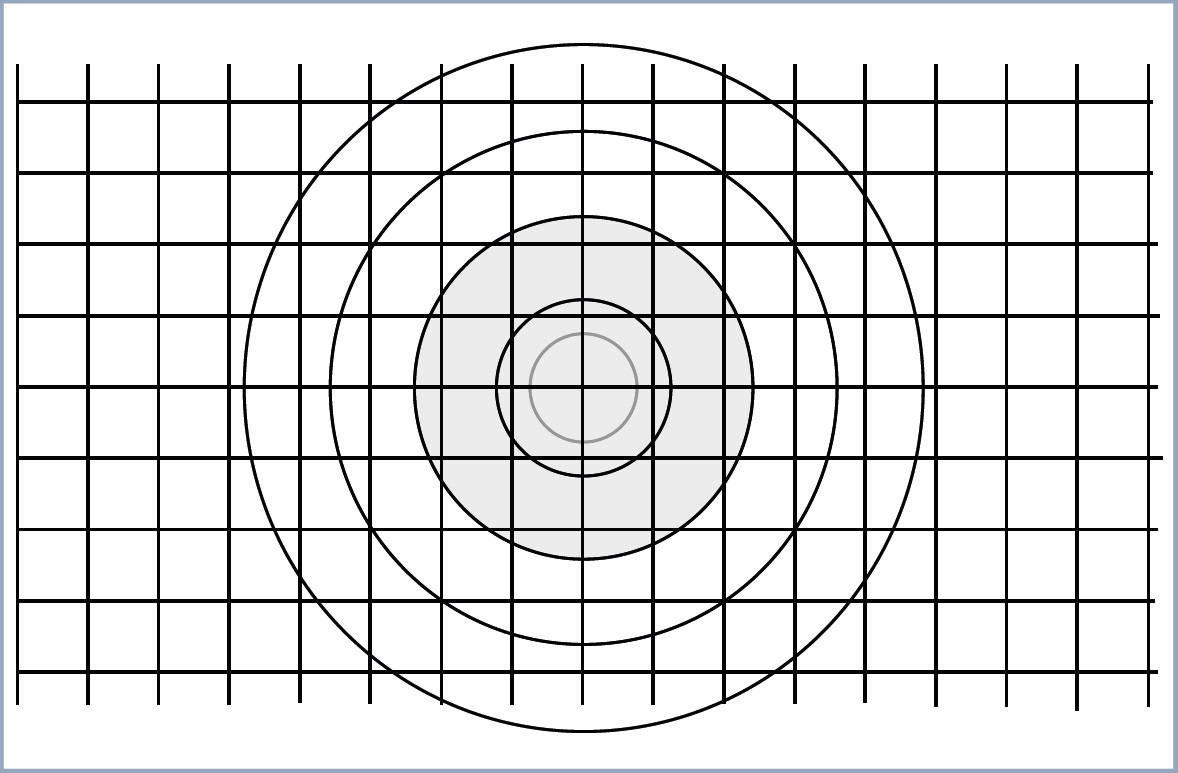
Figure 27. A 1,000-yard replica, 16 MOA wide.

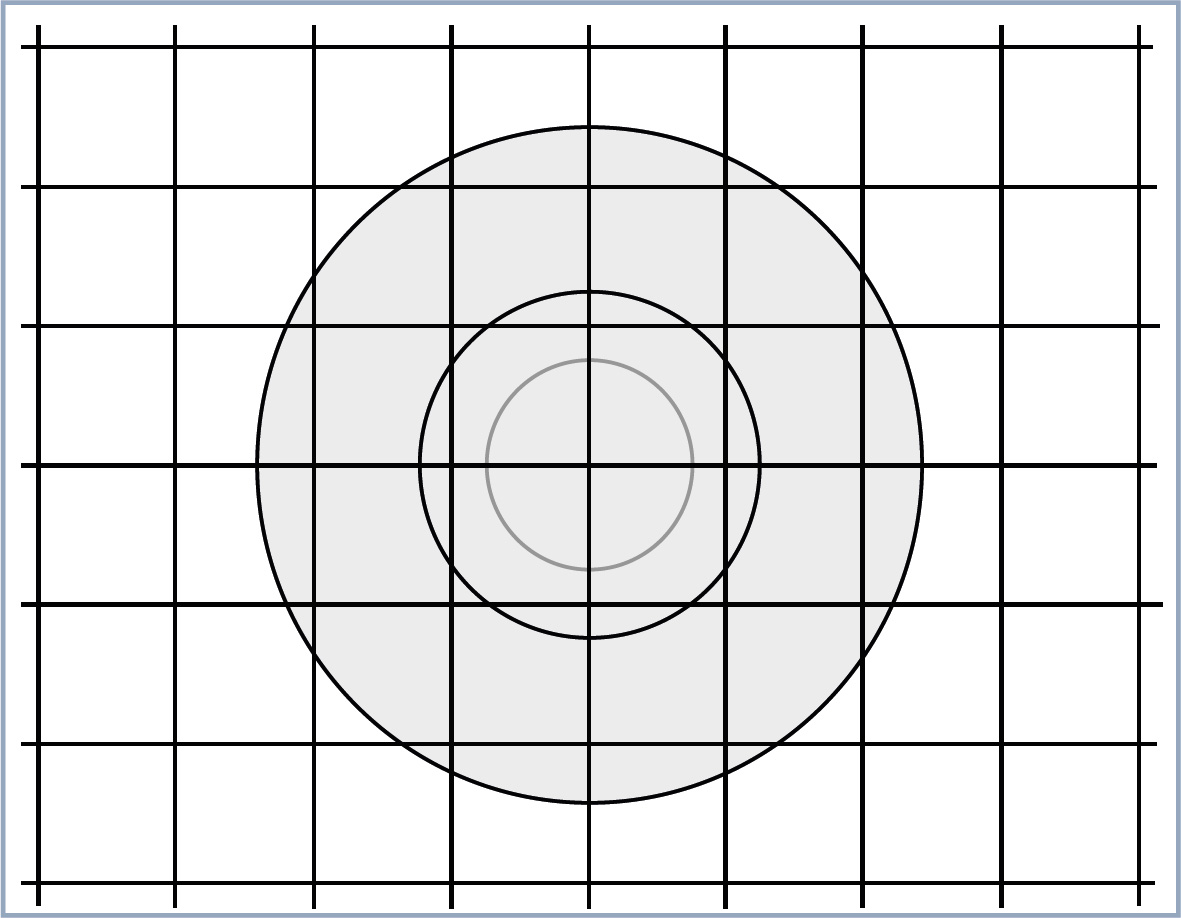
Figure 28 - 1000 Yard Replica - 8 MOA Wide
Once you have a pretty clear picture of what the wind conditions are, you need to think about how you are going to deal with them.
• Decide on the mean sight setting for your shoot and set up your graph or Plot-o-Matic (EZ-Graf).7
• Choose the plotting diagram that’s right for the conditions.
Figures 27 and 28 are both for use with a standard British 1,000-yard bull’s-eye target.
• The first plotting diagram covers about 16 minutes of windage. This diagram makes it easier to plot when you are dealing with widely varying wind conditions. It also tends to help the timid shooter make bold sight changes.
• The second diagram covers about 8 minutes of windage. It makes it easier to plot your shots when they are clustered mostly in the bull and the V-bull. This diagram encourages the shooter to make the fine adjustments appropriate in gentler or steadier conditions.
“[T]ry to make up your mind before you shoot how you will categorize the wind. Is it across the range, or is it ahead or behind, and if so is it fishtailing? Each will best be handled by a slightly different strategy.”8 This part of the thought process will help you select the replica you will use (coarse or fine detail) and how you will set up your Plot-o-Matic (EZ-Graf) for windage (what the median wind condition is).
“By the time his squad is called, [the shooter] should have developed a plan of action that will enable him to approach the match with more confidence.”9
Step 3: Make Your Wind Call and Set Your Sights
Once you are on the line and it is approaching your turn to fire your first shot, confirm your wind call and make sure your sight is correctly set. You have only one or two sighters (depending on the match rules) and you must get as much information as possible from them. Anticipate what the wind will be when you will be firing and fire the shot as quickly as you can fire a perfect shot. Firing quickly will minimize the chances of the wind changing while you are in the aim. If the wind is changing quickly, or if you have taken more than 10 seconds to fire, be prepared to hold your shot and glance at the flags or check the mirage in your spotting scope to see if the wind is still what you thought it was. If it is the same, then fire the shot quickly and accurately. If it has changed, make the sight adjustment and fire quickly and accurately.
Step 4: Fire and Call the Shot
It is essential that you fire a perfect shot and that you are completely confident that it is as perfect as you can fire— otherwise you will be corrupting the data you can get from this first sighter. “If one becomes too engrossed in theory and calculations, then poor holding, aiming, and firing will spoil one’s score more than errors in wind judging.”10
When we are teaching our police sniper students to fire a perfect shot under stress, we emphasize the need to separate themselves mentally from everything before they begin their mental program leading to the firing of a perfect shot. You can’t think two things at once, and a perfect shot demands your full attention.
As soon as you have completed your follow-through, mentally call your shot, without prejudice. If you do not have this critical skill (being able to call your shot), you need to learn it—otherwise you will not be able to separate shot errors from wind effects. Then look at the flags and mirage and determine whether there were any wind changes during your shot execution that would have affected your shot placement.
Many of the sources we have researched emphasize the need for honesty in calling the shot; we believe that you must learn to have a dispassionate (nonemotional) attitude that focuses on the information you are getting and disregards entirely how you feel about your results while you are engaged in the match.
Step 5: Record and Analyze Results
When your target comes up with the shot indicator, record your shot placement on your graph or Plot-o-Matic (EZGraf) replica.
• If you called a center shot and your wind call was correct and the wind did not change while you were in the aim and the shot indicator is in the center (within your grouping capability), then you can say that all went well. All things being equal, you can carry on.
• Otherwise, you need to analyze the results and make sure you attribute any discrepancies to the correct cause.
∘ If you called your shot low right and it is in fact low right, you know that your wind setting was correct; you just need to focus on firing perfect shots.
∘ If you think you fired a perfect shot and expected the indicator to be in the center, but it is one minute left, then you have missed your wind call. Immediately adjust your windage based on shot placement before analyzing for your next shot. This recalibrates your thinking and reestablishes your baseline.
Step 6: Do Your Post-Shot Duties
Complete your post-shot work as quickly as possible; that is, record your shot placement, make sight adjustments for elevation and to center the group, record your score, and reload. As Reynolds and Fulton wrote in Target Rifle Shooting, the shooter must make corrections to center the group (and these may well be very small corrections) and make corrections for wind, when there is an observable change in wind speed or direction, but one type of correction should not be confused with the other.11
Our standard practice is to center the current condition on the Plot-o-Matic (EZ-Graf) and set our sights accordingly. Then we watch the wind.
Step 7: Assess Wind Changes
Keep your eye on your flags or on the mirage, and watch for wind changes. Soon you will have to decide on another wind call, and you want all the available information. To help get you thinking the right thoughts, ask yourself these questions to help lead you to the best decision.
1. “Is the wind the same or different?” If it is the same, do not make a sight adjustment—go with your corrected last shot. If it is different, this leads to another question.
2. “Has the wind increased in value or decreased?” Answering this question requires you to look at both velocity and direction. Your answer determines which way you will be turning your sight. “Always move the sight in the right direction even if you aren’t sure how much to do it.”12
3. “Is the change a little or a lot?” If you think it is a little, remember that it is difficult for the average person to see less than a 1-minute change at long range (except when watching a mirage go to and from a boil). If you think you see a change, it is at least a minute; if you are sure you see a change, it will be at least 2 minutes. You need to be aware of your own abilities and learn just what you can see.
“[I]f a shooter’s experience indicates that he can judge wind changes at the shorts only when of the order of half a minute or more, he should realize that this corresponds to detecting a change of the order of about 2 minutes at 1,000. This is not an attempt to discredit those who make smaller changes at long ranges. Such changes are often necessary in the interest of group centering, and in light winds they can be judged from indicators. This is particularly true in the fishtail type of wind where a shooter may see changes of 1 minute or even less at 1,000 yards, though he may not detect changes in the indicators of less than 2 or 3 minutes in strong winds from 9 o’clock.”13
• If only velocity has changed (direction is still the same), you probably have a modest change in a headwind, and you may have a significant change in a crosswind.
• If only direction has changed (velocity is still the same), you probably have a modest change in a crosswind, and you may have a significant change in a headwind or tailwind.
• If both velocity and direction have changed (one increased and the other decreased), you have a complex situation, one that few shooters respond well to. See the “Tools and Techniques” section for the sandbox technique. Briefly, there are four possible situations you must consider.
∘ If both velocity and direction have increased the value of the wind, you know you have a very significant change.
∘ If both velocity and direction have decreased the value of the wind, you know you have a very significant change. If the change is a lot, you may have to refer to your bookend settings to see how much adjustment to make. Under these circumstances you must be bold. As the saying goes, “An inner on one side is the same value as an inner on the other side.” Memorize the flags and mirage for this extreme shot, and learn what the sight setting is for this condition—you will probably get it again.
∘ If velocity has increased and direction has decreased (or vice versa) the value of the wind, the net effect depends on the specific example, but, generally speaking,
—In a headwind or tailwind the direction change affects wind value more than the speed does; and
—In a crosswind the speed change affects wind value more than direction does.
∘ Sometimes, the direction and speed changes offset each other, and the net effect on the wind value is nil.
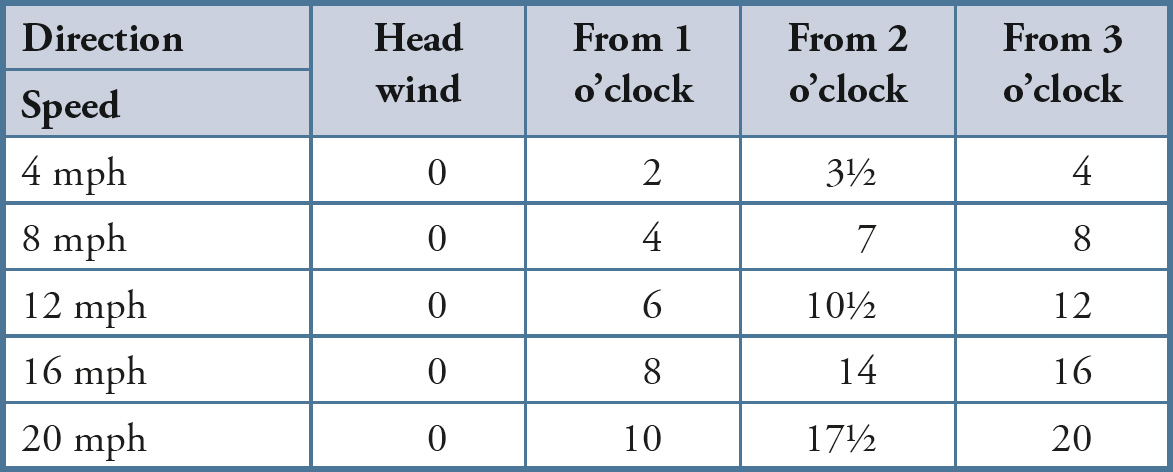
Let’s look at some specific examples. Figure 29 is a wind chart showing the deflection at various wind speeds and directions.
• Say we are shooting with a 12 mph wind coming from 1 o’clock; we would expect 6 minutes of deflection. Since this is more a headwind than a crosswind, we would expect direction changes to be more significant than velocity changes. Sure enough, a wind blowing at the same speed from 12 o’clock will not deflect the bullet at all, and that’s a 6-minute difference.
• The same velocity wind blowing from 3 o’clock deflects the bullet 12 minutes, but if the angle drops off to 2 o’clock, the deflection drops by only 1½ minutes. However, if that 3 o’clock wind picks up in velocity (to 16 mph) it will push the bullet an additional 4 minutes.
• If a strong headwind drops in speed and comes around from the side, it can end up with the same deflection. (For example, a 16 mph wind from 1 o’clock and 8 mph wind from 3 o’clock both produce 8 minutes of deflection.) However, this challenging situation can move through some very different deflections, depending on what mix of speed and direction is present at a given moment.
If you have ever felt a little overwhelmed by the conditions, it is probably in this latter situation. It is genuinely difficult to deal with, and we offer some strategies in chapter 4, “Techniques and Tactics.”

Figure 29. Wind chart (speed and direction) for 1,000 yards.
Step 8: Make Decision, Set Sights, Fire Shot
• Always call your shot and make allowances for a less-than-perfect shot.
• Continue to observe the conditions as compared to what you know.
• Memorize the flags and/or mirage, so that you can recognize the condition as being the same or having changed.
• Talk to yourself. For example: “When the flag was like that, I used this sight setting and I got a bull”; or “The last time the flag was like that, I needed 7 minutes”; or “This wind is clearly outside the high bookend; I will need to go to 15 minutes.” Many top shooters draw little pictures on their plotting diagrams to help them accurately observe and recall the indicators for specific conditions.
The more shots you’ve fired, the more information you have from which to make further decisions. If you get in trouble or there is a major wind change that you have not seen before, go back to the procedure for your first sighter.
SUMMARY
For Your First Sighter
• To determine your game plan for this shoot and To determine your initial sight setting for your first shot:
Step 1: Observe conditions.
Step 2: Convert conditions to sight settings.
Step 3: Make your wind call and set your sights.
Step 4: Fire and call the shot.
Step 5: Record and analyze results; recalibrate your thinking as required.
• To determine your sight setting for your next shot:
Step 6: Do your post-shot duties.
Step 7: Assess wind changes.
• Is the wind the same or different?
• Has the wind increased in value or decreased?
• Is the change a little or a lot?
Step 8: Make your decision, set your sights, and fire your shot.