Laminated Pastries
I fell in love with Viennoiserie, or laminated pastries, when I studied in France in college. During that year, when I lived in Tours, at least once a day and usually more than that, I stopped into a bakery to buy a pain aux raisins, pain au chocolat, or a simple croissant au beurre. I loved the bakeries themselves, how beautiful and charming they were. And I was enthralled with the look and flavor of these delicate pastries.
Laminated pastries are those made with laminated dough: a block of dough composed of many layers of dough and butter. The process of laminating dough consists of encasing a solid block of butter, called a beurrage, in a sheet of dough. The dough with the butter locked inside is then rolled out and folded, rolled out again and folded again, and again, creating a distinct layering of dough and butter. When laminated dough is baked, the heat causes the water in the butter to evaporate, resulting in light, layered, flaky, and delicately crisp pastries.
After my year abroad, when I came home and started baking more seriously, I would ask: How on earth did they make those things? It was the most daunting task I could have imagined doing in the kitchen. I’m not sure if at the time I would have truly believed I could replicate such beautiful pastries myself. The fact that I was able to learn—and to learn to teach others how to do it—is one of my greatest accomplishments. I couldn’t be happier or prouder to be able to share these recipes, and all the tricks I’ve learned along the way, in this chapter.
MASTER CLASS: A Step-by-Step Tutorial to Laminated Pastry Perfection
MASTER RECIPE for Croissant Dough
Twice-Baked Croissants with Sour Cherries and Pistachios
Ham and Cheese Twice-Baked Croissants
Strawberry Jam and Hazelnut Rugelach
Variation: Poppy Seed Rugelach
Variation: Black Sesame Kouign Amann
MASTER RECIPE for Laminated Babka Dough
Blueberry Blackberry Cheese Danish Braid
Black Pepper Fantails with Salted Honey Butter
Master Class
A Step-by-Step Tutorial to Laminated Pastry Perfection
Successful lamination is all about evenness: creating and maintaining perfectly even layers of butter and dough that are consistent all the way across the dough. The steps that we take during the lamination process are all working toward this goal.
The two most familiar types of laminated dough are croissant dough and puff pastry, both of which you will find here. But, in fact, you can laminate many types of dough. In this chapter, I laminate brioche dough, for instance, to make Salted Caramel Sticky Buns (this page); and laminated babka dough is the base for the Blueberry Blackberry Cheese Danish Braid (this page). My rugelach (see this page and this page) and Flaky Buttermilk Biscuits (this page) are also laminated, but they differ from the others in that they are not laminated with a sheet of laminating butter (the beurrage or “butter block”); instead, the butter is quickly mixed into the dough and remains in large chunks. The pastries get their layers from folding in these chunks. (This is called “rough” lamination.)
Different types of dough are laminated with different ratios of dough to laminating butter. It is the baker’s choice how much butter they use in lamination. My croissant dough (this page) is laminated with 25 percent butter in proportion to the total weight of the dough. Brioche dough already contains a lot of butter, so I use less laminating butter in my sticky bun recipe. The same is true for my fantails and Danishes. My Kouign Amann (this page) recipe contains more laminating butter than all of the others because kouign amann are all about the butter.
Make the dough and wrap it in plastic
After making the dough you are going to be laminating, you will chill it until you’re ready to roll it out in the following steps.
Make the butter packet
A butter packet is a term I use to refer to what is technically called a beurrage, which is the sheet of solid butter that is placed on a sheet of dough to begin the lamination process. For my professional kitchens, I order the beurrage, which comes as a 1-kilogram, ½-inch-thick sheet of unsalted French Normandy butter. When the bakers go to laminate their dough, they unwrap the sheet of butter and place it on their sheet of dough. It’s very convenient and efficient. I re-create this for hand laminating.
With the butter packet, I have essentially replicated this experience for home use, creating a butter packet that is the size that suits an amount of dough suitable for the home baker. Many recipes for home bakers call for you to smear the butter onto the dough, which is not a good alternative. Making a butter packet ensures that you create a really smooth, even layer. In my opinion, it is a must for anyone trying to make professional-looking Viennoiserie at home (see A Short and Sweet Chapter on Fried Dough, this page). The packet also gives you total control over the temperature of the butter. I like to make butter packets in advance. I keep a stack in my refrigerator so they’re ready to go when I want to make laminated dough.
To make a butter packet, place a 12- x 15- or 16-inch piece of parchment paper on a flat work surface with the long side parallel to you. Fold the side edges inward and the top and bottom inward to create a 10- x 6-inch rectangle.
Slice the butter ¼ inch thick lengthwise.
Open the paper packet and lay the butter slices in a single layer like tiles within the rectangle created in the center of the folded paper. Refold the packet to enclose the butter and flip the packet so the seam is facing down. Let the butter packet rest at room temperature for 30 to 45 minutes, until the butter is very soft but not greasy. Roll a rolling pin over the packet to distribute the butter in an even layer to the edges and corners of the packet with no spaces between the tiles. Put the butter packet in the refrigerator to chill until it is firm, about 20 minutes, and for up to 2 weeks. I suggest you label the packet with the name of the recipe it is for; different recipes call for different amounts of laminating butter.

Temper the butter
Now that you have your dough resting in the refrigerator and you have made your butter packet, you want to temper the butter, or soften it so it is the same degree of malleability as the dough. This is very important because in the next step, you are going to lock in the butter, or to encase it in a sheet of dough, and after that, you will begin the process of folding and rolling it out with the butter inside. You will be putting pressure on the dough when you roll it out, so if the butter is colder and stiffer than the dough, when you roll out the dough with the butter inside, the butter will splinter or shatter under the pressure. This results in a “broken” lamination. You will be able to see the shattered butter throughout the dough, and the dough will feel bumpy. The result of a broken lamination is uneven layers in your baked goods, and dough that does not bake as high. On the other hand, if the butter is too warm when you apply the necessary pressure to roll out the dough, the butter will ooze out of the dough that encases it; this, too, results in an uneven lamination, and it also means you are going to lose some of your butter.
The doughs that I use for my laminated pastries are fairly soft, so to get the butter at the correct temperature, remove it from the refrigerator and set it out at room temperature until it is soft and bendy. There is no temperature gauge I can give you to help you; you have to do it based on feel. I suggest that, after the butter has sat on your counter for about 5 minutes, you take the dough out of the refrigerator and give it a gentle squeeze or bend. Then do the same with the butter. When you feel that the butter has the same amount of bendyness as the dough, that’s when you should move on to the next step of locking in the butter.
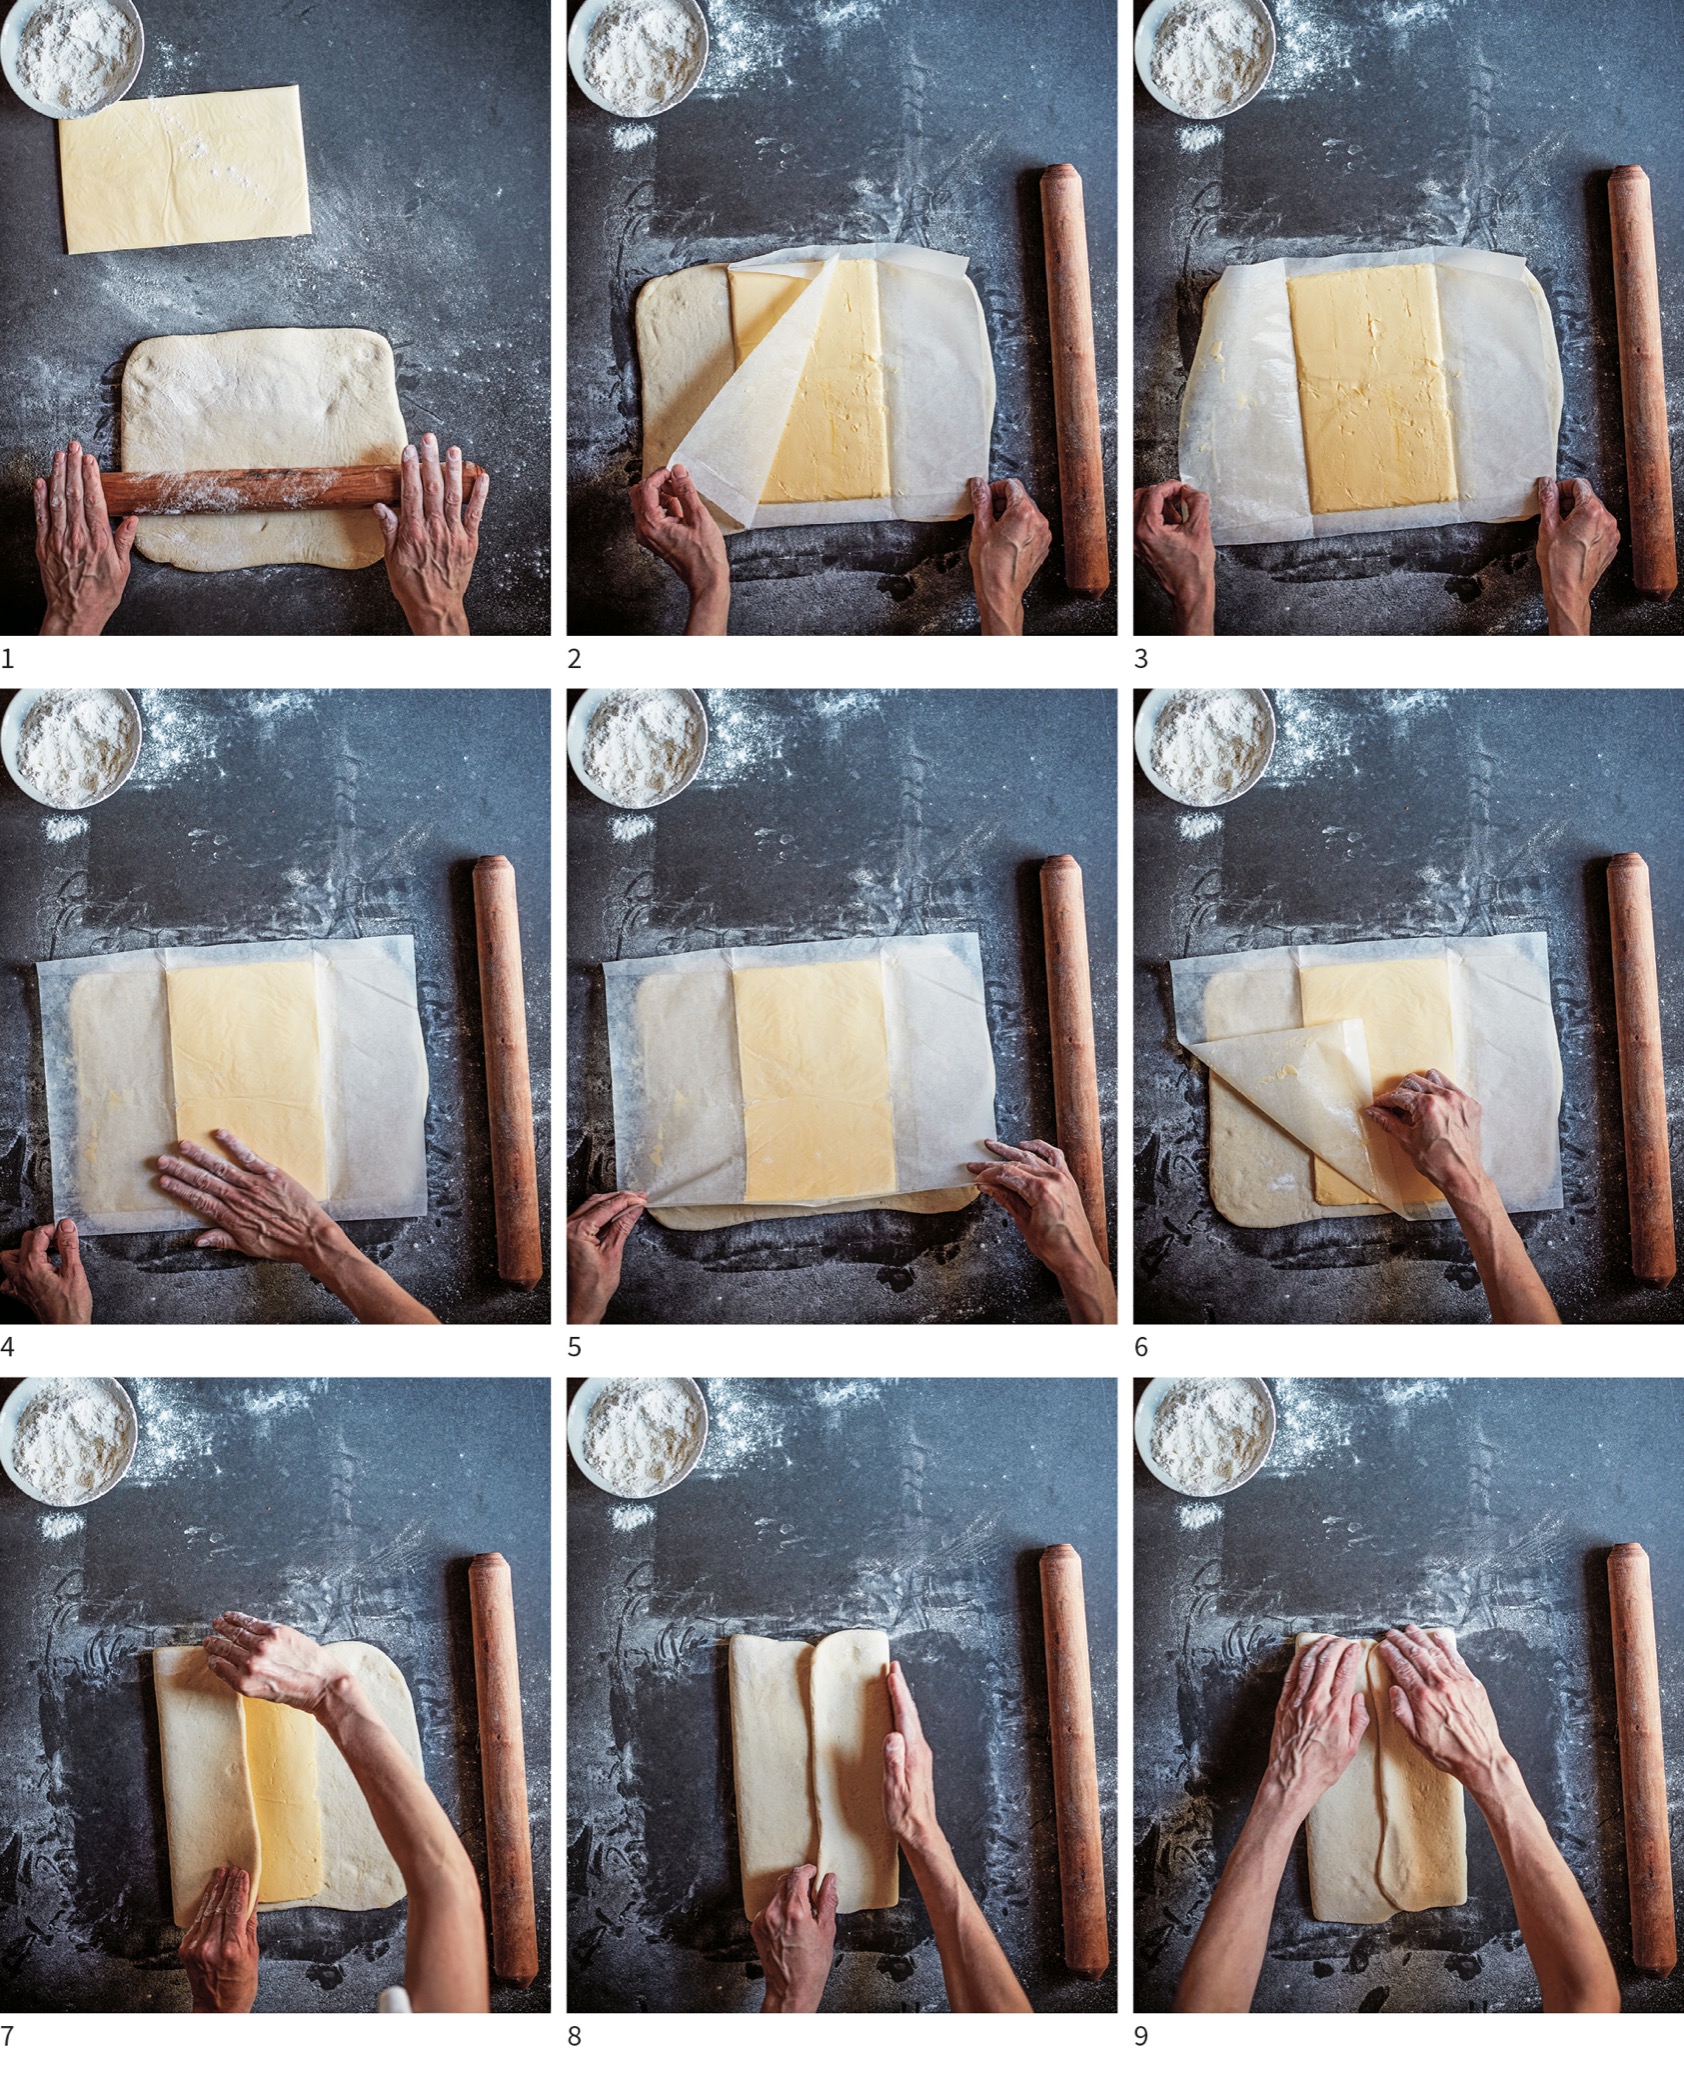
Lock in the butter
Locking in the butter refers to the process of encasing the butter packet in a sheet of dough. Think of it as wrapping a present; the present is the butter packet, and the wrapping paper is a rolled-out sheet of dough. I give exact measurements for rolling out the dough for the butter to lock in. What is important in this step, however, is not the precise dimension, but that the dough is rolled out to a size that can be wrapped around the butter packet. Just as you would cut a sheet of paper to fit around a gift you are wrapping, you want to roll out the dough to dimensions that are big enough to reach around the butter it will encase. I use my butter packet as my measuring device. I keep the packet next to me when I’m rolling out the dough, and as the dough begins to reach the correct size, I put the packet on top and eyeball it to see if the dough will reach around it. If not, I keep rolling. Use whichever system—measuring or eyeballing—works better for you.
Traditionally, butter is locked in by placing the butter in the center of a square of dough and folding the corners inward over the block of butter, like an envelope. I prefer to do it differently: I lay the butter packet on a long sheet of dough and fold the sides of the dough over the butter. I think it’s easier this way.
Roll out and fold the dough
Folding refers to the process of folding the dough with the butter locked inside to create layers of butter. You go straight into folding the dough after locking in the butter, without chilling the dough first. This is the reason the butter has to be at the correct temperature to begin with.
The folding step actually consists of three smaller steps: Rolling out the dough, trimming the edges, and making the fold.
Roll the dough: The first step in folding dough is to roll it out into a long sheet. When I am laminating dough, I always roll so that the dough stretches out away from me. You want to work as quickly as you can when rolling dough for laminating, so the butter doesn’t get too hard in the process.
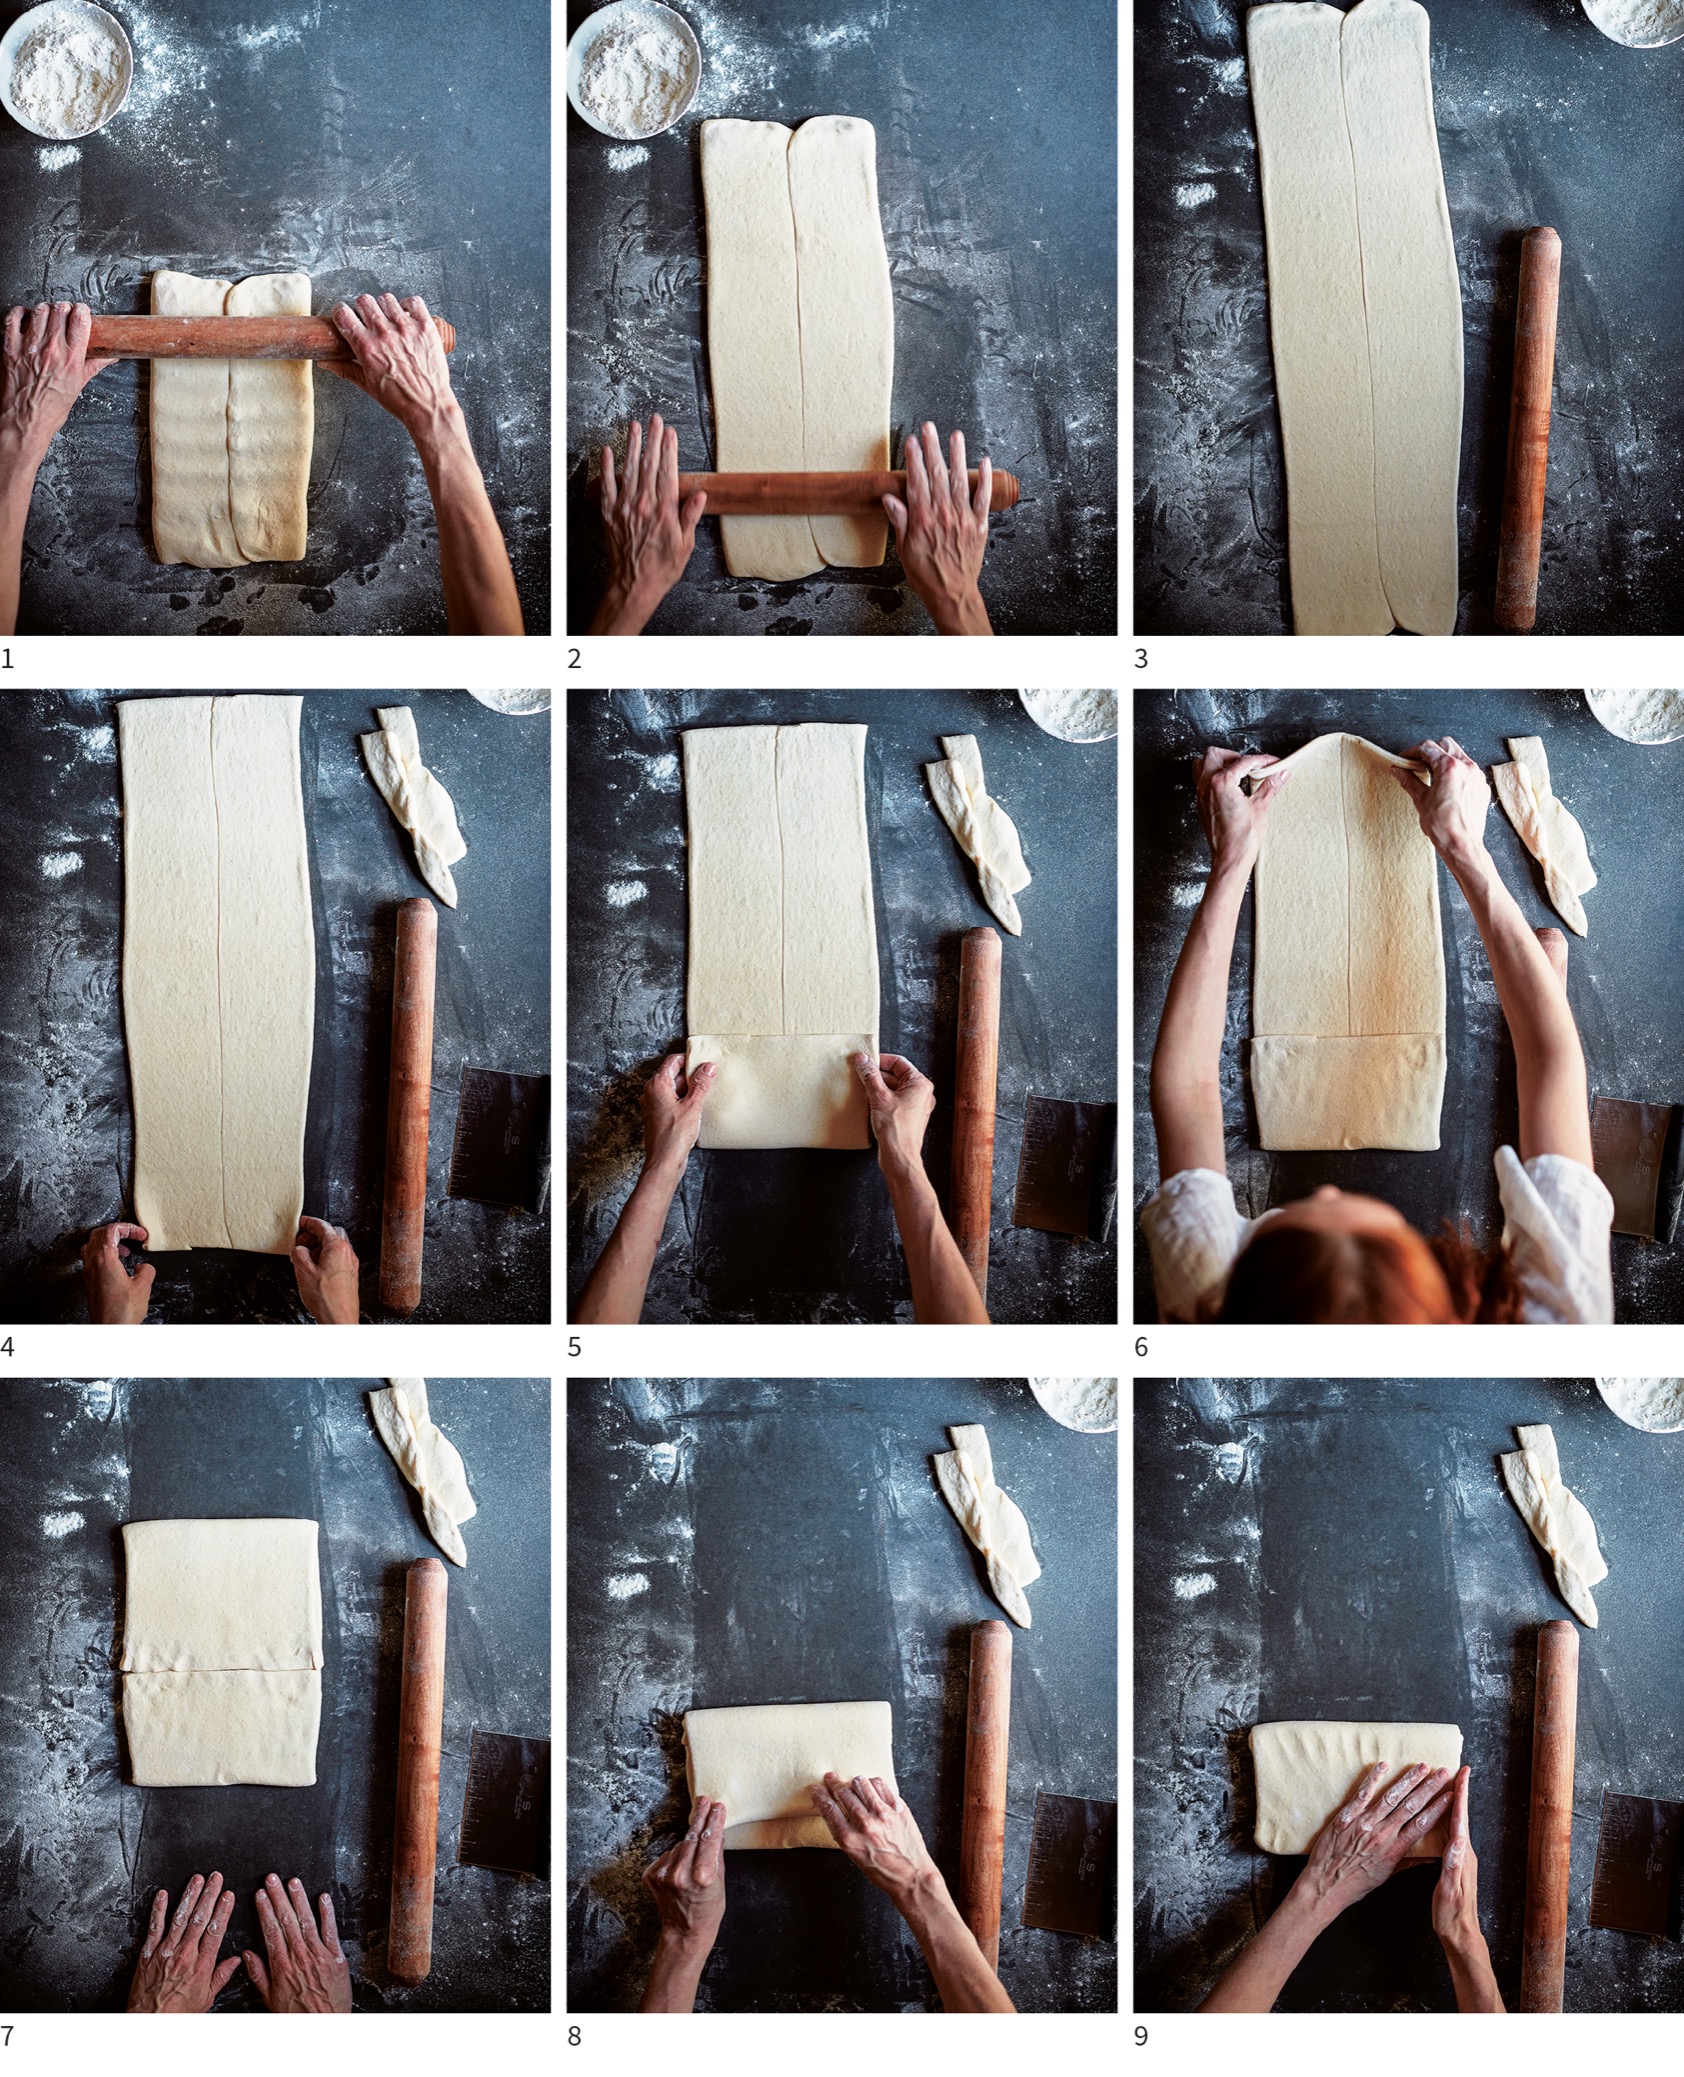
Trim the dough: If you’re the type of person who is going to make laminated pastries at home, then you’re probably the type of person who is going to want to make really perfect laminated pastries, and to make perfect laminated pastries, you have to trim the edges of the dough before each fold. Use a pastry wheel (a bench knife or long sharp knife will also work) to trim the top and bottom edges of the dough. You lose some dough in the process, but trimming the edges between folds creates a clean, even lamination layer, ensuring that every baked good is going to be perfect. The idea is to trim the edges just enough to expose the butter layer; this will usually be about one inch toward the center. If you do not trim the dough, there will be pockets of dough that do not contain any or contain very few butter layers and you end up with an uneven lamination. The pastry made from that dough will not be as flaky because there are not as many distinct layers. You can use the trimmings to make Baked Trimmings (this page).
Fold the dough: Now that your dough has been rolled out and trimmed, it is ready to be folded. There are different types of folds. The first type of fold is a book fold, or a fold within a fold. First, the top and bottom edges are folded toward each other, then the top edge is folded to meet the bottom, like a book, the spine of which is facing away from you. A book fold creates four layers of butter and dough. The second type of fold is a letter fold, wherein the dough is folded into thirds, like a letter. Each time you roll out and fold the dough is considered one “turn.” If a recipe calls for two letter folds and one book fold, then you would say you had made three turns. How many turns you make determines the number of layers in the finished pastry. A letter fold produces three layers of butter and dough. The number of layers produced by a fold increases exponentially; two letter folds produce nine layers of butter and dough. A letter fold plus a book fold produce twelve layers of dough. Different pastries are made using a different pattern (the number and type) of folds.
Rest the dough between folds
Gluten development is important in baking; it causes the baked good to rise properly in the oven. Gluten is formed in the process of working any type of dough, whether through mixing and kneading, folding (punching down a dough), or rolling it out and folding as we do during the lamination process. Dough that has a lot of gluten in it becomes very strong and difficult to work with, because it springs back when you roll it. In the process of laminating, gluten develops to the point where you can’t roll the dough out to the desired dimensions. In a professional bakery this is not as much of a problem because you use a commercial sheeter, which looks like a ginormous pasta machine, which is powerful, and it is able to sheet (roll out) the dough even when the gluten is very developed. But where the sheeter is strong enough to stretch out the dough even when it is springing back, you are not. The more turns you make, the more difficult it will become to roll out the dough. When the gluten starts to develop and your dough springs back, put the dough in the refrigerator for 20 to 30 minutes to let the gluten relax before making another turn.
Stop fermentation
After laminating dough made with yeast, I put the block of dough in the freezer for 1 hour to put a quick stop to the fermentation process. The block gets warm during the rolling, and warmth encourages fermentation. If you put the block directly in the refrigerator, it won’t cool down quickly enough, and will continue to rise. You will open your refrigerator the next day to find your blocks of dough have expanded to look like little balloons. If this were to happen with dough that is not laminated, it would not be a big deal. But because lamination is dependent on all of the layers being even, having the dough expand after it has been layered with butter is a laminating disaster. It breaks the lamination. The extreme cold of the freezer stops the fermentation process. After an hour in the freezer, you will transfer the dough to the refrigerator to let it rest overnight.
Tempering and rolling out the dough
Now that the dough is laminated, the most important thing is that you bring it to the correct temperature before you roll, cut, and shape it. Even if you have laminated the dough perfectly, if you do not temper it properly, the butter between the layers will shatter when you apply pressure on the dough, resulting in a broken lamination. A broken lamination will yield uneven layers, and also cause the butter to leak out of the pastry when baked. To temper a laminated block of dough, pull it out of the refrigerator and let it rest at room temperature until it is just bendy enough that you can roll it without applying too much pressure. This usually takes 5 to 10 minutes, but it is important that you judge by feel, not by time. When rolling out the dough, it may begin to spring back. If this happens, let the dough relax for a few minutes and then continue rolling it out until you have reached the proper dimensions. Rest the dough for a few minutes before you begin cutting the shapes. This will help keep your shapes from shrinking.
Book fold

Letter fold
Baked Trimmings
Since lamination is all about evenness, there is a lot of measuring and trimming involved. You will be left with trimmings when making your laminated block of dough, and again when you are rolling out the laminated block to cut and shape it into individual pastries. Trimmings are made of delicious, layered and buttery bits of dough. Rather than waste them, I suggest you make a pastry out of them. Roll them in sugar, put them in muffin tins, filling each cup one-half to three-quarters full. Cover with a damp kitchen towel and proof them in a warm place until they double in size. Bake in a 350°F oven until they’re golden brown. You can also freeze the scraps until you have enough to fill a larger pan, such as a loaf pan.
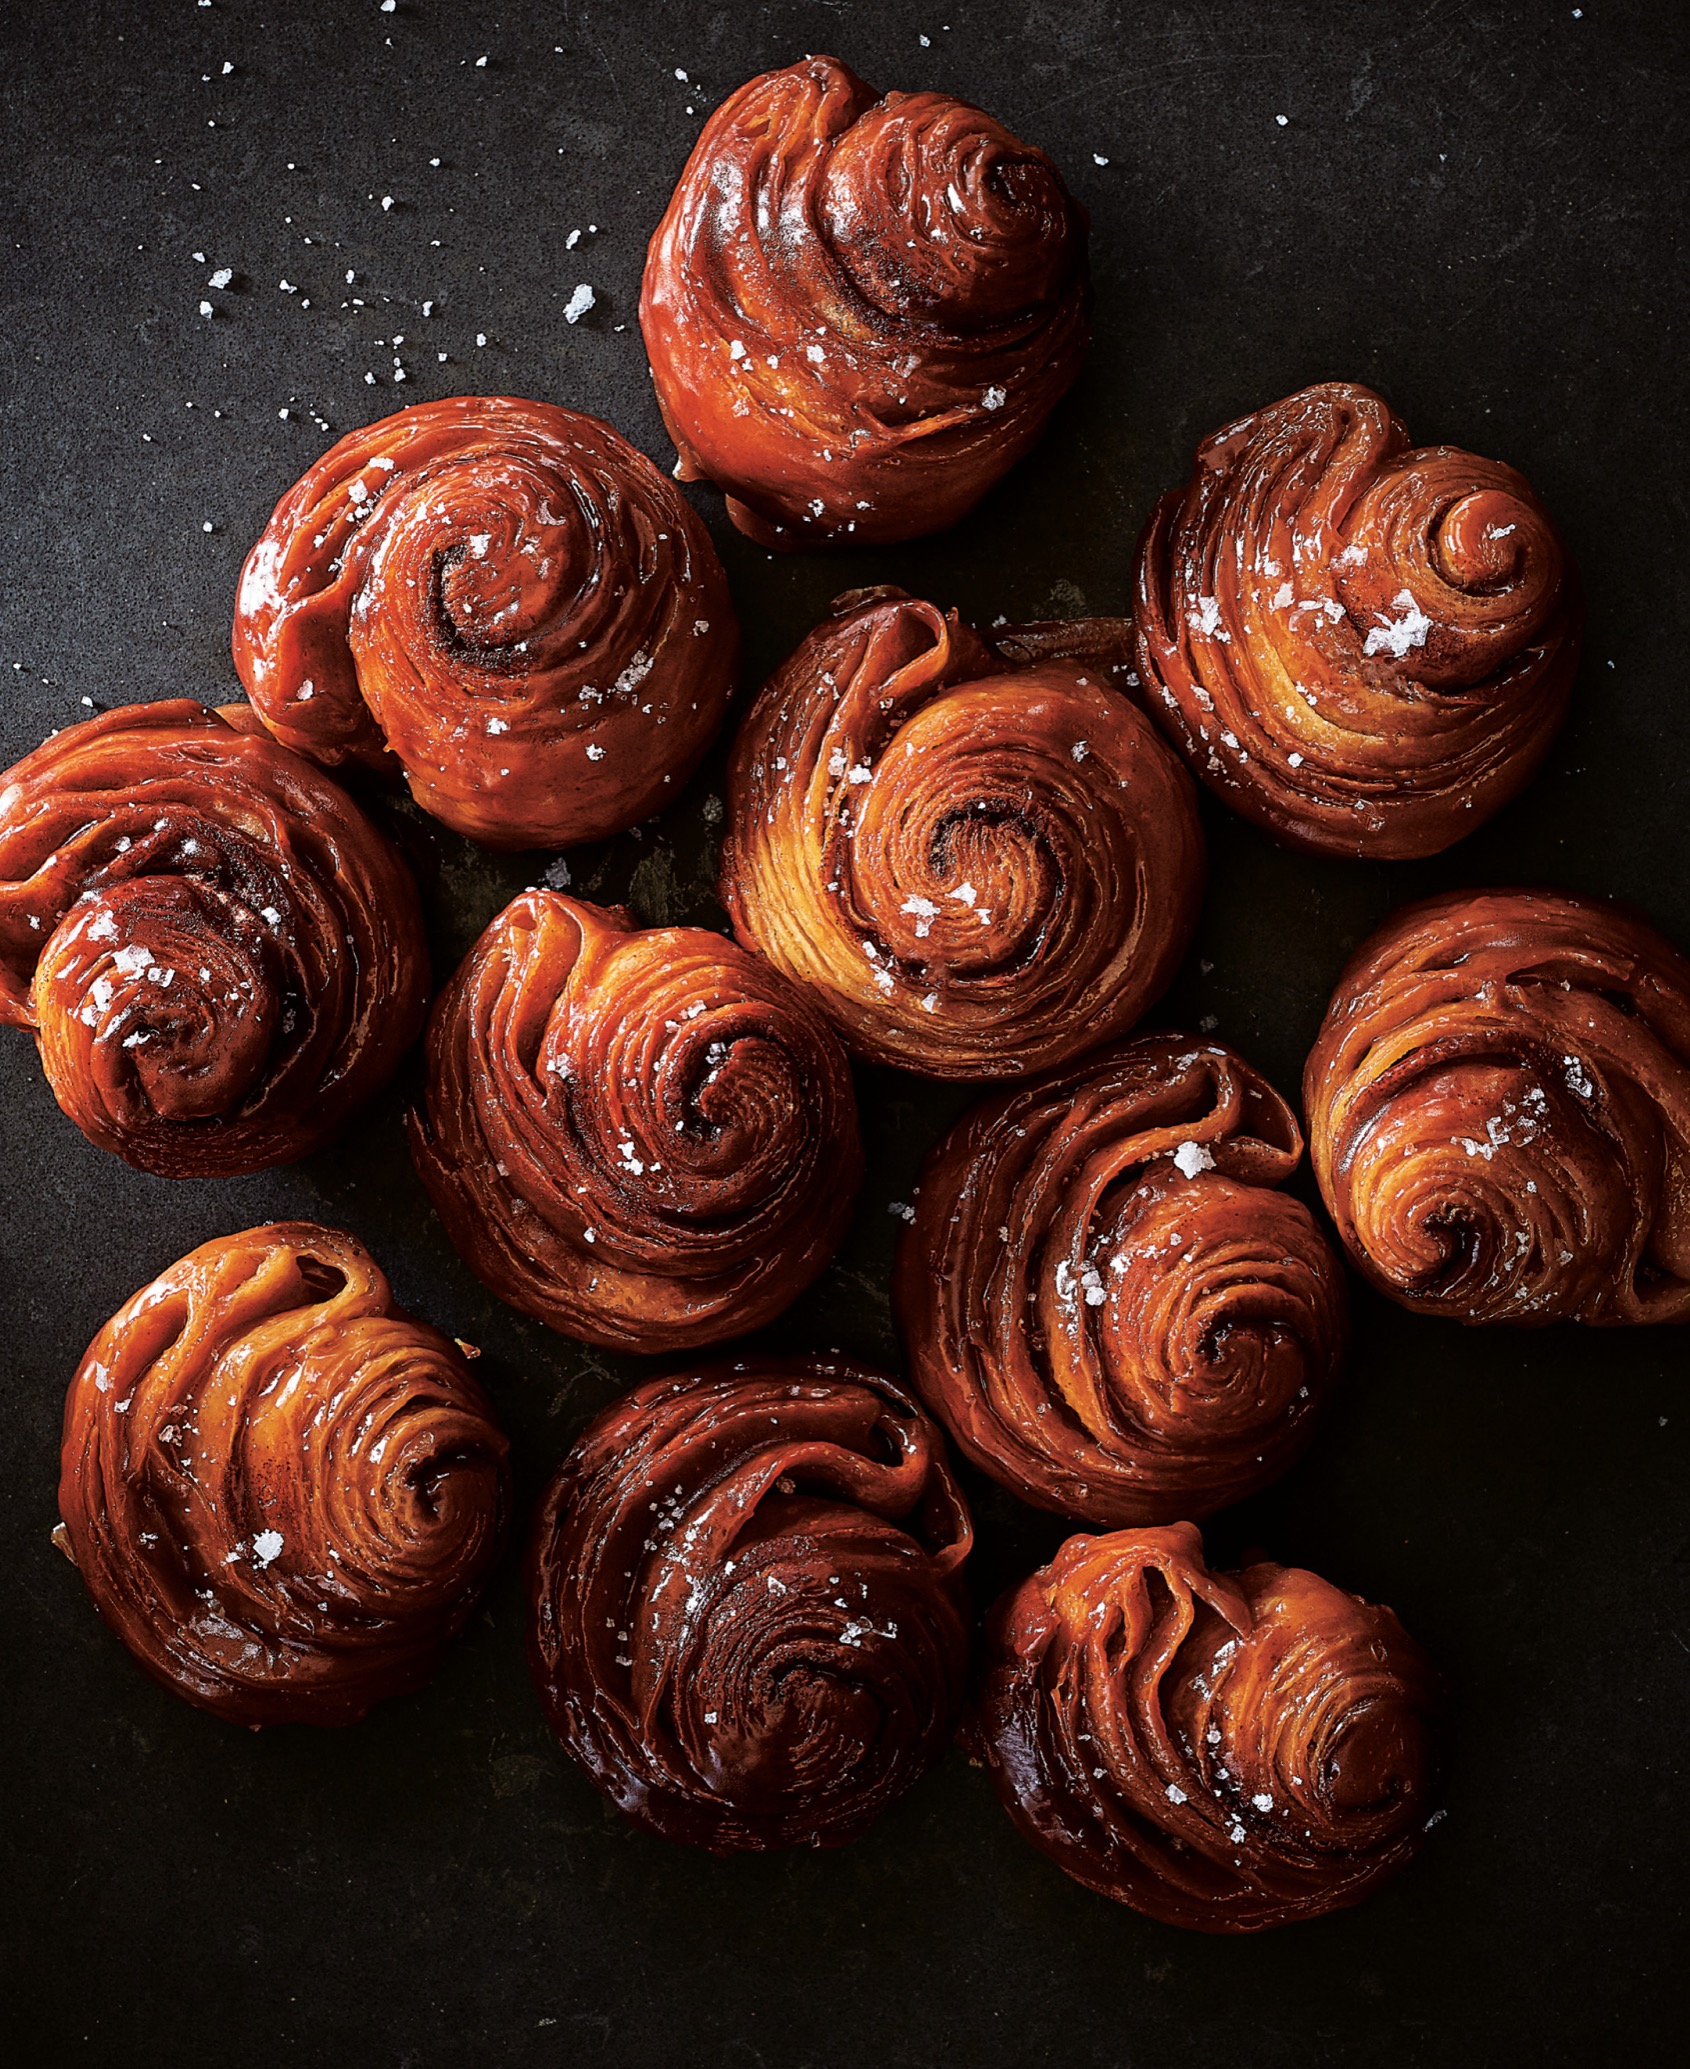
Salted Caramel Sticky Buns
Makes 2 dozen buns
I debuted these laminated sticky buns when I worked as head baker at Roberta’s, and people went nuts for them. The New York Times named them the number-one dish of the year, and they are what I’ve become best known for. I’ve been asked for the recipe many times over the years, but this is the first time I’ve shared it.
To make them, I start with classic French brioche dough, which is enriched with butter and eggs. The brioche dough is moist and flavorful on its own, but then I laminate it, which lifts up the dough a bit and adds that little je ne sais quoi. I bake these individually, in muffin tins, so the entire exterior of each bun is covered in gooey caramel. Finally, I sprinkle Maldon sea salt on the buns when they come out of the oven, which balances out the sweetness. They really are the perfect sticky bun: sweet, salty, and rich, without being heavy.
You want to make your butter packet in advance, or while the dough is in the refrigerator. Place the packet in the refrigerator to chill until you’re ready to laminate the dough, then remove it from the refrigerator to soften it slightly when called to do so in the recipe.
Note You will need four (6-cup) jumbo muffin tins to make these.
For the dough
3⅔ cups plus more for dusting (440 grams) all-purpose flour
1 tablespoon plus 2 teaspoons (15 grams) instant yeast
¼ cup (50 grams) granulated sugar
2 teaspoons (12 grams) fine sea salt
¼ cup (60 grams) whole milk
4 large eggs (200 grams)
16 tablespoons (2 sticks) unsalted butter, cubed and softened (226 grams)
Nonstick cooking spray
12 tablespoons (1½ sticks) butter packet (this page), chilled (168 grams)
For the filling
2 tablespoons (26 grams) granulated sugar
2 tablespoons (12 grams) ground cinnamon
For the topping
26 tablespoons (3 sticks plus 2 tablespoons) unsalted butter, cubed and softened (364 grams)
1¾ cups plus 1 tablespoon (lightly packed) light brown sugar (363 grams)
½ cup (119 grams) heavy cream
Flaky sea salt for sprinkling
Make the dough
■Whisk the flour, yeast, granulated sugar, and fine sea salt together in a large bowl.
■Pour the milk into the bowl of a stand mixer. Add the eggs and put the dry ingredients on top. Fit the mixer with the dough hook and mix on low speed for 3 minutes to combine the ingredients. Turn the mixer speed up a couple of notches to medium and mix for 5 minutes to develop the gluten and create a homogenous dough. Reduce the mixer speed to low and add the butter all at once. Continue to mix on low until the butter is incorporated into the dough, stopping to scrape down the hook and the bowl once or twice with a plastic bowl scraper while you are incorporating the butter; depending on how soft the butter is, this will take between 10 and 15 minutes. Once the butter is incorporated, remove the bowl from the stand and wipe the hook clean with a wet hand. Place a clean kitchen towel or plastic wrap over the bowl and set the dough aside at room temperature to ferment for 1 hour.
■Meanwhile, line a baking sheet with parchment paper and spray it with nonstick cooking spray.
■Use a plastic bowl scraper to scrape the dough out of the bowl and onto the prepared baking sheet. Using wet hands, pat and form the dough gently into an 8-inch square. Refrigerate the dough for at least 1 hour and up to 8 hours. (The dough is very sticky, so I don’t wrap it in plastic wrap. However, if you are refrigerating the dough for longer than 1 hour, remove the baking sheet from the refrigerator after 1 hour, wrap it in plastic wrap, and return it to the refrigerator.)
Laminate the Dough
Lock in the butter
■Remove the butter packet from the refrigerator and set it on the counter to soften until it is bendy but still cool; this could take anywhere from 5 to 20 minutes, depending on how cold it is, and depending on the texture of the dough. You want the butter to be slightly softer and more malleable than the dough but not so soft that it will ooze out of the dough.
■Lightly dust a large flat work surface with flour. Remove the baking sheet from the refrigerator. Unwrap the dough, if it has been refrigerated for more than an hour, and place it on the floured surface. Lightly dust the top of the dough and a rolling pin with flour and roll the dough out to 14 inches from side to side and 11 inches from top to bottom, dusting the work surface, rolling pin, and top of the dough lightly with flour as you roll the dough, so it doesn’t stick.
I try to reuse a sheet of plastic wrap whenever possible. When I unwrap a block of dough, I set the plastic wrap to the side and use it later in the recipe if plastic wrap is needed.
■Open the parchment packet to expose the butter and flip the packet over to place the butter on the dough, centering the 10-inch edge of the butter packet on the 11-inch length of dough. Run your hand over the parchment paper so that the heat of your hand helps to peel off the paper. Then peel off and discard the parchment paper. Fold the left and right sides of the dough over the butter so they meet in the middle and pinch the edges of dough together with your fingers. Gently press the top and bottom edges of the dough together to seal the packet closed and lock in the butter.
Make two letter folds
■Dust your work surface with a bit more flour. Dust the top of the dough and the rolling pin with flour and roll the dough lengthwise to 18 inches from top to bottom, dusting with flour as needed.
■Using a pastry wheel or bench knife, trim the top and bottom edges of the dough just enough to expose the layer of butter in the center of the dough. Reserve the trimmings to make Baked Trimmings (this page) or discard them. Fold the top edge down two-thirds and fold the bottom edge to meet the top edge, so the dough is folded into thirds, like a letter.
■Rotate the dough 90 degrees so that the folded, closed edges are facing left and right and one of the open edges (with the visible layers) is facing you, dusting lightly underneath the dough with flour. Dust the top of the dough and the rolling pin with flour and roll the dough to 18 inches from top to bottom, dusting with flour as needed. Trim the top and bottom edges to expose the butter layers and add the trimmings to your baked trimmings or discard. Fold the top edge down and the bottom edge up to make a second letter fold.
■Wrap the laminated block of dough in plastic wrap and place it in the freezer to chill for 1 hour. Move the dough from the freezer to the refrigerator for at least 8 hours and up to 12 hours to retard the dough.
Prepare to fill the buns
■When you are ready to fill and bake the buns, remove the laminated block of dough from the refrigerator and set it on the counter to rest for 20 to 30 minutes, until you can feel that the butter layers inside the dough are just becoming malleable (but not soft) when you bend the block slightly.
■Meanwhile, stir the granulated sugar and cinnamon for the filling together in a small bowl and set it aside.
■Lightly dust a large flat work surface with flour. Unwrap the dough and place it on the floured surface. Lightly dust the top of the dough and rolling pin with flour and roll the dough out into a rectangle that is 19 inches from side to side and 12 inches from top to bottom, dusting with flour as needed.
Fill and cut the buns
■Using a pastry wheel or bench knife, cut the dough across the middle so that you have two strips 19 inches from side to side and 6 inches top to bottom. Brush the surfaces of both lengths of dough with water. Sprinkle the cinnamon sugar over the surface of the dough, dividing it evenly between the two strips and leaving ½ inch at the top free of cinnamon sugar.
■Beginning with the edge closest to you, make one small, tight roll away from you. Continue to roll the dough away from you as tightly as you can until you’ve rolled the sheet into a tight roll. Adjust the roll so the seam is on the bottom. Roll the second length of dough in the same way. Place the rolls diagonally on a baking sheet and place them in the refrigerator to chill for 30 minutes. (If you are planning ahead, remove the logs from the refrigerator, wrap them in plastic, and place them in the freezer for up to 1 week.)
Make the topping
■Combine the butter and brown sugar in the bowl of a stand mixer. Fit the mixer with the paddle attachment and mix on low speed until the butter and sugar are incorporated, about 1 minute, stopping once to scrape down the sides of the bowl with a rubber spatula. With the mixer running, drizzle in the cream and mix until it is combined.
Form and proof the buns
■Spray the muffin cups lightly with nonstick cooking spray.
■Scoop the caramel topping into the bottom of the tins, dividing it evenly; you will use about 2 tablespoons (30 grams) in each cup. Use your fingers to pat the topping down into an even layer in each cup.
■Remove the dough logs from the refrigerator and place them on a cutting board. Use a serrated knife to cut the rough end off of the right side of one of the logs. Continue cutting down the length of the log, cutting it into 1½-inch pieces. Cut the rough end off the left side of the log when you get there.
■Place one piece of dough, cut side facing up, in each muffin cup. Repeat with the second log. Cover each muffin tin with a damp, lightweight kitchen towel and set aside in a warm place for the buns to proof for about 2 hours, until they have started to grow and fill out the muffin cups; they will not fill them out completely.
Bake the sticky buns
■While the sticky buns are proofing, arrange the oven racks so one is in the top third of the oven and the other is in the bottom third. Preheat the oven to 350°F.
■Put two muffin tins on each oven rack to bake the sticky buns for 25 to 27 minutes, rotating the pans from front to back and from one rack to the other halfway through the baking time so the cinnamon buns brown evenly. Remove the pans from the oven and let the sticky buns rest in the pans for about 3 minutes, to let the caramel set up. Lay a sheet of parchment paper out on your work surface. Quickly invert the muffin tins over the parchment paper to release the buns onto the paper so that the bottoms of the cinnamon buns, which are coated with caramel, will be the tops. Sprinkle a big pinch of flaky salt on each sticky bun. Serve warm or at room temperature.
Master Recipe
for Croissant Dough
Makes 1 (1,260-gram) block; or enough for 7 Classic Croissants (this page), 12 Pain aux Raisins (this page), or 10 Pain au Chocolat (this page)
This dough is used to make croissants, pain au chocolat, and pain aux raisins. It’s a classic yeasted dough, laminated with butter. Some croissant dough recipes have a little butter in the dough, some do not. Mine does. I think the fat in the dough helps the fat in the lamination and makes for an easier laminating process—the fat molecules can slip and slide together. I wrote this recipe with the home baker in mind. It is a small amount of dough with minimal rolling out, which enables you to create nice, even, perfect layers. Because you’re going to go to the effort of making and laminating croissant dough, I suggest you make a double batch. Double the amount of dough you mix, then divide the dough in half. Make two separate butter packets and laminate each batch of dough individually. Use one block and store the other one in the freezer for up to a week. When you are ready to use the frozen dough, transfer it to the refrigerator overnight. This dough is pretty easy to handle; it is not too soft or sticky, so it’s a great recipe for those who are new to laminating.
You want to make your butter packet in advance, or while the dough is in the refrigerator. Place the packet in the refrigerator to chill until you’re ready to laminate the dough, then remove it from the refrigerator to soften it slightly when called to do so in the recipe.
For the dough
1¼ cups (300 grams) whole milk
3¾ cups (450 grams) bread flour
½ cup (52.5 grams) whole-wheat pastry flour
3 tablespoons (39 grams) granulated sugar
3 tablespoons (42 grams) unsalted butter, cubed and softened
1 tablespoon (9 grams) instant yeast
2½ teaspoons (15 grams) fine sea salt
½ cup (85 grams) Sourdough Starter (this page)
All-purpose flour for dusting
19 tablespoons (2 sticks plus 3 tablespoons) butter packet (this page), chilled (266 grams)
Make the dough
■Line a baking sheet with parchment paper.
■Put the milk in a small saucepan and heat it over low heat until it reaches 70°F on a digital thermometer.
■Put the bread flour, whole-wheat pastry flour, sugar, butter, yeast, and salt in a medium bowl and stir to combine.
■Put the milk and starter in the bowl of a stand mixer. Place the dry ingredients on top. Fit the mixer with the dough hook and mix on low speed for 2 minutes. Increase the speed to medium-high and mix for 5 minutes to develop the gluten in the dough.
■Place a long sheet of plastic wrap on your work surface. Use a plastic bowl scraper to scrape the dough out of the mixer onto the plastic wrap and pat the dough into a square shape. Wrap the plastic wrap around the dough and run a rolling pin over the dough to form an even 8-inch square. (For more detail, see Wrapping Dough, this page.) Place the dough in the refrigerator for 1 hour.
Laminate the Dough
Lock in the butter
■Remove the butter packet from the refrigerator and set it on the counter to soften until it is bendy but still cool; this could take anywhere from 5 to 20 minutes, depending on how cold it is and on the texture of the dough. You want the butter to be slightly softer and more malleable than the dough but not so soft that it will ooze out of the dough.
■Lightly dust a large flat work surface with all-purpose flour. Remove the dough from the refrigerator, unwrap the dough, and place it on the floured surface. Lightly dust the top of the dough and a rolling pin with flour and roll the dough out to a rectangle that is 14 inches from side to side and 11 inches from top to bottom, dusting with flour as needed.
■Open the butter packet to expose the butter and flip the packet over to place the butter on the dough, centering the 10-inch edge of the butter packet on the 11-inch length of dough. Run your hand over the parchment paper so that the heat of your hand helps to peel off the paper. Then peel off and discard the parchment paper. Fold the left and right sides of the dough over the butter so they meet in the middle, and pinch the two edges of dough together with your fingers. Gently press the top and bottom edges of the dough together to seal the packet closed and lock in the butter.
Make a book fold
■Dust your work surface with a bit more all-purpose flour. Dust the top of the dough and the rolling pin with flour and roll the dough to 32 inches from top to bottom, dusting with flour as needed. (Standard kitchen counters are 26 inches deep, so to roll this, one end of the dough will be hanging over the counter while you roll the other end.) Using a pastry wheel or bench knife, trim the top and bottom edges of the dough just enough to expose the layer of butter in the dough. Reserve the trimmings to make Baked Trimmings (this page) or discard them. Fold the top edge of the dough toward the bottom and the bottom edge of the dough toward the top so the two edges meet slightly off-center. Fold the bottom edge to meet the top, like a book.
Make a letter fold
■Rotate the dough 90 degrees so the closed, folded edges are facing left and right, and the open edge, where the layers are visible, is facing you. Lightly dust the work surface, rolling pin, and dough with all-purpose flour and roll out the dough to 18 inches from top to bottom, dusting with flour as needed. Using a pastry wheel or bench knife, trim the top and bottom edges of the dough just enough to expose the layers of butter in the center of the dough. Add the trimmings to your baked trimmings or discard them. Fold the top edge down two-thirds and the bottom edge to meet the top edge, so the dough is folded into thirds, like a letter.
■Wrap the laminated block of dough in plastic and place it in the freezer to chill for 1 hour. Move the dough from the freezer to the refrigerator and let it rest for at least 8 hours and up to 12 hours to retard the dough.
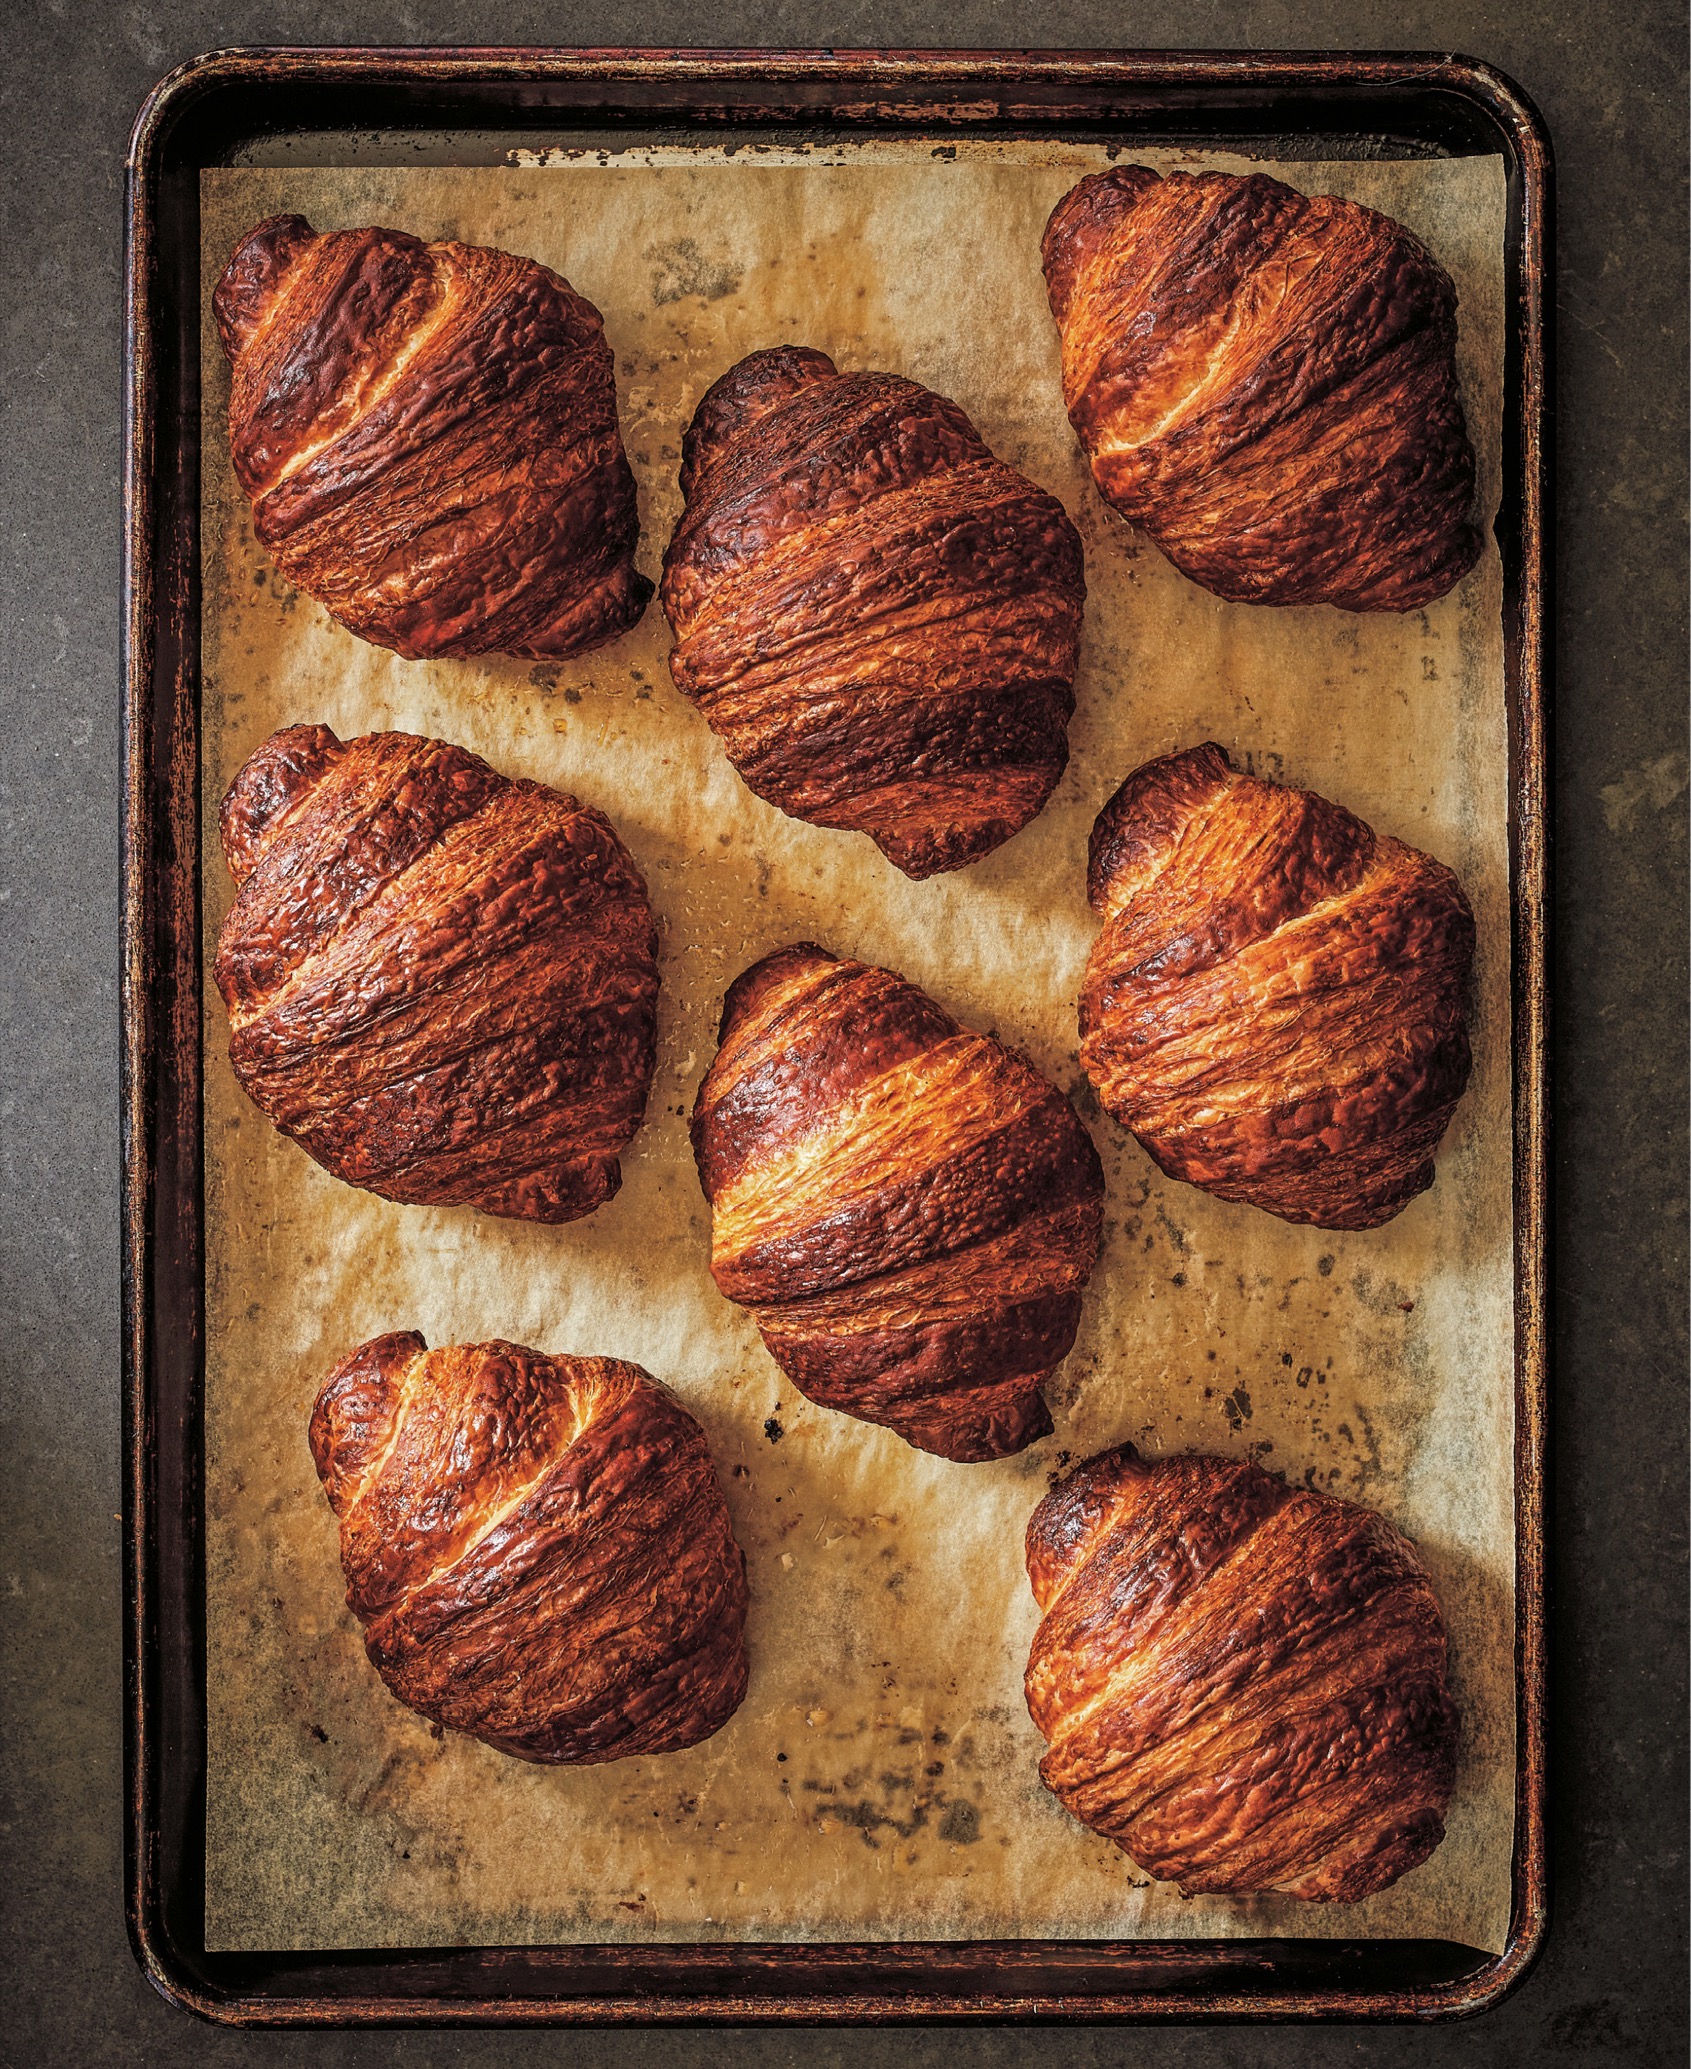
Classic Croissants
Makes 7 croissants
As a baker, my heart is in France, and croissants are such a big part of the French culinary tradition, I was determined to include a recipe in this book that would make perfect-looking croissants at home possible. A cross section of a perfect croissant would show a beautiful, open honeycomb crumb structure. In a professional kitchen, you get this open structure from the gluten that is developed by using a commercial dough sheeter, which you just can’t get when rolling by hand. Through a lot of trial and error, I was able to create a recipe for a croissant with the same even layers and honeycomb look as that you see in a professional bakery.
1 recipe Master Recipe for Croissant Dough (this page)
All-purpose flour for dusting
For baking the croissants
1 large egg (50 grams)
Big pinch fine sea salt
Roll out the dough
■Remove the laminated block of dough from the refrigerator and set it on the counter to rest for 20 to 30 minutes, until you can feel that the butter layers inside the dough are just becoming malleable (but not soft) when you bend the block slightly.
■Line two baking sheets with parchment paper.
■Lightly dust a large flat work surface with flour. Unwrap the dough and place it on the floured surface. Lightly dust the top of the dough and a rolling pin with flour and roll the dough out to a rectangle that is 13 inches from side to side and 12 inches from top to bottom, dusting with flour as needed.
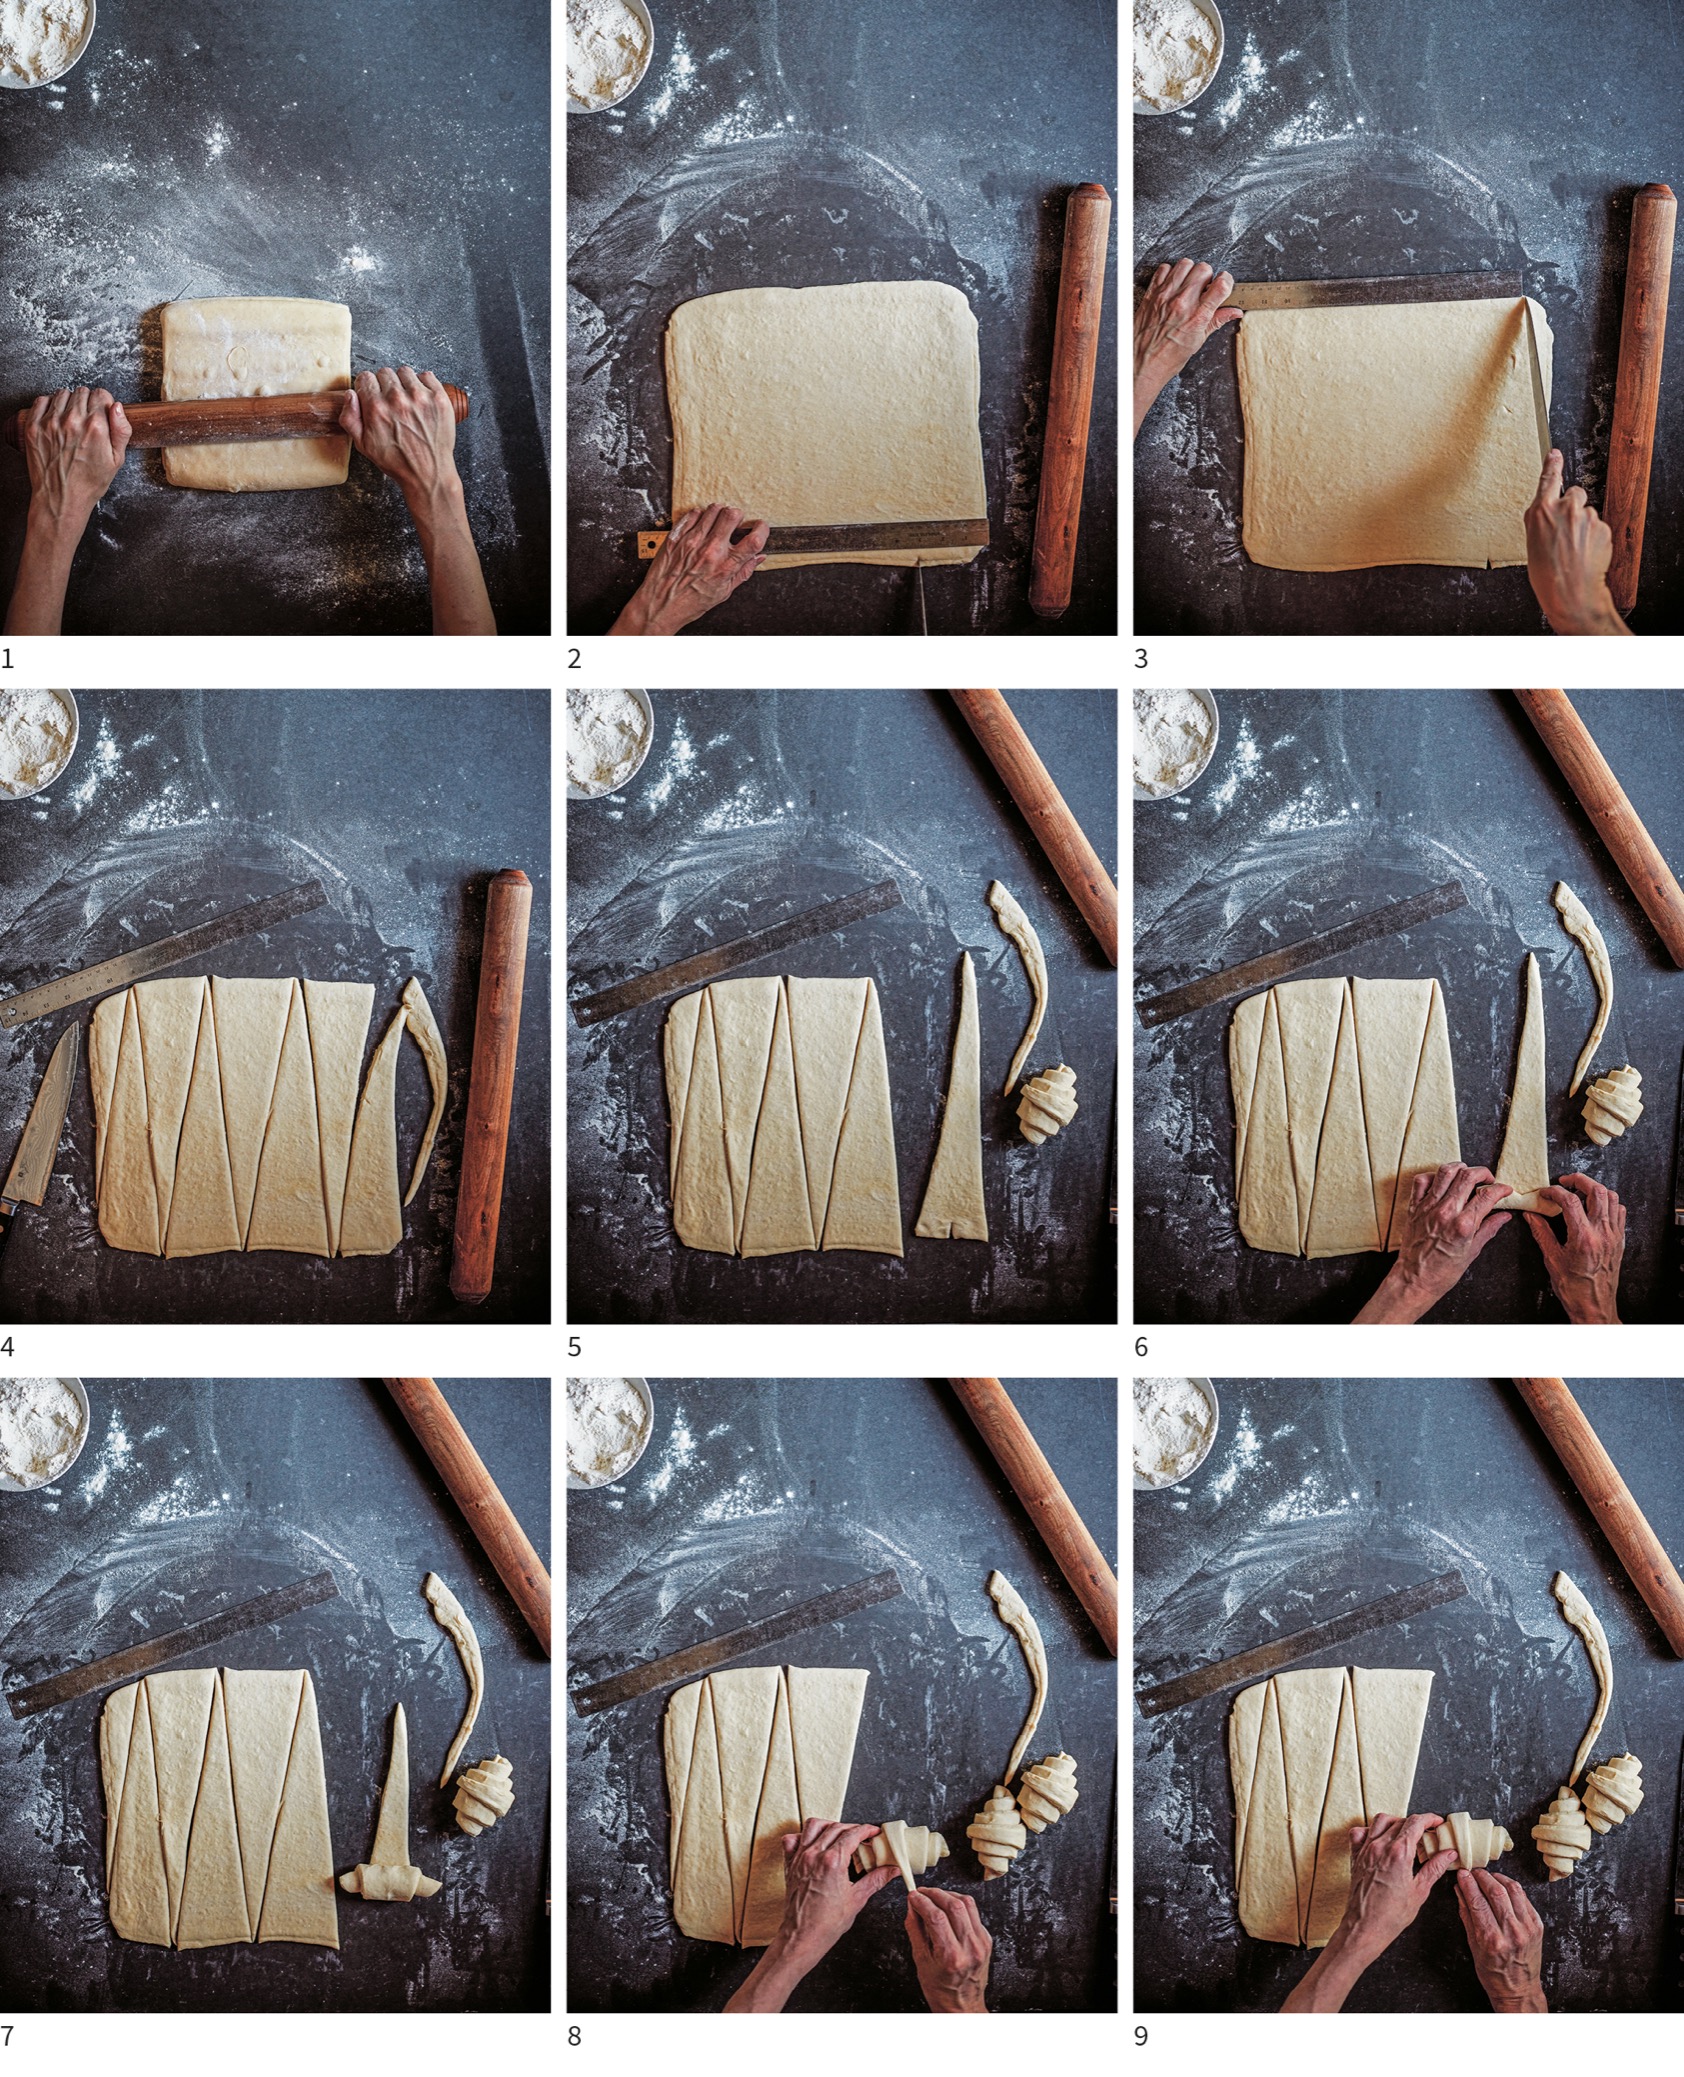
Cut the croissants
■Using a pastry wheel or bench knife, trim the top and bottom edges of the dough. Reserve the trimmings to make Baked Trimmings (this page) or discard them.
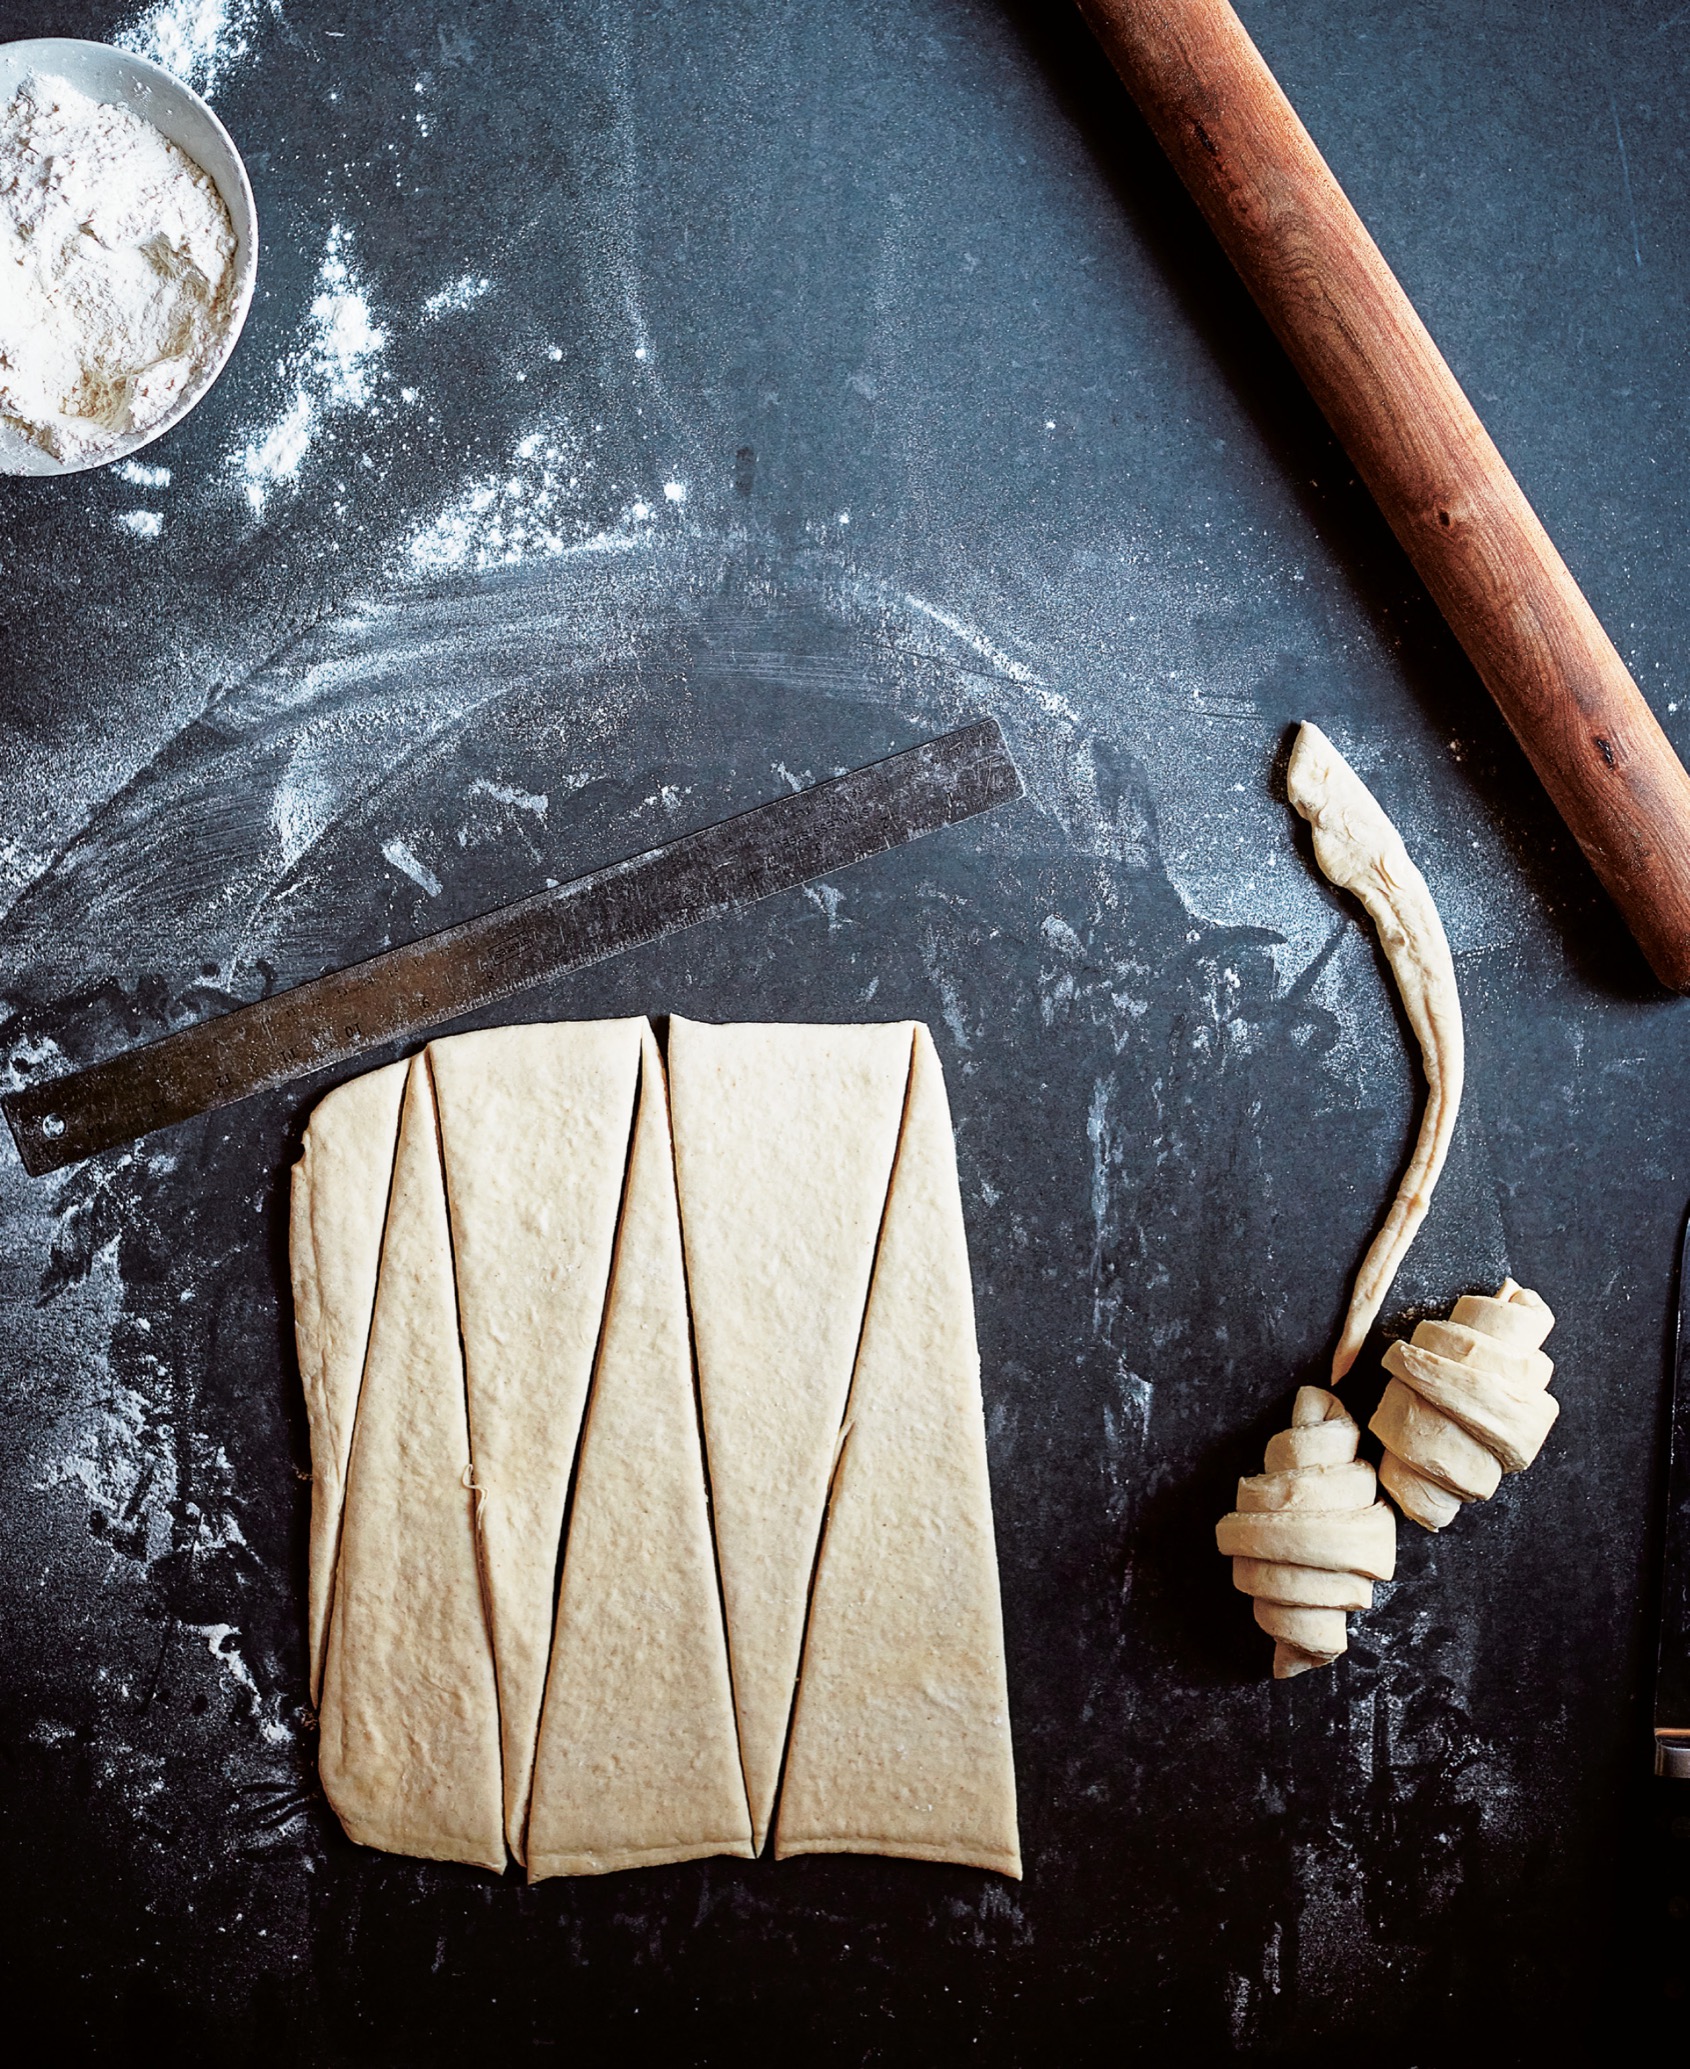
■Starting on the right edge and moving left, use a small sharp knife to score along the bottom edge of the dough every 3 inches. Score one mark 1½ inches from the right edge on the top edge of the dough. Continuing left, from the first mark, score the dough every 3 inches.
■Using a long knife, cut from the lower right corner of the dough to the first score on the top edge of the dough. Then rotate your knife to cut from the top cut to the next mark on the bottom to create a triangle. Continue working your way across the dough, cutting from one mark to another, until you have cut 7 triangles in a backgammon-like formation. Add the misshapen pieces on either end to your baked trimmings or discard them.
Shape and proof the croissants
■Working with one triangle at a time, make a ½-inch-long, perpendicular cut in the center of the short side of the triangle; this cut helps when forming the croissant, to give it an elongated shape. Fold the small flaps of dough created by the small cut from the center toward the outside edges of the triangle.
■Roll the triangle from the base away from you, toward the point, trying to get three full rolls in the dough, ending with the tip of the triangle underneath the croissant, facing the countertop. Place the croissant on one of the prepared baking sheets. Repeat, shaping the remaining croissants in the same way and spacing them evenly between the two baking sheets.
■Gently cover each baking sheet with a damp, lightweight kitchen towel and set the sheets aside in a warm place for 2½ to 3 hours to proof the croissants until they have swelled to one and a half times their size.
Covering dough with a damp kitchen towel prevents it from forming a skin.
Bake the croissants
■While the croissants are proofing, arrange the oven racks so one is in the top third of the oven and the other is in the bottom third. Preheat the oven to 375°F.
■Whisk the egg and salt together in a small bowl to make an egg wash. Uncover the croissants and lightly brush them with the egg wash; discard the remaining egg wash.
■Place one baking sheet on each oven rack to bake the croissants for 25 to 30 minutes, until they are deep golden brown, rotating the baking sheets from front to back and from one rack to the other halfway through the baking time so the croissants brown evenly. Remove the baking sheets from the oven and let the croissants cool on the baking sheets for a few minutes. Use a metal spatula to transfer the pastries to a cooling rack to cool completely. Serve warm or at room temperature.
Twice-Baked Croissants with Sour Cherries and Pistachios
Makes 6 croissants
Around the time I started working on this book, I was working as a consultant, developing the menu for the Walnut Street Café in Philadelphia. I knew I wanted to include a twice-baked croissant on the menu. In the United States, a typical way to make an almond croissant is to pipe almond cream on croissant dough, then roll up the croissant, proof, and bake it. To make the French version, first you start with day-old croissants, which, when you’re running a professional kitchen, is always a great thing. You take the croissant and cut it in half like a sandwich, and then you dunk it in simple syrup. Next you open the croissant like a sandwich, pipe almond cream down the center, close the sandwich, and bake it, so it has this delicate, browned, crunchy exterior and this very moist, flavorful, sweet filling. I love that. I thought of different nut creams I might like in a croissant, and my first instinct was pistachios because I just love them. I also wanted to incorporate jam into the croissant—sour cherry seemed like the perfect pairing. I like that the tart, sour cherry jam balances the sweetness and richness of the pistachio cream. When I first made the pistachio cream, I thought its flavor was too muddled; I couldn’t distinguish it from almond cream. I added apricot kernel oil, which really heightened the distinct pistachio flavor.
Note You will need one large disposable pastry bag.
For the pistachio cream
½ cup (100 grams) granulated sugar
1 cup (100 grams) pistachio flour
7 tablespoons (98 grams) unsalted butter, cubed and softened
¼ teaspoon (2 grams) fine sea salt
2 large eggs (100 grams)
⅛ teaspoon (1 gram) apricot kernel oil (optional)
For the simple syrup
2 cups (400 grams) granulated sugar
2 cups (450 grams) water
For the croissants
6 croissants, day-old (this page; or store-bought)
1 recipe simple syrup
2 tablespoons (40 grams) sour cherry jam (store-bought)
¼ cup (33 grams) pistachios (preferably Sicilian), chopped
¼ cup (30 grams) confectioners’ sugar
Make the pistachio cream
■Put the granulated sugar, pistachio flour, butter, and salt in the bowl of a stand mixer. Fit the mixer with the paddle attachment and mix on low speed until the ingredients are combined and no visible chunks of butter remain, about 2 minutes. Add the eggs, one at a time, mixing on low speed until the first egg is integrated with the rest of the ingredients before adding the second egg, and stopping the mixer to scrape down the sides of the bowl after each addition. Add the apricot kernel oil, if you are using it, and mix to combine.
■Spoon the pistachio cream into a large disposable pastry bag and refrigerate for at least 1 hour for it to set, and up to overnight. (The cream can also be frozen for up to several months.)
Make the simple syrup
■Combine the granulated sugar and water in a medium saucepan and stir so there are no dry patches of sugar. Bring to a boil over high heat, reduce the heat to medium, and boil for 1 minute. Turn off the heat and transfer the simple syrup to a heat-proof medium bowl; you want to choose a bowl that is large enough to hold a croissant easily and deep enough that you can immerse a croissant in it. Set aside to cool to room temperature.
Halve and dip the croissants
■Arrange the oven racks so one is in the center position. Preheat the oven to 350°F.
■Line two baking sheets with parchment paper.
■Using a large serrated knife, slice the croissants in half lengthwise and place them on the prepared baking sheet, dividing them evenly. Picking up one croissant at a time, with one half in each hand, quickly dip the two halves in the syrup, making sure to immerse them completely. Lift the croissant halves out of the simple syrup, sandwich them together in between both hands, and gently squeeze the two halves together, letting the excess syrup drip back into the bowl. Return the dipped croissant, top side up, to the baking sheet and repeat with the remaining croissants, dipping them in the same way.
Fill the croissants
■Remove the tops from the croissants and set them aside. Remove the pistachio cream from the refrigerator and cut a ¾-inch opening in the tip of the pastry bag. Pipe the cream in a 1-inch-wide strip down the center of each croissant bottom.
■Using a small spoon, create a crater in the cream beginning 1 inch from the start of the strip of cream and running down the middle of each strip of cream, stopping about 1 inch before you reach the end of the cream; each crater will be about 3 inches long and ⅜ inch deep. Spoon ½ to 1 teaspoon of jam into each crater scraped out of each line of cream so that the jam is flush with the cream. Place the tops on the croissants and press down on each one gently to adhere the croissant top to the filling.
■Pipe about 1 tablespoon of the pistachio cream in a round on the center of each croissant top. Pick up a big pinch of the chopped pistachios and press them gently into the cream topping.
Bake the croissants
■Put the croissants on the center rack of the oven to bake for about 30 minutes, until the cream topping is gently browned and the edges of the croissants are slightly crisp, rotating the baking sheet from front to back halfway through. Remove the croissants from the oven and transfer them to a cooling rack to cool to room temperature.
■Put the confectioners’ sugar in a fine-mesh strainer and dust it over the croissants.
Ham and Cheese Twice-Baked Croissants
Makes 7 croissants
I lived for a year in France during college. I was in Tours, in the Loire Valley, and I used to purchase these croissants often at the counter of my neighborhood bakery. I would get them heated up—à emporter, which essentially means “to take away”—and eat them on my way to school. It was such an American thing to do—getting lunch like that and eating it on the street! But I enjoyed it. These are made with day-old croissants, so in running a bakery, where you try not to waste anything, it’s a great use for leftovers.
For the béchamel
2 tablespoons (28 grams) unsalted butter
⅓ cup (45 grams) small yellow onion, cut into ¼-inch dice
½ teaspoon (3 grams) fine sea salt
1½ tablespoons (13.5 grams) all-purpose flour
1 cup (240 grams) whole milk, warm
½ teaspoon (< 1 gram) freshly grated nutmeg
For the croissants
7 croissants, day-old (this page; or store-bought)
14 ounces (397 grams) Black Forest ham, thinly sliced
8 ounces (7 ounces thinly sliced; 1 ounce grated) Gruyère cheese (226 grams)
2 tablespoons plus 1 teaspoon (20 grams) Dijon mustard
Make the béchamel
■Put the butter in a small saucepan and heat it over medium heat until it has melted and begins to bubble. Add the onion and sauté over medium heat until the onion has softened but has not begun to brown, about 3 minutes. Add the salt and flour and cook, stirring constantly, for about 1 minute to cook off the flour taste. Add the warm milk in a steady stream, stirring constantly while you add it. Stir in the nutmeg. Bring the béchamel sauce to a gentle boil, stirring constantly, and cook for about 2 minutes, until it is thick enough to coat the back of a spoon. Transfer the béchamel to a small bowl and set aside to cool to room temperature.
Assemble the croissants
■Line two baking sheets with parchment paper.
■Using a large serrated knife, slice the croissants in half lengthwise. Put the croissants on your counter or a cutting board. Take off the tops and put the tops, cut side up, in back of the bottoms; you are forming a sandwich production line. Use a small offset spatula to spread about 1 tablespoon (25 grams) of the béchamel over the bottom half of each croissant. Fold 2 ounces (50 grams) of the ham like a letter and place on each croissant, folding the ham further so it doesn’t hang over the edges. Place 1 ounce (28 grams) of the sliced Gruyère on top of each portion of ham and spread a small dollop (about 1 teaspoon) of mustard on the cheese with the back of a spoon. Place the tops on the croissants and press down gently to seal the sandwiches closed. Place the croissants on the prepared baking sheets, dividing them evenly between the baking sheets. Dollop a spoonful of béchamel on top of each croissant and sprinkle with the grated Gruyère cheese, dividing it evenly among the sandwiches.
■Arrange the oven racks so one is in the top third of the oven and the other is in the bottom third. Preheat the oven to 350°F.
■Place one baking sheet on each baking rack to bake the croissants for approximately 30 minutes, until the béchamel is golden brown and the grated cheese has melted, rotating the baking sheets from front to back and from one rack to the other halfway through the baking time so the croissants brown evenly. Remove the croissants from the oven and transfer them to a cooling rack to cool. Serve warm or at room temperature.
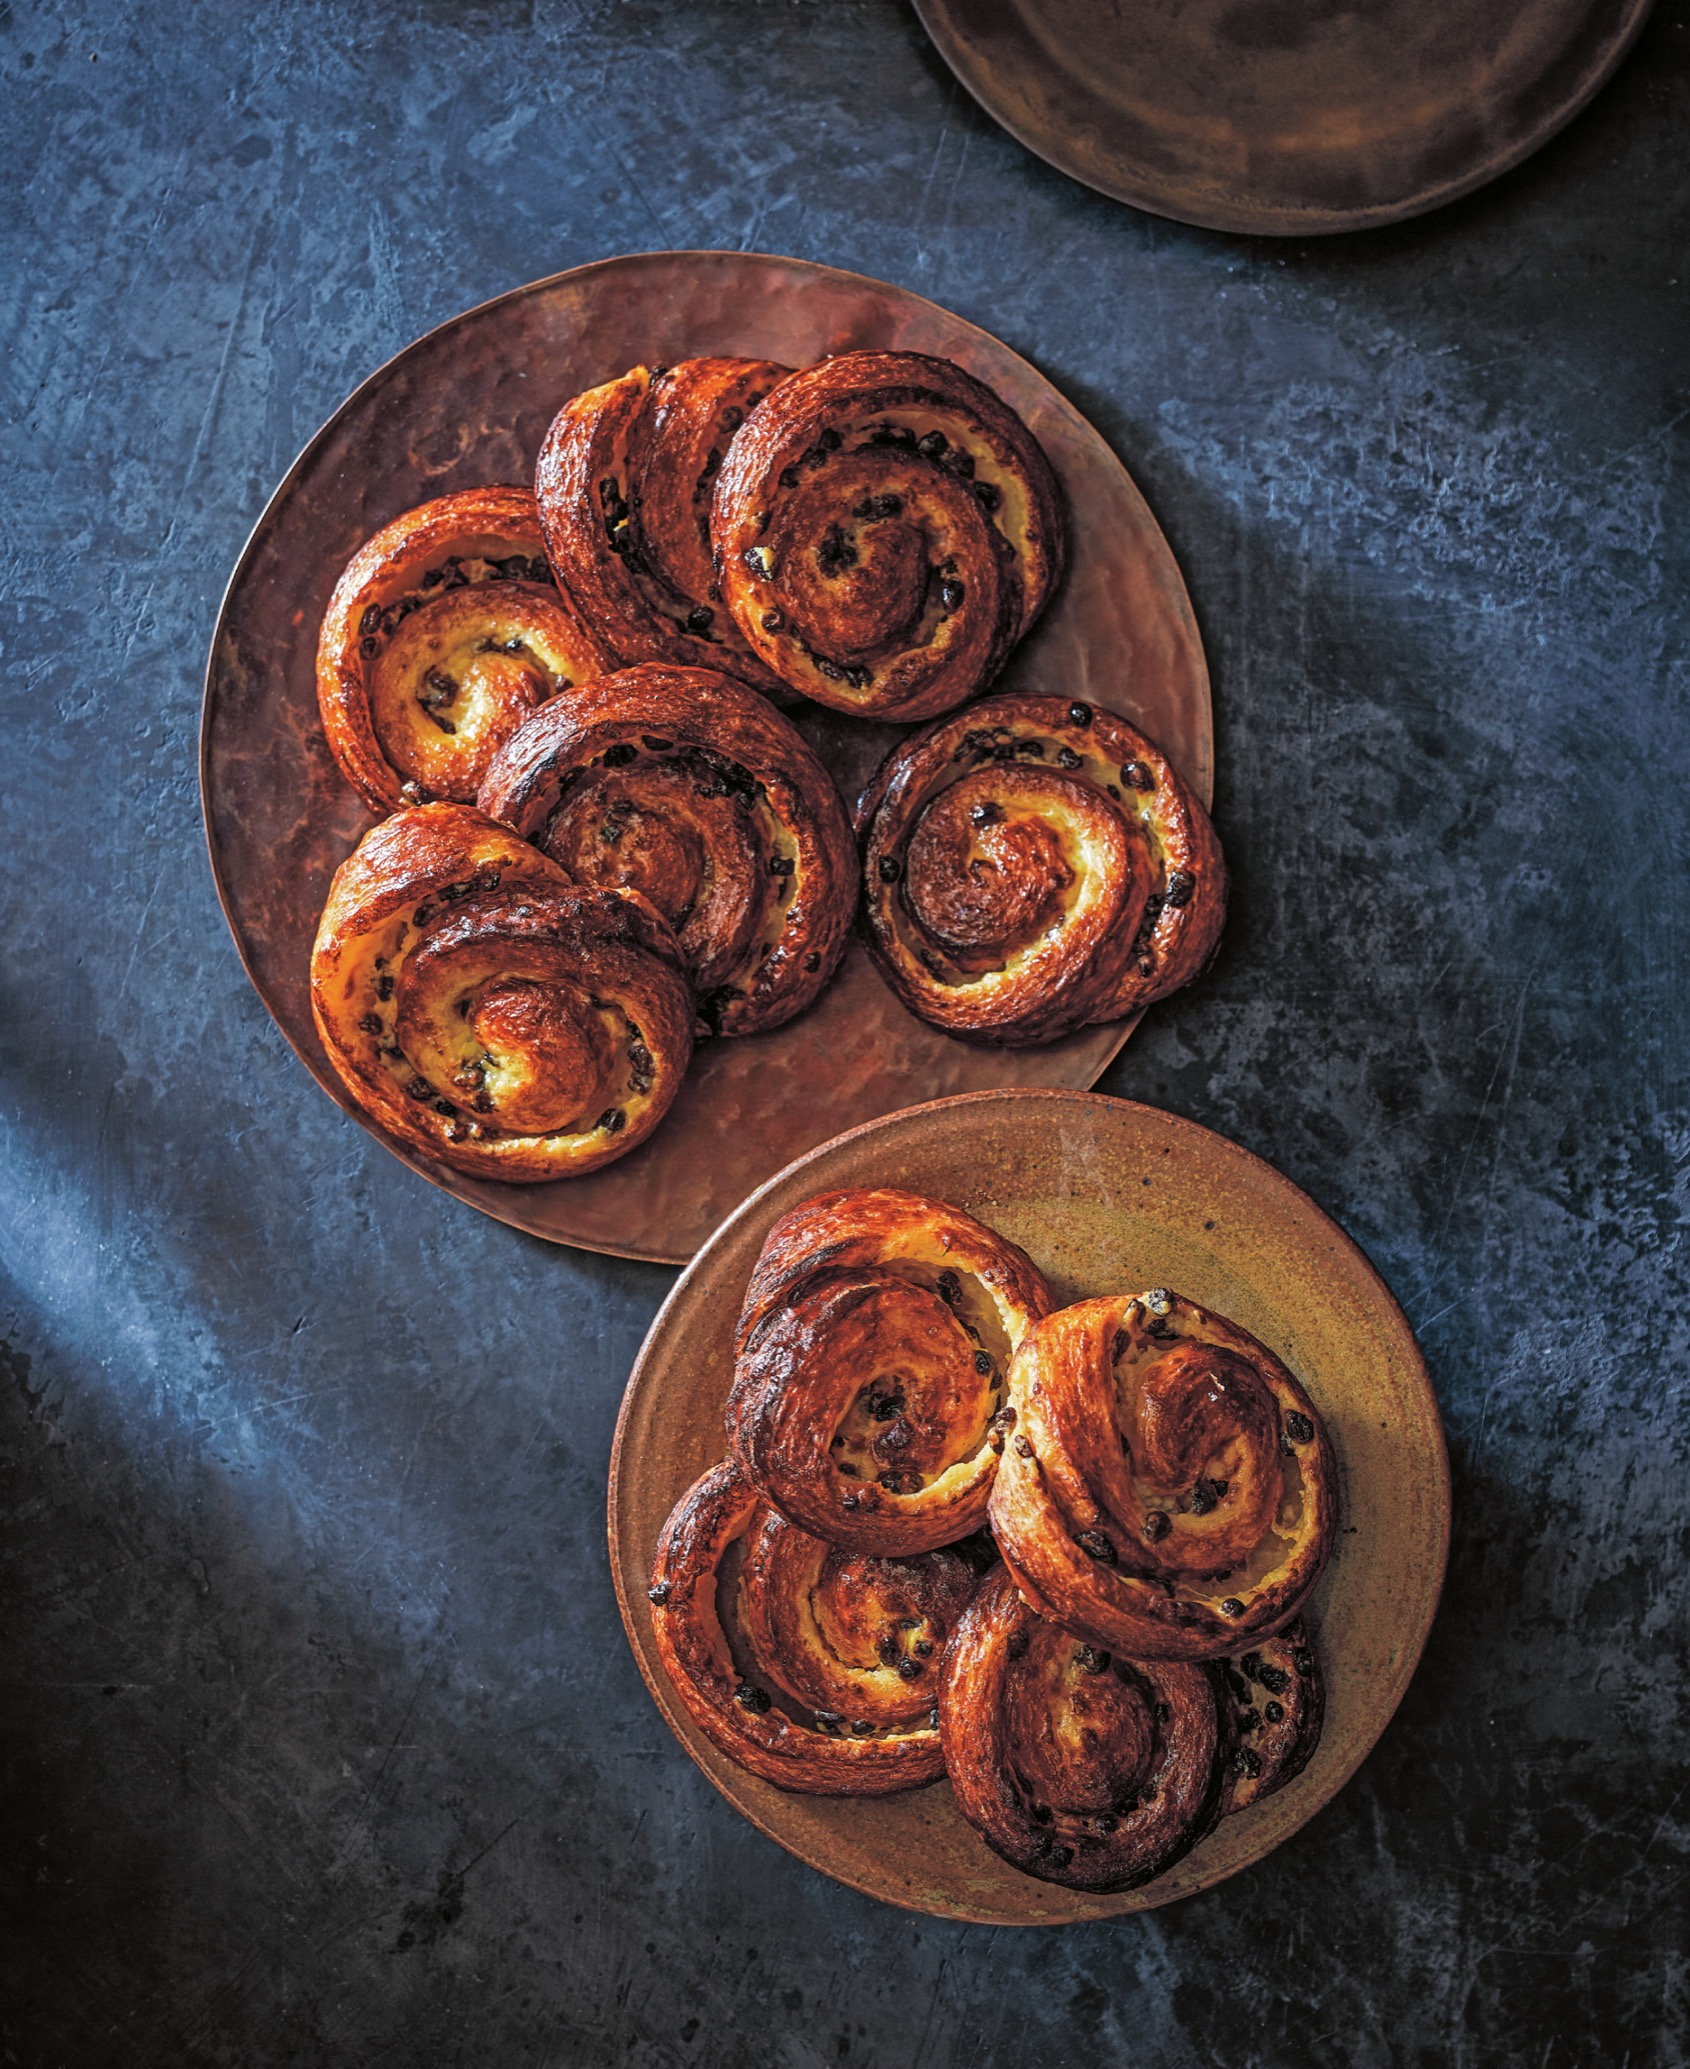
Pain aux Raisins

Makes 1 dozen pains aux raisins
In France this spiral pastry is often called an escargot, or “snail.” Germans have a similar pastry called a zimtschnecke, or “cinnamon snail.” Although it does look a bit like a snail, I always just call it pain aux raisins. The dough is sweet and caramelized, so it’s a little bit crunchy, and between the spirals are layers of dried currants and vanilla pastry cream. I changed the traditional raisins to currants; I like currants better than raisins because of their slightly tarter flavor. I soak the currants in grappa or brandy, which gussies up the flavor and also softens them, but if you don’t have these spirits or don’t want to use them, soak the currants in water instead. Otherwise, I stayed true to the original and my memory of enjoying them when I was a college student in France.
1 cup (135 grams) dried currants
¼ cup (56 grams) Grappa or brandy (optional)
1 recipe Master Recipe for Croissant Dough (this page)
All-purpose flour for dusting
1½ cups (380 grams) vanilla Bean Pastry Cream (recipe follows)
For baking and finishing the pain aux raisins
1 large egg (50 grams)
Big pinch fine sea salt
¼ cup (85 grams) Blood Orange Jam (this page; or store-bought apricot jam)
1 tablespoon water
Soak the currants
■Put the currants in a small bowl. Add the grappa or brandy, if you are using it. Add enough hot tap water to cover the currants. Set the currants aside to soak for 10 minutes. Drain the currants in a fine-mesh strainer and let them sit in the strainer to drain any remaining water while you roll out the dough.
Roll out the dough
■Remove the laminated block of dough from the refrigerator and set it on the counter to rest for 20 to 30 minutes to soften the butter layers, until you can feel that the butter layers inside the dough are just becoming malleable (but not soft) when you bend the block slightly.
■Lightly dust a large flat work surface with flour. Unwrap the dough and place it on the floured surface. Lightly dust the top of the dough and a rolling pin with flour and roll the dough out to a 15-inch square, dusting the work surface, rolling pin, and top of the dough lightly with flour as you roll the dough, so it doesn’t stick. The dough will want to spring back; when you feel resistance, let the dough rest for a minute or two and resume rolling until you reach the desired dimensions.
■Line two baking sheets with parchment paper.
Roll, cut, and shape the pastries
■Dollop the pastry cream onto the dough. Use a large offset spatula to spread the pastry cream in an even layer to cover the surface of the dough, making sure to spread it all the way to the edges. Sprinkle the currants in an even layer over the pastry cream.
■Beginning with the edge closest to you, make one small, tight roll away from you. Continue to roll the dough away from you as tightly as you can until you’ve rolled the sheet into a tight roll. Adjust the roll so the seam is on the bottom. Use a serrated knife to trim the ends of the roll. Reserve the trimmings to make Baked Trimmings (this page) or discard them. Slice the roll into 1-inch-thick “snails.”
■Pick up one pain aux raisins and tuck the tail end of the dough toward the center. Then place the pastry with the tucked end down on one of the prepared baking sheets. Repeat, shaping the remaining pastries in the same way and dividing them evenly between the baking sheets.
Tucking the tail of the dough under the pastry prevents it from springing open or coming unraveled when it bakes.
■Cover each baking sheet with a damp, lightweight kitchen towel and set the sheets aside in a warm place to proof the pastries for about 2 hours, until they have swelled to one and a half times their size.
Bake the pastries
■While the pastries are proofing, arrange the oven racks so one is in the top third of the oven and the other is in the bottom third. Preheat the oven to 375°F.
Stacking two baking sheets together is a useful trick when you need to keep the bottoms of a pastry from darkening too much while the tops brown.
■Place one baking sheet on each oven rack to bake the pastries for 25 to 30 minutes, until they are deep golden brown, rotating the baking sheets from front to back and top to bottom halfway through the baking time so the snails brown evenly.
■While the pains aux raisins are baking, combine the jam and water in a small saucepan over medium heat and bring to a boil, whisking to break up the jam. Turn off the heat.
■Remove the pains aux raisins from the oven and brush the tops with the jam glaze. Return the pastries to the oven for 1 to 2 minutes, until the glaze is set; it will look sticky, not glistening. Remove the baking sheets from the oven and let the pastries cool on the baking sheets for a few minutes. Use a metal spatula to transfer the pastries to a cooling rack to cool completely. Serve warm or at room temperature.
Vanilla Bean Pastry Cream
Makes about 2½ cups
Pastry cream is a thick, egg-based custard used often in French pastry. Where other custards, such as crème anglaise and lemon curd, are thickened with eggs, pastry cream is thickened with cornstarch. The cornstarch prevents the eggs from curdling, which is a constant worry when making other egg-based custards. When cooked, starch absorbs heat and water and swells. This swelling is what causes the pastry cream to thicken. Egg proteins also react to heat. The egg proteins, which start out wound up like little balls, begin to unwind. They cross-link to each other as they unwind, and moisture gets trapped between them; this is what causes egg-based custard to set. A little too much heat, though, and egg-based custard goes from set to curdled instantly. But if there is starch in the mix, it gets in the way of the egg proteins and prevents them from cross-linking. The starch molecules absorb liquid, swell, and link to each other, which causes the starch to thicken. This thickening happens in pockets and clumps. So, when making pastry cream, you have to whisk vigorously while cooking to smooth out the lumps of swollen starches and break them up into smaller pieces. It is the same when you make gravy or béchamel. Unlike custards made with only eggs, it is almost impossible to curdle pastry cream.
2 cups (480 grams) whole milk
1 vanilla bean
½ cup (100 grams) granulated sugar
3 tablespoons (25.5 grams) cornstarch
⅛ teaspoon (1 gram) fine sea salt
6 large egg yolks (102 grams)
4 tablespoons (½ stick) Unsalted butter, cubed and softened (56 grams)
■Put the milk in a medium saucepan. Split the vanilla bean down the middle with a small sharp knife and use the knife to scrape the seeds out of the bean. Add the bean and seeds to the saucepan with the milk.
■Pour half of the sugar into a medium bowl and add the remaining sugar to the saucepan with the milk. (The halves of sugar can be eyeballed; they don’t need to be exact. The sugar added to the milk helps to keep the milk from scorching on the bottom of the pan.) Warm the milk and sugar over medium-high heat, stirring occasionally, until the mixture begins to bubble around the edges.
■Meanwhile, place a dampened kitchen towel under the bowl with the sugar; this will prevent it from sliding around when you begin whisking. Add the cornstarch and salt to the bowl and whisk to combine. Add the egg yolks and whisk for about 30 seconds to lighten them slightly. Drizzle in 1 cup of the hot milk, whisking constantly. Add the remaining milk 1 cup at a time, whisking constantly. Return the mixture to the saucepan and bring it to a boil over high heat, stirring constantly with the whisk. (You need to be able to see that it’s boiling, and if you’re whisking too furiously, it froths and you can’t see it.) When the mixture starts to boil, reduce the heat to medium-low and cook for 2 minutes to swell the cornstarch, whisking furiously to work out any lumps that have formed in the cream. (The reason we’re cooking the custard at this point is not to thicken it—it will be thick before the 2 minutes are up—but to cook the starch in the cornstarch so you don’t taste it, and also to destroy the alpha amylase enzyme in the egg, which can cause the custard to break down after it’s cooked.) Remove the saucepan from the heat, add the butter, and whisk until the butter has melted and combined with the cream. Remove the vanilla bean. (Use the bean to make Vanilla Sugar, this page, or discard it.)
■Set a fine-mesh strainer over a bowl or storage container. Pass the pastry cream through the strainer to remove any lumps, pressing on the cream with a rubber spatula to push it through the strainer. Place a sheet of plastic wrap on top of the pastry cream and press it so it sits directly on the surface to prevent a skin from forming. Cover the container with a lid and refrigerate for at least 1 hour and up to 3 days.
Pain au Chocolat

Makes 10 pains au chocolat
These are often called chocolate croissants, but I prefer to use their French name, pain au chocolat, which translates as “chocolate bread.” Originally, pains au chocolat were made by wrapping bread dough around a stick of chocolate, then at some point, bakers started using croissant dough instead. I started making these when I was working at Roberta’s and my son was two years old. I would take a pastry with me to his swim class for an after-class treat. He would get so excited; he would rip it open and eat the chocolate stick inside first. It is still his favorite. To this day, it’s the first thing he orders when we go to France, and the first thing he does when he gets one is open it up to eat the chocolate first. He’s become somewhat of an expert on them: When he opens up the pastry, we both count to see how many sticks of chocolate the baker used. If the number is fewer than two, we give each other a disapproving look.
Note Chocolate batons are sticks of dark chocolate, formed and sold specifically for making croissants. You can find them at baking supply stores and online. If you cannot find them, use Valrhona feves.
1 recipe Master Recipe for Croissant Dough (this page)
20 (or 40 semisweet chocolate feves) semisweet chocolate batons
For baking the pain au chocolat
1 large egg (50 grams)
Big pinch fine sea salt
Roll out the dough
■Remove the laminated block of dough from the refrigerator and set it on the counter to rest for 20 to 30 minutes, until you can feel that the butter layers inside the dough are just becoming malleable (but not soft) when you bend the block slightly.
If the butter in the laminating dough is too cold and hard, it will shatter when you roll it, resulting in an uneven lamination; the finished pastry won’t have even layers, and it will not rise as high.
■Lightly dust a large flat work surface with flour. Unwrap the dough and place it on the floured surface. Lightly dust the top of the dough and a rolling pin with flour and roll the dough out into a rectangle that is 20 inches from side to side and 12 inches from top to bottom, dusting with flour as needed. The dough will want to spring back; when you feel resistance, let the dough rest for a minute or two and resume rolling until you reach the desired dimensions.
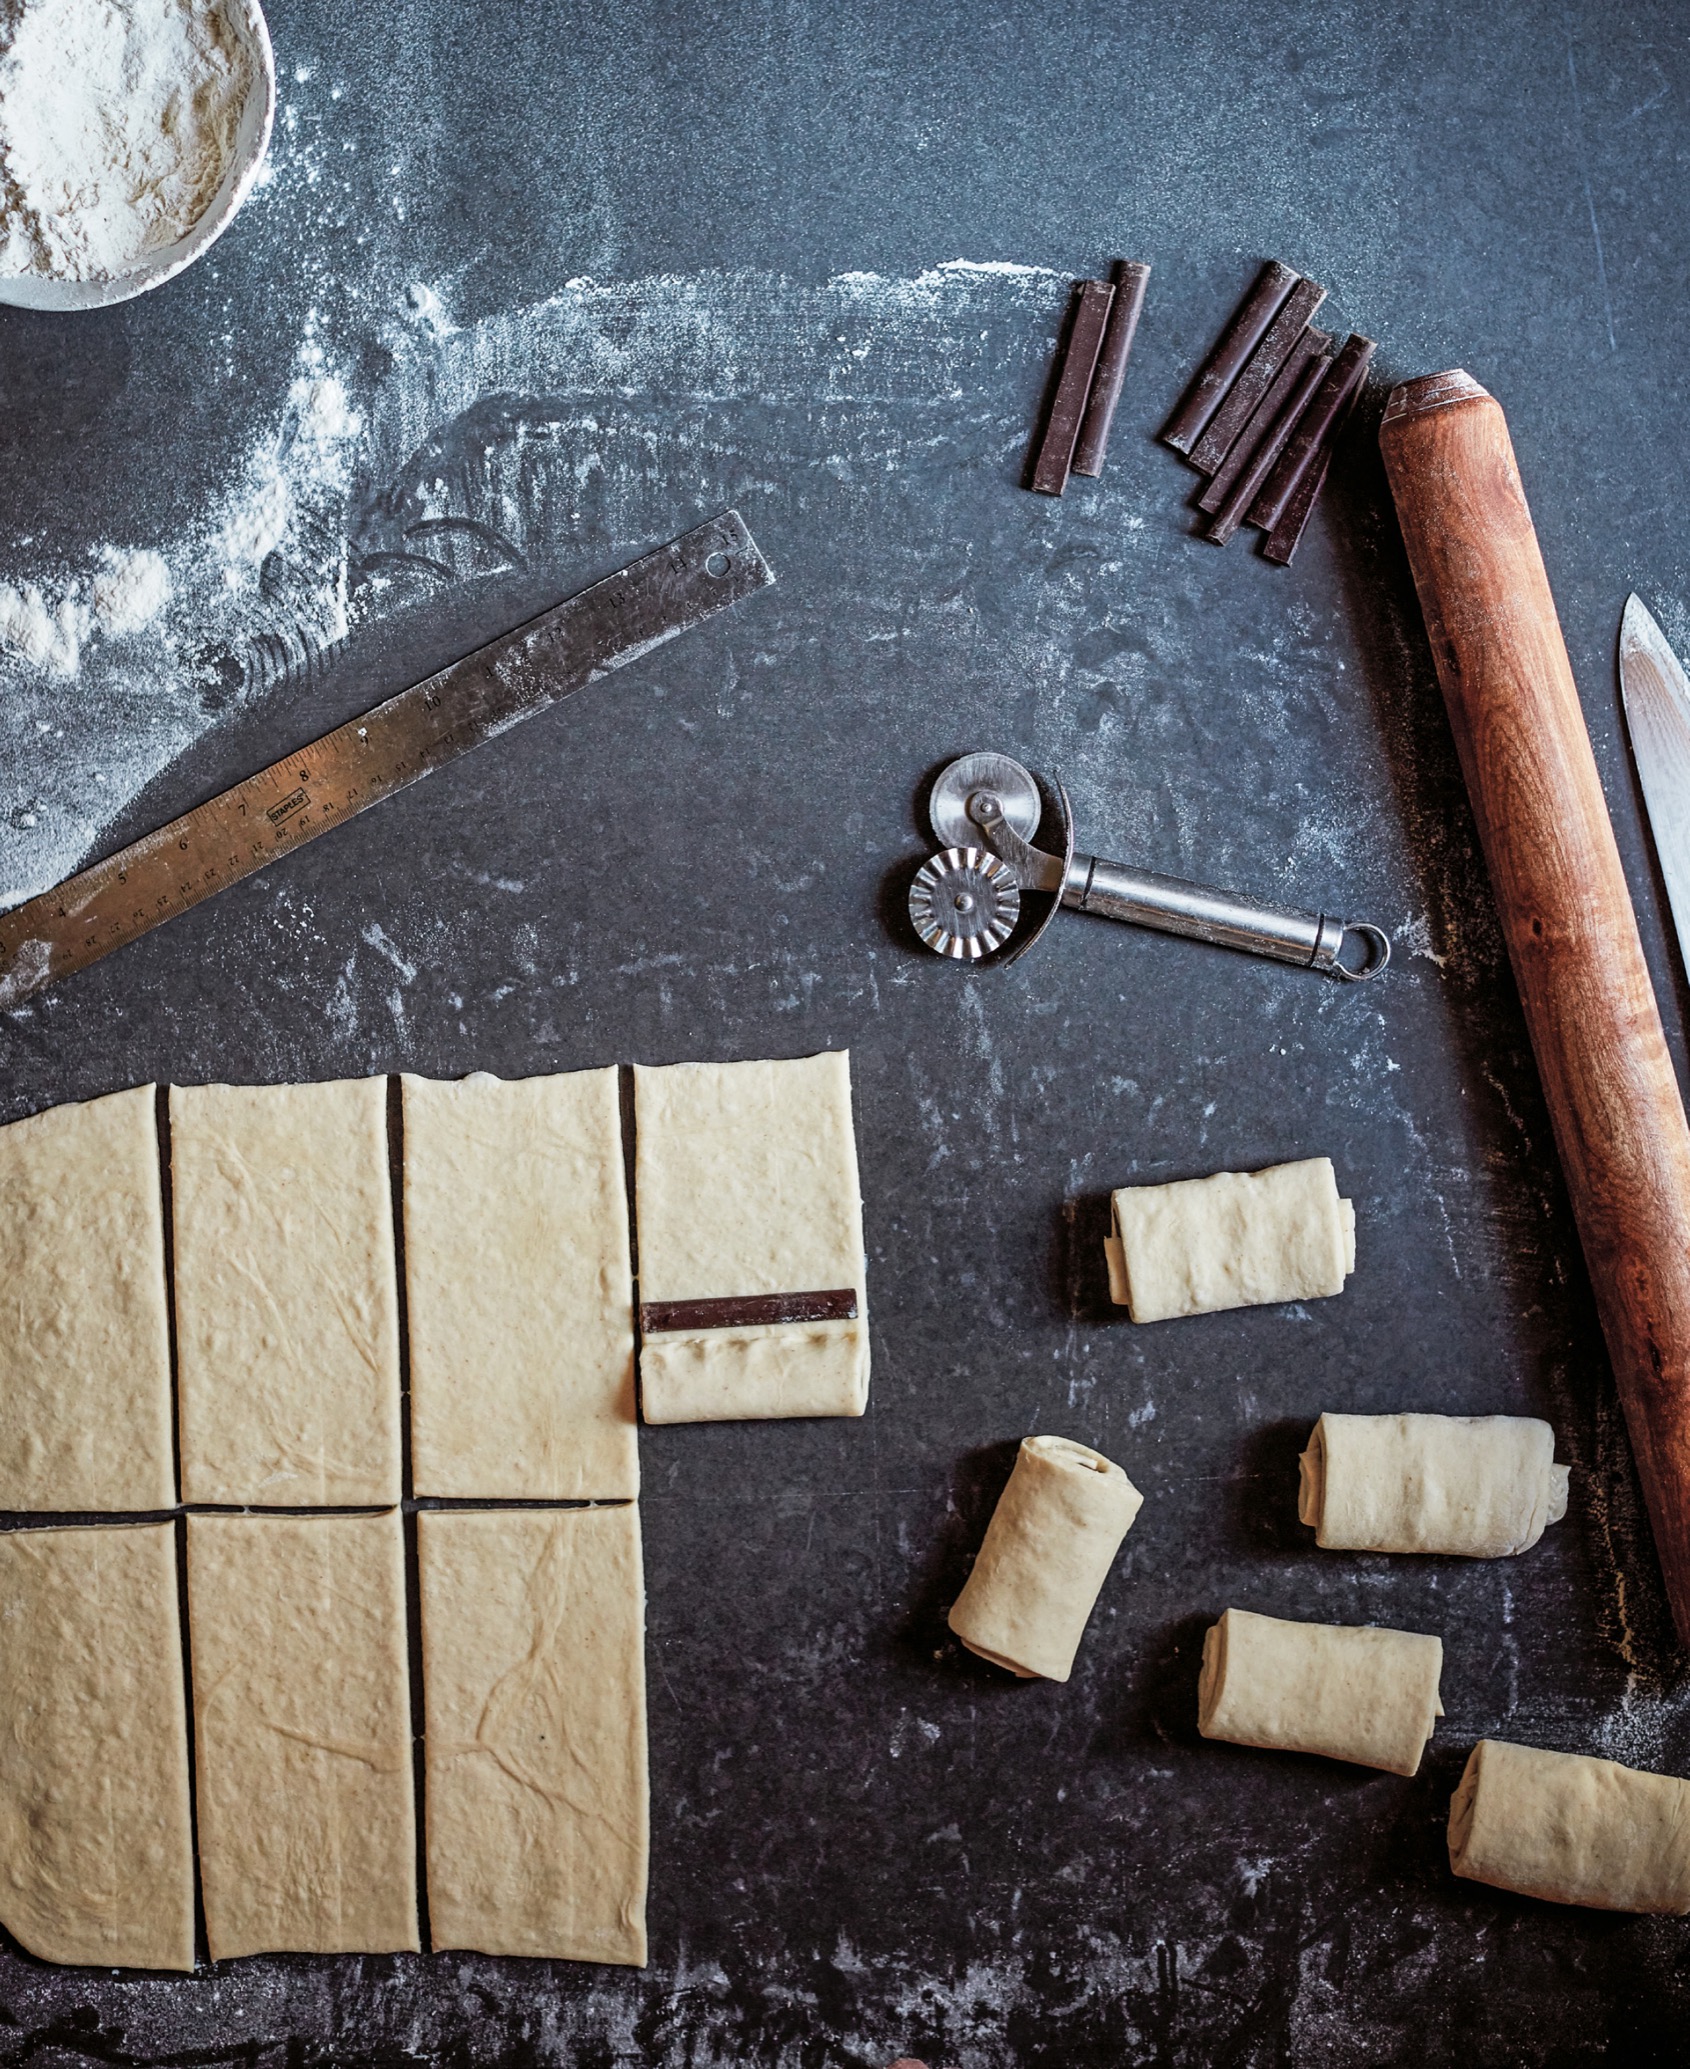
Cut the pains au chocolat
■Using a straightedge and pastry wheel or large knife, trim the edges of the dough, cutting as little as needed to make straight, even edges. Reserve the trimmings to make Baked Trimmings (this page) or discard them. Cut the dough in half lengthwise so you have 2 (6-inch-wide) strips of dough.
■Use a straightedge and pastry roller to cut the dough into 3½-inch-wide rectangles. Add the end pieces to your baked trimmings or discard them. Cut the second strip of dough in the same way.
Shape and proof the pains au chocolat
■Line two baking sheets with parchment paper.
■Without moving the dough rectangles, place 1 stick of chocolate (or 2 feves) along the bottom short edge of the dough and fold the dough over the chocolate as if you are wrapping fabric around a rectangular bolt of cardboard. Once the chocolate is no longer visible, place another chocolate stick (or 2 feves) along the edge of the dough and fold the dough over the chocolate again to “close” the pain au chocolat. The seam should be in the center of the bottom, otherwise the pain au chocolat will pop open when it bakes. If the seam isn’t underneath, gently roll the pastry to shift it. Gently press on the pastry with the palm of your hand to give the pastry the shape of a rectangle with rounded edges. Place it on one of the prepared baking sheets and repeat, filling the remaining rectangles with the remaining chocolate and shaping them as you did the first one. Place 5 on each baking sheet.
■Cover each baking sheet with a damp, lightweight kitchen towel and set the sheets aside in a warm place to proof the pains au chocolat for about 2 hours, until they look swollen and are about one and a half times their original size.
When you are working with delicate dough, such as laminated dough, you want to use a very lightweight kitchen towel when proofing to prevent squishing the pastries in the process.
Bake the pastries
■While the pains au chocolat are proofing, arrange the oven racks so one is in the top third of the oven and the other is in the bottom third. Preheat the oven to 375°F.
■Whisk the egg and salt together in a small bowl to make an egg wash. Uncover the sheets and brush the pains au chocolat with the egg wash.
■Place one baking sheet on each oven rack to bake the pastries for 25 to 28 minutes, until the tops are golden brown, rotating the baking sheets from front to back and from one rack to the other halfway through the baking time so the pastries brown evenly. Remove the baking sheets from the oven and let the pains au chocolat cool on the baking sheets for a few minutes. Use a metal spatula to transfer the pastries to a cooling rack to cool. Serve warm or at room temperature.
Double Chocolate Croissants
Makes 10 croissants
I got the idea for these croissants after making a chocolate babka with a chocolate dough (instead of the traditional plain dough and chocolate filling) and a white chocolate filling. The babka was so delicious that I decided to try making chocolate-on-chocolate croissants, and I loved them. The dough contains cocoa powder, which has a slightly savory quality to it, so to make them sufficiently sweet, I increase the sugar in the dough, and I fill them with more chocolate than I do with traditional pains au chocolat.
The cocoa powder absorbs some of the liquid in the dough, creating a tighter dough that is more difficult to roll, both during the lamination process and when cutting. This recipe calls for you to rest the dough periodically during the rolling process, which helps to relax the gluten.
You want to make your butter packet in advance, or while the dough is in the refrigerator. Place the packet in the refrigerator to chill until you’re ready to laminate the dough, then remove it from the refrigerator to soften it slightly when called to do so in the recipe.
Note Chocolate batons are sticks of dark chocolate, formed and sold specifically for making croissants. You can find them at baking supply stores and online. If you cannot find them, use Valrhona feves.
For the dough
1⅓ cups plus 1 tablespoon (335 grams) whole milk
4 cups plus 2 tablespoons (498 grams) bread flour
¾ cup (64 grams) cocoa powder (preferably Valrhona)
½ cup plus 1 tablespoon (63 grams) granulated sugar
1 tablespoon (9 grams) instant yeast
2½ teaspoons (15 grams) fine sea salt
⅔ cup (113 grams) Sourdough Starter (this page)
4 tablespoons (½ stick) unsalted butter, cubed and softened (56 grams)
19 tablespoons (2 sticks plus 3 tablespoons) Butter Packet (this page) (266 grams)
For shaping the croissants
All-purpose flour for dusting
20 (or 40 semisweet chocolate feves) semisweet chocolate batons
For baking the croissants
1 large egg (50 grams)
Big pinch fine sea salt
Make the dough
■Put the milk in a small saucepan and heat it over low heat until it reaches 70°F on a digital thermometer.
■Put the bread flour, cocoa powder, sugar, yeast, and salt in a medium bowl and stir to combine.
■Put the milk, starter, and 4 tablespoons butter (56 grams) in the bowl of a stand mixer. Place the dry ingredients on top. Fit the mixer with the dough hook and mix on low speed for about 3 minutes, until the dough comes together and no chunks of butter are visible.
■Place a long sheet of plastic wrap on your work surface. Use a plastic bowl scraper to scrape the dough out of the mixer onto the plastic wrap and pat the dough into a square shape. Wrap the plastic wrap around the dough and run a rolling pin over the dough to form an even 8-inch square. (For more detail, see Wrapping Dough, this page.) Place the dough in the refrigerator for 1 hour.
Laminate the Dough
Lock in the butter
■Remove the butter packet from the refrigerator and set it on the counter to soften until it is bendy but still cool; this could take anywhere from 5 to 20 minutes, depending on how cold it is and on the texture of the dough. You want the butter to be slightly softer and more malleable than the dough but not so soft that it will ooze out of the dough.
■Lightly dust a large flat work surface with all-purpose flour. Remove the dough from the refrigerator, unwrap the dough, and place it on the floured surface. Lightly dust the top of the dough and the rolling pin with flour and roll the dough out to a rectangle that is 14 inches from side to side and 11 inches from top to bottom, dusting with flour as needed.
■Open the parchment packet to expose the butter and flip the packet over to place the butter on the dough, centering the 10-inch edge of the butter packet on the 11-inch length of dough. Run your hand over the parchment paper so that the heat of your hand helps to peel off the paper. Peel off and discard the parchment paper. Fold the left and right sides of the dough over the butter so they meet in the middle and pinch the two edges of dough together with your fingers. Gently press the top and bottom edges of the dough together to seal the packet closed and lock in the butter.
Make a book fold
■Dust your work surface with a bit more all-purpose flour. Dust the top of the dough and the rolling pin with flour and roll the dough lengthwise to 32 inches from top to bottom, dusting the work surface, rolling pin, and top of the dough lightly with flour as you roll the dough. (Standard kitchen counters are 26 inches deep, so to roll this, one end of the dough will be hanging over the counter while you roll the other end.) Using a pastry wheel or bench knife, trim the top and bottom edges of the dough just enough to expose the layer of butter in the center of the dough. Reserve the trimmings to make Baked Trimmings (this page) or discard them. Fold the top edge of the dough toward the bottom and the bottom edge of the dough toward the top so the two edges meet slightly off-center. Fold the bottom edge to meet the top, like a book.
Make a letter fold
■Rotate the dough 90 degrees so the closed, folded edges are facing left and right, and the open edge, in which the layers are visible, is facing you. Lightly dust the work surface, rolling pin, and dough with all-purpose flour and roll out the dough to 18 inches from top to bottom, dusting with flour as needed. Using a pastry wheel or bench knife, trim the top and bottom edges of the dough just enough to expose the layers of butter in the center of the dough. Add the trimmings to your baked trimmings or discard them. Fold the top edge down two-thirds and fold the bottom edge to meet the top edge, so the dough is folded into thirds, like a letter.
■Wrap the laminated block of dough in plastic wrap and place it in the freezer to chill for 1 hour. Move the dough from the freezer to the refrigerator and let it rest for at least 8 hours and up to 12 hours to retard the dough.
Roll out the dough
■Remove the laminated block of dough from the refrigerator and set it on the counter to rest for 20 to 30 minutes, until you can feel that the butter layers inside the dough are just becoming malleable (but not soft) when you bend the block slightly.
■Lightly dust a large flat work surface with all-purpose flour. Unwrap the dough and place it on the floured surface. Lightly dust the top of the dough and the rolling pin with flour and roll the dough out into a rectangle that is 20 inches from side to side and 12 inches from top to bottom, dusting with flour as needed. The dough will begin to spring back and resist being rolled to these dimensions. You will need to stop to let the gluten relax for a few minutes two or three times during the rolling process.
Cut the croissants
■Using a straightedge and pastry wheel or large knife, trim the edges of the dough, cutting as little as needed to make straight, even edges. Add the trimmings to your baked trimmings or discard them. Cut the dough in half lengthwise so you have 2 (6-inch-wide) strips of dough.
■Use a straightedge and pastry roller to cut the dough into 3½-inch-wide rectangles. Add the end pieces to your baked trimmings or discard them. Cut the second strip of dough in the same way.
Shape and proof the croissants
■Line two baking sheets with parchment paper.
■Place 1 stick of chocolate (or 2 feves) along the bottom short edge of the dough and fold the dough over the chocolate, as if you are wrapping fabric around a rectangular bolt of cardboard. Once the chocolate is no longer visible, place another chocolate stick (or 2 feves) along the edge of the dough and fold the dough over the chocolate again. Add 1 more baton (or 2 more feves) and fold the dough to “close” the croissant. The seam of the croissant should be in the center of the bottom of the croissant; if it isn’t, gently roll the croissant so the seam is underneath the croissant. Gently press on the croissant with the palm of your hand to give the croissant the shape of a rectangle with rounded edges. Place the croissant on one of the prepared baking sheets. Repeat, filling the remaining croissants with the remaining chocolate and shaping them as you did the first one. Place the croissants on the prepared baking sheets as they are done, placing 5 croissants on each baking sheet.
■Cover each baking sheet with a damp, lightweight kitchen towel and set the sheets aside in a warm place to proof the croissants for 1½ to 2 hours, until they look swollen and about one and a half times their original size.
Bake the croissants
■While the croissants are proofing, arrange the oven racks so one is in the top third of the oven and the other is in the bottom third. Preheat the oven to 375°F.
■Whisk the egg and salt together in a small bowl to make an egg wash. Uncover the sheets and brush the croissants with the egg wash; discard the remaining egg wash.
■Place one baking sheet on each oven rack to bake the croissants for 25 to 28 minutes, until the tops are deep brown, rotating the baking sheets from front to back and from one rack to the other halfway through the baking time so the croissants brown evenly. Remove the baking sheets from the oven and let the croissants cool on the baking sheets for a few minutes. Use a metal spatula to transfer the pastries to a cooling rack to cool. Serve warm or at room temperature.
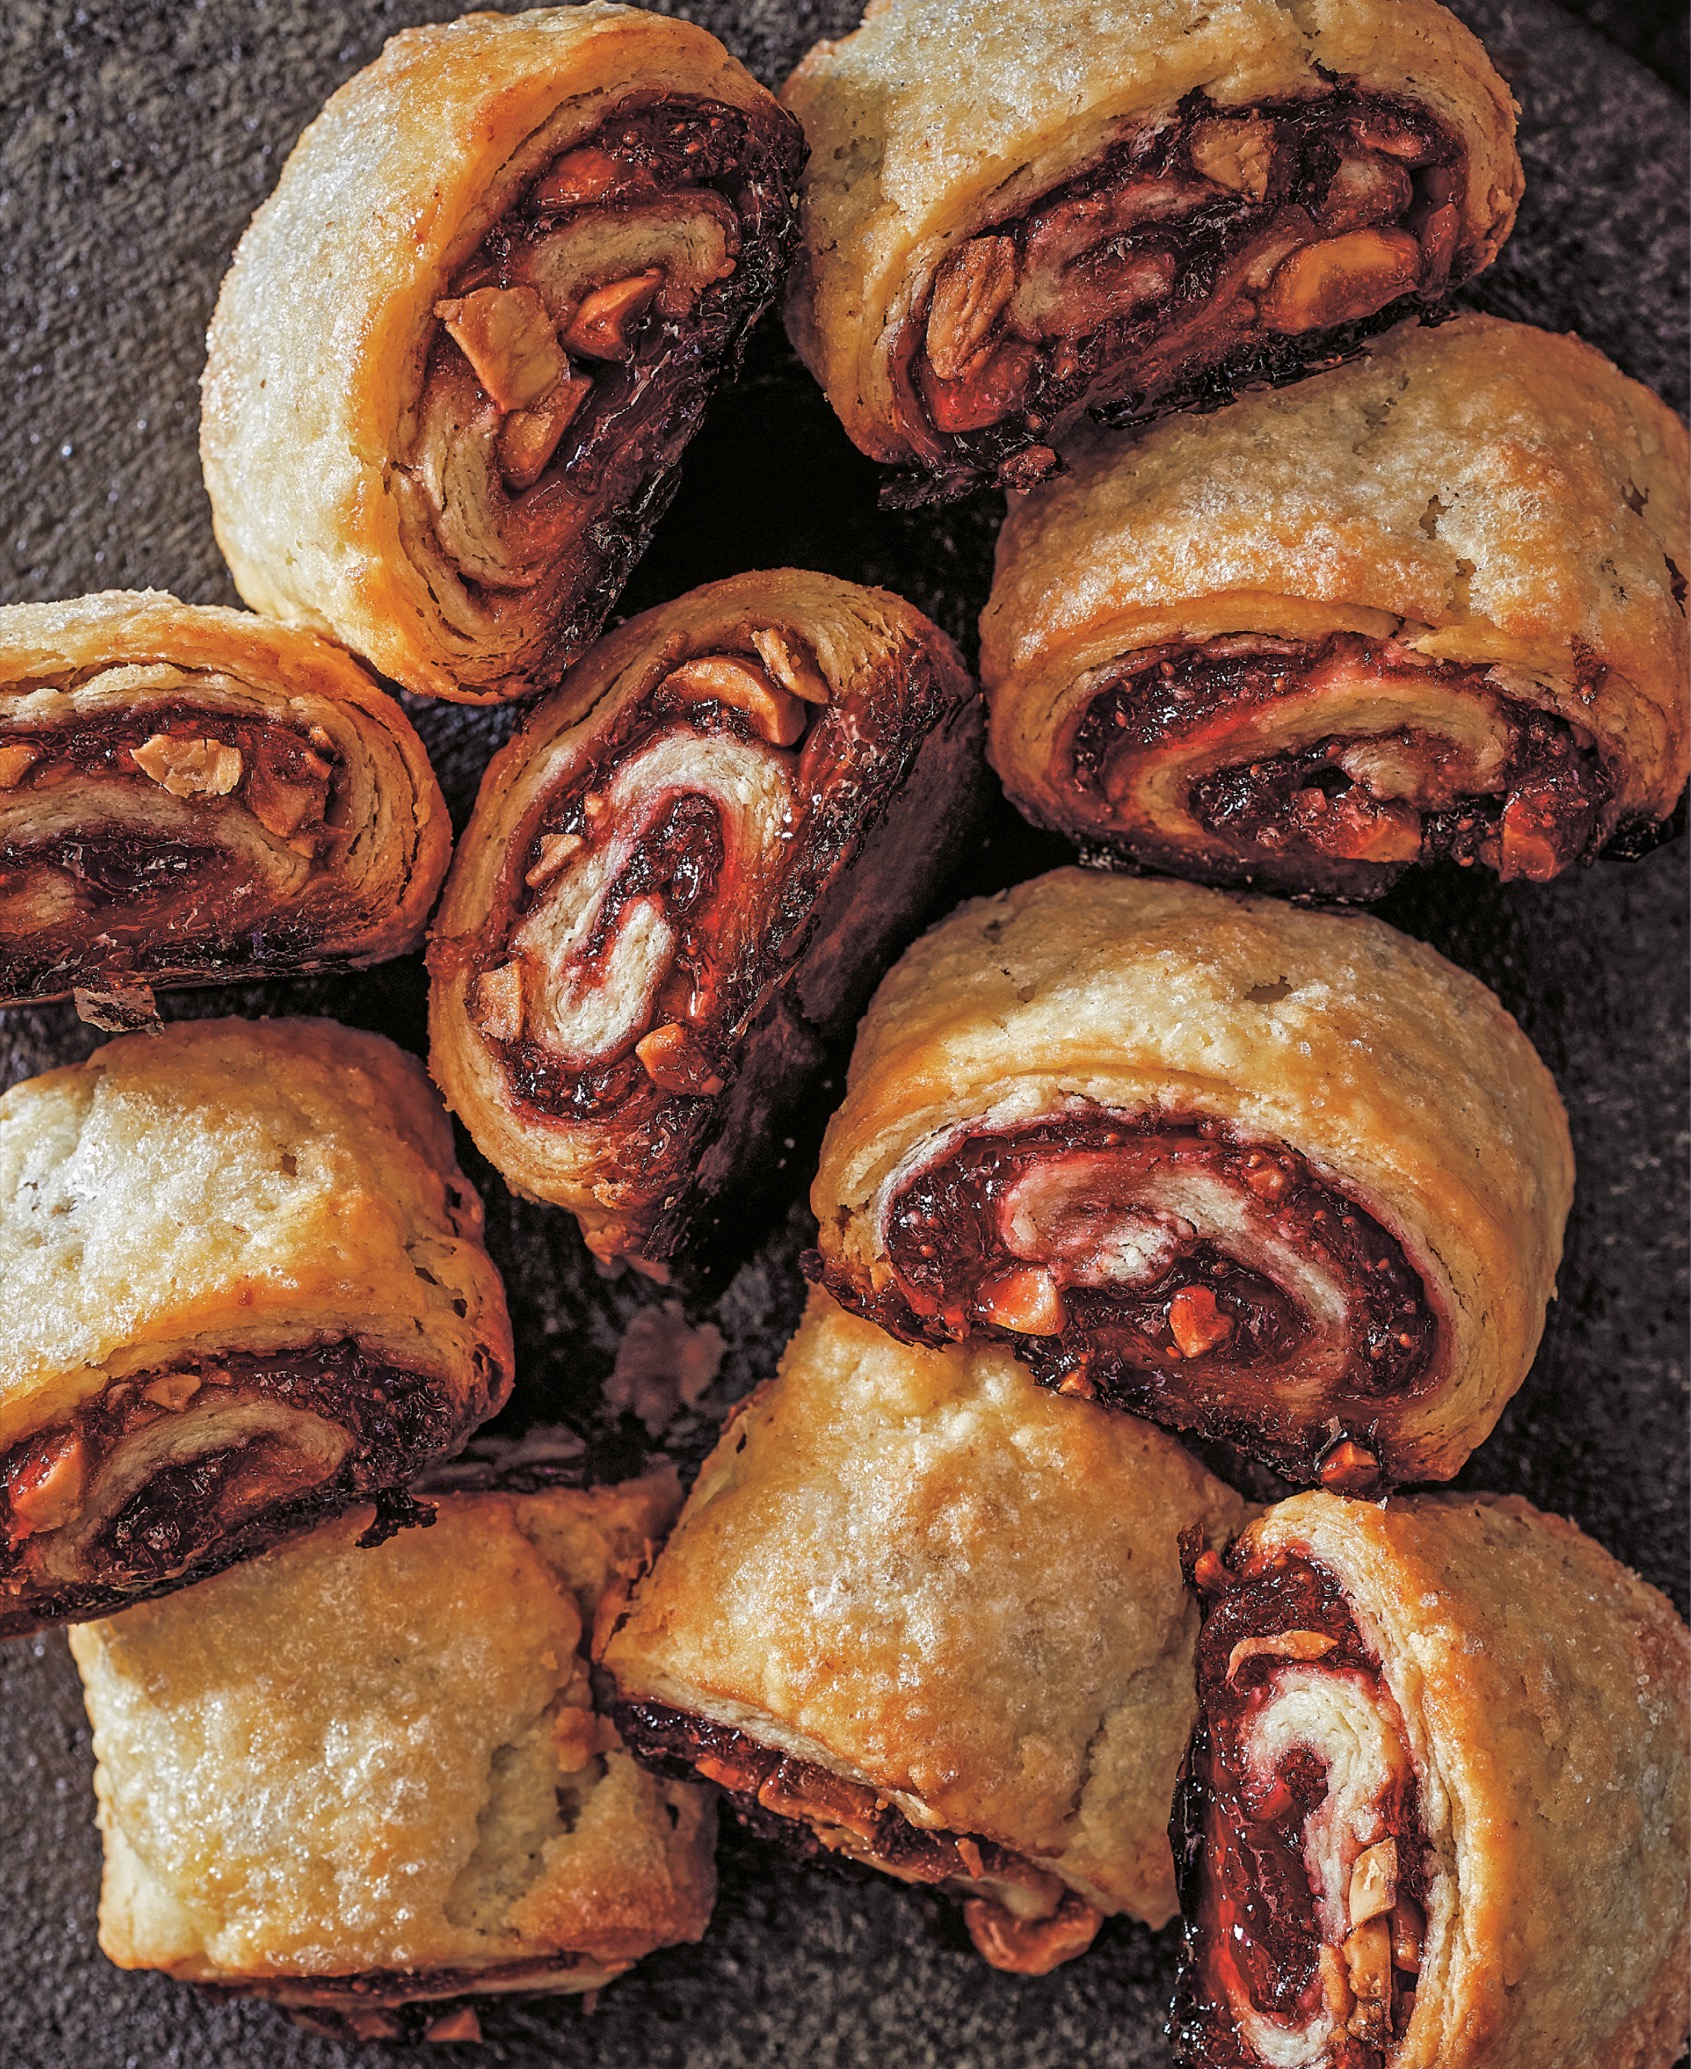
Strawberry Jam and Hazelnut Rugelach
Makes 2 dozen rugelach
These classic Jewish cookies are laminated with sugar, meaning the counter is dusted with sugar instead of flour for rolling the dough. Sugar is hydroscopic, which means it has the ability to absorb moisture from its surroundings. The result is that the sugar between the layers pulls water from the dough and becomes syrupy, so the cookies have a crispy, flaky exterior, and are soft and moist on the inside. Rugelach purists debate the merits of triangular versus rectangular rugelach. I like both shapes, but in terms of making them, I am pro rectangle, because the triangles tend to burn on the bottom when I bake them. These are rectangles. If I don’t already have Strawberry Jam (this page) or it isn’t the season to make it, I use Bonne Maman jam for these; it is good quality and widely available.
Note You will need four baking sheets to make this: two for the cookies and two to line those baking sheets. Stacking two baking sheets allows the rugelach to brown on top without burning on the bottom.
For the filling
¾ cup (105 grams) hazelnuts
¾ cup (218 grams) Strawberry Jam (this page; or store-bought)
For the dough
16 tablespoons (2 sticks) unsalted butter, cold (226 grams)
8 ounces (226 grams) cream cheese, cold
1½ cups plus more for dusting (180 grams) all-purpose flour
½ cup (53 grams) whole-wheat pastry flour
1 tablespoon (13 grams) granulated sugar
½ teaspoon (3 grams) fine sea salt
For laminating the dough
¼ cup plus 2 tablespoons (50 grams plus 25 grams) granulated sugar, for sprinkling
Toast the hazelnuts for the filling
■Arrange the oven racks so one is in the center position. Preheat the oven to 300°F.
■Spread the hazelnuts on a baking sheet and toast them in the oven for 20 to 25 minutes, until they are golden brown and fragrant, shaking the pan once during that time for even toasting. Remove the baking sheet from the oven and set aside for about 10 minutes to allow the nuts to cool slightly.
■Put the nuts in the center of a clean kitchen towel, close the towel, and rub the nuts in the towel between your hands to rub off as much of the skins as possible. Pick up the nuts with your hands, leaving the skins in the towel. Put the nuts in a large sealable plastic bag and seal the bag closed, letting any excess air escape as you seal it. Lay the bag on your countertop and roll your rolling pin over it to crush the hazelnuts into small pieces; you don’t want to crush them so much that they are powdery.
Make the dough
■Cut the butter and cream cheese into 1-inch cubes. Spread them out on a plate and put the plate in the freezer for 10 minutes.
■Meanwhile, put the all-purpose flour, whole-wheat pastry flour, sugar, and salt in the bowl of a stand mixer. Fit the mixer with the paddle attachment and mix on low speed to combine. Turn off the mixer, add the butter and cream cheese, and mix on the lowest speed to avoid flour flying out of the bowl when you turn the mixer on, until the dough completely comes together and wraps around the paddle, about 2 minutes.
■Lightly dust a large flat work surface with all-purpose flour. Scoop the dough out of the bowl with a rubber spatula and place it on the floured surface. Pat the dough into an 8-inch square.
Make a letter fold
■Lightly dust the top of the dough and the rolling pin with all-purpose flour and roll the dough lengthwise to 20 inches from top to bottom. Fold the top edge down two-thirds and fold the bottom edge to meet the top edge, so the dough is folded into thirds, like a letter.
Make a second letter fold
■Put ¼ cup of the laminating sugar in a small bowl. Lift up the dough and dust your work surface with one-third of the sugar. Place the dough on the sugar-dusted surface, rotating it 90 degrees so the closed, folded edges are facing left and right, and one of the open edges (with visible layers) is facing you. Sprinkle the top of the dough with some of the remaining sugar and roll the dough out to 20 inches from top to bottom, dusting the dough, rolling pin, and work surface with the remaining laminating sugar as you roll. Fold the top edge down and the bottom edge up to make a second letter fold.
■Wrap the dough in plastic wrap and place it in the refrigerator to chill until the dough is firm, about 45 minutes and up to 2 days.
Fill and form the rugelach
■Lightly dust a large flat work surface with all-purpose flour. Remove the dough from the refrigerator and place it on the floured surface. Lightly dust the dough and rolling pin with flour and roll it out to a rectangle that is 21 inches from side to side and 13 inches from top to bottom, dusting with flour as needed.
■Using a pastry wheel and straightedge, trim all four sides of the dough to create straight, even edges. Reserve the trimmings to make Baked Trimmings (this page) or discard them. Use the pastry wheel to cut the dough in half lengthwise so you have 2 (roughly 6-inch-wide) strips of dough.
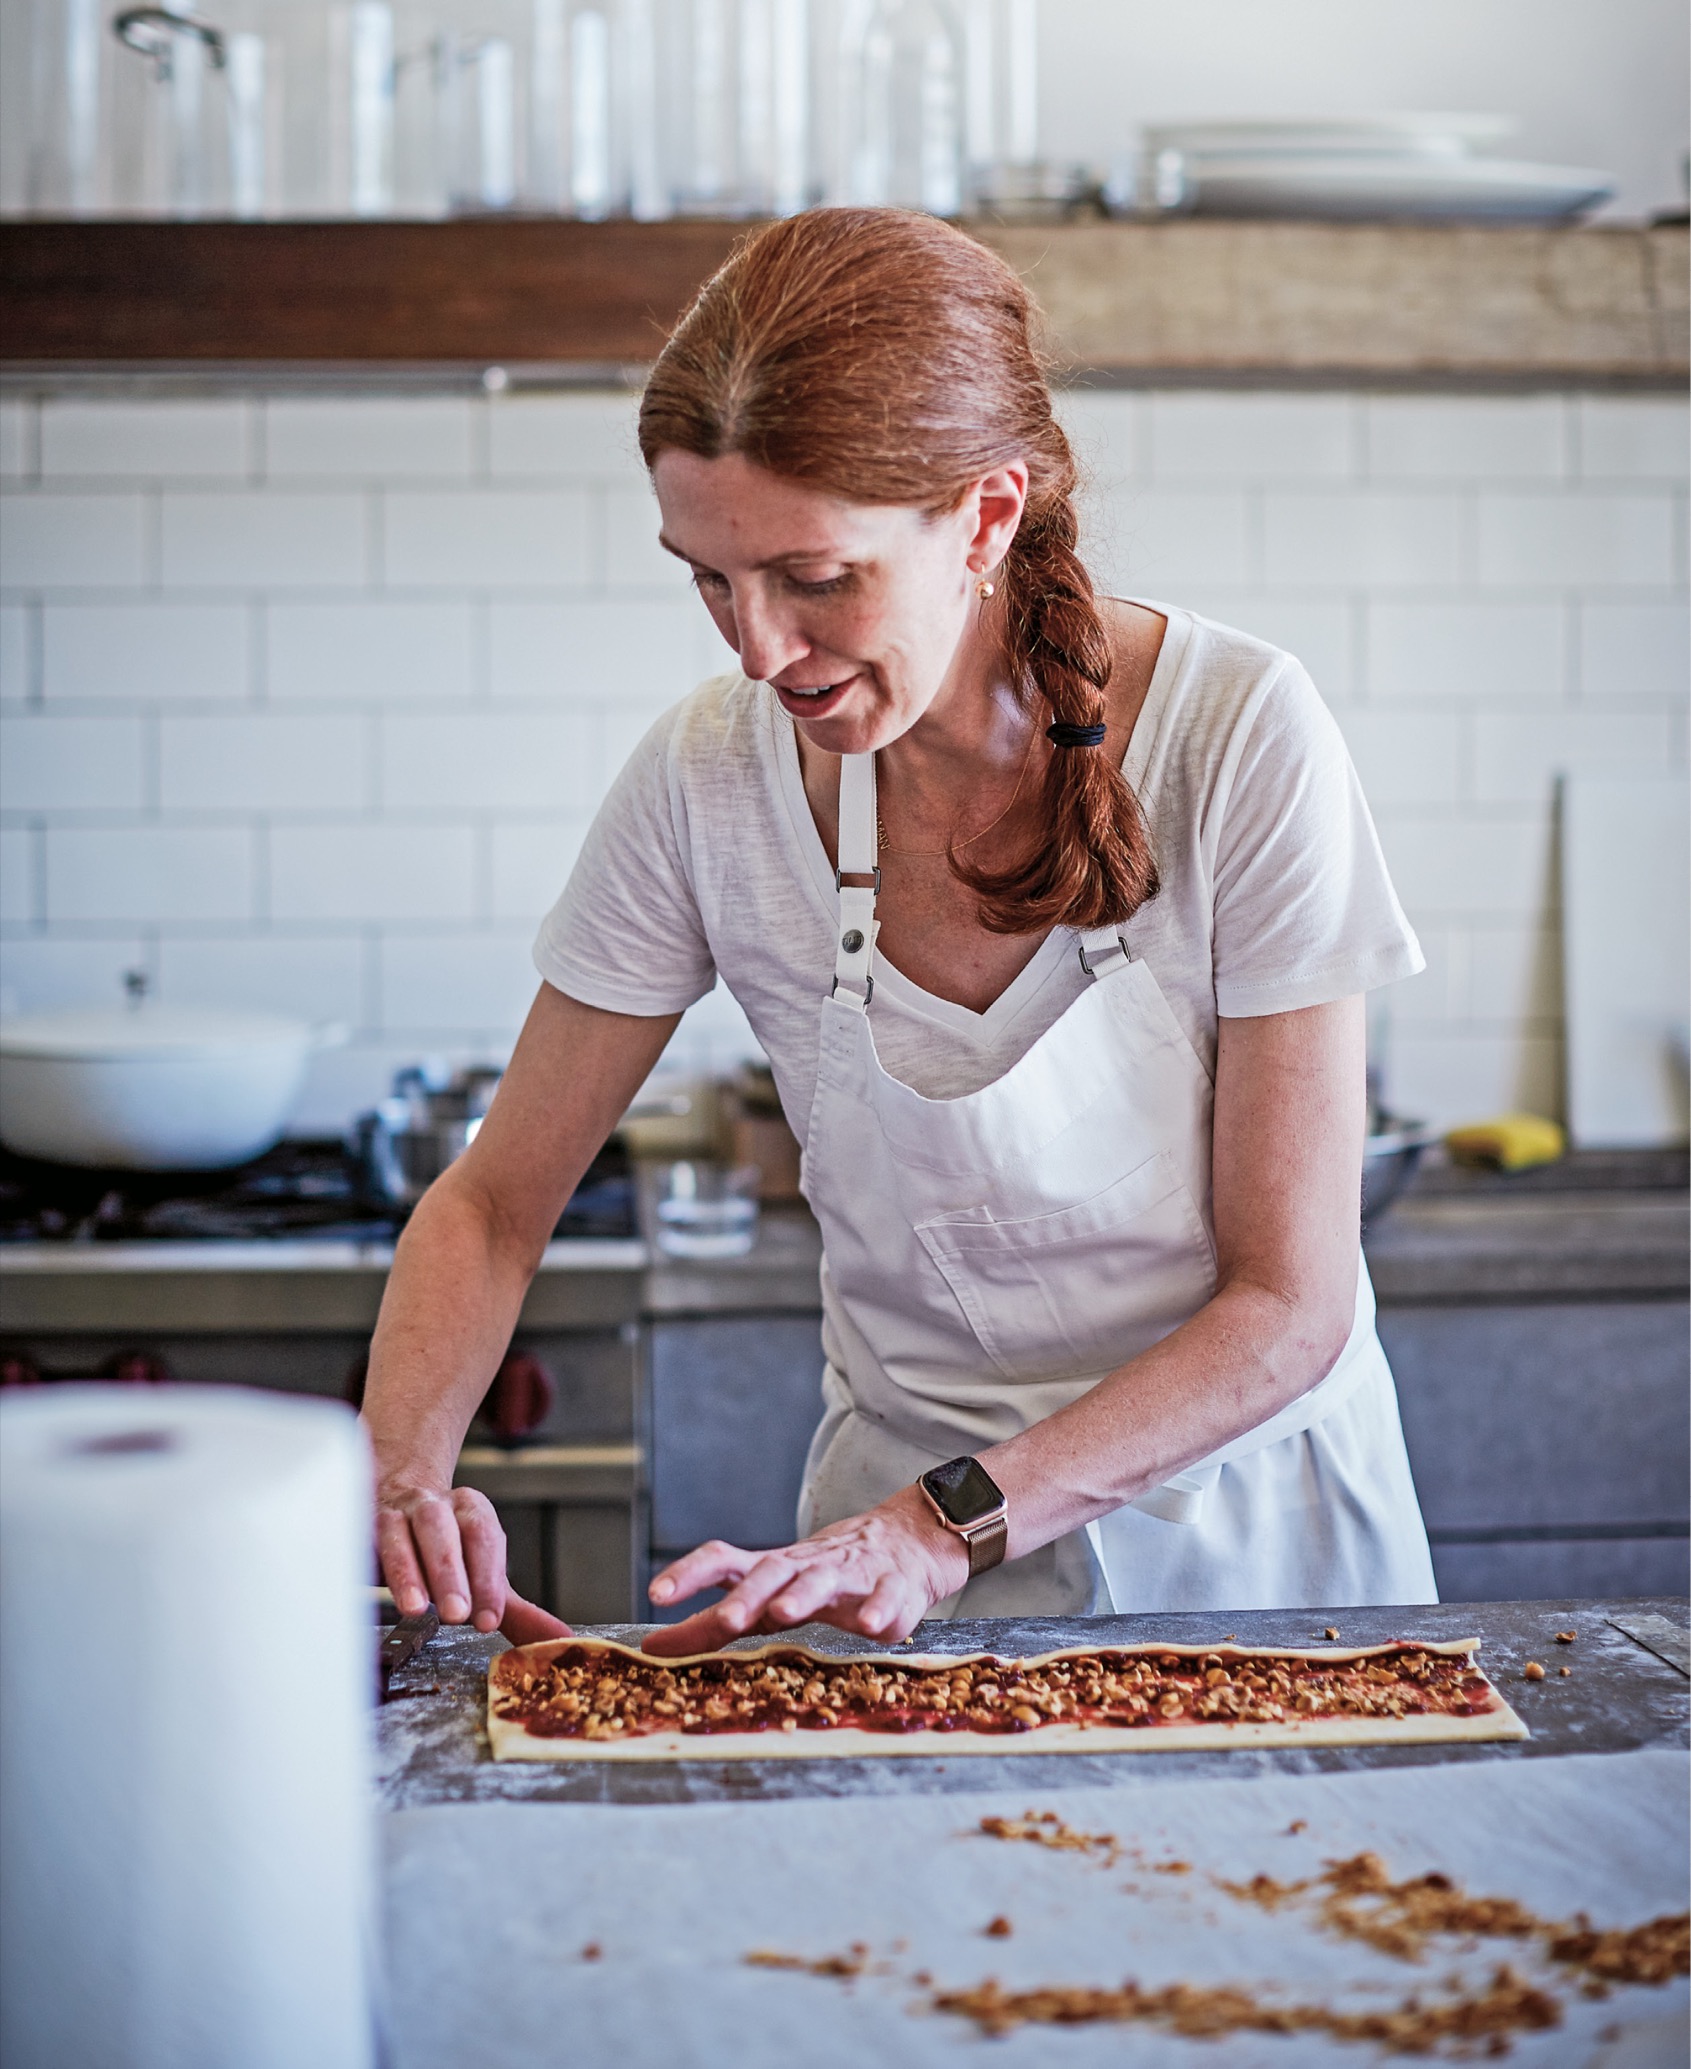
■Spoon half of the jam onto the strip of dough closest to you and use a small offset spatula to spread the filling evenly over the dough, leaving ½ inch on the edge farthest from you clear of filling. Sprinkle half of the hazelnuts over the jam. Brush the bare edge of the length of dough with water.
■Begin with the edge closest to you and fold the jam-covered edge of the dough away from you by ¾ inch. Repeat, flopping the dough over itself until you have rolled the strip of dough into a long log. Move the log aside. Spread the remaining jam on the second length of dough, sprinkle the nuts over the jam, and roll it up in the same way.
■Line a baking sheet with parchment paper.
■Place the logs on the baking sheet and place the baking sheet in the refrigerator to chill the logs for at least 30 minutes, and up to overnight, to firm up the dough. (If you are preparing the rugelach in advance, remove the baking sheet from the refrigerator after the dough is firm. Wrap each log in plastic wrap and freeze for up to 1 month. When you are ready to bake them, remove the logs from the freezer and place them on your counter to defrost for about 30 minutes, until they are soft enough to slice, or place them in the refrigerator overnight to defrost, before proceeding with the recipe.)
Cut the rugelach
■Line two more baking sheets with parchment paper.
■Remove the rugelach logs from the refrigerator. Place one on a cutting board with the seam facing down. Use a large sharp knife to cut the log into 1½-inch lengths and place the pieces, seam side down, on the prepared baking sheets, leaving about 2 inches between each rugelach. Repeat, cutting the remaining log and adding the remaining pieces to the baking sheets. Place the baking sheets in the refrigerator for at least 1 hour, and up to overnight, to firm up the dough before baking.
Prepare to bake the rugelach
■Arrange the oven racks so one is in the top third of the oven and the other is in the bottom third. Preheat the oven to 350°F.
■Remove the baking sheets from the refrigerator. Brush the tops of the rugelach with water and sprinkle with the remaining 2 tablespoons sugar.
■Place a baking sheet under each baking sheet of rugelach so the baking sheets are a double thickness; this allows the cookies to brown on top without burning (the sugar they are rolled in causes the bottoms to burn easily).
Bake the rugelach
■Place one doubled baking sheet on each oven rack to bake the cookies for 25 to 30 minutes, until the rugelach are light golden, rotating the baking sheets from front to back and from one rack to the other halfway through the baking time so the rugelach brown evenly. Remove the baking sheets from the oven. Use an offset spatula or thin metal spatula to move the rugelach to a cooling rack to cool to room temperature.
Variation
Poppy Seed Rugelach
Although jam-filled hazelnut rugelach tend to be more popular, these are my personal favorite. You need a spice grinder to grind the poppy seeds for these, and a digital instant-read thermometer.
For the filling
½ cup (58 grams) poppy seeds
1 large egg (50 grams)
¼ cup (55 grams) crème fraîche (or whole milk)
2 tablespoons (26 grams) granulated sugar
2 tablespoons (40 grams) mild-flavored honey (such as wildflower or clover)
1 tablespoon (14 grams) unsalted butter
Zest from 1 lemon
1 tablespoon (15 grams) juice from ½ lemon
¼ teaspoon (1.5 grams) fine sea salt
Make the filling
■Grind one-third of the poppy seeds in a spice grinder for a few seconds, until they are broken up and powdery. Pour the ground seeds into a small bowl, and repeat, grinding the remaining seeds in two more batches and adding the ground seeds to the bowl with the first batch of ground seeds. Set aside.
■Whisk the egg in a medium bowl to break it up; set it near your stove. Place a fine-mesh strainer in a medium bowl and set aside.
■Place the crème fraîche, sugar, honey, butter, lemon zest, lemon juice, and salt in a small saucepan and heat over medium heat, stirring with a whisk until the butter melts and the sugar dissolves. Gradually add this mixture to the bowl with the egg and return the mixture to the saucepan. Cook on low heat, whisking constantly, until the mixture is a thick, custard-like consistency and registers 180°F on a digital thermometer. Remove the saucepan from the heat and pour the mixture through the strainer into the bowl. Stir in the poppy seeds. Cover the bowl with plastic wrap, pressing the plastic wrap to touch the filling to prevent a skin from forming. Refrigerate the filling until it is cool to the touch and has set up to the consistency of peanut butter, or for up to 3 days.
■Spoon and spread the poppy seed filling as if it were the jam in the recipe above, dividing it between the 2 (6-inch-wide) strips of dough, and proceed with the recipe.
Flaky Buttermilk Biscuits
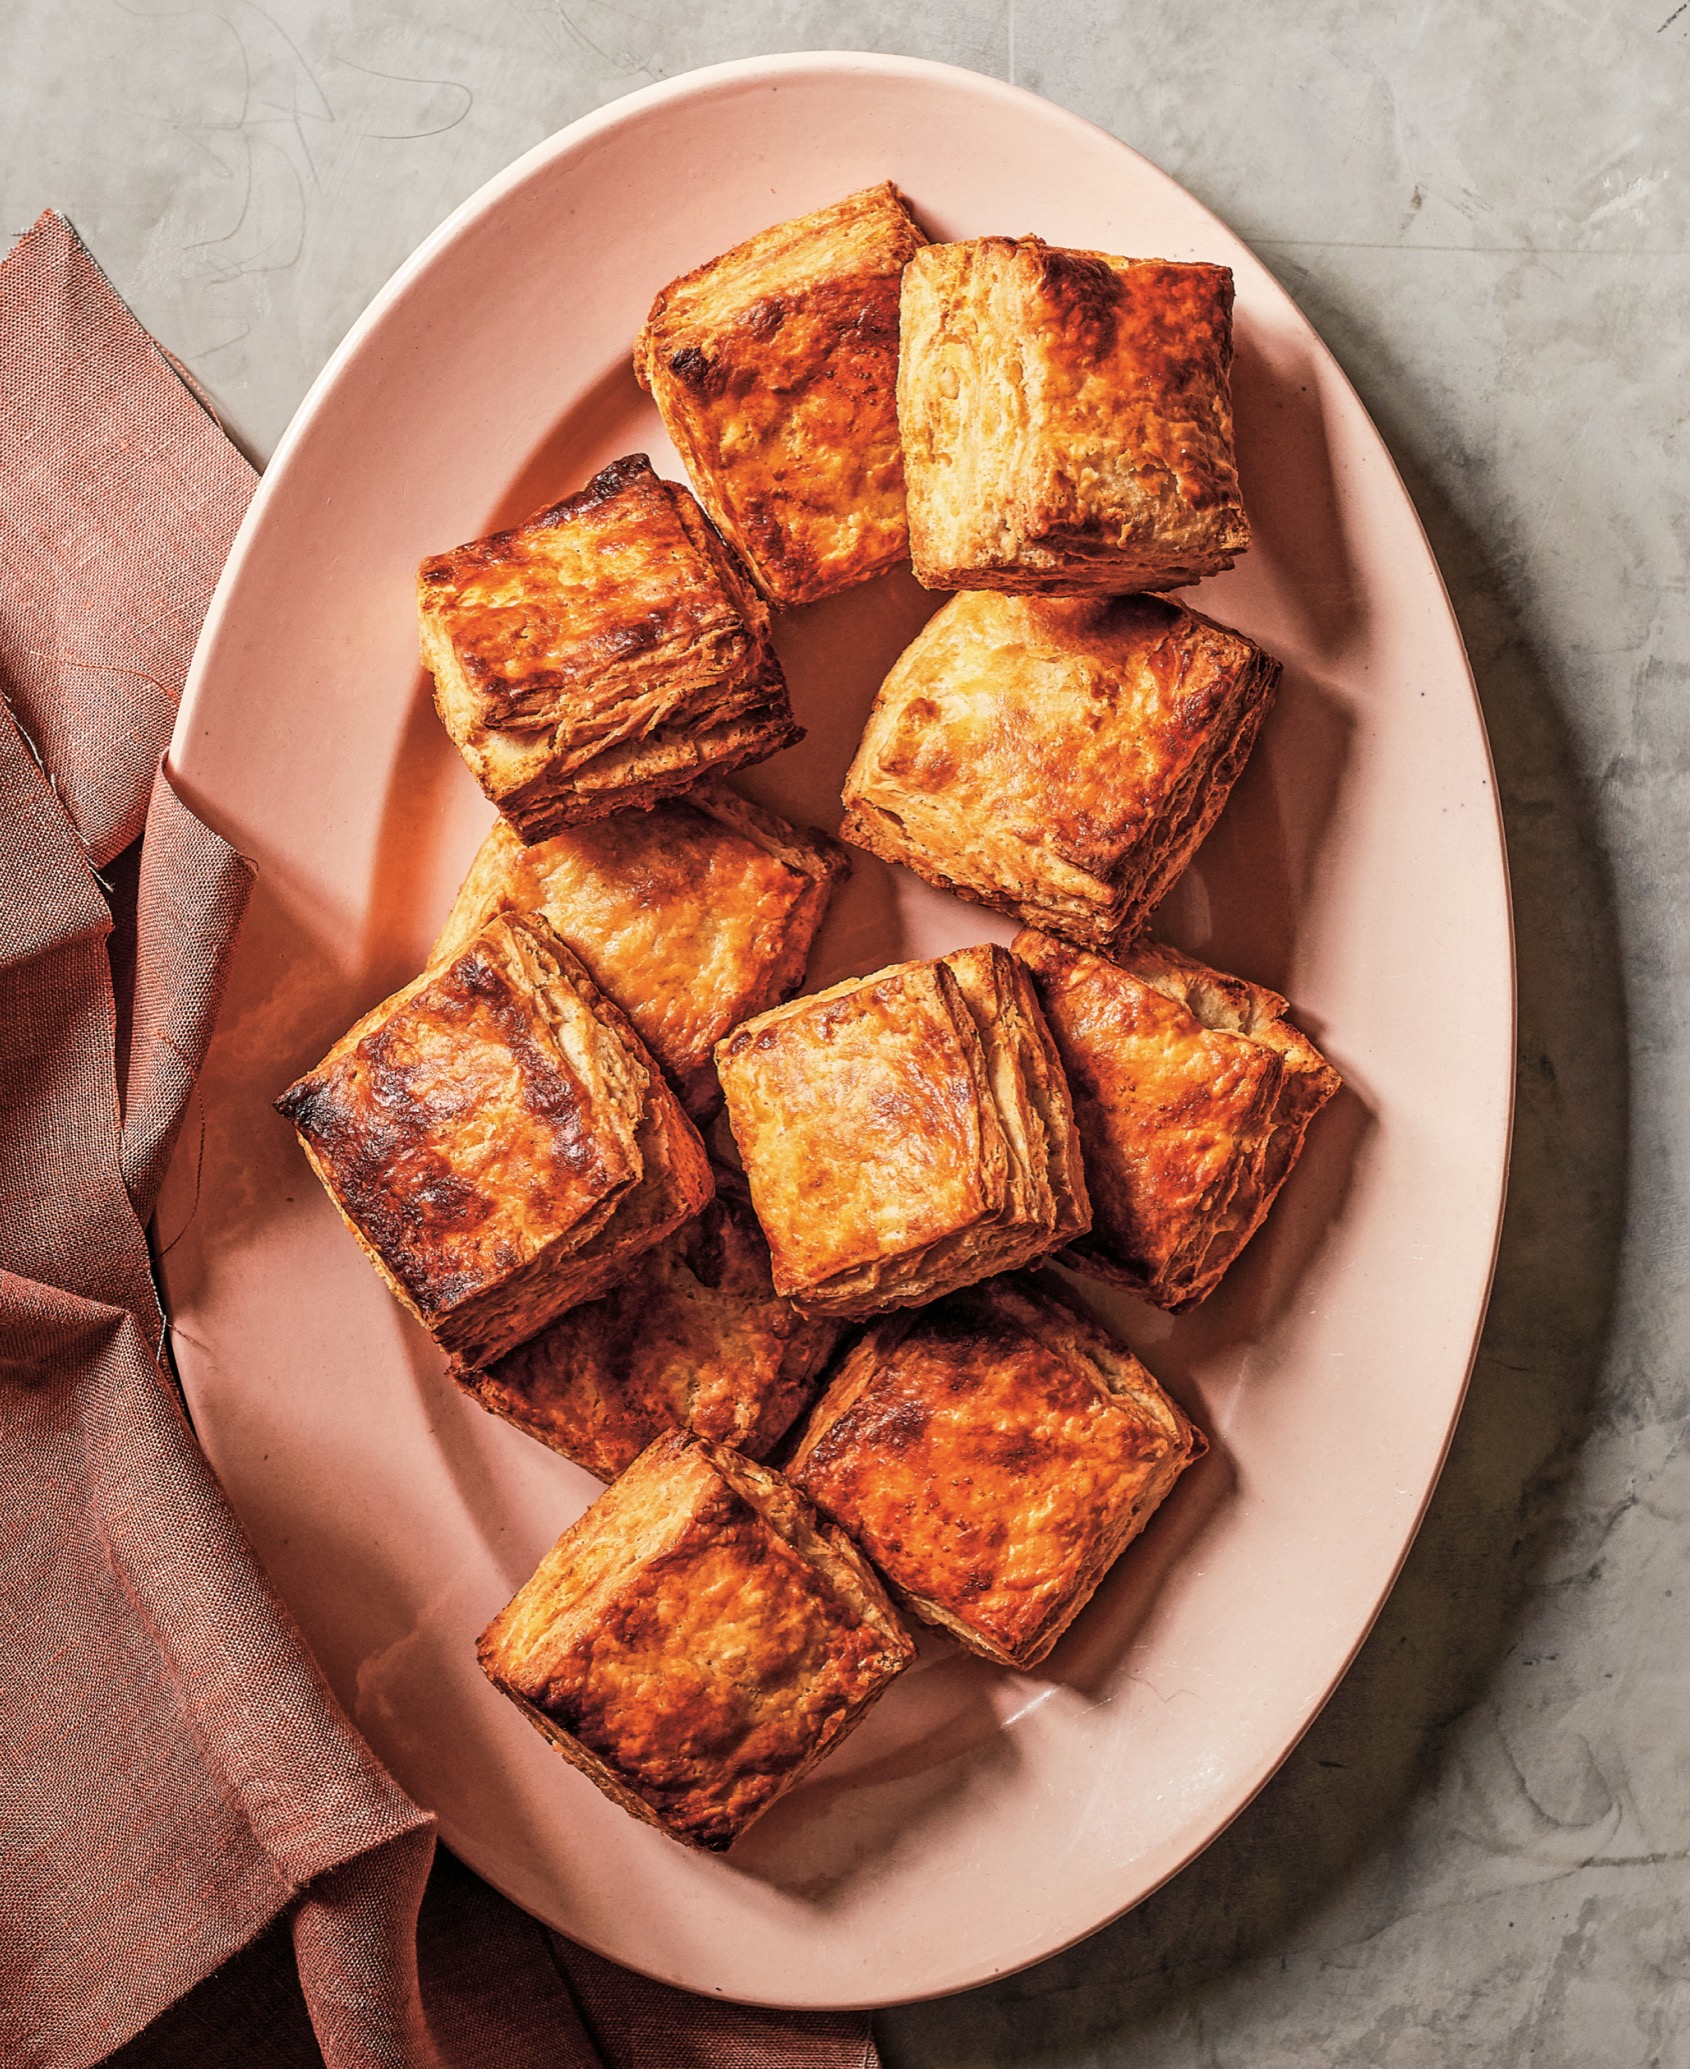
Makes 16 biscuits
I am very clear about what I like in biscuits: I like them soft and flaky, rich with butter, and with a lot of layers that you can see from the side. That’s what these are. They’re not a light, fluffy Southern biscuit that you would pour gravy over. In fact, these have a crunchy, burnished exterior. I like to eat them with salty butter and jam.
16 tablespoons (2 sticks) unsalted butter, cold (226 grams)
1½ cups plus more (180 grams) all-purpose flour, for dusting
1⅔ cups (175 grams) whole-wheat pastry flour
1½ teaspoons (8 grams) baking powder
2 teaspoons (9 grams) granulated sugar
1½ teaspoons (9 grams) fine sea salt
1 cup plus 2 tablespoons (265 grams) buttermilk, well shaken
Make the dough
■Cut the butter into ½-inch-thick pieces. Lay the pieces in a single layer on a plate and put the plate in the freezer for 10 minutes.
■Place the all-purpose flour, whole-wheat pastry flour, baking powder, sugar, and salt in the bowl of a stand mixer. Fit the mixer with the paddle attachment and mix on low speed for about 30 seconds to combine the ingredients. Add the butter and mix on low for 1 to 2 minutes, until there are no large chunks of butter remaining. Turn off the mixer and use your hands to check the size of the butter; if there are any pieces larger than a nickel, pinch them between your fingertips to flatten them. Add 1 cup of the buttermilk and mix on low speed just until the mixture comes together, and no dry pockets remain; it will be slightly lumpy.
Roll out the dough
■Dust a large flat work surface with all-purpose flour.
■Use a plastic bowl scraper to scoop the dough out of the bowl onto the floured surface. Pat the dough into a 6-inch square. Lightly dust the top of the dough and a rolling pin with flour and roll the dough to 14 inches from top to bottom, dusting with flour as needed. Slide a bench knife under the top edge of the dough and fold it down two-thirds. Slide the bench knife under the bottom edge and fold it up to meet the top edge to fold the dough into thirds, like a letter.
■Rotate the dough 90 degrees so the folded, closed edges are facing left and right and one of the open edges (with the visible layer) is facing you, dusting underneath and on top of the dough and the rolling pin with all-purpose flour. Roll the dough out until it is 14 inches from top to bottom, dusting with flour as needed. Slide a bench knife under the top edge of the dough and fold it down two-thirds. Slide the bench knife under the bottom edge and fold it up to meet the top edge to fold the dough into thirds, like a letter.
■Line a baking sheet with parchment paper.
■Pat the dough into an 8-inch square and place the square of dough on the prepared baking sheet and refrigerate for 30 minutes to chill.
Prepare to bake the biscuits
■Arrange the oven racks so one is in the top third and the other is in the bottom third. Preheat the oven to 400°F.
■Line a second baking sheet with parchment paper.
■Take the baking sheet with dough out of the refrigerator.
■Lift the parchment paper with the dough off the sheet and lay it on a flat work surface. Line the baking sheet with a fresh sheet of parchment paper.
■Use a large chef’s knife to cut the dough into 2-inch squares. Transfer the biscuits to the two prepared baking sheets, dividing them evenly and leaving 2 inches between each biscuit.
■Brush the tops of the biscuits with the remaining buttermilk.
Bake the biscuits
■Place one baking sheet on each oven rack to bake the biscuits for 25 to 30 minutes, until the tops are deep golden brown, rotating the baking sheets from front to back and from one rack to the other halfway through the baking time so the biscuits brown evenly. Remove the baking sheets from the oven and let the biscuits cool for about 2 minutes on the baking sheets. Serve warm or at room temperature.
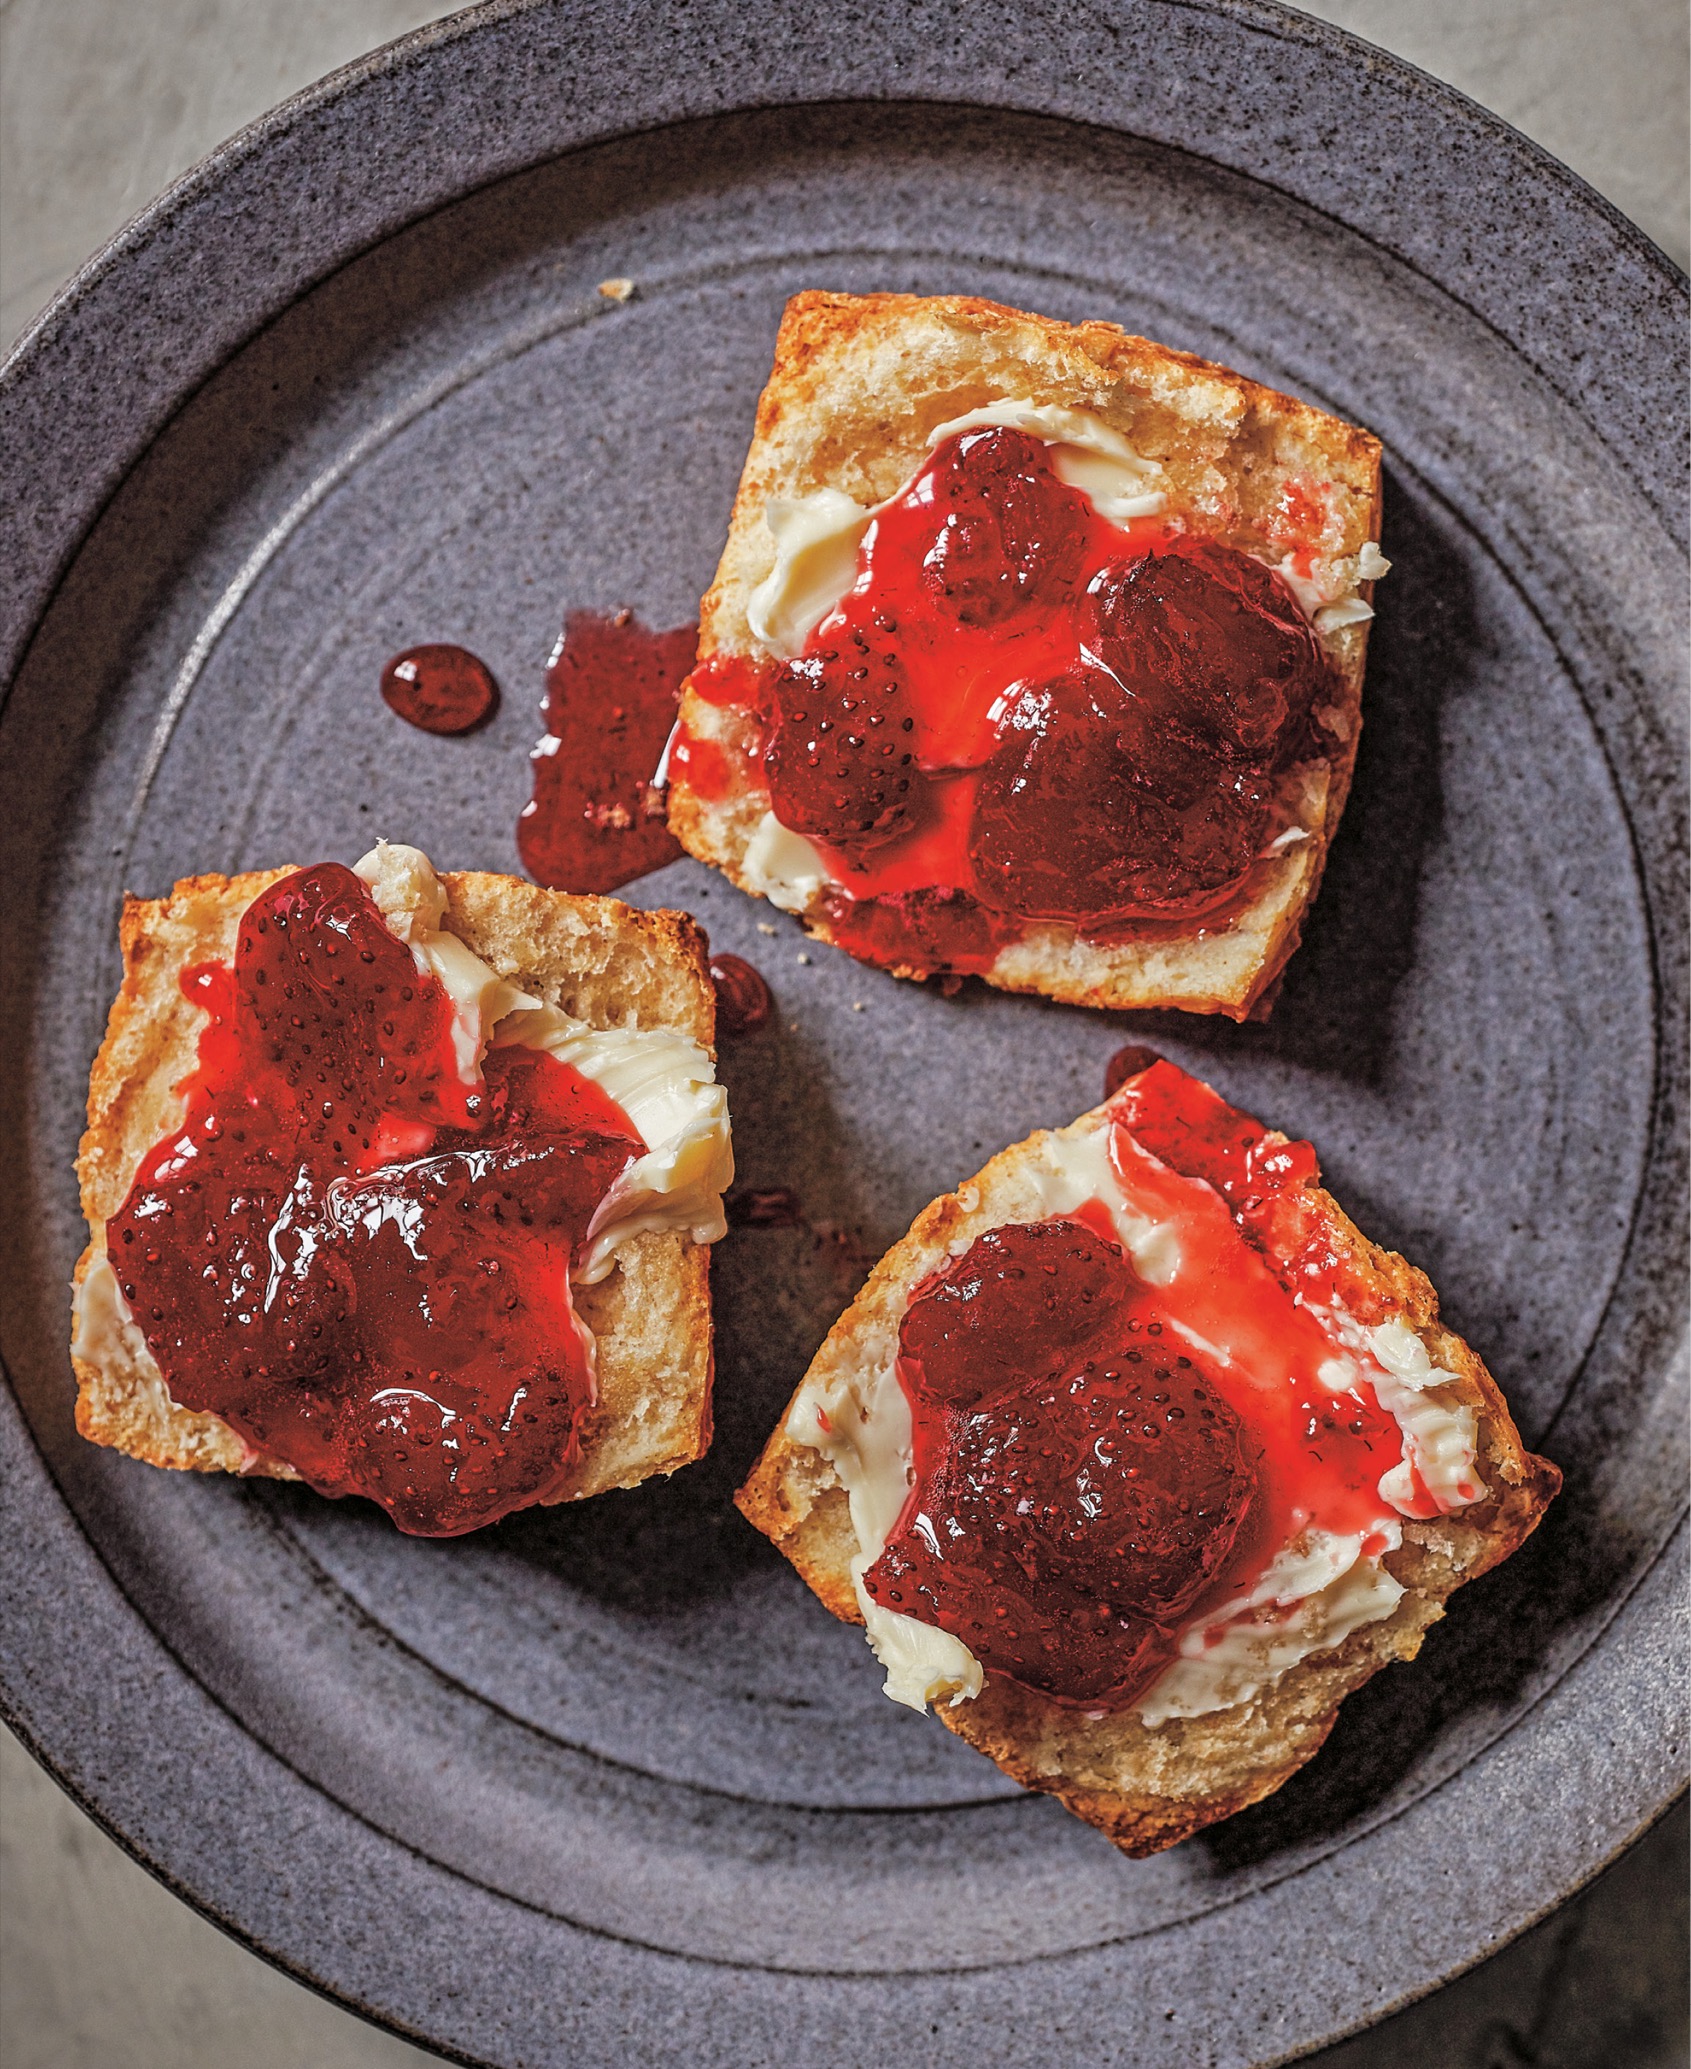
Kouign Amann
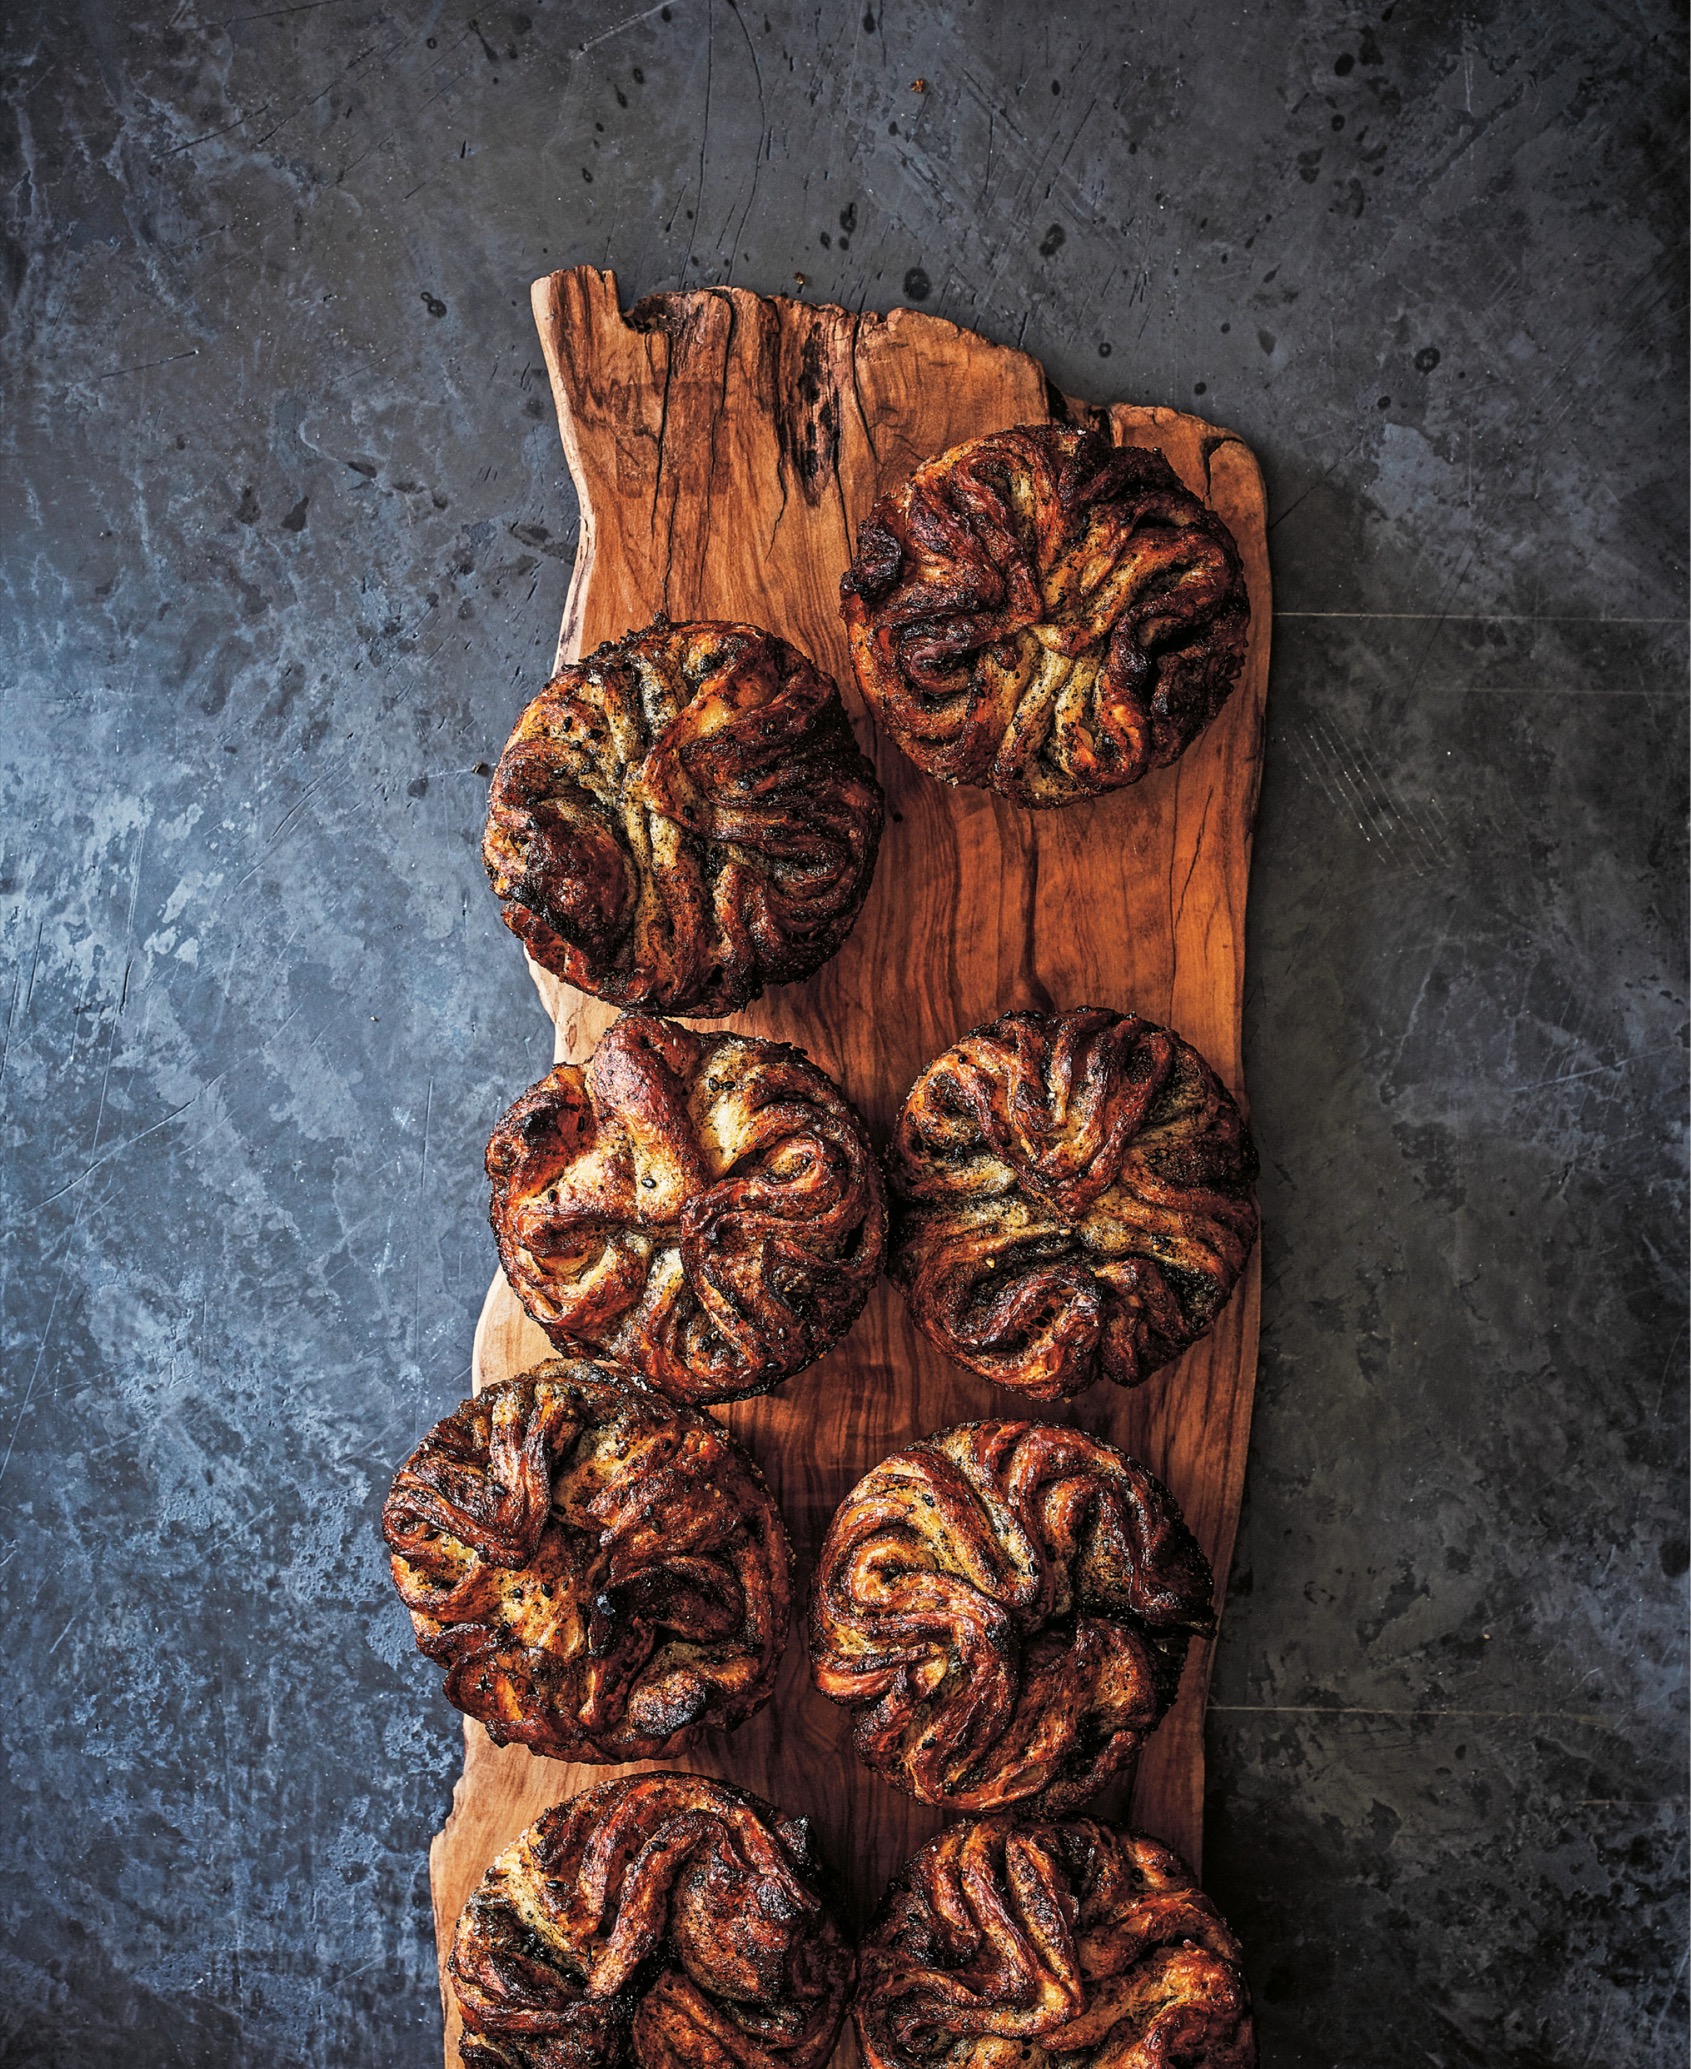
Makes 1 dozen kouign amann
If you’ve never heard of kouign amann, you’re not alone: they are relatively new to the American baking scene. Pronounced “queen amann”—the name means “buttery cake” in Breton—they are a traditional pastry from Brittany, France. They have butter and sugar laminated into the dough, and the dough itself is also very buttery. I add sourdough starter to the dough, which gives it a nice flavor. Brittany is known for its butter, so when I make these, I use good, high-fat European-style butter such as Plugrá, which is now widely available.
You want to make your butter packet in advance, or while the dough is in the refrigerator. Place the packet in the refrigerator to chill until you’re ready to laminate the dough, then remove it from the refrigerator to soften it when called to do so in the recipe.
Note You will need two (6-cup) jumbo muffin tins to make these.
For the dough
3¾ cups (450 grams) bread flour
2 teaspoons (9 grams) granulated sugar
2 teaspoons (12 grams) fine sea salt
1½ teaspoons (4.5 grams) instant yeast
1 cup plus 2 tablespoons (265 grams) water (75°F)
½ cup (85 grams) Sourdough Starter (this page)
1 tablespoon (14 grams) unsalted butter, cubed, softened
25 tablespoons (3 sticks plus 1 tablespoon) Butter Packet (this page), chilled (350 grams)
All-purpose flour for dusting
¾ cup (150 grams) granulated sugar
For finishing the kouign amann
Nonstick cooking spray
12 teaspoons (52 grams) granulated sugar
Make the dough
■Line a baking sheet with parchment paper.
■Put the bread flour, sugar, salt, and yeast in a medium bowl and stir to combine.
■Put the water and starter in the bowl of a stand mixer. Add the dry ingredients and the butter. Fit the mixer with the dough hook and mix on low speed for about 3 minutes, until the dough just comes together and no chunks of butter are visible.
■Place a long sheet of plastic wrap on your work surface. Use a plastic bowl scraper to scrape the dough out of the mixer onto the plastic wrap and pat the dough into a square shape. Wrap the plastic wrap around the dough and run a rolling pin over the dough to form an even 8-inch square. (For more detail, see Wrapping Dough, this page.) Place the dough in the refrigerator for 1 hour.
Laminate the Dough
Lock in the butter
■Remove the butter packet from the refrigerator and set it on the counter to soften until it is bendy but still cool; this could take anywhere from 5 to 20 minutes, depending on how cold it is and on the texture of the dough. You want the butter to be slightly softer and more malleable than the dough but not so soft that it will ooze out of the dough.
■Lightly dust a large flat work surface with all-purpose flour. Remove the dough from the refrigerator, unwrap the dough, and place it on the floured surface. Lightly dust the top of the dough and the rolling pin with flour and roll the dough out to a rectangle that is 14 inches from side to side and 11 inches from top to bottom, dusting with flour as needed.
■Open the parchment packet to expose the butter and flip the packet over to place the butter on the dough, centering the 10-inch edge of the butter packet on the 11-inch length of dough. Run your hand over the parchment paper so that the heat of your hand helps to peel off the paper. Peel off and discard the parchment paper. Fold the left and right sides of the dough over the butter so they meet in the middle and pinch the two edges of dough together with your fingers. Gently press the top and bottom edges of the dough together to seal the packet closed and lock in the butter.
Make three letter folds
■Lightly dust a large flat work surface with all-purpose flour and place the dough on the floured surface. Lightly dust the top of the dough and the rolling pin with flour and roll the dough to 18 inches from top to bottom, dusting the work surface, rolling pin, and top of the dough lightly with flour as you roll the dough, so it doesn’t stick. Using a pastry wheel or a bench knife, trim the top and bottom edges of the dough just enough to expose the layer of butter in the center of the dough. Reserve the trimmings to make Baked Trimmings (this page) or discard them. Fold the top edge down two-thirds and fold the bottom edge to meet the top edge, so the dough is folded into thirds, like a letter.
■Rotate the dough 90 degrees so the closed edges are facing left and right and one of the open edges (with the visible layers) is facing you. Lightly dust the work surface, rolling pin, and dough with flour and roll out the dough until it is roughly 18 inches from top to bottom, dusting with flour as needed. Using a pastry wheel or a bench knife, trim the top and bottom edges to expose the butter layers. Add the trimmings to your baked trimmings or discard them. Fold the top edge down and the bottom edge up to make a second letter fold.
■Wrap the dough in plastic and place it in the refrigerator to relax the gluten for 30 minutes. (Don’t worry about cleaning up your counter as you will be making one more letter fold during this lamination process.)
■Lightly dust your work surface with more all-purpose flour if needed. Remove the dough from the refrigerator, unwrap the dough, and place it on the floured surface with the closed edges facing left and right. Lightly dust the top of the dough and the rolling pin with flour and roll out the dough to 18 inches from top to bottom, dusting with flour as needed. Trim the top and bottom edges to expose the butter layers and add the trimmings to your baked trimmings or discard them. Fold the top edge down and the bottom edge up to make a third letter fold.
■Wrap the laminated block of dough in plastic and place it in the freezer to chill for 1 hour. Move the dough from the freezer to the refrigerator for at least 8 hours and up to 12 hours to retard the dough.
Make the fourth letter fold with sugar
■Remove the laminated block of dough from the refrigerator and set it on the counter to rest for 20 to 30 minutes, until you can feel that the butter layers inside the dough are just becoming malleable (but not soft) when you bend the block slightly.
■Put the laminating sugar in a small bowl. Lightly dust a large flat work surface with about one-third of the sugar.
■ Unwrap the dough and place it so the closed, folded edges are facing left and right, and one of the open edges (with visible layers) is facing you. Lightly dust the top of the dough and the rolling pin with more sugar and roll the dough out to a rectangle that is 18 inches from top to bottom, dusting the dough, rolling pin, and work surface with sugar as needed to keep the dough from sticking. Fold the top edge down and the bottom edge up to make a fourth letter fold. Wrap the dough in plastic wrap and let it rest on your counter for 20 minutes before proceeding.
Roll out and shape the kouign amann
■Spray 12 jumbo muffin cups with nonstick cooking spray. Sprinkle 1 teaspoon of sugar into each muffin cup. Swirl the tins to distribute the sugar over the bottom and sides of the cups.
■Dust your work surface with some of the remaining laminating sugar. Unwrap the dough and place the dough on the sugared surface. Dust the top of the dough and the rolling pin with additional sugar and roll the dough out to a rectangle that is 12 inches from top to bottom and 16 inches from side to side, dusting with the remaining laminating sugar as you roll. Using the straightedge as a guide, cut the dough into 4-inch squares.
■Working with one square of dough at a time, bring two opposite corners of the dough together and press down to seal them together in the center of the square. Fold the two remaining corners together and press to seal them together in the center. Place the dough in a muffin cup with the folds facing up. Repeat with the remaining squares of dough, folding in the same way and placing them in the remaining prepared muffin cups.
■Cover each muffin tin with a damp, lightweight kitchen towel and set them aside in a warm place for 50 to 60 minutes to proof, until the kouign amann start to puff up and expand.
Bake the kouign amann
■While the kouign amann are proofing, arrange the oven racks so that one is in the center position. Preheat the oven to 375°F.
■Place the muffin tins on the center rack to bake the kouign amann for 25 to 30 minutes, until the tops are golden brown and the undersides are caramelized and a bit of the caramelizing sugar begins to peek out around the sides of the pastries, rotating the muffin tins from front to back halfway through the baking time so the pastries brown evenly.
■While the kouign amann are baking, lay a sheet of parchment paper on your countertop. Remove the kouign amann from the oven and immediately flip the tins upside down so the pastries fall out onto the paper. If the pastries are sticking to the sides, run an offset spatula around the edges to loosen them. Turn the pastries right side up to cool. Serve warm or at room temperature.
Variation
Black Sesame Kouign Amann
I love pastries with black sesame seeds. Supposedly they have more flavor than white ones, but I like them just as much for how they look. What really makes a difference when choosing sesame seeds is that they are toasted, as untoasted sesame seeds have very little flavor. You can toast your sesame seeds in a skillet or buy already-toasted sesame seeds; these are sold with the hulls on in the Japanese section of grocery stores, often in a shaker can. The toasted sesame seeds have a sweet, toasty flavor that makes these crisp, buttery pastries really special.
¼ cup plus 2 tablespoons (50 grams) black sesame seeds
¾ cup (150 grams) granulated sugar
■If you are starting with untoasted sesame seeds, put them in a medium skillet and toast over medium-high heat for 1 to 2 minutes, shaking the pan frequently so they toast evenly and don’t burn, until they are fragrant and begin popping in the pan. Turn off the heat and transfer the seeds to a medium bowl to cool to room temperature.
■Working in three batches, put the sesame seeds in a spice grinder with about 1 tablespoon of the sugar. Pulse to break up the seeds without pulverizing them. (Three quick pulses.) Put the ground seeds and sugar in a medium bowl. Repeat, grinding the rest of the seeds in two additional batches with about 1 tablespoon of the sugar in each batch. Add the ground seeds to the bowl. Add the remaining sugar to the bowl and stir to combine.
■Reserve 12 teaspoons to put 1 teaspoon in each muffin cup. Use this mixture of seeds and sugar in place of the laminating sugar in the kouign amann recipe.

Buckwheat Kouign Amann
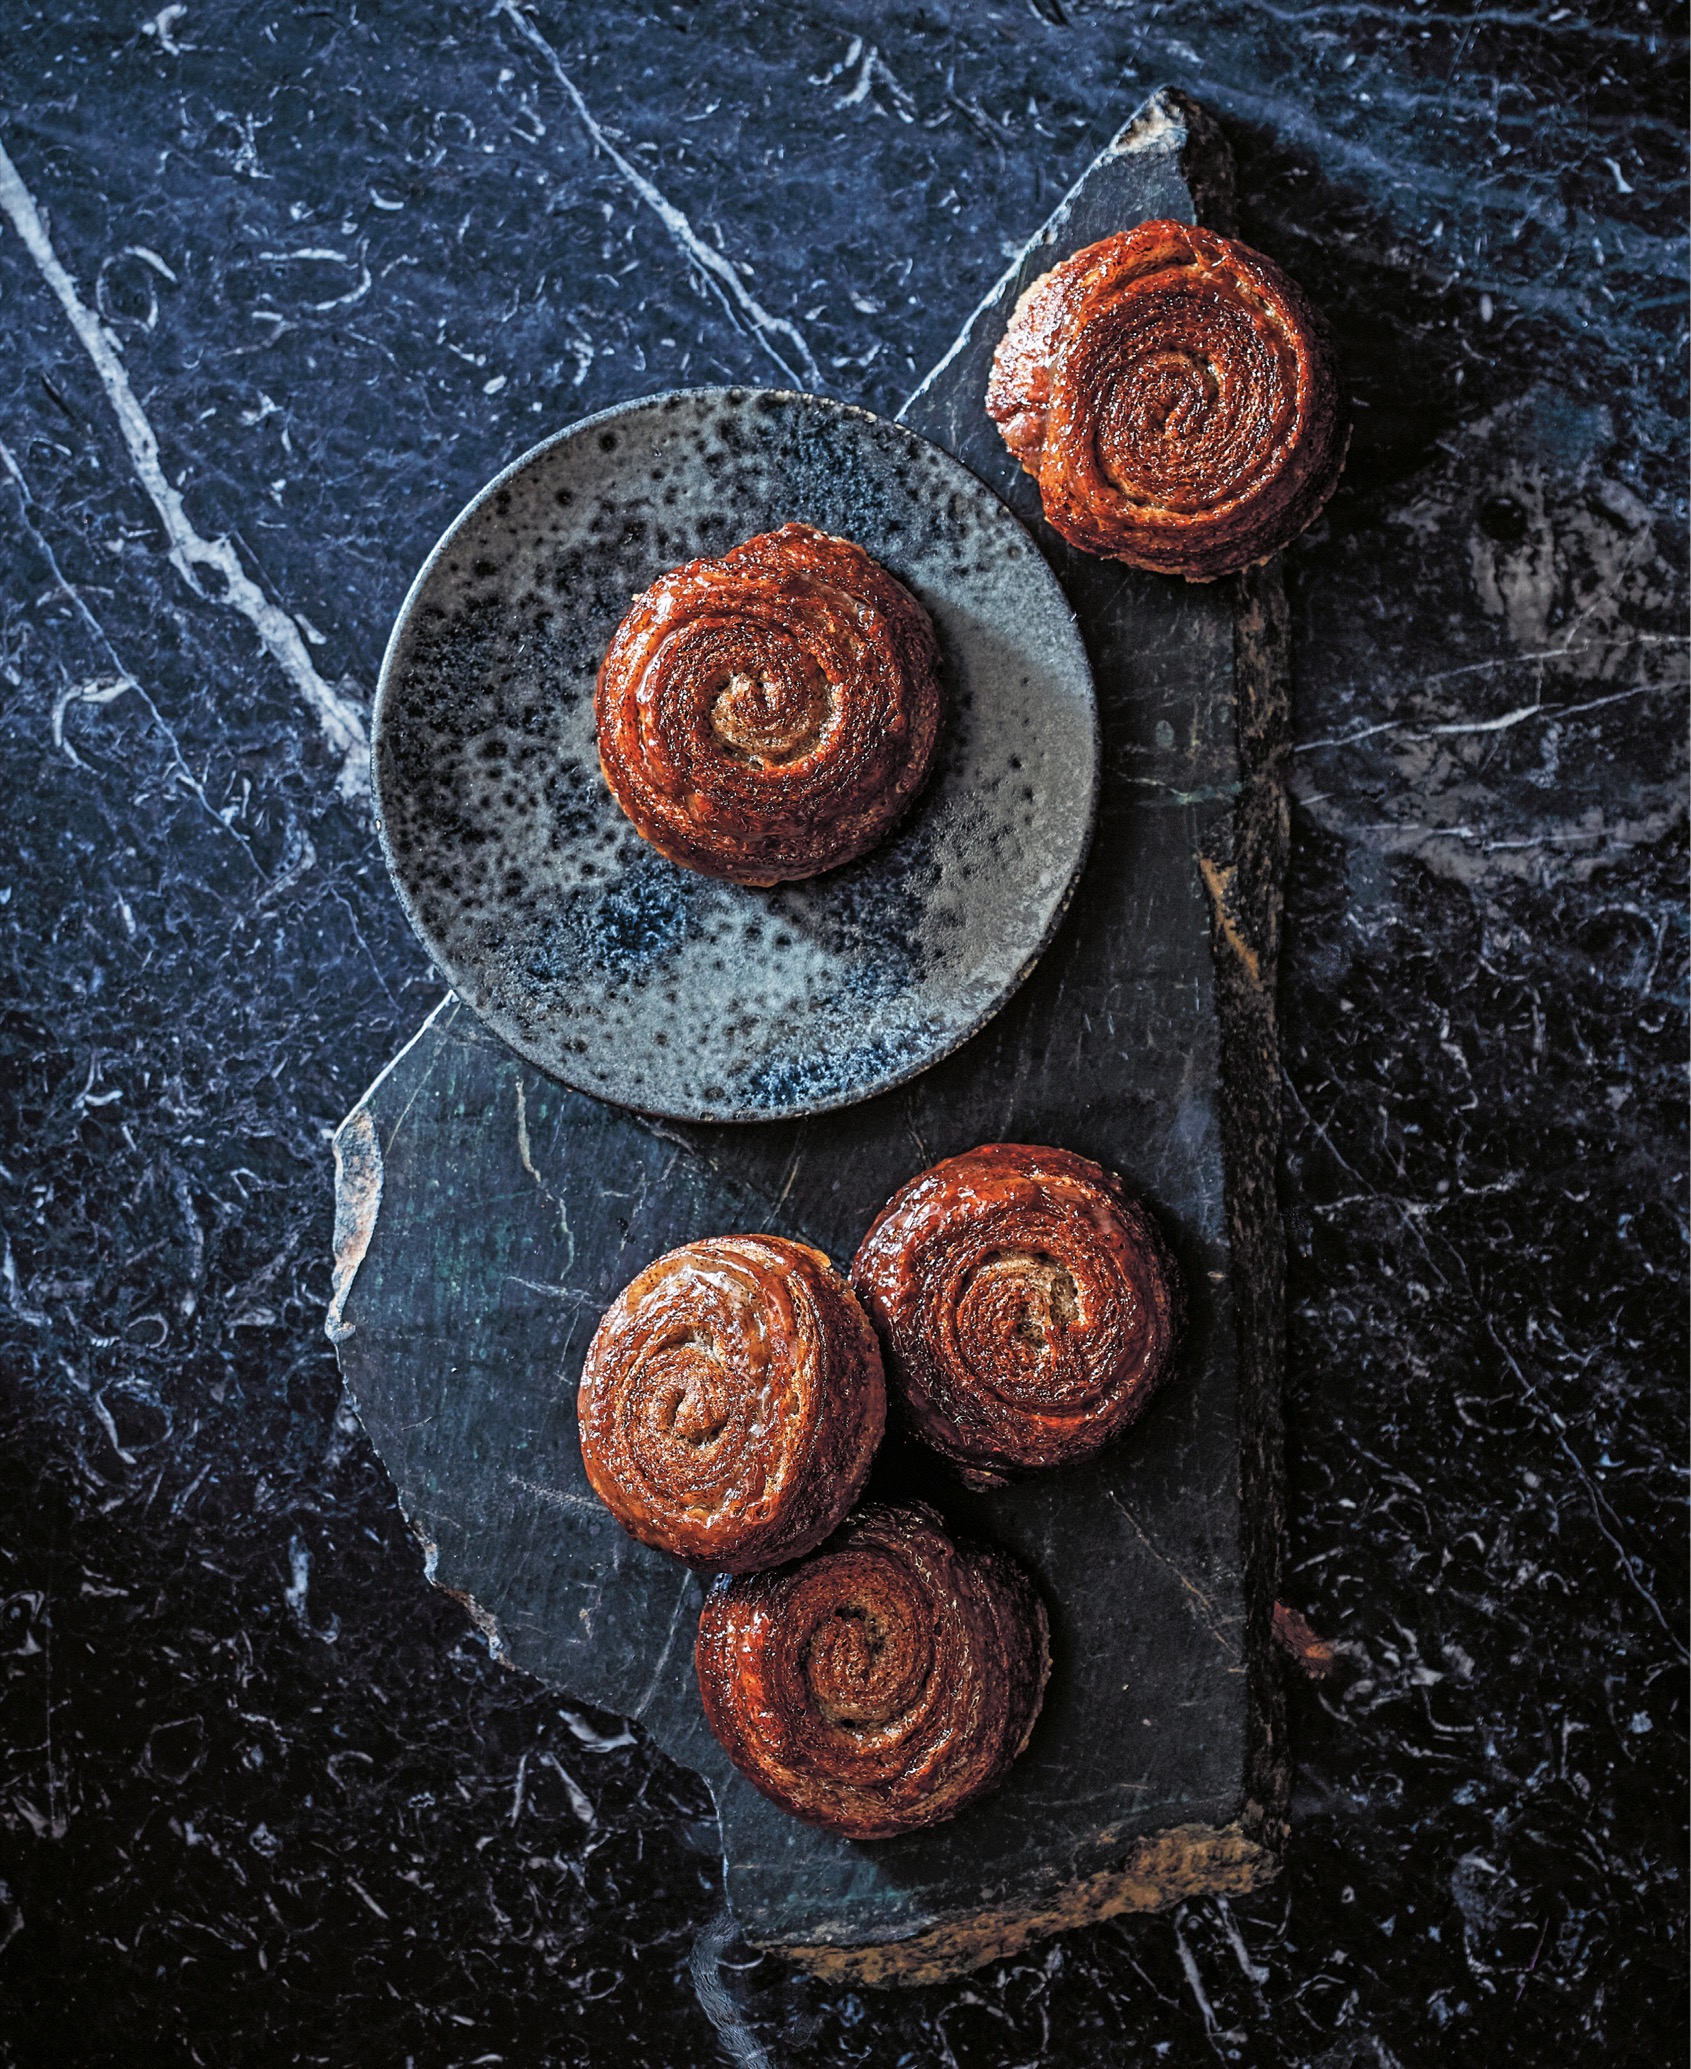
Makes 10 kouign amann
Buckwheat is a grain commonly grown in Brittany and used in many Breton pastries, most famously galettes, or savory crêpes. Kouign amann are also from Brittany, so after a recent trip there, I was inspired to marry the two, creating these delicious buckwheat kouign amann. The nutty and earthy flavors of the buckwheat provide the perfect contrast to the butter and sugar. I shape these into spirals instead of folding in the corners as I do with the plain kouign amann.
Make your butter packet in advance or while the dough is in the refrigerator. Place the packet in the refrigerator to chill until you’re ready to laminate the dough, then remove it from the refrigerator to soften it when called to do so in the recipe.
Note You will need two (6-cup) jumbo muffin tins to make these.
For the dough
2½ cups plus more (300 grams) bread flour for dusting
1¼ cups (150 grams) buckwheat flour
2 teaspoons (9 grams) granulated sugar
2 teaspoons (12 grams) fine sea salt
1½ teaspoons (4.5 grams) instant yeast
1 cup plus 2 tablespoons (265 grams) water (75°F)
½ cup (85 grams) Sourdough Starter (this page)
1 tablespoon (14 grams) unsalted butter, softened
25 tablespoons (3 sticks plus 1 tablespoon) Butter Packet (this page) (350 grams)
1¼ cups (250 grams) Granulated sugar
For finishing the kouign amann
Nonstick cooking spray
10 teaspoons (43 grams) granulated sugar
Make the dough
■Line a baking sheet with parchment paper.
■Place the bread flour, buckwheat flour, sugar, salt, and yeast in a medium bowl and stir to combine the ingredients.
■Put the water and starter in the bowl of a stand mixer. Add the dry ingredients and the butter. Fit the mixer with the dough hook and mix on low speed for about 3 minutes, until the dough just comes together and no chunks of butter are visible.
■Place a long sheet of plastic wrap on your work surface. Use a plastic bowl scraper to scrape the dough out of the mixer onto the plastic wrap and pat the dough into a square shape. Wrap the plastic wrap around the dough and run a rolling pin over the dough to form an even 8-inch square. (For more detail, see Wrapping Dough, this page.) Place the dough in the refrigerator for 1 hour.
Laminate the Dough
Lock in the butter
■Remove the butter packet from the refrigerator and set it on the counter to soften until it is bendy but still cool; this could take anywhere from 5 to 20 minutes, depending on how cold it is and on the texture of the dough. You want the butter to be slightly softer and more malleable than the dough but not so soft that it will ooze out of the dough.
■Lightly dust a large flat work surface with bread flour. Remove the dough from the refrigerator, unwrap the dough, and place it on the floured surface. Lightly dust the top of the dough and the rolling pin with flour and roll the dough out to a rectangle that is 14 inches from side to side and 11 inches from top to bottom, dusting with flour as needed.
■Open the parchment packet to expose the butter and flip the packet over to place the butter on the dough, centering the 10-inch edge of the butter packet on the 11-inch length of dough. Run your hand over the parchment paper so that the heat of your hand helps to peel off the paper. Peel off and discard the parchment paper. Fold the left and right sides of the dough over the butter so they meet in the middle and pinch the two edges of dough together with your fingers. Gently press the top and bottom edges of the dough together to seal the packet closed and lock in the butter.
Make three letter folds
■Lightly dust a large flat work surface with bread flour and place the dough on the floured surface. Lightly dust the top of the dough and the rolling pin with flour and roll the dough lengthwise to 18 inches from top to bottom, dusting the work surface, rolling pin, and top of the dough lightly with flour as you roll the dough so that it doesn’t stick. Using a pastry wheel or a bench knife, trim the top and bottom edges of the dough just enough to expose the layer of butter in the center of the dough. Reserve the trimmings to make Baked Trimmings (this page) or discard them. Fold the top edge down two-thirds and fold the bottom edge to meet the top edge, so the dough is folded into thirds, like a letter.
■Rotate the dough 90 degrees so the closed edges are facing left and right and one of the open edges (with the visible layers) is facing you. Lightly dust the work surface, dough, and rolling pin with flour and roll the dough to 18 inches from top to bottom, dusting with flour as needed. Using a pastry wheel or a bench knife, trim the top and bottom edges to expose the butter layers. Add the trimmings to your baked trimmings or discard them. Fold the top edge down and the bottom edge up to make a second letter fold.
■Wrap the dough in plastic and place it in the refrigerator to relax the gluten for 20 minutes. (Don’t worry about cleaning up your counter as you will be making one more fold during your lamination process.)
■Lightly dust your work surface with more bread flour if needed. Remove the dough from the refrigerator, unwrap it, and place it on the floured surface with the closed edges facing left and right. Lightly dust the top of the dough and rolling pin with flour and roll out the dough to 18 inches from top to bottom, dusting with flour as needed. Trim the top and bottom edges to expose the butter layers. Add the trimmings to your baked trimmings or discard them. Fold the top edge down and the bottom edge up to make a third letter fold.
■Wrap the laminated block of dough in plastic and place it in the freezer to chill for 1 hour. Move the dough from the freezer to the refrigerator for at least 8 hours and up to 12 hours to retard the dough.
Make a fourth letter fold
■Remove the laminated block of dough from the refrigerator and set it on the counter to rest for 20 to 30 minutes, until you can feel that the butter layers inside the dough are just becoming malleable (but not soft) when you bend the block slightly.
■Put the laminating sugar in a small bowl. Lightly dust a large flat work surface with one-third of the sugar.
■Unwrap the dough and place it so the closed, folded edges are facing left and right, and one of the open edges (with visible layers) is facing you. Lightly dust the top of the dough and the rolling pin with more sugar and roll the dough out to a rectangle that is 18 inches from top to bottom, dusting the dough, rolling pin, and work surface with the sugar as needed to keep the dough from sticking. Fold the top edge down two-thirds and fold the bottom edge to meet the top edge to make a fourth letter fold. Wrap the dough in plastic wrap and let it rest on your counter for 20 minutes before proceeding.
Roll out and shape the kouign amann
■Spray 10 jumbo muffin cups with nonstick cooking spray. Sprinkle 1 teaspoon of sugar into each muffin cup. Swirl the tins to distribute the sugar over the bottom and sides of the cups.
■Dust your work surface with the remaining laminating sugar. Unwrap the dough and place the dough on the sugared surface. Dust the top of the dough and the rolling pin with additional sugar and roll the dough out to a rectangle that is 18 inches from top to bottom and 13 inches from side to side. Using a straightedge and a pastry wheel or long knife, trim the edges of the dough, cutting as little as needed to make straight, even edges. Add the trimmings to your baked trimmings or discard them. Using the straightedge as a guide, cut the dough into 10 (1¼-inch) strips.
■Pick up one strip and roll it away from you into a spiral. Lay the spiral with the concentric circles facing up in one of the prepared muffin cups. Repeat with the remaining strips, rolling and placing each in a prepared muffin cup.
■Cover each muffin tin with a damp, lightweight kitchen towel and set aside in a warm place for 50 to 60 minutes to proof, until the kouign amann start to puff up and expand.
Bake the kouign amann
■While the kouign amann are proofing, arrange the oven racks so that one is in the center position. Preheat the oven to 375°F.
■Place the muffin tins on the center rack to bake the kouign amann for 25 to 30 minutes, until the tops are golden brown and the undersides are caramelized and a bit of the caramelizing sugar begins to peek out around the sides of the pastries, rotating the muffin tins from front to back halfway through the baking time so the pastries brown evenly.
■While the kouign amann are baking, lay a sheet of parchment paper on your countertop. Remove the kouign amann from the oven and immediately flip the tins upside down so the pastries fall out onto the paper. If the pastries are sticking to the sides, run an offset spatula around the edges to loosen them. Turn the pastries right side up to cool completely.
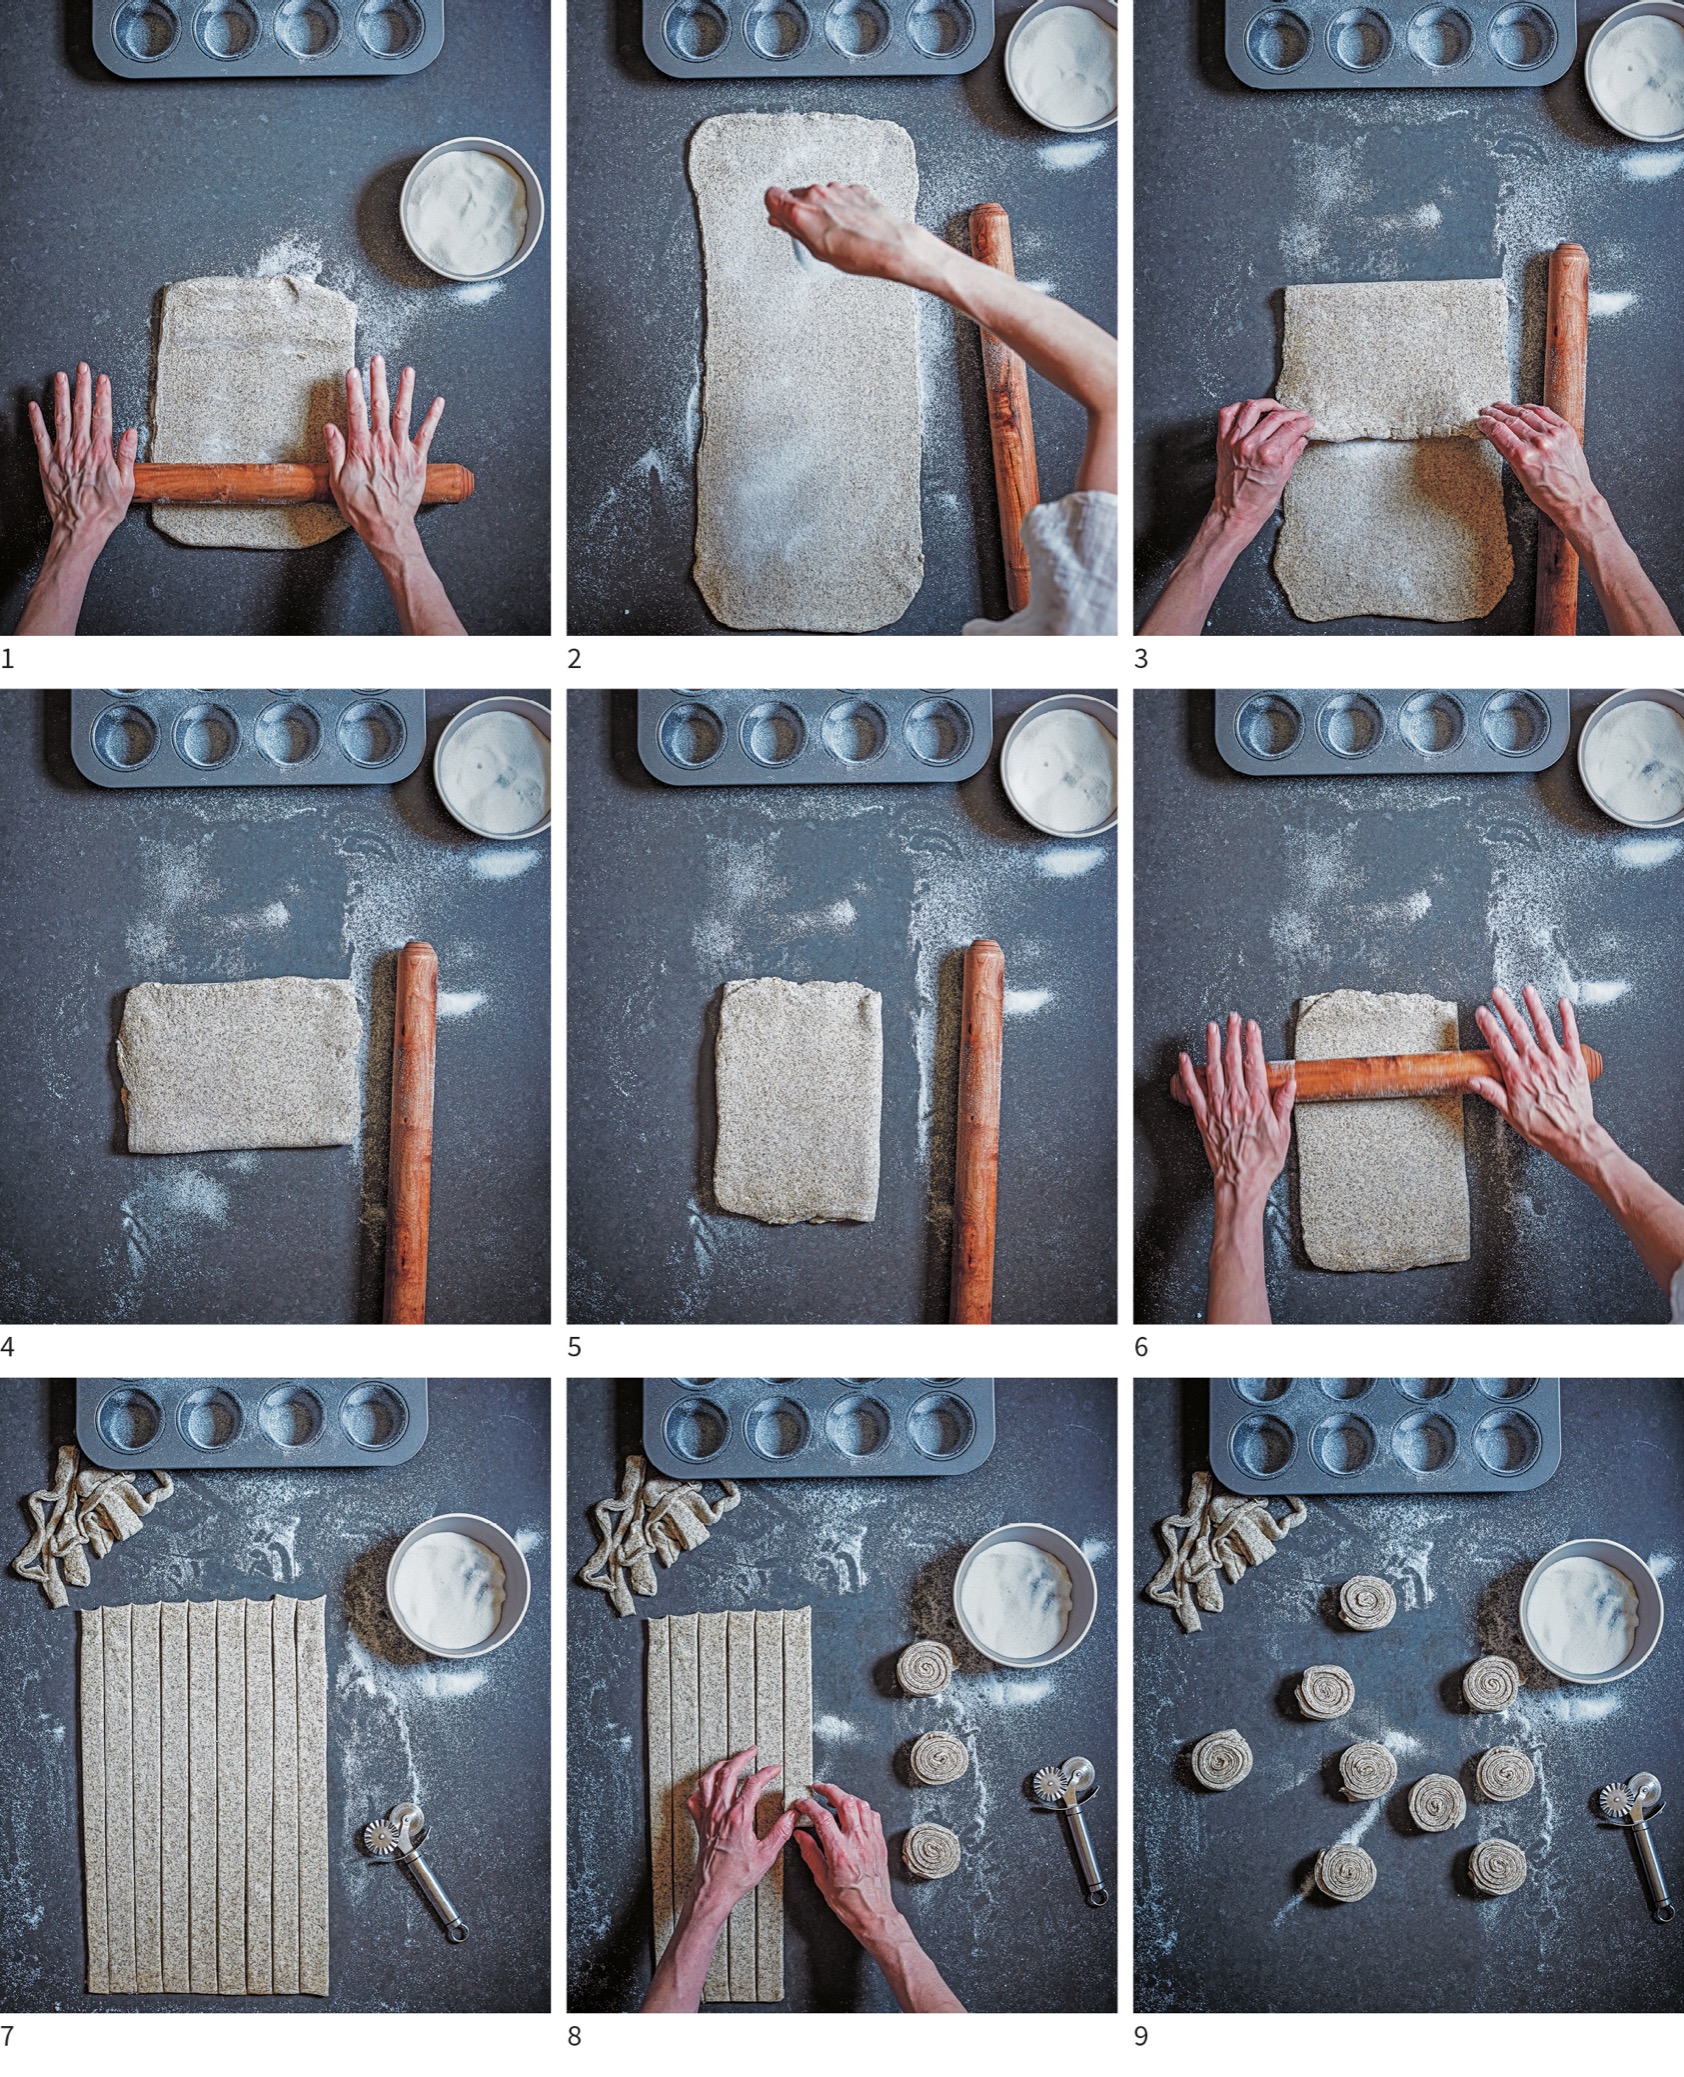
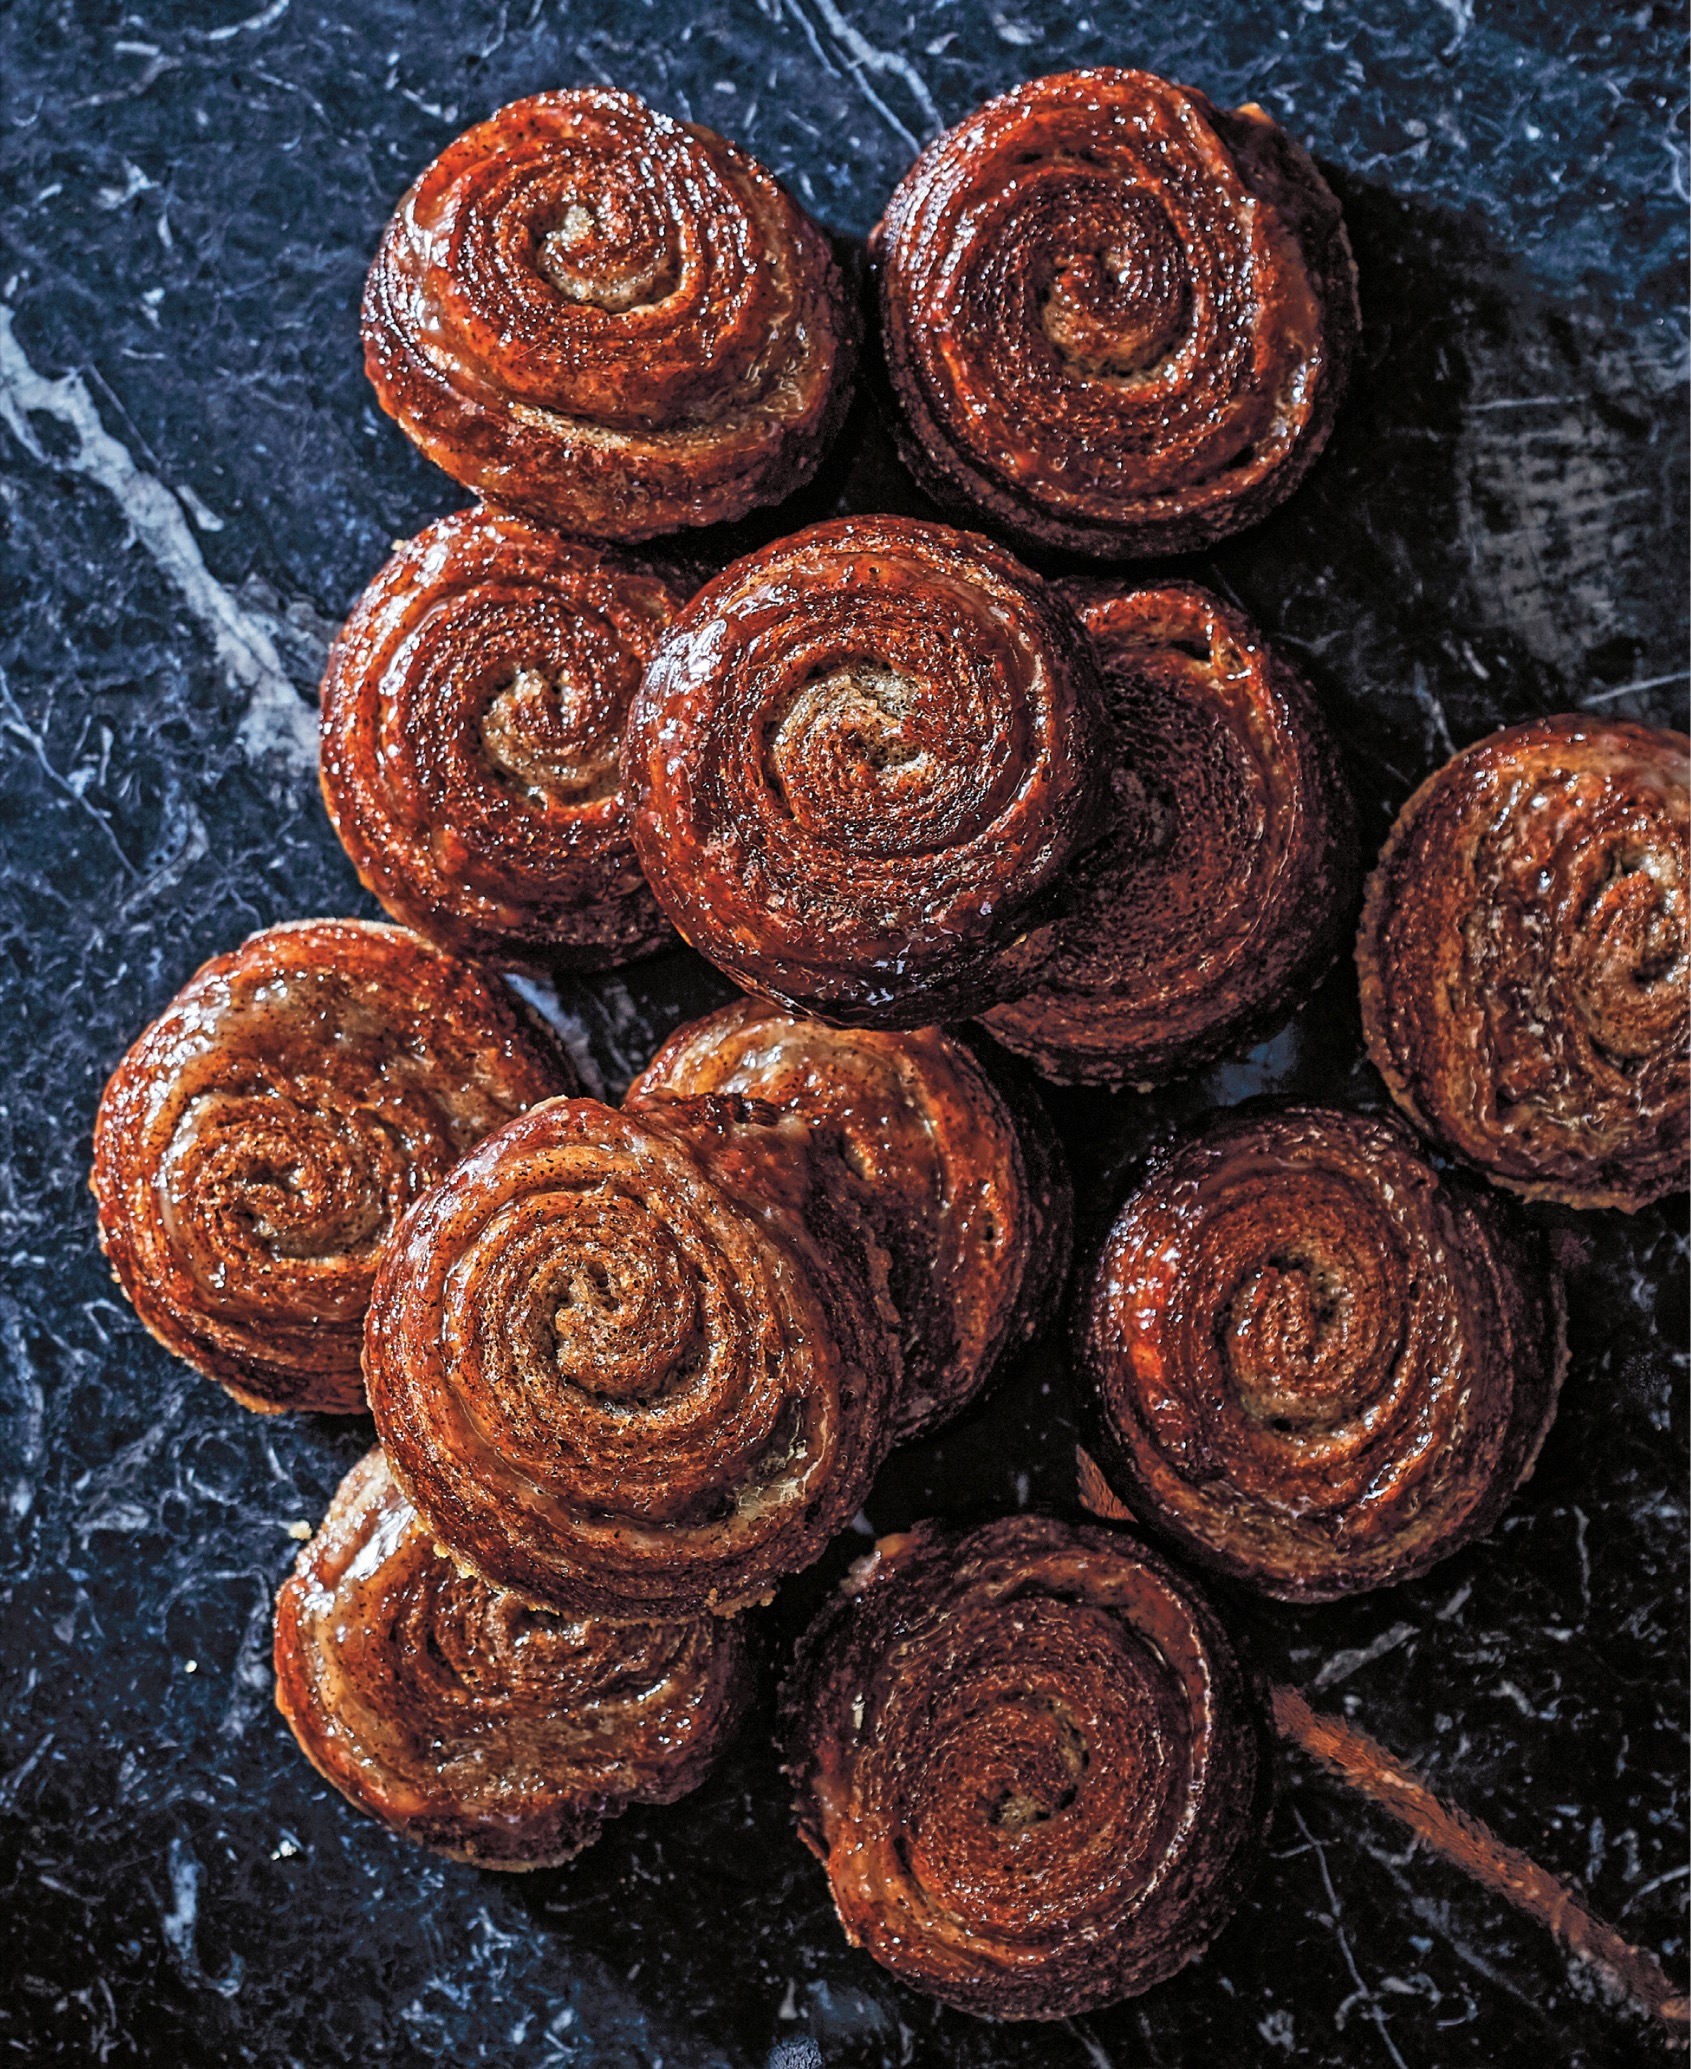
Chaussons aux Pommes
Makes 7 chaussons; makes 1 (1-kilogram) block of puff pastry dough or enough for 2 sheets. (You will need only one sheet for this recipe. Freeze the second sheet for up to 2 weeks. Place it in the refrigerator to thaw overnight before using it.)
A chausson aux pommes is basically the French version of an apple turnover, and a classic after-school treat for French schoolchildren. In addition to Ham and Cheese Twice-Baked Croissants (this page) and Pain aux Raisins (this page), this was one of my go-to snacks when I studied in France.
Chaussons are made with puff pastry, which differs from croissant dough in that it doesn’t contain yeast. Instead, puff pastry gets its height and lightness solely from folding the dough. When the water in the butter evaporates during the baking process, it pushes the layers of dough upward, creating a layered, flaky dough. Traditionally puff pastry is made with six letter folds, considerably more than yeasted laminated dough. I make this puff pastry with five folds; I think the sixth letter fold makes it too flaky. I don’t want it to shatter and fall apart when I bite into it. The other difference in my puff pastry is that it contains some whole-wheat pastry flour, which adds a subtle nutty flavor that you don’t usually get in this delicate dough.
Puff pastry dough can be really irritating to work with because the gluten in the dough gets really strong from being rolled out and folded so many times. You need to relax it in the refrigerator between folds, and then pay attention to how the dough feels when you pull it back out before rolling it again. Give the dough a gentle bend. If you feel the butter is hard, like it is going to break, let it warm up slightly before rolling the dough. I don’t recommend puff pastry for the laminating novice. You want to make your butter packet in advance of starting this recipe. Place it in the refrigerator to chill until you’re ready to laminate the dough, then temper it when called to do so in the recipe.
Note You will need an oval turnover cutter to make these. They aren’t the most common cutter you’ll find (not in the United States anyway) and when you do find them, they can be expensive. I have provided a traceable pattern for you to use to make your own cutter if you don’t want to buy one (see this page). Trace the pattern onto a piece of cardstock (a discarded cereal box would work perfectly). Cut the oval out of the cardstock to create a stencil and use the stencil as a guide to cut ovals from the puff pastry dough.
For the dough
3⅓ cups (400 grams) bread flour
¾ cup (79 grams) whole-wheat pastry flour
2½ teaspoons (15 grams) fine sea salt
1 cup plus 1 tablespoon (250 grams) cold water
1 teaspoon (5 grams) white vinegar
5 tablespoons (70 grams) unsalted butter, cubed and slightly softened
28 tablespoons (3½ sticks) Butter Packet (this page) (400 grams)
All-purpose flour for dusting
For the filling
1 tablespoon (14 grams) unsalted butter
3 medium to large Granny Smith apples
½ cup (lightly packed) Light brown sugar (100 grams)
2 tablespoons (18 grams) all-purpose flour
½ teaspoon (1 gram) ground ginger
¼ teaspoon (2 grams) Fine sea salt
2 teaspoons (10 grams) apple cider vinegar
1 teaspoon (5 grams) pure vanilla extract
For shaping and finishing the pastries
All-purpose flour for dusting
1 large egg
Big pinch fine sea salt
Make the dough
■Combine the bread flour, whole-wheat pastry flour, and salt in a medium bowl.
■Put the water and white vinegar in the bowl of a stand mixer. Add the dry ingredients and butter on top of the liquid ingredients. Fit the mixer with the dough hook and mix on low speed for about 3 minutes, until the dough just comes together and no chunks of butter are visible.
■Place a long sheet of plastic wrap on your work surface. Use a plastic bowl scraper to scrape the dough out of the mixer onto the plastic wrap and pat the dough into a square shape. Wrap the plastic wrap around the dough and run a rolling pin over the dough to form an even 8-inch square. (For more detail, see Wrapping Dough, this page.) Set the dough aside to rest for 20 to 30 minutes.
Laminate the Dough
Lock in the butter
■Remove the butter packet from the refrigerator and set it on the counter to soften until it is bendy but still cool; this could take anywhere from 5 to 20 minutes, depending on how cold it is and on the texture of the dough. You want the butter to be slightly softer and more malleable than the dough but not so soft that it will ooze out of the dough.
■Lightly dust a large flat work surface with all-purpose flour. Remove the dough from the refrigerator, unwrap the dough, and place it on the floured surface. Lightly dust the top of the dough and the rolling pin with flour and roll the dough out to a rectangle that is 14 inches from side to side and 11 inches from top to bottom, dusting with flour as needed.
■Open the parchment packet to expose the butter and flip the packet over to place the butter on the dough, centering the 10-inch edge of the butter packet on the 11-inch length of dough. Run your hand over the parchment paper so that the heat of your hand helps to peel off the paper. Peel off and discard the parchment paper. Fold the left and right sides of the dough over the butter so they meet in the middle and pinch the two edges of dough together with your fingers. Gently press the top and bottom edges of the dough together to seal the packet closed and lock in the butter.
Make five letter folds
■Dust your work surface with a bit more all-purpose flour. Dust the top of the dough and the rolling pin with flour and roll the dough lengthwise to 18 inches from top to bottom, dusting the work surface, rolling pin, and top of the dough lightly with flour as you roll the dough, so it doesn’t stick. Using a pastry wheel or bench knife, trim the top and bottom edges of the dough just enough to expose the layer of butter in the center of the dough. Reserve the trimmings to make Baked Trimmings (this page) or discard them.
■Fold the top edge down two-thirds and fold the bottom edge to meet the top edge, so the dough is folded into thirds, like a letter.
■Rotate the dough 90 degrees so the folded, closed edges are facing left and right, and one of the open edges (with the visible layers) is facing you. Lightly dust the work surface, dough, and rolling pin with all-purpose flour and roll the dough to 18 inches from top to bottom, dusting with flour as needed. Using a pastry wheel or a bench knife, trim the top and bottom edges to expose the butter layers. Add the trimmings to your baked trimmings or discard them. Fold the top edge down and the bottom edge up to make a second letter fold.
■Wrap the dough in plastic and place it in the refrigerator to relax the gluten for 20 to 30 minutes. (Don’t worry about cleaning up your counter as you will be making three more letter folds during this lamination process.)
■Lightly dust your work surface with more flour if needed. Remove the dough from the refrigerator, unwrap it, and place it on the floured surface with the closed edges facing left and right. Lightly dust the top of the dough and rolling pin with flour and roll out the dough to 18 inches from top to bottom, dusting with flour as needed. Trim the top and bottom edges to expose the butter layers. Add the trimmings to your baked trimmings or discard them. Fold the top edge down and the bottom edge up to make a third letter fold.
■Wrap the dough in plastic again and refrigerate it for 20 to 30 minutes before making a fourth letter fold. Let the dough rest again for 20 to 30 minutes, then repeat, rolling the dough out again and making a fifth letter fold.
■Wrap the dough in plastic wrap again and place the dough in the refrigerator overnight or for at least 8 hours to let the gluten relax completely. (The dough can also be frozen for up to 3 months; place it in the refrigerator overnight to thaw it, then proceed with the recipe.)
Make the filling
■Arrange the oven racks so one is in the center position. Preheat the oven to 350°F.
■Grease the bottom of a 9-inch pie plate or another medium baking dish with the butter.
■Peel the apples and discard the peels. Working one at a time, core and cut each apple into quarters. Lay the apple quarters flat on your cutting board and slice them ⅛ inch thick. Place the slices in a large bowl and set aside.
■Put the brown sugar, all-purpose flour, ginger, and salt in a small bowl and stir to combine. Sprinkle the sugar mixture over the apples. Add the cider vinegar and vanilla and toss with your hands to coat the apples with the other ingredients.
■Transfer the apple filling to the prepared pie plate and cover with aluminum foil.
■Place the pie pan on the center rack of the oven to bake for 45 minutes, until the apples are soft and the liquid is thick and bubbly. Remove the pan from the oven and remove the aluminum foil, being careful of the escaping steam. Gently stir the apples and set aside to cool to room temperature. (You can make the filling to this point up to 1 day in advance. Cover the cooled apples and refrigerate until you’re ready to use them.)
Roll out the dough
■Remove the laminated block of dough from the refrigerator and set it on the counter to rest for 20 to 30 minutes, until you can feel that the butter layers inside the dough are just becoming malleable (but not soft) when you bend the block slightly.
■Line a baking sheet with parchment paper and have a second sheet of parchment handy.
■Lightly dust a large flat work surface with all-purpose flour. Unwrap the dough and place it on the floured surface. Dust the top of the dough and the rolling pin with flour and roll the dough out to a 13- x 20-inch rectangle, dusting the work surface, rolling pin, and top of the dough lightly with flour as you roll the dough, so it doesn’t stick. Use a pastry wheel or a large knife to cut the dough in half through the middle. Transfer one half to the prepared baking sheet. Lay the second sheet of parchment paper on top of the dough and lay the second sheet of dough on top of the parchment. Place the baking sheet in the refrigerator to let the dough relax for about 30 minutes.
Roll out and form the chaussons
■Lightly dust a large flat work surface with all-purpose flour. Remove the puff pastry from the refrigerator. Place one sheet of puff pastry on the work surface. Wrap the baking sheet with the remaining pastry sheet in plastic wrap and freeze. Let the first sheet rest at room temperature for 20 to 30 minutes.
■Lightly dust the top of the puff pastry and the rolling pin with flour and roll out the pastry to 20 inches from side to side and 13 inches from top to bottom, dusting with flour as needed.
■Using a small sharp knife and a turnover cutter or the stencil you made from the traceable pattern, cut 7 ovals from the pastry.
Fill the chaussons
■Place about 3 tablespoons (60 grams) of the filling on the bottom half of each oval, leaving a ¼-inch border with no filling around the edges of the pastry. Fill a small bowl with water and use a pastry brush to brush the bare edges of the ovals with water. Fold the top half of the dough over to cover the filling. Press the top and bottom edges of dough together with the tines of a fork to seal each chausson closed. Gather the scraps and add them to your baked trimmings or discard them.
■Line a baking sheet with parchment paper. Transfer the chaussons to the prepared baking sheet.
■Place the baking sheet in the refrigerator to chill the chaussons for 20 minutes. (If preparing the chaussons in advance, remove them from the refrigerator after they have chilled. Wrap each chausson individually in plastic wrap and freeze for up to 1 month. Bake as per the instructions that follow.)
Bake the chaussons
■Arrange the oven racks so that one is in the center position. Preheat the oven to 375°F.
■Remove the chaussons from the refrigerator. Working one at a time, hold the chausson in place with one hand and use a paring knife to score their tops decoratively with the other, making sure that the scores go completely—or almost all the way—through the dough, which will allow the steam to escape when the chaussons are baked.
■Whisk the egg with the salt in a small bowl to make an egg wash. Brush the tops with egg wash; discard the remaining egg wash.
■Place the baking sheet on the center rack and bake the chaussons for 25 to 30 minutes, until they are golden brown, rotating the baking sheet from front to back halfway through the baking time so the pastries brown evenly. Remove the baking sheet from the oven and allow the chaussons to cool for a few minutes on the baking sheet. Use a metal spatula to transfer the pastries to a cooling rack to cool. Serve warm or at room temperature.
Master Recipe
for Laminated Babka Dough
Makes enough for 2 Blueberry Blackberry Cheese Danish Braids (this page) or 9 New York Cheese Danishes (this page)
I started to make cheese Danishes in anticipation of the opening of Sadelle’s. I wanted to create a New York–style Danish, which is soft and buttery, but not crispy. At the time I was also working on my babka dough, so I started with that. I give the dough a light lamination to produce some flakiness, while still maintaining that soft, bready texture.
You want to make your butter packet in advance, or while the dough is in the refrigerator. Place the packet in the refrigerator to chill until you’re ready to laminate the dough, then remove it from the refrigerator to soften it slightly when called to do so in the recipe.
3¾ cups plus more (450 grams) All-purpose flour, for dusting
½ cup (100 grams) granulated sugar
1 tablespoon (9 grams) instant yeast
2 teaspoons (12 grams) fine sea salt
1 cup (240 grams) whole milk
1 large egg (50 grams)
1 large egg yolk (17 grams)
10 tablespoons (1 stick plus 2 tablespoons) unsalted butter, cubed and softened (140 grams)
Nonstick cooking spray
12 tablespoons (1½ sticks) Butter Packet (this page), chilled (170 grams)
Make the dough
■Combine the flour, sugar, yeast, and salt in a large bowl.
■Place the milk, egg, and egg yolk in the bowl of a stand mixer. Fit the mixer with the dough hook. Add the dry ingredients and mix on low speed for 3 minutes to create a homogenous dough. Increase the speed to medium and mix for 5 to 8 minutes, until the dough is completely wrapped around the hook and cleans the sides of the bowl. With the mixer still running on medium speed, add the butter and mix until it is completely mixed in and no butter chunks remain, 5 to 10 minutes (depending on the softness of the butter), stopping to wipe the dough hook clean once or twice with a wet hand. Turn off the mixer.
Ferment the dough
■Remove the bowl from the mixer and wipe the dough hook clean with a wet hand once more. Cover the bowl with a clean kitchen towel or plastic wrap and set aside in a warm place to allow the dough to ferment for 2 hours, turning the dough after 1 hour. To turn the dough, uncover the bowl and use a wet hand to fold the top edge down two-thirds and fold the bottom edge to meet the top edge, so the dough is folded like a misshapen letter; fold the sides inward in the same way to form a sort of ball, then re-cover the bowl.
■Line a baking sheet with parchment paper and generously spray the paper with nonstick cooking spray.
■Uncover the bowl and transfer the dough to the prepared baking sheet. Use your hands to gently coax and pat the dough into an even square. Place the dough in the refrigerator to chill for at least 2 hours, until it feels firm. (If you are making the dough in advance, remove it from the refrigerator after 2 hours, wrap the baking sheet in plastic wrap, and return it to the refrigerator for up to 2 days; this prevents the dough from developing a skin.)
Laminate the Dough
Lock in the butter
■Remove the butter packet from the refrigerator and set it on the counter to soften until it is bendy but still cool; this could take anywhere from 5 to 20 minutes, depending on how cold it is and on the texture of the dough. You want the butter to be slightly softer and more malleable than the dough but not so soft that it will ooze out of the dough.
■Lightly dust a large flat work surface with flour. Remove the dough from the refrigerator, unwrap the dough, and place it on the floured surface. Lightly dust the top of the dough and the rolling pin with flour and roll out the dough to a rectangle that is 14 inches from side to side and 11 inches from top to bottom, dusting with flour as needed.
■Open the parchment packet to expose the butter and flip the packet over to place the butter on the dough, centering the 10-inch edge of the butter packet on the 11-inch length of dough. Run your hand over the parchment paper so that the heat of your hand helps to peel off the paper. Peel off and discard the parchment paper. Fold the left and right sides of the dough over the butter so they meet in the middle and pinch the two edges of dough together with your fingers. Gently press the top and bottom edges of the dough together to seal the packet closed and lock in the butter.
Make two letter folds
■Lightly dust your work surface with a bit more flour. Dust the top of the dough and the rolling pin with flour and roll the dough to 18 inches from top to bottom, dusting the work surface, rolling pin, and top of the dough lightly with flour as you roll the dough, so it doesn’t stick. Using a pastry wheel or a bench knife, trim the top and bottom edges of the dough just enough to expose the layer of butter in the center of the dough. Reserve the trimmings to make Baked Trimmings (this page) or discard them. Fold the top edge down two-thirds and fold the bottom edge to meet the top edge, so the dough is folded into thirds, like a letter.
■Rotate the dough 90 degrees so that the folded, closed edges are facing left and right and one of the open edges (with the visible layers) is facing you. Lightly dust the work surface, dough, and rolling pin with flour and roll the dough to 18 inches from top to bottom, dusting with flour as needed. Using a pastry wheel or a bench knife, trim the top and bottom edges to expose the butter layers and add the trimmings to your baked trimmings or discard them. Fold the top edge down and the bottom edge up to make a second letter fold.
■If you are using the dough to make a Danish braid, use a bench knife to cut the dough in half through the middle, so you are cutting perpendicular to the counter’s edge. If you are using the dough to make cheese Danishes, leave it in one piece.
■Wrap the laminated block, or blocks, of dough in plastic wrap and place it in the freezer to chill for 1 hour. Move the dough from the freezer to the refrigerator for at least 8 hours and up to 12 hours to retard the dough.
Blueberry Blackberry Cheese Danish Braid
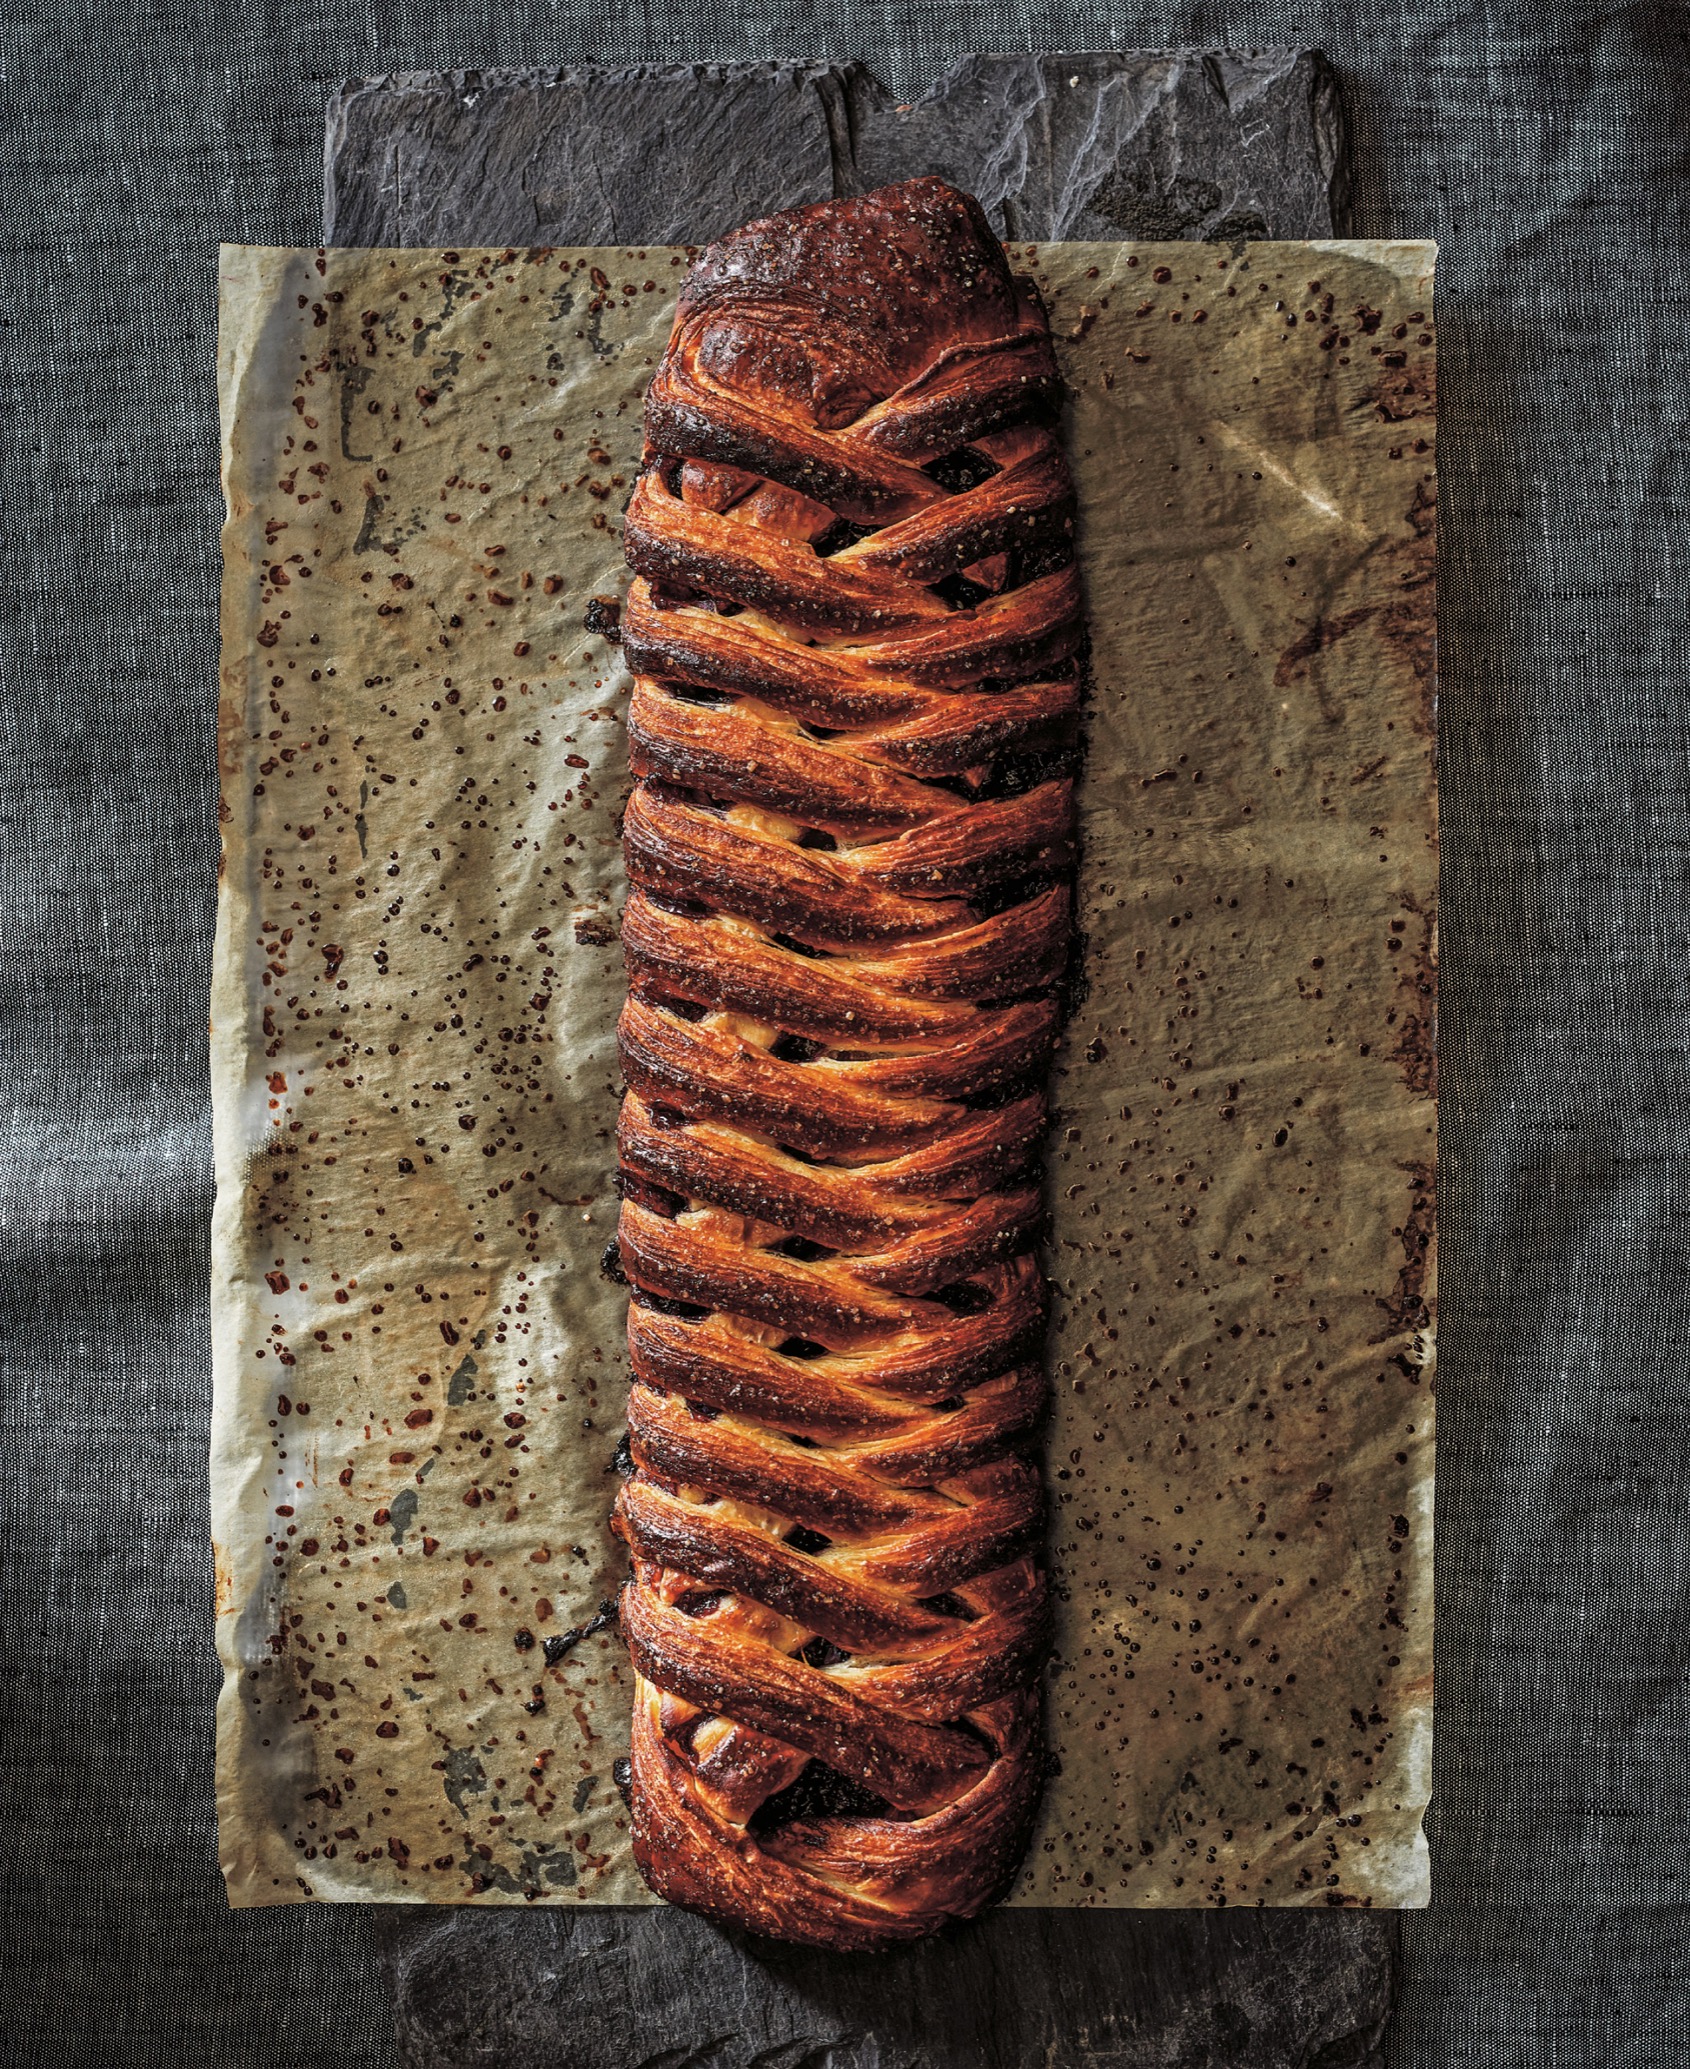
Makes 1 Danish braid; 10 to 12 slices
This is a beautiful Danish braid—made with babka dough that is laminated, so it is both flaky and soft—with a sweet-tart berry filling combined with a rich cream cheese filling. The berries are cooked in a pie plate in the oven, basically imitating a pie filling without the crust. The braid is not difficult to make, but you do have to take care along the way when you are rolling, measuring, and cutting, as it is a pastry where evenness counts.
Note You will need one large disposable pastry bag.
For the cream cheese filling
8 ounces (226 grams) cream cheese, softened
1 tablespoon (13 grams) granulated sugar
1 Large egg yolk (17 grams)
For the berry filling
6 ounces (about 1 heaping cup) blueberries (170 grams)
6 ounces (about 1 heaping cup) blackberries (170 grams)
¼ cup (lightly packed) Dark brown sugar (50 grams)
2 teaspoons (5 grams) arrowroot
pinch (1 gram) fine sea salt
1 ounce (about ½ lemon) Fresh lemon juice (28 grams)
For the dough
½ recipe Master Recipe for Laminated Babka Dough (this page)
All-purpose flour for dusting
For finishing the braid
1 large egg
Big pinch fine sea salt
1½ tablespoons (20 grams) Demerara (turbinado) sugar
Make the fillings
■Arrange the oven racks so one is in the center position. Preheat the oven to 375°F.
■To make the cream cheese filling, combine the cream cheese and granulated sugar in the bowl of a stand mixer fitted with the paddle attachment (or a food processor fitted with a metal blade) and mix on low speed just to combine; don’t mix longer than necessary as you don’t want to aerate the mixture. Add the egg yolk and mix until it is blended in, stopping to scrape down the sides of the bowl with a rubber spatula as needed. Transfer the filling to a large disposable pastry bag and refrigerate for about 2 hours, until the filling sets up, or for up to 2 days.
■To make the berry filling, combine the blueberries and blackberries in a pie plate. Pick out and discard any blueberry stems you find.
■Combine the brown sugar, arrowroot, and salt together in a small bowl and stir or whisk to break up any lumps and to combine the ingredients. Sprinkle the brown sugar mixture over the berries and stir with a rubber spatula to coat the berries with the sugar. Stir in the lemon juice.
■Place the pie plate on the center rack of the oven and bake the berries, uncovered, for 20 minutes, stirring them halfway through the baking time. Remove the berries from the oven and set aside to cool slightly. Turn off the oven.
■Transfer the berries to a small container and cover the container while the berries are still warm; refrigerate until they’ve completely cooled and for up to 3 days. (Covering the container while the berries are warm creates steam inside the container and prevents a skin from forming.)
Roll out the dough
■Remove the laminated block of dough from the refrigerator and set it on the counter to rest for 20 to 30 minutes, until you can feel that the butter layers inside the dough are just becoming malleable (but not soft) when you bend the block slightly.
■Line a baking sheet with parchment paper.
■Lightly dust a large flat work surface with flour. Remove and discard the plastic wrap and place the dough on the floured surface. Lightly dust the top of the dough and the rolling pin with flour and roll the dough out to a rectangle that is 10 inches from side to side and 16 inches from top to bottom, dusting with flour as needed. (If the dough is springing back before you can roll it to those dimensions, transfer it to a parchment-lined baking sheet and refrigerate for 20 to 30 minutes to relax the gluten. Remove the dough from the refrigerator and continue rolling it out until you reach the correct dimensions.) Place the dough on the prepared baking sheet and place it in the refrigerator for 20 minutes to rest and chill the dough before you cut and braid it.
The more you work dough, the more the gluten develops. Cold temperature and time relax it.
■Lay parchment paper on your work surface and transfer the dough to the parchment.
Cut the dough
■Using a straightedge to measure, nick the dough 3¼ inches from the left edge and 3¼ inches from the right edge on the bottom edge of the dough. Do the same on the top edge of the dough. Use the straightedge as a guide to score the dough between the top and bottom marks on both sides to visually divide the dough into 3 segments.
■Start at the top of the left vertical line you just cut and use a bench knife to cut downward toward the left edge of the dough at a 45-degree angle. (You can eyeball the first cut; it doesn’t need to be exactly 45 degrees.) Make diagonal cuts parallel to the first cut, using the bench knife. Start from the diagonal cut you just made, and cut the dough every inch moving downward on the left segment of dough. Repeat on the right side: start at the top of the right vertical line and use a bench knife to cut downward toward the right edge of the dough at a 45-degree angle. Make diagonal cuts that are parallel to the first cut, using the bench knife. Starting from the diagonal cut you just made, cut the dough every inch moving downward on the right segment of dough. Transfer the parchment paper with the dough on it to a baking sheet.
■Remove the cheese filling from the refrigerator and cut a ¾-inch opening at the tip of the pastry bag. Pipe 4 lines of cream cheese filling down the length of the center segment of dough. Use a small offset spatula to spread the filling over to the edges of this segment.
■Remove the berry filling from the refrigerator and spoon about 1 cup (250 grams) of the berry filling on top of the cream cheese layer and use the back of the spoon to spread it to cover the cheese filling. (You will have 1 to 2 tablespoons extra filling. Stir it into plain yogurt or enjoy it however you prefer.)
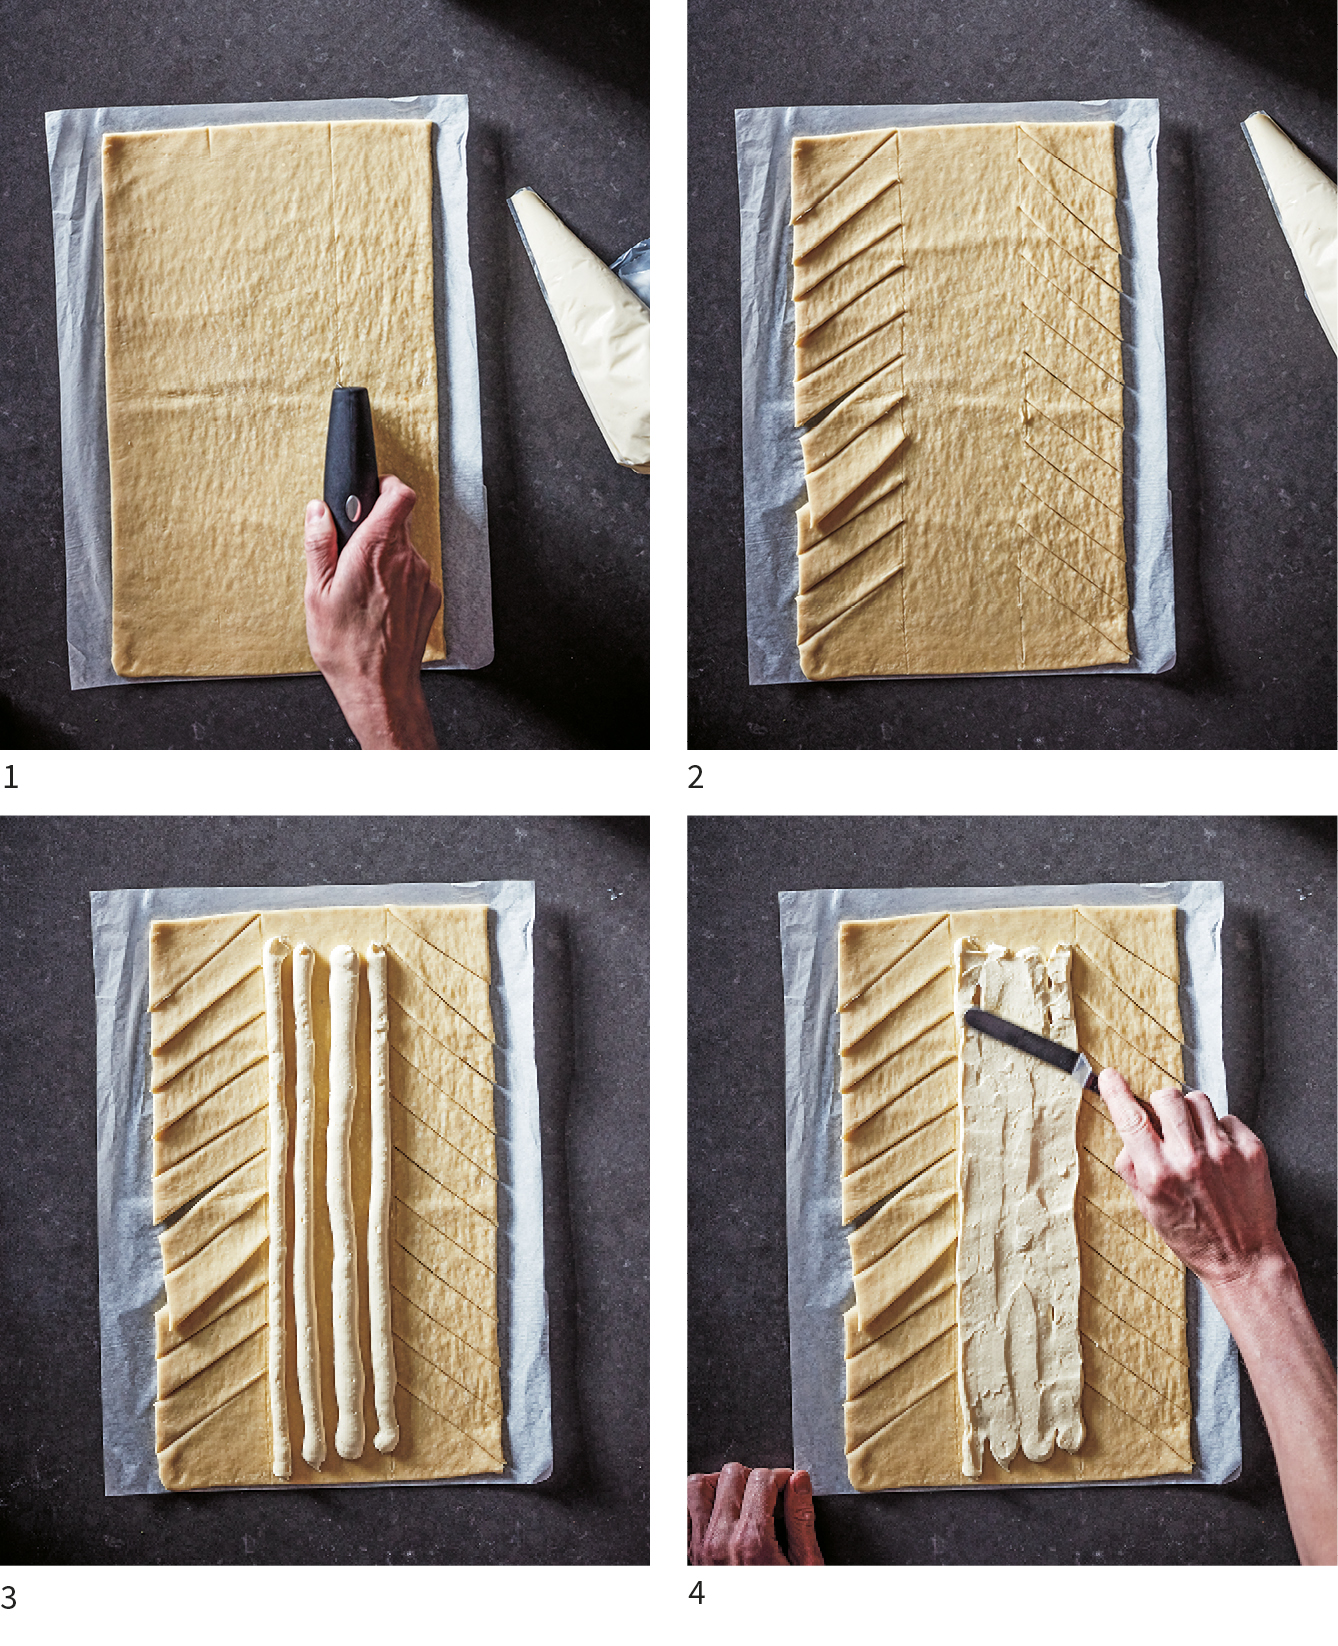

Braid and proof the Danish
■Starting at the edge farthest from you, lift the top left triangular flap of dough and fold it to the right to cover the filling (the edge will be perpendicular to the top edge of the center segment of dough). Fold the top right flap of dough to the left in the same way. Fold the first strip on the left length of dough downward toward the right at a 45-degree angle. Do the same on the right. Continue alternating left and right, braiding the dough as you work your way down the length of the Danish. When you have braided all the strips, seal the top edge of the dough closed by pressing down gently on the top and bottom sheets of dough. Seal the lower edge in the same way.
■Cover the baking sheet with a damp, lightweight kitchen towel and set it aside in a warm place for about 1 hour to proof the braid until it looks puffy.
Prepare to bake the Danish braid
■Arrange the oven racks so one is in the center position. Preheat the oven to 350°F.
■Whisk the egg and salt together in a small bowl to make an egg wash. Uncover the Danish braid and brush the wash over the surface of the braid; discard the remaining egg wash. Sprinkle the demerara sugar on top of the braid.
Bake the Danish braid
■Slip a baking sheet underneath the baking sheet with the braid to create a baking sheet of double thickness. Place the baking sheets on the center rack of the oven to bake the braid for 30 to 40 minutes, until it is golden brown on top, rotating the baking sheet from front to back halfway through the baking time so the Danish braid browns evenly. Remove the baking sheets from the oven and place them on a cooling rack to cool the braid for at least 10 minutes before slicing.
Baking the braid on a doubled baking sheet prevents the bottom of the braid from burning in the time it takes the top to brown.
■Slide the braid onto a cutting board and slice it into 2-inch-wide strips. Serve warm or at room temperature.

New York Cheese Danishes

Makes 16 to 18 Danishes
These are New York Danishes, not to be confused with European-style Danishes, which are made from a dough similar to croissant dough, making them crispier and flakier. New York Danishes are softer, with a homier feel. They are about the size of a sticky bun, so there is a lot of filling relative to the amount of dough, which I like.
Note You will need one large disposable pastry bag.
For the filling
8 ounces (226 grams) cream cheese, softened
1 tablespoon (13 grams) granulated sugar
1 large egg yolk (17 grams)
For the dough
1 recipe Master Recipe for Laminated Babka Dough (this page)
All-purpose flour for dusting
For finishing the Danishes
1 large egg (50 grams)
Big pinch fine sea salt
2 tablespoons apricot jam
1 teaspoon water
Make the filling
■Put the cream cheese and sugar in the bowl of a stand mixer fitted with the paddle attachment (or a food processor fitted with a metal blade) and mix on low speed to combine; don’t mix longer than necessary as you don’t want to aerate the mixture. Add the egg yolk and mix until it is blended in, stopping to scrape down the sides of the bowl with a rubber spatula as needed. Transfer the filling to a large disposable pastry bag and refrigerate for about 2 hours, until the filling sets up, and for up to 2 days.
Roll out the dough
■Remove the laminated block of dough from the refrigerator and set it on the counter to rest for 20 to 30 minutes, until you can feel that the butter layers inside the dough are just becoming malleable (but not soft) when you bend the block slightly.
■Line two baking sheets with parchment paper.
■Lightly dust a large flat work surface with flour. Remove and discard the plastic wrap and place the dough on the floured surface with the long edge parallel to you. Lightly dust the top of the dough and the rolling pin with flour and roll the dough out to a rectangle that is 18 inches from side to side and 12 inches from top to bottom, dusting with flour as needed. (If the dough is springing back before you can roll it to those dimensions, transfer it to a parchment-lined baking sheet and refrigerate for 20 to 30 minutes to relax the gluten. Remove the dough from the refrigerator and continue rolling it out until you reach the correct dimensions.) Using a pastry wheel, trim the top, bottom, and sides so you have clean, straight edges. Use the trimmings to make Baked Trimmings (this page) or discard them.
■Using the pastry wheel, score the dough at every inch mark on the top and bottom edges. Using the straightedge as a guide, cut the dough into 16 to 18 (1-inch-wide) strips.
An unfloured surface gives you the surface tension you need to twist the dough. If the dough is sticking to the surface, which it will if the dough is warm, flour your hands.
■Pick up one strip and lay it horizontally on a section of your work surface that has no flour on it. Twist both ends in opposite directions several times until the length of the strip is completely twisted. Place both hands gently on the twisted strip and move one hand toward you and the other hand away from you to get one more twist into the strip. Pick up the strip and coil it into a tight spiral. Bring the outside end of the coil underneath the Danish and pinch it together with the end that is at the center of the Danish. Place the Danish with the pinched coil underneath on one of the prepared baking sheets. Continue shaping the remaining Danishes in the same way, putting them on the baking sheets, with 2 to 3 inches between them, as you work.
■Cover the baking sheets with damp, lightweight kitchen towels and set the pastries aside in a warm place to proof for 1½ to 2 hours, until they look puffy.
Finish and bake the Danishes
■Arrange the oven racks so one is in the top third of the oven and the other is in the bottom third. Preheat the oven to 350°F.
■Whisk the egg with the salt in a small bowl to make an egg wash. Brush the wash over the surface of each Danish; discard the remaining egg wash. Press both of your thumbs into the center of each Danish to create a flat-bottomed crater about 1½ inches wide.
■Remove the pastry bag from the refrigerator and cut a ¾-inch opening at the tip. Pipe a heaping tablespoon of the filling to fill the center well of each Danish.
■When you have filled all of the Danishes, use wet fingertips to dab down any peaks of cheese that were created during piping, as these will burn in the oven.
■Place one baking sheet on each oven rack and bake the Danishes for 18 to 22 minutes, until they are golden brown and the cheese has puffed up (but not so long that the filling cracks), rotating the baking sheets from front to back and from one oven rack to the other halfway through the baking time so the Danishes brown evenly. Remove the baking sheets from the oven and place them on cooling racks to cool while you prepare the apricot glaze.
■While the Danishes are cooling, combine the apricot jam and water in a small saucepan. Heat over medium heat, whisking, to melt the jam and make a smooth glaze. (Or place the jam in a bowl and heat it in a microwave for about 30 seconds, until the jam liquefies.)
■Use a pastry brush to brush the glaze onto the tops of the warm Danishes. Serve warm or at room temperature.
I tend to be conservative about how much glaze I put on any pastry. Supposedly it seals the pastry, keeping it from drying out, but mostly it makes the pastry shine and sparkle and look beautiful. Don’t overdo it. For me, the most important thing in a pastry is the way it tastes, not the way it looks.
Black Pepper Fantails with Salted Honey Butter
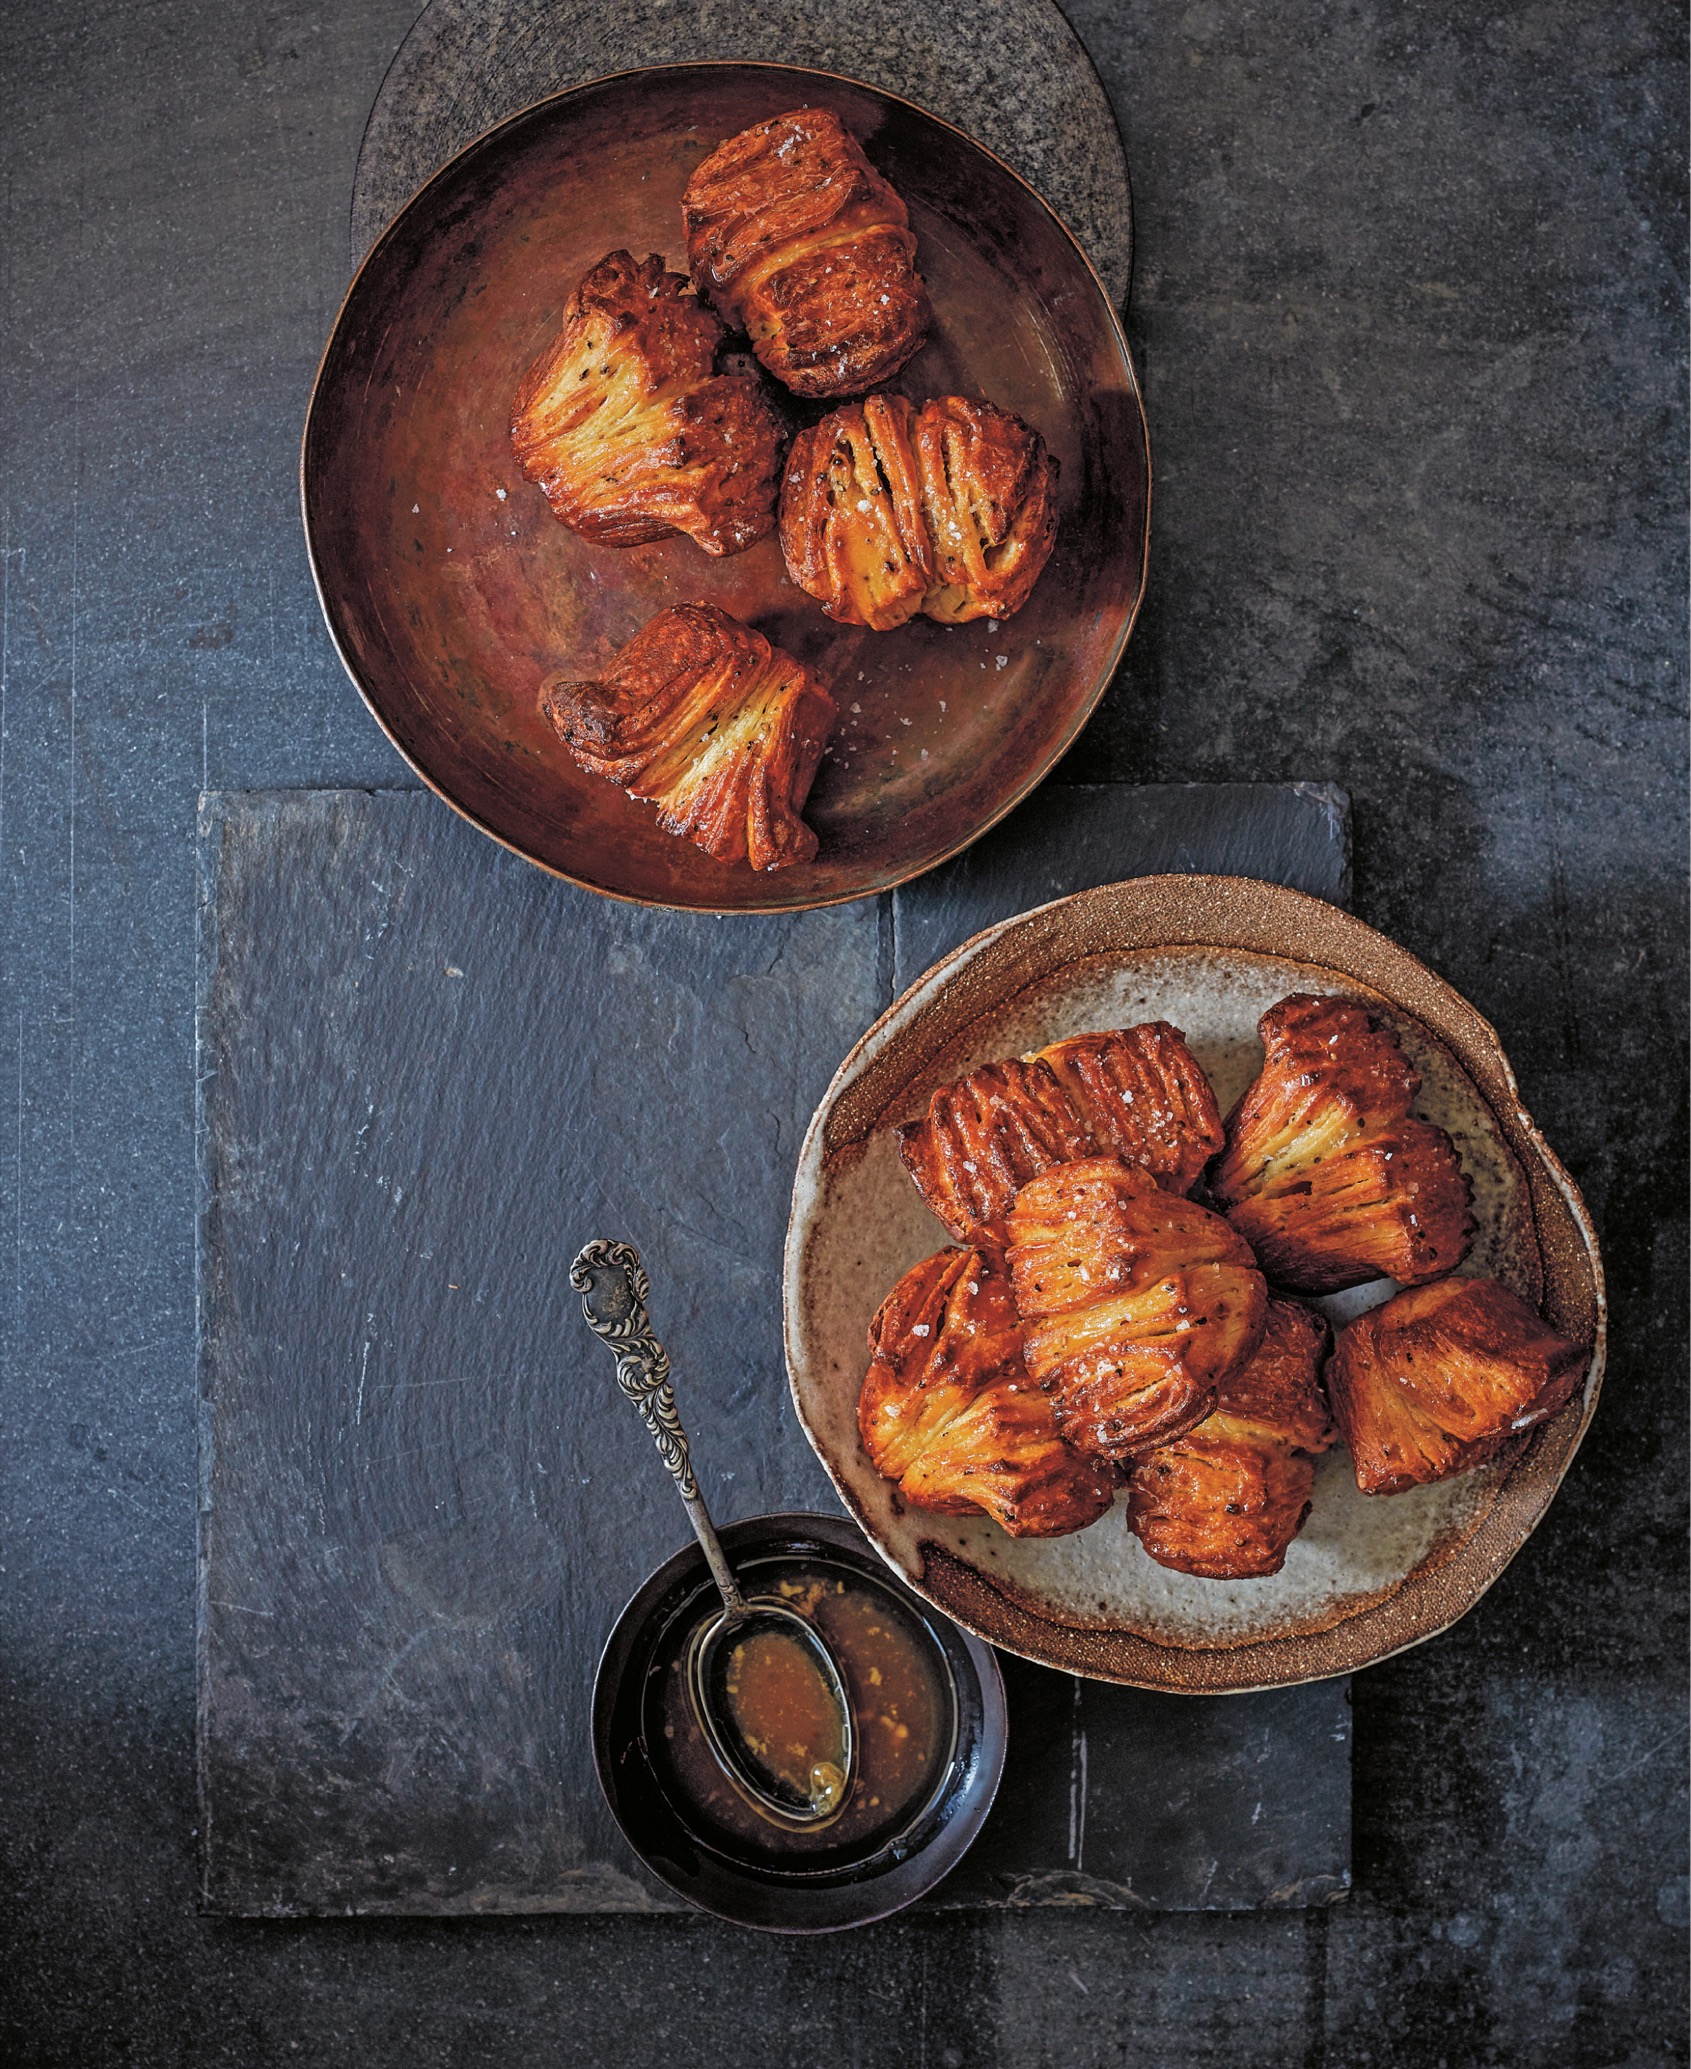
Makes 1 dozen fantails
Fantails are a laminated pastry; the name refers to their shape. They are made by cutting laminated dough into squares, turning the squares on their sides, and baking them in muffin cups. When the dough expands during baking, the squares open up in the individual cups like a fan, and because the cut sides are facing up, you can see all the layers of the lamination. I started making them when I was the head baker at Per Se. Thomas Keller was coming to town and had called ahead to ask that I have these ready on his arrival. I followed the recipe from the baker who preceded me to a T. Thomas loved them, and they became part of my repertoire. The year I left Per Se, I made my own version of fantails for my family’s Thanksgiving dinner and they’ve since become part of my regular Thanksgiving spread. The layers of the fantails may come apart when you remove them from the pan, but don’t worry about it, those crunchy bits are the first thing your guests (and you!) will reach for in the bread basket.
You want to make your butter packet in advance, or while the dough is in the refrigerator. Place the packet in the refrigerator to chill until you’re ready to laminate the dough, then remove it from the refrigerator to soften it slightly when called to do so in the recipe.
Note This recipe calls for cracked butcher’s pepper, which is a larger grind than what you get out of a pepper mill. If you were to analyze what comes out of a mill, it is a mixture of powder and larger chunks. Butcher’s pepper consists solely of the chunks. It is sold at specialty food stores and butcher shops. To make your own, coarsely grind peppercorns in a spice grinder. Pass the ground pepper through a fine-mesh strainer. Reserve the strained pepper for seasoning meats or to use in cooking. Use the chunks of pepper left in the strainer for these fantails.
Note You will need one standard 12-cup muffin tin to make these.
For the dough
4 cups plus more (480 grams) all-purpose flour for dusting
¼ cup (50 grams) granulated sugar
1 tablespoon (9 grams) instant yeast
2 teaspoons (12 grams) fine sea salt
1 tablespoon plus 2 teaspoons (15 grams) cracked butcher’s pepper
1 cup (240 grams) whole milk
1 large egg (50 grams)
1 large egg yolk (17 grams)
10 tablespoons (1 stick plus 2 tablespoons) unsalted butter, cubed and softened (140 grams)
Nonstick cooking spray
12 tablespoons (1½ sticks) Butter Packet (this page), chilled (170 grams)
For the honey butter
8 tablespoons (1 stick) Unsalted butter, melted (113 grams)
3 tablespoons (60 grams) mild-flavored honey (such as wildflower or clover)
½ teaspoon (3 grams) fine sea salt
Flaky sea salt for sprinkling
Make the dough
■Put the flour, sugar, yeast, salt, and pepper in a medium bowl and stir to combine.
■Place the milk, egg, and egg yolk in the bowl of a stand mixer. Place the dry ingredients and butter on top. Fit the mixer with the dough hook and mix on low speed for 2 minutes. Increase the speed to medium and mix for 5 minutes. Remove the bowl from the stand and wipe the dough hook clean with a wet hand. Place a clean kitchen towel or plastic wrap over the bowl and set the dough aside at room temperature to ferment for 1 hour.
■Line a baking sheet with parchment paper and spray the parchment with nonstick cooking spray.
■Use a plastic bowl scraper to scrape the dough out of the bowl and onto the prepared baking sheet. Using wet hands, pat and form the dough gently into an 8-inch square. Refrigerate the dough for at least 1 hour and up to 8 hours. (If you are refrigerating the dough for longer than 1 hour, remove it from the refrigerator after 1 hour, wrap it in plastic wrap, and return it to the refrigerator.)
Laminate the Dough
Lock in the butter
■Remove the butter packet from the refrigerator and set it on the counter to soften until it is bendy but still cool; this could take anywhere from 5 to 20 minutes, depending on how cold it is and on the texture of the dough. You want the butter to be slightly softer and more malleable than the dough but not so soft that it will ooze out of the dough.
■Lightly dust a large flat work surface with flour. Remove the dough from the refrigerator, unwrap the dough, and place it on the floured surface. Lightly dust the top of the dough and the rolling pin with flour and roll out the dough to a rectangle that is roughly 14 inches from side to side and 11 inches from top to bottom, dusting the work surface, rolling pin, and top of the dough lightly with flour as you roll the dough, so it doesn’t stick.
■Open the parchment packet to expose the butter and flip the packet over to place the butter on the dough, centering the 10-inch length of the butter packet on the 11-inch length of dough. Run your hand over the parchment paper so that the heat of your hand helps to peel off the paper. Peel off and discard the parchment paper. Fold the left and right sides of the dough over the butter so they meet in the middle and pinch the two edges of dough together with your fingers. Gently press the top and bottom edges of the dough together to seal the packet closed and lock in the butter.
Make two letter folds
■Lightly dust a large flat work surface with flour. Lightly dust the top of the dough and the rolling pin with flour and roll the dough to 18 inches from top to bottom, dusting the work surface, rolling pin, and top of the dough lightly with flour as you roll the dough, so it doesn’t stick. Using a pastry wheel or a bench knife, trim the top and bottom edges of the dough just enough to expose the layer of butter in the center of the dough. Reserve the trimmings to make Baked Trimmings (this page) or discard them. Fold the top edge down two-thirds and fold the bottom edge to meet the top edge, so the dough is folded into thirds, like a letter.
■Rotate the dough 90 degrees so the closed edges are facing left and right and one of the open edges (with the visible layers) is facing you. Lightly dust the work surface, rolling pin, and dough with flour and roll out the dough to roughly 18 inches from top to bottom, dusting with flour as needed. Trim the top and bottom edges to expose the butter layers and add the trimmings to your baked trimmings or discard them. Fold the top edge down and the bottom edge up to make a second letter fold.
■Wrap the laminated block of dough in plastic wrap and place it in the freezer to chill for 1 hour. Move the dough from the freezer to the refrigerator for at least 8 hours and up to 12 hours to retard the dough.
Cut the fantails
■Remove the laminated block of dough from the refrigerator and set it on the counter to rest for 20 to 30 minutes, until you can feel that the butter layers inside the dough are just becoming malleable (but not soft) when you bend the block slightly.
■Spray a 12-cup muffin tin with nonstick cooking spray.
■Lightly dust a large flat work surface with flour. Unwrap the dough and place it on the floured surface with the long edge parallel to you. Lightly dust the top of the dough and the rolling pin with flour. If the dough is smaller than a 7½-inch square, roll the dough out to those dimensions.
■Cut the dough into 1½-inch squares with a pastry wheel or a large chef’s knife.
■Turn the fantail cubes on their sides and place 2 pieces in each muffin cup. Cover the muffin tin with a damp, lightweight kitchen towel and set it aside in a warm place for about 1 hour to proof the fantails until they just start to puff up.
Make the honey butter
■While the fantails are proofing, place the butter, honey, and fine sea salt in a medium bowl. Whisk vigorously to combine.
Bake the fantails
■Arrange the oven racks so one is in the center position. Preheat the oven to 350°F.
■Place the muffin tin on the center rack of the oven and bake the fantails for 25 to 30 minutes, until the tops are deep golden brown, rotating the muffin tin from front to back halfway through the baking time so the pastries brown evenly.
■Remove the muffin tin from the oven. Immediately brush the fantails with the honey butter and sprinkle each fantail with a generous pinch of flaky sea salt. Set the muffin tins on a cooling rack and let the fantails cool in the pan for 5 to 10 minutes. Remove the fantails and serve them warm or at room temperature.
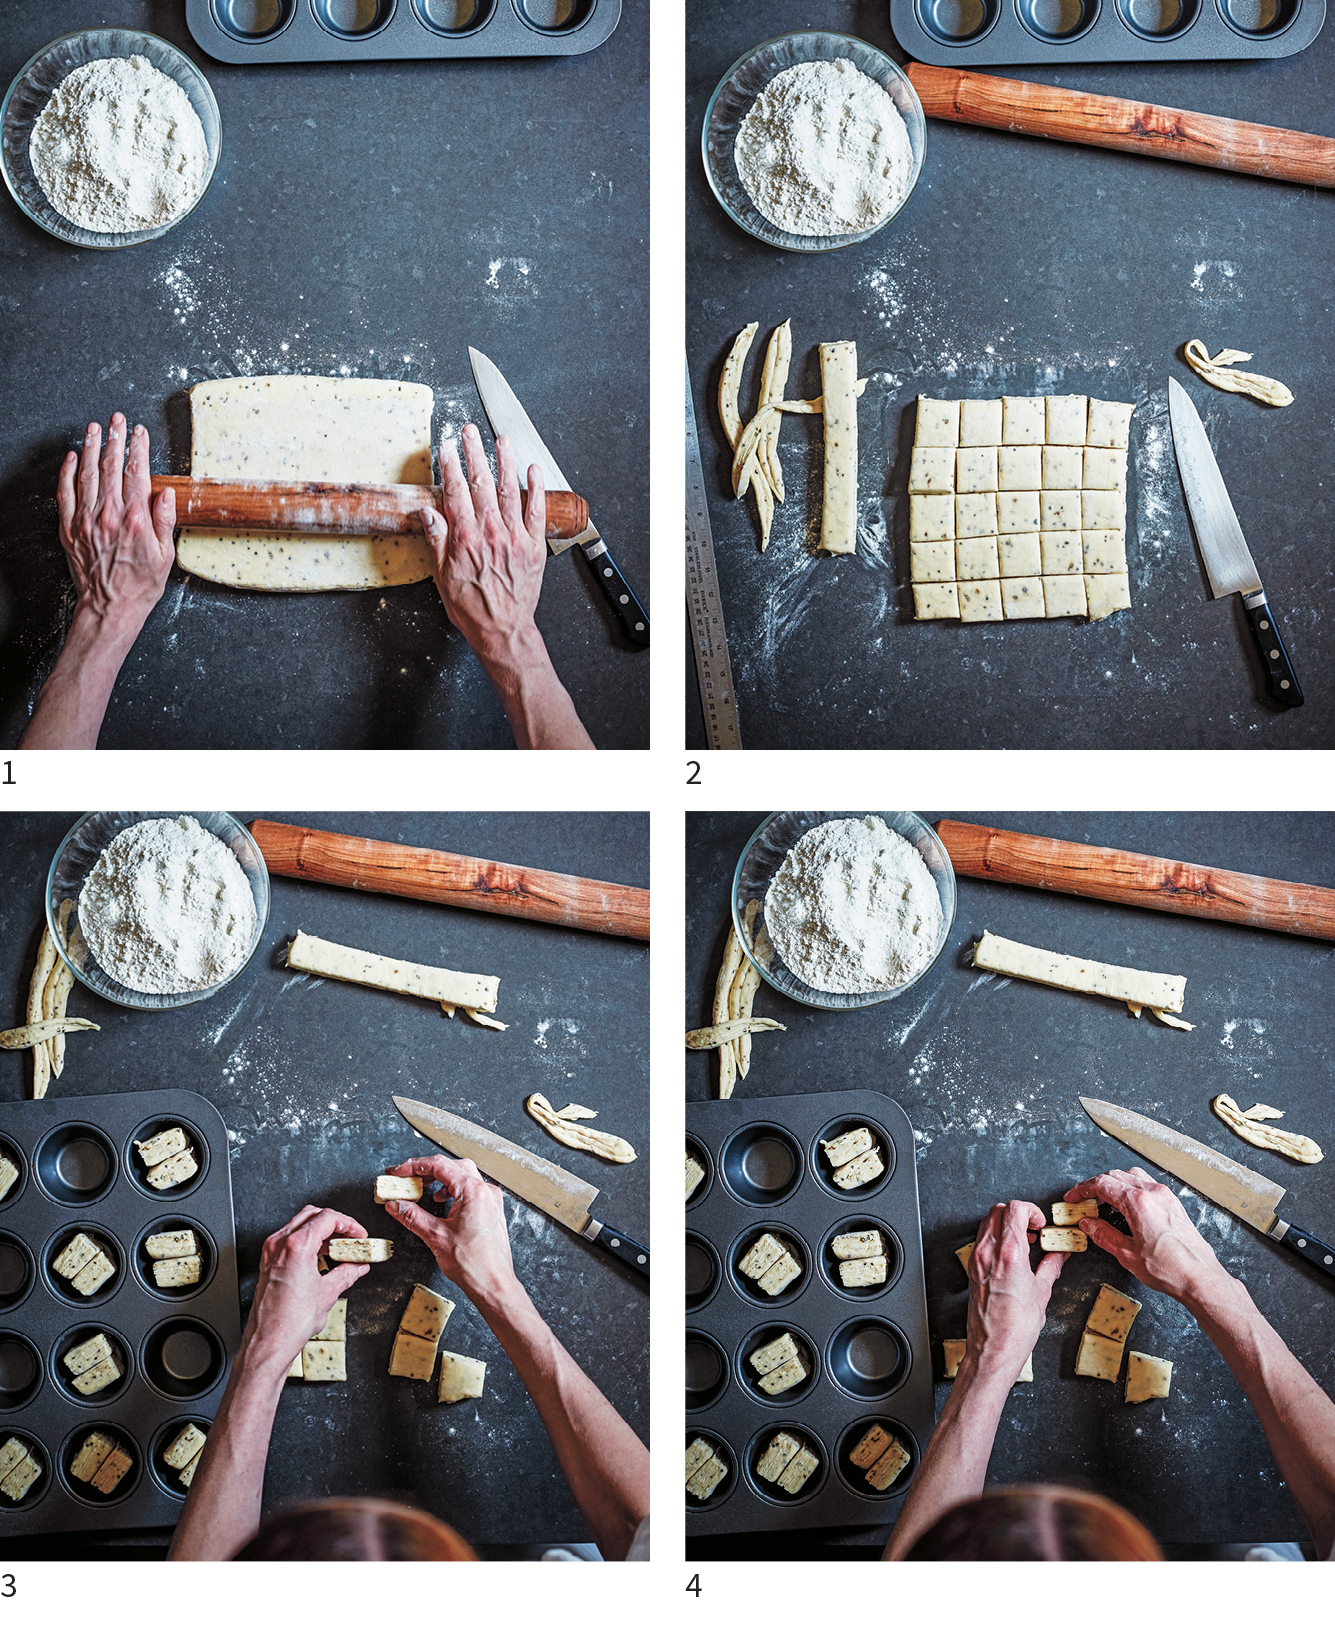
Variation
Chive Fantails
At Sadelle’s, I made two types of fantails: Black Pepper Fantails with Salted Honey Butter (this page) and these. The fresh, grassy, onion flavor of the chives is really delicious with the rich, buttery dough. You need a very sharp knife to cut the chives as finely as you must for this and also to keep from bruising them. To make these, follow the recipe for black pepper fantails, adding the chives to the dough in place of the black pepper, and brushing the baked fantails with the butter instead of the honey butter.
3 bunches (65 grams) fresh chives
8 tablespoons (1 stick) Unsalted butter, melted (113 grams)
Flaky sea salt for sprinkling
■Line up a dozen or so chives at a time so they are all facing the same direction, and slice them as finely as possible. Put them in a bowl and slice the remaining chives, a dozen at a time.
■Add the chives to the fantail dough in place of the butcher’s pepper and proceed with the recipe. After the fantails are out of the oven, brush them with the melted butter and a healthy sprinkle of flaky salt.