A Short and Sweet Chapter on Fried Dough
Frying dough is one of my favorite things to do. I started deep-frying at Babbo, where we always had one deep-fried item on the dessert menu. I had imagined that frying at home would be a big mess, but it turned out to be easy, and also really enjoyable, and soon I was frying everything from chicken to cannoli at home on a fairly regular basis.
Perfect deep-fried pastries are crisp on the outside, light and pillowy on the inside, and they are not greasy. The key to making sure your pastries are not greasy lies in the temperature of the oil. When baking a batter or dough, the water inside it turns to steam and evaporates. Deep-frying, however, is a direct application of heat to the surface. There is no air gap between the dough and the hot oil, so the water immediately turns to steam. If the oil is not hot enough, instead of steam escaping, the oil will penetrate more.
This chapter consists of recipes for only three deep-fried pastries (plus their accompaniments). I wanted to give just a few recipes for thoughtfully designed fried pastries that I love, are original, and are uniquely mine.
MASTER CLASS: A Home Baker’s Guide to Deep-Frying
Sufganiyot with Blood Orange Jam
Master Class
A Home Baker’s Guide to Deep-Frying
The key to a pleasant deep-frying experience is to set yourself up correctly. Here’s what to do before you get started:
The fry oil
Choose the right oil. I call for you to use either canola or corn oil in these recipes (I look for organic versions). The important thing about the oil is that it be neutral flavored. The oil is a medium for cooking the pastries, but you don’t want the pastries to take on the flavor of the oil.
The fry pot
Choose the correct pot, as described in the individual recipe, in which you are going to fry your pastries. The key to choosing a pot is for there to be enough surface area so the pastries can float in the oil in a single layer, but that it is not so big that you need an insane amount of oil to deep-fry. I use a large (12-quart) stainless-steel stockpot. Also, you must dry the pot really well. If there are any droplets of water in the pot, the water will pop when you begin to heat the oil, causing the oil to splatter out of the pot.
Set up your station
Get your frying station ready, including your batter, the pot you’re frying in, your frying oil, and the sugar that the pastries will be tossed in when they’re done. This is the time to also set up your baking sheet, tools for turning the pastries in the oil and removing them from the oil, and a cooling rack to drain the pastries on. (I’ve given detailed instructions for this in the individual recipes.) Line a baking sheet with paper towels and set a cooling rack on top of the paper towels. This is where you will put the pastries to drain after they come out of the oil. Have a pair of tongs and/or a spider handy.
Add oil
Add the oil. Save the container the oil came in; you will use it to hold the dirty oil after frying, which makes it easy to discard.
Temperature
Fasten a deep-fry/candy thermometer to the side of the pot. When I attended the French Culinary Institute, one of the tools I was required to own was a candy thermometer. I still have and use the same one. I use the thermometer as a “stir stick,” first making a counterclockwise stir with it, then stirring in the other direction, and finally running it down the center of the pot one way and then the other. Because all of the heat is coming from the bottom, it is important to move the oil around so that it heats evenly.
Heat the oil over medium-high heat until it reaches 350°F. Heating the oil over medium-high rather than high heat means it doesn’t heat too quickly, so you don’t inadvertently heat the oil too much. Keep your oil at a steady temperature. A professional fryer maintains the temperature of the oil, but when frying at home, you have to do that manually, by adjusting the temperature of the stove—moving the temperature between medium and medium-high. Keep your eye on the thermometer and adjust the heat as needed to maintain a temperature as close to 350°F as possible as you fry.
Adding the pastries
Carefully add the pastries to the oil. I use my hand to carefully slide pastries into the oil, so the oil doesn’t splatter. If the dough is sticking to my fingers, I wet them. Add only as many pastries as fit comfortably in a single layer. If you add more than that, the pastries will stick together, and also, the cold batter will cause the oil temperature to sink, resulting in heavy, greasy pastries.
Dispose of used oil
When you are done frying, turn off the heat and let the oil cool to room temperature. Use a funnel to pour the oil into the bottle you poured it out of. Close the bottle and put the bottle in the trash. You do not want to pour the oil down the sink.
Churros and Hot Chocolate

Makes 2 to 3 dozen (3-inch) churros
Churros are made from pâte à choux, a batter that is leavened by beaten eggs. It’s the same batter used to make éclairs, profiteroles, and French doughnuts, or crullers. Rather than pipe the batter directly into hot oil, which is customary, I pipe the churros onto a baking sheet and then carefully slide them into the oil one at a time. This method prevents much of the risk of the hot oil splattering. If you have leftover churros, freeze them. When you’re ready to eat them, place them on a baking sheet and put them in a 325°F oven for about 20 minutes, until they’re warmed through.
Make the hot chocolate before making the churro batter, so you just need to warm it up when you’re ready to serve. I put the hot chocolate on the stove to warm just before I begin to fry the churros.
Eggs have a wonderful capacity to expand your baked goods. They were the original leaveners, used before bakers started relying on baking soda and baking powder.
Note You will need large pastry bags and a star pastry tip with a 7/16-inch-wide opening (my preference is an open-star pastry tip, such as Ateco #825) to make these.
For the cinnamon sugar
1 cup
1 Vanilla Sugar (this page; or granulated sugar) (200 grams)
1 tablespoon (6 grams) ground cinnamon
⅛ teaspoon (1 gram) fine sea salt
For the churros
2 cups (470 grams) water
8 tablespoons (1 stick) Unsalted butter, cubed (113 grams)
2 cinnamon sticks
Nonstick cooking spray
2 cups (240 grams) All-purpose flour
1¼ teaspoons (8 grams) fine sea salt
3 large eggs (150 grams)
10 cups (or as needed) Canola or corn oil (2,200 grams)
Hot Chocolate (recipe follows)
Make the cinnamon sugar
■Whisk the sugar, cinnamon, and salt together in a medium bowl and set aside.
Make the churro batter
■Place the water, butter, and cinnamon sticks in a medium saucepan and heat over medium-high heat until the butter is melted and the liquid begins to simmer. Turn off the heat and carefully cover the saucepan with plastic wrap. Set aside to infuse the liquid for 30 minutes. Remove the plastic wrap and discard the cinnamon sticks.
The plastic wrap traps the moisture in the pan, which helps to infuse the liquid with the cinnamon.
Get prepared
■While the liquid is infusing, set up a stand mixer and have the paddle attachment handy. Fit a pastry bag with a 7/16 -inch star tip and set aside.
■Spray the perimeters of two baking sheets with nonstick cooking spray and line both with parchment paper. Press around the perimeters of the baking sheet with your hands so the paper adheres to the pan. Spray the top of the parchment paper generously with nonstick cooking spray.
■Combine the flour and salt in a small bowl and set aside.
■Return the saucepan with the cinnamon-infused water to the stove. Return the liquid to a boil over high heat. Add the flour and salt and cook for 2 minutes, stirring constantly with a wooden spoon until a very thin film of dough forms on the bottom of the saucepan. Remove the pan from the heat.
■Transfer the batter to the bowl of the stand mixer. Fit the mixer with the paddle attachment and mix the dough on medium speed for about 5 minutes to cool the dough toward room temperature; you can gauge the temperature by cupping your hands on the outside of the bottom of the bowl. Add the eggs one at a time, beating on medium speed until the egg is completely blended in and stopping to scrape down the sides of the bowl before adding the next egg. Once you’ve added all the eggs, beat until the dough is smooth and homogenous, about 5 minutes.
Pipe the churros
■Scoop the dough into the pastry bag.
■Place one of the prepared baking sheets with the long side parallel to the counter’s edge. Starting in the upper left corner (if you’re right-handed; do the opposite if you’re left-handed), apply gentle, even pressure to the pastry bag to pipe toward you to make a 3-inch churro on the baking sheet. Scrape the tip on the baking sheet to “cut” the batter, and continue piping churros across the baking sheet, leaving about 1 inch between each. Pipe a second row of churros below the first row. Place the baking sheet in the refrigerator to chill. Pipe the remaining batter on the second prepared baking sheet and place it in the refrigerator to chill while you heat the oil, and for as long as 8 hours.
Fry the churros
■Fill a large (12-quart) pot 2 inches deep with oil. Fasten a deep-fry or candy thermometer to the side of the pot and heat the oil over medium-high heat until the thermometer registers 350°F.
■Line a baking sheet with paper towels and place a cooling rack on top of the baking sheet. Place the setup near the stove. Have a pair of metal tongs handy and place the bowl of cinnamon sugar nearby.
■Remove one baking sheet of piped churros from the refrigerator. One at a time, pick up the churros with a metal spatula and gently slide 6 or 8 of them into the oil, being careful to add only as many as will fit comfortably in the pot in a single layer. (Return the baking sheet to the refrigerator so the churros hold their shape while the first batch of churros is frying.) Fry the churros for 5 to 7 minutes, using the tongs to turn them so they fry on both sides. Use the tongs to remove the churros one at a time from the oil and place them on the cooling rack to drain.
■Remove the second baking sheet from the refrigerator. Check the temperature of the oil and wait, if necessary, for the oil to return to 350°F. Carefully slide 6 or 8 more churros into the oil and fry them as you did the first batch.
Finish and serve the churros and hot chocolate
■While the next batch is frying, dip the just-fried churros one at a time into the bowl with the cinnamon sugar to coat them all over.
■Place the finished churros on a serving platter and continue coating the next batch of churros in the cinnamon sugar as they come out of the oil. Continue frying and sugaring the remaining churros.
■When you have finished preparing the churros, heat the hot chocolate in a medium saucepan over medium-low heat or in a microwave.
■To serve, pour the hot chocolate into a small pitcher or small coffee or espresso cups or heat-proof glasses, and serve with the warm churros.
Hot Chocolate
Makes about 2 cups
I have been obsessed with creating the most perfect, creamy, thick, and rich hot chocolate ever since first having Spanish hot chocolate, which is so thick and rich that it is served in a shot glass with a spoon, like pudding. This version is slightly thinner, because I wanted it to be drinkable. Enjoy it with churros or on its own.
½ cup (100 grams) granulated sugar
1 tablespoon cornstarch (9 grams)
1 tablespoon (7 grams) cocoa powder (preferably Valrhona)
⅛ teaspoon (1 gram) fine sea salt
4 ounces (or ⅔ cup chocolate chips) bittersweet chocolate (113 grams)
1 cup (240 grams) whole milk
1 cup (238 grams) heavy cream
1 teaspoon (5 grams) dark rum (optional)
■To make the hot chocolate, whisk the sugar, cornstarch, cocoa powder, and salt together in a small bowl and set aside.
■Roughly chop the chocolate (unless you are using chocolate chips).
■Pour 1 to 2 inches of water in the bottom of a small saucepan and choose a bowl that fits over the saucepan to make a double boiler. Make sure the water is not touching the bottom of the bowl; if it is, pour some out. Bring the water to a boil over high heat and reduce the heat to medium-low to maintain a gentle simmer.
■Add the chocolate to the bowl of the double boiler and melt the chocolate, using a heat-proof rubber spatula to stir and scrape down the sides of the bowl so the chocolate melts evenly and doesn’t burn. Remove the bowl from the double boiler and wipe the bottom of the bowl to make sure no water drips. Set aside for 15 to 20 minutes to cool the chocolate to room temperature.
■Set a fine-mesh strainer over a heat-proof container.
■Combine the milk and cream in a medium saucepan and bring to a boil over medium-high heat. Once the mixture reaches a boil, reduce the heat to medium-low and add the melted chocolate, whisking until the chocolate is completely mixed in. Add the dry ingredients and whisk to combine. Cook the hot chocolate over medium-low heat, whisking constantly, until the hot chocolate begins to thicken, 2 to 5 minutes. Turn off the heat and whisk in the rum, if you are using it. Pour the hot chocolate through the strainer to strain out any lumps. If you are serving it right away, strain it directly into a serving vessel, such as a small pitcher.
Vanilla Sugar
Makes 1 cup
I make this using leftover vanilla pods. Anytime I use a vanilla pod, I rinse it off, let it dry, and collect it in a container. Once I have collected enough, I grind them up with sugar to make this delicious vanilla sugar. This approach is something you see often in the restaurant industry, where you do everything you can to save money. How many vanilla beans you put in your sugar depends on how many you have; the whole point of this recipe is to recycle, so it would defeat the purpose to go out and buy vanilla beans. To dry them out, I put the pods on a plate and set them in a warm place in the kitchen for about 24 hours, until they feel dry to the touch. Use vanilla sugar in an application where vanilla is welcome, and where the sugar is a special component. I like to use it to sprinkle in Classic Roll-Out Sugar Cookies (this page) to create vanilla sugar cookies. It would also be a great choice when you’re using sugar in place of flour to roll out dough, such as for Kouign Amann (this page).
1 cup (200 grams) granulated sugar
2 to 12 dried vanilla beans
Place the sugar and vanilla beans in the bowl of a food processor fitted with a metal blade and grind for about 2 minutes, until the bean is as finely ground as the sugar, with some larger pieces remaining. Pass the sugar through a fine-mesh strainer to sift out the large pieces; discard the contents of the strainer. Transfer the sugar to a covered container and store at room temperature until you’re ready to use it. It will keep almost indefinitely.
Sufganiyot with Blood Orange Jam
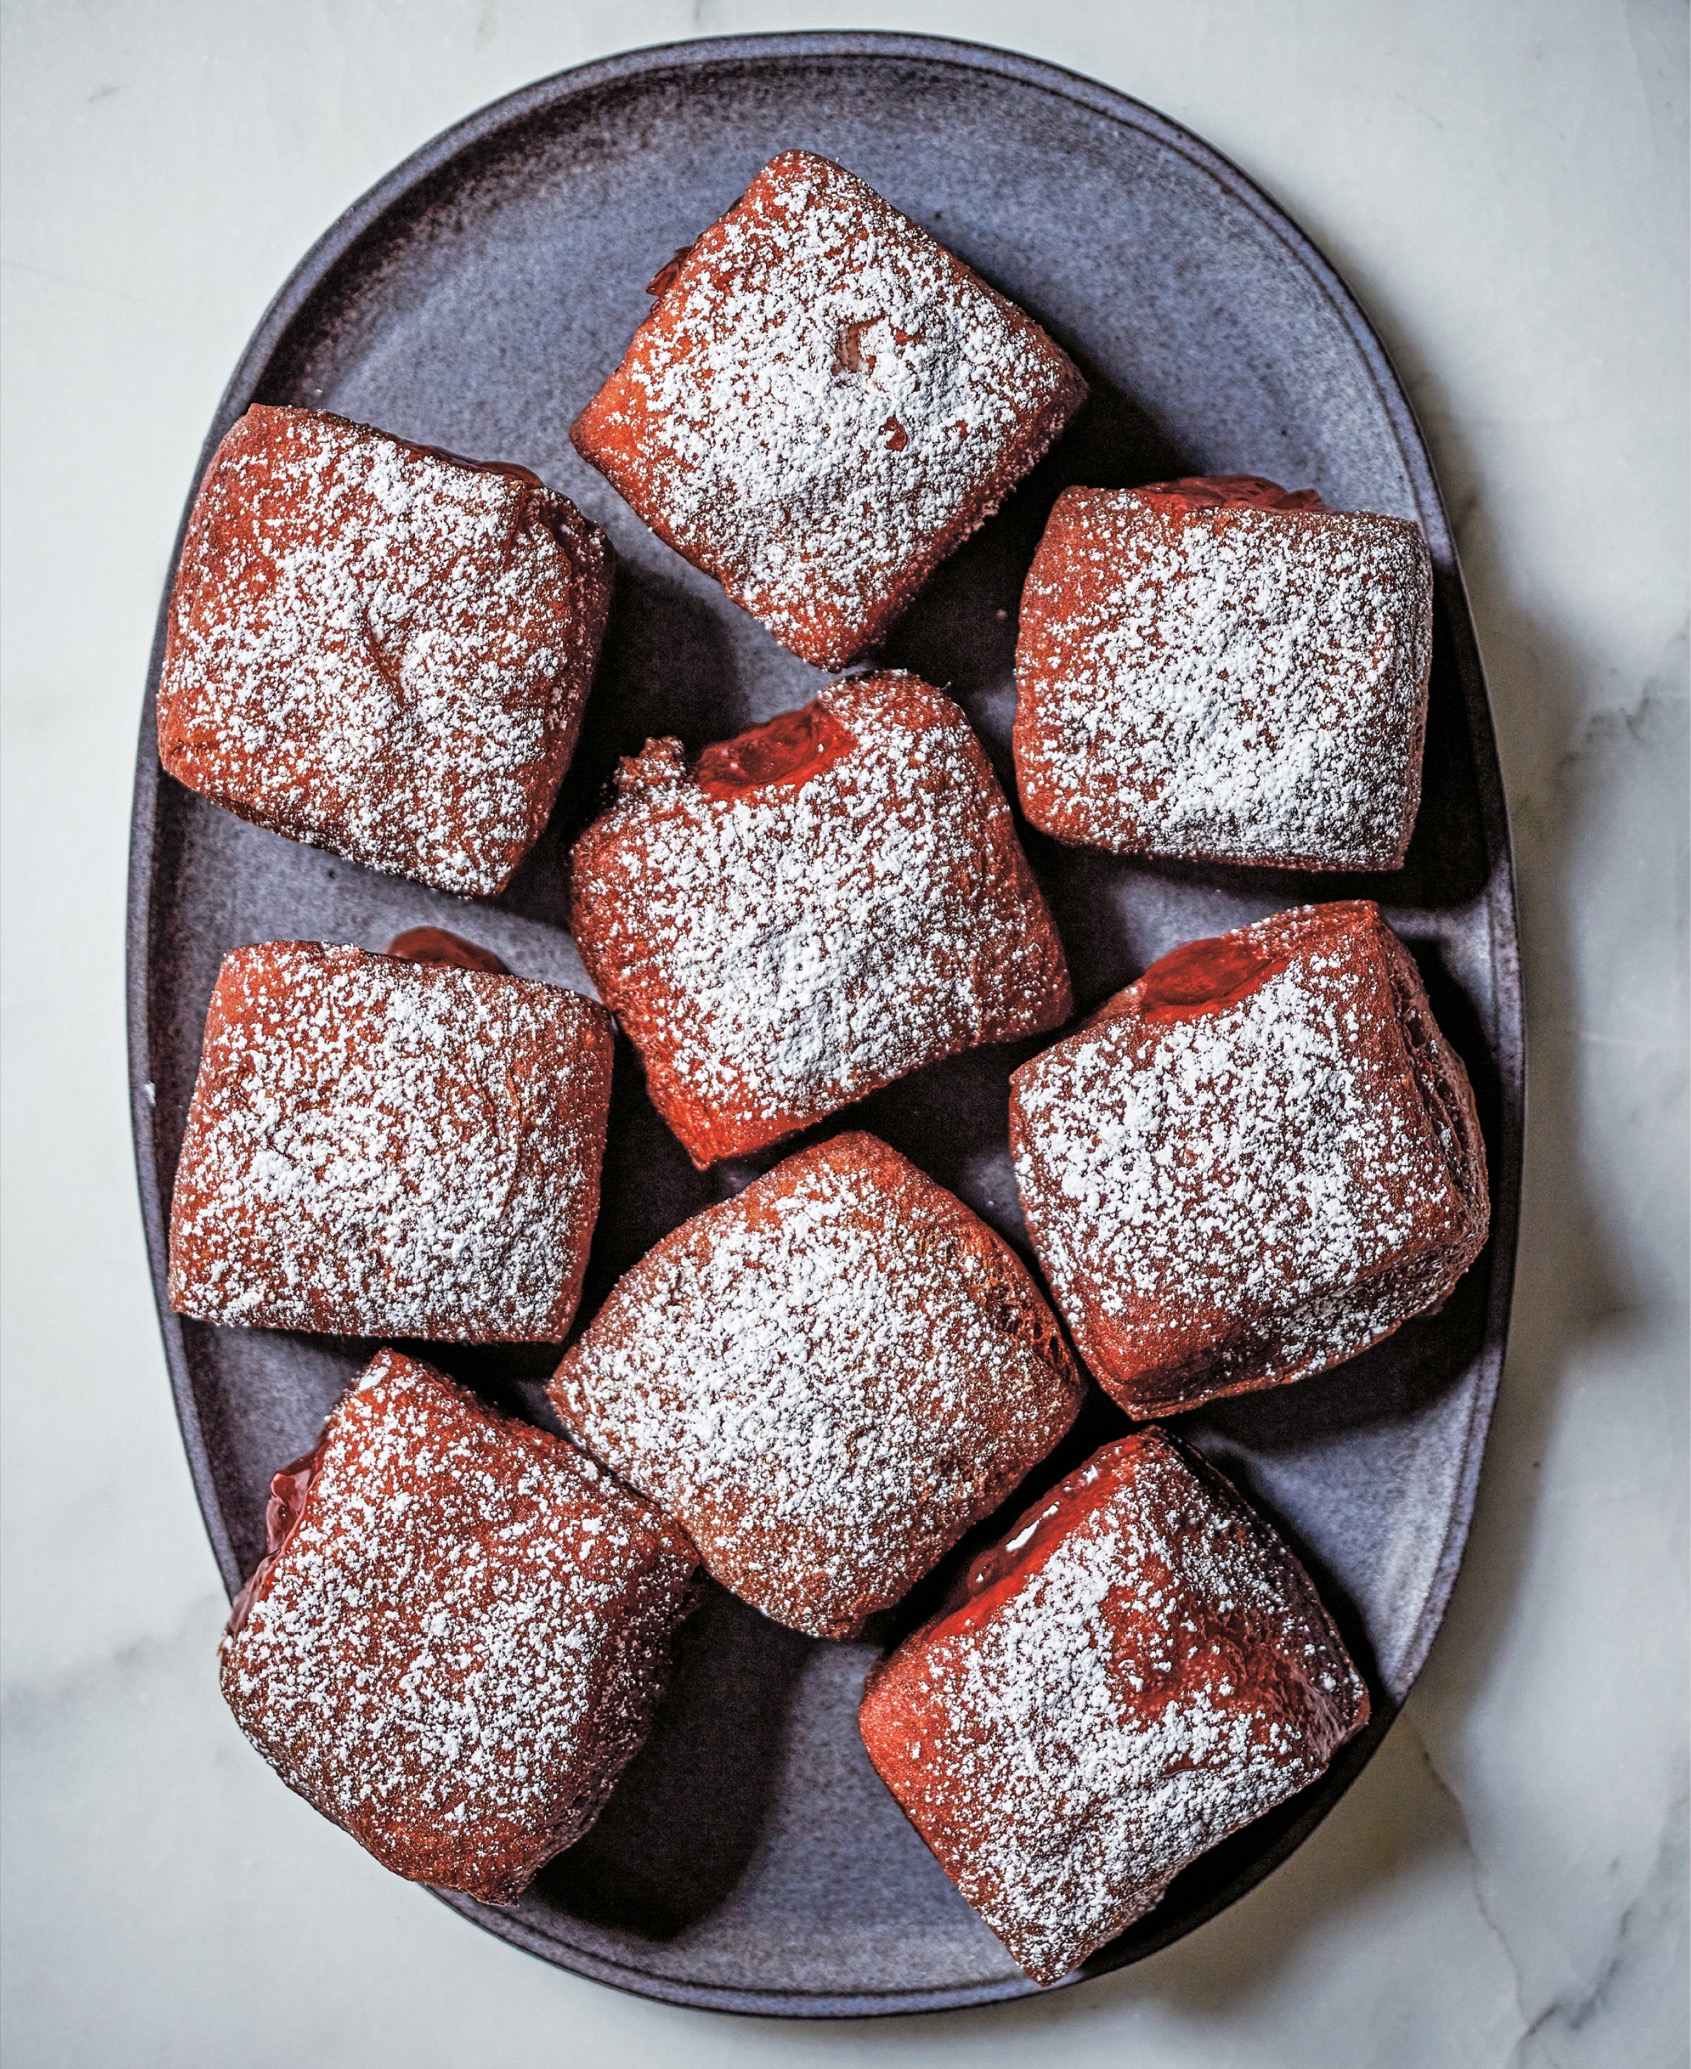
Makes 2 to 3 dozen doughnuts
Sadelle’s, which I opened in 2015, was conceived as a modern interpretation of a Jewish bakery. When Hanukkah rolled around, I wanted to offer sufganiyot, the jelly-filled doughnuts that are traditionally made during that holiday. I started with what is essentially a brioche dough, but then I swapped melted butter for cold—an idea I adopted from the blog Ideas in Food. The idea behind the swap is that yeast likes heat, so when the warm, melted butter reacts with the yeast, it gives a boost to the fermentation process; this causes the dough to rise more aggressively, which in turn results in a light, airy doughnut.
I wanted to use something seasonal for the filling, so I made a blood orange jam, which is delicious and also really pretty. You can also use a jam of your choice.
Note You will need a large disposable pastry bag and a ¼-inch round icing tip (such as an Ateco #802 tip) to make this.
22 tablespoons (2¾ sticks) unsalted butter (311 grams)
¾ cup (180 grams) whole milk
4 cups plus 2 tablespoons plus more (498 grams) all-purpose flour for dusting
¼ cup plus 1 tablespoon (63 grams) granulated sugar
1 tablespoon plus 2 teaspoons (15 grams) instant yeast
2 teaspoons (12 grams) fine sea salt
4 (200 grams) large eggs
Nonstick cooking spray
10 cups (or as needed) canola or corn oil (2,200 grams)
For filling and finishing the sufganiyot
1 cup (340 grams) Blood Orange Jam (recipe follows)
¼ cup (30 grams) confectioners’ sugar
Warm the liquids
■Melt the butter in a small saucepan over medium-low heat. Turn off the heat.
■In another small saucepan, warm the milk over medium-low heat until it is warm to the touch.
Make and ferment the dough
■Combine the flour, granulated sugar, yeast, and salt in a medium bowl.
■Place the warm milk and eggs in the bowl of a stand mixer and add the dry ingredients. Fit the mixer with the dough hook and mix on low speed for 2 minutes. Increase the speed to medium and mix for 3 minutes to develop the gluten. Turn off the mixer, add about one-fifth of the warm butter, and mix on low speed for a few seconds until the butter is no longer sloshing around in the bowl. Increase the speed to medium-high and mix until the butter is completely integrated, about 3 minutes. Turn off the mixer, add more butter, and mix it in as before. Repeat, stopping the mixer and adding the butter in increments, and beating it in before adding more. When you have added and beaten in all of the butter, turn off the mixer.
■Take the bowl off the stand, remove the dough hook, and wipe it clean with a wet hand. Cover the bowl with plastic wrap and set it in a warm place to ferment the dough for 2 hours, turning it once halfway through that time. To turn the dough, uncover the bowl and use a wet hand to fold the top edge down two-thirds and fold the bottom edge to meet the top edge, so the dough is folded like a letter. Fold the sides inward in the same way to form a sort of ball, then re-cover the bowl. At the end of 2 hours, turn the dough again. Re-cover the bowl with plastic wrap and place it in the refrigerator overnight to retard the dough.
Retarding dough slows down the fermentation and adds to the flavor, and also makes the dough easier to roll out and shape.
Roll out the dough and cut the doughnuts
■Dust two baking sheets and your countertop generously with flour. Set the baking sheets aside.
■Remove the bowl from the refrigerator, remove the plastic wrap, and use a plastic bowl scraper to scrape the dough out onto the floured surface. Dust the top of the dough with flour and pat the dough down slightly with your hands to make it easier to roll out. Dust a rolling pin with flour and roll the dough out to a ⅜-inch-thick 13- x 14-inch rectangle, dusting the top of the dough, rolling pin, and work surface periodically to keep the dough from sticking to the rolling pin or countertop.
■Using a straightedge and pastry wheel, cut the dough into 2¼-inch squares. Lift each square with an offset spatula and place the squares on the prepared baking sheets, dividing them evenly. Cut a piece of plastic wrap to fit over one baking sheet. Spray one side of the plastic with nonstick cooking spray and gently place it, sprayed side down, over the baking sheet. Repeat, covering the second baking sheet with a sprayed sheet of plastic wrap. Put the baking sheets in a warm place to proof the dough for 2 to 3 hours, until the dough squares have swelled to one and a half times their original size.
Prepare to fry the doughnuts
■Fill a large (12-quart) pot 2 inches deep with the oil. Fasten a deep-fry or candy thermometer to the side of the pot and heat the oil over medium-high heat until the thermometer registers 350°F.
■Line a baking sheet with paper towels and place a cooling rack on top of the baking sheet. Place the setup near the stove. Have a pair of metal tongs and a slotted spoon or spider handy.
Fry the doughnuts
■Remove the plastic wrap from one of the baking sheets. Wet your fingers—this will help you handle the dough without squishing it—and gently pick up and drop 4 or 5 squares of dough into the oil, holding your hand fairly close to the oil when you drop the dough in so it doesn’t splash up out of the pot, and fry for about 10 seconds, until the doughnuts have begun to expand. Turn the doughnuts with the tongs and fry them for a total of 2 minutes, flipping them from time to time so they brown evenly on both sides.
Turning the doughnuts often helps to keep them evenly shaped.
■Use the tongs to remove the doughnuts from the oil and place them on the cooling rack to drain. Check the temperature of the oil and wait, if necessary, for the oil to return to 350°F. Add another 4 or 5 dough squares to the oil and fry them as you did the first batch. Add them to the cooling rack to drain. Continue frying the remaining doughnuts and adding them to the cooling rack. Let the doughnuts cool to room temperature.
Fill the doughnuts
■Fit a large disposable pastry bag with an Ateco #802 tip and spoon 1 cup (340 grams) of the jam into the bag. Set it aside.
■Line two baking sheets with parchment paper.
■Using the tip of a small sharp knife, make 2 slits about 1 inch deep to form an X in the side of each doughnut. Insert the tip of the pastry bag into the X and gently squeeze the jam into the center of the doughnut. You want about 1½ teaspoons (about 15 grams) of jam per doughnut so that the jam is in harmony with the dough and doesn’t overpower it. (If you want to be precise, put the unfilled doughnut on a scale and tare [zero out] the scale. Then pipe the jam into the doughnut and place it on the scale again to check if you have piped in 15 grams; if not, add more.) If the jam pops up out of a doughnut, lay the doughnut on your work surface with the X facing up and gently shake it to help the jam fall down inside. Place the filled doughnut on one of the prepared baking sheets and fill the remaining doughnuts with the remaining jam.
■Put the confectioners’ sugar in a fine-mesh strainer and dust the sugar over the doughnuts.
Blood Orange Jam
Makes about 4 cups (1,300 grams)
This jam is a bit sweeter than traditional orange marmalade, so you get the lovely flavor and vibrant orange-red color of the blood oranges, without the bitter intensity that turns off some people, including myself. I use apple stock to set the jam; apples, specifically the skins and seeds, contain naturally occurring pectin, the substance used to set jam.
Pectin is found in varying degrees in all fruit. Acidic fruit, such as pears, quince, tart apples, and citrus fruit, are generally high in pectin. Commercial pectin is pectin in powdered form that has been extracted from fruit. Sugar is hydroscopic, which means it attracts water molecules. As the fruit breaks down in the process of making jam, the water molecules in the fruit head to the sugar molecules, leaving the pectin molecules in the fruit by themselves. The pectin molecules then form their own network, which suspends the fruit juices and creates a thick, jammy consistency. Natural apple pectin is easy to make by simply boiling apple skins and cores, where the majority of the pectin in apples is found. Natural pectin doesn’t create a gummy consistency that some commercial varieties do.
1½ pounds (about 4 large) Granny Smith apples (680 grams)
6 pounds (14 to 16) blood oranges (2,700 grams)
3¼ cups (650 grams) granulated sugar
Make the apple stock
■Wash the apples, remove their stems, and quarter them; do not peel or core them. Place the apples in a large (6- to 8-quart) saucepan, cover them with 6 cups (1.5 liters) cold water, and bring the water to a boil over high heat. Reduce the heat to medium-low to maintain a steady simmer and simmer the apples for 1 hour. Turn off the heat and pass the stock through a fine-mesh strainer; discard the contents of the strainer. (Do not press down on the apples as this will make a cloudy stock and a cloudy jam.)
Get prepared
■Place two small plates in the freezer. (You will use these later to test the jam for doneness.)
Make the jam
■Peel 2 of the oranges with a vegetable peeler. Cut the peel into ⅛-inch-wide strips, place the strips in a small saucepan, and fill the saucepan halfway with cold water. Bring the water to a boil over high heat and boil for 1 minute. Turn off the heat and strain the orange peels. Return the orange peels to the saucepan and fill the saucepan with cold water. Bring the water to a boil over high heat and repeat, boiling the peels for 1 minute and straining them again. Repeat, boiling and straining the peels a third time. Set the strainer over a bowl to continue to drain the peels while you make the jam.
Blanching citrus peels rids them of their bitterness, so you’re left with just the concentrated, intense flavor of the peel.
■Juice the oranges and strain the juice into a glass measuring cup, reserving all the seeds and the pith from 2 oranges. Measure out 4 cups (988 grams) juice and drink the rest. Place the seeds from the juiced oranges and the pith into a small piece of cheesecloth and tie the corners together with kitchen twine.
■Place the orange juice, apple stock, sugar, and the cheesecloth bundle in a large stockpot and bring to a boil over high heat, stirring to dissolve the sugar. Reduce the heat to medium and boil for 40 to 50 minutes, until the jam has set, skimming off any scum that forms on the surface. Turn off the heat.
■To test to see if the jam has set up sufficiently, remove one of the plates from the freezer. Place a spoonful of jam on the plate and return the plate to the freezer for 2 minutes, then gently slide your finger through the jam; if the skin on top of the jam wrinkles, it’s done. If not, put the jam back on the heat and cook it for a few more minutes, then test again in the same way using the second plate you put in the freezer.
■Remove the saucepan from the heat, pour the jam into a heat-proof storage container and set aside to cool to room temperature with the lid slightly ajar. Cover and refrigerate the jam until you are ready to use it, or for up to several months.
Deep-Fried French Toast
Makes 8 or 9 slices; serves 4 to 6
This is the French toast recipe that I created for Sadelle’s. I came up with this recipe as a way to use day-old bread. Originally, I made it with challah, but I switched to using brioche; it’s delicious with either. Deep-frying French toast isn’t exactly traditional, but this is the best French toast you’ll ever eat; crunchy on the outside and soft and custardy on the inside, like crème brûlée. Serve it with maple syrup or dusted with confectioners’ sugar with Strawberry Jam (this page) on the side. You can prep the French toast the night before, so the morning you want to serve it, all you have to do is fry it up and enjoy it. These are fried at a higher temperature than the other items in this chapter; the purpose of this is to brown the outside while the inside stays soft and custardy.
1 day-old loaf Sourdough Brioche (this page; or 1 Six-Strand Challah Loaf, this page; or store-bought brioche or challah)
12 large eggs (600 grams)
1 cup vanilla Sugar (this page; or granulated sugar) (200 grams)
1 teaspoon (6 grams) fine sea salt
4 cups (960 grams) whole milk
10 cups (or as needed) canola or corn oil (2,200 grams)
Options for serving
Pure maple syrup, warmed
Confectioners’ sugar and strawberry jam
Slice the bread and make the custard
■Use a serrated bread knife and cut off the ends of the bread loaf; discard or snack on the ends. Slice the loaf into 8 or 9 (1¼-inch-thick) slices and set aside.
■Whisk the eggs, sugar, and salt together in a large mixing bowl until the eggs lighten in color slightly. Add the milk and whisk to combine.
Soak the bread in the custard and drain
■Divide the slices of brioche between two large baking dishes, such as lasagna pans, laying the slices flat on their sides. Pour the custard over the bread slices, dividing it evenly. Place the baking dishes in the refrigerator and let the brioche soak for 2 hours, turning the slices once halfway through so they absorb the custard evenly on both sides. Remove the pans from the refrigerator.
■Place a cooling rack on a baking sheet. Transfer the bread slices to the rack, laying them in a single layer. Let the bread drain while you heat up the oil in the next step or cover the baking sheet and place it in the refrigerator overnight.
Fry the French toast
■Fill a large (12-quart) pot 2 inches deep with oil. Fasten a deep-fry or candy thermometer to the side of the pot and heat the oil over medium-high heat until the thermometer registers 375°F.
■Line a baking sheet with paper towels and place a cooling rack on top of the baking sheet. Place the setup near the stove. Have a pair of metal tongs handy.
■Carefully slide 2 slices of French toast into the hot oil and fry them for about 3 minutes per side, until they are deep golden brown on each side, using tongs to turn them. Remove the French toast slices from the oil and lay them on the cooling rack to drain. Check the temperature of the oil and wait, if necessary, for the oil to return to 375°F. Repeat, frying 2 more slices of bread as you did the first 2, and lay them on the cooling rack alongside the other slices to drain. Fry the remaining bread in the same way, making sure the oil is at the correct temperature before adding the bread to the oil.
■Cut each slice in half on a diagonal. Serve with the maple syrup or confectioners’ sugar with strawberry jam on the side.
Strawberry Jam
Makes about 1¼ cups
In the summer I look for tiny Tristar strawberries at farmers’ markets to make this. But in the winter, a plastic container of grocery store strawberries still makes a delicious jam.
1 pound (454 grams) strawberries
1 cup (200 grams) granulated sugar
1 teaspoon (5 grams) fresh lemon juice
Get prepared
■Place two small plates in the freezer. (You will use these later to test the jam for doneness.)
Make the jam
■Use a paring knife to remove and discard the stems from the strawberries and cut the strawberries into quarters. Place the quartered berries in a medium (2½-quart) saucepan. Add the sugar and lemon juice and cook over medium heat, stirring constantly with a wooden spoon, until the sugar dissolves and the strawberries begin to release their juice. Increase the heat to medium-high and cook, stirring occasionally, for 20 to 25 minutes, smashing the fruit against the sides of the pan with the back of the spoon as it cooks. Turn off the heat.
■To test to see if the jam has set up sufficiently, remove one of the plates from the freezer. Place a spoonful of jam on the plate and return the plate to the freezer for 2 minutes, then gently slide your finger across the plate and through the jam; if the skin on top of the jam wrinkles, it’s done. If not, put the jam back on the heat and cook it for a few more minutes, then test again in the same way using the second plate you put in the freezer.
■Remove the saucepan from the heat, pour the jam into a heat-proof storage container, and set aside to cool to room temperature with the lid slightly ajar. Cover and refrigerate the jam until you are ready to use it, or for up to several months.
