Savory Breads
Even though I am both a chemical engineer and bread baker, this book is not a deep dive into the science of sourdough. It is a collection of recipes that I love and make often at home, and the savory breads I include in this chapter reflect that. The difference between these breads and those in a hard-core bread-baking primer is that none of these rely solely on sourdough starter to rise. Instead, they use a combination of starter and commercial yeast, which makes them easier to achieve, and more forgiving. These are also enriched breads; they have something in them or on them, such as sugar, eggs, nuts, seeds, or cheese. These are my go-to breads that I want to share with you.
Khachapuri with Cheese, Baked Egg, and Nigella Seeds
Kale and Cheese Khachapuri with Zhoug
Summer Focaccia with Sungolds, Corn, and Basil Pesto
Whole-Wheat Pain au Lait Pullman
MASTER RECIPE for Challah Dough
Potato Onion Buns
Makes 13 burger-size buns
These buns make for perfect bacon, egg, and cheese sandwiches. The secret to how special they are lies in the balance of ingredients. First, the dough contains onions that are dehydrated in a low oven, which intensifies their flavor and also improves their texture. Removing water from the onion creates tougher cell walls, which means the onion doesn’t break down during the mixing process, so the buns have bits of sweet onion in them. The buns also contain baked potato, which is pure starch; the potato in the dough causes the dough to ferment quickly, giving the buns an ethereal texture. The acidity of the buttermilk softens the dough, and the dough also contains a small amount of sugar. All of these components work together to create an umami effect, and the perfect balance of sweet, salty, and savory. It is really the perfect bun.
Plan ahead to make these. I suggest you dehydrate the onion and bake the potato the day before you plan to make the dough.
For the dough
2 large (1,000 grams) yellow onions
1 medium to large (200 grams) Yukon gold potato
2 tablespoons plus more olive oil (30 grams), for coating the potatoes
3 large bunches (50 grams) fresh chives
5 cups plus more for dusting (600 grams) all-purpose flour
2 teaspoons (6 grams) instant yeast
1 tablespoon plus 1 teaspoon (17 grams) granulated sugar
3½ teaspoons (21 grams) fine sea salt
¾ cup (188 grams) buttermilk, well shaken
⅔ cup (160 grams) whole milk
1 large egg (50 grams)
1 large egg yolk (17 grams)
For baking the buns
Nonstick cooking spray
2 tablespoons (30 grams) extra-virgin olive oil
Dehydrate the onions
■Arrange the oven racks so one is in the top third of the oven and the other is in the bottom third. Preheat the oven to 200°F.
■Line two baking sheets with parchment paper.
■Cut the onions into a ½-inch dice and spread them out over the surface of the two prepared baking sheets.
■Place one baking sheet on each oven rack and cook the onions for about 4 hours, until the onions have shriveled and are almost completely dried out, stirring them every hour so the onions around the edges of the pans don’t burn. Remove the onions from the oven and set them aside to cool to room temperature. If you are making the onions in advance of making the dough, consolidate them on one baking sheet and set them aside, for as long as several hours, until you’re ready to use them. Or transfer them to a sealable plastic bag and refrigerate for up to 2 days.
Cook the potato
■Arrange the oven racks so one is in the center position. Preheat the oven to 400°F.
■Rinse and dry the potato. Place it on a piece of aluminum foil large enough to wrap it in, drizzle it with enough olive oil to cover (about 1 teaspoon), and rub the oil into the potato. Wrap the potato in the foil and place it on the center oven rack to bake until it is very soft when pierced with the tip of a paring knife, 1 hour to 1 hour 20 minutes. Remove the potato from the oven and set it aside to cool to room temperature. (If you are cooking the potato in advance of making the dough, leave it wrapped in foil and refrigerate it until you’re ready to use it.)
Prepare to mix the dough
■Finely chop the chives and set them aside.
■Unwrap the potato and cut it into ⅜- to ½-inch pieces, leaving the skin on. Set aside.
■Place the dehydrated onions in a small bowl, cover with hot tap water, and set aside to soak for 10 minutes. Drain the onions in a fine-mesh strainer and then gently squeeze the pieces in your fist to remove the excess water.
Mix the dough
■Put the flour, yeast, sugar, and salt in a medium bowl and stir with a whisk to combine.
■Combine the buttermilk, milk, egg, egg yolk, chives, potato, and onions in the bowl of a stand mixer. Add the dry ingredients. Fit the mixer with the dough hook and mix on low speed for 3 minutes. Increase the speed to medium and mix for 5 minutes. Turn off the mixer and remove the bowl from the stand. Remove the dough hook and wipe it clean with a wet hand. Cover the bowl with plastic wrap. Set the dough in a warm place in your kitchen and let it ferment for 1 hour. Uncover the bowl and turn the dough. To turn the dough, use a wet hand to fold the top edge down two-thirds and fold the bottom edge to meet the top edge, so the dough is folded like a letter. Fold the sides inward in the same way to form a sort of ball, then re-cover the bowl. Place the bowl in the refrigerator overnight to retard the dough.
Retarding dough improves its flavor. This is true of straight or enriched dough (dough that is enriched with eggs, butter, sugar, or cream).
Form and proof the buns
■Line two baking sheets with parchment paper and spray the paper on both trays with nonstick cooking spray.
■Remove the dough from the refrigerator and uncover it. Lightly dust your work surface with flour. Using a plastic bowl scraper, scoop the dough out of the bowl onto the floured surface. Dust the top of the dough with flour and use a bench knife to divide the dough into 13 (approximately 110-gram) pieces. Put one piece of dough on the work surface. Dust your hands lightly with flour. Gently rest your palm on the dough and roll the dough into a tight round ball. Put the ball on a prepared baking sheet and continue, rolling the rest of the pieces of dough into balls and adding them to the baking sheets, leaving about 2 inches between each round.
■Once you have shaped all of the buns, dust your palms with flour and gently pat each bun into a flat patty 3 to 4 inches in diameter. Cover each baking sheet with a damp, lightweight kitchen towel and set the sheets aside in a warm place for 1½ to 2 hours, to proof the buns until they have doubled in size and do not spring back when poked in the center.
This is a very sticky dough; it will be easiest to shape when it is cold and your hands are amply floured.
Bake the buns
■Arrange the oven racks so one is in the top third of the oven and the other is in the bottom third. Preheat the oven to 350°F.
■Pour the olive oil into a small bowl. Remove the kitchen towels and lightly brush the buns with the oil, using about half of it.
■Place one baking sheet on each oven rack and bake the buns for 30 minutes, until they are lightly browned and emit a hollow sound when you tap on the bottom of a bun with your finger, rotating the baking sheets from front to back and from one rack to the other halfway through the baking time. (Watch out that the bottoms do not brown too quickly. If they are getting too brown before they are done, slip a second baking sheet directly under each baking sheet to create a doubled baking sheet, shielding the dough from the direct heat.) Remove the buns from the oven and brush again very lightly with the remaining olive oil. Transfer the buns to a rack to cool completely.
Green Lentil and Spelt Rolls
Makes about 20 rolls
When I compose a bread basket, I like to offer different options that fulfill different categories. I always include these wholesome earthy rolls, along with classic Pull-Apart Parker House Rolls (this page) and flaky, buttery Black Pepper Fantails with Salted Honey Butter (this page). They’re made with spelt flour and cooked French lentils. Spelt is an ancient grain in the farro family, and is a relative of wheat. French lentils are smaller than conventional brown lentils, and, unlike those, they also hold their shape when cooked. So, adding them to these rolls gives you the pretty look of the lentils dotting the rolls, and also a toothsome texture. These make great little dinner or sandwich rolls; my favorite way to eat them is split, toasted, and slathered with salted butter.
For the lentils
1 cup (180 grams) French green lentils
3 dried bay leaves
4 cups (940 grams) cold water
For the dough
1¼ cups (294 grams) water (75°F to 80°F)
2 cups plus more (240 grams) all-purpose flour, for dusting
1½ cups (158 grams) spelt flour
1 tablespoon (20 grams) mild-flavored honey (such as wildflower or clover)
2 teaspoons (12 grams) fine sea salt
1½ teaspoons (4.5 grams) instant yeast
Nonstick cooking spray
For baking the rolls
2 tablespoons (30 grams) extra-virgin olive oil
Cook the lentils
■Place the lentils, bay leaves, and water in a small saucepan and bring to a boil over high heat. Reduce the heat to medium and simmer the lentils for about 20 minutes, until they are tender. (Adjust the heat as necessary to maintain a steady simmer.) Remove the saucepan from the heat and drain the lentils in a fine-mesh strainer. Let the lentils cool in the strainer until they are cool enough to touch. Pick the lentils up by the handful and give them a gentle squeeze to extract any excess liquid, then transfer them to a bowl to cool to room temperature. (The lentils can be cooked up to a day in advance; cover and refrigerate until you’re ready to use them.)
Mix the dough
■Place 2 cups of the cooked lentils in the bowl of a stand mixer. (Use the remaining lentils in a grain bowl, salad, or snack on them just as they are.) Add the water. (If the lentils were refrigerated, use warm water, at about 80°F.) Add the all-purpose flour, spelt flour, honey, salt, and yeast. Fit the mixer with the dough hook and mix on low speed for 2 minutes. Increase the speed to medium and mix for 3 minutes. Turn off the mixer and remove the bowl from the stand. Remove the dough hook and wipe it clean with a wet hand. Cover the bowl with plastic wrap and put it in a warm place for 2 hours to ferment, turning the dough once halfway through that time. To turn the dough, uncover the bowl and use a wet hand to fold the top edge down two-thirds and fold the bottom edge to meet the top edge, so the dough is folded like a letter. Fold the sides inward in the same way to form a sort of ball, then re-cover the bowl.
Shape and proof the rolls
■Line two baking sheets with parchment paper. Spray them with nonstick cooking spray and dust them lightly with all-purpose flour. (This preparation helps prevent the squares from sticking to the parchment, which comes in handy if you need to move them around to space them appropriately on the baking sheets.)
■Dust a large flat work surface lightly with all-purpose flour. Using a plastic bowl scraper, scoop the dough out of the bowl onto the floured surface. Gently pat and coax the dough into a 12- x 8-inch rectangle with the long edge parallel to the counter’s edge. Using a pastry wheel and straightedge, cut the dough into 2-inch squares. Place the squares on the prepared baking sheets, leaving approximately 2 inches between each.
■Cover each baking sheet with a damp, lightweight kitchen towel and set aside in a warm place to allow the rolls to proof for 1 hour, until they appear puffy around the edges and do not spring back when you indent the side with your finger.
Bake the rolls
■Arrange the oven racks so one is in the top third of the oven and the other is in the lower third. Preheat the oven to 425°F.
■Pour the olive oil into a small bowl. Uncover the rolls and gently brush the tops with the olive oil.
■Place one baking sheet on each oven rack and bake the rolls for 15 to 20 minutes, until they are golden brown and emit a hollow sound when you tap on the bottom of one with your finger, rotating the baking sheets from front to back and from one rack to the other halfway through the baking time. Remove the rolls from the oven and use a spatula or offset spatula to transfer them to a cooling rack to cool.
Soft Pretzels
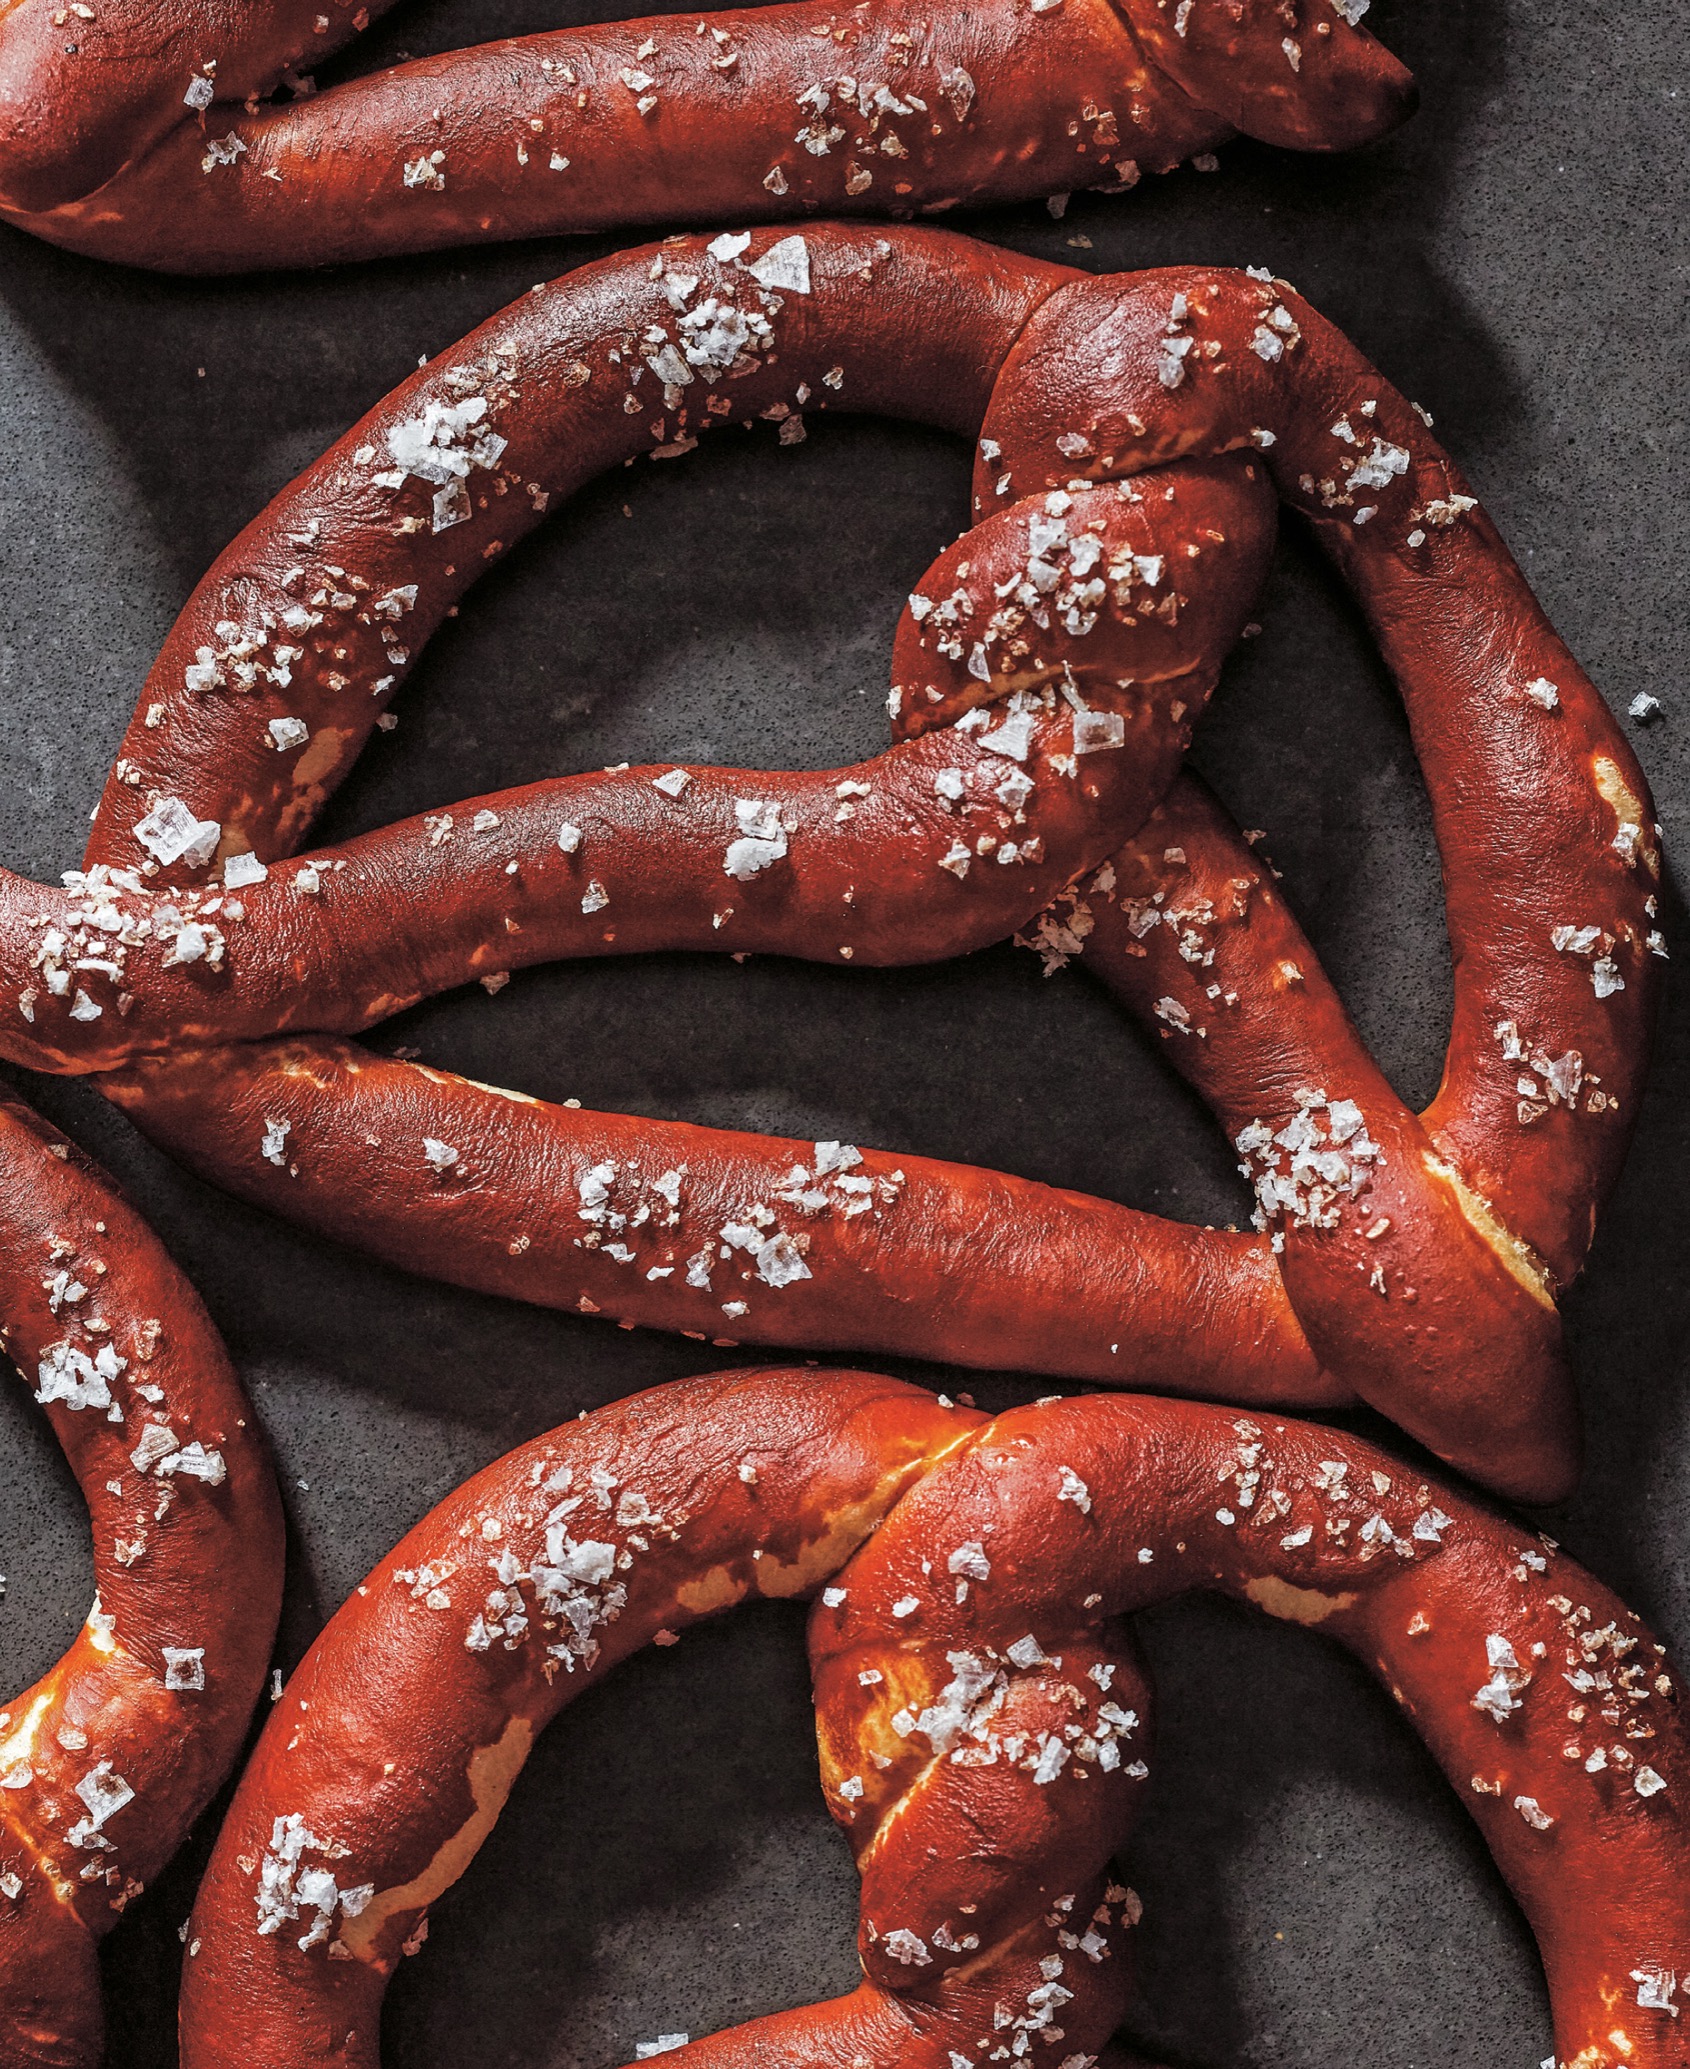
Makes 9 to 10 pretzels
Traditionally, New York pretzels are dipped in a lye solution before being baked. Lye is an alkaline chemical that speeds up the browning process. It is what gives the pretzel its characteristic burnished exterior and also contributes to its distinct flavor. But lye is caustic, and if you get any of it on you, undiluted, it will burn you. When making pretzels at home, I was afraid that no matter how careful I was, my dog might find a drop on the floor and lick it up. So instead of lye, in this recipe I recommend a baking soda solution. Where lye is sodium hydroxide (NaOH), baking soda is sodium bicarbonate (NaHCO3). It is the hydrogen molecule (represented by the H in the chemical formulas) in each of these chemicals that is key. The hydrogen bonds with the starch molecules on the surface of the pretzel to gelatinize, and this gelatinization results in the brown, shiny crust when the pretzel is baked. Because the quantity of baking soda needed to gelatinize the surface is so large, the water needs to be boiling in order for the baking soda to dissolve.
For the pretzels
4¾ cups plus more for dusting (570 grams), bread flour
2 tablespoons (26 grams) granulated sugar
2 teaspoons (12 grams) fine sea salt
1¼ cups (294 grams) water (70°F to 75°F)
1½ teaspoons (4.5 grams) instant yeast
1 (50 grams) large egg
8 tablespoons (1 stick, 113 grams) unsalted butter, cubed and softened
Nonstick cooking spray
For boiling and finishing the pretzels
8 cups (1,880 grams) water
6 tablespoons (90 grams) baking soda
2 to 3 tablespoons flaky sea salt
Mix and ferment the dough
■Place the flour, sugar, and fine sea salt in a large bowl and stir with a whisk to combine.
■Place the water in the bottom of the bowl of a stand mixer. Add the yeast and whisk briefly to help it dissolve. Add the egg and whisk to combine. Add the dry ingredients and the butter. Fit the mixer with the dough hook and mix on low speed for 2 minutes. Increase the speed to medium and mix the dough for 5 minutes to develop the gluten. Turn off the mixer and remove the bowl from the stand. Remove the dough hook and wipe it clean with a wet hand. Cover the bowl with a clean kitchen towel or plastic wrap. Place the bowl in a warm place to ferment the dough for 1 hour. Uncover the bowl and turn the dough. To turn the dough, use a wet hand to fold the top edge down two-thirds and fold the bottom edge to meet the top edge, so the dough is folded like a letter. Fold the sides inward in the same way to form a sort of ball, then re-cover the bowl.
Get prepared
■Line a baking sheet with parchment paper and spray the paper with nonstick cooking spray.
■Dust a large work surface very lightly with flour. Use a plastic bowl scraper to scrape the dough out of the bowl and onto the work surface. Lightly dust the top of the dough with flour and use a bench knife to cut the dough into 10 (105-gram) pieces.
Shape the pretzels
■Put one piece of dough on the work surface. Dust your hands lightly with flour. Gently rest your palm on the dough and roll the dough into a tight round ball. Put the ball on the prepared baking sheet and continue, rolling the rest of the pieces of dough into balls and adding them to the baking sheet.
■Place the baking sheet in the refrigerator to chill the dough for 2 hours or as long as overnight. (If you are refrigerating the balls overnight, after 1 hour, remove the baking sheet from the refrigerator and cover it with plastic wrap to prevent the balls from developing a “skin.” Return it to the refrigerator.)
■Line a second baking sheet with parchment paper and spray the paper with nonstick cooking spray.
■Lightly dust a work surface that is at least 3 feet from side to side with flour. (My counter isn’t big enough, so I use my kitchen table.)
■Remove one ball from the refrigerator and place it on the flour-dusted surface. Gently press on it with the palm of your hand to flatten it into a thick pancake. Using both hands, pick up the top edge of the round and fold it down by one-fourth, pinching the top edge into the round of dough. Repeat, rolling the top edge toward the center and pinching it into the dough, forming the pancake shape into a log in the process. Do this two or three more times, until you reach the bottom of the log, which will now be tight and not floppy. Doing this creates tension in the dough, which helps it to hold its shape because you are stretching and tightening the gluten on the surface of the pretzel.
Don’t add so much flour on your work surface that the log slides around on it; you need tension to get the dough to roll into a long rope.
■Lightly dust your hands with flour and place the fingertips of both hands on the center of the log. Gently roll the log into a 30-inch rope, dusting your work surface and hands very lightly with flour as needed. When you begin to feel tension preventing you from rolling the dough any longer, set the rope aside for 5 to 10 minutes to let the gluten relax, then resume rolling. While the rope is relaxing, remove another ball from the refrigerator and roll it to the same point, then let it rest.
■As each rope reaches 30 inches long, lay it in front of you, parallel to the edge of the counter. Pick up each end of the rope and bring the ends together away from you as if you were forming a circle. Cross the two ends so you have about 10 inches of rope from the point at which they cross. Twist the two ropes once and then lay them down so you have one pointing toward four o’clock and the other to eight o’clock, creating a classic pretzel shape. Pinch the dough in place at the point where it meets the rounded triangle at the bottom.
■Place the shaped pretzel on the prepared baking sheet, adjusting it to return it to a pretty pretzel shape if needed. Continue shaping all of the pretzels in this way, working in rotation, rolling the logs into ropes and shaping the pretzels, and when the ropes are ready, placing 5 pretzels on each baking sheet.
■Cover each baking sheet with a damp, lightweight kitchen towel and set the sheets aside in a warm place to proof the pretzels for 45 minutes, until they have puffed up slightly. Place the baking sheets in the refrigerator for about 30 minutes, and up to overnight, to chill the pretzels so they firm up. (You can prepare the pretzels to this point up to 1 day in advance.)
Dip and bake the pretzels
■Arrange the oven racks so one is in the top third of the oven and the other is in the bottom third. Preheat the oven to 375°F.
■Bring the water to a boil in a large stockpot over high heat. Add half of the baking soda and whisk to combine, taking care, as the water will boil furiously when you add the baking soda. Add the remaining baking soda and whisk it in.
■Remove one baking sheet of pretzels from the refrigerator and uncover it. Pick up one pretzel and gently drop it into the boiling water. Boil for 15 seconds, gently turn it with tongs, and boil for 15 seconds on the other side. Use the tongs to remove the pretzel from the water and return it to the baking sheet. Continue boiling the pretzels and placing them on the baking sheets until you have boiled all of the pretzels from both baking sheets.
■Sprinkle the pretzels generously with flaky salt.
■Place one baking sheet on each oven rack and bake the pretzels for 20 to 25 minutes, rotating them from front to back and from one rack to the other halfway through the baking time. Remove the pretzels from the oven and set aside to cool slightly. Serve warm or at room temperature.

Khachapuri with Cheese, Baked Egg, and Nigella Seeds
Makes 4 khachapuri; serves 4
Khachapuri is a traditional yeasted flatbread from the Eurasian country of Georgia. The sides are rolled inward to create a boat-like shape, which is topped with cheese and a baked egg. (Khachapuri can include any number of toppings, including ground meat or beans.) I try to replicate the cheese commonly used to make khachapuri by combining cheddar, Gruyère, and feta. I sprinkle nigella seeds over the top edge of the dough; these small black seeds, used in Indian and Middle Eastern cuisines, have a mild onion flavor and also look pretty.
You can either bake all four khachapuri at one time, or bake fewer and refrigerate the remaining dough and topping until you’re ready to assemble and bake them, or for up to four days. I usually bake two on one day and two a couple of days later.
For the dough
3 cups plus more for dusting (360 grams) all-purpose flour
2 tablespoons (26 grams) granulated sugar
2 teaspoons (6 grams) instant yeast
1½ teaspoons (9 grams) fine sea salt
1 cup (235 grams) water
2 tablespoons (28 grams) unsalted butter
Nonstick cooking spray
For the filling
8 ounces (226 grams) aged cheddar cheese
8 ounces (226 grams) Gruyère cheese
8 ounces (226 grams) Feta (preferably sheep’s milk)
For finishing the flatbread
1 tablespoon (9 grams) Nigella seeds
Flaky sea salt
4 large eggs (200 grams)
Mix and ferment the dough
■Put the flour, sugar, yeast, and fine sea salt in a large mixing bowl and whisk to combine the ingredients.
■Place the water in the bowl of a stand mixer. Add the dry ingredients and the butter. Fit the mixer with a dough hook and mix on low speed for 2 minutes. Increase the speed to medium and mix for 5 minutes. Turn off the mixer and remove the bowl from the stand. Remove the dough hook and wipe it clean with a wet hand. Cover the bowl with a clean kitchen towel or plastic wrap and set aside in a warm place to let the dough ferment for 2 hours, turning it once halfway through that time. To turn the dough, uncover the bowl and use a wet hand to fold the top edge down two-thirds and fold the bottom edge to meet the top edge, so the dough is folded like a letter. Fold the sides inward in the same way to form a sort of ball, then re-cover the bowl.
Divide and round the dough
■Line a baking sheet with parchment paper and spray the paper with nonstick cooking spray.
■Lightly flour a large flat work surface and use a plastic bowl scraper to scrape the dough out of the bowl onto the floured surface. Lightly dust the top of the dough with flour and use a bench knife to divide the dough into 4 equal (160-gram) pieces.
■Put one piece of dough on the work surface. Dust your hands lightly with flour. Gently rest your palm on the dough and roll the dough into a tight round ball. Put the ball on the prepared baking sheet and continue, rolling the rest of the pieces of dough into balls and adding them to the baking sheet.
■Place the baking sheet in the refrigerator until the balls are chilled and firm, about 1 hour, and up to overnight. (If you are resting the rounds overnight, remove them from the refrigerator after one hour, spray a sheet of plastic wrap with nonstick cooking spray, and place the plastic, sprayed side down, over the baking sheet.)
Roll out the dough
■Line a baking sheet with parchment paper.
■Lightly dust a large flat work surface with flour.
■Remove one ball of dough from the refrigerator and place it on the floured surface. Lightly dust the dough and rolling pin with flour and roll the dough to a 10-inch circle. (For more detailed instructions, see Rolling Dough 101, this page.) If the dough begins to spring back, set it aside to rest to give the gluten a chance to relax while you roll another ball of dough. Place the finished round of dough on the prepared baking sheet. Dust the top of the round lightly with flour. Lay a sheet of parchment paper on the dough and dust it with flour. Continue rolling (and resting the dough as needed) until you have rolled all of the balls of dough into 10-inch rounds, stacking them on top of one another with sheets of flour-dusted parchment between them. Place the baking sheet in the refrigerator to chill the rounds while you make the filling. (You will use the baking sheet that the dough was resting on in the refrigerator for the final shaping and baking of the khachapuri.)
Make the filling
■Grate the cheddar and Gruyère on the small to medium holes of a box grater. Combine the grated cheeses in a large bowl and crumble in the feta. Mix the cheeses together using your hands or a rubber spatula.
Prepare to bake the khachapuri
■Arrange the oven racks so one is in the top third of the oven and the other is in the bottom third. Preheat the oven to 400°F.
Shape the khachapuri
■Remove one dough round from the refrigerator and place it on a flat work surface. Spread 2 cups (170 grams; or one-fourth) of the cheese mixture evenly across the surface of the dough, leaving about ¼ inch free of cheese around the edges. Repeat with a second dough round.
■Roll the top edge (the one farthest from you) of one round down a third of the way toward the center, pinching the dough so that it stays in place. Repeat, rolling the bottom edge one-third of the way upward, toward the center; there will be 2 to 3 inches of exposed cheese between the top and bottom edges of the dough. Continue to roll the top and bottom edges of the dough together at the sides until they meet. Pinch the sides of the dough together and gently twist to seal them closed. Place the shaped khachapuri on the prepared baking sheet. Repeat, shaping a second khachapuri with a second round of dough in the same way. Place the second boat on the same baking sheet and place them in the refrigerator. If you are baking only 2, cover the baking sheet with the remaining 2 dough rounds with plastic wrap and return it to the refrigerator; refrigerate the toppings for up to 3 days. When you are ready to bake them, remove the remaining rounds from the refrigerator, unwrap them, and proceed with the recipe. Otherwise, remove the remaining 2 rounds of dough from the refrigerator. Top and shape them in the same way and place them on the parchment-lined baking sheet that the dough was resting on.
Finish and bake the khachapuri
■Brush the edges of the boat lightly with water and sprinkle with the nigella seeds and flaky salt.
■Place one baking sheet on each oven rack and bake the khachapuri for 20 minutes, rotating them from front to back and from one rack to the other halfway through the baking time.
■After 20 minutes, open the oven door and slide an oven rack out so you can work quickly with the khachapuri. Crack an egg into the center of each khachapuri. (If the cheese has puffed up so much that there is no room for the egg, push the cheese down in the center with the tines of a fork to make room.)
■Sprinkle the eggs with flaky salt and close the oven door.
■Increase the oven temperature to 450°F.
■Bake the khachapuri for an additional 10 minutes, until the egg whites are opaque. Remove the khachapuri from the oven and set aside to cool slightly. Serve warm.


Kale and Cheese Khachapuri with Zhoug
Makes 2 khachapuri; serves 2 to 4
This is another take on khachapuri, inspired by a visit I made to Oda House, a Georgian restaurant in Manhattan. This khachapuri is topped with a second sheet of dough, like a double-crusted pizza, or a thin, savory two-crust pie. The filling is drizzled with zhoug, which is a mix of herbs, spices, and olive oil—the Middle Eastern version of Italian salsa verde. The recipe for zhoug makes more than you’ll need for this, but it’s nice to have in the refrigerator to spoon on anything from eggs in the morning to grilled meat, fish, or vegetables.
For the dough
3 cups plus more for dusting (360 grams) all-purpose flour
2 tablespoons (26 grams) granulated sugar
2 teaspoons (6 grams) instant yeast
1½ teaspoons (9 grams) fine sea salt
1 cup (235 grams) water
2 tablespoons (28 grams) unsalted butter
Nonstick cooking spray
For the filling
1 bunch curly kale
1 large yellow onion
2 tablespoons (28 grams) unsalted butter
1 tablespoon (15 grams) extra-virgin olive oil
1 teaspoon (6 grams) fine sea salt
4 ounces (113 grams) Gruyère cheese
4 ounces (113 grams) aged cheddar cheese
4 ounces (113 grams) Feta (preferably sheep’s milk)
2 tablespoons zhoug (recipe follows)
For finishing the flatbread
1 teaspoon Nigella seeds
1 teaspoon flaky sea salt
Extra-virgin olive oil for brushing
Mix and ferment the dough
■Put the flour, sugar, yeast, and fine sea salt in a large mixing bowl and whisk to combine the ingredients.
■Place the water in the bowl of a stand mixer. Add the dry ingredients and the butter. Fit the mixer with a dough hook and mix on low speed for 2 minutes. Increase the speed to medium and mix for 5 minutes. Turn off the mixer and remove the bowl from the stand. Remove the dough hook and wipe it clean with a wet hand. Cover the bowl with a clean kitchen towel or plastic wrap and set aside in a warm place to let the dough ferment for 2 hours, turning it once halfway through that time. To turn the dough, uncover the bowl and use a wet hand to fold the top edge down two-thirds and fold the bottom edge to meet the top edge, so the dough is folded like a letter. Fold the sides inward in the same way to form a sort of ball, then re-cover the bowl.
Divide and round the dough
■Line a baking sheet with parchment paper and spray the paper with nonstick cooking spray.
■Lightly flour a large flat work surface and use a plastic bowl scraper to scrape the dough out of the bowl onto the floured surface. Lightly dust the top of the dough with flour and use a bench knife to divide the dough into 4 equal (160-gram) pieces.
■Put one piece of dough on the work surface. Dust your hands lightly with flour. Gently rest your palm on the dough and roll the dough into a tight round ball. Put the ball on the prepared baking sheet and continue, rolling the rest of the pieces of dough into balls and adding them to the baking sheet.
■Place the baking sheet in the refrigerator until the balls are chilled and firm, about 1 hour, and up to overnight. (If you are resting the rounds overnight, remove them from the refrigerator, spray a sheet of plastic wrap with nonstick cooking spray, and place the plastic, sprayed side down, over the baking sheet.)
Make the filling
■Rip the leaves of kale off the stems and discard the stems. Wash the leaves, dry them in a colander, and roughly chop them.
■Bring a large pot of salted water to a boil. Fill a large bowl with ice water to make an ice bath. Place a colander in the sink.
■Place the kale leaves in the boiling water, using tongs to submerge them, and boil for 3 minutes, until the leaves are bright green and tender. Lift the kale out of the water and plunge it in the ice bath to cool completely. Drain the kale in the colander. Pick up the kale and squeeze it in your fists to extract as much water as possible. Transfer the drained kale to a large bowl.
■Cut the tops off the onion, peel it, and cut it in half, root to tip. Lay the onion halves flat on a cutting board and slice the onion ⅛ inch thick.
■Heat the butter and olive oil in a large sauté pan over medium-high heat until the butter melts. Add the onion slices, reduce the heat to medium, and sauté, stirring frequently, for about 7 minutes, until the onion has softened and is just beginning to take on a faint color. Add the onion to the bowl with the kale. Add the salt to the bowl and fold together with a rubber spatula to combine.
■Grate the Gruyère and cheddar on the small to medium holes of a box grater. Combine the grated cheeses in a large bowl and crumble in the feta. Mix the cheeses together using your hands or a rubber spatula.
Roll out the dough
■Line a baking sheet with parchment paper. Lightly dust a large flat work surface with flour.
■Remove one ball of dough from the refrigerator and place it on the floured surface. Lightly dust the dough and rolling pin with flour and roll the dough to an 11-inch circle. (For more detailed instruction, see Rolling Dough 101, this page.) If the dough begins to spring back, set it aside to rest to give the gluten a chance to relax while you roll another ball of dough.
■Place the circle on the prepared sheet. Arrange half of the kale-onion mixture evenly on the round, leaving about 1 inch clear of filling along the edge. Brush the edges of the dough with water. Drizzle 2 tablespoons of the zhoug over the kale mixture and arrange half of the cheese over the top. Set aside.
■Lightly dust the work surface with more flour as needed. Remove a second round from the refrigerator, place it on the floured surface, and roll it out into an 11-inch circle. Fold the circle in half, pick it up, and gently place it over the khachapuri and its filling, centering it. Unfold the round so it completely covers the filling. Roll the edges of the bottom and top sheets of dough together toward the center of the khachapuri. Pinch the dough together so the edges do not unroll.
■Lightly brush the top of the khachapuri with water. Sprinkle with ½ teaspoon nigella seeds and ½ teaspoon flaky salt. Place the sheet in the refrigerator to chill for 30 minutes, or up to 1 hour.
■Repeat, making a second khachapuri with the remaining dough and filling and placing it on the baking sheet that the dough was resting on in the refrigerator. Place the baking sheet in the refrigerator to chill for 30 minutes, or up to 2 hours.
Prepare to bake the khachapuri
■Arrange the oven racks so one is in the top third of the oven and the other is in the bottom third. Preheat the oven to 400°F.
■Remove the khachapuri from the refrigerator. Cut 2 (2-inch) slits to form an X in the top of each khachapuri; this allows the steam to escape so the pastry does not get soggy while it is cooling after baking.
Bake the khachapuri
■Place one baking sheet on each oven rack to bake the khachapuri for 35 to 40 minutes, until the top and bottom crusts are golden brown, rotating the baking sheets from front to back and from one rack to the other halfway through the baking time. Remove the baking sheets from the oven. Use a large spatula to move the khachapuri to a cooling rack to cool slightly. Transfer the khachapuri to a cutting board and use a pizza cutter or large knife to cut each pastry into 6 slices. Serve warm or at room temperature.
Zhoug
Makes about 1 cup
1 cup (40 grams) fresh cilantro (leaves and stems)
½ cup (15 grams) fresh flat-leaf parsley (leaves and stems)
1 serrano pepper, halved, ribs and seeds removed and chopped
3 cloves garlic, thinly sliced
1 teaspoon ground cumin
⅛ teaspoon ground cloves
⅛ teaspoon ground cardamom
½ teaspoon (3 grams) Fine sea salt
3 tablespoons (45 grams) olive oil
¼ cup (59 grams) apple cider vinegar
Place the cilantro and parsley leaves and stems, serrano pepper, garlic, cumin, cloves, cardamom, and salt in the bowl of a food processor (or a blender). Process until the ingredients have broken down. Add the olive oil and cider vinegar and process until smooth. Transfer to a covered container and refrigerate until ready to use, or for up to 2 weeks.
Hot Dog Buns
Makes 16 buns
One year I was asked to make hot dog buns for a client for the Fourth of July. When the buns came out of the oven, I looked at them and thought: Something isn’t right. I checked the dimensions, and they were fine. Then I looked at the buns again, and I realized that the problem was that I hadn’t baked them close enough together, so they weren’t pull-apart buns. Hot dog buns have to grow together when they’re proofed and baked. That’s what gives them their signature look, but it also helps keep them soft and tender, with a minimal amount of crust.
These hot dog buns are my take on Martin’s Potato Rolls. I add buttermilk to the dough, the acidity of which tenderizes the dough and makes the buns soft and squishy, like commercial hot dog buns, but, of course, better.
8 ounces (about 2 medium, 250 grams) Yukon gold potatoes
Extra-virgin olive oil for brushing
6½ cups plus more for dusting (780 grams) all-purpose flour
1½ tablespoons (20 grams) granulated sugar
1 tablespoon plus ¼ teaspoon (19.5 grams) fine sea salt
2½ teaspoons (8 grams) instant yeast
1 cup (240 grams) whole milk
1 cup (245 grams) buttermilk, well shaken
1 (50 grams) large egg
2 (34 grams) large egg yolks
Nonstick cooking spray
Bake the potatoes
■Arrange the oven racks so one is in the center position. Preheat the oven to 400°F.
■Rinse and dry the potatoes and coat them with about 1 teaspoon of olive oil. Wrap the potatoes in aluminum foil and bake in the oven until they are very soft when pierced with the tip of a paring knife, 1 hour to 1 hour 20 minutes. Remove from the oven and let cool to room temperature in the foil. The potatoes can be baked the day before making the dough. Refrigerate them in the foil and unwrap them when you’re ready to use them.
Mix and proof the dough
■Put the flour, sugar, salt, and yeast in a large bowl and stir to combine.
■Unwrap the potato and cut it into roughly ⅜-inch pieces, leaving the skin on, and put in the bowl of a stand mixer. (If the potato has been refrigerated, it’s fine to add it to the mix cold.) Add the milk, buttermilk, egg, and egg yolks to the bowl. Add the dry ingredients. Fit the mixer with the dough hook and mix on low speed for 3 minutes. Increase the speed to medium and mix for 5 minutes to develop the gluten. Turn off the mixer and remove the bowl from the stand. Remove the dough hook and wipe it clean with a wet hand. Cover the bowl with a clean kitchen towel or plastic wrap and set the dough in a warm place to ferment for 1 hour. Uncover the bowl and turn the dough. To turn the dough, use a wet hand to fold the top edge down two-thirds and fold the bottom edge to meet the top edge, so the dough is folded like a letter. Fold the sides inward in the same way to form a sort of ball, then re-cover the bowl.
■Place the dough in the refrigerator overnight to retard the dough.
Shape and proof the hot dog buns
■Remove the dough from the refrigerator. Lightly dust a large flat work surface with flour and use a plastic bowl scraper to scrape the dough out of the bowl and onto the floured surface. Dust the top of the dough with flour and use a bench knife to divide it into 16 (approximately 100-gram) pieces.
■Dust your hands lightly with flour. Take one piece of dough and gently rest your palm on the dough and roll the dough into a tight round ball. Place the ball off to the side of the work surface and continue, rolling the rest of the pieces of dough into balls and moving them off to the side. Let the rounds rest for about 15 minutes.
■Lightly dust your hands with flour and pick up one ball of dough. Put the ball on your work surface in front of you and gently press on it with the palm of your hand to flatten the dough into a thick pancake. Fold the top down two-thirds of the way toward you and press it into the dough. Then bring the bottom two-thirds up and press it into the dough like you are forming a letter. Using both hands, pick up the top edge of the letter and fold it down to the center, pinching the edge into the dough. Repeat, moving the top edge toward the bottom of the dough, pinching it into the dough to form a log. Push down on the dough with the palm of one hand to flatten the log until it is 5 inches long. If the dough sticks to your work surface, use a bench knife to scrape under it and release it. Set the flattened log to the side and repeat, shaping the remaining balls of dough in the same way.
This classic bread baker’s shaping technique creates tension in the dough, which helps the dough proof more uniformly.
Finish shaping the hot dog buns
■Spray the perimeters of a baking sheet with nonstick cooking spray. Line with parchment paper and spray the parchment with nonstick cooking spray.
■Place the flattened dough logs on the prepared pan so that there are two rows of 8 logs, each with their long sides parallel to the short length of the pan, leaving ⅛ to ¼ inch between each bun.
■Pour ⅓ cup olive oil into a small dish and lightly brush the buns with half of the olive oil. (Reserve the remaining oil; you will use it later.) Cover the baking sheet with a damp, lightweight kitchen towel and set it aside in a warm place to proof the buns for 1½ to 2 hours, until they have doubled in size; they will have grown into each other and the dough will not spring back when poked in the center.
Bake the hot dog buns
■Arrange the oven racks so one is in the center position. Preheat the oven to 350°F.
■Lightly brush the rolls with about half of the remaining olive oil. Place the baking sheet on the center rack of the oven to bake the hot dog buns for 40 minutes, until the buns are golden brown, rotating the baking sheet from front to back halfway through the baking time.
■Remove the buns from the oven and brush the remaining olive oil on top. Holding the baking sheet with both hands, gently hit the bottom of the sheet pan on a cooling rack to release the buns so they slide in one piece onto the rack. (If they are resisting sliding off the baking sheet, gently slide a spatula under them to nudge them off.)
It is important that pull-apart rolls, such as hot dog buns, cool in one piece so that the parts of the rolls that are touching one another do not dry out from being exposed to air.

Summer Focaccia with Sungolds, Corn, and Basil Pesto

Makes 1 large focaccia; serves 12 to 16
The summer that I was working on this book, I was also consulting for a Philadelphia bakery-restaurant called Walnut Street Café. I was making focaccia and needed toppings. Sweet corn, which was in season, came to my mind, and I thought it would taste even better balanced by the acidity of summer tomatoes. But the real magic of this focaccia is the cream, which is whipped and then spread onto the dough. It acts as a bed for the corn and tomatoes, and then caramelizes when baked. It’s divine.
The focaccia starts with a “poolish,” which is a type of preferment. Poolish is a dough that is fermented before the fermentation of the main dough. The poolish adds stretchiness to the dough, which in this case is needed to stretch the focaccia dough into the baking sheet.
Note You will need one baking sheet pan (18 x 13 inches, or a pan of similar dimensions) to make this.
For the poolish
½ cup (118 grams) water (70°F to 75°F)
1/16 (0.15 gram) teaspoon instant yeast
1 cup (120 grams) bread flour
For the dough
1⅓ cups (313 grams) water (70°F to 75°F)
3¾ cups (450 grams) all-purpose flour
1 teaspoon (3 grams) instant yeast
2 teaspoons (12 grams) fine sea salt
5 to 6 tablespoons (75 grams) extra-virgin olive oil
For the topping
¾ cup (179 grams) heavy cream
1 pint (315 grams) sungold tomatoes (or another small, sweet variety), halved
About ¾ cup (120 grams) corn, 1 ear shucked, kernels removed
1 tablespoon (5 grams) fresh chives, chopped
¼ teaspoon red pepper flakes
1½ teaspoons (6 grams) flaky sea salt
⅓ cup (not packed) Pecorino Romano, finely grated (20 grams)
For finishing the focaccia
3 tablespoons basil pesto (recipe follows)
⅓ cup (not packed) Pecorino Romano, finely grated ( 0 grams)
Make the poolish
■The evening before you plan to make the focaccia (12 hours before you plan to mix the dough), pour the water into a quart-size container (ideally one with a lid). Sprinkle the yeast on top of the water and sprinkle the bread flour on top of that. Mix with a spoon until no flour is visible, cover with the lid (or plastic wrap), and set the poolish aside at room temperature to ferment for 12 to 18 hours. (To check that the poolish has fermented sufficiently, fill a small bowl with water. Wet the fingers of one hand and gently use your fingers to lift a small portion of the poolish out of the container and drop it in the water. If the poolish floats, it is ready. If not, let it ferment until it is ready, as long as 6 additional hours. If you find that it is taking too long, set it in a warmer place, such as near the stove.) If your poolish is ready before you are ready to use it, place it in the refrigerator. If your poolish is cold when you use it, bring your water to 80°F instead of 70°F when mixing your focaccia dough.
Mix and ferment the dough
■Place the water in the bowl of a stand mixer and add the poolish and all-purpose flour. Fit the mixer with the dough hook and mix on low speed for 2 to 3 minutes, until no flour is visible and very few lumps remain. Turn off the mixer and remove the bowl from the mixer stand; you can leave the dough hook in the bowl.
■Place the yeast and fine sea salt in separate piles on the top of the dough. Set the dough aside in a warm place to rest, uncovered, for 30 minutes. (For more information on why we are resting the dough before mixing the yeast and salt into the dough, see “Autolyse” in the Yeast Tutorial, this page.)
■Return the bowl to the stand and mix with the dough hook for about 2 minutes on low speed. Increase the speed to medium and mix for 3 minutes to develop the gluten. Turn off the mixer and remove the bowl from the stand. Remove the dough hook and wipe it clean with a wet hand. Cover the bowl with plastic wrap and set the dough in a warm place to ferment for 2 hours, turning the dough once halfway through that time. To turn the dough, uncover the bowl and use a wet hand to fold the top edge down two-thirds and fold the bottom edge to meet the top edge, so the dough is folded like a letter. Fold the sides inward in the same way to form a sort of ball, then re-cover the bowl.
Shape the focaccia
■Uncover the bowl. Pour the olive oil onto a baking sheet and spread it around with your fingers to completely coat the bottom and sides. Use a plastic bowl scraper to scrape the dough in a big lump onto the baking sheet. Dip your fingers in the olive oil on the baking sheet and use the oil to coat the top of the dough. Let the dough rest for about 20 minutes without disturbing it. (It does not need to be covered because the oil provides a protective barrier to prevent the surface of the dough from drying out.) Dip your fingers in the oil on the baking sheet. Slide your fingers under the lump of dough and gently stretch it out toward the sides of the baking sheet. Press your fingertips into the surface of the dough to dimple it and stretch it evenly toward the sides of the baking sheet. When the dough starts to spring back, stop dimpling and stretching and let it rest for 20 minutes, then resume, dimpling and stretching the dough until it reaches the edges of the baking sheet. Set the dough aside in a warm place to proof for 45 minutes.
Top and bake the focaccia
■Arrange the oven racks so one is in the center position. Preheat the oven to 425°F.
■Put the cream in the bowl of a stand mixer. Fit the mixer with the whisk attachment and whip on medium-high speed until stiff peaks form. Turn off the mixer. Spoon the whipped cream onto the dough and use a small offset spatula to spread it to cover the surface. Place the tomatoes, cut side up, on the whipped cream layer, pushing down gently so they adhere to the cream. Sprinkle on the corn, followed by the chives, red pepper flakes, flaky salt, and pecorino.
■Place the focaccia on the center rack of the oven to bake for 30 to 35 minutes, until the surface and underside of the focaccia are golden brown (use an offset spatula to lift up and peek at the underside), rotating the baking sheet from front to back halfway through the baking time. Remove the focaccia from the oven. Using a large offset spatula, carefully slide the focaccia out of the baking sheet and onto a cooling rack.
Finish the focaccia
■While the focaccia is still warm, use a spoon to dot the surface of the focaccia with the pesto in small spoonfuls.
■When the focaccia has cooled, sprinkle the pecorino over the top. Use scissors to cut the focaccia into pieces.
Basil Pesto
Makes about 1 cup
This makes more than you will need for the focaccia. Use the leftover for pasta or spoon it on sandwiches or grilled vegetables and meats.
2 cloves garlic
1 teaspoon (6 grams) fine sea salt
2 cups (lightly packed, 60 grams) basil leaves, julienned
½ cup (115 grams) extra-virgin olive oil
½ cup (60 grams) Pecorino Romano, finely grated
■Put the garlic, fine sea salt, and basil in the bowl of a food processor fitted with a metal blade and pulse until the leaves are finely chopped but not pulverized. With the machine running, add the olive oil through the feed tube in a slow drizzle. Add the pecorino and process until the pesto is almost smooth, with flecks of basil remaining.
■Refrigerate the pesto in a covered container until you’re ready to use it, and for up to 1 week.
Variation
Onion Board
Makes 1 large onion board; serves 12 to 16
Onion board, also called pletzel, is a Jewish flatbread similar to focaccia that is covered with caramelized onions and sprinkled with poppy seeds. Onion boards used to be a Jewish deli staple, but you don’t see them much anymore, which is too bad, because they’re delicious. To make an onion board, make, shape, and proof the dough for Summer Focaccia with Sungolds, Corn, and Basil Pesto (this page). Cook the onions and use them, along with the poppy seeds, to top the dough as described here.
Note You will need one baking sheet pan (18 x 13 inches, or a pan of similar dimensions) to make this.
For the onions
3½ pounds (4 to 5 large, 1,670 grams) yellow onions
4 tablespoons (½ stick, 56 grams) unsalted butter
2½ teaspoons (15 grams) fine sea salt
For the topping
2 teaspoons (6 grams) poppy seeds
½ teaspoon (3 grams) flaky sea salt
3 tablespoons (30 grams) bread crumbs
Cook the onions
■Arrange the oven racks so one is in the lowest position. Preheat the oven to 300°F.
■Cut the tops off the onions, peel the onions, and cut them in half, root to tip. Lay the onion halves flat on a cutting board and slice the onions ⅛ inch thick.
■Melt the butter in a large Dutch oven (or another oven-safe pot with a lid) over medium heat. Add the onion slices and fine sea salt and cook without browning them for 15 minutes, stirring frequently. (If the onions begin to brown, reduce the heat slightly.) Turn off the heat, cover the pot, and place it in the oven to cook the onions for 30 minutes. Remove from the oven and let them rest, covered, for another 30 minutes. Remove the lid from the pot and put the onions in a large fine-mesh strainer to strain out the liquid. Set the onions aside for 30 minutes to cool to room temperature. (You can prepare the onions to this point up to a day in advance. Refrigerate in an airtight container until you’re ready to use them.)
Assemble and bake the onion board
■Arrange the oven racks so one is in the center position. Preheat the oven to 425°F.
■Transfer the onions to the prepared focaccia dough and use your fingers to spread them evenly over the surface of the dough. Sprinkle the poppy seeds over the onions, followed by the flaky salt and bread crumbs.
■Place the onion board on the center rack of the oven to bake for 30 to 35 minutes, until the surface and underside of the onion board are golden brown, rotating the pan halfway through the baking time. (Use an offset spatula to lift up and peek at the underside of the onion board to make sure that it has browned and is crispy before removing it from the oven.) Remove from the oven. Using a large offset spatula, carefully slide the onion board out of the pan and onto a cooling rack. Use scissors to cut it into pieces.
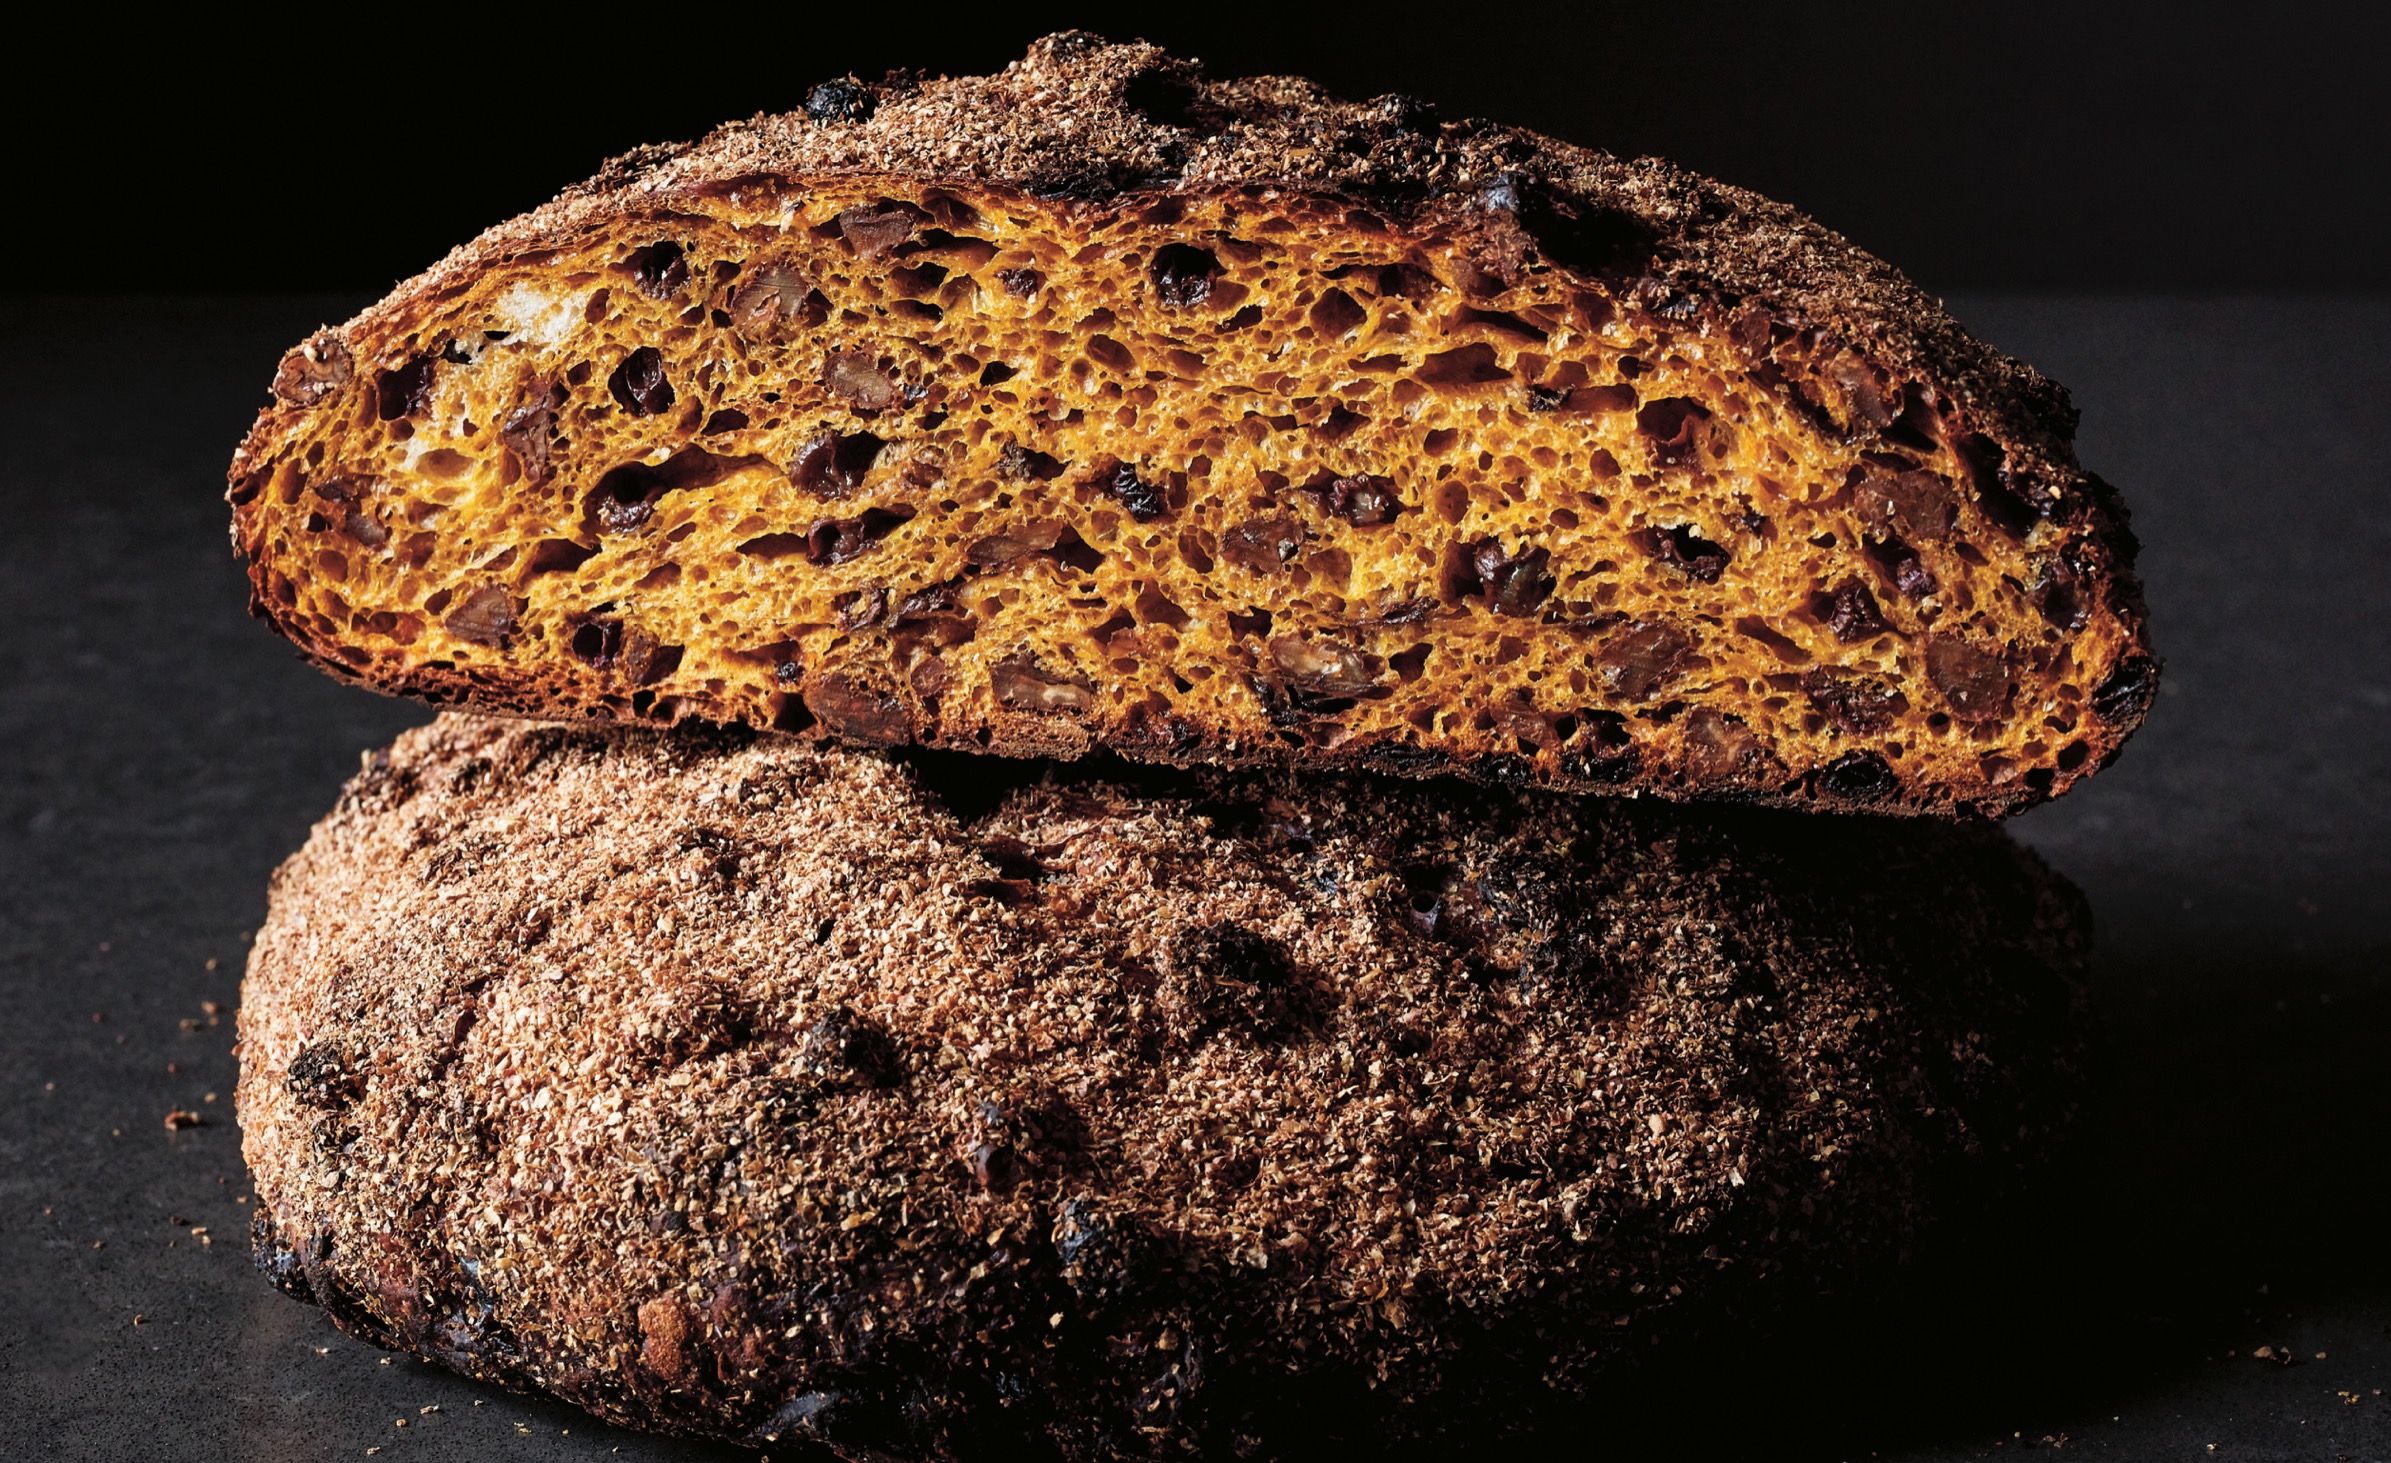
Carrot Currant Pecan Loaf

Makes 1 loaf
After I left Babbo, I wanted to learn to make bread, so I went to work for the great baker Jim Lahey, of Sullivan Street Bakery, in New York City. Jim is simply one of the most knowledgeable (and passionate) bread bakers in this country. This recipe uses his famous “no-knead” bread dough, which went viral after being published in The New York Times. Even though the words carrot and pecan in the title might lead you to believe this is a carrot bread along the lines of a quick bread or carrot cake, it is not that at all. It is a delicious, nutty, savory bread, perfect for serving with a cheese plate or for pre-meal snacking. I was enamored with it from the first time I made and tasted it. The year after my year with Jim, I made this loaf for Thanksgiving. Ten years later, it is still an annual tradition.
The bread is baked in a Lodge 3.2 Quart Cast Iron Combo Cooker, which is comprised of a cast-iron Dutch oven with a skillet lid. The pair is inverted so the skillet is on the bottom and the Dutch oven rests on top like a “cloche.” Baking the bread in this heavy, closed vessel results in a beautiful, brown crusty exterior like that produced by a good bread bakery. The combo is not expensive, and after you taste this bread, you will be glad you bought one. This dough takes 18 hours to ferment and then proofs for 2 hours, so if you want to enjoy it with dinner, start mixing your dough about six o’clock the evening before.
Note You will need a Lodge 3.2 Quart Cast Iron Combo Cooker (Dutch oven with skillet lid) to make this.
1 cup (115 grams) whole pecans
1 cup (130 grams) dried currants
3⅓ cups plus more for dusting (400 grams) bread flour
2 teaspoons (12 grams) fine sea salt
¼ teaspoon (1 gram) instant yeast
1½ cups (360 grams) carrot juice (70°F to 75°F)
½ cup for dusting (60 grams) rye flour
Get prepared
■Arrange the oven racks so one is in the center position. Preheat the oven to 300°F.
■Spread the pecans on a baking sheet and toast them in the oven for 18 to 20 minutes, shaking the pan once during that time for even toasting, until the nuts are golden brown and fragrant. Remove the baking sheet from the oven and set aside to cool the nuts to room temperature. Roughly chop the pecans and set aside.
■Place the currants in a small bowl and cover with hot water. Set aside to soak for 5 minutes. Drain the currants in a fine mesh strainer and let them sit in the strainer so they continue to drain until you’re ready to use them.
Mix and ferment the dough
■Combine the bread flour, salt, and yeast in a medium bowl and stir to distribute the ingredients.
■Place the carrot juice in a deep mixing bowl (such as the bowl of a stand mixer, although you won’t be using the mixer). Add the dry ingredients, pecans, and currants. Stir the dough with a large rubber spatula or wooden spoon until the currants and pecans are evenly incorporated and no pockets of dry ingredients remain. Cover the bowl tightly with plastic wrap (or a tight-fitting lid) and put the bowl in a warm place for about 18 hours, until the dough looks swollen.
Controlling the temperature is an important part of making this bread. Insulating the dough by mixing and fermenting it in a deep container helps it to stay at a good fermentation temperature (ideally between 75°F and 80°F).
Form and proof the loaf
■Line a baking sheet with a large, clean, lightweight kitchen towel and dust heavily with the rye flour. Dust a large flat work surface heavily with bread flour. Use a plastic bowl scraper or rubber spatula to scoop the dough out of the bowl and gently place the dough on the floured surface.
It’s important when working with no-knead bread dough that you handle it gently. Because we usually develop the gluten by kneading, or mixing, this dough relies solely on the gluten that is formed during fermentation. We don’t want to deflate that by manhandling the dough.
■Handling the dough gently, fold the top edge gently two-thirds of the way toward the bottom edge. Fold the bottom edge to meet the top edge, as if you were folding a letter, pressing on the dough just enough to get it to stay in place, but not patting the dough. Do the same with the two sides, folding the right edge two-thirds of the way toward the left edge, and folding the left edge to meet the right edge. Flip the dough upside down onto the prepared kitchen towel. Use the ends of the towel to cover the loaf so it doesn’t dry out while proofing. Set the dough aside in a warm place to proof for 2 hours, until it does not bounce back when you indent it with your finger.
Bake the bread
■About 30 minutes before the dough is done proofing, arrange the oven racks so one is in the center position and no oven racks are above it. Place the Dutch oven, skillet side down, in the oven and preheat the oven and the Dutch oven to 450°F.
■Open the oven and carefully slide the oven rack out partway. Remove the Dutch oven from the skillet lid. Uncover the dough and use the towel to rock the ball of dough into the palm of your free hand. Place the dough, right side up, on the skillet lid. Return the Dutch oven to cover the dough and slide the oven rack back into the oven. Bake the bread for 25 minutes. Remove the top of the Dutch oven from the skillet lid and bake the bread for 20 to 25 minutes more, until it has a deeply burnished crust. Remove the skillet with the bread from the oven. Slide a large metal spatula under the bread with one hand on the spatula and the other, protected by a clean kitchen towel, holding the bread, remove the bread from the skillet lid. Place the bread on a cooling rack to cool completely.
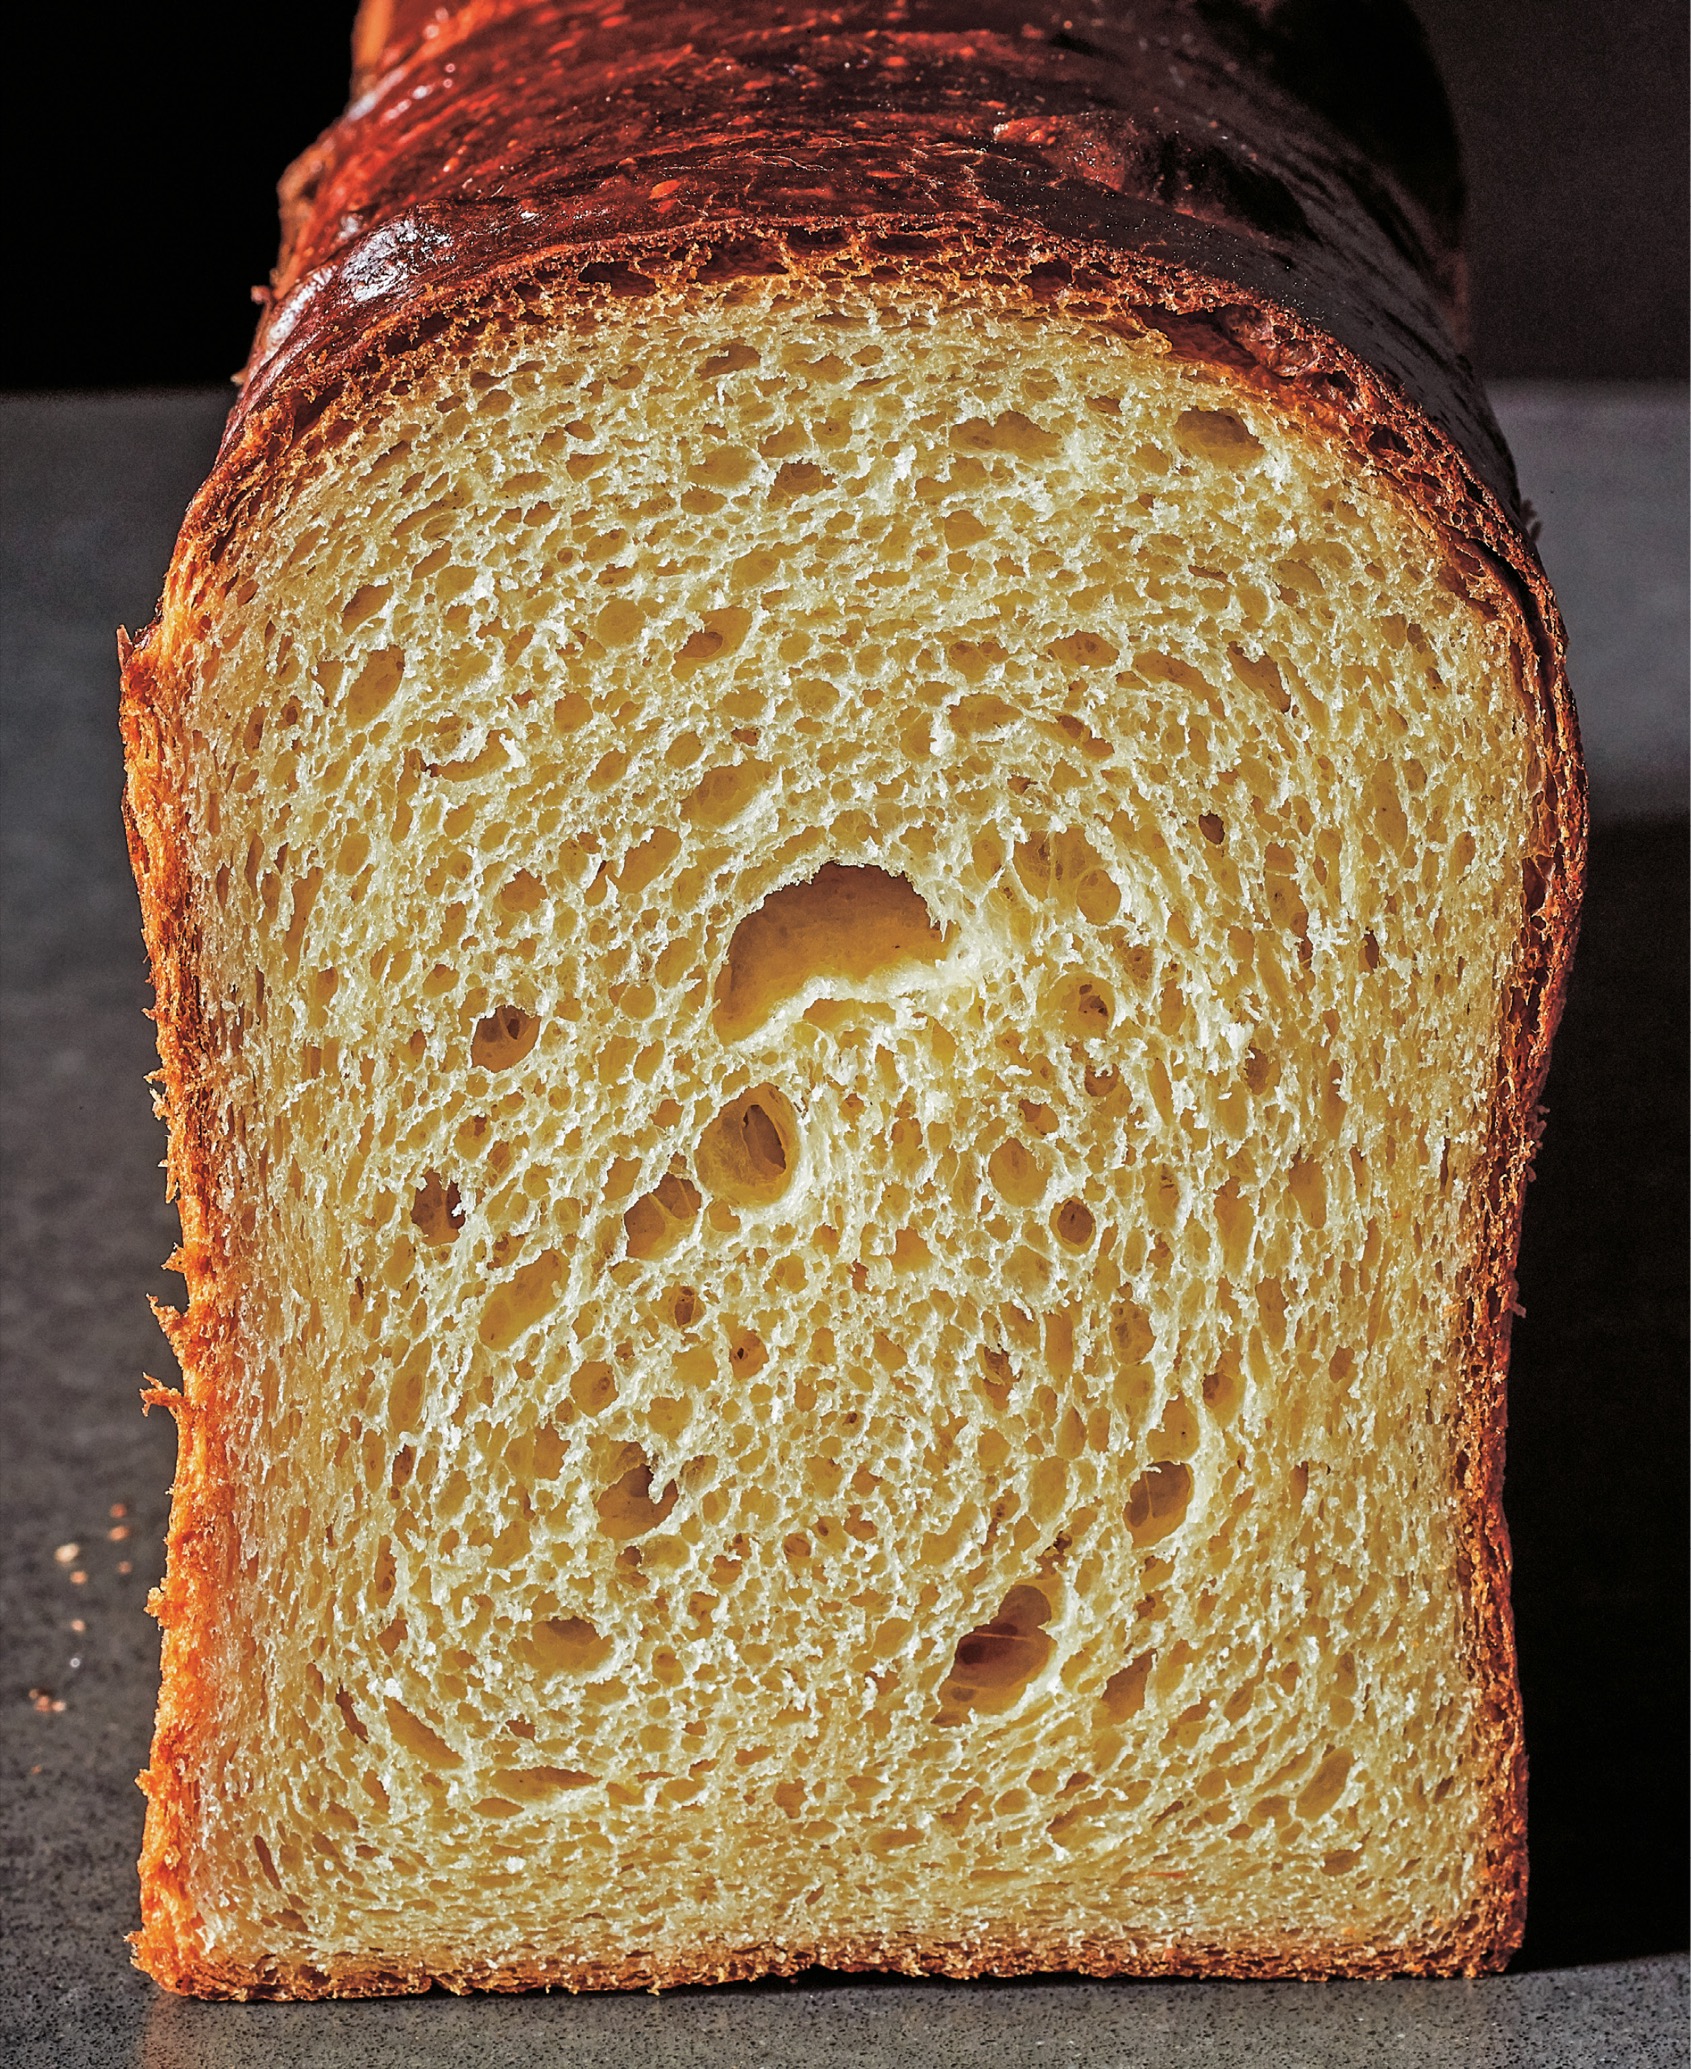
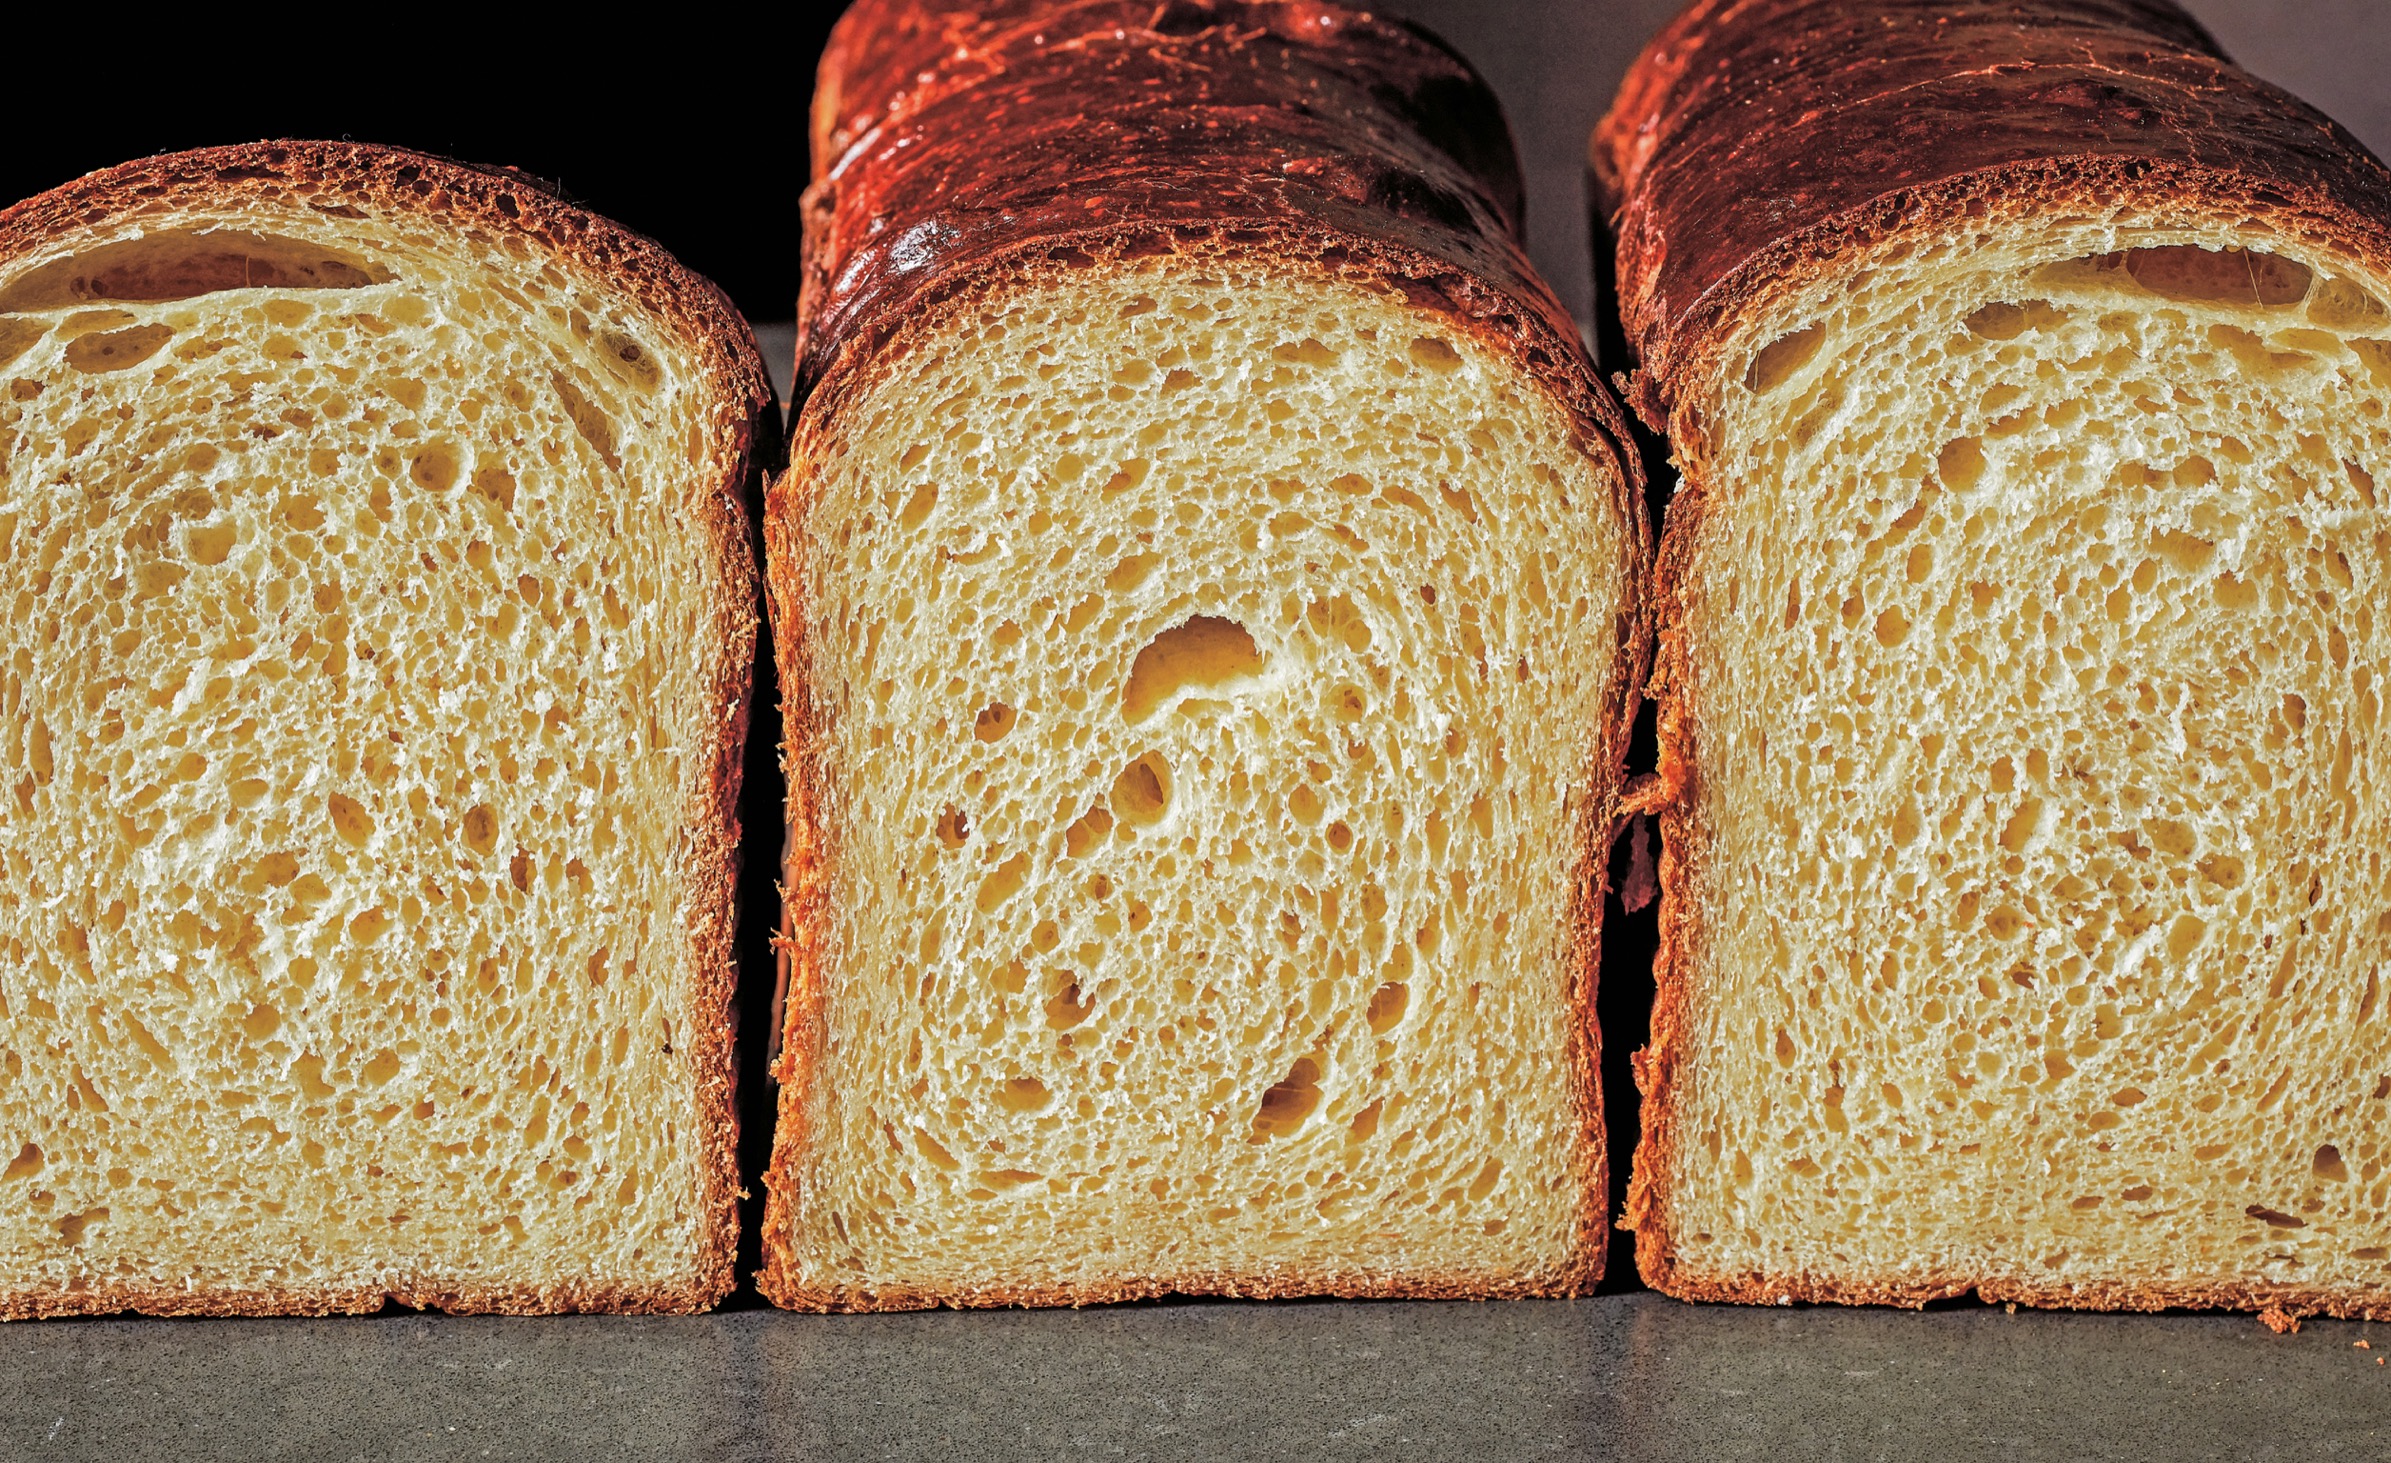
Whole-Wheat Pain au Lait Pullman
Makes 1 (13-inch) loaf
This is my favorite bread for making toast. I eat it with salted butter and jam, and I also like to use it to make sandwiches. What I particularly like about this loaf is that, where most whole-wheat breads are made with 10 or 20 percent wheat flour and 80 or 90 percent white flour, this one is made with one-third whole-wheat flour, so it has an intense, wheat-y, nutty flavor. The other thing that sets it apart from other whole-wheat loaves is that the dough contains butter. The butter imparts great flavor, of course, and it also gives the bread a delicately crispy exterior. I often give it as a gift: a loaf of bread with a jar of homemade jam—so simple, and people really go crazy for it.
In this recipe, I call for you to pinch off a hunk of the dough before putting the rest in the loaf pan. By giving more space to the dough in the pan, the resulting bread is lighter and airier, with a more delicate crumb. The recipe will leave you with some excess dough to make into dinner rolls. If you’re wondering why I don’t just make the recipe a little bit smaller, it has to do with bread baking, which is done in metric measurements, which means it is scaled larger or smaller in multiples of ten.
Note You will need a 13- x 4-inch Pullman loaf pan to make this.
3¾ cups (450 grams) all-purpose flour
1¾ cups (210 grams) whole-wheat flour
2 teaspoons (6 grams) instant yeast
1 tablespoon plus 1 teaspoon (24 grams) fine sea salt
1½ cups (360 grams) whole milk
¾ cup (128 grams) Sourdough Starter (this page)
2 (100 grams) large eggs
2 tablespoon plus 1 teaspoon (45 grams) mild-flavored honey (such as wildflower or clover)
16 tablespoons (2 sticks, 226 grams) unsalted butter, cubed and softened
Nonstick cooking spray
Mix and ferment the dough
■Combine the all-purpose flour, whole-wheat flour, yeast, and salt and stir to distribute the ingredients.
■Put the milk in a medium saucepan and heat over medium heat, stirring with a wooden spoon, until it is just warm to the touch but not hot (about 90°F). Turn off the heat and transfer the milk to the bowl of a stand mixer. Add the starter, eggs, honey, and dry ingredients.
■Fit the mixer with the dough hook and mix on low speed for 2 minutes. Increase the speed to medium and mix for 5 minutes to develop the gluten. Reduce the speed to low, add the butter, and mix for 7 to 10 minutes, until the butter is mixed in. Turn off the mixer and remove the bowl from the stand. Remove the dough hook and wipe it clean with a wet hand. Cover the bowl with a clean kitchen towel or plastic wrap and set the bowl aside in a warm place to ferment the dough for 2 hours, turning the dough once during that time. To turn the dough, uncover the bowl and use a wet hand to fold the top edge down two-thirds and fold the bottom edge to meet the top edge, so the dough is folded like a letter. Fold the sides inward in the same way to form a sort of ball, then re-cover the bowl.
Turning the dough halfway through the fermentation helps to develop the gluten and distribute the yeast.
Form and proof the loaf
■Lightly spray the insides and the underside of the lid of a 13- x 4-inch Pullman loaf pan with nonstick cooking spray.
■Pinch off a 250-gram piece of the dough (about the size of an orange) and set it aside.
■Using a plastic bowl scraper, scrape the remaining dough out of the bowl into the prepared pan. Wet your hands and use them to pat the dough into the corners of the pan and to even out the surface of the dough. Slide the lid closed on the pan, leaving it cracked open by 1 inch.
■Place the loaf in a warm place for 1½ to 2 hours to proof the dough, until it begins to peek out of the opening in the lid. Close the lid completely and discard any dough that has been pinched off by closing the lid.
Bake the bread
■While the dough is proofing, arrange the oven racks so one is in the center position. Preheat the oven to 375°F.
■Place the loaf on the center rack of the oven to bake for 45 to 50 minutes, until the top is dark golden brown, rotating the pan from front to back halfway through. (To check for doneness, using oven mitts or kitchen towels, slide the Pullman loaf lid open enough to see the color, being careful of any steam that will arise when you open the pan.) Remove the loaf from the oven.
■Using oven mitts or kitchen towels to protect your hands from the heat, immediately slide the lid off the loaf pan. Invert the pan so the bread falls onto a cooling rack. Let the loaf cool completely and slice as desired.
When making bread, start preheating your oven before the dough is finished proofing; if you wait until the dough is ready, it will over proof. Over-proofed bread will grow too large and bake out of the pan. And it will have an unappealing “fluffy” texture, and might also cave in.
Multigrain Loaf
Makes 1 (13-inch) loaf
I call this bread multigrain even though, in reality, it contains more seeds than grains, but whatever you call it, it’s a really beautiful loaf of healthy bread. At Sadelle’s, we used it to make our healthy egg sandwich, which consisted of an egg-white omelet, arugula, and salsa verde. At Walnut Street Café, we used the bread for avocado toast. At home, I like it toasted with French butter, and my son likes it with butter and jam. In other words: it is very versatile.
It is not difficult to make, and the ingredients are not hard to find, but you have to plan ahead, as the grains need to be soaked overnight before you mix the dough; the soaked mixture is referred to as a “soaker.” Starting with a soaker is a traditional bread baker’s technique when baking with whole grains. Dry grains will absorb any water available to them. If you don’t soak them before adding them to bread dough, they will take the water they find in the dough, resulting in bread that is dry, with chewy, undercooked grains in it.
Note You will need a 13- x 4-inch Pullman loaf pan to make this.
For the soaker
½ cup (80 grams) steel-cut oats
⅓ cup (52 grams) polenta
⅓ cup (50 grams) brown flaxseeds
⅓ cup (42 grams) black sesame seeds
1 cup (235 grams) water (95°F to 100°F)
For the dough
3 cups (360 grams) bread flour
2⅓ cups (245 grams) spelt flour
1 tablespoon (18 grams) fine sea salt
2 teaspoons (6 grams) instant yeast
1¾ cups (411 grams) water (about 80°F)
½ cup (85 grams) Sourdough Starter (this page)
Nonstick cooking spray
Make the soaker
■The evening before you want to bake the bread, combine the oats, polenta, flaxseeds, and sesame seeds in a 2-cup (or similar size) container or bowl and stir to combine. Add the water and stir again to distribute the water among the grains and seeds. Cover the container with a lid or plastic wrap and set it aside at room temperature overnight, or for at least 12 hours.
Mix and ferment the dough
■Put the bread flour, spelt flour, salt, and yeast in a medium bowl and stir to combine. Scoop the seed soaker into the bowl of a stand mixer. Add the water and starter, as well as the dry ingredients. Fit the mixer with the dough hook and mix on low speed for 3 minutes. Increase the speed to medium and mix for 2 minutes. Turn off the mixer and remove the bowl from the stand. Remove the dough hook and wipe it clean with a wet hand. Cover the bowl with a clean kitchen towel or plastic wrap and set the dough aside in a warm place for 2 hours to ferment, turning the dough once halfway through that time. To turn the dough, uncover the bowl and use a wet hand to fold the top edge down two-thirds and fold the bottom edge to meet the top edge, so the dough is folded like a letter. Fold the sides inward in the same way to form a sort of ball, then re-cover the bowl.
Form and proof the loaf
■Lightly spray the insides and the underside of the lid of a 13- x 4-inch Pullman loaf pan with nonstick cooking spray.
■Using a plastic bowl scraper, scrape the dough out of the bowl into the prepared pan. Wet your hands and use them to pat the dough into the corners of the pan and to even out the surface of the dough. Slide the lid on the pan, leaving it cracked open by 1 inch.
■Place the loaf in a warm place for about 1 hour, until the dough starts to rise through the lid opening. Close the lid completely and discard any dough that has been pinched off by closing the lid.
Bake the bread
■While the dough is proofing, arrange the oven racks so one is in the center position. Preheat the oven to 400°F.
■Place the loaf on the center rack of the oven to bake for about 50 minutes, until the top is dark golden brown, rotating the pan from front to back halfway through. (To check for doneness, using oven mitts or kitchen towels, slide the Pullman loaf lid open enough to see the color, being careful of any steam that will arise when you open the pan.) Remove the loaf from the oven.
■Using oven mitts or kitchen towels to protect your hands from the heat, immediately slide the lid off the loaf pan. Invert the pan directly onto a cooling rack. Let the loaf cool completely and slice as desired.
Sourdough Brioche Loaf
Makes 1 (13-inch) loaf
This rich, tender bread is great toasted, with butter and jam. It also makes delicious Deep-Fried French Toast (this page).
Note You will need a 13- x 4-inch Pullman loaf pan to make this.
4 cups plus more for dusting (480 grams) all-purpose flour
¼ cup plus 2 tablespoons (76 grams) granulated sugar
2 teaspoons (6 grams) instant yeast
2 teaspoons (12 grams) fine sea salt
5 (250 grams) large eggs
⅓ cup (80 grams) whole milk
1 cup (170 grams) Sourdough Starter (this page)
20 tablespoons (2½ sticks, 283 grams) unsalted butter, cubed and softened
For baking the loaf
1 egg
pinch fine sea salt
Mix and ferment the dough
■Put the flour, sugar, yeast, and salt in a medium bowl and stir to combine the ingredients.
■Put the eggs, milk, and starter in the bowl of a stand mixer and place the dry ingredients on top. Fit the mixer with the dough hook and mix on low speed for 2 to 3 minutes to combine the wet and dry ingredients. Increase the mixer speed to medium and mix for 5 minutes to develop the gluten. Turn off the mixer and wipe the dough hook clean with a wet hand; the dough tends to climb up the hook during the mixing of this dough. Add the butter and mix on low speed until it is incorporated into the dough, 5 to 10 minutes (depending on the softness of the butter), stopping to clean the dough hook with a wet hand once or twice during this time. Turn off the mixer and remove the bowl from the stand. Remove the dough hook and wipe it clean with a wet hand. Cover the bowl with a clean kitchen towel or plastic wrap and set the dough aside in a warm place for 2 hours to ferment, turning the dough once halfway through that time. To turn the dough, uncover the bowl and use a wet hand to fold the top edge down two-thirds and fold the bottom edge to meet the top edge, so the dough is folded like a letter. Fold the sides inward in the same way to form a sort of ball, then re-cover the bowl. After 2 hours, turn the dough again. Cover the bowl and place it in the refrigerator overnight to retard the dough.
Form and proof the loaf
■Lightly dust a large flat work surface with flour. Remove the dough from the refrigerator and uncover it. Use a plastic bowl scraper to scoop the dough out onto the floured work surface. Gently pat the dough into a rectangle about the length of the pan you will be baking it in, with the long edge parallel to you. Use your hands to get underneath the top edge of the dough and fold it down about two-thirds of the way from the top like a letter. Scoop your hands under the bottom edge of the dough (the edge closest to you) and fold it up over the top so the bottom edge is even with the top edge. Lift the dough and flip it over into the pan so the seam is on the bottom. Use your hands to pat the dough into the corners of the pan and even out the surface of the dough.
■Cover the dough with a damp, lightweight kitchen towel and set aside in a warm place for about 3 hours, until the dough has risen and is about ¼ inch from the top rim of the pan.
Bake the bread
■Arrange the oven racks so one is in the center position. Preheat the oven to 350°F.
■Whisk the egg with a pinch of salt to make an egg wash. Brush the top of the loaf with the egg wash; discard the remaining egg wash.
■Put the loaf on the center rack to bake for about 35 minutes, until the top is a beautiful mahogany brown, rotating the pan from front to back halfway through. Remove the loaf from the oven.
■Invert the pan so the loaf falls onto a cooling rack. Turn the loaf right side up and let it cool completely. Slice as desired.

Pull-Apart Parker House Rolls

Makes 15 rolls
When I was at Per Se, Jonathan Benno, the chef de cuisine, tasked me with creating a warm roll for bread service. He told me about the rolls at the restaurant Craftsteak, which he considered the ne plus ultra of Parker House rolls. I studied those rolls and started experimenting with different dough variations. These rolls are still on the menu, ten years later. They’re that good. At home, I prefer a pull-apart shape to a Parker House roll shape, which is mostly a matter of putting the rolls closer together on the baking sheet before baking them. Baking them close together like this keeps them really tender, because the sides stay soft and squishy, and really old-school.
Note You will need a quarter sheet pan (13- x 9½-inches) or a pan of similar dimensions) to make this.
3½ cups plus more for dusting (420 grams) all-purpose flour
2 tablespoons (26 grams) granulated sugar
2 teaspoons (12 grams) fine sea salt
1½ teaspoons (4.5 grams) instant yeast
1 cup (240 grams) whole milk
⅓ cup (57 grams) Sourdough Starter (this page)
1 (50 grams) large egg
12 tablespoons (1½ sticks, 170 grams) unsalted butter, cubed and softened
Nonstick cooking spray
For baking the rolls
3 tablespoons (42 grams) unsalted butter, melted and cooled slightly
Pinch of flaky sea salt
Mix and ferment the dough
■Place the flour, sugar, salt, and yeast in a medium bowl and stir with a whisk to combine the ingredients.
■Place the milk, starter, and egg in the bowl of a stand mixer. Add the dry ingredients. Fit the mixer with the dough hook and mix on low speed for 2 minutes. Increase the mixer speed to medium and mix the dough for about 5 minutes, until it is smooth and no longer sticky. Add the cubed butter and mix on low speed until there are no chunks of butter remaining, 5 to 10 minutes, stopping to scrape down the sides of the bowl if the butter is sticking.
■Turn off the mixer and remove the bowl from the stand. Remove the dough hook and wipe it clean with a wet hand. Cover the bowl with a clean kitchen towel or plastic wrap and set the bowl in a warm place to allow the dough to ferment for 2 hours, turning the dough once halfway through that time. To turn the dough, uncover the bowl and use a wet hand to fold the top edge down two-thirds and fold the bottom edge to meet the top edge, so the dough is folded like a letter. Fold the sides inward in the same way to form a sort of ball, then re-cover the bowl.
■While the dough is fermenting, line a baking sheet with parchment paper and spray the paper with nonstick cooking spray.
■Transfer the dough to the baking sheet and spread it out. Put it in the refrigerator for 1 hour, until it’s chilled and no longer sticky, and up to overnight. (If you are refrigerating the dough overnight, remove the baking sheet from the refrigerator after 1 hour, cover it with plastic wrap, and return it to the refrigerator.)
Shape and proof the rolls
■Spray the bottom and sides of a quarter sheet pan with nonstick cooking spray. Line the pan with parchment paper and spray the parchment with nonstick cooking spray.
■Remove the dough from the refrigerator. Lightly dust a large flat work surface with flour and use a plastic bowl scraper to scrape the dough out of the bowl and onto the floured surface. Lightly dust the top of the dough with flour and use a bench knife to divide the dough into 15 (65-gram) pieces.
■Put one piece of dough in front of you on the work surface. Dust your hands lightly with flour. Gently rest your palm on the dough and roll the dough into a tight round ball. Put the ball on the prepared baking sheet and continue, rolling the rest of the pieces of dough into balls and adding them to the baking sheet, spacing the rounds out evenly with 3 rounds lined up across the short side and 5 lined up on the long side. Cover the balls with a damp, lightweight kitchen towel. Set aside in a warm place to proof the rolls for 2½ to 3 hours, until the rolls are swollen looking and touching each other.
Bake the rolls
■While the rolls are proofing, arrange the oven racks so one is in the center position. Preheat the oven to 350°F.
■Brush the tops of the rolls with half of the melted butter. Reserve the remaining butter.
■Put the baking sheet on the center rack of the oven to bake the rolls for 25 to 30 minutes, until they are light golden brown, rotating the rolls from front to back halfway through. Remove the rolls from the oven and brush with the remaining melted butter. Holding the pan with both hands, tap the pan on a cooling rack to slide the rolls out onto the rack in a single piece. Sprinkle a generous pinch of flaky salt on top of each roll. Serve warm.

Master Recipe for Challah Dough
Makes 1,000 grams dough, enough for 1 Sectional Challah (this page) plus 3 Challah Rolls, 9 Challah Rolls (this page), or 1 Six-Strand Challah Loaf (this page)
Challah is the ultimate Jewish bread. It’s the bread that’s traditionally broken for the Friday Sabbath. There are many different shapes, and I give you instructions here for shaping several different kinds of them; but whatever shape you choose, the important thing is that the bread is torn, not cut with a knife.
I learned to make challah when I was at Per Se, where I inherited an excellent recipe from the baker who came before me. It had egg yolks, whole eggs, water, oil, honey and sugar for sweeteners, flour, salt, and yeast. We would mix the dough, ferment it for two hours, and then shape it into a six-strand braided loaf, and proof and bake it. Because we sold the braided loaf at our Bouchon Bakery, I started retarding the shaped and proofed loaves overnight in the walk-in refrigerator so the overnight baker needed only to pull them out of the refrigerator and bake them. I did this to accommodate our production schedule, but I very quickly noticed that the challah loaves that had been retarded had better flavor, and the very best challahs were made from dough that was retarded before being shaped. I took this knowledge with me to my next job, at Roberta’s. There, in addition to retarding the dough, I increased the proofing time from 2 hours to as long as 4, until the dough was so light it practically deflated when you poked it with your finger. The long proofing time is what makes my challah as light and feathery as it is, where too often challah is tight (a baker’s term for bread that doesn’t have the characteristic open holes that indicate it has been properly proofed) and dry. Even after I’d created a challah that was very flavorful, from retarding the dough, and light and airy, from the long proofing time, I thought it could still be a bit more moist. So, I began adding sourdough starter to the dough, which, consisting of half flour and half water, adds moisture to the bread, and also prolongs the shelf life. In the end, I created a challah that is light and feathery, flavorful, and moist. It is, in my opinion, the best challah I have ever baked.
1¼ cups (188 grams) golden raisins (optional)
4 cups (480 grams) all-purpose flour
2 tablespoons (26 grams) granulated sugar
2 teaspoons (12 grams) fine sea salt
2 teaspoons (6 grams) instant yeast
2 tablespoons (40 grams) mild-flavored honey (such as wildflower or clover)
1 (50 grams) large egg
2 (34 grams) large egg yolks
¼ cup plus 2 tablespoons (83 grams) canola or vegetable oil
⅔ cup (157 grams) water (70°F to 75°F)
⅔ cup (113 grams) Sourdough Starter (this page)

Soak the raisins (if you are using them)
■Place the raisins in a small bowl, cover with hot tap water, and set aside to soak for 10 minutes. Drain the raisins in a strainer and let them sit in the strainer to continue to drain while you mix the dough.
Mix and ferment the dough
■Place the flour, sugar, salt, and yeast in a medium bowl and stir with a whisk to combine. Place the honey, egg, egg yolks, canola oil, water, and starter in the bottom of the bowl of a stand mixer. Then place all of the dry ingredients on top. Fit the mixer with the dough hook attachment and mix on low for 2 minutes. Hold on to the mixing bowl to steady it and increase the speed to medium. Mix on medium for 5 minutes to develop the gluten, holding on to the mixer the entire time; the dough is stiff and can cause the mixer to jump around. Add the raisins, if you are using them, and mix on low speed until they are incorporated.
■Turn off the mixer and remove the bowl from the stand. Remove the dough hook and wipe it clean with a wet hand. Cover the bowl with a clean kitchen towel or plastic wrap and set the bowl in a warm place to allow the dough to ferment for 2 hours, turning the dough halfway through that time and again after 2 hours. To turn the dough, uncover the bowl and use a wet hand to fold the top edge down two-thirds and fold the bottom edge to meet the top edge, so the dough is folded like a letter. Fold the sides inward in the same way to form a sort of ball, then re-cover the bowl. Place the dough in the refrigerator overnight or for at least 8 hours to retard the dough.
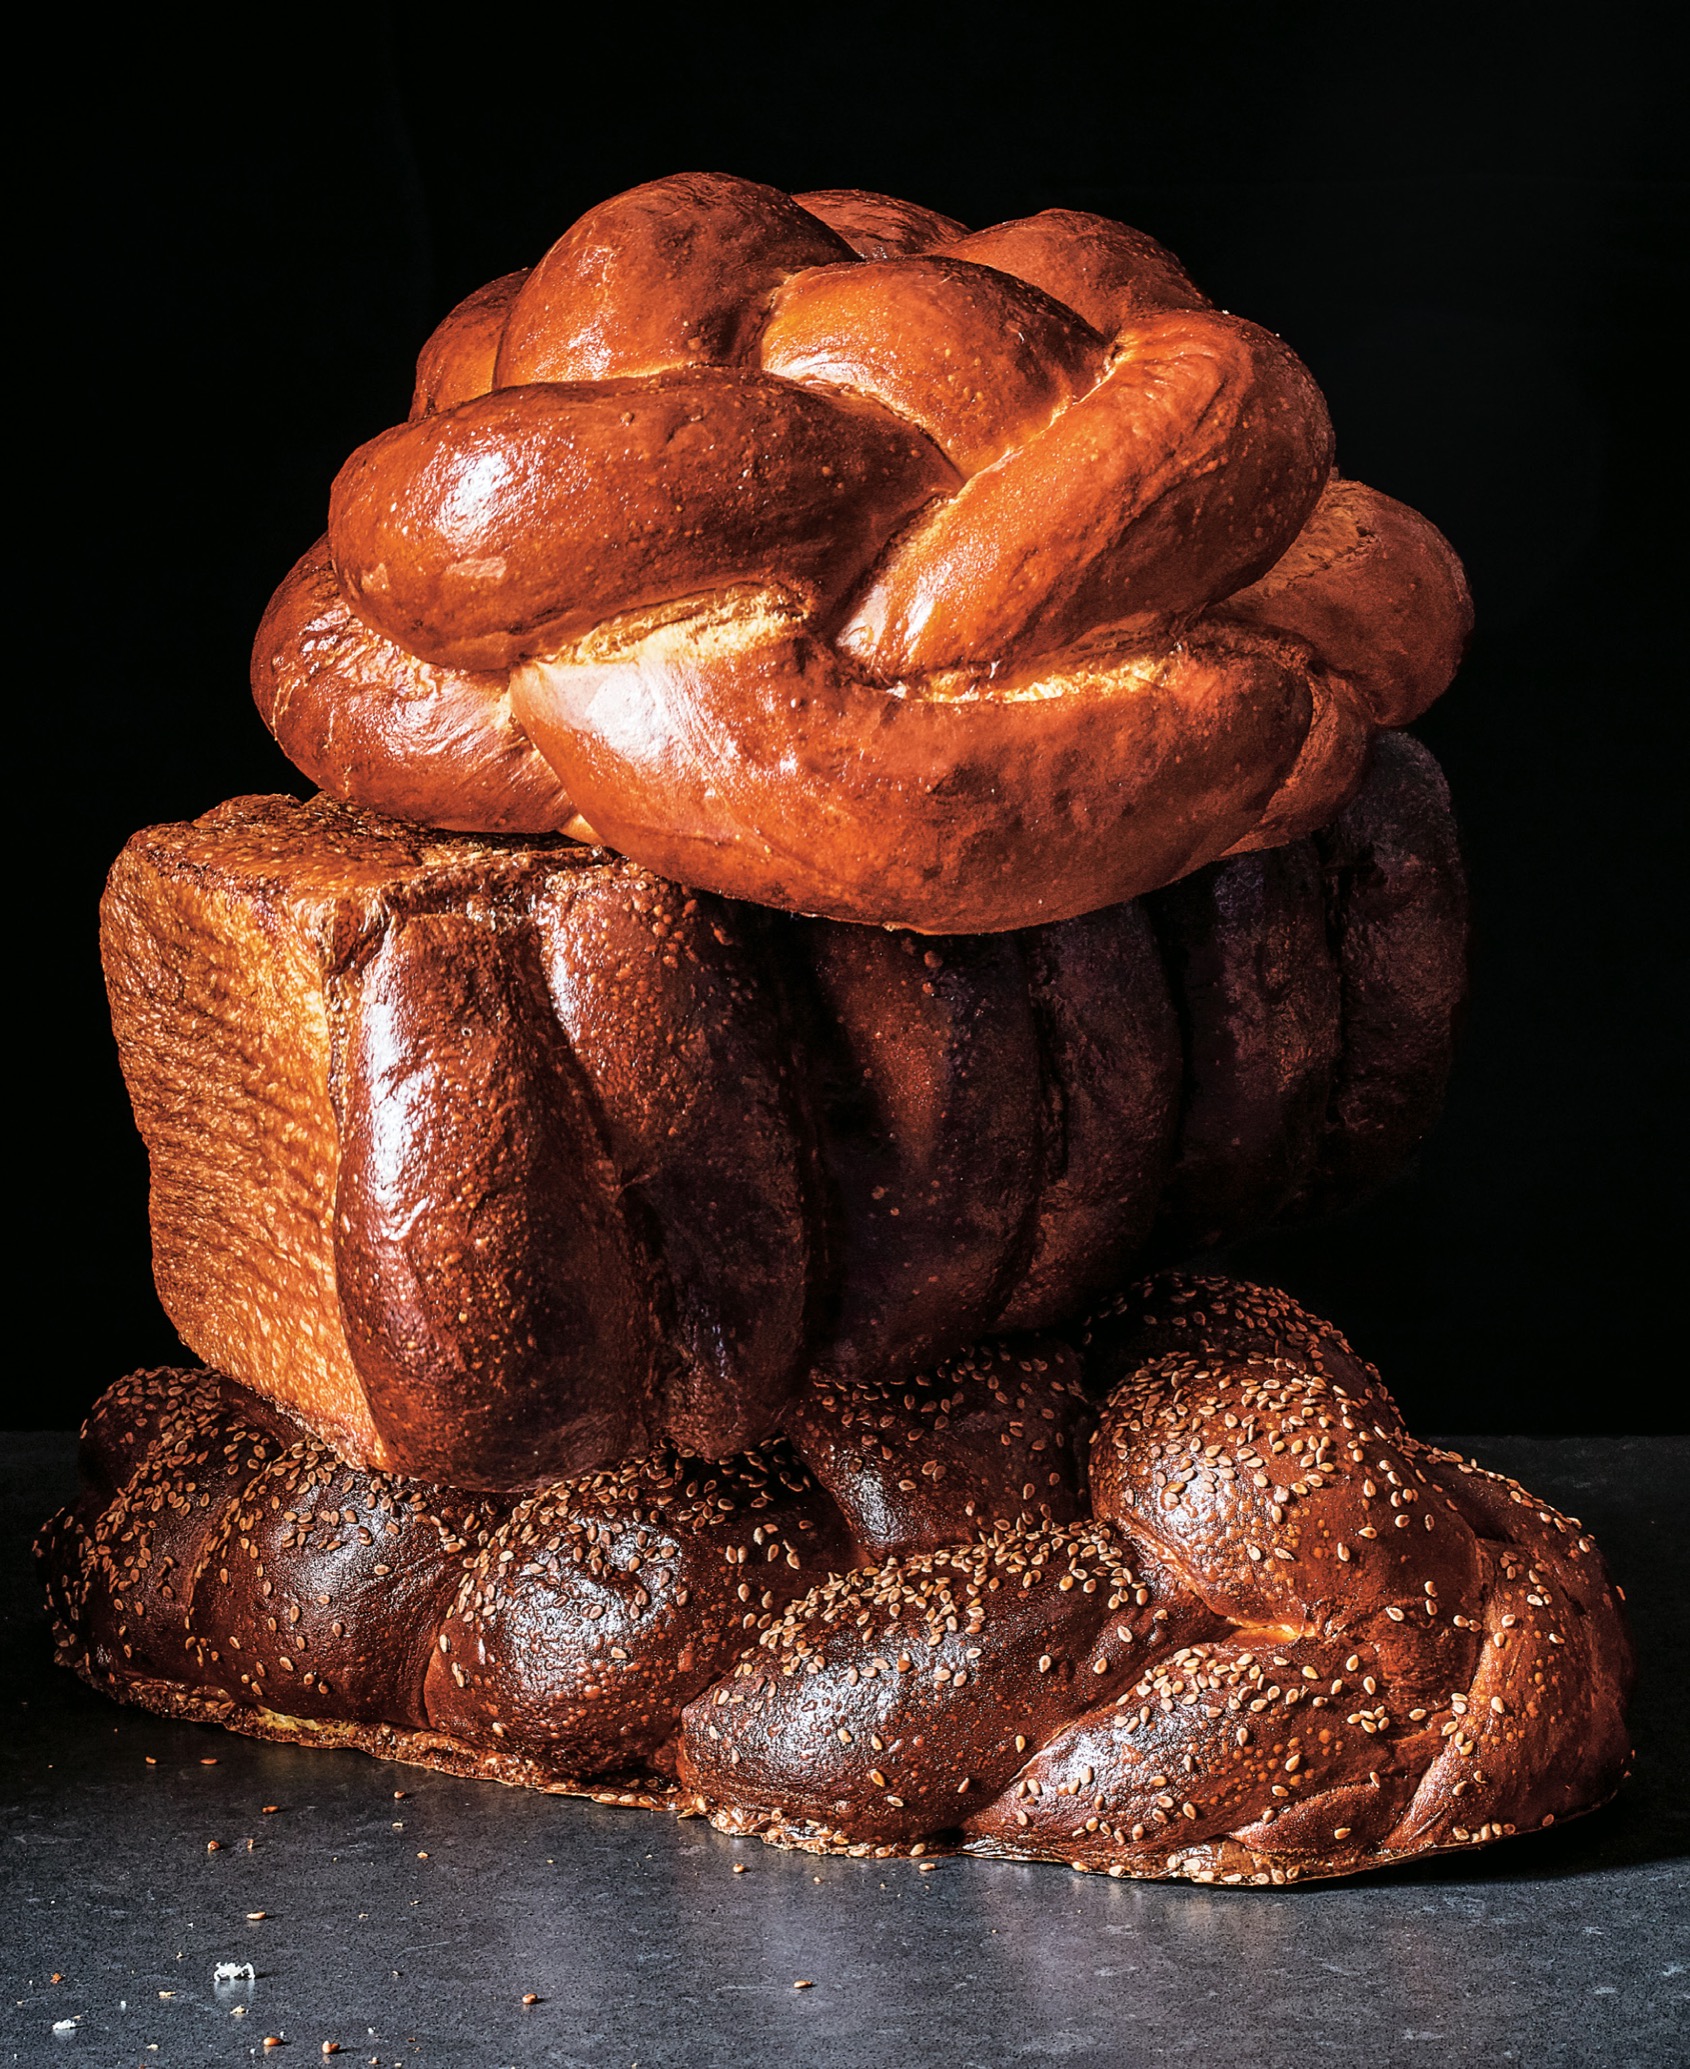
Sectional Challah

Make 1 (9-inch) loaf
Challah is customarily ripped rather than sliced, so it is traditionally formed into pull-apart shapes. A six-stranded challah is the most ubiquitous and also considered the most symbolic. But challah doesn’t need to be limited to that shape. The way a pull-apart loaf works is that when you put balls or logs of dough together in a pan, they proof and grow into each other, so they form a cohesive loaf, but the individual pieces of dough maintain their structure, so they can be easily pulled apart. I had seen brioche shaped like this; called “Brioche Nanterre,” it is comprised of separate balls. When I saw something similar at Walls’ Bake Shop, a classic Jewish bakery on Long Island, it was a eureka moment. The Walls’ challah was comprised of logs rather than balls, creating rip-apart slices, which seemed like a fun way to enjoy French toast. I also knew it would save the bakery a lot of time, because it is a lot quicker to shape logs than it is to braid a six-strand loaf. For the same reason, this is a convenient way of shaping challah for the home cook.
Note You will need a 9- x 4-inch Pullman loaf pan (or a 9- x 4-inch standard loaf pan) to make this.
Nonstick cooking spray
1 recipe (1,000 grams) Master Recipe for Challah Dough (this page)
All-purpose flour for dusting
For baking the challah
1 large egg
Pinch fine sea salt
Get prepared
■Spray the bottom and insides of a 9- x 4-inch Pullman loaf pan (or a 9- x 4-inch standard loaf pan) with nonstick cooking spray.
■Remove the dough from the refrigerator, uncover it, and use a plastic bowl scraper to scrape it onto a flour-dusted flat work surface. Lightly dust the top of the dough with flour and use a bench knife to cut the dough into 9 (110-gram) pieces.
Shape the challah
■Put one piece of dough on the work surface. Dust your hands lightly with flour. Gently rest your palm on the dough and roll the dough into a tight round ball. Place the ball on a lightly flour-dusted corner of your work surface, away from where you are rolling, and continue rolling the remaining pieces of dough into balls and moving them aside to rest. (If you don’t have enough space on your counter, place the balls on a flour-dusted baking sheet instead.) Let the balls rest for 10 to 15 minutes to allow the gluten to relax.
■Lightly dust your hands with flour and pick up one ball of dough. Put the ball on your work surface and gently press on it with the palm of your hand to flatten it into a thick pancake. Using both hands, pick up the top edge of the round and fold it down by one-fourth, pinching the top edge into the log with the tips of your fingers. Repeat, moving the top edge toward the center and pinching it into the dough. Do this two or three more times, until you reach the bottom of the log. (This is a classic bread baker’s shaping technique to create tension in the dough, which helps the dough proof more uniformly.)
■Roll out the log until it is 4 inches long (the width of your pan), dusting your hands very lightly with flour if the dough is sticking to the work surface. Lay the log widthwise in the prepared loaf pan. Repeat, rolling the remaining balls into tight logs and adding them to the pan one at a time and stopping once you have filled the pan with 6 logs. (Roll the remaining balls into logs and shape them to make Challah Rolls, this page.)
Proof and bake the challah
■Spray a sheet of plastic wrap with nonstick cooking spray and lay it, sprayed side down, on the pan. Set the loaf aside in a warm place to proof for about 3 hours, until the dough has risen to just below the rim of the pan.
■While the challah is proofing, arrange the oven racks so one is in the center position. Preheat the oven to 350°F.
■Whisk the egg with the salt to make an egg wash. Uncover the loaf pan and brush the wash generously over the challah; discard the remaining egg wash.
■Put the challah on the center rack of the oven to bake for 35 to 40 minutes, until the top is a deep caramel color and the loaf emits a hollow sound when you tap on the bottom with your finger, rotating the loaf pan from front to back halfway through the baking time. Remove the loaf from the oven and let it cool slightly in the loaf pan. Invert the pan so the loaf falls onto a cooling rack. Turn the loaf right side up and cool completely.

Challah Rolls
Makes 9 rolls
This is a traditional challah roll shape. The rolls are made to resemble a knot and are very pretty.
All-purpose flour for dusting
1 recipe (1,000 grams) Master Recipe for Challah Dough (this page)
For baking the rolls
1 large egg
Pinch fine sea salt
Get prepared
■Line two baking sheets with parchment paper and set aside.
■Remove the dough from the refrigerator, uncover it, and use a plastic bowl scraper to scrape it onto a flour-dusted flat work surface. Lightly dust the top of the dough with flour and use a bench knife to cut into 9 (110-gram) pieces.
Shape the challah
■Put one piece of dough on the work surface. Dust your hands lightly with flour. Gently rest your palm on the dough and roll the dough into a tight round ball. Place the ball in a flour-dusted corner of your work surface, away from where you are rolling, and continue, rolling the remaining pieces of dough into balls and moving them aside to rest. (If you don’t have enough space on your counter, place the balls on a flour-dusted baking sheet instead.) Let the balls rest for 10 to 15 minutes to allow the gluten to relax.
■Lightly dust your hands with flour and pick up one ball of dough. Put it on your work surface and gently press with the palm of your hand to flatten it into a thick pancake. Using both hands, pick up the top edge of the round and fold it down by one-fourth, pinching the top edge into the log with your fingertips. Repeat, moving the top edge toward the center and pinching it into the dough. Do this two or three more times, until you reach the bottom of the log.
This classic bread baker’s shaping technique creates tension in the dough, which helps it proof more uniformly. The tension also works the gluten, helping your bread expand to its fullest potential.
■Lightly dust a flat work surface and your hands with flour. (You want to have enough flour on your hands so that the dough is not sticking to your hands or the counter, but not so much that the dough slides on the work surface; you need tension between the dough and the work surface to shape the dough.) Place one log on the work surface and roll it under the palms of both hands into a 12-inch-long strand. Dust a space to the side of where you are working and place the strand there to rest. (If you do not have room on your counter for the strands, put them on a flour-dusted baking sheet.) Roll all the remaining logs into strands and move them to the side with the first one.
■Pick up one strand and lay it parallel to you. Cross the ends of the strand over each other into a loose circle, adjusting the “tail” of the top end so it is longer than the other. Bring the “tail” over, down, and back up through the hole in the center of the circle like you are starting to tie a knot. Loop this end again over, around the outside, and up through the middle of the circle, popping up like a little knob out of the center. Pull the other end of dough down through the center hole, so the knob of this end pokes through the bottom. Lay the roll on a prepared baking sheet. Repeat, forming the remaining strands into rolls and placing them on the baking sheets, leaving about 3 inches between each.
Proof and bake the rolls
■Cover the rolls with a damp, lightweight kitchen towel and proof for 2 hours, until a roll holds the indentation of a fingertip poked into its side.
■While the rolls are proofing, arrange the oven racks so one is in the top third of the oven and the other is in the bottom third. Preheat the oven to 350°F.
■Whisk the egg with the salt to make an egg wash. Uncover the rolls and brush the wash generously over them; discard the remaining egg wash.
■Put one baking sheet of challah rolls on each oven rack and bake for 25 to 30 minutes, until the tops are a deep caramel color and the rolls emit a hollow sound when you tap on the bottom of one with your finger, rotating the baking sheets from front to back and from one rack to the other halfway through the baking time. Remove the baking sheets from the oven and place them on cooling racks; let the challah rolls cool on the baking sheets.

Six-Strand Challah Loaf
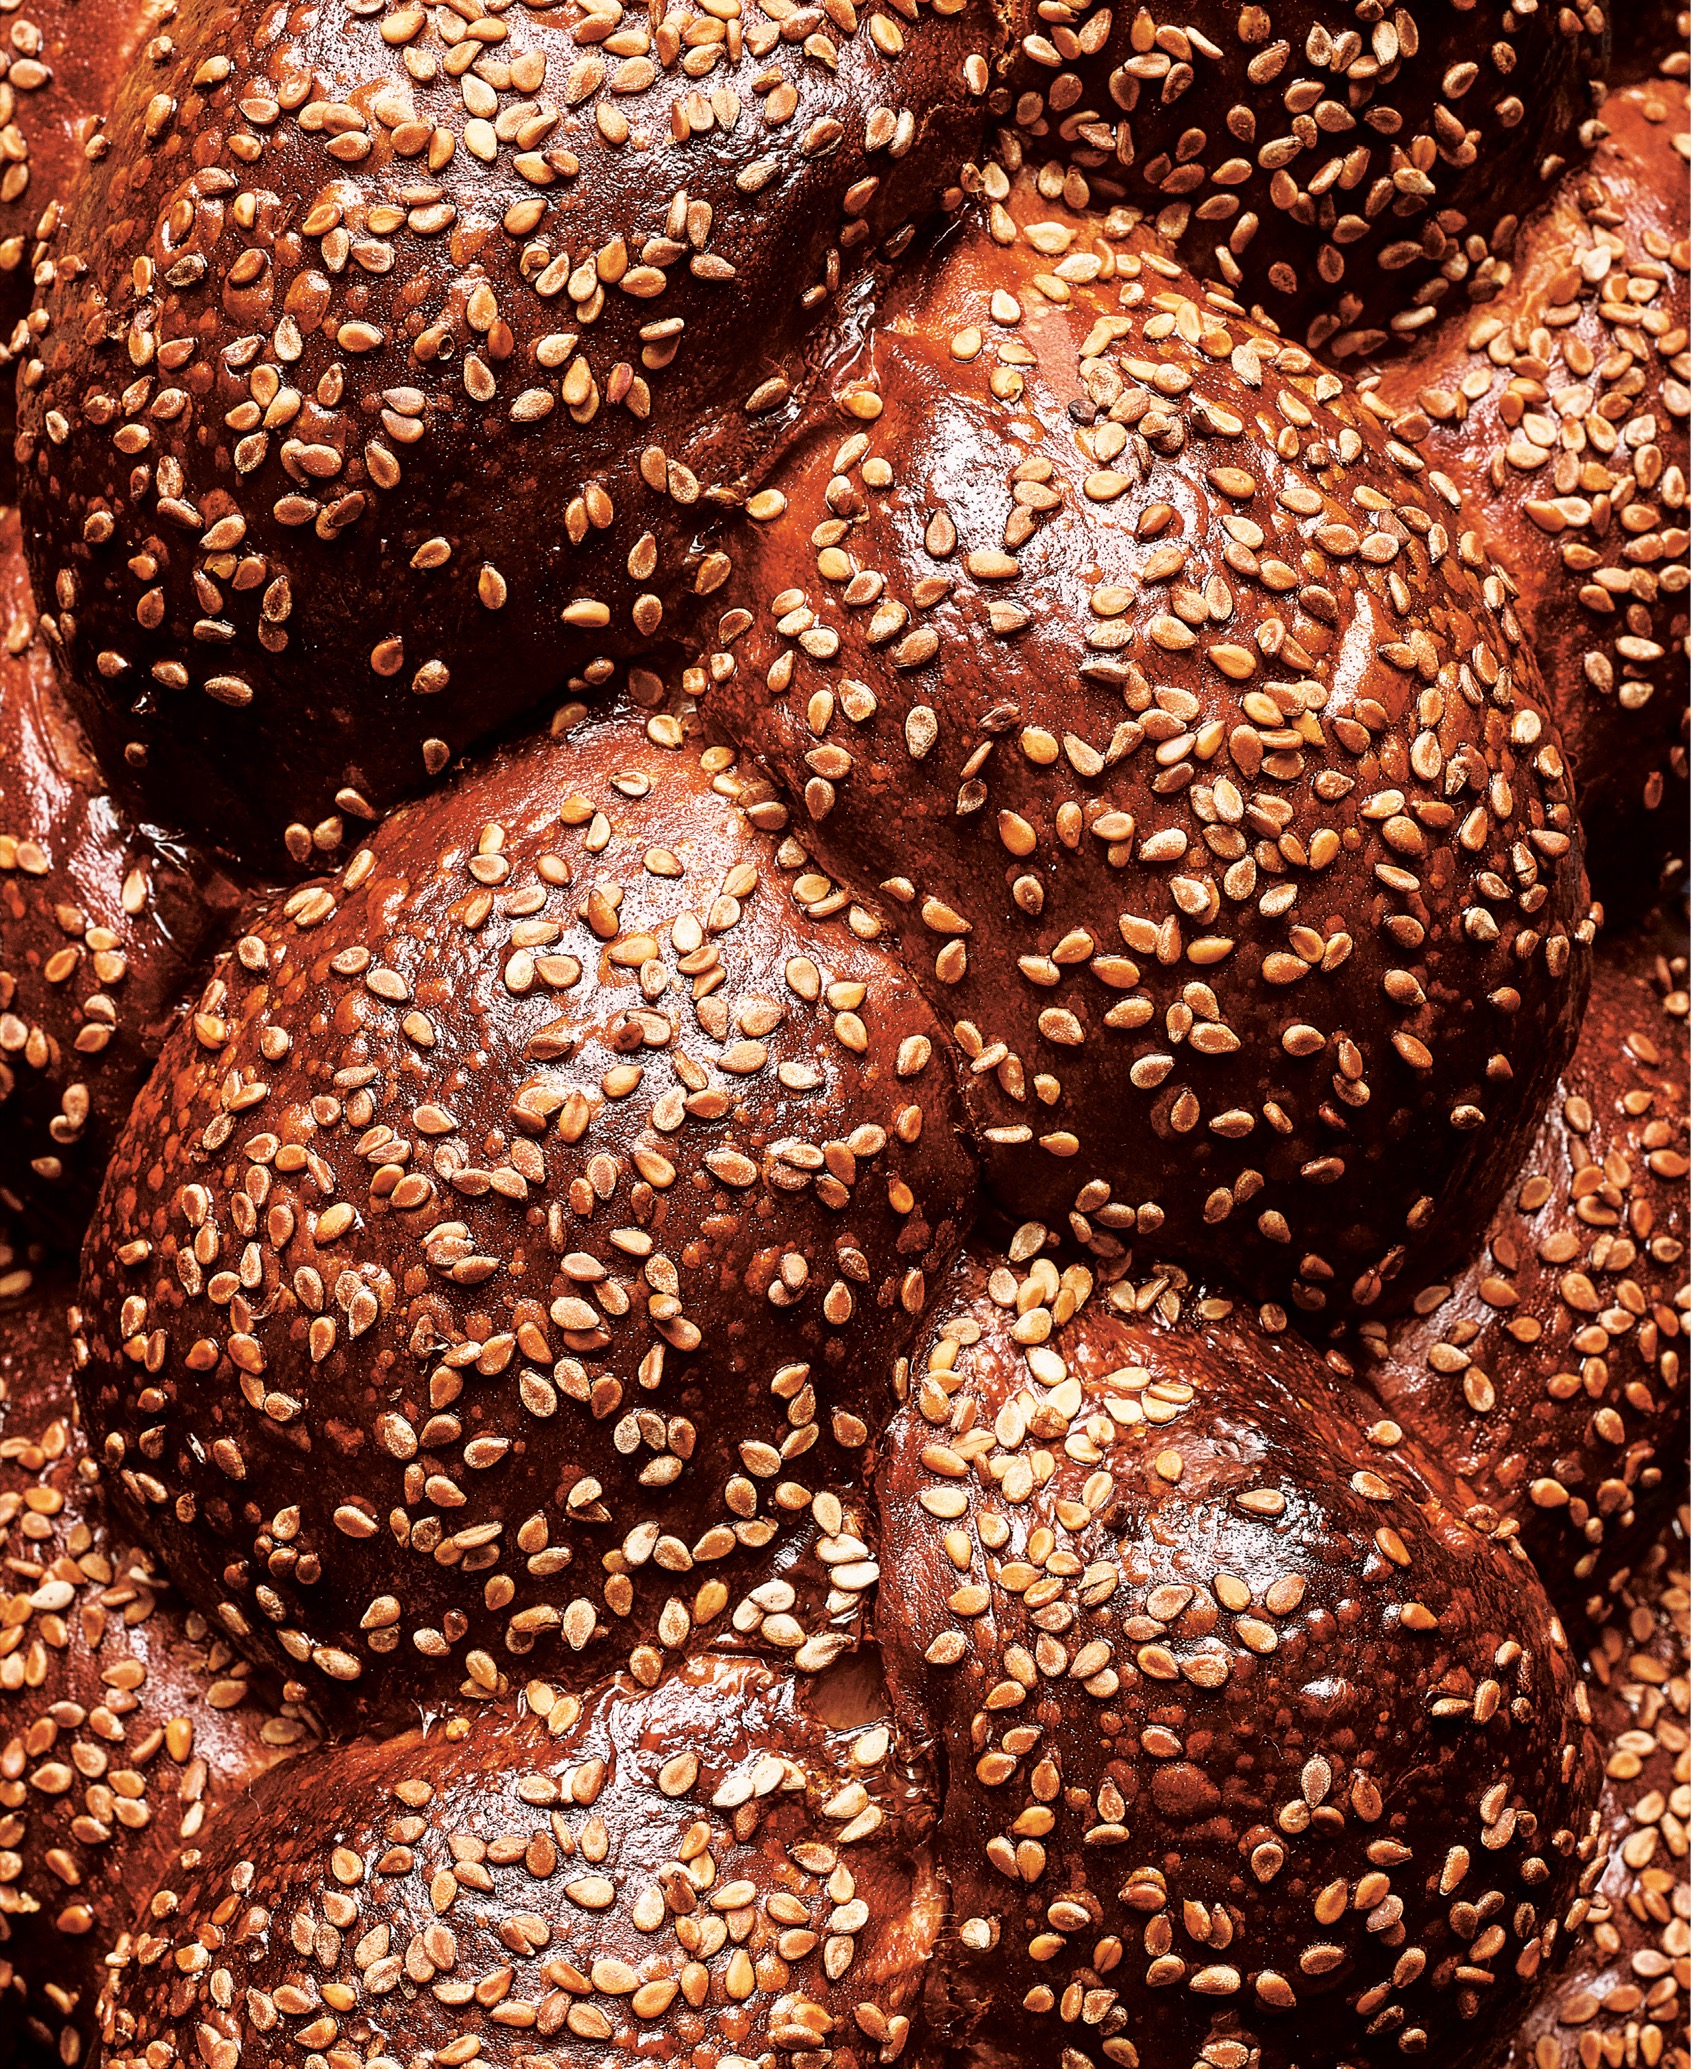
Makes 2 loaves
A six-strand braided loaf is the classic, iconic challah shape. At Roberta’s, we offered it only on Fridays, and it was so popular, we sold out every week. Enjoy it as a dinner bread. I love a fried egg and cheese sandwich on toasted challah.
This loaf takes 3 to 4 hours to proof. Dough proofs from the outside in, so a large loaf like this takes longer to proof than, say, a roll. What’s more, because this challah is formed into long strands that are fairly tightly braided, the gluten in the dough has been worked significantly, which adds to the proofing time. The long proofing time results in light, feathery challah, so be patient. Slow bread equals good bread.
This recipe calls for you to top the dough with natural sesame seeds, which leave the hull still intact. These are used often in bread baking, but they can be hard to find for the home cook. You can find them on Nuts.com, or the best option in grocery stores are Japanese toasted sesame seeds, which come in a shaker canister. These have the hull intact and they’re really flavorful. (The seeds come in black and white; use white for this.) The difference is that the Japanese seeds are lightly toasted, but this won’t affect your baked goods. What you don’t want are the pearly white hulled sesame seeds, which don’t have the same delicious flavor.
For the challah braid
1 recipe (1,000 grams) Master Recipe for Challah Dough (this page)
All-purpose flour for dusting
For baking the challah
½ cup (70 grams) natural white sesame seeds
1 large egg
Pinch fine sea salt
Get prepared
■Remove the dough from the refrigerator, uncover it, and use a plastic bowl scraper to scrape it onto a flour-dusted flat work surface. Lightly dust the top of the dough with flour and use a bench knife to cut the dough into 12 (80-gram) pieces.
Shape the dough into strands
■Put one piece of dough on the work surface. Dust your hands lightly with flour. Gently rest your palm on the dough and roll the dough into a tight round ball. Place the ball in a flour-dusted corner of your work surface, away from where you are rolling, and continue rolling the remaining pieces of dough into balls and moving them aside to rest. (If you don’t have enough space on your counter, place the balls on a flour-dusted baking sheet instead.) Let the balls rest for 10 to 15 minutes to allow the gluten to relax.
■Lightly dust your hands with flour and pick up one ball of dough. Put the ball on your work surface and gently press on it with the palm of your hand to flatten it into a thick pancake. Using both hands, pick up the top edge of the round and fold it down by one-fourth, pinching it into the dough log with the tips of your fingers. Repeat, moving the top edge toward the center and pinching it into the dough, two or three more times until you reach the bottom of the log.
■Lightly dust a flat work surface and your hands with flour. (You want to have enough flour on your hands so that the dough is not sticking to your hands or the counter, but not so much that the dough slides back and forth on the work surface; you need tension between the dough and the work surface to shape the dough.) Place one log on the work surface and roll it under the palms of both hands into a 12-inch-long strand. Dust a space to the side of where you are working and place the strand there to rest. (If you do not have room on your counter for the strands, put them on a flour-dusted baking sheet.) Roll all the remaining logs into strands and move them to the side with the first one.
Braid the strands
■Lay 6 of the strands side by side perpendicular to you on your work surface. Pinch the strands together at the top, and then move the 3 strands on the left to the left and the 3 on the right to the right to create two sections of strands.
■Move the bottom of the outer right strand diagonally up to the left so it begins to form an X. Move the outer left strand diagonally to the upper right quadrant to form an X, with 4 strands on the bottom and 2 on the top. Next, pick up the strand in the upper left quadrant, and bring it diagonally down to the center, placing it inside the 2 strands that are on the bottom right. Take the outermost right strand on the bottom of the X and move it up and across diagonally so that it is in the upper left quadrant.
■Pick up the strand in the upper right quadrant of the X and move it diagonally downward, to the center, placing it inside the 2 strands that are on the bottom left. Take the outermost left strand on the bottom and move it up and across diagonally so that it is in the upper right quadrant.
■Continue braiding in this way, moving the upper left strand down to the center and the bottom outer right strand up and then moving the upper right strand down to the center and the bottom outer left strand up until the challah is braided. Once you’ve braided as far as you can go, pinch the ends together. Use the edge of your hand to press down on the end of the challah and make a sawing motion to pinch off the end. This makes a tight, clean end to the braid. Do the same on the other side of the challah.
■Slide your hands under the challah and gently push the two ends of the challah closer together so that the challah is not too long and skinny. Set aside while you braid the second challah in the same way.
Do not tug on the strands as you braid. They become shorter as you go, and they will feel awkward and you will want to pull on them to make it easier to braid, but don’t. Doing it will cause the challah to look less like a braid and more like a lobster.
Finish the challah loaves
■Line two baking sheets with parchment paper.
■Place the sesame seeds in a large shallow bowl. Whisk the egg and salt together in a small bowl to make an egg wash.
■Brush both challah loaves with egg wash. Cover the bowl and refrigerate the remaining egg wash. You will use it again later, after the challah proofs. Pick up one loaf and place the top in the bowl of seeds. Move the challah around to coat the top all over with the seeds. Picking it up by the bottom so you don’t disturb the seed coating, place the challah loaf diagonally on one of the prepared baking sheets. Dip the second challah in the sesame seeds and place it on the second baking sheet.
Proof and bake the loaves
■Cover the loaves with damp, lightweight kitchen towels and proof for 3 to 4 hours, until the dough holds the indentation of a fingertip poked into the side.
When challah is properly proofed, it will feel almost as if it wants to deflate when you poke it with your finger.
■While the challah loaves are proofing, arrange the oven racks so one is in the top third and the other is in the bottom third. Preheat the oven to 350°F.
■Uncover the loaves and brush the wash generously over them; discard the remaining egg wash.
■Place one baking sheet on each oven rack and bake the loaves for 30 to 35 minutes, until the tops are a deep caramel color and the loaves emit a hollow sound when you tap on the bottom with your finger, rotating the baking sheets from front to back and from one rack to the other halfway through the baking time. Remove the baking sheets from the oven and place them on cooling racks to cool.

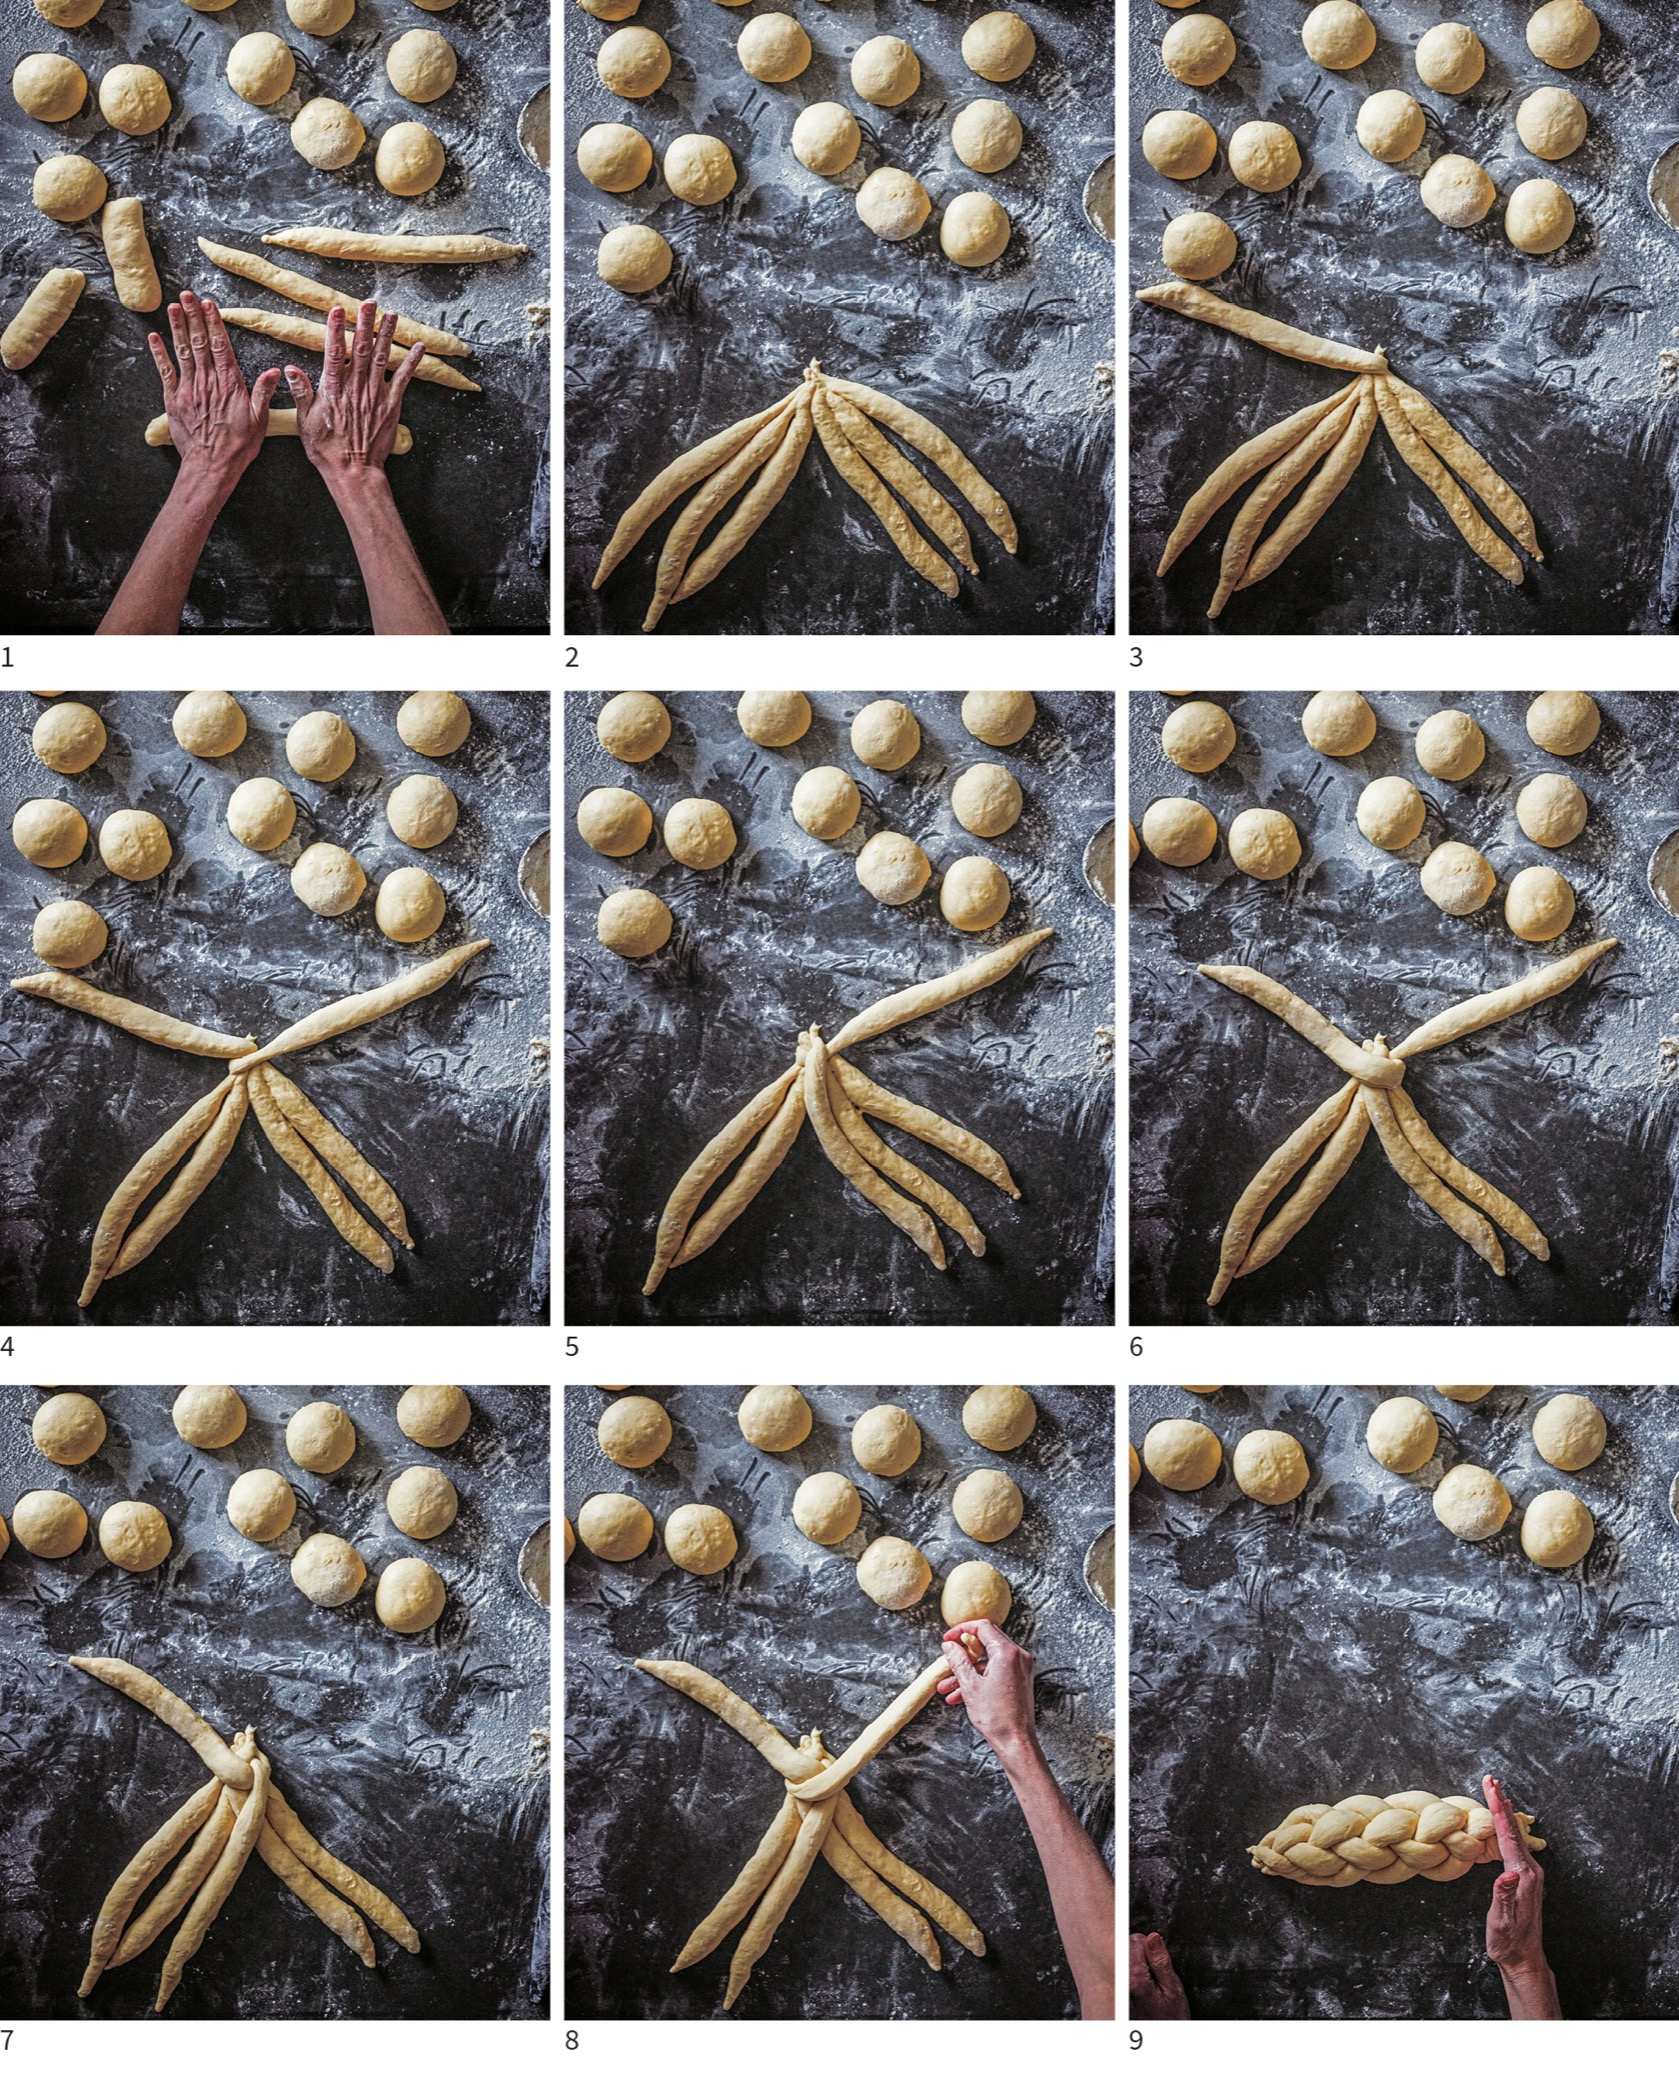

Challah Crowns
Makes 2 crowns
This is a really classic shape for challah, which my friend Joe Bowie taught me how to make. It is traditionally served for Rosh Hashanah, the Jewish New Year, to represent how things come full circle.
1 recipe (1,000 grams) Master Recipe for Challah Dough (this page)
All-purpose flour for dusting
For baking the challah
1 large egg
Pinch fine sea salt
Get prepared
■Remove the dough from the refrigerator, uncover it, and use a plastic bowl scraper to scrape it onto a flour-dusted flat work surface. Lightly dust the top of the dough with flour and use a bench knife to cut the dough into 8 (125-gram) pieces.
Shape the dough into strands
■Put one piece of dough on the work surface. Dust your hands lightly with flour. Gently rest your palm on the dough and roll the dough to create a tight round ball. Place the ball in a flour-dusted corner of your work surface, away from where you are rolling, and continue rolling the remaining pieces of dough into balls and moving them aside to rest. (If you don’t have enough space on your counter, place the balls on a flour-dusted baking sheet instead.) Let the balls rest for 10 to 15 minutes to allow the gluten to relax.
■Lightly dust your hands with flour and pick up one ball of dough. Put the ball on your work surface and gently press on it with the palm of your hand to flatten it into a thick pancake. Using both hands, pick up the top edge of the round and fold it down by one-fourth, pinching it into the dough log with the tips of your fingers. Repeat, moving the top edge toward the center and pinching it into the dough, two or three more times until you reach the bottom of the log.
■Lightly dust a flat work surface and your hands with flour. (You want to have enough flour on your hands so that the dough is not sticking to your hands or the counter, but not so much that the dough slides on the work surface; you need tension between the dough and the work surface to shape the dough.) Place one log on the work surface and roll it under the palms of both hands into a 15-inch-long strand. Dust a space to the side of where you are working and place the strand there to rest. (If you do not have room on your counter for the strands, put them on a flour-dusted baking sheet.) Roll all the remaining logs into strands and move them to the side with the first one.
Weave the crown
■Line two baking sheets with parchment paper. Lay 2 of the strands 1 inch apart, parallel to you on your work surface. Lay the remaining 2 strands 1 inch apart, across the first 2 strands in a tic-tac-toe formation.
■To start the weave pattern, lift up the parallel rope that is farthest from you and slide the perpendicular rope on the right side underneath it so the 2 are woven together. Do the opposite on the other side, slipping the perpendicular rope on the left side underneath the parallel rope that is closest to you.
■As you weave the crown, you will first move 360 degrees clockwise and then 360 degrees counterclockwise. Take the top left perpendicular rope and move it over the top right perpendicular rope, bending it at a 90-degree angle so it is parallel to you. Take the top right parallel rope and move it over the bottom right parallel rope, bending it 90 degrees so it is perpendicular to you. Take the bottom right perpendicular rope and cross it over the bottom left perpendicular rope, bending it 90 degrees to the left so that it is parallel to you. Finally, take the bottom left parallel rope, cross it over the top left parallel rope, and move it up 90 degrees. This is one rotation.
■Repeat this rotation in a counterclockwise direction, starting first with the top right perpendicular rope, crossing it over the top left perpendicular rope, and moving it to the left 90 degrees so that it is parallel to you. Repeat this pattern to complete the rotation.
■After you have completed one clockwise rotation and one counterclockwise rotation, you should be able to complete one more clockwise rotation and then you will run out of room to weave. When you have no more room to weave, pull the ends of the strands underneath the crown and pinch them together. Place the crown on a prepared baking sheet. Repeat, weaving the second crown with the remaining dough strands and placing the crown on the second prepared baking sheet.
Proof and bake the crowns
■Cover the crowns with damp, lightweight kitchen towels and proof for 3 hours, until the dough holds the indentation of a fingertip poked into their sides.
■While the crowns are proofing, arrange the oven racks so one is in the top third of the oven and the other is in the bottom third. Preheat the oven to 350°F.
■Whisk the egg with the salt to make an egg wash. Uncover the crowns and brush the wash generously over them; discard the remaining egg wash.
■Place one baking sheet on each oven rack to bake the challah crowns for 30 to 35 minutes, until the tops are a deep caramel color and the crowns sound hollow when you tap their undersides with your finger, rotating the baking sheets from front to back and from one rack to the other halfway through the baking time. Remove the baking sheets from the oven and place them on cooling racks; let the crowns cool on the baking sheets.

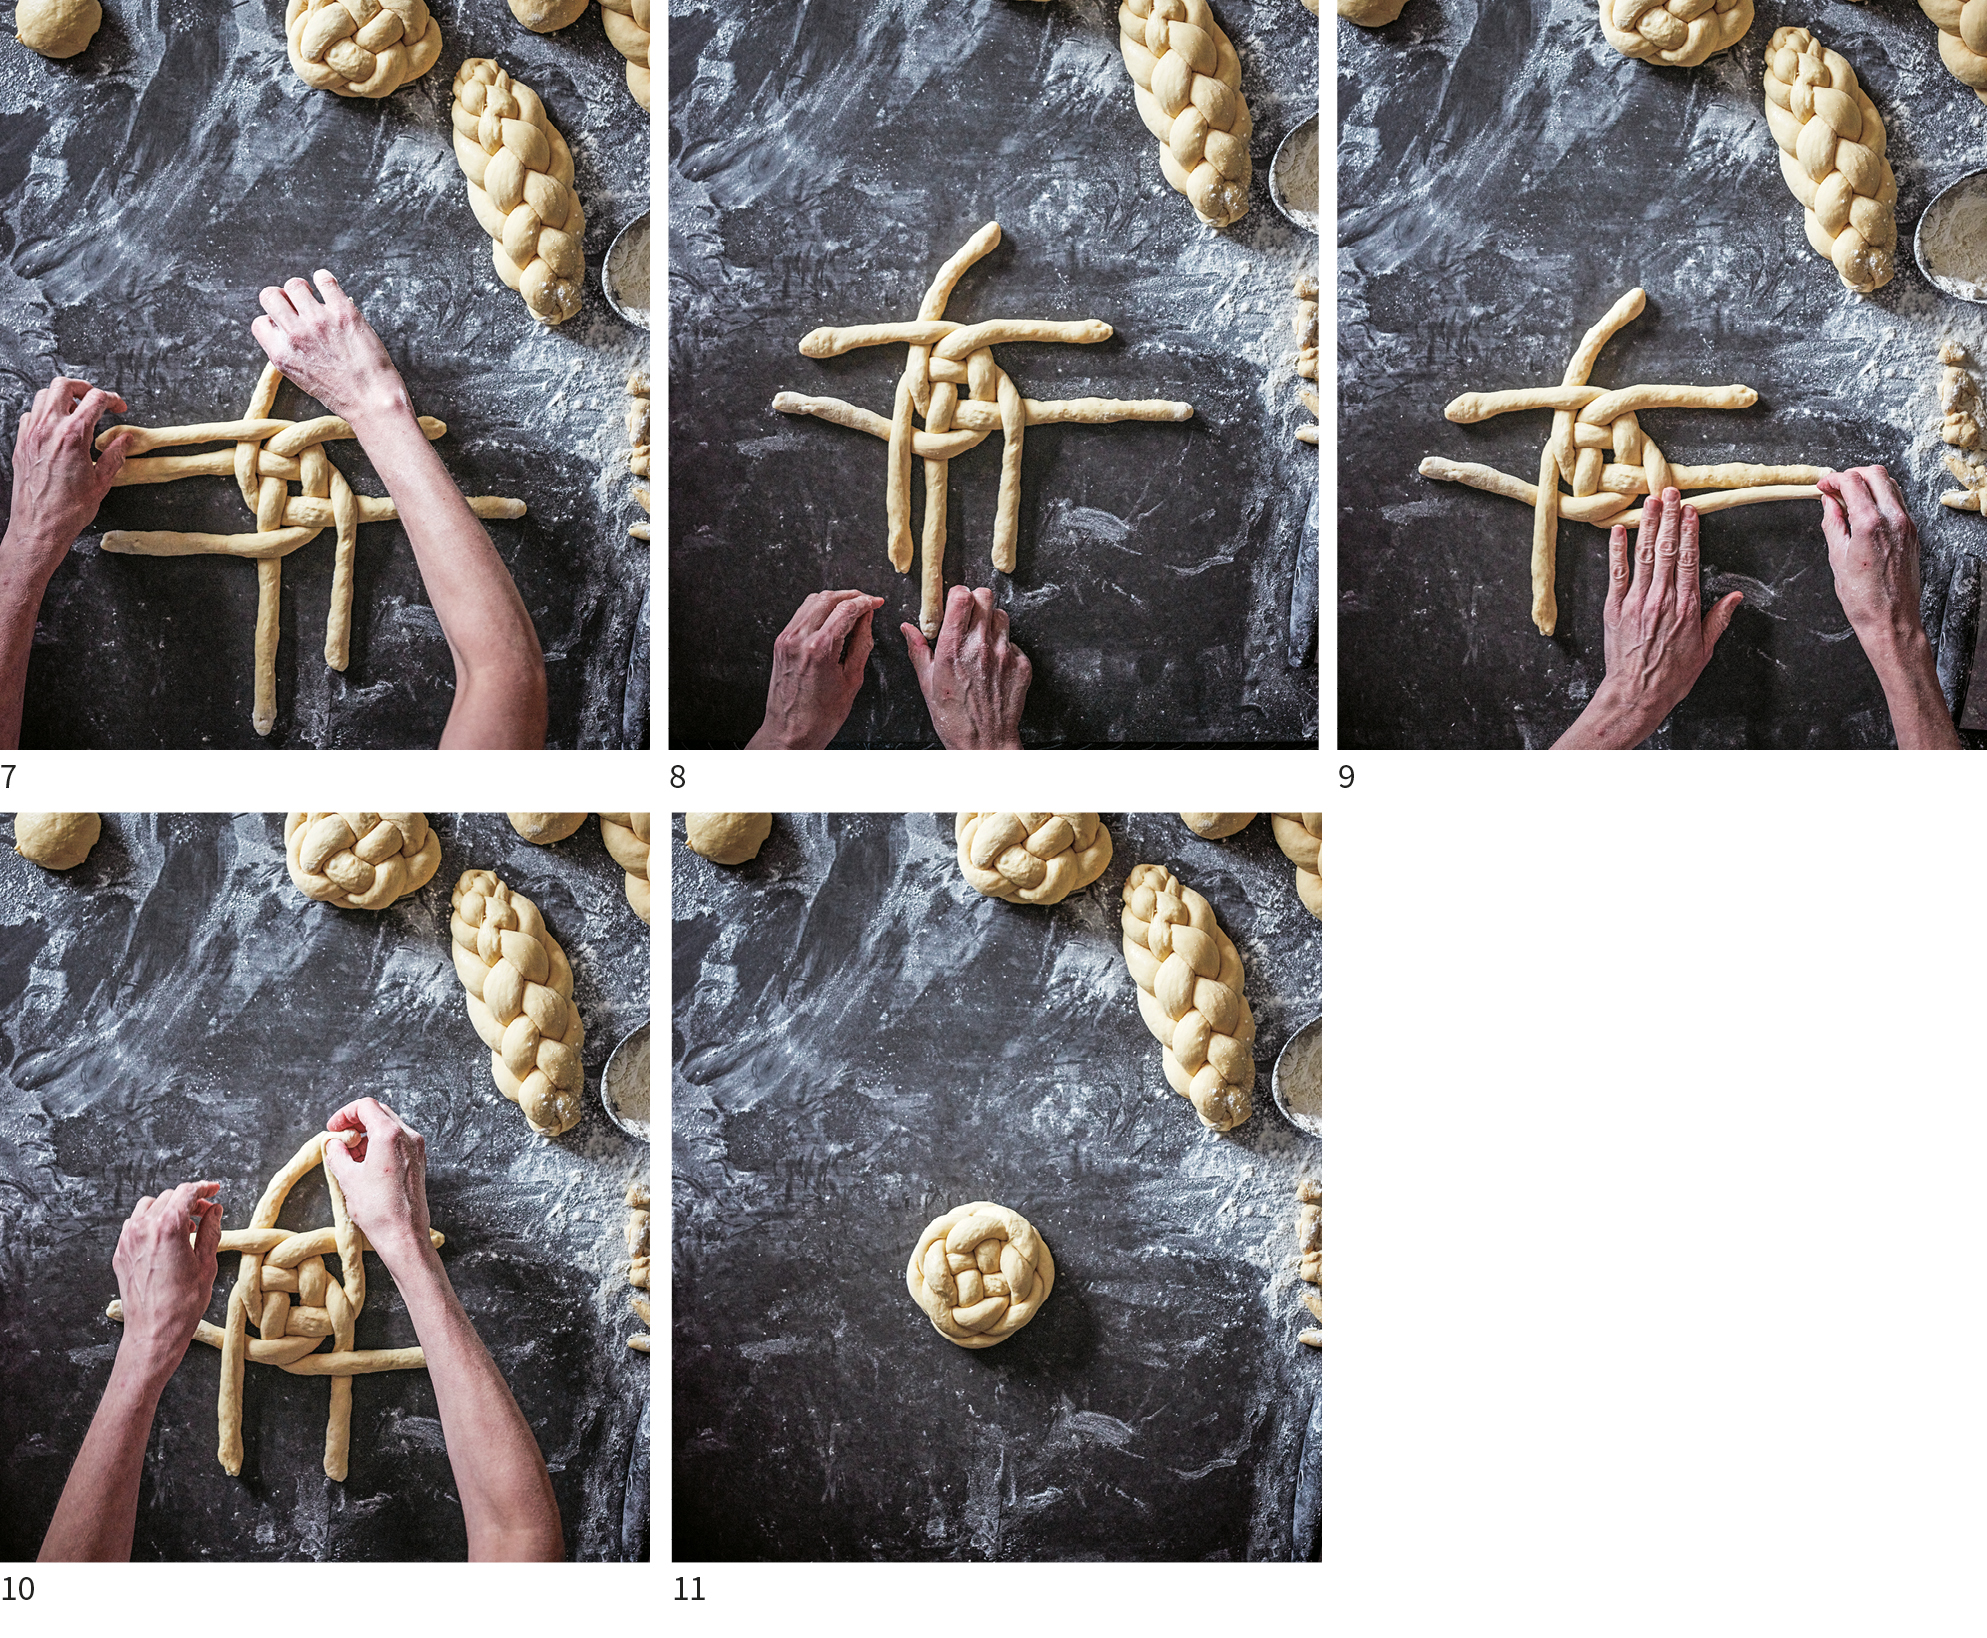
Date Tahini Challah Knots
Makes 10 knots
Influenced by Yotam Ottolenghi’s books, I have “Jerusalem fever” as much as anyone, and I wanted to create a Middle Eastern–inspired challah pastry. Tahini, or toasted sesame seed butter, was the obvious place to start. For me, it’s like a sophisticated version of peanut butter. Dates provide the perfect sweet contrast to pair with the salty tahini, like an au courant version of peanut butter and jelly.
The shape of the knots comes from Sweden. Several years ago, I was invited to teach baking classes at Meyers Bageri in Copenhagen. I took a side trip to nearby Sweden. I loved the shape of their cinnamon rolls and was determined to learn how to re-create it.
For the jam
10 ounces (284 grams) dates (with pits; preferably Medjool)
2 cups (470 grams, or as needed) boiling water
2 cups (494 grams) fresh orange juice
1 teaspoon (5 grams) pure vanilla extract
Pinch fine sea salt
½ cup (110 grams) tahini (sesame seed butter)
For the challah knots
1 recipe (1,000 grams) Master Recipe for Challah Dough (this page)
All-purpose flour for dusting
For baking the knots
1 large egg
Pinch fine sea salt
For the glaze
1 cup (120 grams) confectioners’ sugar
From ½ orange (300 grams) fresh orange juice
1 teaspoon (5 grams) orange blossom water
Pinch fine sea salt
Make the jam
■Place the dates in a small heat-proof bowl and add enough boiling water to cover. Set aside to soak the dates for 10 to 15 minutes, until their skins begin to pull away from the flesh. Strain the dates through a fine-mesh strainer and use your fingers to remove and discard the skins and pits.
■Place the pitted dates in a small saucepan. Add the orange juice, vanilla, and salt, and bring the liquid to a boil over medium-high heat. Reduce the heat to medium to maintain a strong simmer, and simmer the dates for about 20 minutes, stirring frequently, until most of the liquid has cooked off and the dates are soft and mushy. Turn off the heat and stir to break down the dates until the mixture becomes a puree. Stir in the tahini and transfer to a small bowl to cool. You can make the jam up to several days in advance. Cover and refrigerate it until you are ready to use it.
Roll out, fill, and fold the dough
■Remove the dough from the refrigerator and uncover it. Lightly dust a large flat work surface with flour. Use a plastic bowl scraper to scoop the dough onto the floured surface. Dust the top of the dough and a rolling pin lightly with flour and roll the dough into a 12- x 24-inch rectangle with the short side parallel to the counter’s edge, stopping to rest the dough when it begins to spring back.
■Spread about three-quarters of the jam evenly over the dough using an offset spatula. Fold the top edge down two-thirds toward the bottom edge and fold the bottom edge up to meet the top edge, so the dough is folded like a letter. Your dough should now be approximately 12 inches wide and 7 inches long. Gently run a rolling pin over the dough to stretch it to 10 inches long. Then let the dough rest on the countertop for 10 to 15 minutes to relax the gluten before proceeding.
Shape the knots
■Line two baking sheets with parchment paper.
■Using a long chef’s knife, cut the dough lengthwise into 10 (1¼-inch-wide) strips. Lift up 1 strip by both ends and twist each end 180 degrees in opposite directions. Pick the twist up by both ends. Holding the top end between your thumb and index finger, wrap the twist twice around your index and middle fingers. Then take the bottom end of the twist and pull it through the loop and pinch it to the top end to seal. Place the formed knot down on a parchment-lined baking sheet so that the ends are in the center of the knot. Repeat, forming the rest of the knots and dividing them evenly among the prepared baking sheets. Cover the pans with damp, lightweight kitchen towels and set them in a warm place to proof for 2 hours, or until the knots look swollen and have roughly doubled in size.
Bake the knots
■Arrange the oven racks so that one is in the top third of the oven and one is in the bottom third. Preheat the oven to 350°F.
■Whisk the egg with the salt to make an egg wash. Remove the towels and brush the knots generously with the egg wash; discard the remaining egg wash.
■Place one baking sheet on each oven rack to bake the knots for 25 to 30 minutes, until the tops are a deep caramel color and the knots emit a hollow sound when you tap on the bottom of one with your finger, rotating the baking sheets from front to back and from one rack to the other halfway through the baking time. Remove the knots from the oven and set aside to cool slightly.
Glaze the knots
■To make the glaze, combine the confectioners’ sugar, orange juice, orange blossom water, and salt in a small bowl and whisk until smooth. Use a spoon to drizzle the glaze over the warm (but not hot) knots.
Sweet Potato Challah Coils
Makes 2 coils
In 1999, I was living in San Diego and working as an unpaid pastry cook in my first restaurant job. The Thanksgiving issue of Martha Stewart Living magazine that year included a recipe for pumpkin challah bread pudding by a contemporary southern cook, Sara Foster. I made her recipe and loved it. Many years later, that recipe became the inspiration for this challah, a pretty and delicious addition to your Thanksgiving table.
1 large garnet sweet potato
4 cups plus more for dusting (480 grams) all-purpose flour
2 teaspoons (6 grams) Instant yeast
2 teaspoons (12 grams) fine sea salt
1 large egg (50 grams)
2 large egg yolks (34 grams)
½ cup (118 grams) water
3 ounces (83 grams) canola or vegetable oil
2 tablespoons (40 grams) mild-flavored honey (such as wildflower or clover)
For baking the challah
1 Large egg
Pinch fine sea salt
Bake the sweet potato
■Arrange the oven racks so one is in the center position. Preheat the oven to 400°F.
■Wrap the sweet potato in aluminum foil and place it on a small baking sheet. Place it in the oven to roast for 1 hour, or until a small knife can be easily inserted into the center. Remove the sweet potato from the oven and set it aside to cool to room temperature. Remove the foil and use a small sharp knife to remove the peel and discard. Place the sweet potato in a small bowl and mash it with a fork.
Mix and ferment the dough
■Put the flour, yeast, and salt in a medium mixing bowl and whisk to combine the ingredients.
■Place ⅔ cup (170 grams) of the mashed sweet potato in the bowl of a stand mixer. (Snack on the remaining sweet potato or reserve it for another use.) Add the egg, egg yolks, water, oil, and honey. Place the dry ingredients on top.
■Fit the mixer with the dough hook and mix on low speed for 3 minutes. Increase the speed to medium and mix for 5 minutes to develop the gluten. Turn off the mixer and remove the bowl from the stand. Remove the dough hook and wipe it clean with a wet hand. Cover the bowl with a clean kitchen towel or plastic wrap and set in a warm place to ferment the dough for 2 hours, turning the dough halfway through that time. To turn the dough, uncover the bowl and use a wet hand to fold the top edge down two-thirds and fold the bottom edge to meet the top edge, so the dough is folded like a letter. Fold the sides inward in the same way to form a sort of ball, then re-cover the bowl. Place the dough in the refrigerator overnight or for at least 8 hours to retard the dough.
Shape and proof the coils
■Line two baking sheets with parchment paper. Lightly dust a large flat work surface with flour. Remove the dough from the refrigerator and uncover it. Use a plastic bowl scraper to scrape it out of the bowl onto a flat work surface. Lightly dust the top of the dough with flour and use a bench knife to cut it in half.
■Put one piece of dough on the work surface. Dust your hands lightly with flour. Gently rest your palm on the dough and roll the dough into a tight round ball. Repeat with the second piece of dough. Let the rounds rest for 15 to 20 minutes to relax the gluten before proceeding.
■Line two baking sheets with parchment paper.
■Lightly dust your hands with flour. Set one ball of dough to the side and place the other in the center of the floured surface. Gently press on the dough with the palm of your hand to flatten it into a thick pancake. Using both hands, pick up the top edge of the round and fold it down by one-fourth, pinching the top edge into the dough log. Repeat, moving the top edge toward the center and pinching it into the dough. Do this two or three more times, until you reach the bottom of the log. (This is a classic bread baker’s shaping technique to create tension in the dough, which helps the dough proof more uniformly.) Roll the log out until it is 24 inches long, dusting your hands very lightly with flour if the dough is sticking to the surface.
■Take one end of the dough and roll it in toward the center of the strand, spiraling the strand around it until you reach the other end of the dough. Take this outer end and tuck it underneath the spiral toward the center and pinch it secure. Place the loaf on the center of one of the prepared baking sheets.
■Repeat with the second ball of dough, shaping it in the same way and placing it on the second baking sheet.
Proof and bake the challah coils
■Cover the coils with damp, lightweight kitchen towels and proof for 2½ to 3 hours, until the dough holds the indentation of a fingertip poked into their sides.
■While the challah coils are proofing, arrange the oven racks so one is in the top third of the oven and the other is in the bottom third. Preheat the oven to 350°F.
■Whisk the egg with the salt to make an egg wash. Uncover the coils and brush the wash generously over them; discard the remaining egg wash.
■Place one baking sheet on each oven rack to bake the challah coils for about 40 minutes, until the tops are a deep caramel color and the coils emit a hollow sound when you tap on the bottom of one with your finger, rotating the baking sheets from front to back and from one rack to the other halfway through the baking time. Remove the baking sheets from the oven and place them on cooling racks; let the challah coils cool on the baking sheets.