Cookies and Bars
Cookies are a strong part of my repertoire, and also my family traditions. When I was growing up, my mother went all out with cookies at Christmastime. She would bake several different kinds, and at the same time I would push my own cookies through my Easy-Bake oven. I carry on the tradition (minus the Easy-Bake) with my son. We usually bake at least five types of holiday cookies, including Classic Roll-Out Sugar Cookies decorated with Royal Icing (this page), Pistachio Biscotti (this page), and Hazelnut Linzer Cookies with Pineapple Jam (this page), among others. I also have a strong affinity both for making and eating what I call snacking cookies—those familiar favorites that you make to serve and enjoy as an everyday afternoon snack, such as Chocolate Chunk Cookies (this page), Fudgy Brownies (this page), and Oatmeal Raisin Cookies (this page). The cookies in this chapter are those that I make time and again, that are crowd-pleasers and satisfy my quest for the perfect (and often simplest) thing.
Tahini White Chocolate Chunk Cookies
Classic Roll-Out Sugar Cookies
Hazelnut Linzer Cookies with Pineapple Jam
Spiced Graham Crackers with Chocolate Marshmallows
Milk Chocolate and Raspberry Blondies
Tahini White Chocolate Chunk Cookies
Makes 16 to 20 cookies
Not long ago, it seemed like all of a sudden, many of the bakers I know started baking with tahini, or sesame seed butter. Their curiosity intrigued me, and I began poking around and experimenting with different brands of tahini and ways to use tahini in baked goods. These cookies are one product of that experimenting. They are basically peanut butter cookies made with tahini (in place of peanut butter), which imparts a toasty, nutty flavor to the cookies. Even though I love the taste memory of peanut butter cookies, I like these even more.
I make these cookies with brown rice flour. Because rice flour is not ground as fine as wheat flour, it takes longer to absorb liquid, which gives the cookies a grainier, crispier texture. And, because rice flour is gluten free, the cookies are gluten free.
Note Regular grocery store tahini will work fine in this recipe, but if you want to make the very best version of these cookies, seek out tahini made with Ethiopian sesame seeds; my favorite is Soom. When buying sesame seeds, look for those that haven’t been hulled. You can find them online or buy toasted sesame seeds in a shaker can in the Japanese section of grocery stores; these are not hulled, and they have great flavor.
6 ounces (or 1 cup white chocolate chips) white chocolate (170 grams)
1¾ cups (224 grams) brown rice flour
½ teaspoon (3 grams) baking powder
½ teaspoon (3 grams) baking soda
9 tablespoons (1 stick plus 1 tablespoon) unsalted butter, cubed and softened (see this page) (126 grams)
½ cup (lightly packed) dark brown sugar (100 grams)
1 teaspoon (6 grams) fine sea salt
½ cup (128 grams) tahini (sesame seed butter)
1 tablespoon (15 grams) pure vanilla extract
1 large egg (50 grams)
¼ cup (35 grams) sesame seeds (not hulled)
2 tablespoons (26 grams) granulated sugar
Get prepared
■Arrange the oven racks so one is in the top third and the other is in the bottom third. Preheat the oven to 350°F.
■Line two baking sheets with parchment paper.
■Unless you are using chips, chop the chocolate into ¼- to ½-inch chunks and set aside.
Make the dough
■Whisk the brown rice flour, baking powder, and baking soda together in a large bowl.
■Combine the butter, brown sugar, and salt in the bowl of a stand mixer. Fit the mixer with the paddle attachment and beat on medium speed for 2 to 3 minutes, stopping to scrape down the sides of the bowl with a rubber spatula once or twice, until the mixture is light and fluffy. Turn off the mixer, scrape down the sides of the bowl, add the tahini, and mix it in. Add the vanilla and egg and beat on medium speed until the mixture is light and fluffy, 1 to 2 minutes. Turn off the mixer, add the dry ingredients, and mix on low speed until no flour is visible. Add the white chocolate and mix on low speed until the chocolate is evenly dispersed.
Form and bake the cookies
■Put the sesame seeds and granulated sugar in separate small bowls. Scoop a 2-tablespoon (50-gram) portion of dough and roll it between the palms of your hands into a ball. Roll the ball in the sesame seeds, pushing down slightly so the seeds adhere, then roll the ball in the sugar to coat it on all sides. Place the ball on one of the prepared baking sheets. Continue forming and rolling the dough in the same way, placing the balls on the prepared baking sheets as they are ready and leaving about 2 inches between each one. When you have rolled all of the balls, flatten each ball with the palm of your hand to about 3 inches in diameter and ¾ inch thick.
■Put one baking sheet on each rack of the oven and bake the cookies for 12 to 14 minutes, until they are light golden brown, rotating them from front to back and from one rack to the other halfway through the baking time. Remove the cookies from the oven and set them aside to cool slightly. Transfer the cookies to a cooling rack to cool completely.
■Store the cookies in an airtight container at room temperature for up to 1 week or freeze for up to 3 months.
Softening Butter
Many people think they have to plan ahead to make cookies because they need to soften the butter for a long time, but that’s not the case. The ideal temperature for butter when you start to make cookies is 65°F to 70°F, which takes 10 to 15 minutes after removing it from the refrigerator. At that temperature, the butter is solid, so when you pound it with your mixer in the process of creaming the butter with the sugar—the foundation of most cookie recipes—the coarse shards of sugar break through the butter to make it fluffy. As butter gets warm, it becomes liquid, so instead of the sugar breaking through a solid substance and holding air, which makes the mixture light and fluffy, the mixture becomes flat and greasy. If you’ve softened your butter so much that it is greasy, put it in the refrigerator to firm it up. It’s better to err on the side of butter that is too cold than too warm, as the process of creaming will soften butter that is too cold.
Chocolate Chunk Cookies
Makes about 3 dozen cookies
I know: there are a lot of chocolate chip cookies in the world. What makes these different—and I think better—is the addition of confectioners’ sugar. Classic chocolate chip cookie dough is made with both granulated and brown sugar. These cookies are made with those sugars plus confectioners’ sugar, which contains cornstarch. The starch absorbs moisture and results in cookies that are tender and chewy all the way through. I use a combination of dark semisweet chocolate and milk chocolate in these cookies. I know that dark chocolate is thought to be more “sophisticated,” and while I do like dark chocolate, I have to confess that I like milk chocolate even more. I also think the milk chocolate gives the cookies a homey, nostalgic flavor.
8 ounces (or 1¼ cups chocolate chips) bittersweet chocolate (226 grams)
8 ounces (or 1¼ cups chocolate chips) Milk chocolate (226 grams)
3 cups (360 grams) all-purpose flour
1½ teaspoons (8 grams) baking powder
1 teaspoon (5 grams) baking soda
1 teaspoon (6 grams) fine sea salt
2 large eggs (100 grams)
4 large egg yolks (68 grams)
2 teaspoons (10 grams) pure vanilla extract
14 tablespoons (1 stick plus 6 tablespoons) unsalted butter, cubed and softened (see this page) (196 grams)
1¼ cups (lightly packed) dark brown sugar (250 grams)
¾ cup (150 grams) granulated sugar
½ cup (60 grams) confectioners’ sugar
Make the dough
■Unless you are using chocolate chips, chop the bittersweet and milk chocolate into ¼- to ½-inch chunks. Put the chunks in a bowl and set aside.
■Place the flour, baking powder, baking soda, and salt in a medium bowl and whisk to combine.
■Combine the eggs, egg yolks, and vanilla in a small bowl and whisk to combine.
■Combine the butter, brown sugar, granulated sugar, and confectioners’ sugar in the bowl of a stand mixer. Fit the mixer with the paddle attachment and beat on medium speed for 2 to 3 minutes, stopping to scrape down the sides of the bowl with a rubber spatula once or twice, until the mixture is light and fluffy. Add the egg mixture in three additions, beating until it is completely integrated with the batter and stopping to scrape down the sides of the bowl between each addition. Turn off the mixer, add the dry ingredients, and mix on low speed until no flour is visible. Add the chocolate and mix on low just to combine. Chill the dough overnight or for at least 2 hours.
Prepare to bake the cookies
■Arrange the oven racks so one is in the top third of the oven and the other is in the bottom third. Preheat the oven to 375°F.
■Line two baking sheets with parchment paper.
Form and bake the cookies
■Scoop the dough in 2-tablespoon (50-gram) portions and roll them between the palms of your hands into balls. Place the balls on the prepared baking sheets, leaving about 2 inches between each ball, and fitting 8 to 10 balls on each baking sheet. Flatten each ball with the palm of your hand to about 3 inches in diameter and ¾ inch thick. Return the remaining dough to the refrigerator.
■Place one baking sheet on each oven rack and bake for 16 to 18 minutes, until the centers of the cookies no longer look wet and the edges are deep golden brown, rotating the baking sheets from front to back and from one rack to the other halfway through the baking time. Remove the baking sheets from the oven and let the cookies cool for 2 minutes on the baking sheets. Use a spatula to remove the cookies to a cooling rack to finish cooling.
■Remove the remaining dough from the refrigerator, roll the remaining balls, flatten them, and bake them as you did the first batch.
■Store the cookies in an airtight container at room temperature for up to 1 week or freeze for up to 3 months.
Oatmeal Raisin Cookies
Makes 18 to 20 cookies
After eating these cookies at Sadelle’s, the New York Times restaurant reviewer Pete Wells wrote that they were “one of the best oatmeal cookies in existence.” The secret is letting the dough rest for four days. Yes, you read that right! One day will do if that’s all you have, but four is ideal. While the dough rests, the oats absorb the moisture, which gives the cookie its perfect texture: slightly crispy around the edges with a chewy center.
Note The weight of 2 cups of oats varies by brand. So even though I prefer weighing to measuring when baking, for this recipe, I suggest you measure the oats.
1 cup (150 grams) black raisins
1⅓ cups (160 grams) all-purpose flour
2 teaspoons (4 grams) ground cinnamon
1½ teaspoons (9 grams) baking soda
1 teaspoon (6 grams) fine sea salt
12 tablespoons (1 stick plus 4 tablespoons) unsalted butter, cubed and softened (see this page) (170 grams)
¾ cup (lightly packed) light brown sugar (150 grams)
¼ cup plus 2 tablespoons (76 grams) granulated sugar
1 large egg (50 grams)
1 large egg yolk (17 grams)
2 teaspoons (10 grams) pure vanilla extract
2 cups old-fashioned rolled oats
Make the dough
■Place the raisins in a small bowl, cover with hot tap water, and set aside to soak for 30 minutes. Drain the raisins in a fine-mesh strainer and let them sit in the strainer to drain any remaining water while you mix the cookie dough.
■Put the flour, cinnamon, baking soda, and salt in a medium bowl and whisk to combine.
■Combine the butter, brown sugar, and granulated sugar in the bowl of a stand mixer. Fit the mixer with the paddle attachment and beat on medium speed for 2 to 3 minutes, stopping to scrape down the sides of the bowl with a rubber spatula once or twice, until the mixture is light and fluffy. Turn off the mixer, scrape down the sides of the bowl, and add the egg, egg yolk, and vanilla. Mix on medium speed until combined. Turn off the mixer, scrape down the sides of the bowl, add the dry ingredients, and mix on low until almost no flour is visible. Add the oats and mix on low speed to combine. Add the raisins and mix on low to distribute. Turn off the mixer and remove the bowl from the stand. Cover the bowl and chill for 4 days.
Prepare to bake the cookies
■Arrange the oven racks so one is in the top third of the oven and the other in the bottom third. Preheat the oven to 350°F.
■Line two baking sheets with parchment paper.
Form and bake the cookies
■Remove the dough from the refrigerator and uncover. Scoop a 2-tablespoon (50-gram) portion of dough and roll it between the palms of your hands into a ball. Place the ball on one of the prepared baking sheets. Continue scooping and rolling the dough, leaving 2 inches between each ball and fitting 9 to 10 balls on each baking sheet. Return any remaining dough to the refrigerator.
■Place one baking sheet on each oven rack and bake for 16 to 18 minutes, until the centers of the cookies no longer look wet and the edges are deep golden brown, rotating the baking sheets from front to back and from one rack to the other halfway through the baking time. Remove the baking sheets from the oven and let the cookies cool for 2 minutes on the baking sheets. Use a spatula to remove the cookies to a cooling rack to finish cooling.
■Remove the remaining dough from the refrigerator, roll the remaining balls, and bake them as you did the first batch.
■Store the cookies in an airtight container at room temperature for up to 1 week or freeze for up to 3 months.
Chewy Gingersnaps
Makes about 2 dozen cookies
For me, the perfect gingersnap cookie is crispy on the outside and chewy on the inside, with a good ginger kick. This is it! I think of these as a holiday cookie, although there’s no reason you can’t enjoy them year-round.
2¼ cups (270 grams) all-purpose flour
2 teaspoons (10 grams) baking soda
½ teaspoon (3 grams) fine sea salt
1½ teaspoons (3 grams) ground ginger
1 teaspoon (2 grams) ground cinnamon
1 teaspoon (2 grams) ground cloves
⅛ teaspoon (< 1 gram) ground cardamom
1¼ cups (250 grams) granulated sugar
½ cup plus 1 tablespoon (125 grams) canola oil
1 large egg (50 grams)
¼ cup (79 grams) molasses
1 tablespoon (15 grams) fresh ginger, peeled and grated on the medium holes of a box grater
Make the dough
■Whisk the flour, baking soda, salt, ground ginger, cinnamon, cloves, and cardamom together in a medium bowl and set aside.
■Combine 1 cup (200 grams) of the sugar, the oil, and egg in the bowl of a stand mixer. Fit the mixer with the paddle attachment and mix on medium speed for 2 minutes, until the mixture begins to lighten in color. Turn off the mixer and scrape down the sides of the bowl. Add the molasses and grated fresh ginger and beat on medium speed to combine. Turn off the mixer, add the dry ingredients, and beat on low speed until no flour is visible. Turn off the mixer and remove the bowl from the stand. Cover the bowl with plastic wrap, and refrigerate until the dough has chilled and firmed up, at least 2 hours and up to 2 days.
Prepare to bake the cookies
■Arrange the oven racks so one is in the top third of the oven and the other is in the bottom third. Preheat the oven to 350°F.
■Line two baking sheets with parchment paper.
Form and bake the cookies
■Remove the dough from the refrigerator and uncover. Place the remaining ¼ cup (50 grams) sugar in a small bowl. Scoop a 1-tablespoon (25-gram) piece of dough and roll it between the palms of your hands into a ball. Roll the ball in the bowl with the sugar to coat it all over. Place the ball on one of the prepared baking sheets. Continue with the remaining dough, leaving 2 inches between each ball on the baking sheets.
■Place one baking sheet on each oven rack and bake for 11 to 13 minutes, until the cookies have risen and fallen, rotating them from front to back and from one rack to the other halfway through the baking time. Remove from the oven and let the cookies cool on the baking sheets for about 10 minutes. Use a spatula to remove the cookies to a cooling rack to cool completely.
■Store the cookies in an airtight container at room temperature for up to 1 week or freeze for up to 3 months.
Chocolate Sugar Cookies

Makes 16 to 18 (2-inch) cookies
These are everything I want in a chocolate sugar cookie: they’re really chocolaty, not too sweet, ever-so-slightly salty, and a bit chewy. And, they have that beautiful crackle on top that, for me, is the sign of a perfect rise-and-fall cookie. A rise-and-fall cookie refers to one that rises in the oven and then falls when you take it out. The rise-and-fall process is a result of the baking soda reacting with the cocoa powder and brown sugar before the cookie is set. When the cookies are removed from the oven, they fall, giving them that crackle top. How quickly the cookie rises before it sets up is the key to achieving that finish. For these cookies, to ensure they rise quickly, I don’t refrigerate the dough before baking, which causes the cookies to rise more quickly than if the dough were cold. I use Valrhona cocoa powder to make these, which in my opinion is the best there is, but if you can’t find Valrhona, the cookies will be delicious with whatever cocoa powder you use. And I make them with dark brown sugar in place of the more typical granulated sugar, which gives a depth of flavor to an otherwise straightforward cookie.
2 cups (240 grams) all-purpose flour
½ cup (43 grams) cocoa powder (preferably Valrhona)
1 teaspoon (5 grams) baking soda
½ teaspoon (3 grams) fine sea salt
16 tablespoons (2 sticks) Unsalted butter, cubed and softened (see this page) (226 grams)
1½ cups (lightly packed) dark brown sugar (300 grams)
1 large egg (50 grams)
1 teaspoon (5 grams) pure vanilla extract
½ cup (100 grams) granulated sugar, for rolling
Get prepared
■Arrange the oven racks so one is in the center position. Preheat the oven to 350°F.
■Line two baking sheets with parchment paper.
Make the dough
■Put the flour, cocoa powder, baking soda, and salt in a medium bowl and whisk to combine the ingredients. Set aside.
■Put the butter and brown sugar in the bowl of a stand mixer. Fit the mixer with the paddle attachment and beat on medium speed for 2 to 3 minutes, stopping to scrape down the sides of the bowl with a rubber spatula once or twice, until the mixture is light and fluffy. Turn off the mixer, add the egg and vanilla, and beat until the egg is thoroughly incorporated, 1 to 2 minutes, stopping to scrape down the sides of the bowl once during that time. Add the dry ingredients and mix on low speed until no flour is visible, stopping to scrape down the sides of the bowl once during the process.
Form and bake the cookies
■Pour the granulated sugar into a small bowl. Scoop a 2-tablespoon (50-gram) portion of dough and roll it between the palms of your hands into a ball. Roll the ball in the bowl with the sugar to coat it all over. Place the ball on one of the prepared baking sheets. Continue scooping and rolling the dough, leaving about 2 inches between each ball.
■When you have filled one baking sheet, place it on the center rack of the oven and bake for 12 to 14 minutes, until the cookies have puffed up and have cracked as they’ve fallen back down, rotating the baking sheet from front to back midway through the baking time. Remove the baking sheet from the oven and let the cookies cool to room temperature for about 2 minutes. Use a metal spatula to transfer them to a cooling rack to cool completely.
■While the cookies are baking, roll 6 more balls and place them on the second baking sheet. While the first batch is cooling, put the second batch of cookies in the oven and bake them as you did the first batch. Repeat with the third batch of cookies.
■Store the cookies in an airtight container at room temperature for up to 1 week or freeze for up to 3 months.

Classic Roll-Out Sugar Cookies

Makes about 5 dozen (2-inch) cookies
Every year, my son and I make these cookies together. I make the dough and cut out the cookies, and then he decorates them with colored sugar. This recipe makes a big batch, because I like to give the baked cookies away. If the yield is more than you need, bake off all of the cookies and freeze them to enjoy another time. You can snack on them straight from the freezer or bring them to room temperature.
Please note: The yield and baking time for this recipe are for cookies made with a 2-inch round cookie cutter; if you use a different size or shape of cutter, the yield and baking time may change. To know if your cookies are done, rely on the indicators given in the recipe, rather than the time.
If this dough is too cold, it will crack when you roll it out. If it is too warm, it will stick to the rolling pin and work surface. You want to soften it until it is just pliable. If you soften it too much, return it to the refrigerator to firm it up a bit before you start or continue rolling.
Note You will need a 2-inch round cookie cutter to make this. If you are icing the cookies, you will need at least one large disposable pastry bag and one ⅛-inch round icing tip.
4½ cups plus more (540 grams) all-purpose flour, for dusting
1 teaspoon (5 grams) baking powder
1 teaspoon (6 grams) fine sea salt
20 tablespoons (2 sticks plus 4 tablespoons) unsalted butter, cubed and softened (see this page) (283 grams)
2 cups (400 grams) granulated sugar
2 large eggs (100 grams)
2 teaspoons (10 grams) pure vanilla extract
Optional for decorating
About 2 tablespoons colored or plain sanding sugar, for sprinkling
2 recipes Royal Icing (recipe follows)
Sprinkles, for decorating (optional)
Make the dough
■Whisk the flour, baking powder, and salt together in a medium bowl and set aside.
■Combine the butter and sugar in the bowl of a stand mixer. Fit the mixer with the paddle attachment, and beat on medium speed for 2 to 3 minutes, stopping to scrape down the sides of the bowl with a rubber spatula once or twice, until the mixture is light and fluffy. Add the eggs one at a time, mixing on medium speed until each egg is blended in and stopping to scrape down the sides of the bowl before adding the next egg. Add the vanilla and mix to combine. Add the dry ingredients and mix on low speed until no flour is visible, stopping to scrape down the sides of the bowl as needed.
■Lay two long sheets of plastic wrap in a crisscross formation on your work surface. Scoop the dough out of the bowl onto the center of the cross of plastic wrap and use your hands to pat the dough into a rectangular block. Loosely wrap the dough in the plastic, leaving a few inches of slack all around. Run a rolling pin over the dough to roll it out in the plastic, to a ½- to 1-inch-thick rectangle. Turn the dough out onto your work surface and wrap it loosely in plastic wrap. (For more detail, see Wrapping Dough, this page.) Place the dough in the refrigerator for at least 2 hours and up to 3 days to firm up.
Prepare to bake the cookies
■Arrange the oven racks so one is in the top third of the oven and the other is in the bottom third. Preheat the oven to 350°F.
■Line two baking sheets with parchment paper.
Roll out and cut the dough
■Remove the block of dough from the refrigerator. Unwrap the dough, and use a bench knife or serrated knife to cut it in half. Set one half on your work surface to soften until it is barely pliable but not soft, about 10 minutes. Rewrap the other half of the dough and return it to the refrigerator.
■Lightly dust a large flat work surface with flour and place the block of dough on the floured surface. Lightly dust the top of the dough and the rolling pin with flour. Starting from the center of the dough and working outward with the rolling pin, roll out the dough to an even rectangle ⅜ inch thick, dusting the work surface, dough, and rolling pin as needed to keep the dough from sticking. (For more detailed instruction, see Rolling Dough 101, this page.)
■Using a 2-inch cookie or biscuit cutter, cut circles from the dough, making the cuts close together to get as many cookies as possible from the dough. Use a small offset or metal spatula to lift the cookies off the work surface and onto the prepared baking sheets, leaving about 1 inch between them. Gather the scraps of dough, wrap them in plastic, and place them in the refrigerator to chill.
If you are decorating the cookies with sugar
■Sprinkle a light layer of sugar on the cookies. If you are decorating the cookies with royal icing, do not sprinkle sugar on them.
Bake the cookies
■Place one baking sheet on each oven rack and bake the cookies for 12 to 14 minutes, until the edges are lightly browned, rotating the baking sheets from front to back and from one rack to the other halfway through the baking time. Remove the baking sheets from the oven and set aside to cool for about 2 minutes. Use a metal spatula to lift the cookies from the baking sheet and transfer them to a cooling rack to cool completely.
■Remove the second block of dough from the refrigerator and roll it out and cut the cookies in the same way. Add the scraps to the first ball of scraps. Gather the dough scraps and chill them. Roll the scraps once and cut and bake them as you did the previous batches. Discard any scraps remaining after cutting those.
■Store the cookies in an airtight container at room temperature for up to 1 week or freeze for up to 3 months.
If you are icing the cookies
■After the cookies have baked and cooled, line two (or more) baking sheets with parchment paper. Arrange 12 cookies on each pan. If you don’t have enough baking sheets to hold all of the cookies, lay the parchment on a flat work surface and place the cookies on the paper. Fit a large disposable pastry bag with a ⅛-inch round icing tip, such as Ateco #6. Have a small offset spatula nearby to clean up the cookies.
Pipe the outlines of the cookies
■Spoon half of the icing into the pastry bag. Working with one cookie at a time, hold the piping bag about ¼ inch above the cookie and gently squeeze the pastry bag to slowly pipe the icing around the perimeter of the cookie, leaving a ⅛-inch border free of icing. If you make a mistake, use the offset spatula to remove the icing from the cookie and start again. Once you have outlined all of the cookies, if you still have icing in the bag, empty the icing out into the bowl with the icing of that color. Remove and rinse out the tip and return it to the pastry bag.
“Flood” the cookies
■Gradually add enough water (a teaspoon or two) to the remaining icing in the mixing bowl, stirring as you add it, until the icing starts to run like honey. Fill the pastry bag with the flooding icing, using the end of the bag to “plug” the tip so the icing doesn’t leak out of the bag while you’re filling it.
Flood is a term used for filling in the outline when decorating cookies or cakes.
■Squeeze a big dollop of icing into the middle of one cookie and drag the pastry tip through the icing to spread it toward the piped edges. Continue squeezing icing out onto the cookie and using the tip to spread it until the icing floods the entire surface of the cookie.
■If you are using sprinkles, sprinkle them on the cookie while the icing is wet.
■Line a baking sheet or work surface with parchment paper and put the cookie on the parchment. Continue flooding the remaining cookies with the remaining icing and adding them to the parchment-lined baking sheet. When one baking sheet is full, line another with parchment paper and place the iced cookies on that.
At home, I have a small work space, so I squeeze as many cookies onto each baking sheet as possible without stacking them and messing up the icing. You could also move the cookies to a dining table. Find what works best for you given your space.
■Let the icing dry and harden overnight before storing the cookies. Place the cookies in an airtight container, separated by sheets of parchment paper. Cover and store at room temperature for up to 2 weeks.


Royal Icing
Makes enough for 2 dozen (2-inch) cookies
Royal icing is a decorative icing made with egg whites, confectioners’ sugar, and water. It is smooth when it sets up, so you get really pretty, professional-looking cookies. But royal icing can be tricky to work with; the main consideration is the consistency. You make a stiff icing to pipe the outline of the cookies, and then thin the icing to flood or fill in the outline to cover the surface of the cookies. The perfect flooding consistency is thicker than maple syrup but thinner than honey; it needs to be thin enough that it will pool and move around nicely to flood the cookies, but not so much that it runs all over the place, out of control. You may have to make a few batches of icing before you get it just right.
The other “trick” to beautiful iced cookies is that you use the correct pastry tip. If the tip is too small, you’ll hurt your wrist trying to squeeze the icing out of it. If it’s too big, the icing will spill out of it too fast, resulting in messy-looking cookies. I recommend a tip that has a round ⅛-inch opening.
In terms of colored icing, I keep it simple. I make one batch of icing at a time and color each one individually. I generally make only two colors; rarely more than three. You will need two batches of icing to color the entire batch of classic sugar cookies, so this works out perfectly.
This recipe uses uncooked egg whites, and there is always a slight risk for them to contain food-borne pathogens. To avoid any potential risk, use pasteurized egg whites, which are available at most grocery stores.
1 (16-ounce) box confectioners’ sugar (454 grams)
2 large egg whites (65 grams)
1 teaspoon plus more as needed (5 grams) water
Food coloring (optional)
Combine the confectioners’ sugar, egg whites, and 1 teaspoon of the water in the bowl of a stand mixer. Fit the mixer with the paddle attachment and mix on medium speed for 30 seconds to 1 minute, until the icing is smooth. Remove the paddle and scrape the icing off with a butter knife or small offset spatula. If you want to color the icing, add one or two drops of food coloring and stir with a rubber spatula until no streaks of color remain. Continue to add additional drops to your liking.
Pistachio Biscotti
Makes 4 to 5 dozen biscotti
My favorite biscotti hands down are dry, crunchy biscotti. What makes biscotti as hard and crunchy as they are has to do with the proportion of wet to dry ingredients. These biscotti are unusual in that the dough contains cookie crumbs. Because the cookie crumbs contain butter, they impart more flavor (and also more texture) than if you just added flour in their place. I call for you to slice these really thin, which makes the cookies delicate and crispy. I make the crumbs from Classic Roll-Out Sugar Cookies (this page), but you could also use store-bought all-butter sugar cookies.
For the dough
2 large eggs (100 grams)
½ cup (118 grams) water
⅔ cup (from about 5 cookies) Sugar cookie crumbs (this page; or store-bought) (90 grams)
4 cups plus 2 tablespoons (498 grams) all-purpose flour
2⅔ cups (347 grams) pistachios (preferably Sicilian)
1¾ cups (350 grams) granulated sugar
1½ teaspoons (8 grams) baking powder
1 teaspoon (5 grams) baking soda
2 teaspoons (12 grams) fine sea salt
For baking the biscotti
1½ tablespoons (20 grams) granulated sugar, for sprinkling
Get prepared
■Arrange the oven racks so one is in the center position. Preheat the oven to 350°F.
■Line a baking sheet with parchment paper.
Make the dough
■Separate the yolk and white of one of the eggs into individual small bowls. Set the bowl with the egg white aside.
■Add the whole egg and water to the bowl with the egg yolk and whisk to break up the yolks.
■Put the cookie crumbs in the bowl of a stand mixer. Fit the mixer with the paddle attachment and add the flour, pistachios, sugar, baking powder, baking soda, and salt and mix on low speed to combine. With the mixer running, add the egg and water mixture and mix for about 2 minutes, until the dough has formed clumps the size of large marbles.
Shape the logs
■Lay a sheet of parchment paper on your work surface.
■Scoop half of the dough (about 720 grams) out of the mixer bowl onto the parchment-lined baking sheet. Roll the dough into a log 3 inches wide, 12 inches long, and 1 inch thick. Repeat, forming a second log on the same baking sheet. Rearrange the logs if necessary, making sure there are 3 inches between them.
Bake and slice the biscotti
■Whisk the egg white in the small bowl. Brush the tops of the biscotti logs with the egg white and sprinkle with the sugar.
■Place the baking sheet on the center rack to bake the logs for 35 minutes, rotating the baking sheets from front to back halfway through the baking time. Remove the logs from the oven and let cool to room temperature.
Warm biscotti loaves will crumble when you slice them. As the loaves cool, the water escapes in the form of steam, and at the same time, the structure of the logs continues to set. The cooled, set loaves won’t crumble when sliced.
■Reduce the oven temperature to 250°F. Arrange the oven racks so one is in the top third of the oven and the other is in the bottom third.
■Slide one log onto a cutting board and use a serrated knife to slice the loaf at a 90-degree angle into ⅜-inch- to ½-inch-thick slices. Lay the slices, cut sides up, in a single layer on a baking sheet and repeat with the second loaf, laying those slices on a second baking sheet. (There is no need to leave space between the cookies as they are not going to spread like many cookies do; the point of the second baking is simply to dry them out.)
The key to cleanly sliced biscotti is to rest the knife where you want the slice and then to press down quickly.
Bake the sliced biscotti
■Return the biscotti to the oven and bake for 20 minutes. Remove the baking sheets from the oven and use tongs or your fingers to turn each biscotti. Return the baking sheets to the oven, rotating them from front to back and from one rack to the other. Bake the biscotti for an additional 15 to 20 minutes, until they are dry and crunchy. To test for doneness, remove one biscotti from the oven and place it on your work surface for about 5 minutes to cool down, then break it open to see if it is dry all the way through. If the biscotti are not crunchy enough, bake for an additional 5 minutes. Remove the biscotti from the oven and set aside to cool to room temperature.
■Store the biscotti in an airtight container at room temperature for up to 1 week or freeze for up to 3 months.

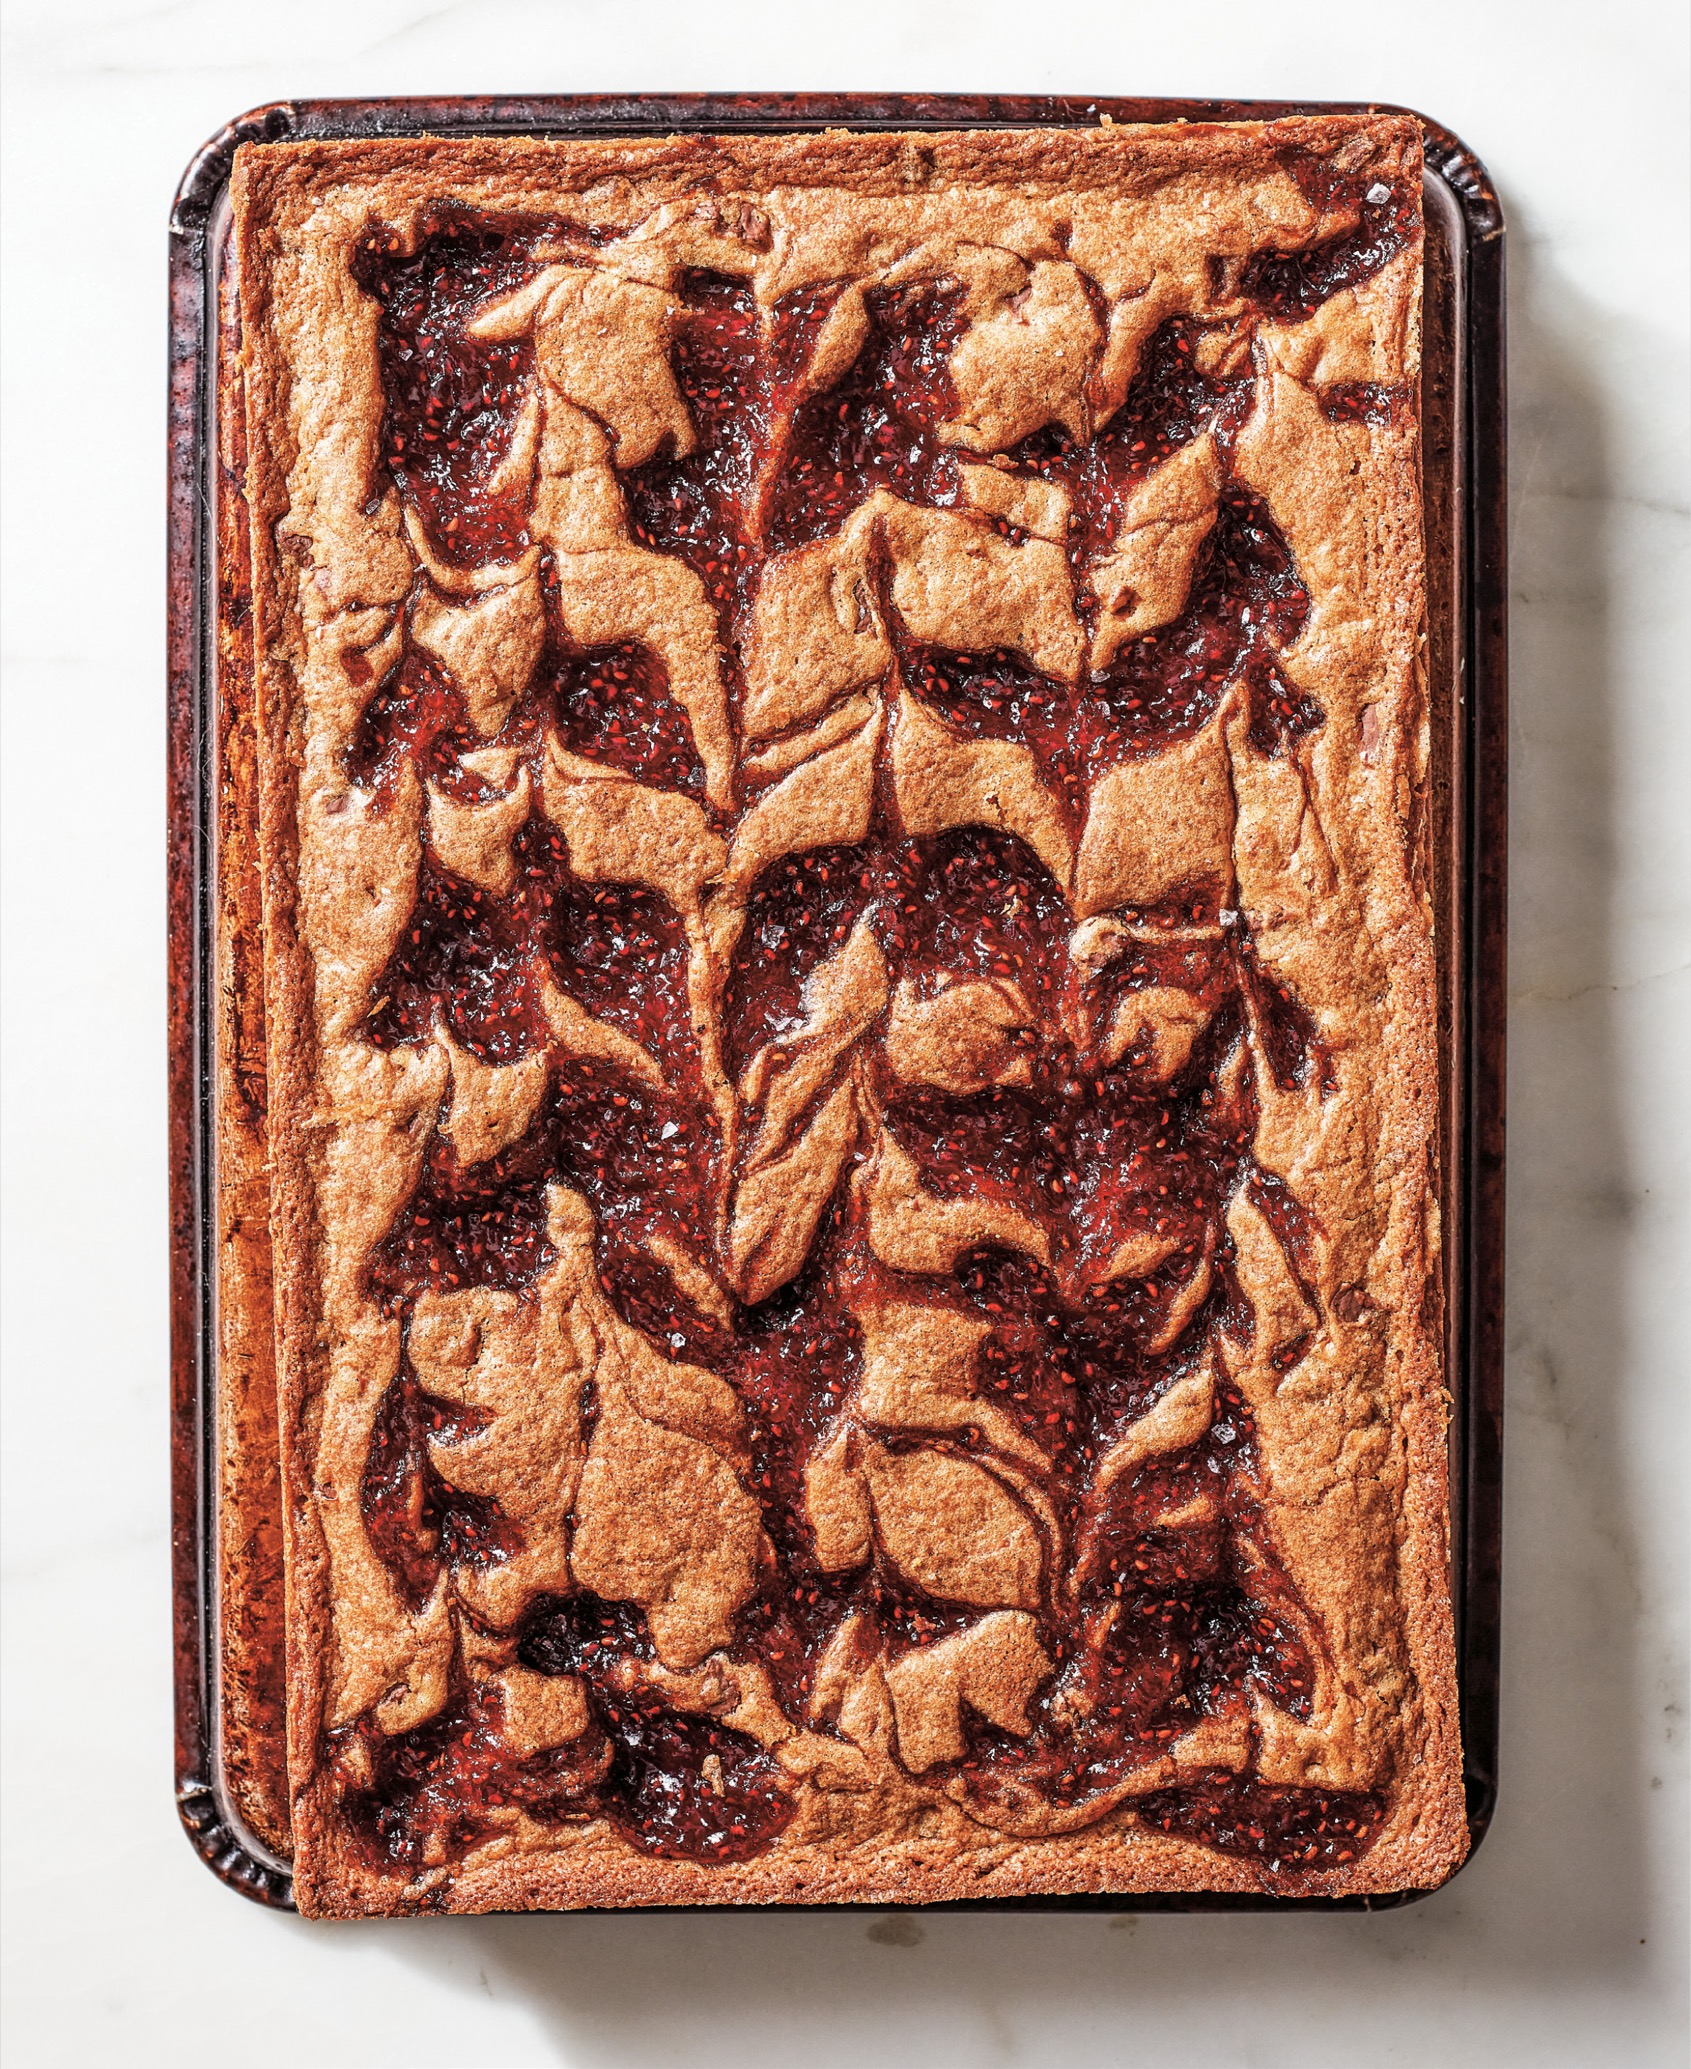
Raspberry Jam Bars

Makes 28 bars
I was in Copenhagen a few years ago teaching a baking class at Meyers Bageri, a bakery there owned by Claus Meyer, one of the founders of Noma. There they made these traditional jam bars, called Hindbærsnitter, that I couldn’t stop eating. Before I left, I asked them for the recipe, and they were kind enough to share it with me. These are not like the “open-face” jam bars I was familiar with. The jam is sandwiched between two thin sheets of dough, almost like a Pop-Tart, with a crust made from almond flour. So, you can even fool yourself into thinking they’re a “breakfast cookie.” Put whatever jam you want inside. I like raspberry for both the flavor and the bright red color. Often when I am working with a sticky dough, which this is, I roll it out between two sheets of parchment paper. For these, I go the extra step of creating a paper packet for the dough, which ensures that it is rolled out to a specific dimension and even thickness. If you don’t mind jam bars with uneven edges, skip the step of creating the paper packets and simply roll the dough out to a ten-inch square.
1 large egg (50 grams)
3 cups (360 grams) all-purpose flour
1 cup (200 grams) granulated sugar
⅔ cup (67 grams) almond flour
1 teaspoon (6 grams) fine sea salt
1 vanilla bean
20 tablespoons (2 sticks plus 4 tablespoons) unsalted butter, cubed (283 grams)
1 large egg white
1½ cups (435 grams) Raspberry Jam (this page; or store-bought)
About 2 tablespoons (26 grams) granulated sugar, for sprinkling
Get prepared
■Cut a piece of parchment paper from a roll to 24 inches long. Fold the edges inward to create the 10 x 10-inch paper packet. Repeat, creating a second 10-inch-square parchment-paper packet.
■Whisk the egg in a small bowl to break up the yolk.
Make the dough
■Combine the all-purpose flour, sugar, almond flour, and salt in the bowl of a stand mixer. Split the vanilla bean down the middle with a small sharp knife and use the knife to scrape the seeds out of the bean. Add the seeds to the mixer bowl. (Use the bean to make Vanilla Sugar, this page, or discard it.) Fit the mixer with the paddle attachment and mix on low speed for about 30 seconds, just to combine the ingredients. Add the butter and mix on low speed until the mixture is the texture of coarse cornmeal, with no chunks of butter remaining, but not so long that the dough begins to clump together. Turn off the mixer, add the egg, and mix on low speed until a dough forms around the paddle, 2 to 3 minutes, stopping to scrape down the paddle once or twice.
■Turn the dough out of the bowl onto your work surface and use a bench knife or serrated knife to cut it in half; each half will be approximately 475 grams (about 17 ounces). Place one half of the dough in the center of one of the paper packets and use your fingertips to pat the dough into a square. Fold the edges of the packet inward to cover the dough. Flip the packet so the seams of paper are facing down and run a rolling pin over it to press the dough to the edges of the packet, forming a 10-inch square of dough of even thickness. Repeat, wrapping the remaining dough in parchment and rolling it to create an identical packet. Place both dough packets on a flat surface in your refrigerator and refrigerate for 1 to 2 hours, until thoroughly chilled, and up to overnight.
Prepare to bake the jam bars
■Arrange the oven racks so one is in the center position. Preheat the oven to 350°F.
■Line a baking sheet with parchment paper.
Form the jam bars
■Whisk the egg white in a small bowl to break it up. Remove one dough packet from the refrigerator, unwrap it, and place it on the prepared baking sheet. Brush the egg white in a ½-inch-wide border around the edges of the dough. Spoon the jam onto the dough and use a small offset spatula to spread it evenly over the surface, leaving the ½-inch border brushed with egg white free of jam. Unwrap the second packet of dough and gently place the dough on top of the packet. Use your fingertips to gently press along the edges of the dough to seal the top and bottom together. If any jam has squeezed out the sides of the sealed dough, use a damp paper towel to wipe off the jam so it doesn’t burn in the oven.
■Press the edges of the top and bottom sheets of dough together with the back side of a fork to further seal them. Again, if any jam squeezes out, use a damp paper towel to wipe it off. Pierce the dough all over with the tines of the fork, making sure to get all the way through both the top and bottom layers of dough. Brush the dough with the remaining egg white and sprinkle with the sugar.
Bake the jam bars
■Place the baking sheet on the center rack of the oven to bake the jam bars for 35 to 40 minutes, rotating them front to back halfway through the baking time so they bake evenly, until the top is light golden brown and the edges are deep golden brown; some spots may darken even further from the jam that has leaked out. Remove the baking sheet from the oven and place it on a cooling rack until the bars have cooled completely.
■Set the baking sheet on a cutting board. Holding onto the parchment paper, gently slide the jam bars onto the work surface. Using a large knife, cut into 28 bars. Store the bars in an airtight container at room temperature for up to 1 week or freeze for up to 3 months.
To cut bars, blondies, brownies, slab pies, or any other rectangular baked goods into even pieces, first make a cut down the center, then make an even number of cuts on either side of the center. Rotate the pan 90 degrees and do the same thing, making a cut down the center that is perpendicular to the first cuts, and then making an even number of cuts on either side of the center line.
Chocolate Shortbread
Makes 18 to 20 (2-inch) cookies
These shortbread cookies are very chocolaty and not too sweet; they make a great afternoon snacking cookie. I also use the cookies to make ice cream sandwiches and grind them into crumbs to use in Chocolate Babka (this page).
1⅓ cups plus more (160 grams) all-purpose flour, for dusting
⅔ cup (57 grams) cocoa powder (preferably Valrhona)
⅛ teaspoon (1 gram) baking soda
½ teaspoon (3 grams) fine sea salt
11 tablespoons (1 stick plus 3 tablespoons) unsalted butter, cubed and softened (see this page) (155 grams)
½ cup (100 grams) granulated sugar
Make the dough
■Put the flour, cocoa powder, baking soda, and salt in a medium bowl and whisk to combine the ingredients. Set aside.
■Place the butter and sugar in the bowl of a stand mixer. Fit the mixer with the paddle attachment and beat on medium speed for 2 to 3 minutes, stopping to scrape down the sides of the bowl with a rubber spatula once or twice, until the mixture is light and fluffy. Turn off the mixer, scrape down the sides of the bowl with a rubber spatula, and add the dry ingredients. Mix on low speed until the dough comes together and wraps around the paddle.
■Lay two long sheets of plastic wrap in a crisscross formation on your work surface. Scoop the dough out of the bowl onto the center of the cross of plastic wrap and use your hands to pat the dough into a rectangular block. Loosely wrap the dough in the plastic, leaving a few inches of slack all around. Run a rolling pin over the dough to roll it out in the plastic, to a ½-inch-thick rectangle. (For more detail, see Wrapping Dough, this page.) The dough does not need to be refrigerated before rolling it out (it is already a stiff dough), but if you are planning ahead, you can refrigerate the dough for up to 3 days.
Prepare to bake the shortbread
■Arrange the oven racks so one is in the top third of the oven and the other is in the bottom third. Preheat the oven to 325°F.
■Line two baking sheets with parchment paper.
Roll out and cut the shortbread
■Lightly dust a large flat work surface with flour. Remove the dough from the refrigerator, remove and discard the plastic wrap, and place the dough on the floured surface.
■Lightly dust the top of the dough and the rolling pin with flour. Starting from the center of the dough and working outward with the rolling pin, roll out the dough to an even rectangle ⅜ inch thick, dusting the work surface, dough, and rolling pin as needed to keep the dough from sticking. (For more detailed instruction, see Rolling Dough 101, this page.)
■If you are making the cookies to serve and eat on their own, use a straight-edge and a pastry wheel or long knife to trim the top and bottom edges of the dough to create straight lines; reserve the scraps. Cut the dough into 2-inch squares. Use an offset spatula to lift the dough squares up and transfer them to the parchment-lined baking sheets, leaving about 2 inches between each cookie. Prick each square several times with the tines of a fork. If you are making the cookies to turn into crumbs, use a pastry wheel or long knife to cut the dough into roughly 2-inch pieces and prick them with the tines of a fork.
Bake the shortbread
■Place one baking sheet on each oven rack and bake the shortbread for about 17 minutes, until the tops are dry to the touch and the cookies have begun to fall after rising, rotating the baking sheets from front to back and from one rack to the other halfway through the baking time. Remove the cookies from the oven and set them aside for about 2 minutes to cool on the baking sheets. Use an offset spatula or a metal spatula to transfer the shortbread to a cooling rack to cool completely.
■While the cookies are baking, gather the scraps and roll them into a ball. Pat the dough into a thin block, wrap it in plastic, and place it in the refrigerator to chill. Roll out, cut, and bake the scraps as you did the first batch.
■Store the shortbread in an airtight container at room temperature for up to 1 week or freeze for up to 3 months.
Hazelnut Linzer Cookies with Pineapple Jam
Makes 20 to 22 sandwich cookies
Not long ago, I went to a small, beautiful tea shop called Té Company in the West Village in Manhattan and tried their delicious little sandwich cookies filled with pineapple jam. I had never tasted pineapple jam like this before. It was infused with rosemary; I thought it was very special, particularly paired with hazelnut cookies. This is my version of those cookies. It is similar to a linzer cookie, but the cookie itself is crisper and not as tender as a traditional linzer cookie. These filled sandwich cookies are really good the day after they’re assembled, but after two days, the filling turns the cookies soggy and they begin to go downhill. Use Raspberry Jam (this page), Blood Orange Jam (this page), Lemon Rosemary Curd (this page), or your favorite store-bought jam, if one of those is more convenient or more to your liking than the pineapple jam in this recipe.
Note You will need a 2-inch round cookie or biscuit cutter and a smaller cutter to make these.
1 heaping cup (140 grams) hazelnuts
2⅓ cups (280 grams) all-purpose flour
1 teaspoon (5 grams) baking powder
1 teaspoon (6 grams) fine sea salt
1¾ cups (350 grams) granulated sugar
16 tablespoons (2 sticks) unsalted butter, cubed and softened (see this page) (226 grams)
1 large egg (50 grams)
1 teaspoon (5 grams) pure vanilla extract
1 cup Pineapple Jam (recipe follows)
Get prepared
■Arrange the oven racks so one is in the center position. Preheat the oven to 300°F.
■Spread the hazelnuts on a baking sheet and toast them in the oven for 20 to 25 minutes, shaking the pan once during that time for even toasting, until the nuts are golden brown and fragrant. Remove the baking sheet from the oven and set aside to cool the nuts to room temperature.
■Put the nuts in the center of a clean kitchen towel, gather the towel to close it, and rub the nuts in the towel between your hands to remove as much of the skins as possible. Open the towel, discard the skins, and transfer the hazelnuts to the bowl of a food processor fitted with a metal blade.
■While the nuts are cooling, whisk the flour, baking powder, and salt together in a medium bowl.
Make the dough
■Add ½ cup (100 grams) of the sugar to the bowl of the food processor and pulse until the nuts are very finely ground, 30 seconds to 1 minute. (It is important to pulse rather than run the machine continuously, so you don’t end up with hazelnut butter.)
■Transfer the hazelnut-sugar crumbs to the bowl of a stand mixer. Add the butter and the remaining 1¼ cups (250 grams) sugar. Fit the mixer with the paddle attachment and beat for about 20 seconds on the lowest speed to prevent the sugar-nut mixture from flying out of the mixer. Increase the speed to medium and beat for 2 to 3 minutes, until light and fluffy. Turn off the mixer and scrape down the sides of the bowl with a rubber spatula. Add the egg and vanilla and mix on medium speed until the egg is completely incorporated. Stop, scrape down the sides of the bowl, and add the dry ingredients. Mix on low speed until no flour is visible, stopping to scrape down the sides of the bowl once during this time.
■Lay two long sheets of plastic wrap in a crisscross formation on your work surface. Use a plastic bowl scraper to scoop the dough out of the bowl onto the center of the cross of plastic wrap and use your hands to pat the dough into a rectangular block. Loosely wrap the dough in the plastic, leaving a few inches of slack all around. Run a rolling pin over the dough to roll it out in the plastic to a ½- to 1-inch-thick rectangle. (For more detail, see Wrapping Dough, this page.) Place the dough in the refrigerator to chill for 1 hour, and up to 2 days.
Prepare to bake the cookies
■Arrange the oven racks so one is in the top third of the oven and the other is in the bottom third. Preheat the oven to 325°F.
■Line two baking sheets with parchment paper.
Roll out and cut the cookies
■Remove the dough from the refrigerator, unwrap the dough, and use a bowl scraper or knife to cut the dough in half. Rewrap and return one half of the dough to the refrigerator.
■Lightly dust a large flat work surface with flour. Place the dough on the floured surface, lightly dust the top of the dough and a rolling pin with flour, and starting from the center and working outward, roll the dough out to a ⅛-inch-thick rectangle. (For more detailed instruction, see Rolling Dough 101, this page.)
■Using a 2-inch cookie or biscuit cutter, cut circles from the dough, making the cuts close together to get as many cookies as possible from the dough. Use a small offset or metal spatula to lift the cookies off the work surface and onto the prepared baking sheets, leaving about 2 inches between each cookie. Gather the scraps of dough into a ball and set aside.
■Remove the second half of the dough from the refrigerator and roll and cut the dough in the same way that you did for the first batch. After cutting all of the circles, use a small circular cutter to cut smaller circles, like doughnut holes, in the center of each of the 2-inch rounds. Use a small offset or metal spatula to lift the circles with the holes in them off the work surface and onto the prepared baking sheets, leaving about 2 inches between each cookie.
■Gather the scraps, add them to the first bunch of scraps, and pat them into a thin disk. Wrap the dough in plastic and place it in the refrigerator for at least 2 hours and up to 3 days to firm up.
Bake the cookies
■Place one baking sheet on each oven rack and bake the cookies until they are golden brown around the edges, 15 to 18 minutes for the “doughnut” cookies, and 18 to 20 minutes for the whole rounds, rotating them from front to back and from one rack to the other halfway through the baking time. Remove the baking sheets from the oven and let the cookies cool on the baking sheets for 5 to 10 minutes. Use a small offset or metal spatula to transfer the cookies to a cooling rack to cool to room temperature.
■Roll out, cut, and bake the scraps, cutting an equal number of tops and bottoms.
Assemble the cookies
■Set up an assembly line with full round cookies, the jam, and then the cookies with the holes cut out all laid out in a line.
■Spoon 1 heaping teaspoon of jam on the bottom (flat) side of one full cookie round and use a small offset spatula to spread the jam over the surface, leaving a small border around the edge with no jam. Place a “doughnut” cookie on top with the flat side of the cookie facing the jam, and gently press on the top to smush the jam down in an even layer. Repeat, using the rest of the cookies and jam to assemble the rest of the cookie sandwiches.
■Store the cookies in an airtight container at room temperature for up to 1 week or freeze for up to 3 months.
Pineapple Jam
Makes about 2½ cups
3 limes
1 medium to large ripe pineapple
1½ cups (300 grams) granulated sugar
1 cup (235 grams) water
2 sprigs fresh rosemary
½ teaspoon (3 grams) fine sea salt
■Place two small plates in the freezer. (You’ll use these later to test the jam for doneness.)
■Use a fine Microplane to grate the zest of one lime into a bowl, grating only the outermost, bright-colored layer.
■Cut off the top and bottom of the pineapple, remove the skin, and discard. Cut the pineapple into quarters and cut out and discard the cores. Turn each quarter onto its side and slice it into ⅛- to ¼-inch-thick wedges. Place the pineapple in the bowl of a food processor fitted with a metal blade and process to a rough pulp with no large chunks remaining. Transfer the pulp to a medium saucepan. Add the sugar, water, lime zest, and the juice from the remaining 2 limes. Bring the mixture to a boil over medium-high heat and cook, stirring frequently, for 20 to 30 minutes, until the jam is thick enough that you can draw a clean line in it with a wooden spoon across the bottom of the pan. Reduce the heat to low, add the rosemary sprigs and the salt, and cook for 10 to 15 minutes more, stirring frequently so the jam doesn’t burn on the bottom, until the jam is very thick.
■To test to see if the jam has set up sufficiently, remove one of the plates from the freezer. Place a spoonful of jam on the plate and return the plate to the freezer for 2 minutes, then gently slide your finger through the jam; if the skin on top of the jam wrinkles, it’s done. If not, put the jam back on the heat and cook it for a few more minutes, then test again in the same way using the second plate you put in the freezer.
■Remove the saucepan from the heat, pour the jam into a heat-proof storage container, and set aside to cool to room temperature with the lid slightly ajar. Cover and refrigerate the jam until you are ready to use it, or for up to several months.
Spiced Graham Crackers with Chocolate Marshmallows
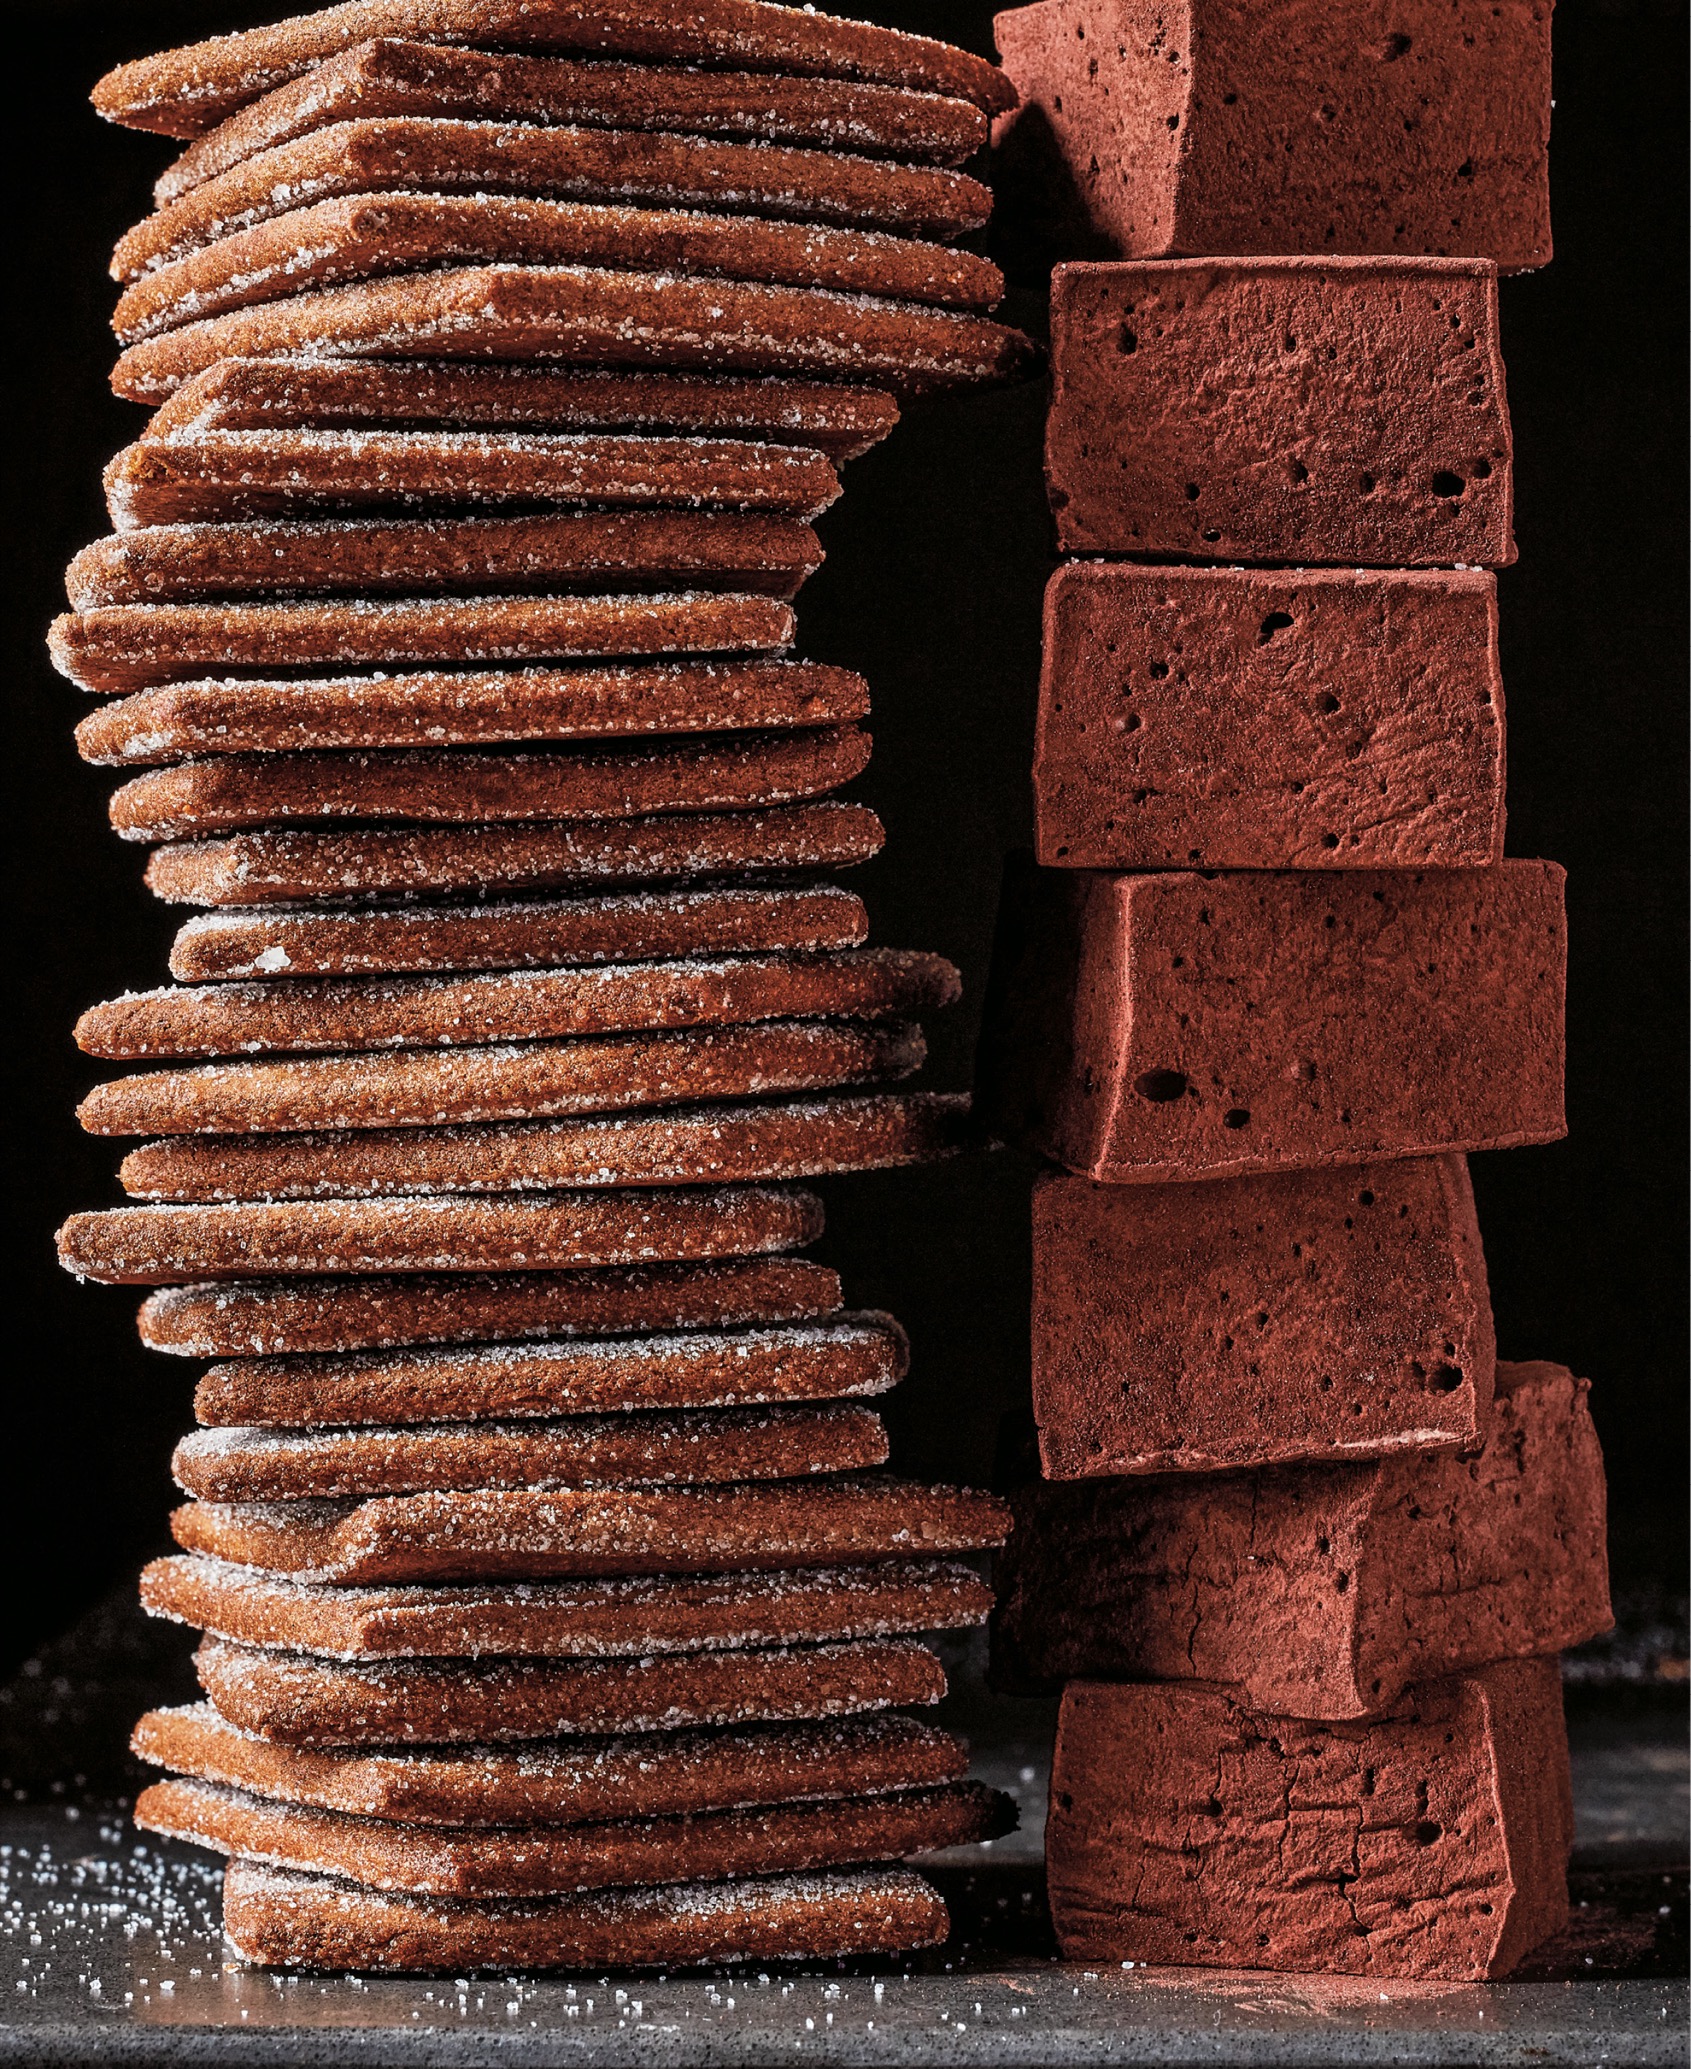
Makes 3 to 4 dozen graham crackers
Even though most of us have been eating graham crackers all our lives, many people are surprised to learn that there is even such a thing as homemade graham crackers. I put cinnamon and cayenne pepper in mine, so they’re a little bit spicy, but obviously you can skip the cayenne if you want. I make these most often when I am making s’mores with Chocolate Marshmallows (this page), which I do for my family when we go camping, or in the winter, to toast the marshmallows in the fireplace.
I call for you to roll out this dough between two sheets of parchment paper. It is a sticky dough that gets even stickier as it warms up in the process of being rolled out.
2 cups plus more (240 grams) all-purpose flour, for dusting
¾ cup (79 grams) whole-wheat pastry flour
1 cup (lightly packed) dark brown sugar (200 grams)
1 tablespoon (6 grams) ground cinnamon
1 teaspoon (5 grams) baking soda
1 teaspoon (6 grams) fine sea salt
¼ teaspoon (2 grams) cayenne pepper
8 tablespoons (1 stick) unsalted butter, cold and cubed (113 grams)
⅓ cup (105 grams) mild-flavored honey (such as wildflower or clover)
¼ cup (60 grams) whole milk
2 teaspoons (10 grams) pure vanilla extract
about 2 tablespoons (26 grams) granulated sugar, for sprinkling
Make the dough
■Combine the all-purpose flour, whole-wheat pastry flour, brown sugar, cinnamon, baking soda, salt, and cayenne in the bowl of a stand mixer. Fit the mixer with the paddle attachment and mix on low speed to combine. Turn off the mixer. Add the butter and mix on low speed until the mixture is the consistency of coarse cornmeal and no chunks of butter remain, about 2 minutes, stopping once to scrape down the sides of the bowl with a rubber spatula. Turn off the mixer.
■Whisk the honey, milk, and vanilla in a small bowl and add to the mixer bowl. Mix on low speed until the dough comes together and no flour is visible, 1 to 2 minutes, stopping once during that time to scrape down the sides of the bowl with a rubber spatula. Turn off the mixer.
■Lay two long sheets of plastic wrap in a crisscross formation on your work surface. Use a plastic bowl scraper to scoop the dough out of the bowl onto the center of the cross of plastic wrap and use your hands to pat the dough into a rectangular block. Loosely wrap the dough in the plastic, leaving a few inches of slack all around. Run a rolling pin over the dough to roll it out in the plastic to a ½- to 1-inch-thick rectangle. Refrigerate the dough for at least 2 hours, until it is firm, and for up to 2 days.
Roll out and cut the dough
■Remove the dough from the refrigerator, unwrap the dough, and use a bench knife or serrated knife to cut it in half. Rewrap half of the dough and return it to the refrigerator.
■Lay a sheet of parchment paper on a large flat work surface and dust it lightly with all-purpose flour. Place the dough on the parchment and dust the top lightly with flour. Place another sheet of parchment on top of the dough. Working as quickly as possible to prevent the dough from warming up and becoming sticky, roll out the dough between the sheets of parchment paper to ⅛ inch thick. (A few times during the rolling process, quickly lift the top sheet of parchment paper, dust the dough with flour, and lay the paper back down. Flip the dough over and do the same on the other side. If the dough becomes too sticky to roll, place it, sandwiched between the two sheets of parchment paper, in the refrigerator to chill until it firms up slightly before continuing to roll it out.) Place the dough, sandwiched in the parchment paper, in the refrigerator. Remove the second half of dough from the refrigerator and roll it out and refrigerate it as you did the first batch. Lay the second sheet of dough on top of the first sheet in the refrigerator. Chill the dough for at least 30 minutes, until it is firm.
■Remove one sheet of dough from the refrigerator. Peel off the top sheet of parchment paper and then lay it back on the dough. Flip the dough over and remove the remaining sheet of parchment paper; use it to line a baking sheet with the clean side facing up.
The reason you remove the parchment paper only to set it back on the dough is so that the dough is not stuck to the paper; this makes it easier to lift off of the paper after it is rolled out.
■Using a straightedge and pastry wheel or long knife, trim the top and bottom edges of the dough to create straight lines; reserve the scraps and set them aside. Cut the dough into 2½-inch squares, adding the outermost strips with uneven edges to the trimmings. Use an offset spatula to lift the dough squares up and transfer them to the parchment-lined baking sheet, fitting as many squares as you can on the paper in a single layer. Place the baking sheet with the squares in the refrigerator while you cut the second sheet of dough.
Note that graham cracker dough is very sticky, so it is more important to work quickly than it is to measure impeccably.
■Remove the baking sheet with the cut dough from the refrigerator and use the offset spatula to lift the squares off the work surface and onto the parchment paper that you laid on the first layer of cookies. Return the baking sheet to the refrigerator to chill the graham squares for at least 30 minutes and as long as overnight.
■Gather the scraps of dough into a ball and pat the ball into a thin block with your hands. Place the dough in the refrigerator to chill for 15 to 20 minutes, until it firms up. Remove the dough from the refrigerator and roll and cut it as you did the others. Discard any remaining scraps.
Prepare to bake the graham crackers
■Arrange the oven racks so one is in the top third of the oven and the other is in the bottom third. Preheat the oven to 325°F.
■Line two baking sheets with parchment paper.
Bake the graham crackers
■Remove the baking sheet with the graham cracker squares from the refrigerator. Transfer 8 cookies to each of the prepared baking sheets, spacing them evenly. Prick the squares with the tines of a fork and sprinkle them with a thin layer of granulated sugar. Return the remaining dough squares to the refrigerator.
■Place one baking sheet on each oven rack and bake the graham crackers for 16 to 18 minutes, until they are crispy and light golden brown around the edges, rotating the baking sheets from front to back and from one rack to the other halfway through the baking time. Remove the graham crackers from the oven and set them aside to cool for 5 to 10 minutes on the baking sheet. Use a spatula to move the graham crackers onto a cooling rack to cool completely. The graham crackers should be crunchy throughout once they have cooled. If they are not, return them to the oven and bake for an additional 2 to 3 minutes.
■Bake the remaining cookies in the same way.
■Store the graham crackers in an airtight container at room temperature for up to 1 week or freeze for up to 3 months.
Chocolate Marshmallows
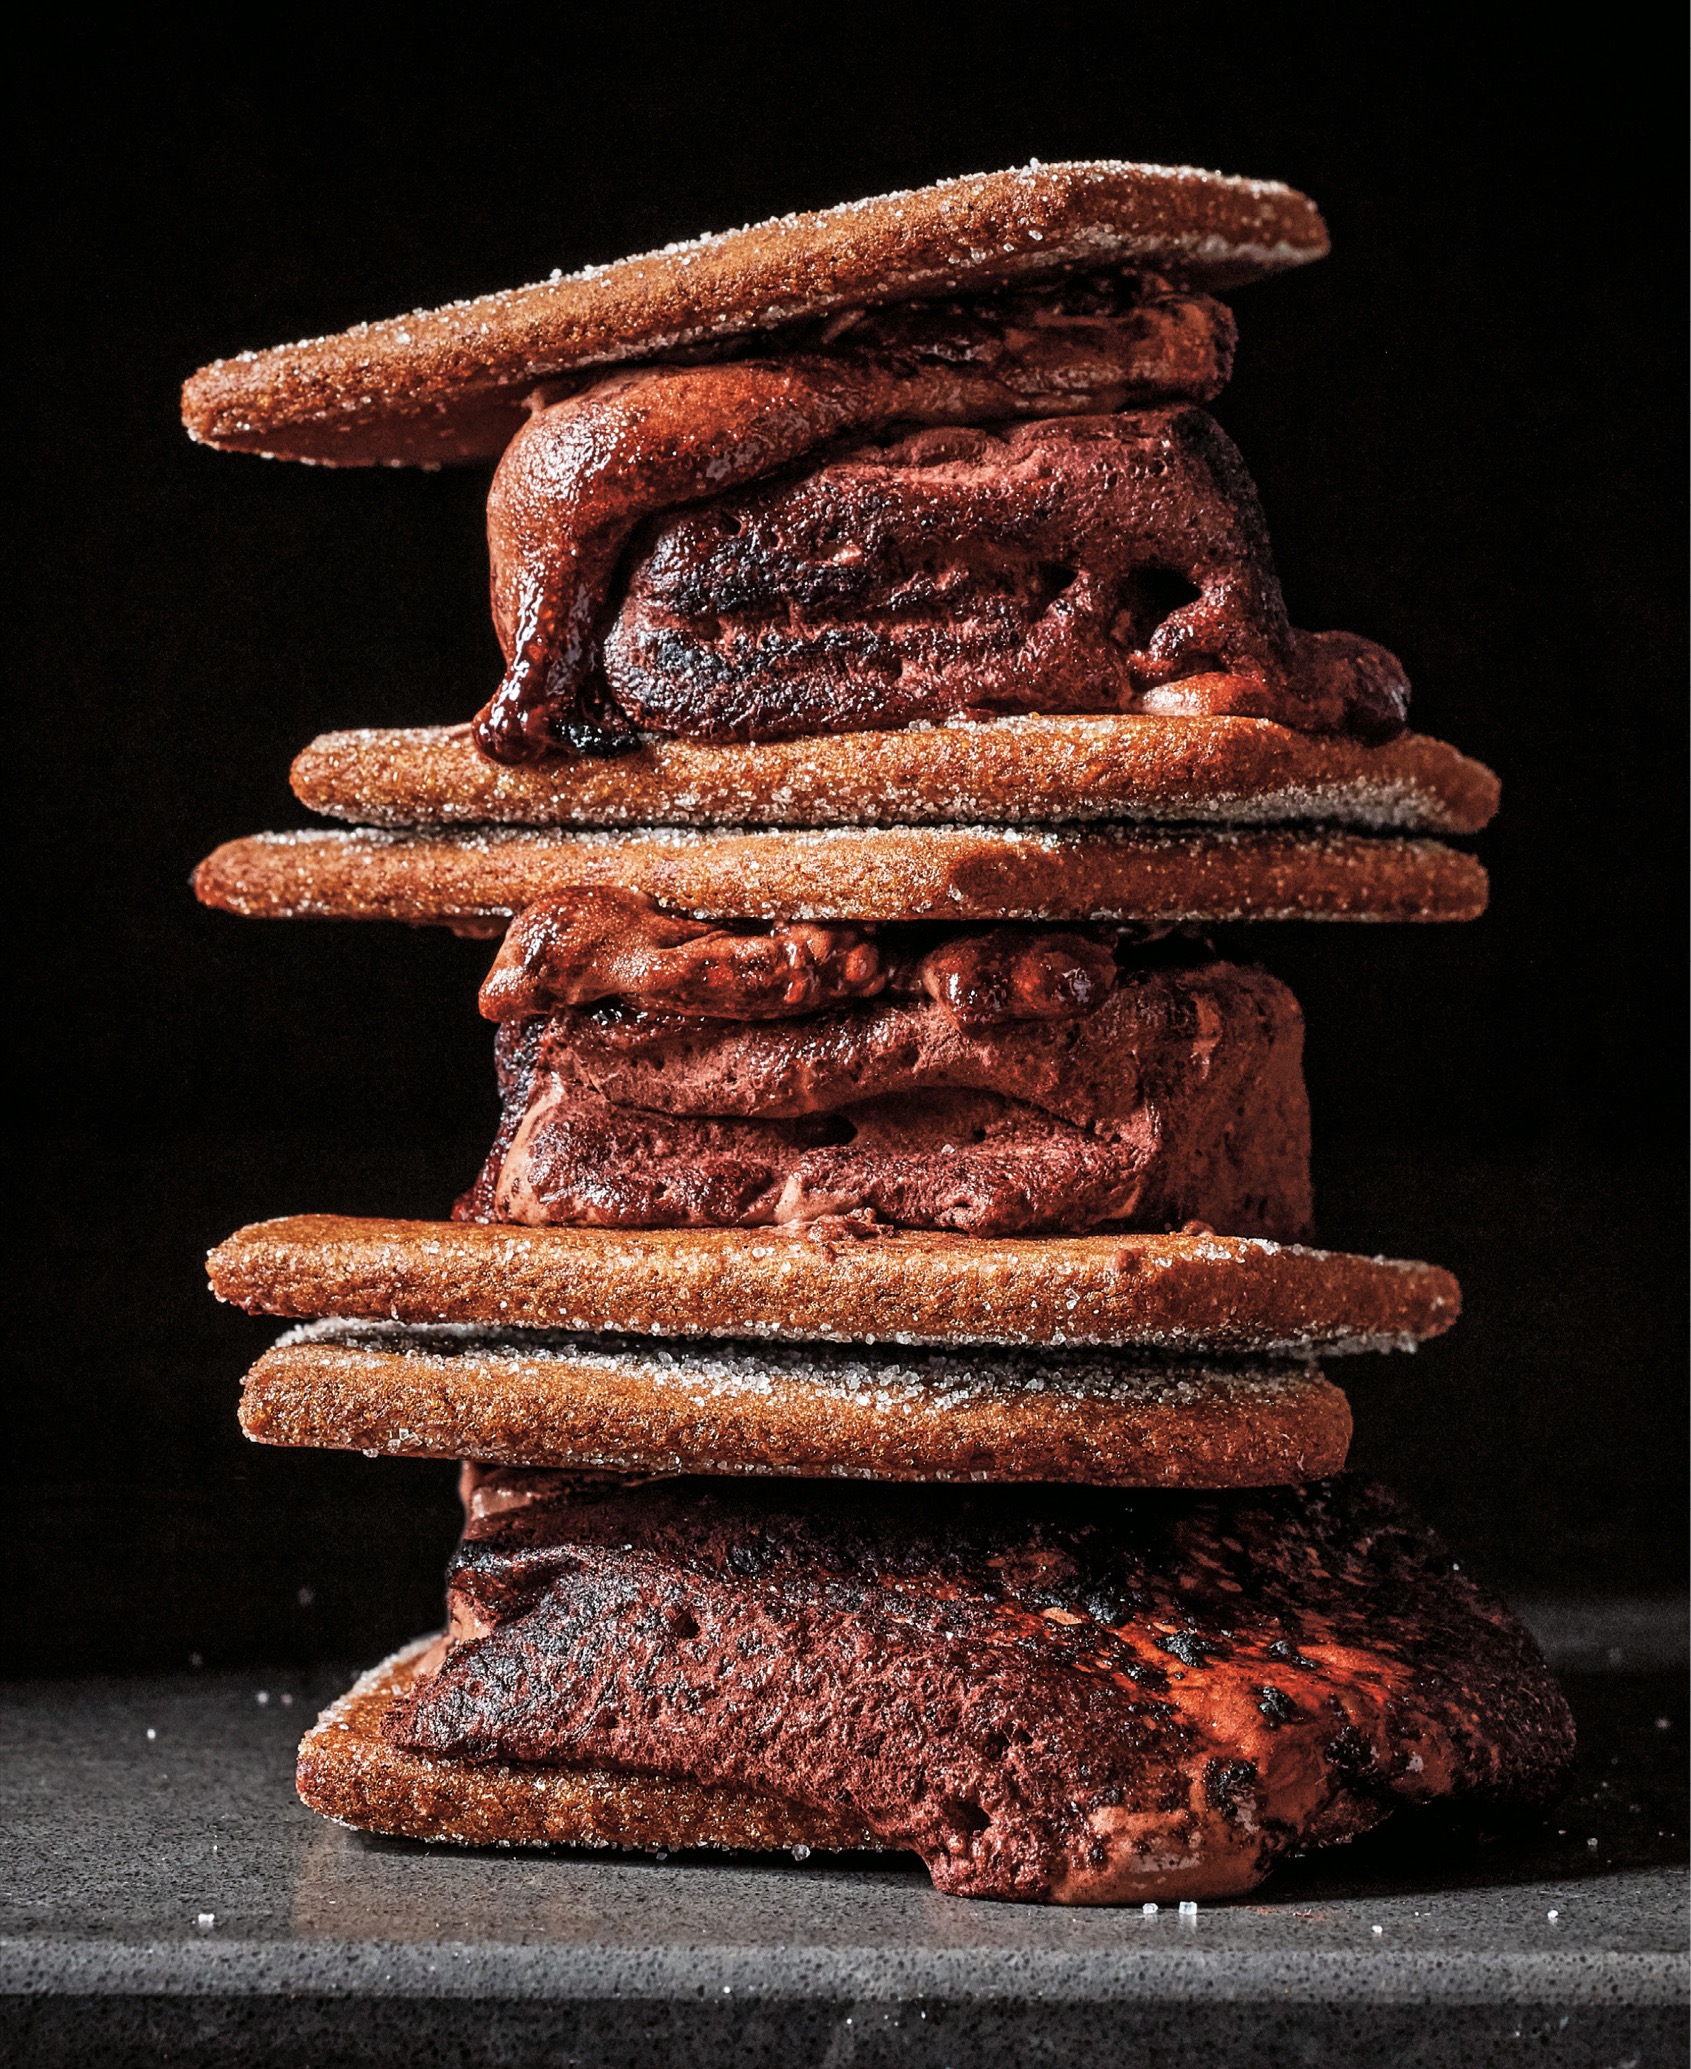
Makes 2 to 3 dozen marshmallows
I love s’mores, but my pet peeve is when the chocolate doesn’t melt all the way through from the heat of the marshmallow. My solution to this problem is to put the chocolate in the marshmallow, eliminating the chocolate bar altogether, which is how these marshmallows came about. The secret to getting these marshmallows so chocolaty is that I cook the cocoa powder with the sugar syrup. This is something Gina DePalma taught me when I worked at Babbo. When we made chocolate sorbetto, Gina was insistent that we simmer cocoa powder for at least fifteen minutes. If it wasn’t cooked long enough, she said the sorbetto didn’t taste as good, and she would get angry—and you didn’t want to face Gina when she was angry in the kitchen!
Marshmallows are set up with gelatin, which is derived from collagen. Gelatin is sold in the form of powder and sheets. I call for powdered gelatin because it is more widely available to the home cook. It needs to be rehydrated before using it, so you will see that step in this recipe.
Note You will need an 8-inch square baking pan to make this and a candy thermometer.
Nonstick cooking spray
1 cup (235 grams) cold water
3 packets (22 grams) powdered gelatin
2⅓ cups (467 grams) granulated sugar
½ cup (158 grams) light corn syrup
½ cup (43 grams) cocoa powder (preferably Valrhona)
2 tablespoons (40 grams) mild-flavored honey (such as wildflower or clover)
¼ teaspoon (2 grams) fine sea salt
1 teaspoon (5 grams) pure vanilla extract
For dusting
3 tablespoons (22 grams) cocoa powder (preferably Valrhona)
2 teaspoons (5 grams) confectioners’ sugar
Get prepared
■Spray an 8-inch square baking pan with nonstick cooking spray. Line the pan with aluminum foil and use your hands to smooth out the foil as much as possible. Spray the foil generously with nonstick cooking spray.
Make the marshmallow
■Pour ½ cup (118 grams) of the water into the bowl of a stand mixer. Fit the mixer with the whisk attachment and sprinkle the gelatin over the water. Set the bowl on the mixer stand and let it rest for about 5 minutes to hydrate the gelatin.
■Put the granulated sugar, corn syrup, cocoa powder, honey, salt, and the remaining ½ cup (118 grams) water in a medium saucepan and whisk to combine the ingredients. Cook over medium-high heat until a candy thermometer reads 240°F, stirring occasionally. This is the end of what is known in candy making as the “soft-ball stage.” Turn off the heat.
When I’m cooking sugar, I often use the thermometer I’m using to gauge the temperature to stir, so I don’t dirty another tool.
■With the mixer on high, gradually add the sugar syrup, pouring it down the inside of the bowl so it doesn’t splash against the whisk, shooting the syrup all over the sides of the bowl. Whip for 15 minutes, until the marshmallow cools to room temperature; check the temperature by cupping your hands around the bottom of the bowl. Turn off the mixer, add the vanilla, and mix on medium speed to distribute the vanilla.
■Scoop the marshmallow into the prepared pan with a rubber spatula or a large metal spoon. Spray a large offset spatula with nonstick cooking spray (or grease it with neutral-flavored oil) and use it to spread the marshmallow to the corners of the pan and even out the top.
Dust and cut the marshmallows
■Place the cocoa powder and confectioners’ sugar in a small bowl and stir to combine. Transfer the mixture to a fine-mesh strainer and lightly dust the mixture over the top of the marshmallow to cover it with a light drift of the powder; reserve the remaining powder. Set the pan of marshmallow aside to rest, uncovered, for 8 to 10 hours to let the marshmallows set. (If you let the marshmallows rest any longer than about 10 hours, they will begin to get a dry crust.)
■Invert the pan to transfer the marshmallow to a cutting board. Remove and discard the aluminum foil and dust the bottom and sides with the remaining cocoa powder mixture. Use a long sharp knife to cut the marshmallow into 1½-inch cubes. Dust the sides of each marshmallow with the remaining coating powder.
■Store the marshmallows in an airtight container at room temperature for up to 1 week.

Fudgy Brownies

Makes 16 brownies
If there are two brownie camps—one made up of those who prefer cakey brownies and one of those who prefer fudgy—I definitely belong in the fudgy camp. I bake these at 400°F, which makes the outside edges cook faster than they would at the usual 350°F, resulting in brownies that are moist and fudgy on the inside with a delicate, thin crust on the outside. In my opinion, brownies just don’t get any better; I’ve been making this recipe, which I originally adapted from one in Alice Medrich’s book Cookies and Brownies for more than twenty years.
Note You will need an 8-inch square baking pan to make these.
Nonstick cooking spray
4 ounces (or ⅔ cup unsweetened chocolate chips) unsweetened chocolate (113 grams)
8 tablespoons (1 stick) Unsalted butter, cubed (113 grams)
1¼ cups (250 grams) granulated sugar
1 teaspoon (5 grams) pure vanilla extract
½ teaspoon (3 grams) fine sea salt
2 large eggs (100 grams)
½ cup (60 grams) all-purpose flour
Get prepared
■Arrange the oven racks so one is in the center position. Preheat the oven to 400°F.
■Spray the bottom and sides of an 8-inch square baking pan with nonstick cooking spray. Cut a piece of parchment paper 8 inches wide and 15 to 16 inches long. Lay the paper in the pan so it travels up and over two of the sides. Spray the paper with nonstick cooking spray.
Make the batter
■Pour 1 to 2 inches of water into the bottom of a small saucepan and choose a bowl that fits over the saucepan to make a double boiler. Make sure the water is not touching the bottom of the bowl; if it is, pour some water out. Bring the water to a boil over high heat, then reduce the heat to medium-low to maintain a gentle simmer.
When I am using a double boiler, while the water is coming to a simmer, I weigh the ingredients directly into the bowl that will rest on top of the simmering water.
■Unless you are using chocolate chips, roughly chop the chocolate. Put the butter and chocolate into the bowl of the double boiler and melt them, using a heat-proof rubber spatula to stir and scrape down the sides of the bowl so the chocolate doesn’t burn.
■Remove the bowl from the double boiler and wipe the bottom of the bowl so no water drips. Add the sugar and vanilla and whisk them in. Add the eggs one at a time and whisk until the batter is shiny and smooth, 1 to 2 minutes. Add the flour and stir with a rubber spatula until no flour is visible.
Bake the brownies
■Using a rubber spatula, transfer the batter to the prepared pan. Use the spatula to smooth out the top of the batter.
■Place the brownies on the center rack of the oven and bake for 20 minutes, rotating the pan from front to back halfway through the baking. Remove the brownies from the oven and cool on a cooling rack. The tops will appear dry, but the insides will remain fudgy if you poke the center with a toothpick or cake tester. Holding the sides of the parchment paper, lift the brownies out of the pan and place them on a cutting board. Using a large knife, cut the brownies into 16 equal pieces.
■Store the brownies in an airtight container at room temperature for up to 1 week or freeze for up to 3 months.


Milk Chocolate and Raspberry Blondies
Makes 2 dozen blondies
I’m not always fan of blondies. I often find them to be too sweet, but these are different. First, they are made with salted butter. Then they are dotted with raspberry jam, which is a bit tart, and sprinkled with sea salt, so they have a nice balance, and in my opinion, they really break the blondie mold.
Note You will need an 8- x 12-inch baking pan to make this.
Nonstick cooking spray
2 cups (240 grams) all-purpose flour
1 teaspoon (5 grams) baking powder
8 ounces (1¼ cup milk chocolate chips) milk chocolate (226 grams)
1½ cups (lightly packed) dark brown sugar (300 grams)
2 large eggs (100 grams)
16 tablespoons (2 sticks) salted butter, melted and cooled slightly (226 grams)
2 teaspoons (10 grams) pure vanilla extract
½ cup (145 grams) Raspberry Jam (this page; or store-bought)
1 teaspoon flaky sea salt (such as Maldon; optional), for sprinkling
Get prepared
■Arrange the oven racks so one is in the center position. Preheat the oven to 350°F.
■Spray the bottom and sides of an 8- x 12-inch baking pan with nonstick cooking spray.
■Whisk the flour and baking powder together in a small bowl and set aside.
■Unless you are using chocolate chips, chop the chocolate into ⅜-inch pieces. Pass the chocolate through a fine-mesh strainer to sift out any dust and discard the dust.
Make the batter
■Combine the brown sugar and eggs in a medium bowl and whisk until the mixture is smooth and lightened in color. Gradually add the butter, stirring with the whisk as you add it and taking care that it doesn’t slosh out of the bowl. Use the whisk to stir in the vanilla. Add the flour mixture and fold it in with a rubber spatula until almost no flour is visible. Add the chocolate and fold it in until the chocolate is evenly distributed and no flour is visible.
Bake the blondies
■Using a rubber spatula, transfer the batter to the prepared pan. Use the spatula to get the batter into the corners of the pan and to smooth out the top. Drop in the jam in ½-teaspoon-size drops, distributing it over the surface of the batter. Draw a small paring knife back and forth through the batter, running it through the jam across the length of the pan and then back across the sides. Sprinkle the salt, if you are using it, over the top.
■Place the blondies on the center rack of the oven and bake for about 30 minutes, until the batter has puffed up, rotating the pan from front to back halfway through the baking time. Remove the pan from the oven and put it on a cooling rack; let the blondies cool to room temperature in the pan. Use a large knife to cut the blondies into 24 equal pieces.
The blondies may not look completely set when they come out of the oven. Not overbaking them is the secret to a moist, chewy texture.
■Store the blondies in an airtight container at room temperature for up to 1 week or freeze for up to 3 months.
