8
No Butter, No Problem
Perfect Allergen-Free Cookies, Tarts and Pies Every Time
A friend recently had a craving for chocolate chip cookies, but was tired from a long day at work. On her way home she stopped at the grocery store and picked up a roll of Nestlé Toll House cookie dough from the refrigerated section. When she got home, she and her boys sliced them up and popped them into the oven. It doesn’t get more convenient than that. We’ve all been there, taking the shortcut so we can optimize family time. I’ve done it too—for years the only pie crust I used was the Pillsbury roll-out crust from the refrigerated section—and yes, it was easy and convenient.
When you’re eating allergen-free, most prepackaged products are no longer an option, but you may be surprised at how simple it is to prepare your own allergen-free dough and use it later. Baking doesn’t have to be time-consuming. I was intimidated by having to create my own crusts, until I understood that all I needed was flour, shortening, and little bit of cold water to create one.
If you mix up big batches of cookie dough, you can refrigerate or freeze what you haven’t used. Dough will keep for weeks in the refrigerator and for up to twelve months in the freezer. The next time you need a special treat, you’ll be ready to bake just as few or many as you desire, and you’ll have them in minutes. If you like pies, mix up batches of pie crust dough and store them in the refrigerator or freezer. This can bring your time in the kitchen down to forty-five minutes or less when you’re ready to start baking.

About Gluten-Free Doughs and Crusts
When working with batters, you will get the best results when the ingredients are at room temperature. This “neutral” temperature ensures that the ingredients don’t react too soon, but are ready to react as soon as they find the oven heat. When working with doughs and crusts, notice that many of the ingredients will be used cold. This is deliberate. The shortening should be cold when you cut it into the flour for a crust, and cold water will keep the crust from sticking to the rolling surface. Many recipes, including the ones I have created for you here, require refrigerating the dough prior to scooping cookies or rolling out a pie crust. Why? Spread is a common problem with doughs and crusts, whether or not they are wheat-free. With non-gluten grains, the problem is exacerbated because you no longer have the gluten to help the baked goods hold their shape. Chilling firms up the fat (the shortening), which keeps cookies from spreading too much, and allows pie crusts to hold their own.
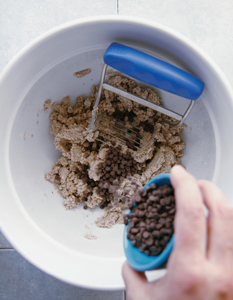
One technique you will use when creating doughs is called cutting (sometimes referred to as rubbing). This is a technique in which first the dry ingredients are blended together, then the fat is “cut” into the flour mixture, and lastly, a small amount of cold liquid is added to help the ingredients stick together. This is similar to the technique used to create the streusel topping for Coffee Cake, and you’ll see it used throughout this chapter. To cut the fat into the flour you can use a pastry cutter, a wide-pronged fork (a pastry fork), or your hands. Yes, hands are fantastic tools for baking.
When preparing doughs, you won’t be using an electric mixer. If you blend the ingredients with a mixer you will most likely blend them too well; the fat (the shortening) should remain in small pieces in your dough. During the baking process the shortening will melt, giving the cookie or crust a flaky pastry quality. Likewise, resist the urge to blend too well when rubbing. And because you won’t be getting these baked goods into the oven right away after mixing, it’s important to ensure that the xanthan gum is very well blended into the flour before adding any wet ingredients.
There’s one final point I need to make before you start baking cookies: I have called for Earth Balance Natural Shortening in the recipes in this chapter because it performs better than the rest of the pack. Earth Balance makes a number of shortenings—this one comes in stick form, in a green and pale yellow box. The ingredients include soybean oil, but no soy protein. If you and your doctor have determined that you must avoid soybean oil, substitute Spectrum Organic All Vegetable Shortening or coconut oil. See more on shortening options. Whichever you choose, make sure you choose a shortening (rather than an oil) and use it cold; the keys to success when mixing dough are to keep the shortening cold until you are ready to use it and to cut the shortening into tablespoon-sized pieces before you begin working it into the flour.
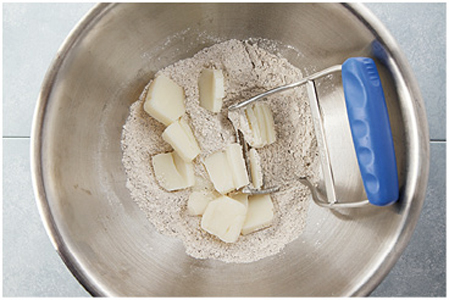
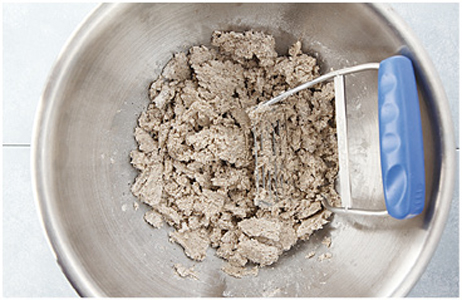
cutting shortening into flour
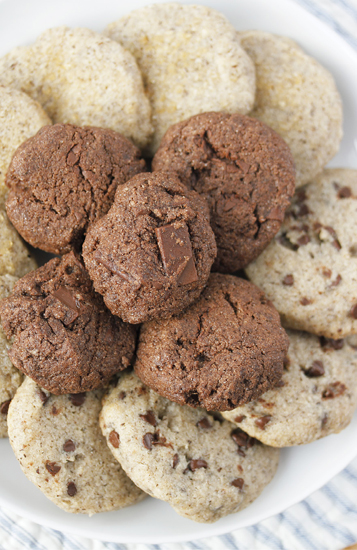
Sugar Cookies
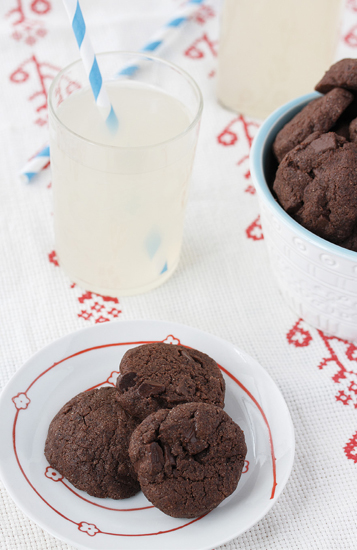
(Pictured with Chocolate Chip Cookies and Chocolate Chunk Cookies.)
Remember those rolls of cookie dough that I mentioned earlier? I’m going to show you how you can create your own refrigerated cookie dough, using allergen-free ingredients. While I can’t claim that these are low-calorie or sugar-free (they are sugar cookies after all!), the buckwheat flour does add a bit of protein that the originals are lacking.
I sometimes make these as half-and-half batches—½ sugar cookies, and ½ chocolate chip cookies (see the variation below). In my house, that keeps everyone happy. I dare you to tell me that these aren’t among the best cookies you’ve ever had!
{ Makes 24 to 36 cookies }
½ cup buckwheat flour
¾ cup gluten-free flour blend
¼ teaspoon xanthan gum (leave out if your flour blend contains xanthan gum)
1½ teaspoons baking powder
½ teaspoon salt
½ cup granulated sugar
8 tablespoons (1 stick) Earth Balance Natural Shortening, cold
2 tablespoons unsweetened applesauce, cold (see tip)
1 tablespoon cold water (as needed)
¼ cup raw sugar (for topping)
- Combine the flours, xanthan gum (if needed), baking powder, salt, and granulated sugar in a large mixing bowl.
- Cut the shortening into tablespoon-sized pieces and place them on top of the flour mixture. Use a pastry cutter or pastry fork to cut the shortening into the flour mixture.
- When the flour and shortening are crumbly, add the applesauce and continue cutting with the pastry cutter.
- Add up to 1 tablespoon of cold water, ½ tablespoon at a time, as needed. Continue cutting until the dough forms.
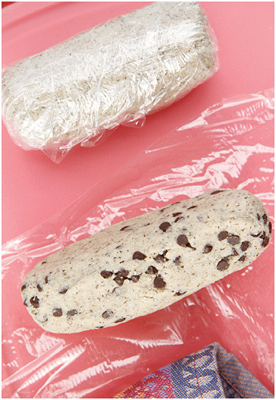
- Roll the dough into a long cylinder, about 1½ inches thick. Wrap it in plastic and refrigerate for at least an hour.
- When you are ready to make the cookies, preheat the oven to 350°F. Line a cookie sheet with parchment paper.
- Slice the cookies from the roll, about ¼ inch thick. Place the cookies on the cookie sheet, with space in between.
- Sprinkle raw sugar on top of the cookies and gently press it into the dough.
- Bake at 350°F for 12 to 14 minutes, until lightly browned.

- The applesauce provides some texture in these cookies, but isn’t required. For a crispier cookie, substitute 2 tablespoons of cold water for the applesauce.
- These are easy to make in large batches. Keep the rolls of dough in your refrigerator or freezer (just as you would the kind you buy in the refrigerated section of the grocery store).
- Use a very sharp, nonstick knife to slice the cookies. If you don’t have a nonstick knife, spray a small amount of cooking oil on your blade to make the job easier.
* Variation:
Chocolate Chip Cookies: Prepare the sugar cookies as described earlier. Prior to rolling the dough into a cylinder (step 5) add ½ cup of allergen-free chocolate chips. Work the chocolate chips into the dough with your hands, roll, wrap, and refrigerate. Leave off the sugar topping. Enjoy Life Mini Chips work extremely well with this recipe (see more options).

Rolling Out a Crust
As noted earlier, when working with dough you want the ingredients, especially the fat, to be cold before mixing the dough. Likewise, once the dough is prepared, you want it to be cold before rolling out a crust. A cold dough will ensure that the shortening doesn’t spread too much as you’re rolling, and it will keep it from sticking too much to the rolling surface. While it’s tempting to skip the step where you refrigerate the dough, I don’t recommend it; it’s much easier to roll out a crust after the dough has been chilled. If you’re working from frozen dough, either let it thaw in the refrigerator overnight, or let it thaw at room temperature for a couple of hours. You may need to rework the dough a bit with your hands if you choose the latter option. Now that your dough is nicely chilled, it’s time to get the rolling pin out. Now is also the time to preheat the oven and prepare the pan you’ll be using for baking.
There are many ways to roll out a pie crust, and most bakers have their favorite technique. What are common among all of them are a nonstick surface and a good rolling pin. I addressed the rolling pin earlier, now let’s talk about the rolling surface. If you are lucky enough to have a marble counter or slab, that’s a great choice; in addition to being a nice smooth surface, marble remains cool. For the rest of us, a nonstick pastry mat is the next best thing. And some bakers simply use two sheets of wax paper and roll their chilled dough between them; after you’ve rolled out a crust peel back the top layer of wax paper, flip the crust into the pie plate using the bottom sheet of wax paper, and then peel back the second layer of wax paper. Make sure the diameter of your pie crust is 2 inches wider than your pie plate; you need enough crust for the sides of the plate and to crimp the edges.
You might be surprised that it’s actually easier to form a gluten-free pie crust than a wheat crust. Yes, this is one area where working with gluten-free flours is an advantage. If a wheat crust cracks or breaks as you’re moving it to the pie plate you have to re-roll it (and then attempt to delicately move it again). Gluten-free crusts are easy to repair. If you make a hole, or the crust tears as you move it, simply use your fingers to stick it back together. Add additional dough and a couple drops of cold water, if you need to.
If you have any dough left over from trimming the edges of your crust, store it in the freezer for future use.
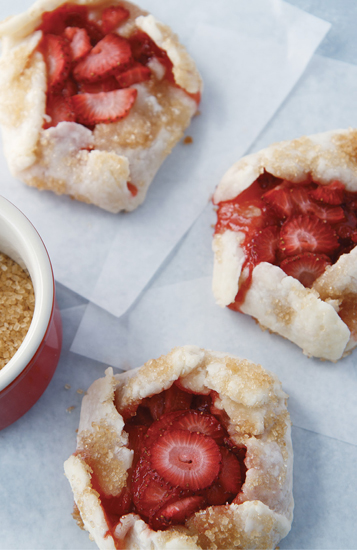
Strawberry Tartlets
In the Hudson Valley where my family lives, we belong to a Community Supported Agriculture program called the Poughkeepsie Farm Project. Every week from late spring through fall I look forward to fresh vegetables. But my favorite part of the weekly trip to the farm is the pick-your-own berries. There is absolutely nothing that can compare to juicy ripe strawberries fresh from the field. When I first joined the CSA and saw how many strawberries we would be taking home every week, I knew I had to develop a recipe that would leverage the sweetness of those strawberries but not overpower them.
This tartlet recipe simplifies the concept of a pie, while giving it a natural, rugged feel. It works well with all varieties of strawberries, taking you through the summer. It can also be made with any other berry, or a combination of berries. Have fun with it!
{ Makes 4 tartlets }
For the tartlets:
1 cup gluten-free flour blend
¼ teaspoon xanthan gum (leave out if your flour blend contains xanthan gum)
½ teaspoon salt
1 tablespoon granulated sugar
4 tablespoons (½ stick) Earth Balance Natural Shortening, cold
1 tablespoon apple cider vinegar
1 to 3 tablespoons cold water (as needed)
For the strawberry filling:
1 cup sliced strawberries (see tip)
1½ teaspoons fresh lime juice
1½ teaspoons tapioca starch
1½ teaspoons granulated sugar
2 tablespoons raw sugar (optional)
Prepare the tartlet crusts:
- Combine the flour, xanthan gum (if needed), salt, and granulated sugar in a large mixing bowl.
- Cut the shortening into tablespoon-sized pieces and place them on top of the flour mixture. Use a pastry cutter or pastry fork to cut the shortening into the flour mixture.
- When the flour and shortening are crumbly, add the apple cider vinegar and 1 tablespoon of cold water. Continue cutting the ingredients together.
- Add up to 2 tablespoons additional water, ½ tablespoon at a time, as needed. Continue cutting until the dough forms.
- Separate the dough and use your hands to create four equal-sized balls. Flatten the balls. Cover with plastic wrap, and refrigerate for at least an hour.
- When you are ready to roll out the dough, preheat the oven to 350°F. Spray a cookie sheet with cooking oil.
Prepare the filling:
- Coat the strawberries with lime juice.
- Combine the tapioca starch and the granulated sugar. Mix this together with the strawberries, by hand, and then set it aside.
Roll out the dough and form the tartlets:
- Place the dough on a smooth prep surface.
- Using a rolling pin, gently roll each disk into a thin crust, about 6-7 inches round.
- Use a spatula to gently lift the crusts and place them on the prepared cookie sheet.
- Scoop the strawberry mixture into the centers of the crusts. Discard any remaining liquid.
- Form the tartlets with your hands by folding the edges of the crusts over the berry filling, leaving the center open. Repair any broken pieces of crust with your fingers and a dab of water, if needed.
- If a sugar crust is desired, use your fingers to sprinkle raw sugar over the folded crusts.
- Bake at 350°F for 20 to 25 minutes, until the crusts are lightly browned and the strawberry filling is bubbling.

- Slice the strawberries thinly (about ⅛ inch thick) for best results.
- The dough will work best if it’s refrigerated for at least an hour prior to rolling it out. It can be made ahead and stored in the fridge overnight, or even frozen. If you are using frozen dough, thaw it in the refrigerator before using it.
Chocolate Chunk Cookies
Cookies are so simple, and yet they can be so decadent. What makes a cookie worthy of the name Chocolate Chunk? That would be the mega chocolate chunks that are used in this recipe. Warm, gooey chocolate surrounded by more chocolate—it doesn’t get better than that. This is the treat that I would choose at the coffee shop, if they made it in an allergen-free version.
This recipe uses the same technique as the Sugar Cookies, and it’s just as easy to keep in your refrigerator or freezer. Unless you’re baking for a big crowd, separate the dough into two parts, and save half for later. You will need to use two baking sheets (or bake two batches) if you make the full recipe.
{ Makes 24 to 36 cookies }
½ cup buckwheat flour
¾ cup gluten-free flour blend
¼ teaspoon xanthan gum (leave out if your flour blend contains xanthan gum)
½ cup natural unsweetened cocoa powder
1½ teaspoons baking powder
½ teaspoon salt
½ cup sugar
10 tablespoons (1 stick + 2 tablespoons) Earth Balance Natural Shortening, cold
2 tablespoons unsweetened applesauce, cold
1 teaspoon vanilla extract
1 to 2 tablespoons cold water (as needed)
½ cup allergen-free mega chocolate chunks (see tip)
- Combine the flours, xanthan gum (if needed), cocoa powder, baking powder, salt, and sugar in a large mixing bowl.
- Cut the shortening into tablespoon-sized pieces and place them on top of the flour mixture. Use a pastry cutter or pastry fork to cut the shortening into the flour mixture.
- When the mixture is crumbly, add the applesauce and vanilla. Continue cutting with the pastry cutter.
- Add up to 2 tablespoons of cold water, ½ tablespoon at a time, as needed. Continue cutting until the dough forms.
- Add the chocolate chunks and work them into the cookie dough with your hands.
- Roll the dough into a long cylinder, about 1½ inches thick. Wrap it in plastic and refrigerate for at least an hour.
- When you are ready to make the cookies, preheat the oven to 350°F. Line a cookie sheet with parchment paper.
- Slice the cookies from the roll, about ½ inch thick, then slice in half. Smooth the edges and place the cookies on the cookie sheet.
- Bake at 350°F for 12 to 14 minutes, until the edges are just softened.

- One of the best allergen-free mega chocolate chunk products is from Enjoy Life Foods.
- If the cookie slices fall apart as you are cutting, simply stick them back together again with your hands.
- These cookies get better the longer the dough sits in the refrigerator. I strongly recommend always having a roll of cookie dough (or two) ready to go.

Sweetening Options
Sugar is sugar, right? To a point, that is correct. The crystal form of sugar that we use in baking is almost always sucrose, and usually comes from the sugar cane plant. Chemically, sucrose is a disaccharide (a combination of two sugars), consisting of the monosaccharides (simple sugars) glucose and fructose.
Is sugar bad for you? Keep in mind that sugar is nearly pure carbs and does contribute greatly to the calorie content of your baked goods. One teaspoon of granulated cane sugar is 15 calories. That doesn’t sound so bad, but consider that 1 cup of sugar is 770 calories. Yikes! Those calories can sure add up. In many of our recipes we will use ½ cup (sometimes more) of sugar; if that sugar is distributed across eight muffins, about 48 calories per muffin will be from the sugar alone. I’m not suggesting that you forgo the sugar in your baked goods. After all, most of us expect our cookies to be sweet. But, whether it’s granulated sugar, confectioners’ sugar, brown sugar, or other forms of sugar, you want to make the most of the sugar you do use.
Sugars are also the same in terms of how they behave when heated. When crystal sugar is heated, it liquefies. This is a key concept to understand as you think about the balance of liquids to solids in your recipes. If you reduce the amount of sugar in a recipe, you will be better off adding a little more liquid rather than adding more dry ingredients. Conversely, if you add more sugar, you may need to reduce the liquid in your recipe. Even though you will usually add the sugar to the dry ingredients, except when you are creaming, you should think of sugar as a liquid when you think about proportions.
Now that I’ve let you in on that secret, you can start to imagine how your choice of a sweetener—crystal sugar or an alternative (e.g., honey, pure maple syrup, or agave nectar) can affect your recipes. Any of these work quite well (and can be easily substituted) with simple batters. Thick batters, doughs, and pie crusts will generally be easier to work with and produce a better end result if you choose sugar in crystal form. That’s not to say you can’t use agave nectar in your scones, but you may need to use a scone pan if you do.
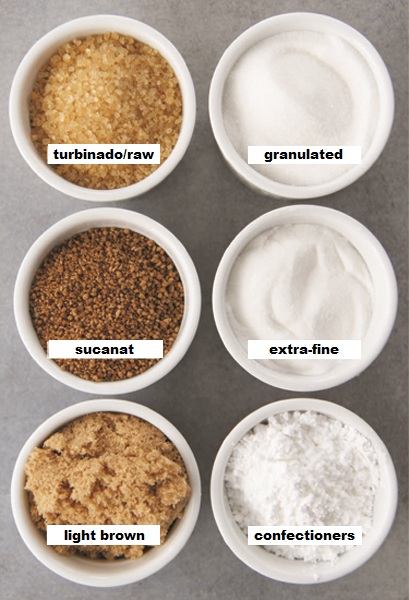
Within the crystal sugar world, there are many options to choose from, and some have specific uses:
- Granulated cane sugar: This is what most of us think of when we think about sugar. It’s the sugar you put in your coffee, and the one you will reach for most often when baking. If you were to pick just one sugar to keep in your pantry, this should be it. Cane sugar plants are actually a form of grass, and all of the crystal sugars discussed here come from these tall fibrous stalks. What differs between the various forms of cane sugar is the level of refinement and processing. The refining process for granulated cane sugar removes nearly all of the molasses, leaving a fine white product. It is virtually tasteless—sweet without flavor. We will discuss working with yeast in detail later, but keep in mind that, while technically any sugar can react with yeast, you will achieve the fastest and most consistent results when using granulated sugar to activate yeast. There are also granulated sugars derived from the beet plant. While it’s okay to substitute these, I find that I get the best results with cane sugar.
- Extra-fine cane sugar: Sometimes referred to as “superfine,” “baker’s,” or “baker’s special” sugar, this is finely milled cane sugar. Many bakers prefer this lighter sugar because it can be thoroughly blended with dry ingredients, it absorbs liquid more quickly, and it creates a very smooth texture. It’s also more expensive that your typical cane sugar, and harder to find. You can easily substitute baker’s sugar for granulated cane sugar, 1 to 1, in your recipes (unless you are creaming). For your everyday baking, granulated cane sugar will do just fine. Unless you own your own bakery or catering business, save the baker’s sugar for your grandmother’s eightieth birthday cake, or your silver wedding anniversary. It’s called special for a reason. If you want to try it and can’t find a local source, don’t fret—grind your own from granulated cane sugar in a food processor or high-speed blender.
- Confectioners’ sugar: Also referred to as powdered sugar, it is super-finely milled cane sugar—milled down to a powder, hence its name. Confectioners’ sugar looks like a very fine snow. This sugar is whiter and lighter than granulated sugar. One cup of granulated sugar weighs approximately 200 grams, whereas one cup of confectioners’ sugar weighs 120 grams. You will typically be using large amounts of confectioner’s sugar for a frosting recipe (3 cups is common to make enough frosting to cover one cake), but it will absorb moisture very quickly as you add shortening and liquids. I do not recommend substituting cane sugar for confectioners’ sugar or vice versa, as your measurements will be way off. In addition to being used for frostings, confectioners’ sugar is great for decorating cakes, doughnuts, and other pastries. Those with corn allergies should note that this sugar is often mixed with a small amount of starch (usually corn starch) to prevent clumping. One company that makes a corn-free confectioners’ sugar is Miss Roben’s.
- Brown sugar: Whereas white sugars are made by extracting the molasses from the sugar, brown sugars are made by adding molasses back into the sugar. Light brown sugar usually contains about 3.5 percent molasses, and dark brown sugar has about 6.5 percent. Adding the molasses back changes both the taste and the texture of the sugar. Molasses is thick and syrupy; when added back into cane sugar the result is a wetter (but not liquid) sugar that is just a bit lighter than white sugar, weighing approximately 192 grams per cup. Although most white sugars are consistently tasteless, brown sugars vary quite a bit, with some having a bitter taste. I rarely use dark brown sugar while baking, but light brown sugar is a staple in my pantry and my recipes. For a crumb cake topping or chocolate chip cookies, light brown sugar is the way to go. Store it in an airtight container, as it performs best when soft. When it hardens it will be much more difficult to use. I have seen recommendations to add water to soften brown sugar, but I prefer using a fresh batch. If you need to substitute for brown sugar your best bet is raw sugar.
- Raw sugar: Also called turbinado sugar and marketed as Sugar in the Raw, this is coarsely grained sugar. It’s not really raw—there is processing involved—but it’s less processed than all other crystal sugars except Sucanat. As I described brown sugar, you may have been wondering why they bother taking the molasses out of the sugar just to add it back in. That’s where raw sugar comes in—it’s the form of sugar produced from the first crystallization of the sugar cane. Despite the fact that it’s much coarser than white sugar, raw sugar does substitute well for granulated in recipes, but do so sparingly as it’s more expensive. Raw sugar’s true advantage comes in when you are making a pastry with a sugared topping (e.g., Blueberry Muffins). When sprinkled on top of pastry, it will hold its form through the baking process, leaving you with a crunchy topping like the kind you would get on many bakery muffins. Yum!
- Sucanat: Sucanat is as natural as crystal sugar gets. It is virtually unprocessed, formed as a result of water evaporating from the sugar cane after it’s extracted from the plants. It is coarse, but harder than raw sugar. Sucanat is grainy, and not translucent like raw sugar. It works well as a replacement for granulated sugar, but is best as a replacement for brown sugar in crusts and cookie doughs. It does not work well as a replacement for brown sugar in crumble toppings, or as a substitute for raw sugar when you want a crunchy sugared topping.
Crystal sugars are not the only option for sweetening baked goods. More bakers are turning to other natural sweetening options as they look to reduce the amount of sugar in their diets, or to opt for sweeteners with a lower glycemic index. While it is extensively debated whether these are healthier for you, and there are arguments on all sides, I will simply say that they can be used very effectively when baking. These include:
- Honey: Just like sugar, not all honeys are the same. Honey takes on a very distinctive taste, depending on where the honey is from and what flowers are located near the hive. For example, the cranberry honey I like to use in Cranberry Bread comes from Cape Cod, where the honey bees have access to local cranberry bogs. When you find a honey you like, make a note of the brand and type so you can re-create your favorite baked goods. I love to look for local honey sources when I travel. Honey has the same relative sweetness as sugar, and can generally be substituted 1 to 1 for cane sugar. Due to its sticky liquid consistency, I don’t recommend using it in crusts, doughs, or yeast breads.
- Maple syrup: Made from the sap of maple trees, pure maple syrup is another natural form of sucrose that can be found locally in many areas. Here in the Northeast, maple syrup is sold by the gallon at roadside farm stands throughout the fall. Both honey and maple syrup remain shelf stable forever—they don’t have expiration dates, and they don’t go bad. Maple syrup has a strong taste, so choose where you use it. It will change the flavor of your baked goods. For example, if you substitute maple sugar for granulated sugar in Vanilla Pound Cake, you will have Maple Pound Cake (and feel free to try it!). Like honey, maple syrup works best with simple batters. (Do not substitute pancake syrups; use only 100% pure maple syrup.)
- Agave nectar: Some bakers are turning to agave nectar as a substitute for sugar, honey, or maple syrup, but this sweetener stirs up its own intense debate. Many believe it to be more natural and healthier than crystal forms of sugar. Some even call it a raw food. Still others believe that agave nectar may not be a healthy alternative. So what is agave nectar, exactly? The nectar comes from the cactus-like agave plant that thrives in warm, dry climates. It’s a highly processed sweetener—up to 70 percent fructose. On the flip side, agave nectar is said to have a much lower glycemic index than sugar, and it’s very sweet so you can use less of it. I’ll leave it to you to decide whether agave nectar is a product you want to use in your baking. It does perform well, especially as a replacement for honey.
- Stevia: Stevia is the only sweetener discussed here that is not a sugar; it’s an herb. For those who need to eliminate sugar completely from their diet, or for the occasion when your diabetic grandfather is coming for dinner, this is an option worth exploring. The sweetener is extracted from the leaves of the stevia plant (similar to how vanilla or other extracts are made). Stevia is virtually calorie-free. If you choose to use stevia, keep in mind that it is very sweet—just 1 teaspoon of stevia is needed to achieve the same sweetness as 1 cup of sugar. Because stevia is not a sugar, it won’t provide the same texture in your baked goods; you will need to add additional liquids or fruit purees if you replace sugar with stevia in your recipes. Please note that allergies to stevia have been reported.
Which sweetener should you use? I am a big fan of the crystal forms of sugar. After years of experimenting with these and the alternatives, my personal preference is cane sugar. Between granulated cane, confectioners’, brown, and raw sugar, I can create all of the textures and tastes that I am striving for, from a smooth creamy white frosting to a crunchy sugared crust. While there may be other health reasons to avoid sugar, food allergies are not usually one of them. With the exception of corn starch in some confectioners’ sugars, crystal forms of sugar are considered allergen-free. This is one traditional baking product that most of us do not have to substitute for when baking.
While I do offer recipes with all of these choices, feel free to substitute based on your own preference and dietary needs. In the next recipe I have chosen to use Sucanat to give this crust some texture.
Sucanat Pie Crust
This pie crust uses a small amount of Sucanat to give it a mildly sweet taste. Notice that the large Sucanat crystals are ground down as the shortening is cut into the dry ingredients. This pie crust works extremely well with both white and multigrain flour blends. If you plan to make many pies, the recipe can be scaled up and prepared in advance. Refrigerate or freeze the crusts until you are ready to bake.
{ Makes 1 double pie crust or 2 single crusts }
2 cups gluten-free flour blend
½ teaspoon xanthan gum (leave out if your flour blend contains xanthan gum)
2 tablespoons Sucanat
1 teaspoon salt
10 tablespoons (1 stick + 2 tablespoons) Earth Balance Natural Shortening, cold
1 tablespoon apple cider vinegar
3 to 4 tablespoons cold water (as needed)
- Combine the flour, xanthan gum (if needed), Sucanat, and salt in a large mixing bowl.
- Cut the shortening into tablespoon-sized pieces, and place them on top of the flour mixture.
- Use a pastry cutter or pastry fork to cut the shortening into the flour, until the mixture is crumbly.
- Add the apple cider vinegar and continue cutting.
- Add the cold water, ½ tablespoon at a time, to the mixture. Continue using the pastry cutter to blend the water into the dough, until it sticks together in a pasty ball.
- Separate the pie crust mixture into two equal hockey puck–sized portions. Wrap each one in plastic and refrigerate for at least an hour.
- When you are ready to make pies, preheat the oven to 350°F. Spray a pie plate with cooking oil.
- Roll out the first crust, and gently place it in the prepared pie pan.
- Add the filling (see tip).
- Roll out the second crust. Gently place it over the pie plate. Trim any excess crust and crimp the two crusts together.
- Using a sharp knife, make at least five 2-inch cuts in the top crust to allow for venting.
- Bake at 350°F for 42 to 45 minutes, until the crust is lightly browned and the filling is bubbling.

- Your filling should be prepared just prior to rolling out the crust.
- This crust works extremely well with the Apple Raisin Pie Filling, but can be used with any pie filling. (Just make sure your filling of choice is allergen-free!)
Apple Raisin Pie Filling
Where I live in New York’s Hudson Valley, there are apple orchards everywhere. I don’t have to travel more than five miles in any direction to find one. Of course that means that fresh (often organic) apples of every variety are bountiful and inexpensive in the fall. In addition to making your own applesauce, fall means it’s time to make apple pie. This pie filling is the perfect complement for the Sucanat Pie Crust.
{ Makes filling for one 9-inch pie, 8 to 12 servings }
4 cups apples, peeled, cored, and chopped
½ cup raisins (see tip)
2 tablespoons fresh lime juice
½ cup sugar
¼ cup sweet rice flour (see tip)
½ teaspoon cinnamon
- Combine the apples and raisins in a large bowl. Separate any chunks of raisins that are sticking together.
- Add the lime juice and toss to coat the fruit.
- Combine the sugar, sweet rice flour, and cinnamon in a small bowl. Blend thoroughly.
- Add the dry ingredients to the apple mixture and toss to coat.

- While some recipes that use raisins suggest you soak the raisins to plump them up, here you should use the raisins dry. They will plump on their own as they absorb the liquid from the filling.
- Tapioca starch or corn starch may be substituted for sweet rice flour, for an even thicker filling.
- Prepare the pie filling just before you begin to roll out your crust. If it sits too long, the flour will absorb too much liquid before baking.
Lemon Tart
If he had his druthers, my oldest (non–food-allergic) son would choose cheesecake or lemon meringue pie for dessert. Of course, cheesecake is one of those foods that just wouldn’t be the same when made without milk and eggs, and I’m not happy with the options to make meringue without eggs. Sometimes the end result is better if, instead of trying to substitute, you just do without. That’s the approach I took with this lemon tart recipe, which comes as close to a lemon meringue pie (without the meringue) as you can get.
{ Makes one 9-inch tart, 8 to 12 servings }
For the tart:
1¼ cups gluten-free flour blend
½ teaspoon xanthan gum (leave out if your flour blend contains xanthan gum)
½ teaspoon salt
¼ cup sugar
8 tablespoons (1 stick) Earth Balance Natural Shortening, cold
2 tablespoons cold water
For the lemon filling:
2 tablespoons corn starch mixed with ¼ cup warm water (see tip)
4½ teaspoons Ener-G Egg Replacer mixed with 6 tablespoons warm water (equal to 3 eggs)
⅔ cup fresh lemon juice
¼ cup original hemp milk
¾ cup sugar
1 teaspoon lemon zest
Prepare the tart crust:
- Combine the flour, xanthan gum (if needed), salt, and sugar in a large mixing bowl.
- Cut the shortening into tablespoon-sized pieces and place them on top of the flour mixture. Use a pastry cutter or pastry fork to cut the shortening into the flour mixture.
- When the flour and shortening are crumbly, add the cold water. Continue cutting the ingredients together.
- Use your hands to form the dough into a disk and flatten, keeping the sides rounded. Wrap the dough in plastic and refrigerate for at least an hour.
While the dough is chilling, prepare the lemon filling:
- Prepare the corn starch mixture and the egg replacer mixture, and set them aside.
- In a medium saucepan, whisk together the lemon juice, hemp milk, sugar, and lemon zest. Bring this mixture to a boil over medium-high heat, whisking intermittently.
- When the mixture reaches a rolling boil, remove the saucepan from the heat. Add the egg replacer mixture and whisk constantly (over no heat) for 1 minute. You will immediately see the liquid rise and start to thicken.
- Whisk in the corn starch mixture. Return the saucepan to medium-low heat and bring the mixture to a low boil. Whisk frequently for another 5 minutes, until the sauce thickens.
- Remove the saucepan from the heat, and allow it to cool. The sauce will thicken further as it cools.
Prepare the tart:
- Preheat the oven to 350°F. Spray a pie plate with cooking oil.
- Place the dough on a nonstick rolling surface.
- Use a rolling pin to gently roll the dough into a crust about 10 inches in diameter.
- Transfer the crust to the pie plate. Use a knife to cut away any loose edges of dough, and repair any broken patches.
- Bake the unfilled crust at 350°F for 20 minutes.
- When both the crust and the filling have cooled, spoon the filling into the crust. Refrigerate for at least 4 hours before serving.

- If you need to avoid corn, any other starch can be substituted.
- During the first boil, the liquid will be clear. The second boil is reminiscent of a lava lamp, with both large and small bubbles bursting as the mixture boils.
- A quiche dish works extremely well for this tart, giving the edges a true tart effect.
- For a crust-free version, prepare the filling and serve it as lemon mousse. Transfer the mousse to serving dishes before refrigerating.
- Garnish with fresh berries, if desired.
* Variation:
Key Lime Tart: Substitute fresh Key lime juice for the lemon juice, and coconut milk beverage for the hemp milk, in equal amounts.

What Is Zest?
Every now and then you will come across a recipe, such as the Lemon Tart, that asks for an ingredient called lemon zest. While it sounds fancy, and you might be wondering what the heck it is, it’s actually very straightforward. Lemon zest is the outer layer of lemon skin that has been grated (or super-finely chopped). As the word zest implies, it provides an extra pop of citrus flavor, due to the strong aromatic oils in the rind.
The easiest way to make your own lemon zest is using a very fine grater (e.g., a Microplane). Zest should be made from just the outer yellow layer of the lemon only; the white inner layer can be very bitter. One large lemon will yield about 2 teaspoons of lemon zest. If you are buying lemons to make lemon juice, zest the skins before peeling the lemons. Make sure you wash the lemons before zesting. The same process can be used for zesting limes and oranges. If you use the same grater to make zest as you do to grate dairy cheese, be careful to avoid cross-contamination by thoroughly washing the grater prior to using it (see more on contamination issues).
Lemon zest can also be purchased off the shelf; note that these packaged products often contain sugar and preservatives.

