Hats & Caps
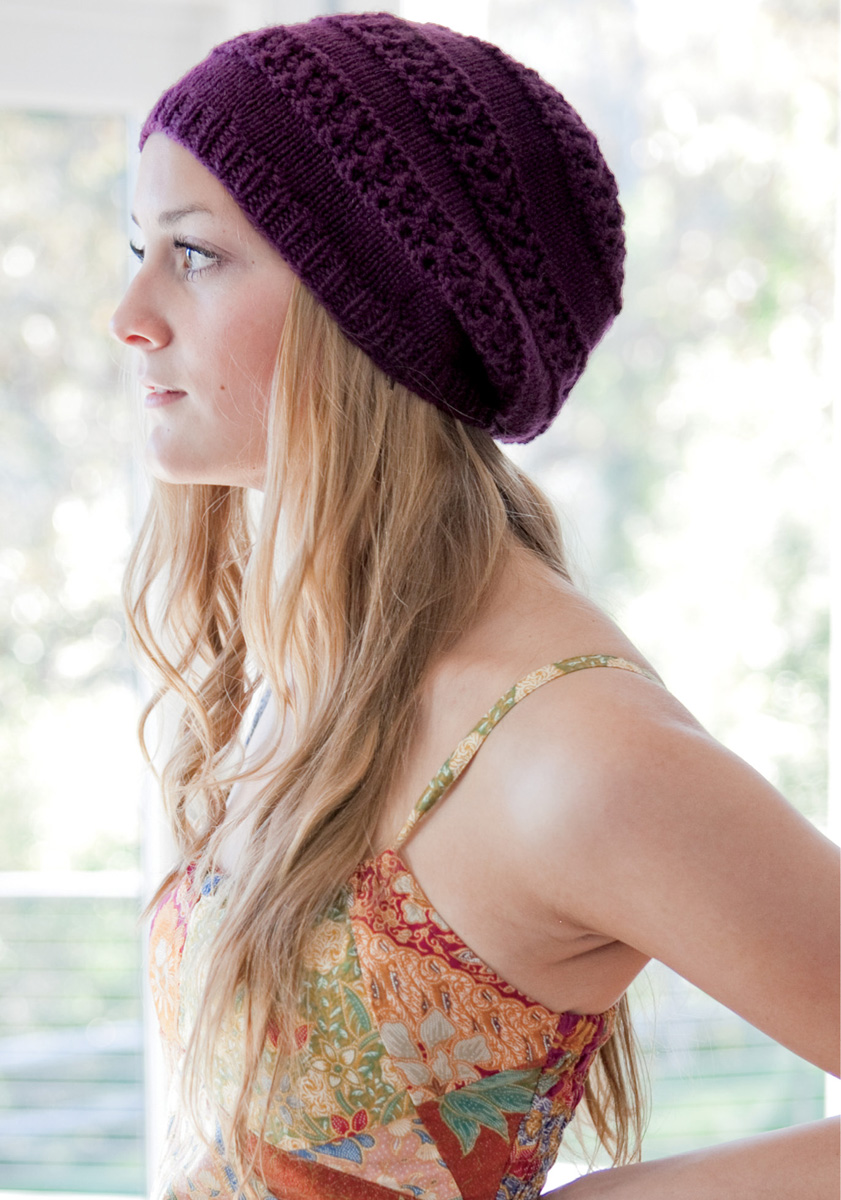
Etta Hat
Designed by Kim Whelan
A great beginning knitter’s project, Etta is a slouchy hat with a touch of lace. You’ll be surprised how quickly this one knits up!
- Finished Measurements: Approximately 18"/45.5 cm circumference at the bottom and 91⁄2"/24 cm deep
- Yarn: Brown Sheep Company Nature Spun Worsted Weight, 100% wool, 245 yds (224 m)/3.5 oz (100 g), Color 142W Spiced Plum
- Needles: US 6 (4 mm) circular needle 16"/40 cm long and set of four US 6 (4 mm) double-point needles or size you need to obtain correct gauge
- Gauge: 18 stitches and 26 rounds = 4"/10 cm in stockinette stitch
- Other Supplies: Stitch marker, yarn needle, form for blocking
Knitting the Hat
- Using the circular needle, cast on 80 stitches. Place marker and join into a round, being careful not to twist the stitches.
- Rounds 1–6: *K1, p1; repeat from * to end of round.
- Round 7: Knit, increasing 25 stitches evenly spaced. You now have 105 stitches.
- Rounds 8–16: Knit.
- Round 17: Purl.
- Round 18: *P1, yo, ssk; repeat from * to end of round.
- Round 19: *P1, k2; repeat from * to end of round.
- Round 20: *P1, k2tog, yo; repeat from * to end of round.
- Round 21: *P1, k2; repeat from * to end of round.
- Rounds 22 and 23: Repeat Rounds 18 and 19.
- Round 24: Purl.
- Repeat Rounds 8–24 two more times (58 rounds completed).
Decreasing for the Crown
Note: Change to double-point needles when necessary.
- Round 1: Knit, decreasing 25 stitches evenly spaced. You now have 80 stitches.
- Round 2: *K14, k2tog; repeat from * to end of round. You now have 75 stitches.
- Round 3: *K13, k2tog; repeat from * to end of round. You now have 70 stitches.
- Round 4: *K12, k2tog; repeat from * to end of round. You now have 65 stitches.
- Continue in the manner, knitting 1 fewer stitch between the decreases on every round, until 10 stitches remain.
- Next Round: *K2tog; repeat from * to end of round. You now have 5 stitches.
Finishing
- Cut yarn, leaving an 8"/20.5 cm tail. Thread tail onto yarn needle and draw through remaining stitches; pull up snugly and secure. Weave in ends. Block. Note: This hat was blocked on a combination of a dinner plate, bowl, and saucer — use whatever it takes to get the shape you desire!
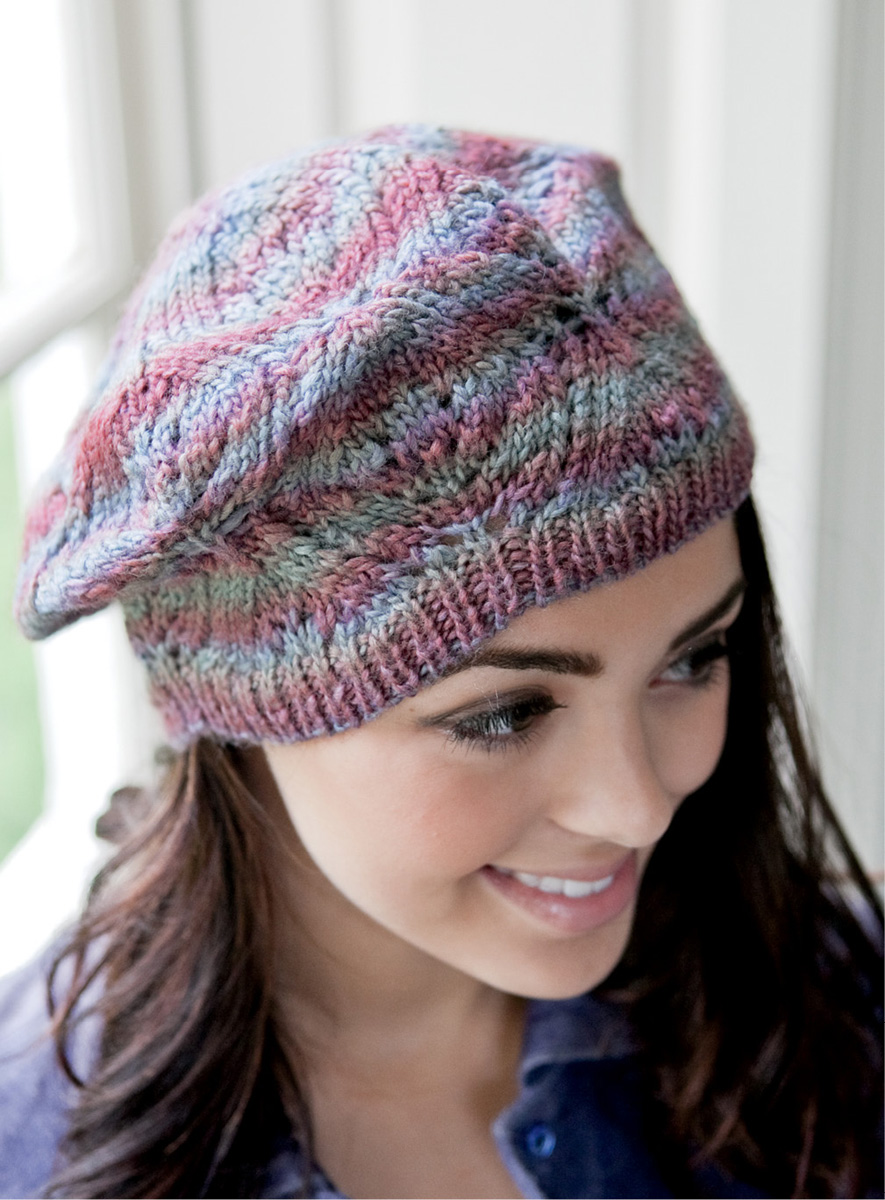
Tredegar Hat
Designed by Michaela Moores
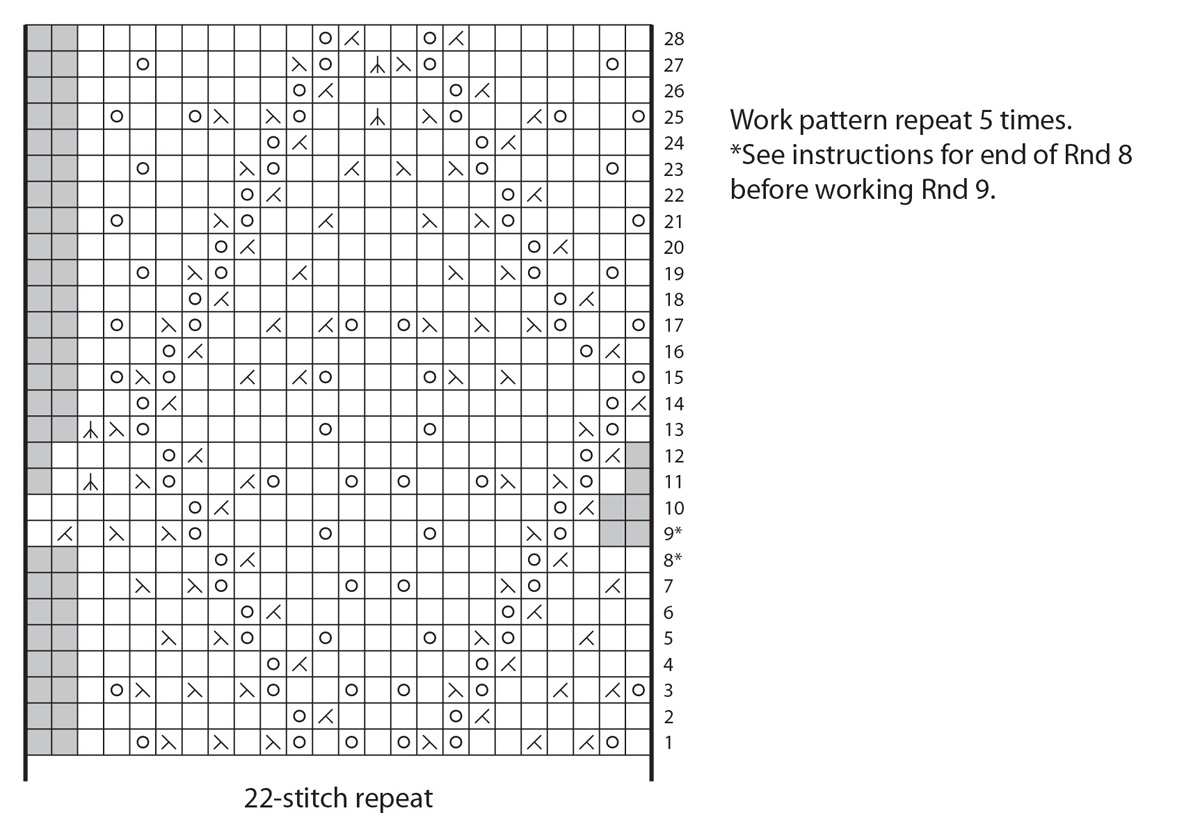
Tredegar is a lovely beret-style hat that begins with a tubular cast on. The decreases for the crown flow beautifully from the main pattern; for a more slouchy hat, work an extra repeat of the lace chart before decreasing for the crown.
- Finished Measurements: Approximately 20"/51 cm circumference, unstretched
- Yarn: Rowan Tapestry, 70% wool/30% soybean fiber, 131 yds (120 m)/ 1.75 oz (50 g), Color 171 Rainbow
- Needles: US 3 (3.25 mm) circular needle 16"/40 cm long, US 5 (3.75 mm) circular needle 32"/80 cm long, and set of four US 5 (3.75 mm) double-point needles or size you need to obtain correct gauge
- Gauge: 22 stitches and 34 rounds = 4"/10 cm in Tredegar Lace pattern on larger needles
- Other Supplies: Stitch marker, yarn needle, dinner plate for blocking
Knitting the Hat
- Using the smaller circular needle and the tubular method (see page 299), cast on 110 stitches. Place marker and join into a round, being careful not to twist the stitches. Work in k1, p1 rib until piece measures 1"/2.5 cm from cast on.
Knitting the Lace
- Change to larger circular needle and knit 1 round. Work Rounds 1–8 of Tredegar Lace chart, working the chart five times in each round. At the end of Round 8, remove marker, k3, replace marker. This is the new start of the round.
- Work Rounds 9–28 of Tredegar Lace chart once, then work Rounds 1–14 once more, repositioning the marker at the end of Round 8 as before.
Decreasing for the Crown
Note: Change to double-point needles when necessary.
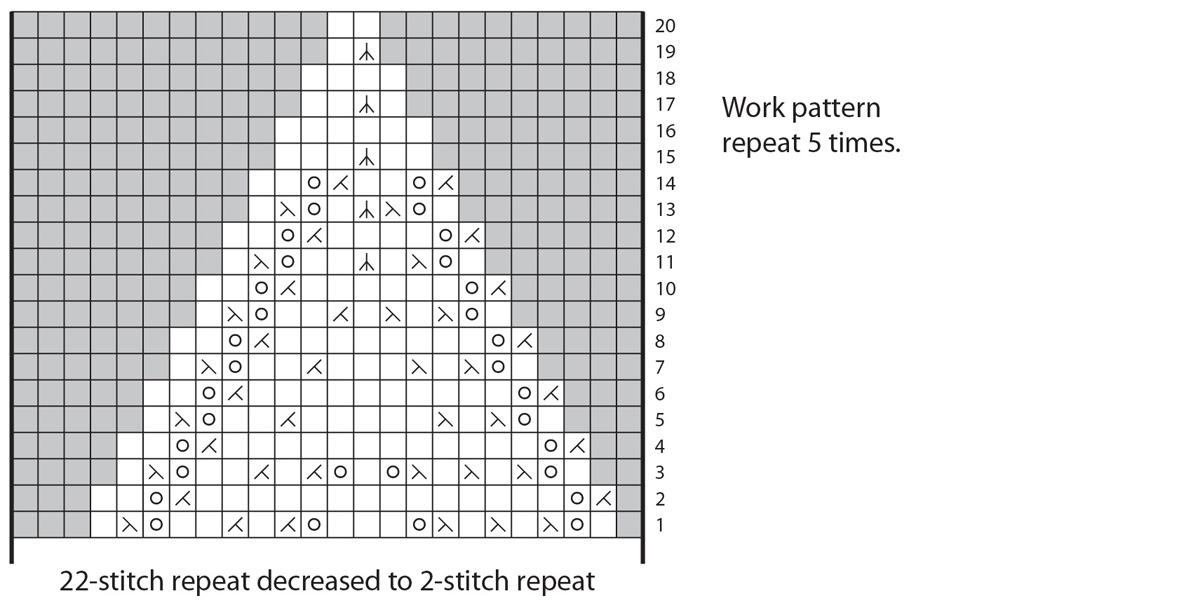
- Work Rounds 1–20 of Tredegar Crown chart. You now have 10 stitches.
Finishing
- Cut yarn, leaving a 10"/25.5 cm tail. Thread tail onto yarn needle and draw through remaining stitches twice; pull up snugly and secure. Weave in all ends. Block on a dinner plate.
Lacy Liberty Wool Hat
Designed by Meg Myers
This fitted ribbed hat is worked in a simple lace pattern from the bottom up with well-incorporated decreases for the crown. It will stretch to fit many sizes.
- Finished Measurements: Approximately 171⁄2"/44.5 cm circumference and 7"/18 cm deep, unstretched
- Yarn: Classic Elite Yarns Liberty Wool, 100% washable wool, 122 yds (111 m)/1.75 oz (50 g), Color 7815 Bright Olive
- Needles: US 6 (4 mm) circular needle 16"/40 cm long and set of US 6 (4 mm) double-point needles or size you need to obtain correct gauge
- Gauge: 25 stitches and 32 rounds = 4"/10 cm in Lacy Rib pattern, unstretched
- Other Supplies: Stitch marker
Knitting the Hat
- With circular needle, cast on 110 stitches. Place marker and join into a round, being careful not to twist the stitches.
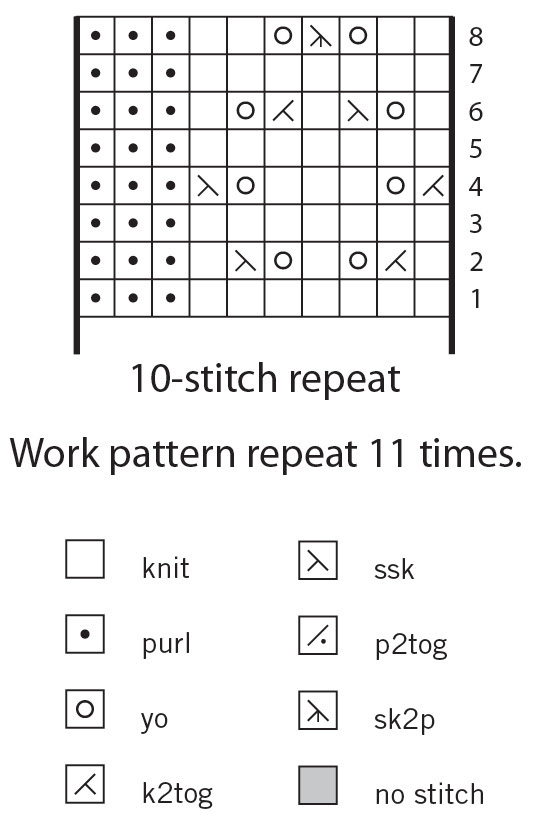
- Following the chart or written instructions, work Rounds 1–8 of Lacy Rib five times.
Pattern Essentials
Lacy Rib (multiple of 10 stitches)
Round 1 and all odd-numbered rounds: *K7, p3; repeat from * to end of round.
Round 2: *K1, k2tog, yo, k1, yo, ssk, k1, p3; repeat from * to end of round.
Round 4: *K2tog, yo, k3, yo, ssk, p3; repeat from * to end of round.
Round 6: *K1, yo, ssk, k1, k2tog, yo, k1, p3; repeat from * to end of round.
Round 8: *K2, yo, sk2p, yo, k2, p3; repeat from * to end of round.
Repeat Rounds 1–8 for pattern.
Decreasing for the Crown
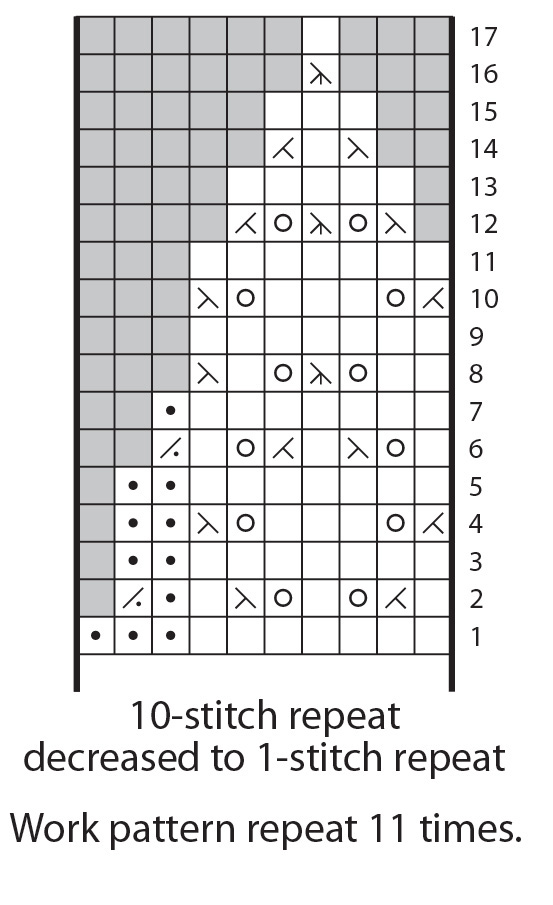
- Following the chart or written instructions, work Rounds 1–17 of Lacy Rib Crown Decrease, switching to double-point needles when necessary.
- Round 1: *K7, p3, repeat from * to end of round.
- Round 2: *K1, k2tog, yo, k1, yo, ssk, k1, p1, p2tog; repeat from * to end of round. You now have a multiple of 9 stitches.
- Round 3: *K7, p2; repeat from * to end of round.
- Round 4: *K2tog, yo, k3, yo, ssk, p2; repeat from * to end of round.
- Round 5: Repeat Round 3.
- Round 6: *K1, yo, ssk, k1, k2tog, yo, k1, p2tog; repeat from * to end of round. You now have a multiple of 8 stitches.
- Round 7: *K7, p1; repeat from * to end of round.
- Round 8: *K2, yo, sk2p, yo, k1, ssk; repeat from * to end of round. You now have a multiple of 7 stitches.
- Round 9 and all odd-numbered rounds to Round 15: Knit.
- Round 10: *K2tog, yo, k3, yo, ssk; repeat from * to end of round.
- Round 12: *Ssk, yo, sk2p, yo, k2tog; repeat from * to end of round. You now have a multiple of 5 stitches.
- Round 14: *Ssk, k1, k2tog; repeat from * to end of round. You now have a multiple of 3 stitches.
- Round 16: *Sk2p; repeat from * to end of round. You now have 1 stitch in each repeat.
- Round 17: Knit. You now have 11 stitches.
- Cut yarn, leaving an 8"/20.5 cm tail. Thread tail onto yarn needle and draw through remaining stitches twice; pull up snugly and secure on inside.
Finishing
- Weave in all ends. Block.
Pine Needle Toque
Designed by Jenise Reid
Comfortable and attractive, this topper features an easy-to-work lace pattern. The crown decreases form a lovely eight-point star at the top. (See page 51 for the matching mittens.)
- Finished Measurements: Approximately 191⁄2"/49.5 cm circumference and 9"/23 cm deep
- Yarn: Knit Picks Palette, 100% Peruvian Highland wool, 231 yds (211 m)/1.75 oz (50 g), Bittersweet Heather
- Needles: US 3 (3.25 mm) circular needle 16"/40 cm long and set of four US 3 (3.25 mm) double-point needles or size you need to obtain correct gauge
- Gauge: 23 stitches and 34 rounds = 4"/10 cm in Pine Needle Lace pattern, blocked
- Other Supplies: Stitch marker, yarn needle
Pattern Essentials
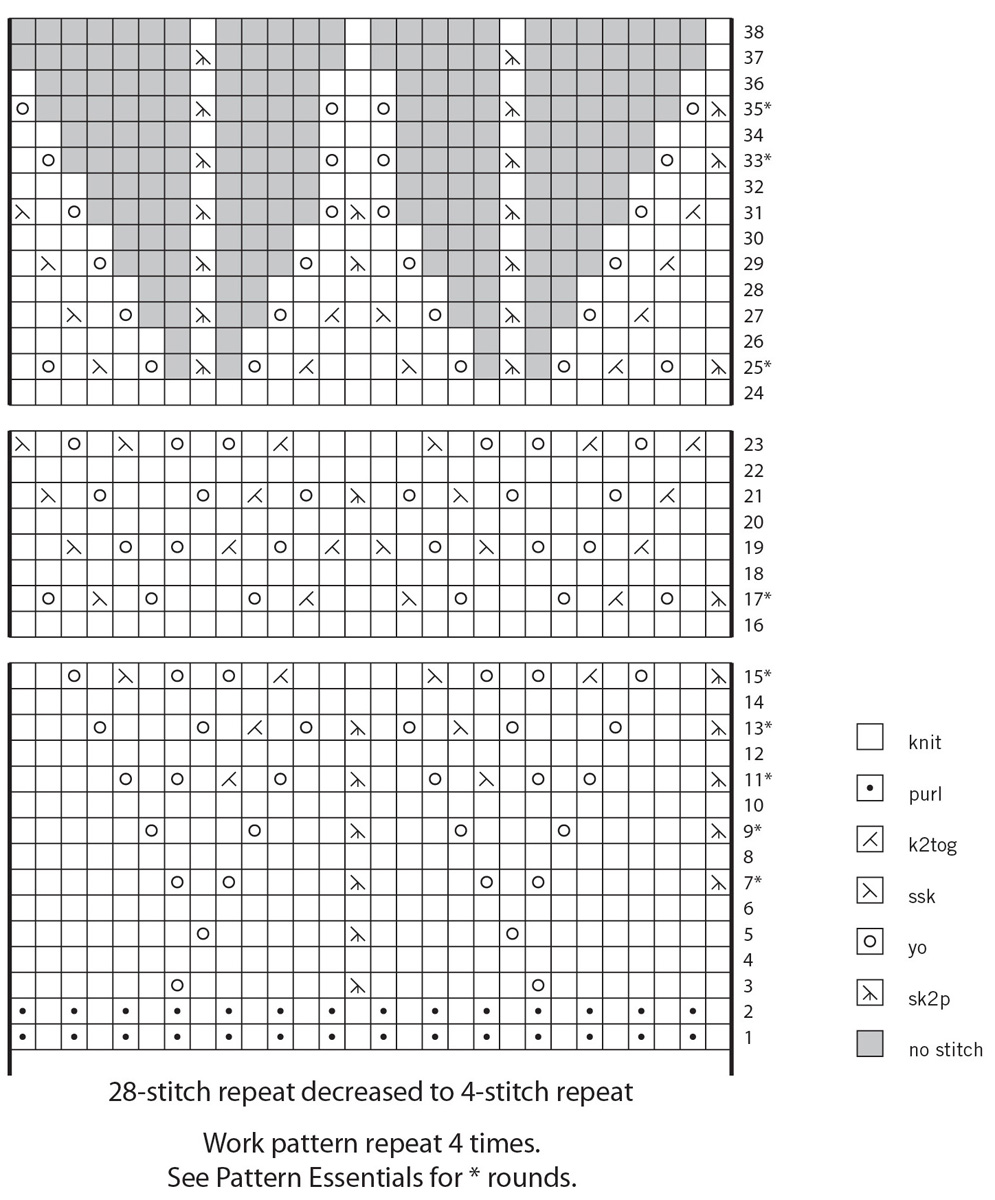
For the rounds on the chart where the pattern repeat begins with sk2p (indicated by *), the beginning of the round must be moved by 1 stitch in order to keep the pattern aligned. End the round before each * round 1 stitch before the marker: temporarily slip the last stitch to the right-hand needle, remove the marker, return the slipped stitch to the left-hand needle, and replace the marker on the right-hand needle. When you work the sk2p at the beginning of the * round, the transferred stitch will be the first of the 3 stitches used in the sk2p. The completed sk2p becomes the new first stitch of the round.
Knitting the Toque
- Using circular needle, cast on 112 stitches. Place marker and join into a round, being careful not to twist the stitches.
Note: Work the 28-stitch repeat of the Pine Needle Lace chart four times for each round.
- Work Rounds 1–15 of the Pine Needle Lace chart once.
- Work Rounds 16–23 of the chart six times.
Decreasing for the Crown
- Work Rounds 24–38 of the chart once. You now have 16 stitches.
Finishing
- Cut yarn, leaving an 8"/20.5 cm tail. Thread tail onto yarn needle and draw through remaining stitches; pull up snugly and secure. Weave in ends. Block.
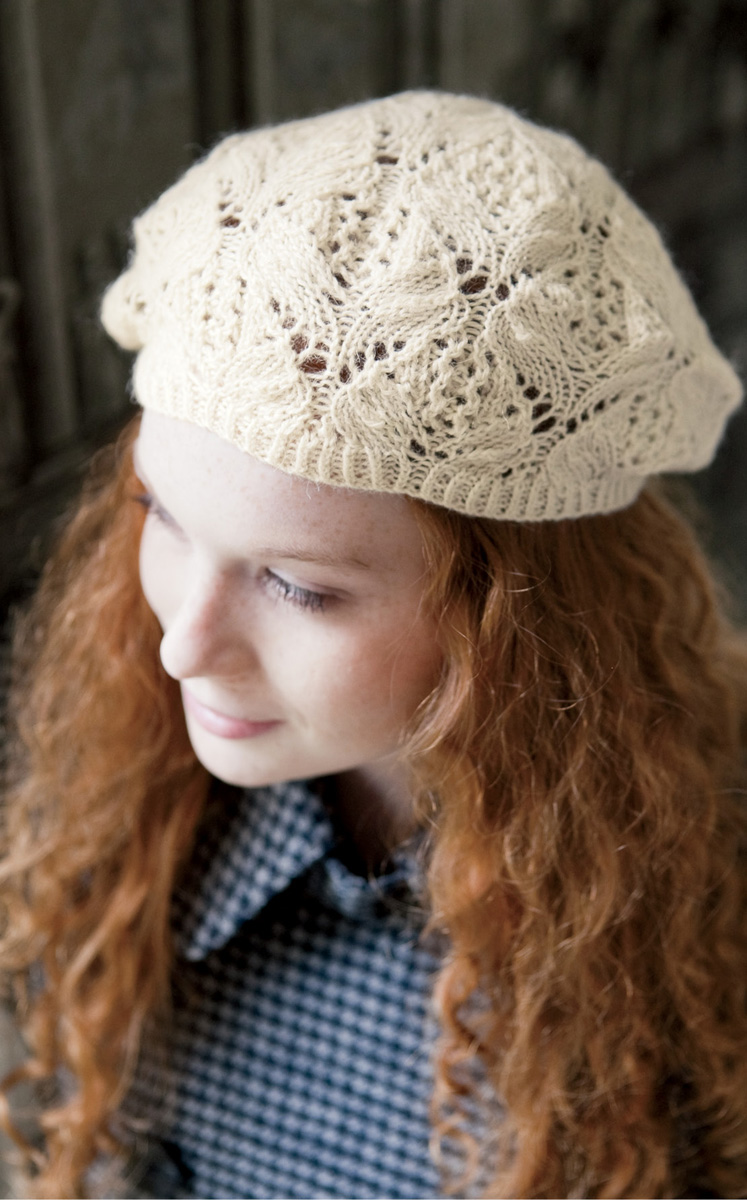
Very Pretty Lace Beret
Designed by Vera Sanon
This lace beret, worked in fingering-weight yarn, features an intricate and beautiful lace pattern. The decreases for the crown flow seamlessly from the leafy lace design into an eight-point star pattern.
Knitting the Beret
- Using the smaller needle, cast on 140 stitches. Place marker and join into a round, being careful not to twist the stitches.
- Rounds 1–10: *K1 tbl, p1; repeat from * to end of round.
- Next Round: Knit, increasing 20 stitches evenly spaced and placing a marker every 20 stitches. You now have 160 stitches.
Knitting the Lace
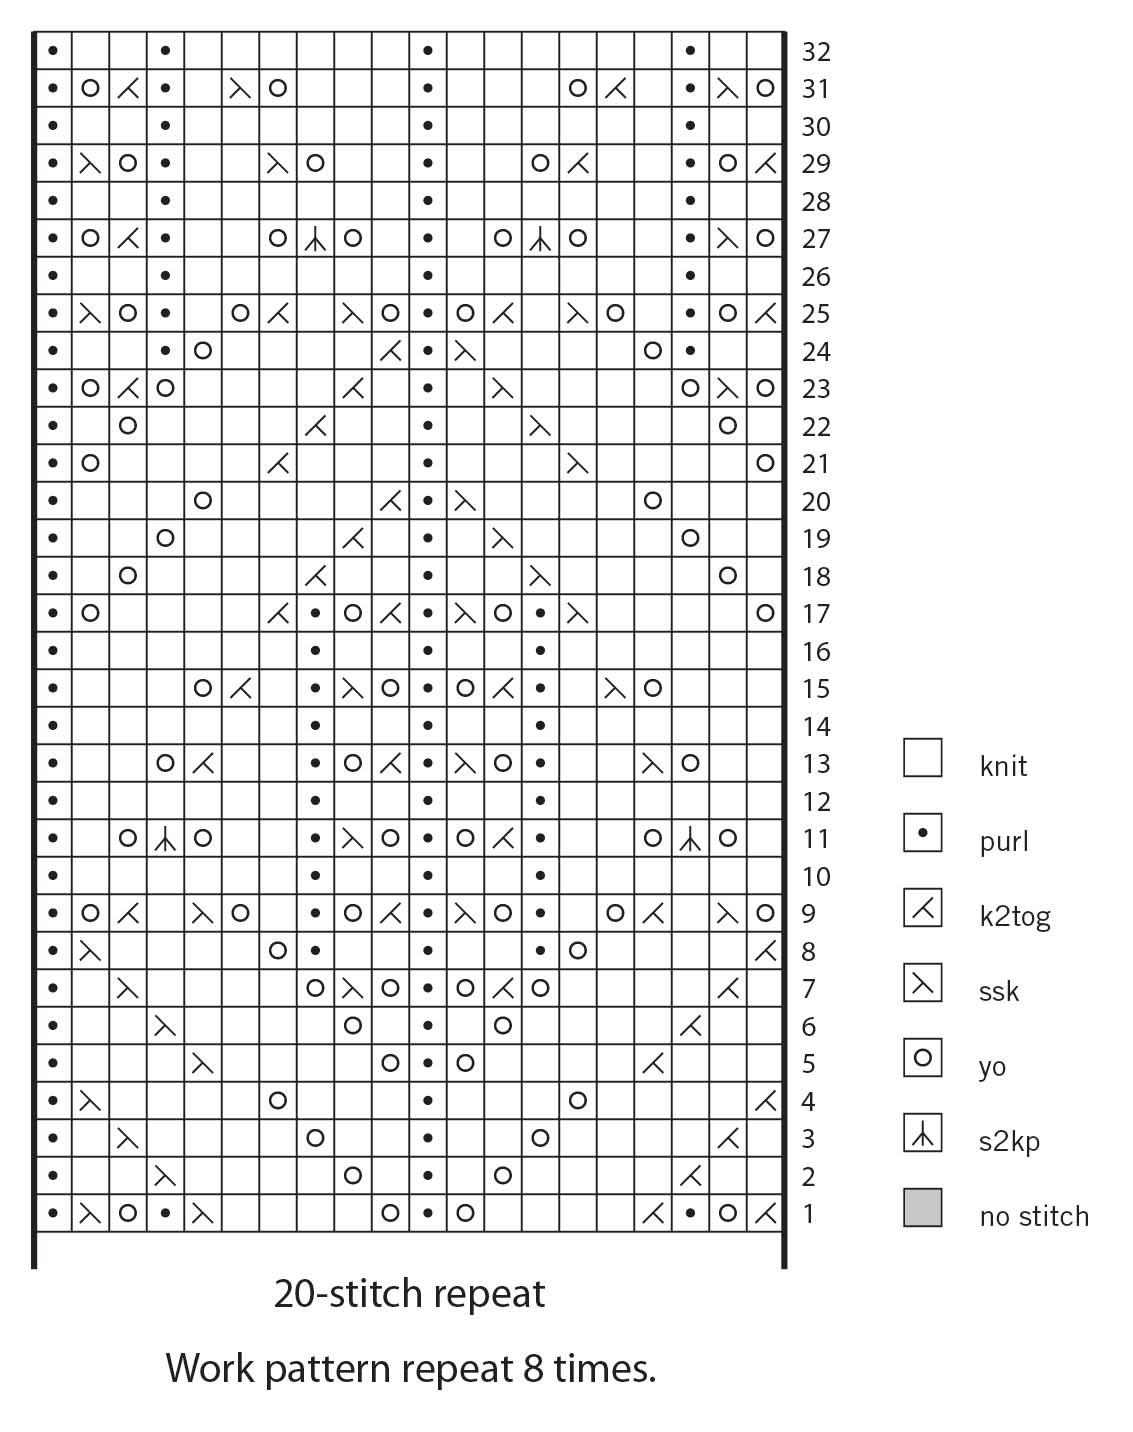
- Change to larger circular needle and follow the text or chart (see below) to work Rounds 1–32 of Very Pretty Lace, then work Rounds 1–24 once more (56 lace rounds worked).
- Round 1: *K2tog, yo, p1, k2tog, k4, yo, p1, yo, k4, ssk, p1, yo, ssk, p1; repeat from * to end of round.
- Round 2: *K2, k2tog, k4, yo, k1, p1, k1, yo, k4, ssk, k2, p1; repeat from * to end of round.
- Round 3: *K1, k2tog, k4, yo, k2, p1, k2, yo, k4, ssk, k1, p1; repeat from * to end of round.
- Round 4: *K2tog, k4, yo, k3, p1, k3, yo, k4, ssk, p1; repeat from * to end of round.
- Round 5: *K3, k2tog, k4, yo, p1, yo, k4, ssk, k3, p1; repeat from * to end of round.
- Round 6: *K2, k2tog, k4, yo, k1, p1, k1, yo, k4, ssk, k2, p1; repeat from * to end of round.
- Round 7: *K1, k2tog, k4, yo, k2tog, yo, p1, yo, ssk, yo, k4, ssk, k1, p1; repeat from * to end of round.
- Round 8: *K2tog, k4, yo, p1, k2, p1, k2, p1, yo, k4, ssk, p1; repeat from * to end of round.
- Round 9: *Yo, ssk, k1, k2tog, yo, k1, p1, yo, ssk, p1, k2tog, yo, p1, k1, yo, ssk, k1, k2tog, yo, p1; repeat from * to end of round.
- Round 10: *K6, (p1, k2) twice, p1, k6, p1; repeat from * to end of round.
- Round 11: *K1, yo, s2kp, yo, k2, p1, k2tog, yo, p1, yo, ssk, p1, k2, yo, s2kp, yo, k1, p1; repeat from * to end of round.
- Round 12: Repeat Round 10.
- Round 13: *K2, yo, ssk, k2, p1, yo, ssk, p1, k2tog, yo, p1, k2, k2tog, yo, k2, p1; repeat from * to end of round.
- Round 14: Repeat Round 10.
- Round 15: *K3, yo, ssk, k1, p1, k2tog, yo, p1, yo, ssk, p1, k1, k2tog, yo, k3, p1; repeat from * to end of round.
- Round 16: Repeat Round 10.
- Round 17: *Yo, k4, ssk, p1, yo, ssk, p1, k2tog, yo, p1, k2tog, k4, yo, p1; repeat from * to end of round.
- Round 18: *K1, yo, k4, ssk, k2, p1, k2, k2tog, k4, yo, k1, p1; repeat from * to end of round.
- Round 19: *K2, yo, k4, ssk, k1, p1, k1, k2tog, k4, yo, k2, p1; repeat from * to end of round.
- Round 20: *K3, yo, k4, ssk, p1, k2tog, k4, yo, k3, p1; repeat from * to end of round.
- Round 21: *Yo, k4, ssk, k3, p1, k3, k2tog, k4, yo, p1; repeat from * to end of round.
- Round 22: *K1, yo, k4, ssk, k2, p1, k2, k2tog, k4, yo, k1, p1; repeat from * to end of round.
- Round 23: *Yo, ssk, yo, k4, ssk, k1, p1, k1, k2tog, k4, yo, k2tog, yo, p1; repeat from * to end of round.
- Round 24: *K2, p1, yo, k4, ssk, p1, k2tog, k4, yo, p1, k2, p1; repeat from * to end of round.
- Round 25: *K2tog, yo, p1, k1, yo, ssk, k1, k2tog, yo, p1, yo, ssk, k1, k2tog, yo, k1, p1, yo, ssk, p1; repeat from * to end of round.
- Round 26: *K2, p1, k6, p1, k6, p1, k2, p1; repeat from * to end of round.
- Round 27: *Yo, ssk, p1, k2, yo, s2kp, yo, k1, p1, k1, yo, s2kp, yo, k2, p1, k2tog, yo, p1; repeat from * to end of round.
- Round 28: Repeat Round 26.
- Round 29: *K2tog, yo, p1, k2, k2tog, yo, k2, p1, k2, yo, ssk, k2, p1, yo, ssk, p1; repeat from * to end of round.
- Round 30: Repeat Round 26.
- Round 31: *Yo, ssk, p1, k1, k2tog, yo, k3, p1, k3, yo, ssk, k1, p1, k2tog, yo, p1; repeat from * to end of round.
- Round 32: Repeat Round 26.
Decreasing for the Crown
Note: Change to double-point needles when necessary.
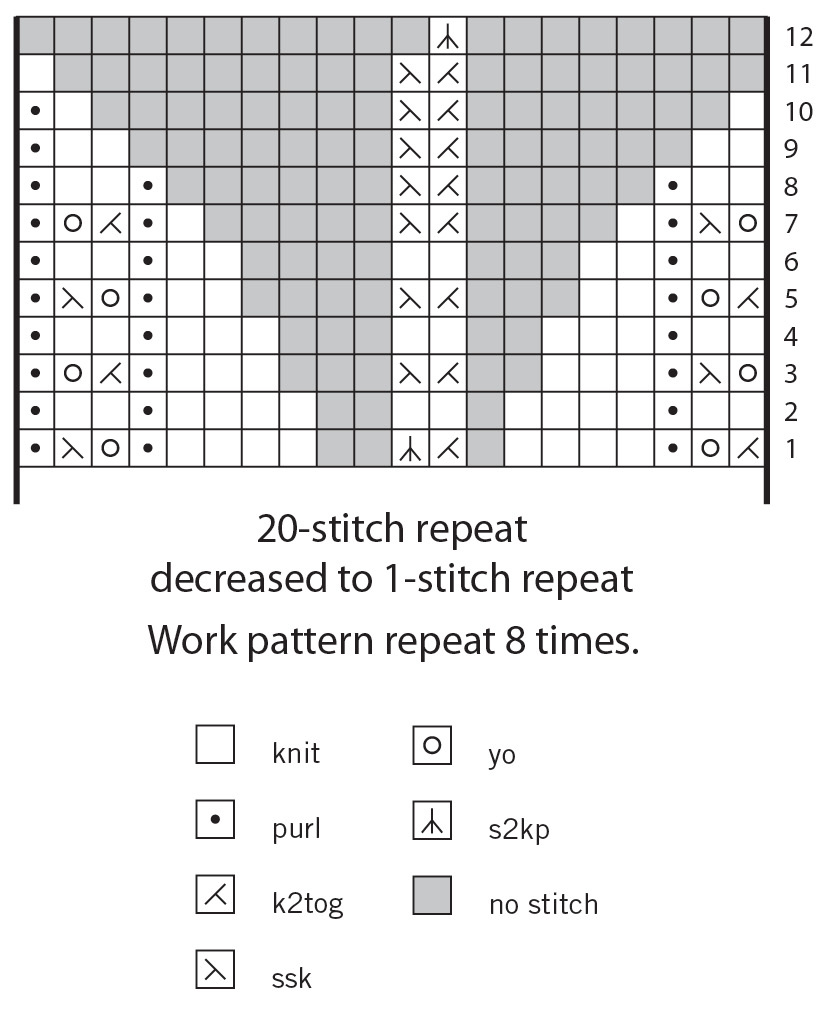
- Follow the text or chart to work Rounds 1–12 of Crown pattern. You now have 8 stitches total.
Note: Shaping begins with 20 stitches between markers.
- Round 1: *K2tog, yo, p1, k4, k2tog, s2kp, k4, p1, yo, ssk, p1; repeat from * to end of round. You now have 17 stitches between the markers.
- Round 2: *K2, p1, k10, p1, k2, p1; repeat from * to end of round.
- Round 3: *Yo, ssk, p1, k3, k2tog, ssk, k3, p1, k2tog, yo, p1; repeat from * to end of round. You now have 15 stitches between the markers.
- Round 4: *K2, p1, k8, p1, k2, p1; repeat from * to end of round.
- Round 5: *K2tog, yo, p1, k2, k2tog, ssk, k2, p1, yo, ssk, p1; repeat from * to end of round. You now have 13 stitches between the markers.
- Round 6: *K2, p1, k6, p1, k2, p1; repeat from * to end of round.
- Round 7: *Yo, ssk, p1, k1, k2tog, ssk, k1, p1, k2tog, yo, p1; repeat from * to end of round. You now have 11 stitches between the markers.
- Round 8: *K2, p1, k2tog, ssk, p1, k2, p1; repeat from * to end of round. You now have 9 stitches between the markers.
- Round 9: *K2, k2tog, ssk, k2, p1; repeat from * to end of round. You now have 7 stitches between the markers.
- Round 10: *K1, k2tog, ssk, k1, p1; repeat from * to end of round. You now have 5 stitches between the markers.
- Round 11: *K2tog, ssk, k1; repeat from * to end of round. You now have 3 stitches between the markers.
- Round 12: *S2kp; repeat from * to end of round. You now have 1 stitch between the markers.
Finishing
- Work k2tog around, removing markers. You now have 4 stitches.
- Slide 4 stitches onto one double-point needle and work 2 rounds of I-cord (see page 292). Cut the yarn leaving an 8"/20.5 cm tail. Thread tail onto yarn needle and draw through remaining stitches; pull up snugly and secure. Weave in ends. Block over dinner plate.
Twig Lace Cap
Designed by Kerin Dimeler-Laurence
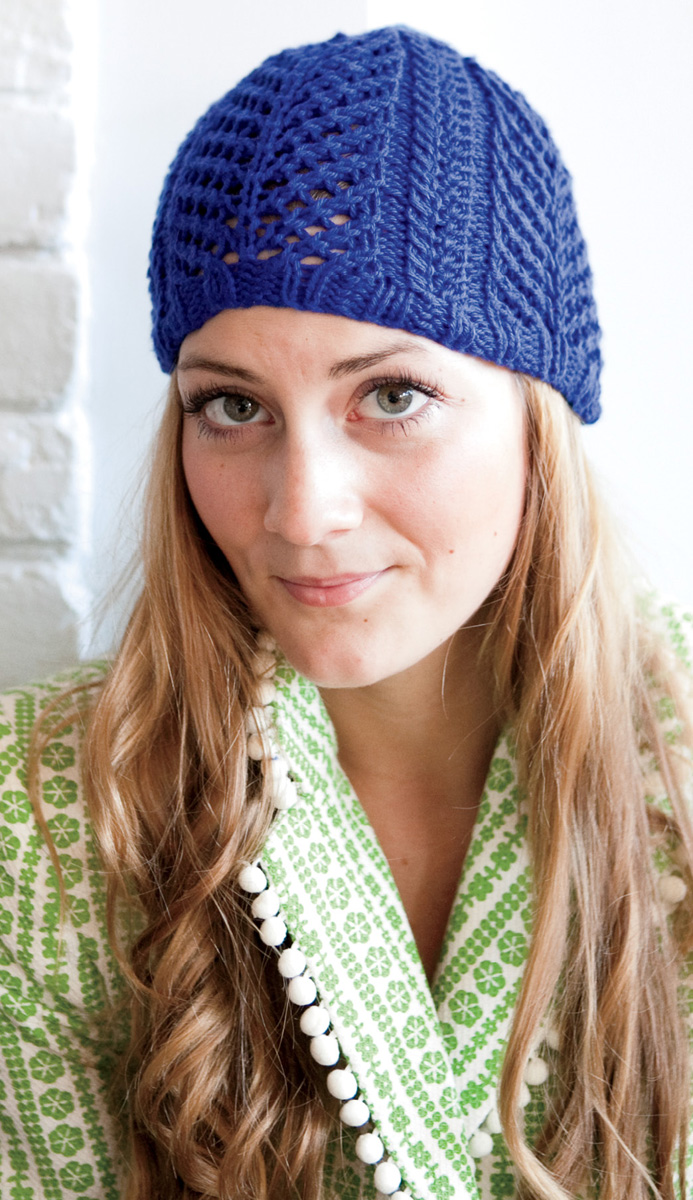
The four sections of lace in this cap are decreased beautifully for the crown. The bright blue color is reminiscent of the romantic jewel tones of the Renaissance era.
Pattern Essentials
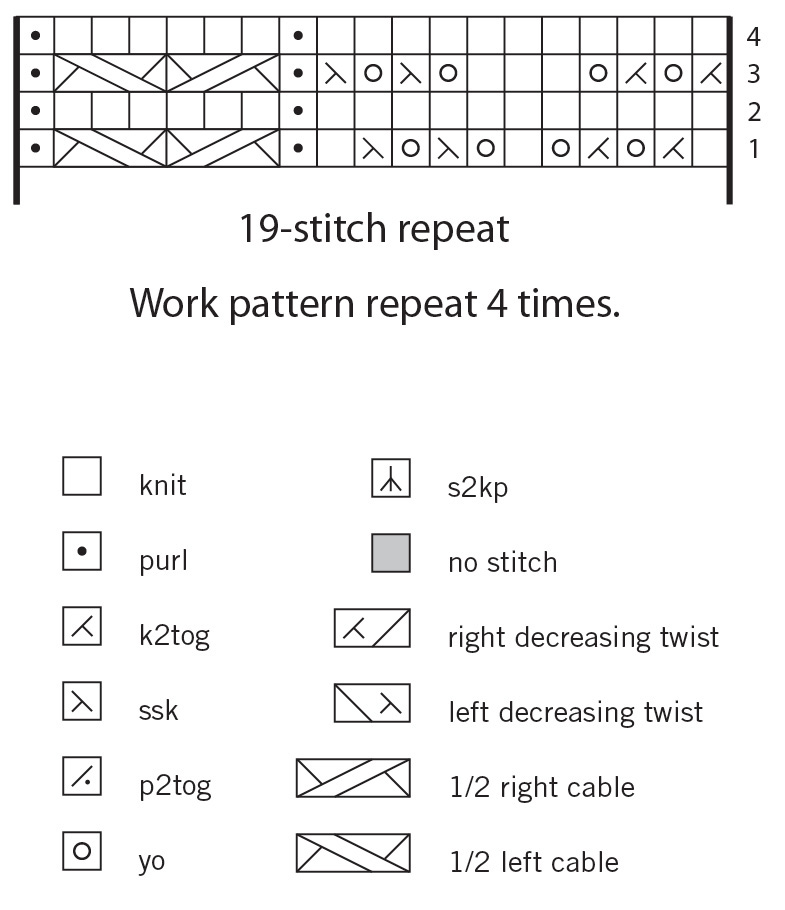
1⁄2 Left Cable: Slip 1 stitch to cable needle and hold in front, k2 from left-hand needle, k1 from cable needle.
1⁄2 Right Cable: Slip 2 stitches to cable needle and hold in back, k1 from left-hand needle, k2 from cable needle.
Left Decreasing Twist: Slip 1 stitch to cable needle and hold in front; ssk from left-hand needle, k1 from cable needle — 3 stitches decreased to 2 stitches.
Right Decreasing Twist: Slip 2 stitches to cable needle and hold in back; k1 from left-hand needle, k2tog from cable needle — 3 stitches decreased to 2 stitches.
Knitting the Band
- With smaller needle cast on 76 stitches. Place marker and and join into a round, being careful not to twist the stitches.
- Rounds 1–5: *K2, p2; repeat from * to end of round. Piece measures 3⁄4"/ 2 cm.
Knitting the Lace
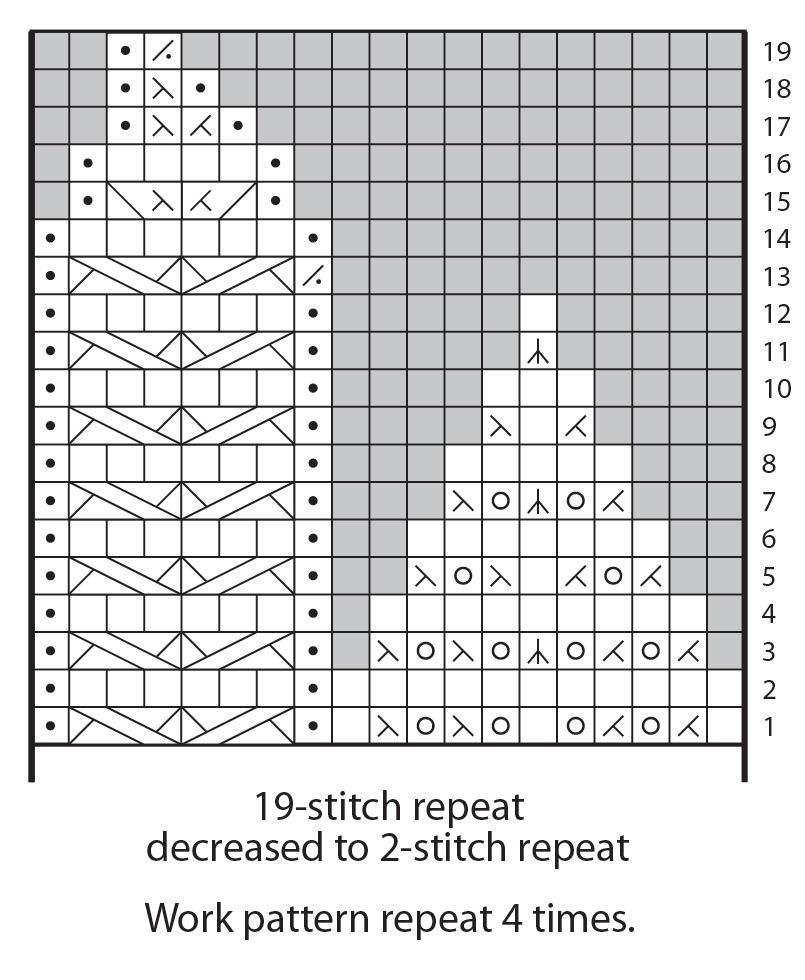
- Change to larger needle. Work Rounds 1–4 of Twig Lace chart eight times.
Decreasing for the Crown
- Work Rounds 1–19 of Twig Lace Crown chart, changing to double-point needles when necessary. You now have 8 stitches.
Finishing
- Cut yarn, leaving 6"/15 cm tail. Thread tail onto yarn needle, draw through remaining 8 stitches, pull up snugly, and fasten off. Weave in ends. Wash and block.
Alexandra Hat
Designed by Jillian Moreno
Jillian loves a close-fitting cap for showing lace, which can sometimes get lost in a slouchy hat. The diagonal lines combine with yarnovers to create a play of light across the surface of the fabric.
- Sizes and Finished Measurements: To fit 19"–21"/48.5–53.5 cm head, 18"/45.5 cm circumference after blocking, unstretched
- Yarn: Madelinetosh Tosh DK, 100% superwash merino wool, 225 yds (206 m)/3.5 oz (100 g), Caravan
- Needles: US 5 (3.75 mm) circular needle 16"/40 cm long and set of US 5 (3.75 mm) double-point needles or size you need to obtain correct gauge
- Gauge: 18 stitches and 32 rounds = 4"/10 cm in Alexandra Lace pattern, blocked
- Other Supplies: Stitch marker, yarn needle, head form or balloon for blocking
Knitting the Hat
- Cast on 80 stitches. Place marker and join into a round, being careful not to twist the stitches.
- Round 1: *K1, p1; repeat from * to end of round.
- Repeat Round 1 until piece measures 11⁄2"/4 cm.
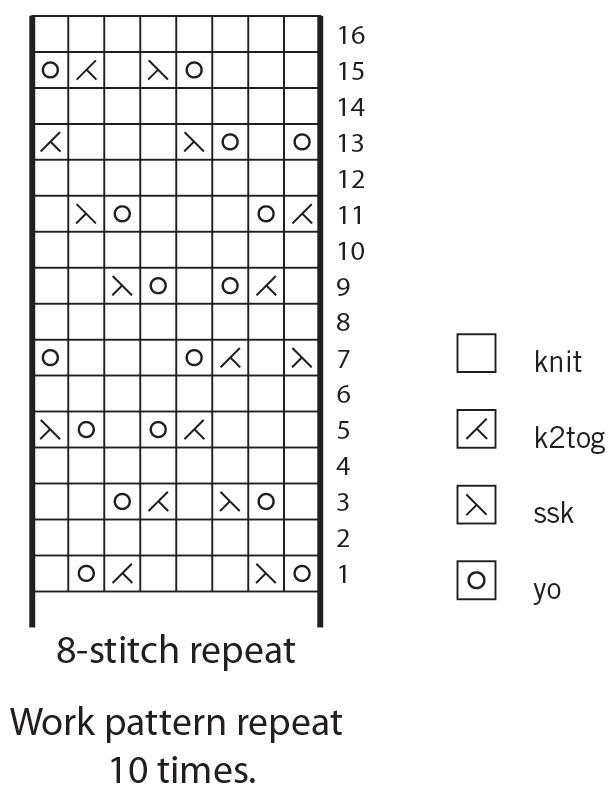
- Work Rounds 1–16 of Alexandra Lace chart three times (48 chart rounds total). Hat measures approximately 71⁄2"/ 19 cm from cast-on edge. Note: The diagonal decrease lines of the pattern are not continuous and have deliberate “jogs” in Rounds 7 and 13.
Decreasing for the Crown
Note: Change to double-point needles when necessary.
- Next 3 Rounds: *K2tog; repeat from * to end of round. You now have 10 stitches.
Finishing
- Cut yarn, leaving a 6"/15 cm tail. Thread tail onto yarn needle and draw through remaining stitches; pull up snugly and fasten off.
- Weave in ends and block to open lace on a head form or an inflated balloon.
Hepatica Hats
Designed by Mindy Vasil
These beautiful lacy berets are perfect early spring accessories. The flower design on the crown adds a feminine and soft touch. The pattern offers the choice of two sizes.
- Sizes and Finished Measurements: Small (large), approximately 18.5 (21.5)"/ 47 (54.5) cm band circumference, unstretched
- Yarn:
- Red Hat: Lorna’s Laces Shepherd Sport, 100% superwash wool, 200 yds (183 m)/ 2.5 oz (70 g), Color 107 Red Rover
- Blue Hat: Zitron Unisono, 100% superwash extrafine merino, 328 yds (300 m)/ 3.5 oz (100 g), Color 1220
- Needles: US 7 (4.5 mm) circular needle 16"/40 cm long and set of US 7 (4.5 mm) double-point needles or size you need to obtain correct gauge
- Gauge: 18 stitches and 36 rounds = 4"/10 cm in k2, p2 ribbing
- Other Supplies: Stitch marker, yarn needle
Knitting the Band
- Cast on 84 (96) stitches. Place marker and join into a round, being careful not to twist the stitches.
- Round 1: *K2, p2; repeat from * to end of round.
- Repeat Round 1 six more times.
Knitting the Hat Body
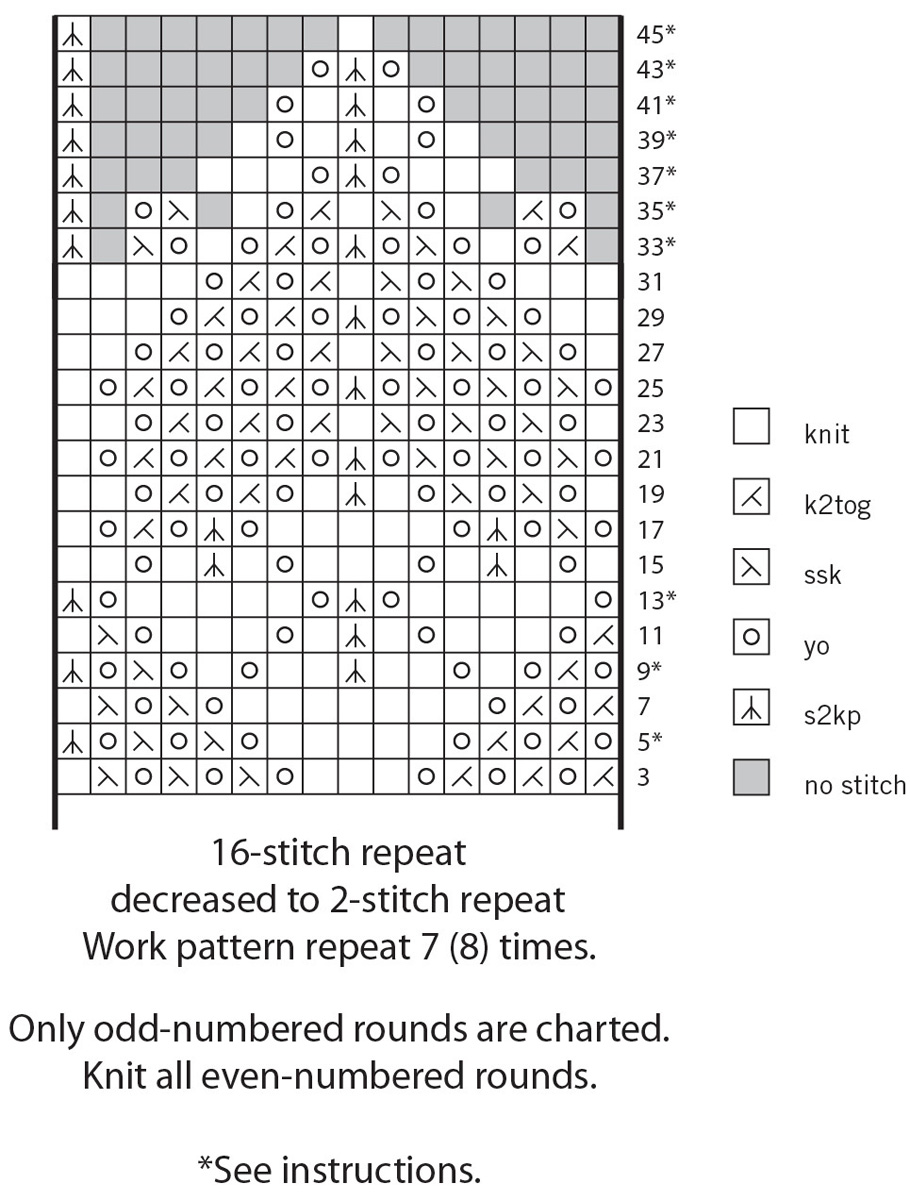
- Increase Round (counts as Round 1 of Chart): *Yo, k1, (yo, k2tog) twice, yo, k1, (yo, ssk) twice, (yo, k1) twice; repeat from * six (seven) more times. You now have 112 (128) stitches.
Notes: Only odd-numbered rounds are charted, and Round 1 is not shown. Knit all even-numbered rounds from 2 through 32.
At the start of Rounds 5, 9, and 13, remove the end-of-round marker, k1, replace the marker, and then begin working the chart pattern; the k1 worked to shift the marker at the start of these rounds is included in the last 3-stitch decrease of the same round and maintains the pattern alignment.
- For both sizes: Work Rounds 2–32, working the pattern repeat seven (eight) times around.
Decreasing for the Crown
Note: At the start of odd-numbered Rounds 33–45, remove the end-of-round marker, k1, replace the marker, and then begin working the chart pattern; moving the marker in this manner maintains the pattern alignment.
- Continuing to knit all the even-numbered rounds, work Rounds 33–45. You now have 14 (16) stitches.
- Work final decreases as follows.
- Round 46: *K2tog; repeat from * to end of round. You now have 7 (8) stitches.
- Rounds 47–49: Knit.
- Round 50:
- For small size: K1, *k2tog; repeat from * to end of round. You now have 4 stitches.
- For large size: *K2tog; repeat from * to end of round. You now have 4 stitches.
Finishing
- Cut yarn, leaving a 6"/15 cm tail. Thread tail onto yarn needle and draw through remaining stitches; pull snugly and fasten off. Weave in ends. Block if desired.
Nicole’s Angora Beanie
Designed by Diana Foster
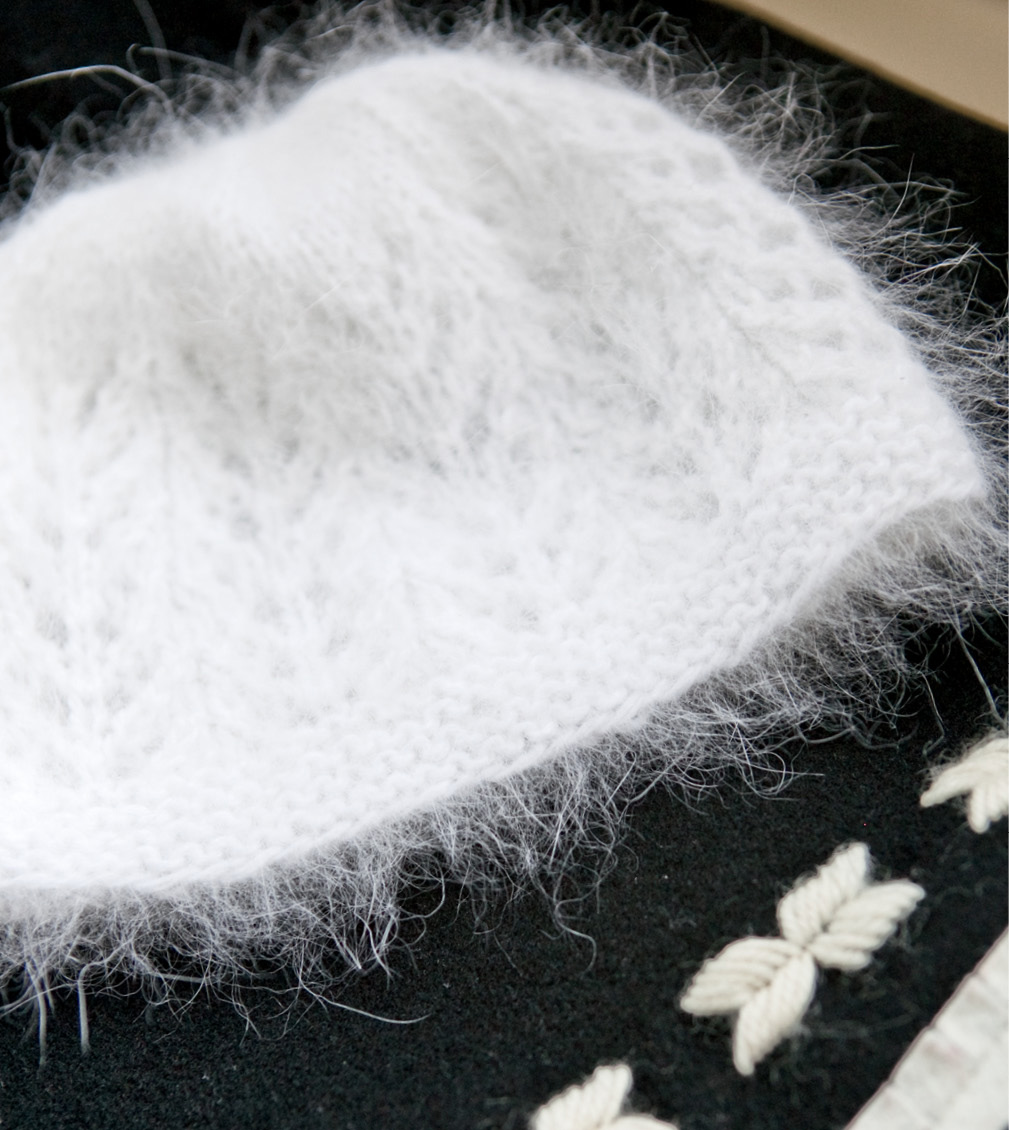
This lovely beanie features an easy-to-remember lace pattern, and it shows wonderfully knitted in white angora. The hat would be perfect for a winter bride — at least for getting to and from the church!
- Finished Measurements: Approximately 20"/51 cm circumference and 7"/18 cm deep
- Yarn: Schulana Angora-Fashion, 80% angora/ 20% nylon, 122 yds (112 m)/0.88 oz (25 g), Color 1 White
- Needles: US 8 (5 mm) circular needle 16"/40 cm long and set of four US 8 (5 mm) double-point needles or size you need to obtain correct gauge
- Gauge: 16 stitches = 4"/10 cm in garter stitch; 17 stitches and 24 rounds = 4"/10 cm in Lace pattern
- Other Supplies: Stitch marker, yarn needle
Pattern Essentials
Lace (multiple of 7 stitches)
Round 1: Knit.
Round 2: *K1, k2tog, yo, k1, yo, ssk, k1; repeat from * to end of round.
Round 3: Knit.
Round 4: *K2tog, yo, k3, yo, ssk; repeat from * to end of round.
Repeat Rounds 1–4 for pattern.
Knitting the Beanie
- With circular needle, cast on 84 stitches. Do not join into a round. Work back and forth in garter stitch (knit every row) for 1"/2.5 cm. Place marker and join into a round and work Rounds 1–4 of Lace pattern six times.
Decreasing for the Crown
Note: Change to double-point needles when necessary.
- Round 1: *K10, k2tog; repeat from * to end of round. You now have 77 stitches.
- Rounds 2, 4, and 6: Knit.
- Round 3: *K9, k2tog; repeat from * to end of round. You now have 70 stitches.
- Round 5: *K8, k2tog; repeat from * to end of round. You now have 63 stitches.
- Round 7: *K7, k2tog; repeat from * to end of round. You now have 56 stitches.
- Round 8: *K6, k2tog; repeat from * to end of round. You now have 49 stitches.
- Round 9: *K5, k2tog; repeat from * to end of round. You now have 42 stitches.
- Round 10: *K4, k2tog; repeat from * to end of round. You now have 35 stitches.
- Round 11: *K3, k2tog; repeat from * to end of round. You now have 28 stitches.
- Round 12: *K2, k2tog; repeat from * to end of round. You now have 21 stitches.
- Round 13: *K1, k2tog; repeat from * to end of round. You now have 14 stitches.
- Round 14: *K2tog; repeat from * to end of round. You now have 7 stitches.
Finishing
- Cut yarn, leaving an 8"/20.5 cm tail. Thread tail onto yarn needle and draw through remaining stitches; pull up snugly and secure. Thread beginning tail onto yarn needle and sew garter ridge bumps together to close slit at start of beanie. Weave in ends and block.
Ellie’s Orange Tam
Designed by Judith Durant
The best thing about this tam is the yarn. Check out Ellie’s Reclaimed Cashmere (www.elliesreclaimedcashmere.com) for fabulous recycled luxury. This tam is worked in seven distinct sections, with decreases worked along the divisions.
- Finished Measurements: Approximately 20"/51 cm circumference at ribbing
- Yarn: Ellie’s Reclaimed Cashmere, 100% recycled cashmere, 216 yds (198 m)/1.2 oz (34 g), Orange
- Needles: US 3 (3.25 mm) circular 16"/40 cm long and set of US 3 (3.25 mm) double-point needles or size you need to obtain correct gauge and US 11⁄2 (2.5 mm) circular 16"/40 cm long
- Gauge: 26 stitches and 381⁄2 rounds = 4"/10 cm in Tam Lace pattern on larger needle, blocked
- Other Supplies: Stitch marker, yarn needle, dinner plate for blocking
Knitting the Tam
- Using smaller circular needle, cast on 144 stitches. Place marker and join into a round, being careful not to twist the stitches.
- Round 1: *K1, p1; repeat from * to end of round.
- Repeat Round 1 until piece measures 1"/2.5 cm.
- Change to larger circular needle.
- Increase Round: *(K4, M1L) 17 times, (k2, M1L) twice; repeat from * once more. You now have 182 stitches.
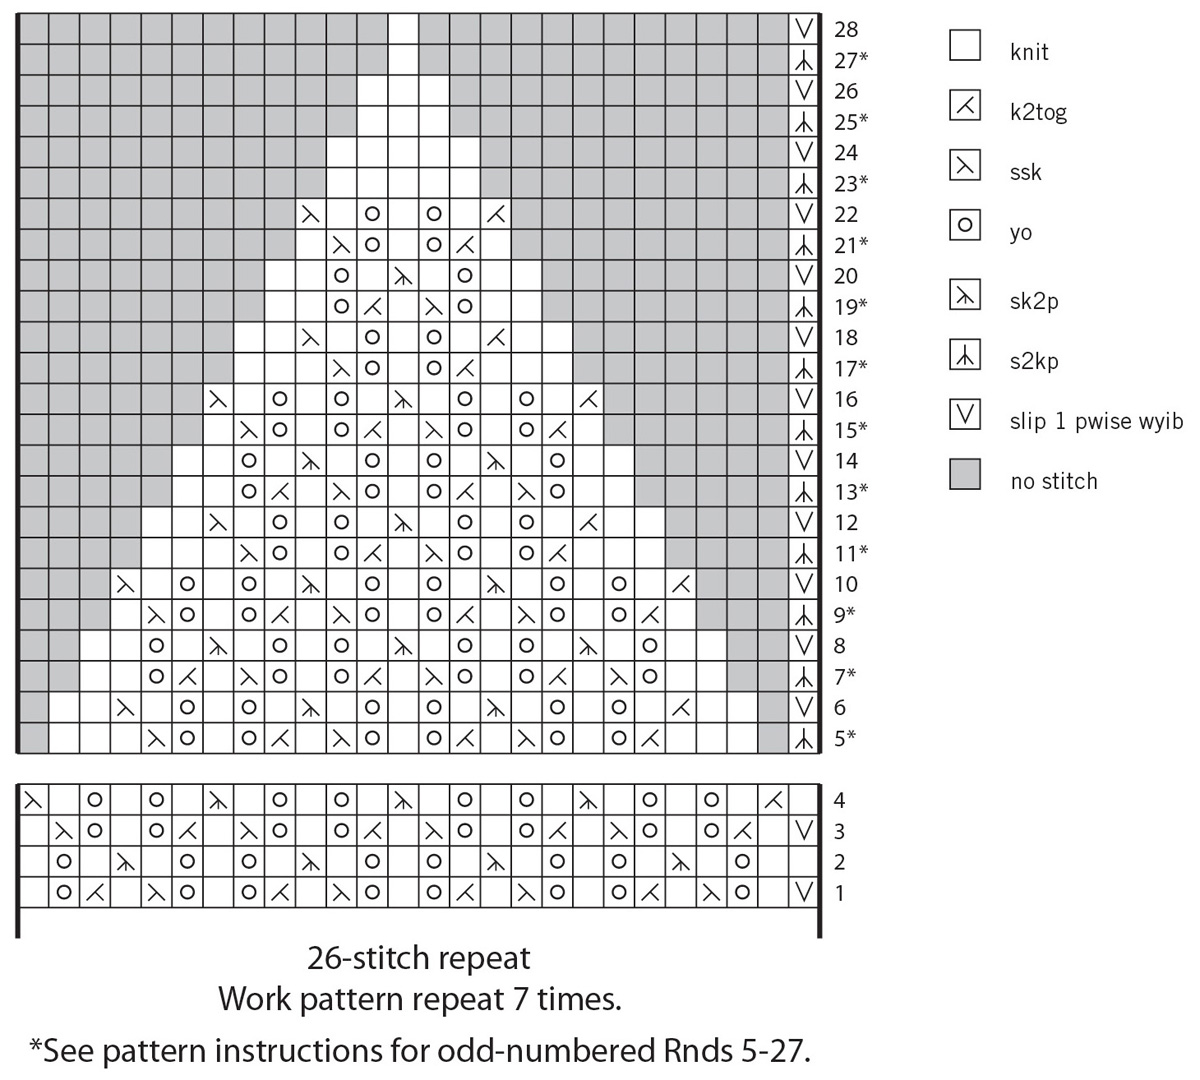
- Repeat Rounds 1–4 of Tam Lace chart, working the 26-stitch repeat seven times in each round, until piece measures 31⁄2"/9 cm from cast-on edge, ending with Round 4.
Decreasing for the Crown
Note: Before working odd-numbered Rounds 5–27, which have an s2kp decrease as the first decrease of the round, remove the end-of-round marker, slip the last stitch from the end of the previous even-numbered round to the left-hand needle, and replace the end-of-round marker.
- Work Rounds 5–28 of chart, changing to double-point needles when there are too few stitches for the circular needle. You now have 14 stitches.
- Next Round: *K2tog; repeat from * to end of round. You now have 7 stitches.
Finishing
- Cut yarn, leaving a 6"/15 cm tail. Thread tail onto yarn needle, draw through remaining stitches, pull up snugly, and fasten off. Weave in ends. Block over a 10"/25.5 cm dinner plate.
Flutter Toque
Designed by Jenise Reid
This toque matches the Flutter Mitts on page 54. It is knit in the round on a circular needle and features evenly spaced staggered decreases instead of aligned decreases.
- Finished Measurements: Approximately 18"/45.5 cm circumference, unstretched, and 81⁄2"/21.5 cm deep
- Yarn: Knit Picks Sugarbunny, 80% merino wool/20% angora, 136 yds (124 m)/1.75 oz (50 g), Topaz
- Needles: US 4 (3.5 mm) circular needle 16"/40 cm long and set of four US 4 (3.5 mm) double-point needles or size you need to obtain correct gauge
- Gauge: 18 stitches and 26 rounds = 4"/10 cm in stockinette stitch
- Other Supplies: Stitch marker, yarn needle
Knitting the Toque
- With circular needle, cast on 81 stitches; place marker and join into a round, being careful not to twist the stitches.
- Round 1: (K2tog, yo, p1) 27 times.
- Round 2: (K2, p1) 27 times.
- Round 3: (Yo, ssk, p1) 27 times.
- Round 4: Repeat Round 2.
- Rounds 5–16: Repeat Rounds 1–4 three more times; piece measures about 21⁄4"/5.5 cm.
- Rounds 17–30: Knit.
Decreasing for the Crown
Note: Change to double-point needles when necessary.
- Round 31: (K7, k2tog) nine times. You now have 72 stitches.
- Rounds 32–40: Knit.
- Round 41: (K4, k2tog) 12 times. You now have 60 stitches.
- Rounds 42–46: Knit.
- Round 47: (K1, k2tog) 20 times. You now have 40 stitches.
- Rounds 48–51: Knit.
- Round 52: (K2tog) 20 times. You now have 20 stitches.
- Rounds 53 and 54: Knit.
- Round 55: (K2tog) 10 times. You now have 10 stitches.
- Round 56: Knit.
- Round 57: (K2tog) five times. You now have 5 stitches.
Finishing
- Cut yarn, leaving an 8"/20.5 cm tail. Thread tail onto yarn needle and draw through remaining stitches; pull up snugly and secure. Weave in ends and block.
Tilting Ladders Hat
Designed by Sarah Jean Hood
This lace is easy to knit because it’s easy to read — you’ll always know exactly where you are in the stitch pattern. The hat is knit top down, so the length can be adjusted for a custom fit. One skein is enough for two hats.
- Finished Measurements: Approximately 22"/56 cm circumference
- Yarn: Jade Sapphire Mongolian Cashmere 2-Ply, 100% cashmere, 400 yds (366 m)/ 1.9 oz (55 g), Color 61 Blue Spruce
- Needles: US 3 (3.25 mm) circular needle 16"/40 cm long and set of five US 3 (3.25 mm) double-point needles, or one long circular needle for magic loop or size you need to obtain correct gauge
- Gauge: 26 stitches and 44 rounds = 4"/10 cm in Tilting Ladders Lace pattern
- Other Supplies: Stitch marker, cable needle, yarn needle, one 1⁄2"/13 mm button, sewing needle and coordinating thread
- Special Abbreviations:
- C4B: cable 4 stitches back
- C4F: cable 4 stitches front
Pattern Essentials
Cable 4 Stitches Back: Slip next 2 stitches onto cable needle and hold in back, knit 2 stitches from left-hand needle, knit 2 stitches from cable needle.
Cable 4 Stitches Front: Slip next 2 stitches onto cable needle and hold in front, knit 2 stitches from left-hand needle, knit 2 stitches from cable needle.
Knitting the Crown
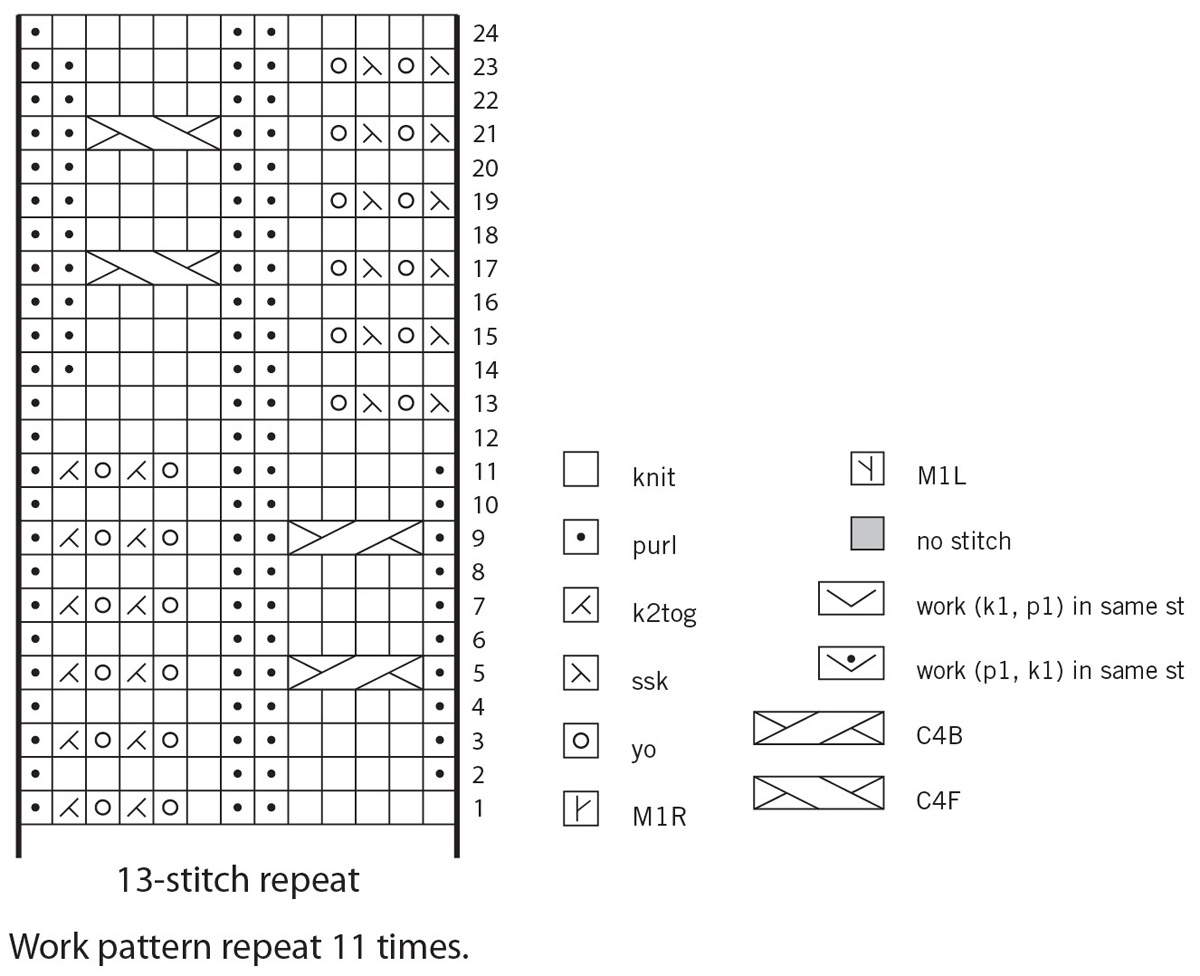
- Using double-point needles and a circular cast-on method (see page 291) or magic loop method (see page 295), cast on 11 stitches. Place marker and join into a round, being careful not to twist the stitches. Knit 1 round. Work Rounds 1–34 of Crown Increase chart, working the chart 11 times in each round and changing to circular needle when necessary. You now have 143 stitches.
Pattern Notes
Instructions are for a 22"/56 cm circumference hat with 11 repeats of the 13-stitch Tilting Ladders Lace pattern. Increase to 24"/61 cm or decrease to 20"/51 cm by adding or subtracting one repeat, respectively. The crown begins with a circular cast on.
Knitting the Lace
- Work Rounds 1–24 of Tilting Ladders Lace chart twice, then work Rounds 1–12 once more. Knit one round.
Binding Off with I-Cord
- Following the instructions on page 292, work a 4-stitch I-cord bind off. When all hat stitches have been bound off, knit 3 I-cord stitches again, pick up and knit (see page 297) 1 stitch from the first stitch of hat round and work it together with the last I-cord stitch as k2tog. Using two double-point needles, work 3 rounds of 4-stitch I-cord (see page 292) without attaching to the hat.
Making the Buttonhole Tab
- Work back and forth in rows on the 4 stitches of the I-cord as follows:
- Row 1 (WS): Purl.
- Row 2 (RS): Knit.
- Row 3: Purl.
- Row 4 (RS, Buttonhole Row): K2, yo, k2. You now have 5 stitches.
- Rows 5–7: Repeat Rows 1–3.
- Row 8: K1, s2kp, k1. You now have 3 stitches.
- Row 9: Purl.
- Row 10: S2kp. You now have 1 stitch.
- Cut yarn, leaving a 12"/30.5 cm tail. Thread tail onto a yarn needle, draw through the remaining stitch.
Finishing
- Weave in the tail at the end of the buttonhole tab by working it along the selvedge back to the I-cord join and tack it securely in place. Weave in ends. Block.
- Using a sewing needle and coordinating thread, sew the button to the I-cord underneath the buttonhole.
