Courtesy of Jason Martineau
CHAPTER 7
Starlight Skirt
MAKE A STYLISH SKIRT AND PROGRAM IT USING THE ARDUINO IDE TO SHINE IN ALL the colors of light.
What You Will Learn
In this chapter, you will learn how to
 Work with loose fiber-optic strands
3D print fiber-optic holders and light-emitting diode (LED) diffusers
Arduino programming
Files You Will Need
Star-shaped diffuser models for 3D printing: starDiffuser.stl
Starlight skirt Arduino sketch: starlightSkirt.io
Tools You Will Need
Soldering tools: soldering iron and solder
3D printer
Hot-glue gun
Sewing machine and thread
Arduino programming environment
Materials You Will Need
3D printer filament: polylactic acid (PLA), acrylonitrile butadiene styrene (ABS), glow-in-the-dark nylon
WS2812b addressable LEDs (One meter of prewired LEDs is recommended.)
JST-SM connectors (only if your addressable LEDs don’t have the correct connector)
50 to 100 meters of 0.5-, 0.75-, or 1.0-millimeter end-glow fiber-optic strands
Craft scissors
Hot-glue gun and glue sticks or other glue suitable for plastics
Electrical tape (available in different colors)
Heat shrink
Fiber-optic diffusers
StitchKit MakeFashion controller board (www.stitchkit.io), or other small Arduino-compatible board
Battery, either a USB battery pack or a LiPo battery
1.5 to 2 yards of fashion fabric (wovens recommended)
1 yard of lining material for lining and pocket: cotton, cotton/poly, other woven fabrics
2 hooks and eyes ⅝ inch wide, usually called skirt or pants hooks
Matching thread
Optional: Lightweight iron-on interfacing for the waistband of the skirt
Low-sew option: Purchased knee- or above-knee-length skirt with a flat waistband
The Starlight skirt has easy-to-connect electronics and a bit of programming. This time we’ll be using the Arduino programming environment, also known as the Arduino IDE. The electronics are the StitchKit Fashion Technology Kit, which was designed by fashion tech makers to work with wearable projects. Inside the StitchKit you’ll find the MakeFashion board and most of the components you need to make this project (Figure 7.1). Other small Arduino-compatible boards such as those made by Arduino, Sparkfun, or Adafruit can be substituted for the StitchKit MakeFashion board.
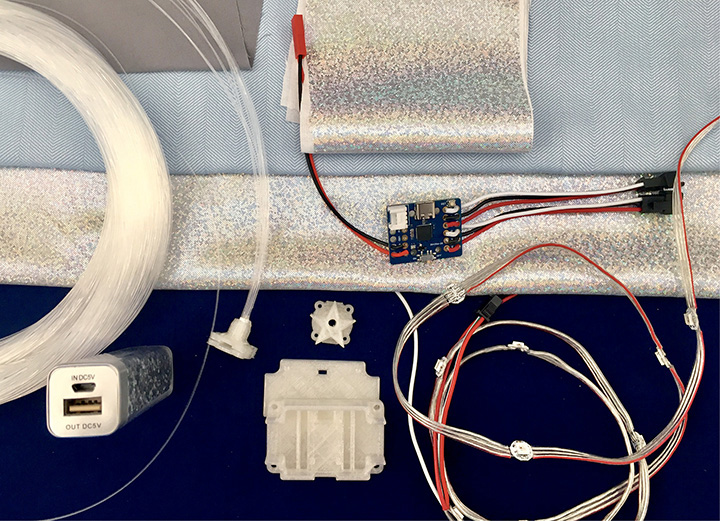
Figure 7.1 Fiber-optic filament, wired LEDs, and MakeFashion board are used for the Starlight skirt.
Step 1: Sew the Skirt
Remember to sew a backtack at the start and stop of your seams.
1. You will need two measurements for this skirt. First, measure your waist where you want the waistband of the skirt to sit. Then measure how long you want the finished skirt, for someone who is 5 feet, 6 inches tall, somewhere between 18 and 22 inches will make an above-the-knee or knee-length skirt, respectively.
2. Cut the lining fabric. Cut a rectangle that is as long as 1.5 times your waist measurement with a width of how long you want your finished skirt.
Lining = length (1.5 × waist measurement) × width (desired length of skirt)
3. Cut the skirt fashion fabric. Cut a rectangle that is as long as 2.5 times your waist measurement with a width of the how long you want your skirt + 4 inches. If you want a really full skirt, you can cut a rectangle that is 3 times your waist measurement. Depending on how wide your fabric is, you may need to sew two rectangles together to get this length.
Skirt fabric = length (2.5 × waist measurement)
× width (desired length of skirt + 4 inches)
Or for a very full skirt,
Skirt length = length (3 × waist measurement)
× width (desired length of skirt + 4 inches)
4. Cut the waistband. The fabric is the same as your skirt fashion fabric. Cut a waistband that is a rectangle as long as your waist measurement + 4 inches for the seam allowances and 4 inches wide. The skirt will overlap at the back. If you want to add interfacing to make your waistband a little stiffer, cut the same measurements out of a lightweight iron-on interfacing. Iron the interfacing to the waistband before you start sewing.
Waistband = length (waist measurement + 4 inches) × width (4 inches)
5. Cut a pocket. This pocket will go inside the skirt next to the waist opening and will hold the microcontroller board and battery. Cut the pocket out of lining fabric.
Pocket = length 10 inches × width 6 inches
6. Make the pocket. To hem the pocket, fold the 6-inch side in ¼ inch, press, and then fold ¼ inch again. Sew along the fold to hem the pocket. Fold the hemmed end of the pocket up 4 inches. Sew along both sides of the pocket with a ½-inch seam allowance. Turn the pocket inside out so that the raw edges are on the inside (Figure 7.2).

Figure 7.2 Sew a pocket for the electronics.
7. Sew your side seams, remembering to backtack at the start and stop of each seam. Fold the lining piece so that the short ends are together. Sew with a ½-inch seam allowance, leaving the top 5 inches open. This opening is how you get into the skirt. Turn the seam allowance under on each side of the opening, and sewn it down to make a neat hem. Fold your fashion fabric piece so that the short ends are together, and sew with a ½-inch seam allowance, leaving the top 5 inches open. Finish the opening as you did with the lining piece (Figure 7.3).

Figure 7.3 Sew down the sides of the back opening to make a neat hem.
8. You will need to gather the material in order to sew the skirt together.
a. Start the gathering with a long thread tail for your needle and bobbin thread. Do not backtack when you start and stop sewing gathers.
b. Using the longest straight stitch on your machine, sew about ¼ inch away from the raw edge of the fabric all the way. Leave a long thread tail when you are done.
c. Sew another line of long, straight stitches about ⅜ inch away from the edge. Having two lines of stitches prevents the thread from breaking as you gather the fabric.
d. Wind the bobbin threads around your fingers to create gathers in the fabric. Gently keep pulling and positioning the gathers until you get the length of fabric you want. Once you get the right length, you can tie a knot in the fabric tails to keep everything in place (Figure 7.4).
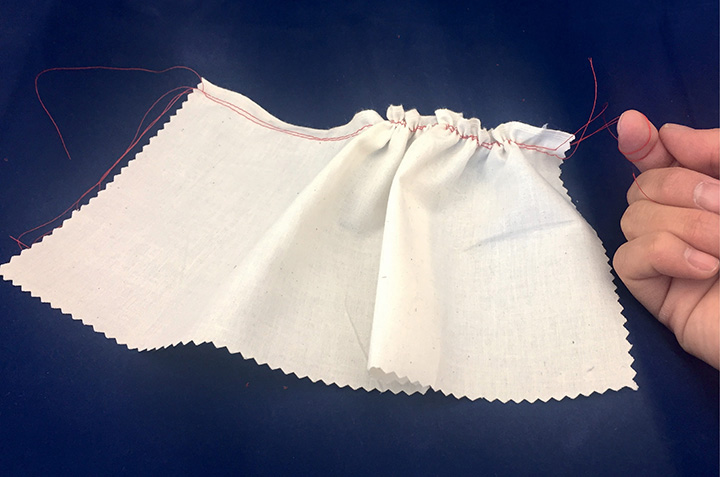
Figure 7.4 Gather the fabric along the stitching.
9. Gather the top side of the lining with the opening into the length of the waistband (waist measurement + 4 inches).
10. Gather the top side of the skirt fabric with the opening into the length of the waistband. Gather the bottom side of the skirt fabric into the length of the lining (1.5 × waist measurement).
11. Sew the bottoms together. With the right sides facing each other, pin the bottom edge of the lining to the bottom edge of the gathered skirt fabric. Sew with a ½-inch seam allowance (Figure 7.5).
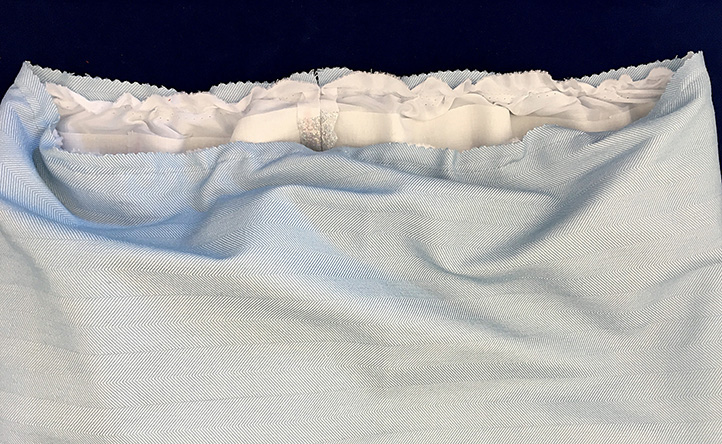
Figure 7.5 Sew the bottom of the skirt fabric to the bottom edge of the lining fabric.
12. Press this seam, and then turn the fabric out so that the seam is on the inside of the skirt.
13. Pin the top of the skirt fabric to the top of the lining fabric, matching up the openings at the back. Sew these pieces together with a straight stitch ¼ inch from the raw edges at the top (Figure 7.6).

Figure 7.6 Sew the skirt and lining together at the top.
14. Sew the pocket to the inside of the skirt. Pin the raw edge of the pocket to the inside of the skirt and lining pieces 1 inch from the openings. Sew to the skirt piece with a straight stitch ¼ inch from the top (Figure 7.7).

Figure 7.7 Sew the electronics pocket to the inside of the skirt.
15. Fold the waistband in half lengthwise with the right sides together. Sew each of the short ends with a ½-inch seam allowance. Turn the right side out, and press (Figure 7.8).
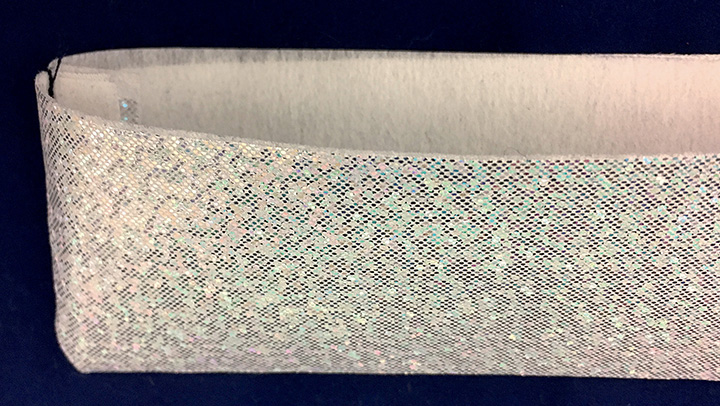
Figure 7.8 Sew the ends of the waistband and turn the right sides out.
16. Attach the waistband to the skirt. Match up one long edge of the waistband with the raw edges of the skirt. Sew the waistband on with a ½-inch seam allowance (Figure 7.9).
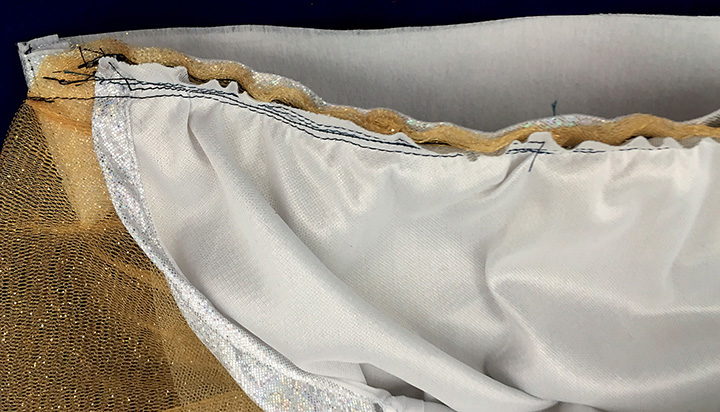
Figure 7.9 Sew one side of the waistband to the skirt.
17. Press the waistband open so that the raw edges of the skirt go inside the folded waistband. You will now have one long edge of the waistband that isn’t sewn yet. Fold the long edge of that side in ½ inch, and pin it so that it covers the stitching that attached the skirt (Figure 7.10).
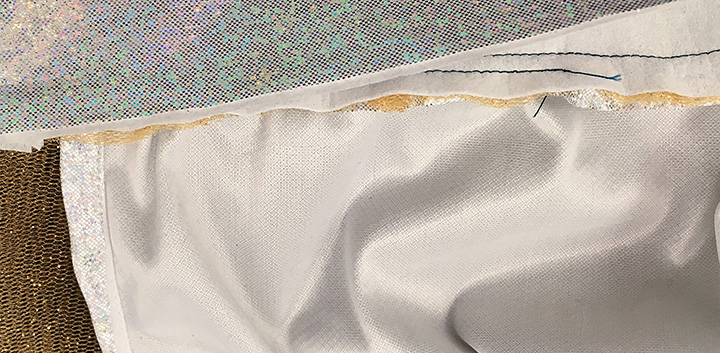
Figure 7.10 Fold the open edge of the waistband in ½ inch, and pin over the previous stitches.
18. Sew the waistband closed by hand or with a machine, enclosing the raw edges of the skirt completely in the waistband.
19. Use the hooks and eyes to close the waistband. Sew the eyes on ½ inch from the edge of the waistband. Sew the hooks on ½ inch from the edge of the overlap (Figure 7.11).
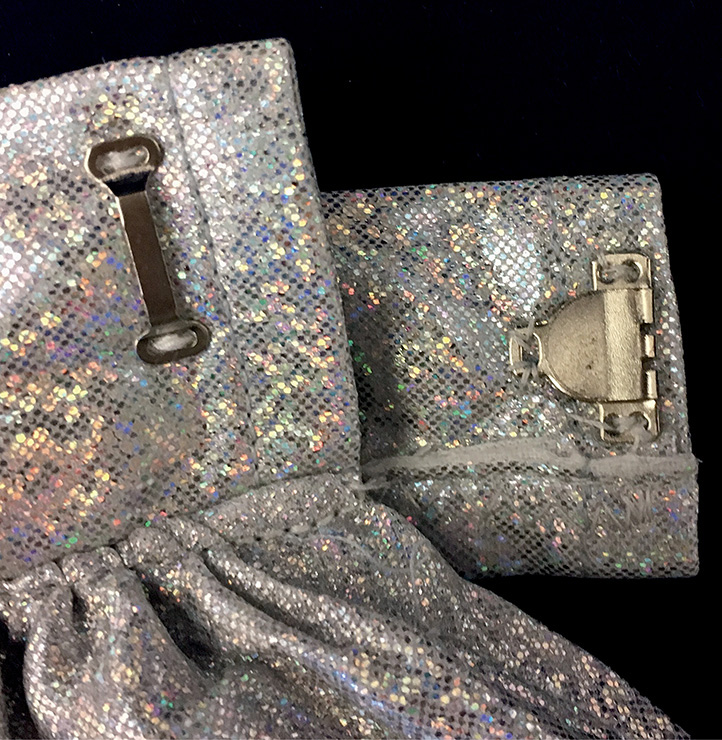
Figure 7.11 Use large hooks and eyes to close the skirt waistband.
Step 2: 3D Print the Fiber-Optic Holders and LED Diffusers
1. Using the waistband measurement for your skirt, measure the wired LEDs, leaving enough wire to connect to the board, and place the board in the skirt pocket.
2. Count the number of LEDs on your strand. This is the number of star diffusers you will need for the skirt. You will need both the snap-on base and the fiber-optic holder tops. Both are included in the downloadable model (Figure 7.12).
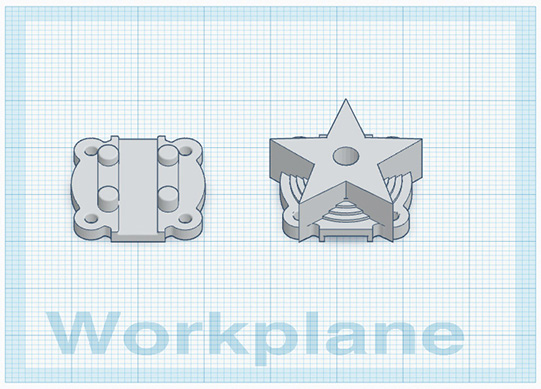
Figure 7.12 The star diffuser was remixed in TinkerCad from StitchKit originals.
3. Download the model of the starDiffuser.stl file, and open it in Cura for slicing. The model includes the snap-on base.
4. Load the filament, and slice the model with the following settings: 10 percent infill; Generate Support: yes; Build Plate Adhesion Type: Brim. Start your 3D printer according to the operating instructions. Print!
5. On a filament printer the diffuser tops will print with thinner plastic support material inside. Remove this material with pliers by twisting and pulling (Figure 7.13).
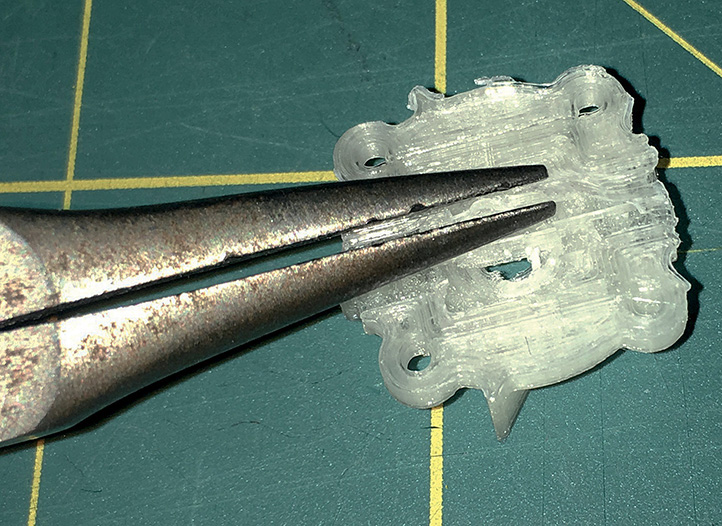
Figure 7.13 Use pliers to remove the printed plastic supports inside the diffuser tops by twisting and pulling.
Step 3: Put the Fiber Optics Together
1. If your optical fiber came in a long roll, you will need to cut the fiber into strands using scissors. Strands should be between 1 to 2 feet long, and you will probably need seven to ten strands per diffuser.
2. Bundle the fibers together, holding the ends flush. Insert the bundle through the star diffuser to determine how many fibers can fit in each bundle. Remove the bundle.
3. Use a small amount of glue between ⅛ and ½ inch from the end of the bundle to stick the fibers together. Allow the glue to dry. You can also wrap the bundle in electrical tape, although it will not be as secure as with the glue (Figure 7.14).
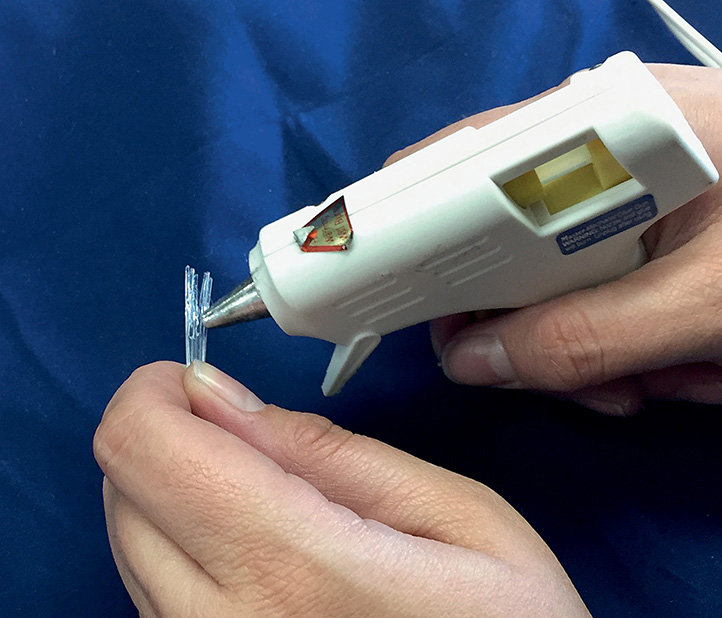
Figure 7.14 Glue the fibers together into a round bundle.
4. Once your bundle is dry, recut the end so that all the strands are flush. The flatter the ends are, the better they will make contact with the LED and transmit light (Figure 7.15).
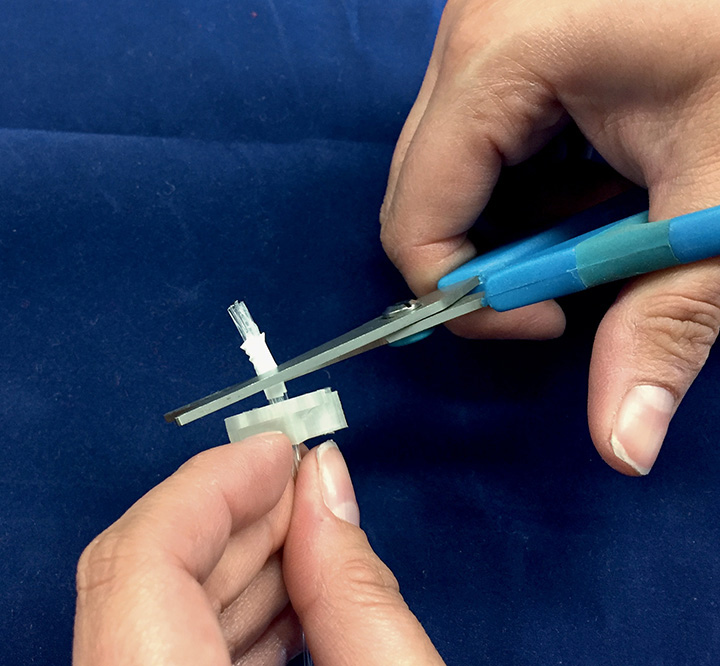
Figure 7.15 Cutting the optical fiber into 1- to 2-foot lengths. Try to keep the ends flat.
5. Push the bundle back into the diffuser, and line it up with the holder, leaving enough room for the LED and diffuser base to snap together. Test it to be sure that everything fits; then unsnap it. To secure the fiber optics in the diffuser, apply hot glue or other glue along the outside edge (Figure 7.16).

Figure 7.16 Insert the wrapped bundle into the diffuser, and secure it with hot glue.
6. Attach the diffusers to the LED strip (Figure 7.17).
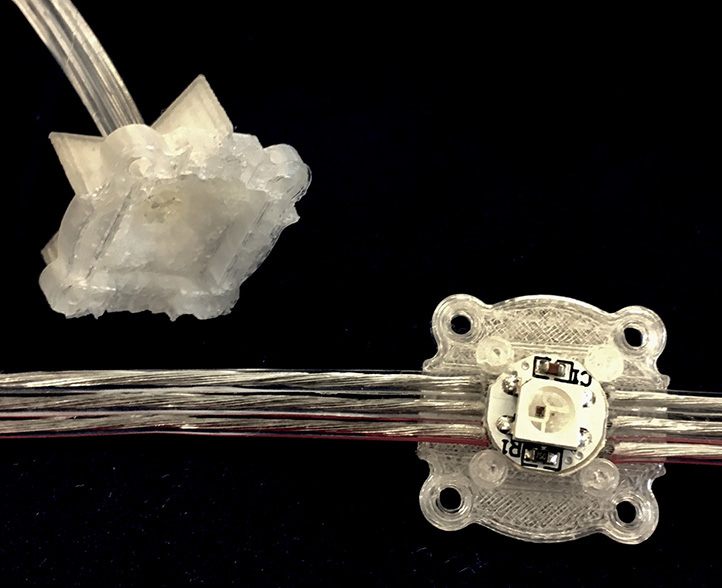
Figure 7.17 Wired LEDs fit into the star diffuser and snap together around the wire.
7. Sew the LED diffusers onto the waistband using the holes on each corner of the diffuser. You may want to sew the bases down first and then snap the two parts together and sew the whole diffuser to the waistband with a whipstitch through the holes in the corners (Figure 7.18).

Figure 7.18 Sew the diffuser via the corner holes onto the waistband with a whipstitch.
Step 4: Connect the Electronics
1. If needed, add connectors to the addressable LED strips. The StitchKit controller board comes with a JST-SM plug connector that can be used to connect to WS2812b addressable LED strands (Figure 7.19).
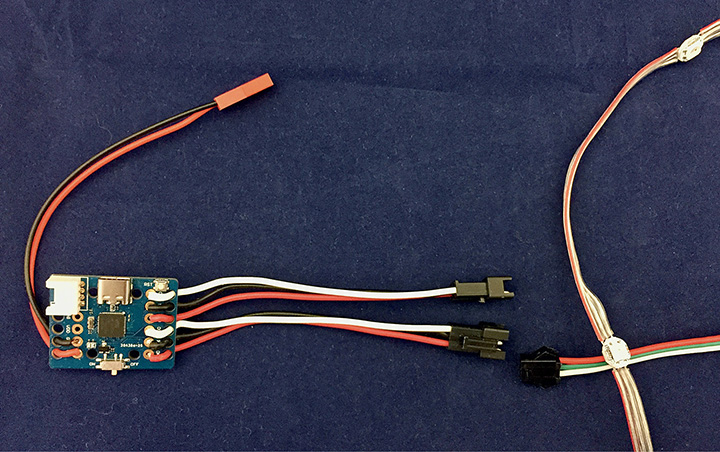
Figure 7.19 LED strips will need a JST-SM socket connector in order to plug into the StitchKit controller board.
2. If your stand of addressable LEDs does not have a socket JST-SM connector, you can remove the old connecter and solder on a new one, or you can create a short adapter cable. If you are relatively new to soldering, we recommend creating a short adapter cable.
3. Create a short adapter cable (if needed). If your LED strip came with the same JST-SM plug connector as the StitchKit’s MakeFashion board, create a short adapter cable consisting of two JST-SM socket connectors. Solder the red wire to the red wire and the black wire to the black wire. Use heat shrink or electrical tape to insulate and protect your solder connections (Figure 7.20).
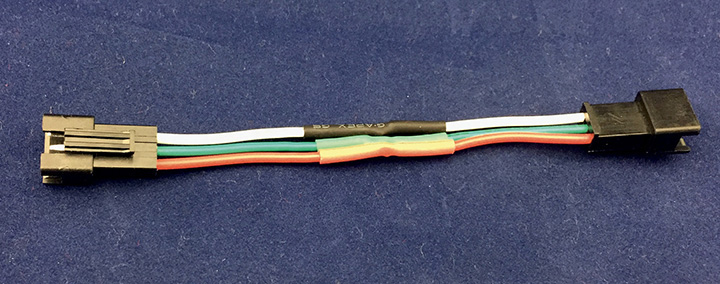
Figure 7.20 Sometimes addressable LED strips come with a plug connector. You can remove the old connecter and solder on a new one, or you can create a short adapter cable.
Step 5: Program the StitchKit’s MakeFashion Board
The StitchKit’s MakeFashion board can be programmed using the Arduino IDE (Integrated Development Environment). The Arduino IDE lets you create programs called sketches and upload them to StitchKit’s MakeFashion board. Unlike the MakeCode programming environment we used to program the hip pack (Chapter 5), the Arduino IDE is an application (app) that you have to install on your computer.
1. Download the Arduino IDE through the Arduino website (www.arduino.cc/en/Main/Software). There are two choices, the Arduino Web Editor, which lets you work online but requires a reliable Internet connection, and the Arduino Desktop IDE. We’ll be using the Desktop IDE, which lets you work offline on your computer.
2. Download the NeoPixel Library by accessing the Library Manager by choosing “Manage Libraries” from the “Include Library” menu item under the “Sketch” menu (Figure 7.21). Search for “Adafruit NeoPixel,” and install it (Figure 7.22).
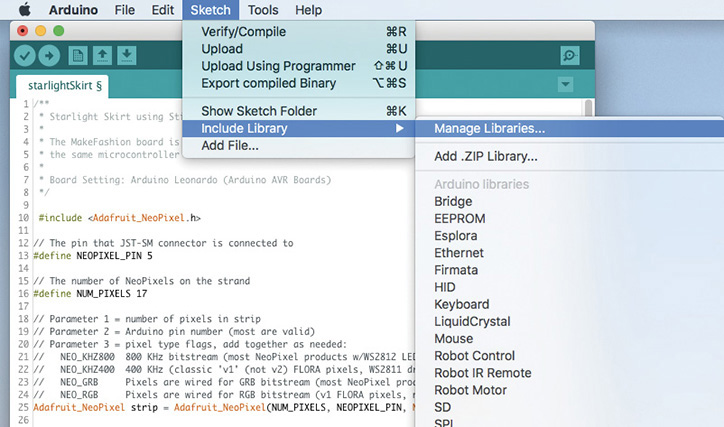
Figure 7.21 Access the Library Manager from the “Include Library” menu item under the “Sketch” menu.
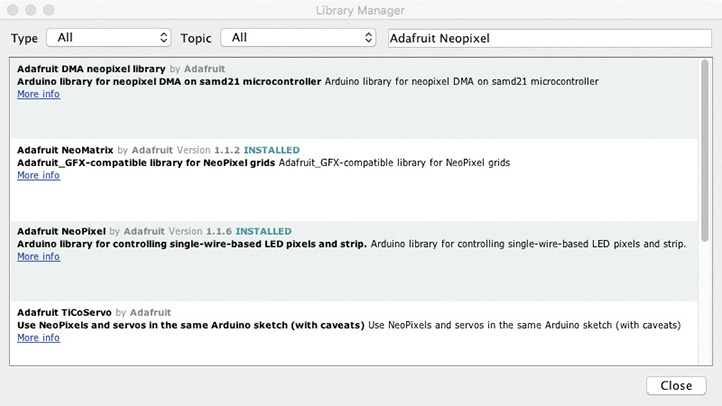
Figure 7.22 Search for “Adafruit Neopixel” and install it from the Library Manager.
3. Download the starlightSkirt folder contain the starlightSkirt.io sketch and open the sketch in the Arduino IDE.

4. Update the program to reflect the number of LEDs in your project. Count the number of LEDs you are using for your skirt. To get the controller to light that number, change the code in the third line “#define NUM_PIXELS 17” from 17 to however many LEDs are on your skirt.
5. Select “Arduino Leonardo” from the “Board” menu item under the Tools menu. The StitchKit controller board is based on the ATmega32U4 microcontroller, the same microcontroller used in the Arduino Leonardo board (Figure 7.23).
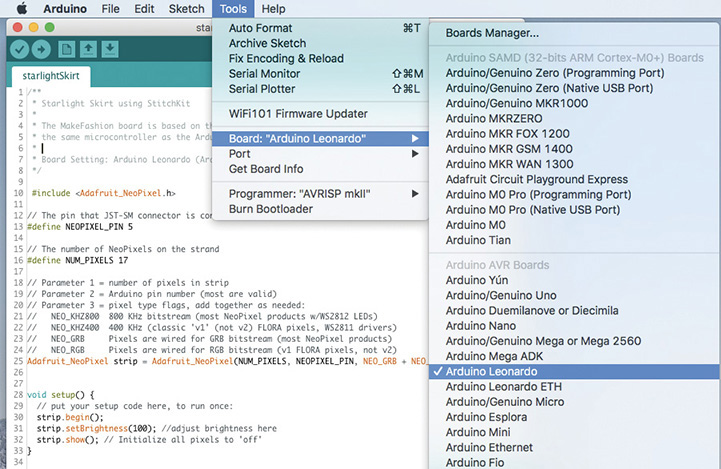
Figure 7.23 Select the Arduino Leonardo as the board type.
6. Using the USB cable that came in the StichKit, plug the StitchKit’s MakeFashion board into your computer.
7. Select the board’s serial port from the “Port” menu item under the Tools menu. On the Mac, the serial port is probably something like/dev/tty.usbmodem241. On Windows, it’s a COM port.
8. When you’re ready to upload the sketch, select “Upload” from the “Sketch” menu. Your skirt will down cycle through the colors of the rainbow (Figure 7.24).
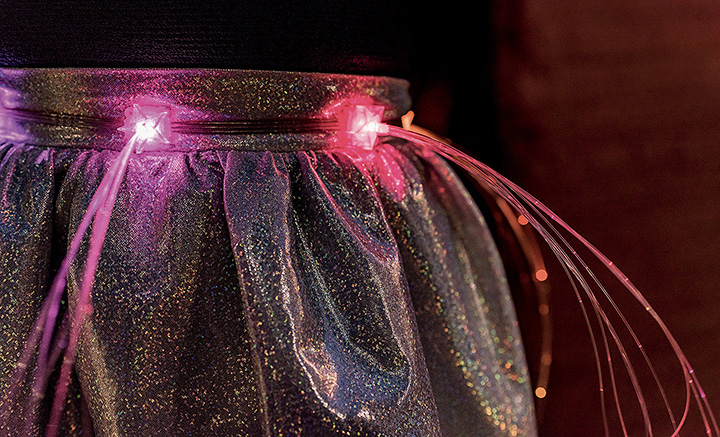
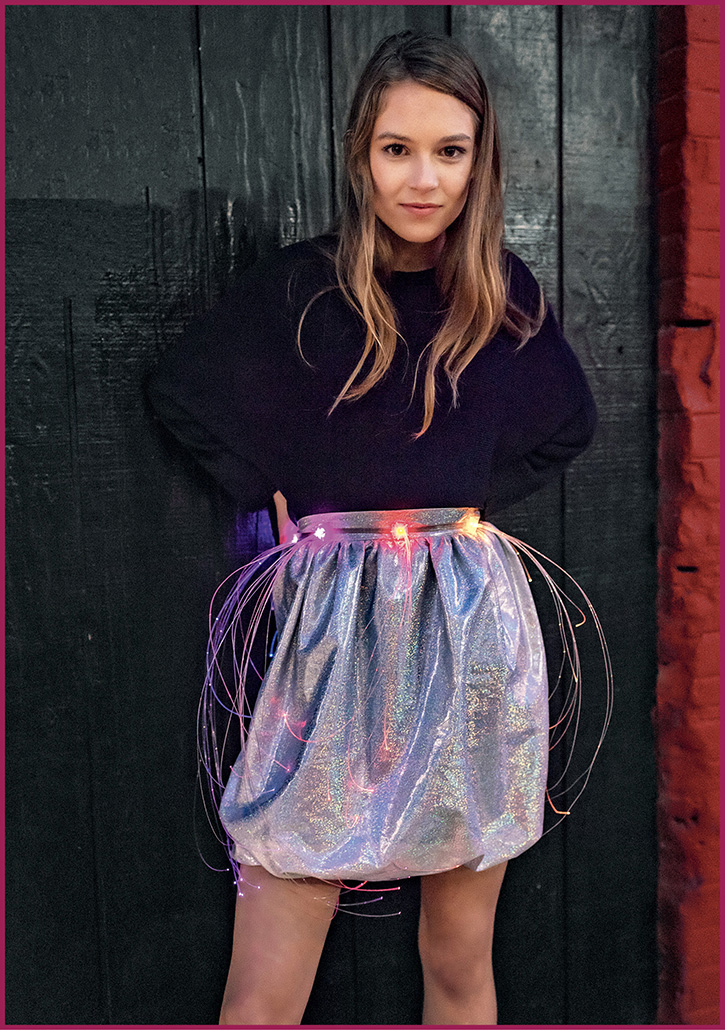
Figure 7.24 Starlight skirt showing the fiber-optic diffusers. (Courtesy of Jason Martineau)
Step 6: Going Further
It’s hard to beat a cycling rainbow pattern, but with the StitchKit MakeFashion board you can also add sensors so that your skirt can react to sound, movement, and more. In fact, the StitchKit MakeFashion board works with an assortment of Seeedstudio’s Grove sensors and inputs such as accelerometers, loudness sensor, light sensors, and buttons. The important thing is to have fun (Figure 7.25).
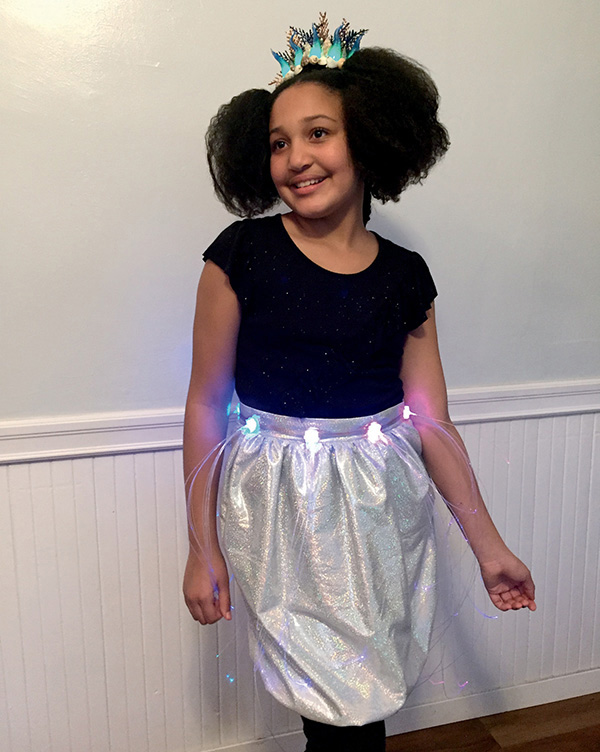
Figure 7.25 The Starlight Skirt is a fun project to wear.