 IN THIS CHAPTER
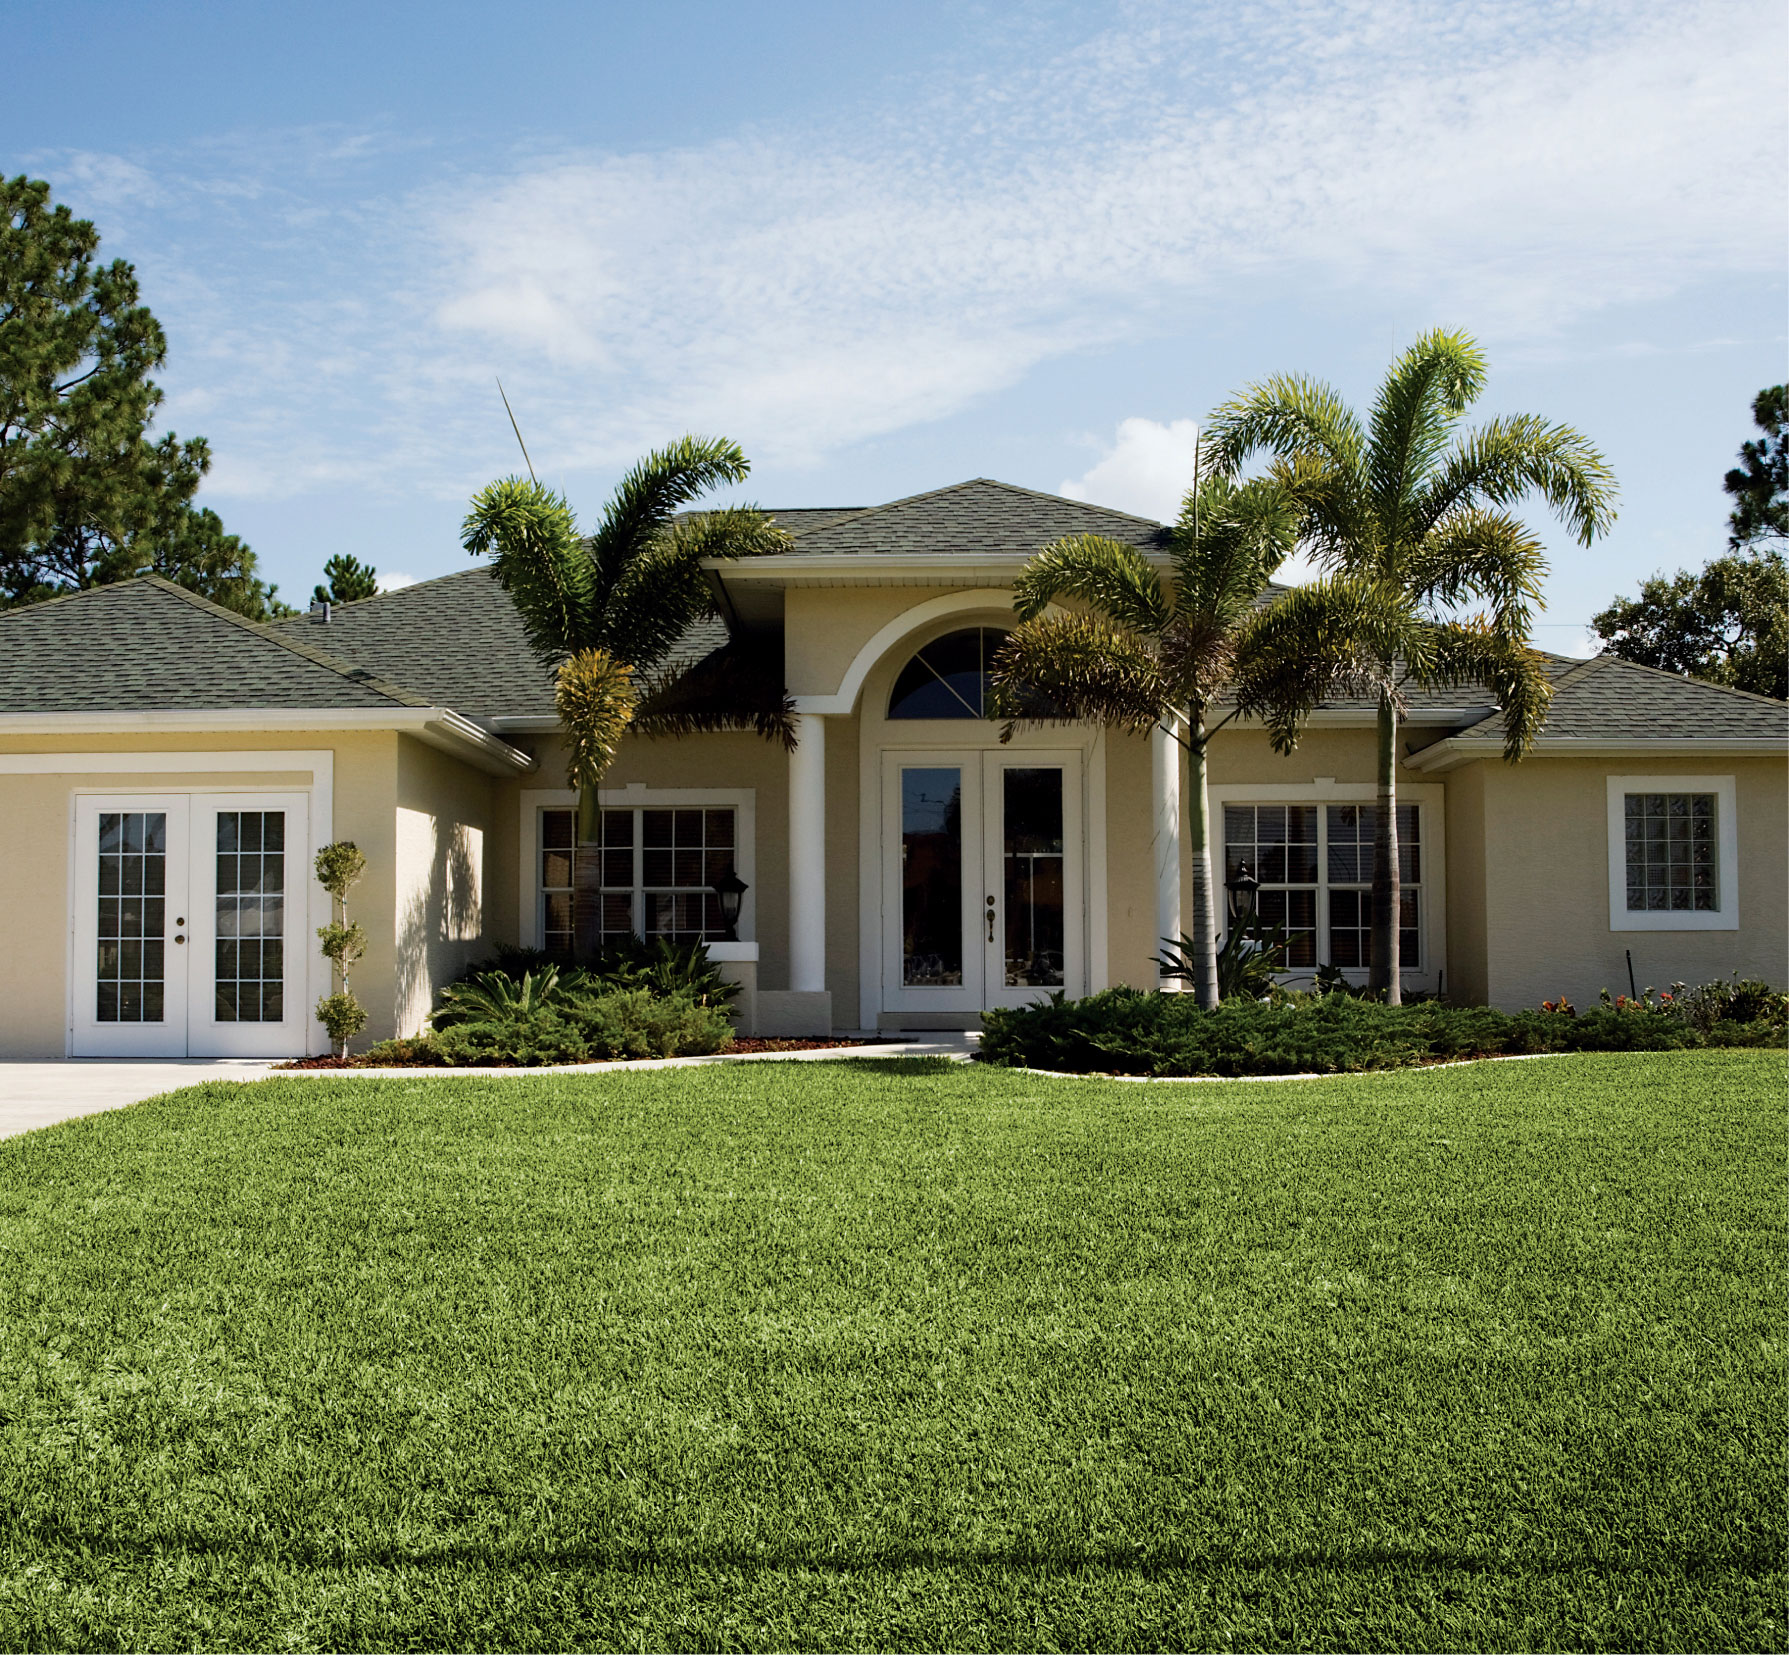
In this chapter, we’ll cover basic exterior home fix-ups from top to bottom. This sequence isn’t just a tidy way to organize a chapter; it’s also the best approach to tackling exterior repairs. The logic here is as right as rain: When water hits your roof, it runs down the shingles toward the gutters. Any holes it finds along the way may lead the water into the attic or, worse, the living spaces below (time to repaint the ceiling). If the gutters are dirty, leaky, or sagging, the water drips or overflows down onto the siding and trim, bringing the dirt and rotting leaves along with it and messing up the walls. That’s why it’s wise to make repairs from the top down.
Once you’ve taken care of the most pressing practical matters, you can focus your attention on aesthetic improvements, like washing the siding and touching-up or repainting the trim. And don’t ignore the “floors” of your outdoor home—the driveway, patios and stoops, decks, and the always-scrutinized walkway leading up to the front door. Simple cosmetic upgrades are the secrets to erasing years of use and weathering without blowing your budget.
 Roof Repairs
If you’re like most people, you pay absolutely no attention to your roof until one fateful day when you make the heart-sinking discovery that you have a leak. Don’t worry; a single leak may not be that bad. Chances are the problem lies in one localized area and you can fix it using ordinary tools and materials. But fix it you must. Leaving it for future owners to discover could lead to litigation, and you’d be crazy to ignore a leak if you’re staying in the home (water is the enemy of house structures). Be aware that home inspectors, unlike owners, pay very close attention to roofs when writing their reports. It behooves sellers to examine their own roof and make necessary repairs before the official inspection. For new owners, the inspector’s report can be a handy source for identifying and locating shortcomings in the roofing systems.
Often the hardest part of repairing a roof is finding the source of a leak. This is because water that gets through the roofing material can travel great distances along the building paper, roof decking, or even the rafters before it drops onto the top of your ceiling or runs down the inside of a wall. So unless your roof’s been hit by a meteorite, you can assume the breech in the roofing is not directly above the drip in your ceiling. To find the source of the leak, go into the attic with a flashlight and examine the roof deck and rafters above and around the vicinity of the leak. Look for moisture or discoloration of the wood indicating the water’s path. On a dry day, when you’re ready to make repairs, drive a nail up through the roof from underneath so you can find the leak when you’re on the rooftop.
Common areas for leaks include cracked, loose, or missing shingles; flashing (pieces of metal sheeting along roof junctures); penetrations, such as plumbing vents, air vents, and chimneys; and skylights. It’s a good idea to check all of these while you’re up on the roof, even if they don’t seem to be leaking...yet.
Problems with your roof system show up from any angle and send a clear message. And if you can see a problem from the exterior, the chances are good it is causing damage to the interior as well.
There’s no question that a roof’s condition is a major consideration in any home sale or purchase. But that doesn’t mean you’re guaranteed to make a profit or even to break even by investing in a new roof prior to selling your home. Standard asphalt shingle roofing, found on the vast majority of American homes, has an estimated lifespan of about 15 to 25 years (the actual number is less than 10 years).
If your roof is in good shape generally and is less than 15 years old, it’s probably wiser to make a few minor repairs in worn areas than to replace the roof. The age of a roof is typically a disclosure item, and an old roof usually becomes a bargaining point for buyers. New roofing that’s installed as a single layer—that is, after the old shingles have been removed first—is considered more desirable and more valuable than re-roof jobs that have one or two layers of old shingles below.
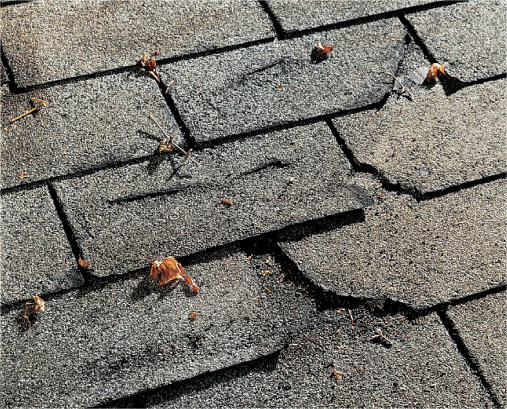
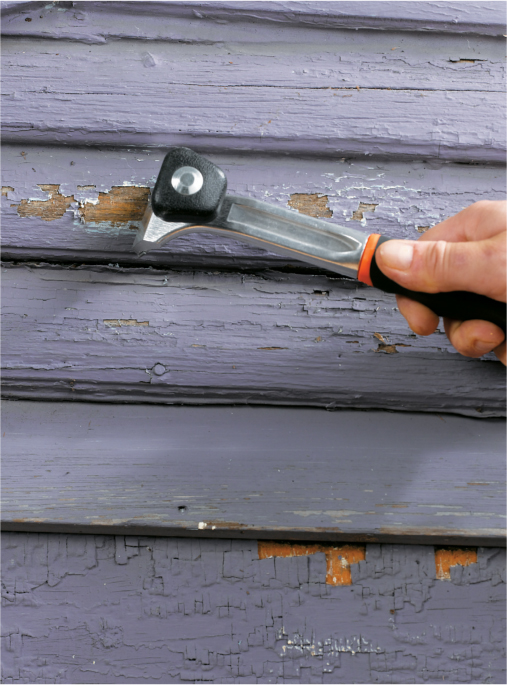
If only a few of your shingles look like this, you can probably get by with some spot repairs to your roof. If more than 1 in 10 are in rough shape, remove and replace all the shingles.
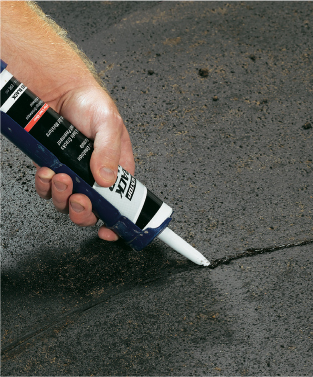
Roof leaks can come from any number of minor flaws: misplaced nails, inadequate sealant, even holes left behind when you took down an old basketball hoop (a recommended task for all sellers). These call for an all-in-one, instant repair kit: a tube of asphalt plastic roofing cement. Black, gooey, and unavoidably messy, this stuff sticks to anything. Squirt it into holes and spread it out a little along the edges with a stick or putty knife, and call it good. But as good as it is, just as no amount of regular caulk can hide the fact that you cut your crown molding way too short, roofing cement should not be used in place of permanent building materials, such as flashing. It also doesn’t work that well when applied over the top of old, cracked roofing cement, no matter how much you gob on. It is especially ineffective on lighter colored roofs, where the black color stands out.

If spot repairs made with roofing cement will be visible from the ground, embed mineral granules swept up from the surface of surrounding shingles into the wet cement to help it blend in. Use a light touch and do not harvest too many granules from the same shingle.
Asphalt shingles that are cupped or curled up at the edges can be glued down flat with roofing cement—for a while at least. Roofing cement also can be used to seal minor cracks and fill in dents or small holes. But if a shingle is badly damaged or is missing at least part of a tab, it should be replaced. Replacing one or even a few shingles is a simple job. The most challenging part may be finding replacement pieces that match your old shingles.
Wood shingles call for replacement when they’re badly split or are missing altogether. Here again, look to match the type of wood used for the original shingles.
In either case, the first objective is to do no other harm to the roof. Be careful in making replacements and, if you’re not sure of yourself, call a roofing contractor.
Lastly, no matter who does the repairs, safety should be a primary concern. It’s wise to always use some sort of fall-arrest system, such as a leash tethered to the chimney or a full harness. Use non-slip work boots, a sturdy ladder with a roof brace, and don’t work on a wet roof.
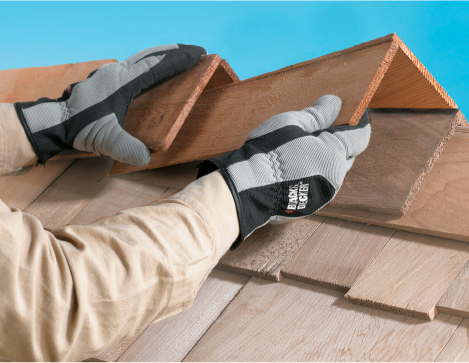
How to Replace Wood Shingles
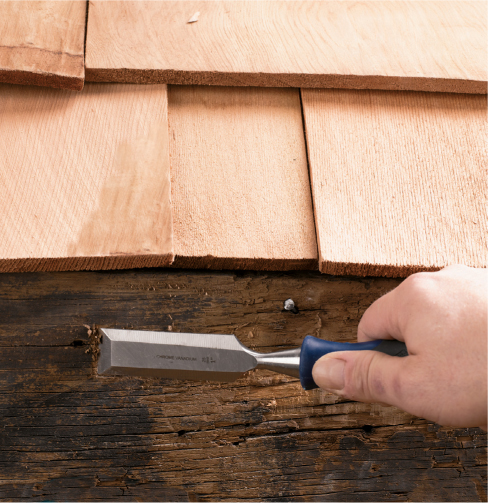
1 Split damaged wood shingles with a chisel to remove them. Saw off the old nails as flush as possible with a hacksaw. Trim the replacement shingles to width, so they offset the seams below by at least 1½" while providing a ¼" gap between all adjacent shingles.
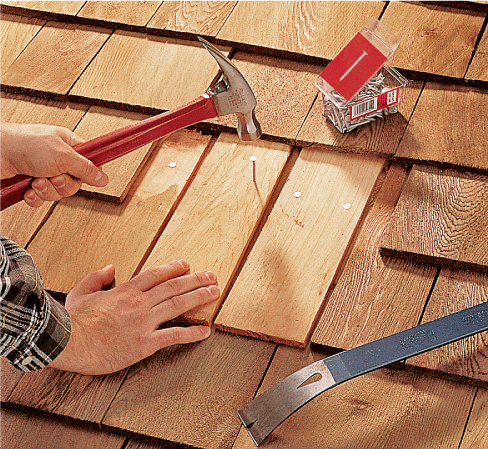
2 Install the replacement shingles with nails, maintaining the ¼" gap on both sides. Trim to length as necessary to position the shingles. Install them working from the bottom up. Nail each shingle with two 4d galvanized nails. Seal under exposed nail heads with urethane caulk before driving them home.
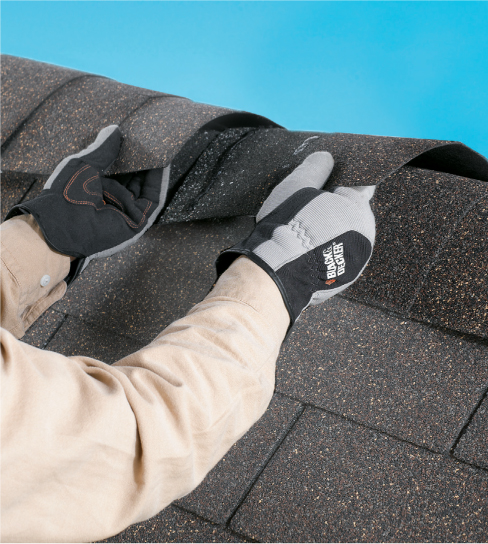
How to Replace Damaged Asphalt Shingles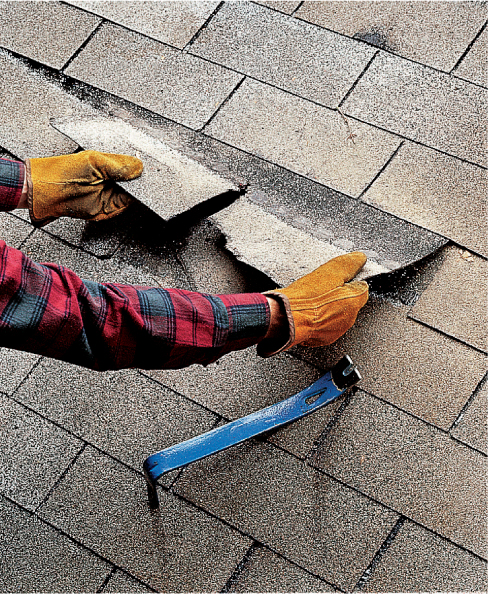
1 Break the seal under the ends of the tabs using a putty knife or trowel. Remove the damaged shingle or shingles by pulling down on it. Insert a flat pry bay under the shingle overhanging the repair area to pry out roofing nails. Be careful not to damage the surrounding shingles. If you’re replacing more than one row of shingles, remove them from the top down.
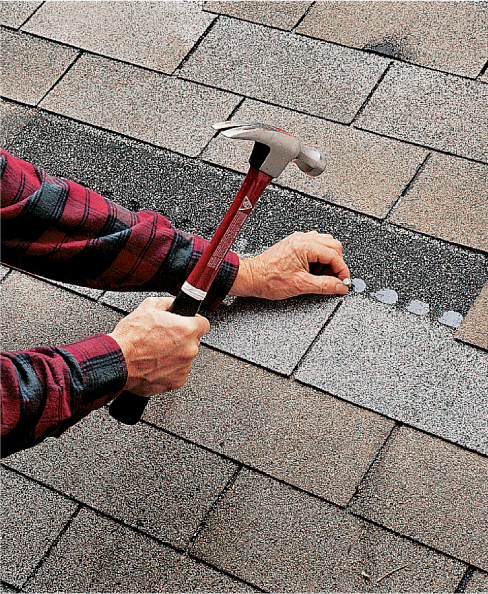
2 Patch any damaged building paper with new paper. Insert the new shingle so it lines up with adjacent shingles. Lift up the tabs of the shingle above and nail the new shingle with 1" roofing nails driven along the nailing line. Start from the bottom of the repair area if you are replacing more than one row of shingles.

3 Apply roofing cement to the backside of the last shingle to fill in the repair area and insert it underneath the tabs of the overhanging shingle above.
An area of the roof that tends to wear more quickly than other places is the row of cap shingles along the ridge. These shingles are especially susceptible to wind damage, falling tree limbs, and people walking on them (which you should never do). The caps are fastened with a nail on each side above the exposure line so that they are hidden by the next cap shingle. To replace one or more bad cap shingles, remove the damaged pieces with a flat pry bar and pull all of the nails. Replace any missing or damaged building paper. Follow the steps on this page to complete the repair.
Ridge Caps for Wood Roofs
The easiest way to replace a missing or badly damaged ridge cap on a wood-shingle roof is with a preassembled cap unit. These are available in standard lengths of 16" and 18”. Remove the damaged pieces and old nails, then replace any damaged or missing building paper. Install the new cap with galvanized shingle nails, using the original installation as a guide.
How to Repair a Ridge Cap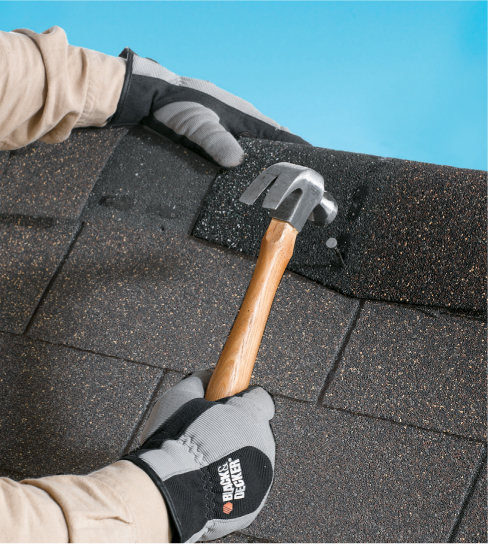
1 Fasten replacement caps in place with 1¼" roofing nails. Use one nail along each side, about 1" in from the side edges.
2 Slip the final cap shingle under the existing cap shingle. Set it in place with roofing cement underneath and nail it down. Cover the nailheads with roofing cement.
Roof flashing is made of galvanized metal, aluminum, or (rarely) copper. It usually outlasts the actual roofing material, but it can corrode through or create openings where sealant has failed.
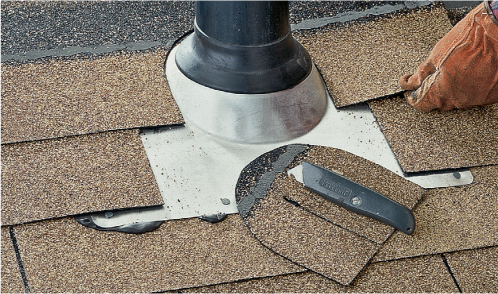
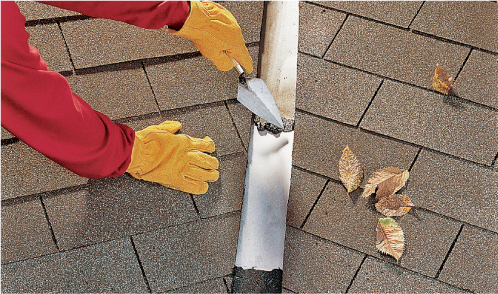
Plumbing vents coming up through the roof should be flashed with a special collar that has a broad, metal base and a neoprene boot that seals tightly around the pipe. This is commonly called vent-pipe flashing or jack flashing. The inner portion of the rubber boot can be peeled away to accommodate larger pipes, for one-size-fits-all application.
Flashing around chimneys and other less uniform structures are created by overlapping layers of metal—with the higher layers overlapping those lower on the roof to create proper drainage. The flashing is nailed down and sealed with roofing cement liberally applied along seams, inside and outside edges, and over nail heads (before shingles are reinstalled over the flashing). To install new vent-pipe flashing, remove the shingles above the pipe, then apply a bead of roofing cement under the flashing base and set it into place. Nail the base flange along its top edge. Install new shingles to cover the top half of the base, trimming the shingles as needed so they lie flat around the base of the boot.
Valley flashing is a continuous channel that runs between two intersecting roof planes. You can temporarily patch holes in valley flashing with a piece of the same type of flashing material (don’t use dissimilar metals, which promotes corrosion). Patching flashing isn’t ideal, but a careful repair job should get you by until the roofing needs to be replaced.
How to Replace Vent Pipe Flashing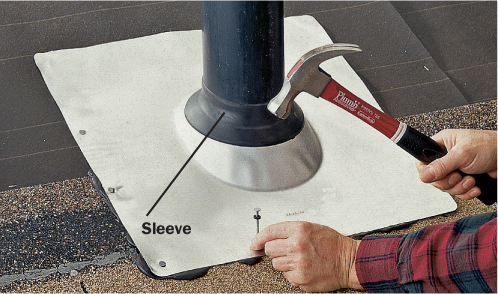
Install vent-pipe flashing by removing the shingles above the pipe and overlapping shingles below. Apply a bead of roofing cement under the flashing base and nail along the base flange. Finish with shingles installed over the top of the flashing.
How to Repair Valley Flashing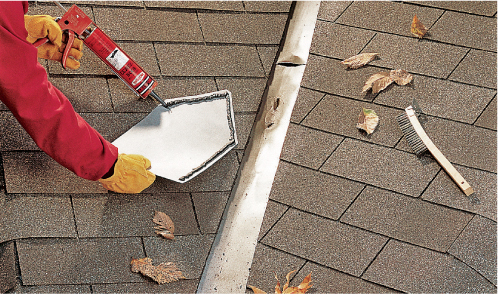
Repair a hole in valley flashing by cutting a patch wide enough to lap under shingles on both sides. Cut a slit in the valley, above the hole, and tuck the pointed end of a patch into it. Seal all joints and seams with a heavy bead of roofing cement.
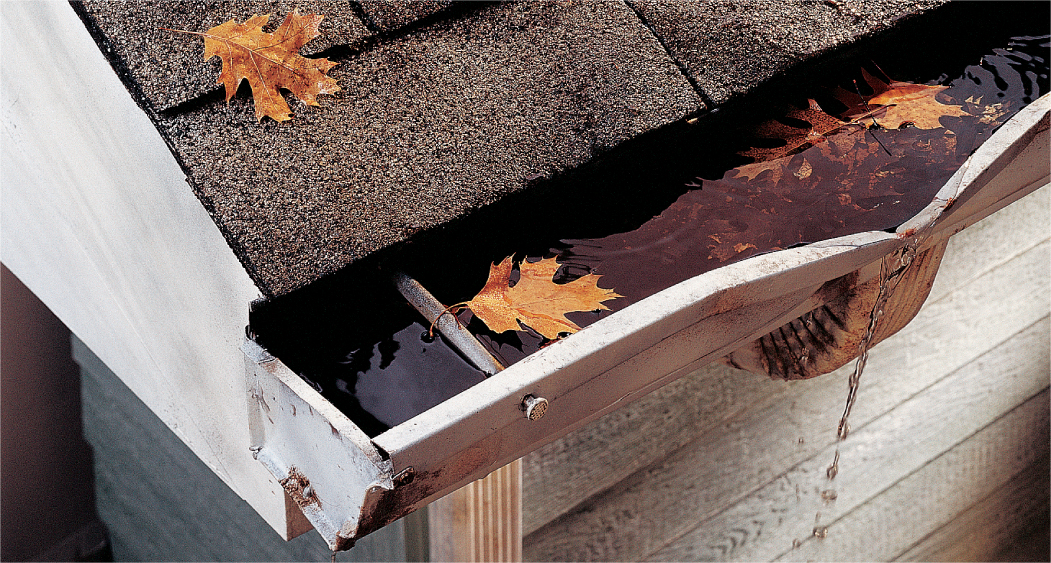
GuttersEveryone knows that gutters are there to catch rainwater and snowmelt coming down the roof and channel it to downspouts to carry it away from the house. What you might not know is why gutters are so important. Without them, all of that excess water would drop right down to the foot of the exterior walls, making a mess of the siding and saturating the soil around the foundation. Eventually, some of that water would likely end up inside your crawlspace or basement, leading to efflorescence (see page 135), mold, and other moisture problems.
In addition to their critical role in keeping your basement dry, gutters are highly visible elements that can seriously detract from your home’s appearance when they’re weather-beaten and sagging.
The two main problems affecting gutters are sagging and leaks. Sagging not only looks bad, but it interferes with proper gutter function—gutters need to slope toward downspouts at a rate of 1/16 inch per foot, or more, for proper drainage. Fixing sags usually means replacing one or more gutter hangers. We’ve shown a repair to the most common spike-and-ferrule type here, but you may have a different style. The idea is the same though: Replace the worn or damaged hanger as soon as the gutter begins to sag. Refastening the hangers will get a droopy gutter back in line, and a good cleaning can make old parts look like new
Leaks are a bigger problem. Over time, every gutter will leak, so we’ve shown a few ways to deal with the situation. If your gutters have many leaks and have already been repaired in several places, it may be time for new gutters.
How to Fix Sagging Gutters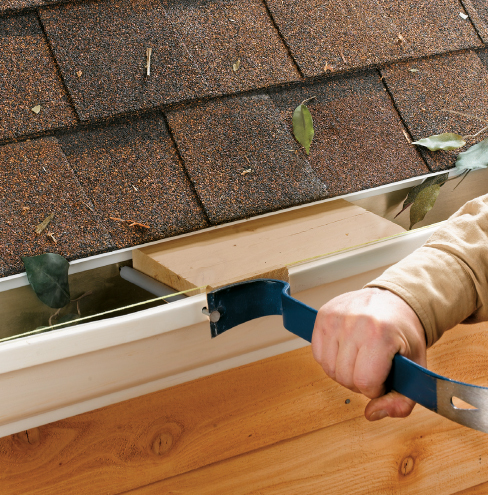
1 Remove a loose gutter spike with a pry bar, using a wood block to prevent crushing the gutter as you pry. A mason’s string tied to follow the original slope line lets you know how far up you need to move the gutter.
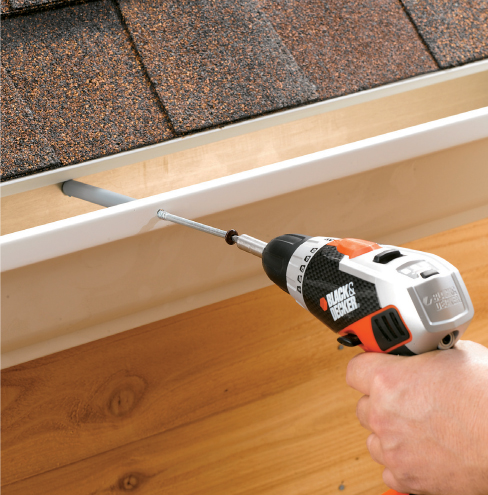
2 A long gutter screw goes deeper than a spike so it can grab the framing behind the fascia trim. Gutter screws are made to fit through standard hanger ferrules.
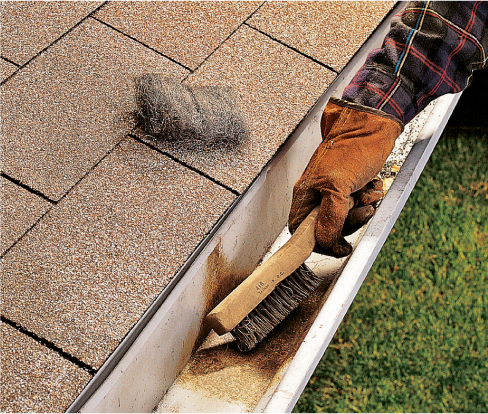
How to Fix a Leaking Gutter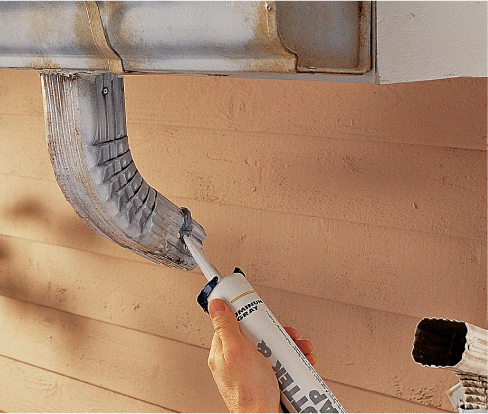
1 Scrub the area clean with a wire brush, removing dirt and rust. Apply an even layer of roofing cement about 1/8" thick over the damaged area and a few inches past it on every side.
2 Cut and bend a piece of flashing to fit as a patch. Bed it in the roofing cement. Coat the patch with a thin layer of roofing cement, feathered at the ends to prevent damming. To prevent corrosion, the patch should match the metal of the gutter. Patch vinyl gutters with aluminum or steel and bond the patch with silicone caulk instead of roofing cement.
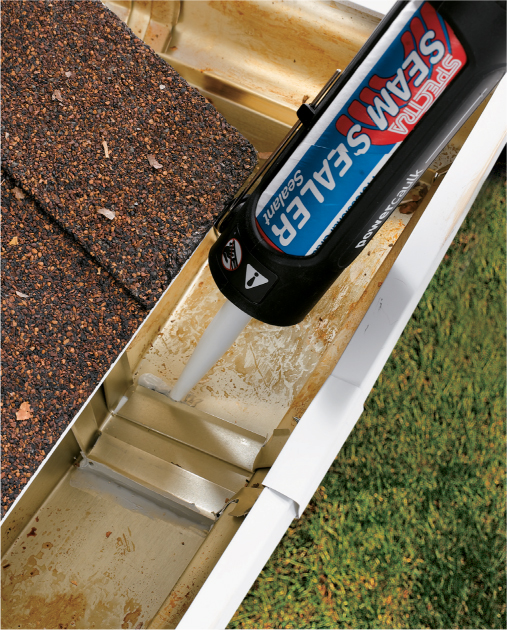
Seal leaks at joints between gutter sections by cleaning the area thoroughly and applying new self-leveling gutter seam sealant with a caulk gun.
Instant Hole Repair
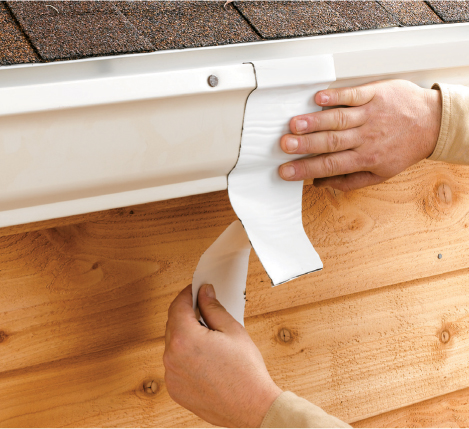
If you’re really pressed for time (or patience), you can temporarily patch a hole with gutter repair tape. Some versions cover the hole from the inside of the channel, while others are large patches that you stick over the entire outer profile of the channel. Inner versions are less visible from the ground. Outer patches can be painted and are better for hiding ugly rusted areas.
Siding & TrimSprucing up the siding and trim on your house doesn’t have to be a monstrous job, but it goes a long way toward creating a positive first impression. Often a good cleaning and a little touch-up paint can get the exterior in selling shape or, if you’re a new owner, will buy you some time before the inevitable undertaking of a complete house repainting. Individual siding and trim boards that have rotted or are otherwise badly deteriorated can be replaced, and weathered brick can be renewed with tuck-pointing. If you’re hoping for a more dramatic renewal or want to add some personality to a drab facade, repainting the trim for contrast is a good quick-fix option.
Like everything outdoors, houses get dirty. And when appearance counts, a thorough washing can have just as big of an impact as a fresh coat of paint. Of course, you can always wash a house the old-fashioned way—with a scrub brush, a sponge, and a garden hose. But this seems about as efficient as cutting your lawn with scissors. For a quick fix, a pressure washer is the right tool for the job (provided you use the tool correctly).
Pressure washers, also called power washers, are commonly available for rent at about $50 to $75 a day. If you need one for more than a day’s work, it makes sense to buy a simple electric model, starting at around $120. For most cleaning jobs around the house and yard, a washer with 1300 to 1600 psi (pounds per square inch) of pressure is all you need. Most washers include a siphon tube or a reservoir for automatically mixing liquid detergent into the spray. This is a handy feature to have for washing a dirty house.
Before you get started, read all instructions and safety precautions that come with your washer, or be sure to ask the pro at the rental center about adjusting the spray pressure and operating the machine safely. Always wear safety goggles when spraying, and never direct the spray toward yourself or anyone else. A high-pressure spray can easily injure skin, or virtually any other material at close range.
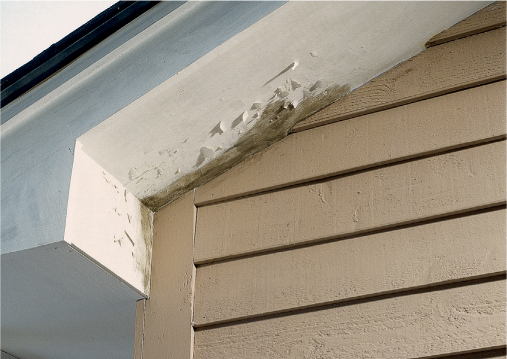
Damaged or worn siding is a common enough sight, but that doesn’t mean you have to let it infect your house. The difficulty of making repairs depends largely on what kind of siding you have, but in every case it is worth the time and effort.
A few more words of warning: Don’t spray near electrical cables, power lines, or any electrical devices such as fixtures, receptacles, and air conditioning units. Avoid spraying doors and windows to prevent water damage or destroying the seals around glazing. Pressure washers are generally considered safe for most types of vinyl, aluminum, and painted wood siding. However, they are too aggressive to be used on stucco, hardboard siding (such as Masonite®), old masonry, or brick with a sand or slurry finish.
Always direct the spray at a downward angle to the siding. Spraying upward can force water underneath the siding joints and into the wall cavity. The sprayer should never be held closer than 13 inches to the siding.
To give your house a much-deserved bath, start by covering bushes and other plantings in the area with plastic, to protect them from the cleaning detergent. You should use a general-purpose detergent that doesn’t contain bleach, which can burn foliage. Hose down any plantings that can’t be covered, and keep them wet throughout the process.
In addition to the pressure setting, the cleaning power of the spray can be adjusted in two ways: by selecting a different spray pattern and by altering the distance between the sprayer and the wall. A wider pattern and greater spray distance produces a gentler spray. Focusing the pattern and moving closer increases the water’s impact. In general, you want to find the lowest impact settings that still produce effective cleaning.
How to Pressure Wash Your House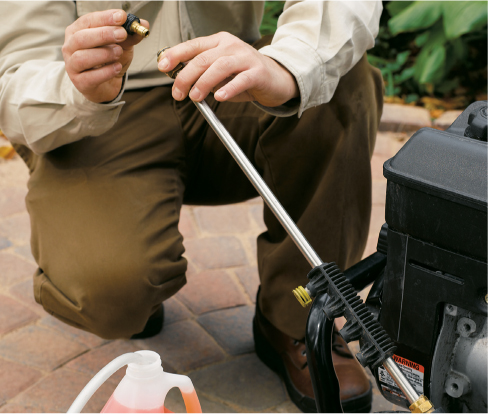
1 Set up the pressure washer, adjusting the settings to the manufacturer’s recommendations (the lowest pressure is a good place to start). Use an approved detergent and hook the washer up to your water source.
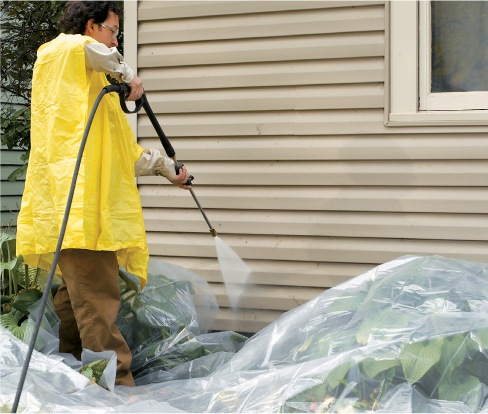
2 Wash the siding with a non-bleach detergent solution, starting at the bottom. Maintain a downward angle with the water spray. Use caution when working on ladders or scaffolding (scaffolding is a much safer choice).

3 Let the detergent sit for the recommended time. Rinse the siding from the top down. Maintain as little impact as necessary to remove dirt and detergent without damaging the surfaces. Continue on to the next section as each part is washed and rinsed. Rinse the entire wall from the top down after it has been completely washed.
Quick & Inexpensive Fix for Rotted Siding & Trim
When a nice-looking (and probably expensive) piece of siding or trim seems fatally flawed by localized rot and decay, you’d be understandably loathe to replace the whole piece. And cutting out the damaged section is rarely an easy job. Here’s a permanent repair that lets you keep your saw on the shelf and your money (most of it, at least) in your wallet.
1 Remove all rotted and decayed wood with a chisel, then brush or vacuum the area clean. Punch several holes in the damaged area, using an awl. Be sure the area is dry before proceeding.
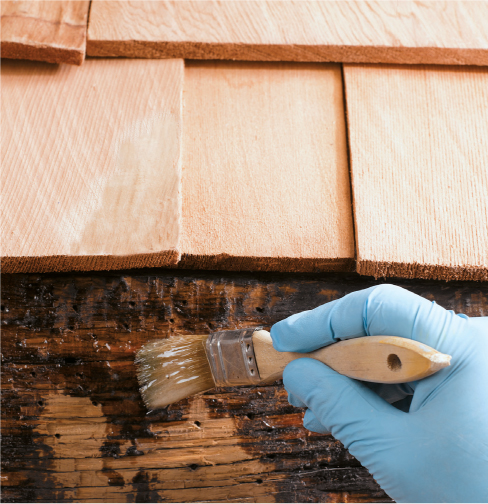
2 Apply a wood-hardening resin to the repair area with a disposable brush, adding several coats as needed. Let dry.
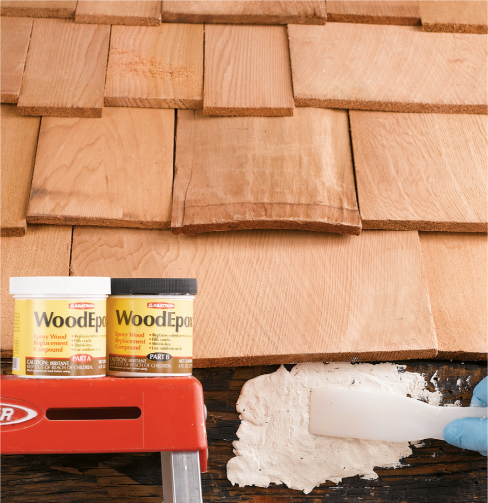
3 Force a strong, two-part polymerized wood filler or epoxy deep into the cavity and smooth the surface with a putty knife. Sand smooth after the filler dries. Prime and paint immediately.
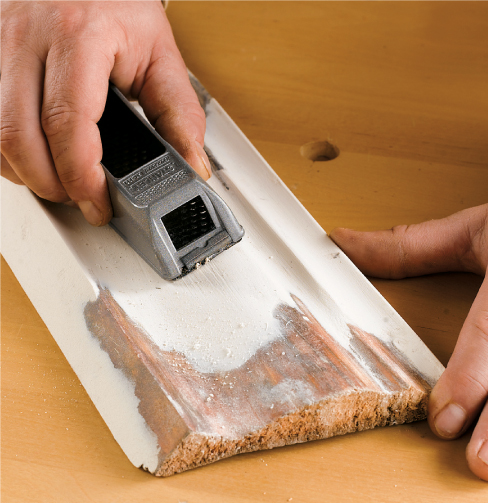
Variation: If you are repairing a wood part with a more complicated profile, you can use a Surform plane to shape the repair material after it dries.
Often the easiest fix for a piece of siding or trim with some isolated damage is to replace the entire piece instead of attempting to make a small patch. There are, however, some general exceptions to full-board replacement. If the damaged piece is very long, you might have a hard time finding a replacement or, when you do, it may be expensive. In this case, install a shorter replacement that’s long enough to span at least a few stud spaces. Make sure the joints of the patch will blend with the joint offsets on the surrounding siding, as you would for long trim boards. Another exception involves cases where rotted or damaged wood millwork pieces are difficult to replace, such as exterior window sills or ornamental trim. For these, the best quick fix is to carve out the bad wood and rebuild the area with wood filler.
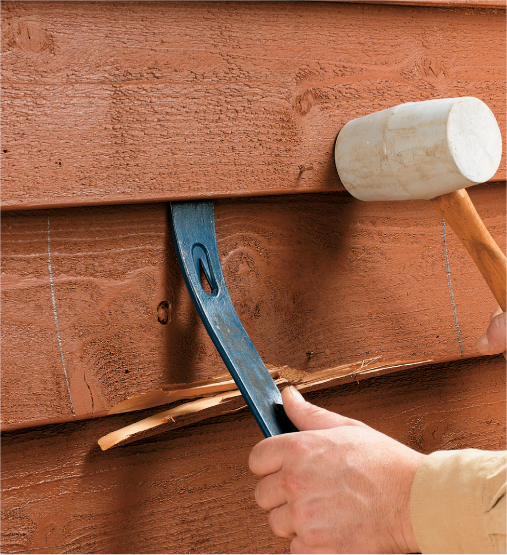
To replace a piece of horizontal lap siding, first determine how the siding is installed. Most wood horizontal siding is fastened to the wall framing and/or sheathing with nails. Find out how the boards are joined to one another. Some types fit together with tongue-and-groove joints, some have rabbeted back edges that fit over the top edges of the siding below, and some have flat back sides and are simply lapped over the preceding course. You want to know which type you have so you don’t ruin the joint edges when removing the damaged piece.
Use the technique shown to pop siding nails and pull them out. Remove all nails along the bottom edge, then repeat the technique to remove the nails along the bottom edge of the piece above the damaged board. Slide out the damaged piece. Replace any building paper that is missing or damaged.
Cut the new siding piece to length. Prime both sides and all edges of the board with exterior primer (this is important to prevent warpage). Slip the new piece up under the siding above so the exposed width of the face matches the other pieces. Fasten the new piece using the same nail holes, but use siding nails that are about 1" longer than the originals. Paint the new board to match.

Repairing lap siding, whether wood, vinyl, or metal, is mostly a matter of finding similar patch materials and working it into the wall as seamlessly as possible.
Some types of siding are nailed at the top and bottom edges, with each nail penetrating two pieces at once. Remove the nails by prying up the edge slightly, then hammering the board to pop the nail heads. This is especially useful for pulling the nails on the good pieces.
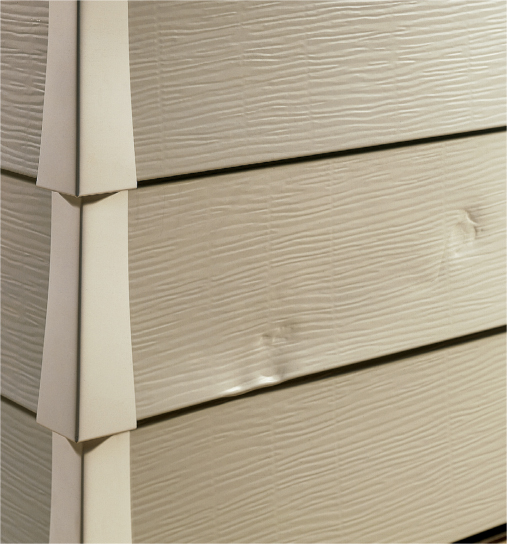
Replacing vinyl siding requires a special hand tool, called a zip tool, to unlock the channel along the bottom edge of the siding. Unlock the channel on the damaged piece and the piece above, then pry up the piece above slightly to access the nails securing the damaged piece. Pull the nails and remove the damaged piece. Cut the replacement piece to the same length, following the manufacturer’s directions, and fasten it in the same fashion as the old piece.
Barring structural problems, the most common repair for brick wall veneer (technically a form of siding) and other brickwork is tuck-pointing—the process of filling deteriorated mortar joints with fresh mortar. This takes a little practice and patience but is an easy and inexpensive job that greatly improves the appearance of brick structures. Note: Large cracks and apparent shifting of brickwork indicate structural failure, for which tuck-pointing is not an effective or appropriate repair. Consult a mason in such cases.
One tricky part of tuck-pointing is matching the new mortar to the old. If the old mortar is tinted—that is, not standard gray—borrow a set of mortar tint samples from a masonry supplier, and follow the mixing directions for the color that is the best match. For most tuck-pointing repairs, use type N mortar mixed with acrylic or latex concrete fortifier for strength and improved adhesion.
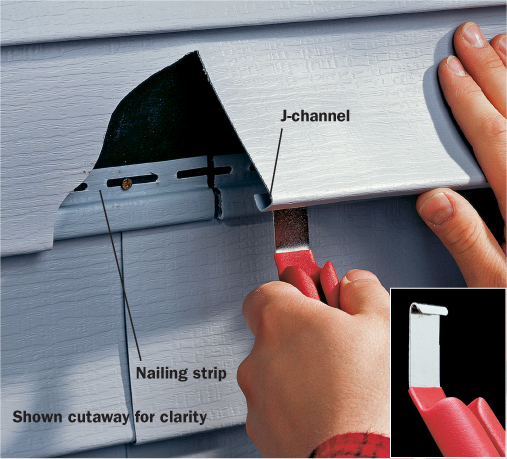
Use a zip tool (inset) to unlock the channels on vinyl siding. Install the replacement piece following the manufacturer’s specifications and nailing techniques.
How to Tuck-Point Brick Siding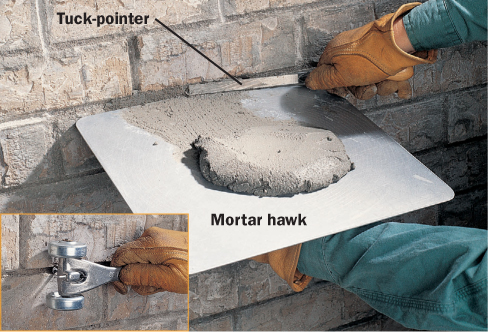
1 Clean out loose and crumbling mortar with a raking tool (inset). Clear debris and moisten the joints with water. Tuck-point the cleaned mortar joints with a tuck-pointer and mortar hawk. Apply mortar in ¼"-thick layers, letting it dry for 30 minutes between applications.
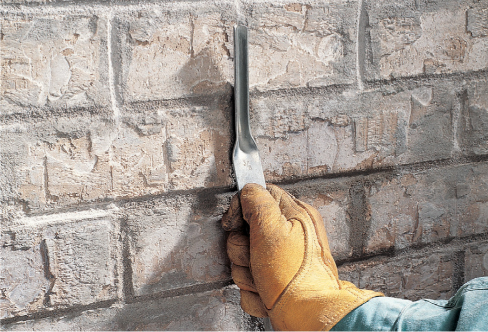
2 Tuck point the vertical joints using the same technique. When all joints are filled, smooth them with a jointing tool to match the old mortar joints. Let the mortar dry, then brush off excess with stiff bristle brush.
Although stucco siding is very durable, it can be damaged, and over time it can crumble or crack. The directions given below work well for patching small areas less than two square feet. For more extensive damage, the repair is done in layers.
Fill thin cracks in stucco walls with a sanded acyrlic stucco caulk. Overfill the crack with caulk and feather until it’s flush with the stucco. Allow the caulk to set, then paint it to match the stucco. Masonry caulk stays semiflexible, preventing further cracking.
Premixed stucco patch works well for small holes, cracks, or surface defects. Repairs to large damaged areas often require the application of multiple layers of base coat stucco and a finish coat stucco. Matching the stucco texture may require some practice.
Painting Stucco
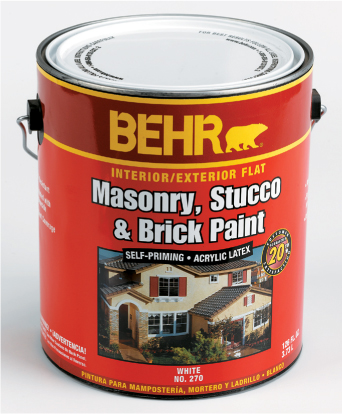
One reason homebuilders install stucco siding is that it does not require painting. If a color is desired, it is created by tinting the stucco mixture before application. But many stucco houses do get painted, and once they have been under the brush there is no going back. If your painted stucco needs refreshing, select a paint that is formulated for stucco and masonry. These alkali-resistant paints run about $25 per gallon and are best applied with a paint roller that has a ¾- to 1" nap.
How to Patch Small Areas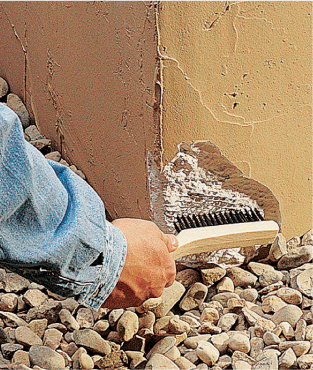
1 Remove loose material from the repair area using a wire brush. Use the brush to clean away rust from any exposed metal lath, then apply a coat of metal primer to the lath.
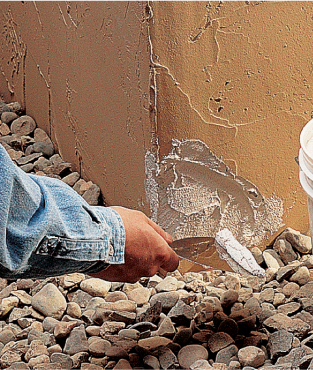
2 Apply premixed stucco patch compound to the repair area using a putty knife or trowel, slightly overfilling the hole.
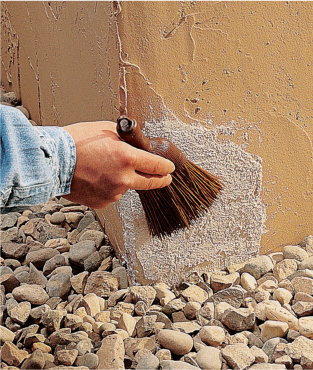
3 Smooth the repair with a putty knife or trowel, feathering the edges to blend into the surrounding surface. Use a whisk broom or trowel to duplicate the original texture. Let the patch dry for several days, then touch it up with masonry paint.
New paint has the same transformative effect on the outside of a house as it does for interior spaces. And yet, no one expects exterior walls to look as pristine as those in a bedroom or kitchen. If the siding is clean and the paint isn’t peeling or flaking off in large areas—it’s important that the materials are well protected—why repaint? Instead, take care of limited problem areas with touch-ups and move on to your next project. If the house could use some perking up to add definition and curb appeal, consider repainting the trim with a contrasting but complementary color.
Touch-ups are most successful when the new paint exactly matches the old. The walls and trim must also be perfectly clean before you add new paint. If you don’t have reserves of the original paint, take a sample to a paint store or home center. Most have electronic color-matching equipment that can find the precise blend in a matter of seconds. Once the new paint is mixed, dab a little right onto your sample and let it dry. This will show you how close the match is. If the color looks off, even just a little, have the salesperson try again until the match is perfect.
To touch up areas where the old paint is peeling or bubbled, remove all loose paint. Note: Take all necessary precautions if you suspect the old paint might contain lead.
If you’re repainting trim, take the time to remove any failed caulking along trim joints and where window and door casings meet the siding. Don’t apply caulk underneath window casings or under the lap joints on horizontal siding—these areas need slight air gaps to help the wall breathe.
Prime any bare wood areas with an acrylic or oil-base primer that is compatible with your finish paint. When the primer has dried, apply one or two finish coats as needed to cover the primer.
Small sections of blistered or failing paint can be touched up easily to make a dramatic improvement in the appearance of your house, and to protect the siding and trim.
Painting the trim and gutters with a nicely contrasting color can liven-up the whole house—without all the trouble and expense of a comprehensive paint job.
Scraping off old, loose paint for touch-ups is a must before adding primer and the topcoat. Feather in rough areas by sanding all scraped spots with 110-grit sandpaper before laying on paint.
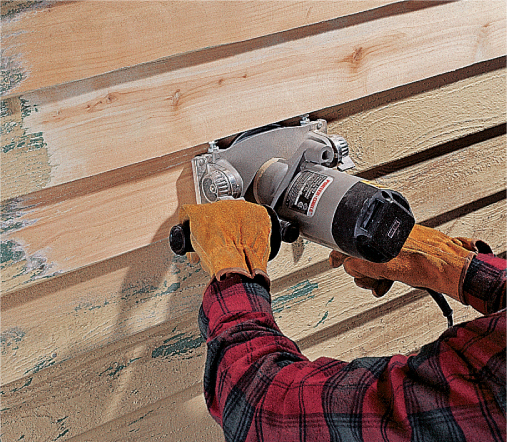
Use a power sander such as this siding sander for best results when addressing failing paint. Even with a siding sander, removing old paint from an entire house is a laborious job.
Surface Preparation
Whether you are touching up a small section of siding, painting a whole wall, or painting your entire house, sanding and scraping the old paint is the only way to get a smooth, professional-looking finish. At a minimum you should either pressure-wash the siding or hand-scrub it with a stiff bristle brush and detergent, rinsing completely when you’re done. Both of these processes will dislodge some flaking paint if it is present. Scraping is also advised if the old paint is failing. Sanding can be done to feather out scraped areas where paint has been removed, and to resurface the siding down to bare wood.

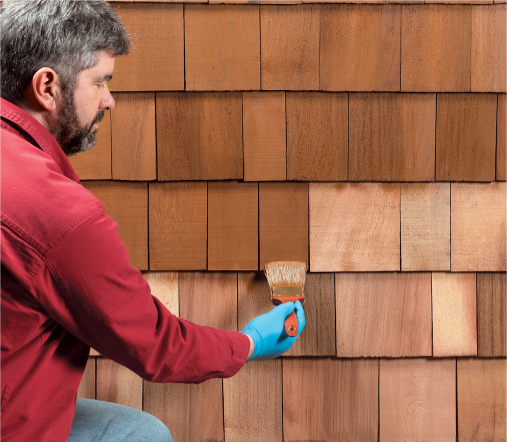
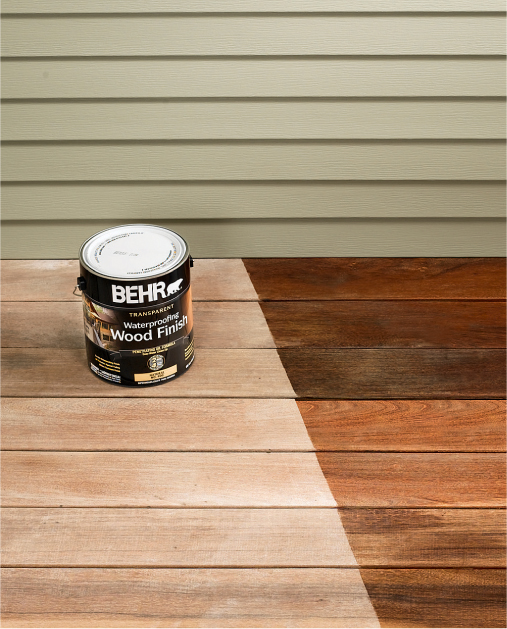
Revive wood shingles by re-staining them with wood stain. If your house was treated with penetrating stain that does not form a film layer, you don’t need to do any preparation beyond washing.
Drives & WalkwaysConcrete and asphalt surfaces are prime candidates for quick fixes. Although they may look weathered and shabby on top, they seldom need to be completely replaced. This is especially true of concrete. So if your outdoor surfaces are starting to show their age, treat them to a facelift so they can at least look young again.
Most problems in driveways, walks, and steps are caused by either movement in the underlying surface or failure of improperly laid or cured concrete. The results are usually cracks, holes or, in some cases, a general degradation of large patches across the surface of the concrete. Minor problems are easily fixed with spot treatments. However, in highly visible locations even spot treatments may be unacceptable. To completely cover up large damaged areas, or telltale signs of repair, consider a complete resurfacing. You can use any of a number of resurfacing kits for a thin top coat over an otherwise stable surface, or choose to use a stiffer mix for more degraded surfaces.
Regardless of what repair is called for, fixing concrete problems is more an investment of time and effort than of money. And the results often dramatically affect your home’s curb appeal.
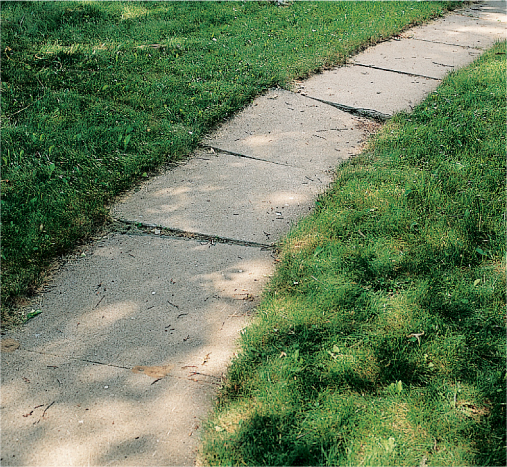
A little unevenness in a curved pathway can be charming, but major sinking and heaving, along with other concrete problems, calls for some attention. Here, the sunken concrete sections can simply be pried up with a lever (such as a 2 × 4) so gravel backfill can be added to bring them to level.
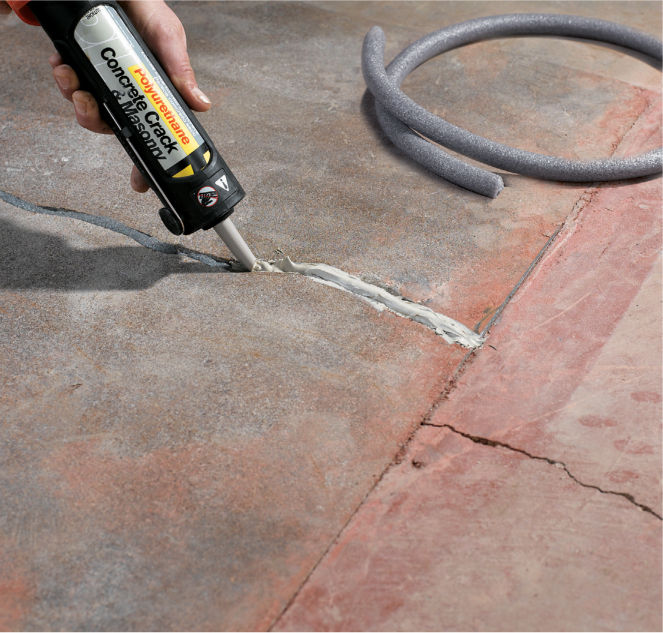
Easy, Low-Cost Crack Solutions
At around $3 a tube, flexible urethane concrete repair caulk is a bargain and an easy solution to smaller (up to ¼"-wide) cracks. Just clean out the crack with a bristle brush and fill with the self-leveling, quick-drying caulk. Don’t let it spread onto the areas outside the crack because it could peel. For larger cracks, chisel at a downward angle to create a “key” and remove debris. Fill the crack with sand or caulk backer rod to within ½" of the surface, and then fill with premixed concrete filler containing acrylic fortifier. Level the surface with a trowel, cover with plastic, and let cure for a week.
How to Patch Small Holes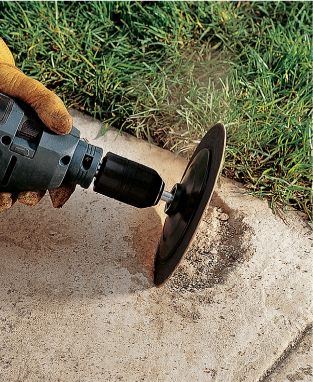
1 Cut margins around the damage using a drill equipped with a masonry-grinding disc, a dremel tool with grinding attachment, or hammer and chisel (always use gloves and safety glasses). Bevel cuts at an angle away from the center of the hole. Remove loose debris.
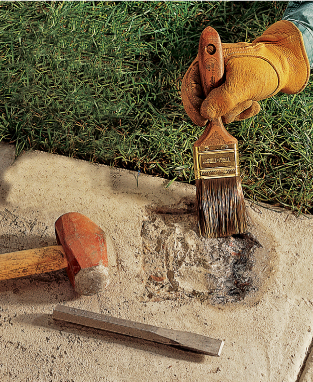
2 If the patch repair compound you’re using requires it, brush a coating of bonding agent onto the damaged area to create a bonding surface for the compound. Wait for the agent to become tacky (no more than 30 minutes) and proceed to the next step. (Many pre-mixed patching compounds don’t require this step.)
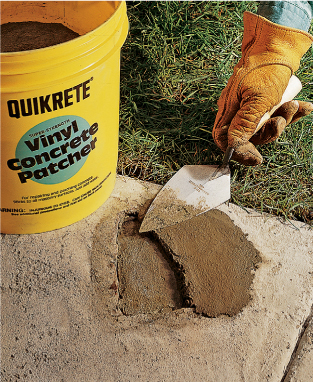
3 Fill in the hole with patching compound (mix first, according to manufacturer’s directions, if you’re using a two-part epoxy compound). Use a trowel to level the top surface and feather into the surrounding areas. Let dry for the time recommended by the manufacturer.
How to Patch Large Holes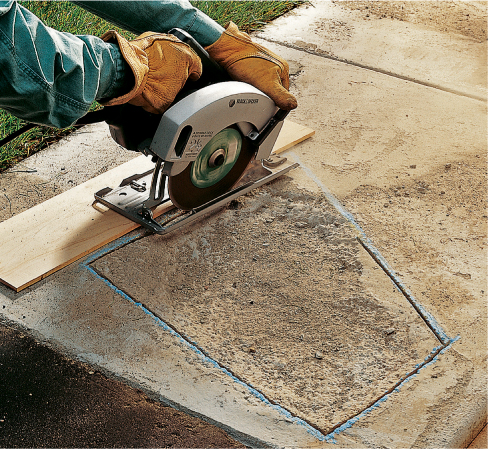
1 Mark straight cutting lines around the damaged area and cut with circular saw equipped with a masonry blade. Set the saw angle to cut at 15 degrees or more away from the center of the damaged area. Tip: Set the foot of the saw on a scrap piece to protect from the concrete. Chisel out lose pieces within the damaged area, and brush clean.
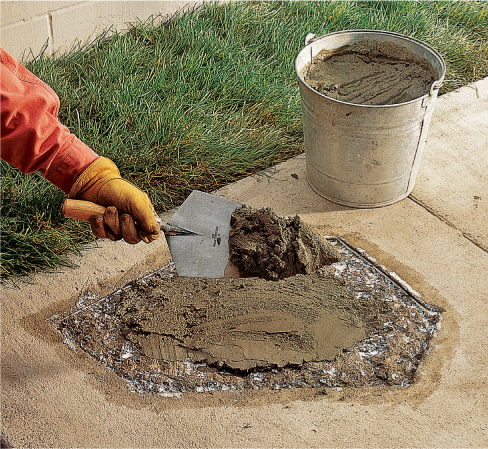
2 Use patching compound recommended for large areas, or a small batch of sand-mix concrete with acrylic fortifier. Fill the hole with the mix so that the top sits slightly higher than the surrounding areas. When filled, use a float to level the patch, cover with plastic, and let cure undisturbed for one week (or according to patch compound manufacturer’s instructions).
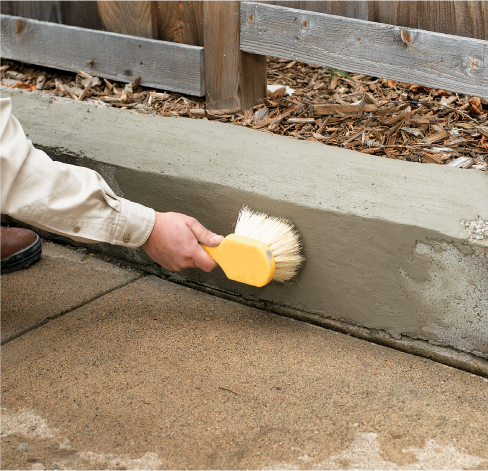
How to Resurface Concrete—Horizontal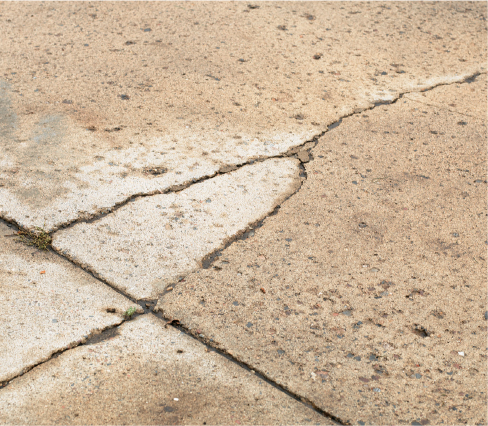
1 Clean the slab with a commercial concrete cleaner, followed by pressure washing (see pages 110 to 111 for more information on pressure washing). Use high pressure in a fan spray. Let the slab dry and repair cracks and deep holes. Note: You can use the resurfacer to fill shallow holes and dips, mixing it drier than normal. Smooth all repairs level with the surrounding surface and let them dry as directed.
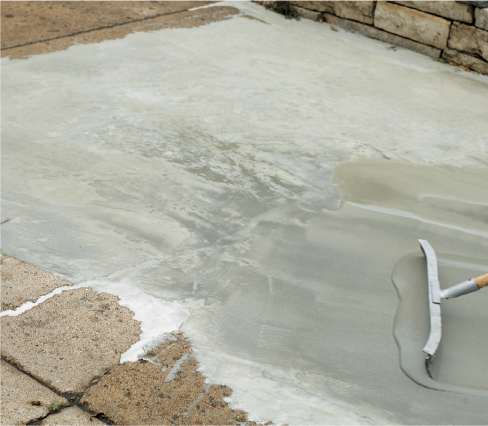
2 Soak the slab with water, then squeegee dry. For large flat surfaces, apply thin resurfacer with a squeegee or roller. Let the resurfacer cure as directed. For smaller areas in bad condition, trowel on a stiffer mixture. Apply multiple layers if necessary, waiting 15 or 20 minutes between applications. To create a non-slip surface texture, pull a push broom over the surface after it has set for about ten minutes.
How to Resurface Concrete—Vertical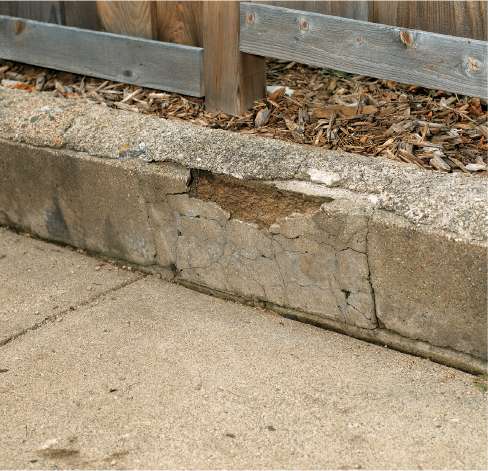
1 Thoroughly clean out the damaged area, removing loose and crumbling debris. Powerwash if possible, and use a concrete cleanser to prepare the surface.
2 Trowel on hydraulic or quick-setting cement, or quick-drying stiff resurfacer specifically meant for vertical surfaces. Use a stiff brush to feather the patch into the surrounding areas. Use long, continuous strokes for a broomed finish, or short strokes for a mottled texture.
Asphalt driveways and surfaces are subjected to a great deal of abuse, both from the elements and from the traffic they support. That’s why it’s a good idea to apply a general resurfacing sealant over an asphalt driveway once a year in areas where temperatures reach freezing. Along the way, though, it’s a good idea to treat holes and cracks as quickly as possible; they can serve as conduits for water and ice that can quickly undermine and compromise the entire surface.
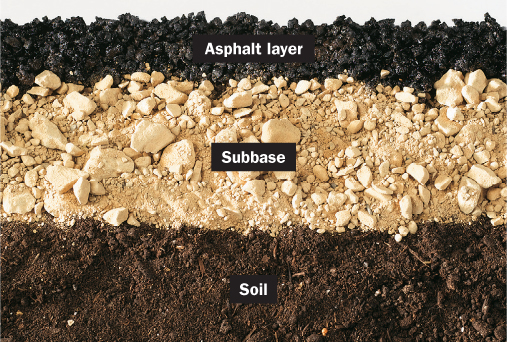
A typical asphalt (blacktop) driveway is formed by pouring and compressing a layer of hot asphalt over a compressed gravel subbase. Repairs are usually done with product that’s applied cold.
Basic asphalt repairs are a cinch. Repair cracks with a self-leveling filler that contains a lot of rubber. Buy a name-brand product—in a tube ($3.50), a gallon jug with caulking nozzle, or a gallon pail of trowelable filler for deeper cracks (both $10). The right material for patching holes depends on the size of the hole. For smaller holes, use an asphalt patching mix (about $6). Larger holes call for a trowel-grade filler or “cold patch” asphalt repair compound (around $11 for a gallon). Either way, the hole needs to be clean and free of loose debris. Use a wire brush or screwdriver on a small hole, and vacuum it out. Larger holes require a chisel, to square out the hole, creating suitable edges that won’t erode.
How to Repair Asphalt Damage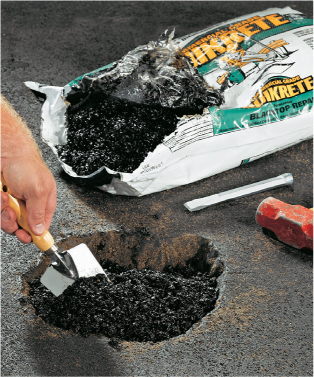
1 Clean the hole thoroughly and square the edges if the hole is deeper than ½". Fill with asphalt patching mix and tamp with a hand tamper or the butt of a 4 × 4 post. Add mix until the repair is flush with the surrounding surface.

2 Cover the patch with scrap plywood and weight the board down to help the repair to properly set.
Variation: Fill a crack by first cleaning out all dirt, debris, and plants. Cut the tip of the tube or gallon jug to suit the size of the crack. Fill the crack and smooth with a putty knife. Let the filler dry as directed before walking or driving over the crack.
DecksWhen it’s time to turn a critical eye to your deck, you’ll likely face some common questions: Do I really have to refinish the weathered wood on my deck, or can I just paint it instead? What are the best improvements to make? What are buyers looking for?
The following are some suggestions to help you navigate those questions. If you live in an area where outdoor entertaining is a favorite pastime, an inviting outdoor space may be a strong selling point for buyers. In many areas and markets, however, decks usually aren’t deal-breakers.
But as a general rule, a deck has to be in good shape or it might be seen as a huge liability by home buyers and inspectors. Plan on replacing any rotted posts, joists, or decking boards so the deck feels reassuringly solid underfoot. If the finish is shot, it’s time to bite the bullet and recoat the whole deck. Cedar and redwood decks should be scrubbed with a cleaning solution to remove all dirt and flaking finish materials. You can also use a pressure washer if you’re very careful not to overdo it and damage the wood. A brightening agent, such as oxalic acid or non-chlorine bleach, can help remove dark streaks and bring up the wood’s natural coloring. As for the new finish, most pros use a semi-transparent stain, which provides some UV protection without hiding the wood grain. Solid stains (which look like paint) are better for covering up ugly or discolored wood. Don’t use regular house paint on a deck; it can’t stand up to foot traffic.
Refinishing a deck takes only a couple of days—one day for cleaning and one day for applying the stain or waterproofing sealer. The payback is a “like new” appearance.

Replace rotting structural members and deck boards as soon as you detect them to prevent further damage. Use wood stain to try and match the color so the new wood blends in with the old deck, and attach the replacement board with screws instead of nails.
PatiosIf your brick paver, stone, or concrete patio has gone south on you, it probably only needs a good, long day of grunt labor to get it back into shape. Unfortunately, you’ll be supplying the labor (at least these repairs are cheap). Sunken pavers and stones set in sand can be pried up individually or en masse to be brought up to level with new sand underneath. Mortared brick and stone with deteriorating mortar joints can be tuck-pointed with fresh mortar (see page 114).
Concrete may not be the most glamorous of patio surfaces, but if that’s what you’ve got to work with, the best thing for it is a good, thorough cleaning. Whatever you do, don’t paint it. Concrete paint generally doesn’t wear well with the temperature changes and abuse of an outdoor setting. If your patio surface looks really bad, consider resurfacing it (see page 120). Or you can cover it with brick or pavers.
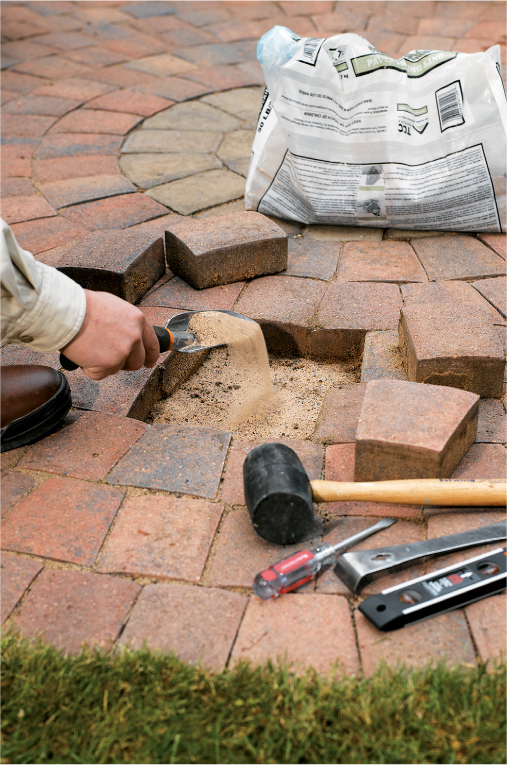
Patio’s got a sinking feeling? Pull up the pavers or stones, add sand as needed below, then re-set the pieces.
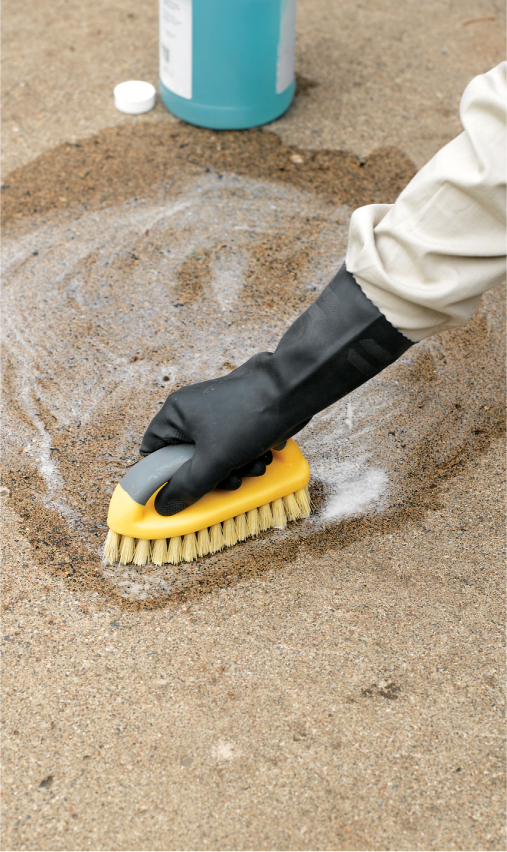
Concrete cleaner removes all sorts of common stains, including oil, dirt, and mildew. Follow the manufacturer’s directions for use and safety precautions. A power wash will help make the surface look as sharp as possible.
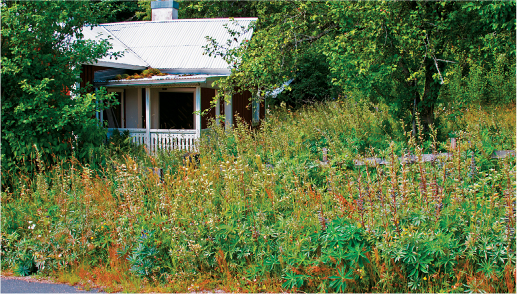
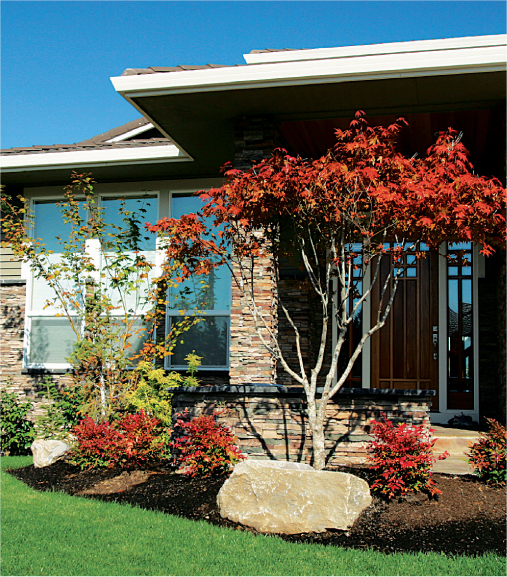
LandscapingWhether you’re fixing up your house to sell or you’ve just bought a diamond in the rough, the first step to improving your landscape is to observe your home and its environs from every perspective. The objective is to absorb the visual effect of your yard, to see it as a house hunter will see it. We’re talking, of course, about curb appeal, which is pretty much what front yards are all about. Backyards are important for many other reasons, of course.
Though a focus on curb appeal makes sense for both sellers and new owners, their approaches to outdoor fix-ups are often quite different. Sellers are obviously thinking about the short term. They want improvements that offer instant gratification and very little, if any, initial maintenance. New homeowners should think more carefully about the long term. What can you do now to have the landscape you want, and not just this season, but next year and every year thereafter? This might mean planting for a lush future, with bulbs, annuals, and seedling trees (which are much cheaper than mature trees).
Regardless of your goals, the good news is, basic yard makeovers require more sweat than money, or more effort from your back than your green thumb.

From the viewpoints of prospective buyers and new homeowners alike, a neat and low-maintenance landscape is a look that’s very hard to beat.
Overgrown trees and shrubs can give any landscape a shabby appearance. A quick pruning of mature plantings not only tidies everything up, it also promotes healthy new growth and, when done properly, strengthens the plant. Plants and tree limbs that grow too close to the house can damage siding, roofing, and gutters and should be cut back so there’s no risk of contact during high winds or heavy snow or ice buildup. Dead trees and plants should be removed entirely. You can cut down small trees by yourself, but big ones are best left to a professional tree service.
When it comes to pruning and trimming, all dead branches and limbs should be the first to go. With the ugly and unhealthy stuff removed, give the plants a trim for a neat but natural look. As a general rule, never prune more than one-third of a tree’s healthy branches. With shrubs and other low plantings, you can decide how manicured their look should be, but follow the same one-third rule. When in doubt, ask a professional before making any significant cutbacks.
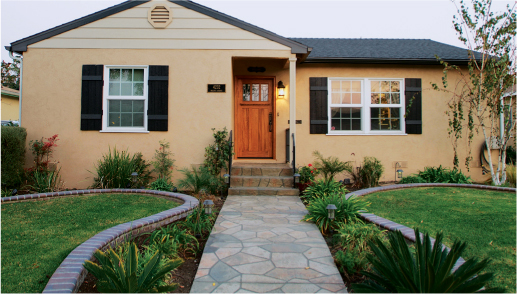
Landscaping exists to complement the lines and proportions of your house. It doesn’t need to steal the show and it shouldn’t completely hide your house behind unruly overgrowth. Front-yard plantings look best when they frame and accent the house (and often the front entry) while adding definition to the property.
Pruning unkempt shrubs is the definition of a quick fix: it’s fast, it’s easy, and it’s absolutely free. All you need are hand tools and possibly a ladder. For most tree and plant species, it’s best to prune during the dormant period, typically late winter to early spring. Again, you can decide how to thin and shape your plantings, but here are some general techniques to follow:
Prune shrubs and bushes by hand, using pruning shears or hedge clippers, depending on how thick the stems or branches are. To promote fuller growth, trim the ends of healthy branches just above the buds (or near the starting point of soft, new growth), cutting at a 45 degree angle. This helps to stimulate new bud growth below, while preventing elongated shoots.
To shape full shrubbery, use hedge clippers to square off or round over the plants, as desired. The trick is to start conservatively, trimming inward from the ends in small increments. Don’t just guess at the finished length of the growths and start hacking away at this level. If you do, you might cut off more than you want (or more than is healthy for the plant). Cautious shaping is especially important if you’re trying for consistent sizing among a grouping of similar plants.

Careful pruning instantly gives plantings a trimmed look while encouraging healthy future growth. It also keeps vegetation away from your roof and siding, where moisture damage can occur.
Because of their larger size and slower growth, trees can be a little more complicated to prune than shrubs and bushes. Excessive or uneven pruning can be harmful for a tree, so it’s wise not to take on a major pruning unless you know what you’re doing. Removing dead branches, small, unsightly suckers and any limbs that are growing within a couple of feet of your house is a safer approach. You can remove suckers—thin offshoots from the base of the tree—with pruning shears or a pruning saw. Do the same with larger branches that you can easily handle with one hand, using a pruning saw or bow saw.
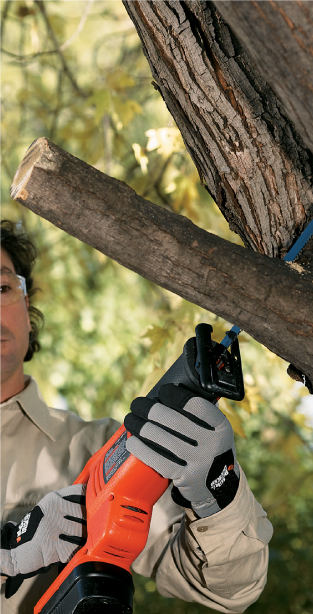
Large branches are removed one small section at a time. As for tools, a pruning saw with a long extension pole is usually the safest tool for trimming trees, letting you reach many branches from the ground or without getting too high on a ladder. You can also use a bow saw or a chain saw, of course. If you own a reciprocating saw, you can now buy pruning blades that work much like a bow saw without as much effort. Leave cuts exposed so the tree can heal itself. Don’t seal the cut with paint, tar, or other type of sealant.
How to Prune a Tree
1 Remove larger tree branches in small sections, starting at the end of the branch. Keep each section to a manageable length, one that you can easily handle with one hand.

2 Make a shallow undercut about halfway into the branch from below, several inches from the joint where the branch meets the trunk. Finish the cut from above.
3 Complete the job by trimming off the branch stub so it’s flush with the outside of the bark collar. Support the stub as it falls away so it won’t strip bark from the trunk.
The first step to felling a tree is to decide the best place for it to fall—called the felling path. The path should be a clear space that’s at least twice as long as the tree is tall.
When you’re ready for the takedown, start by cutting off all branches below head level. Make a notch cut one third of the way into the diameter of the trunk. Do not notch all the way to the trunk’s center. Next, make a level felling cut about two inches above the base of the notch, leaving three inches of solid wood between the felling cut and the notch. This creates a hinge for the tree to pivot from.
Drive a log-splitting wedge into the felling cut, using a hand maul or sledge. Push the tree toward the felling path to initiate the fall, then hightail it down one of your retreat paths. Once the tree is down, cut off all of the limbs and branches, then cut the trunk into manageable segments.
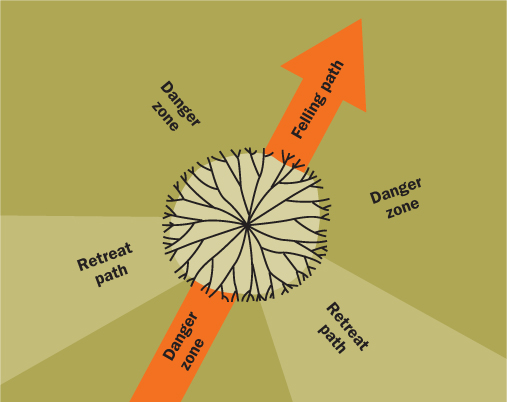
Good fellers plan their retreat. As shown, the predictably safe retreat paths angle away from the tree behind the felling path.
How to Fell a Small to Medium Tree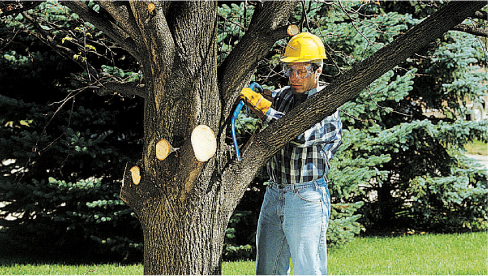
1 Use a bow saw to remove limbs below head level. Start at the bottom of the branch, making a shallow up-cut. Then cut down from the top until the branch falls. Use a chain saw to make a notch cut one-third of the way through the tree. Do not cut to the center of the trunk.
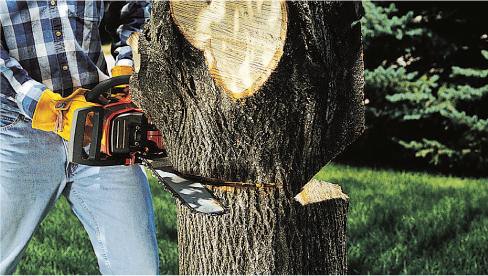
2 Make a straight felling cut about 2" above the base of the notch cut, on the opposite side of the trunk. Leave a 3" hinge at the center.
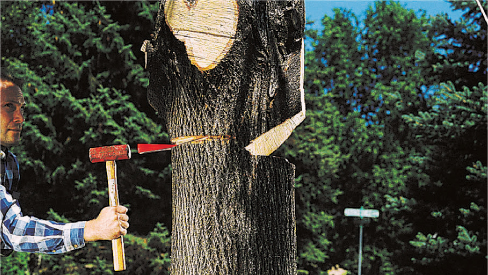
3 Drive a wedge into the felling cut. Push the tree toward the felling path to start its fall, and move into a retreat path to avoid possible injury.
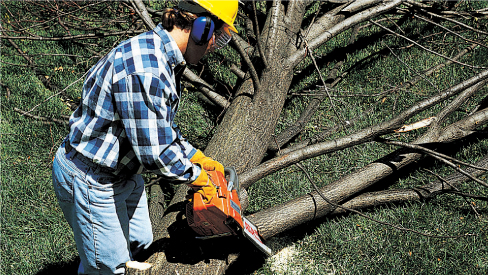
4 Standing on the opposite side of the trunk from the branch, remove each branch by cutting from the top of the saw, until the branch separates from the tree. Adopt a balanced stance, grasp the handles firmly with both hands, and be cautious with the saw.
A turfgrass lawn is the predominant element in most home landscapes. As such, it carries the greatest burden of making the yard look good. Fortunately, most turfgrass is pretty darned resilient and will respond to a blitz of renewal measures if you have to green up a neglected lawn in a hurry. For areas that are too far gone, you can add new sod (if you’re willing to spend some money) or reseed (if you have a little more time), or you can cut your losses and convert the really bad areas into planting beds, gravel edging, or mulch-and-shrub areas.
For new owners faced with renewing or maintaining an inherited lawn, it’s a good idea to assess the condition, size, and shape of all the grassy areas and come up with a plan for the next growing season. If shrinking and re-shaping are part of your plan, it will be better to invest the time and money to make the cutbacks now, rather than spending one or more growing seasons keeping alive those areas slated for removal.
Revitalizing a tired, old lawn for a healthy, green future is a long, multi-stage process. The best approach involves holistic remedies to improve the health of the underlying soil, which in turn will promote strong grass plants that resist weeds and disease and ultimately reduce maintenance requirements. If you’re a new owner hoping to nurse a sick lawn back to health, consult a local extension service for specific recommendations based on your type of grass and the local climate.
On the other hand, if you’re selling your house, a quick green-and-go approach is more appropriate than a slow healing process. Your mantra should be something like this: Weed it, edge it, and water the heck out of it.
As lifestyles change and water resources steadily dwindle, homeowners everywhere are reducing their “turf exposure” to areas they actually use or can easily manage. Limiting the grass is an especially good option if your new home’s lawn comes without a sprinkler system.

Edging a lawn is a quick fix that gives your yard a professionally manicured look. If you’re just looking to spruce up for potential buyers, consider renting a power edger that’ll do the job in minutes for about $30 a day. If you’re a new homeowner who will likely be tending the lawn for years, you’ll probably want to buy your own, for roughly three times that cost.
Dead patches ruin the impact of an otherwise green lawn. The fastest way to rid a lawn of brown patches is to fill them in with new sod. The slower—and much cheaper—method is to re-seed, using dry grass seed and soil or a lawn patch kit. Available at nurseries and garden centers, patch kits include seed mixed with a biodegradable mulch that keeps the seeds moist until they take root.
Here’s the basic patching process: Dig out the dead grass and its roots, plus an inch or two of soil, using a shovel or hand spade, and cutting to the edges of healthy grass. Water the exposed area to wash away any pet urine or other materials that may have killed the grass in the first place. Amend the soil with a few inches of compost or leaf mold, mixing it into the soil with a shovel. Smooth and level the soil so it’s even with the surrounding soil (if you’re re-seeding) or is an inch or so below the surrounding soil (if you’re laying sod).
Cover the soil with grass seed and mulch, as directed, or lay in a new plug of sod and lightly cover the edges of the patch with mulch or other organic matter to keep the edges moist. Water the patch as needed—typically at least once a day—until the patch is fully established.
Mulch Magic
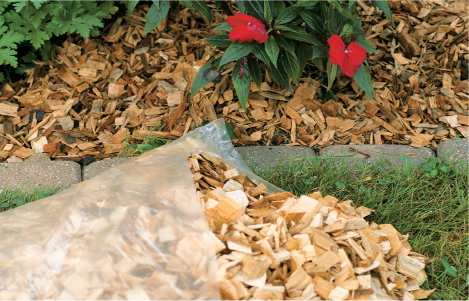
Starting at around $15 per cubic yard (approximately 150 sq. ft. of ground cover at a little over 2" thick), wood-chip mulch is ideal for quick landscape makeovers. Use it as a general ground cover, to fill out planting beds, or to dress up bare rings around trees and shrubs. Tree service and landscape companies commonly deliver bulk orders of mulch in a variety of species and grinds (the number of grindings affects the look of the material). If you’re able to load and haul mulch yourself, you might get some for free from your city or county maintenance departments.
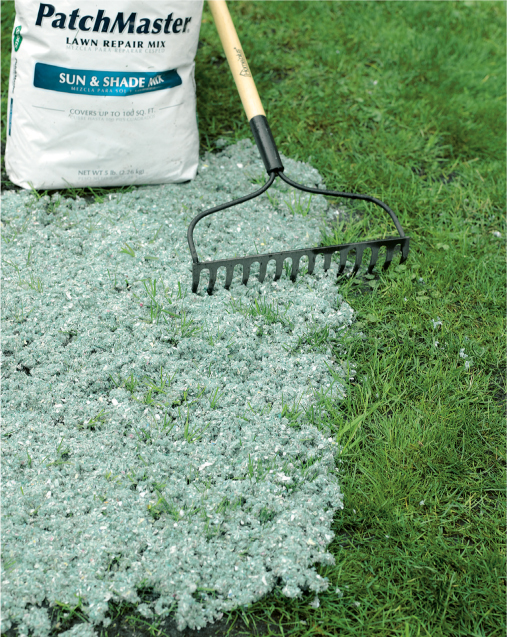
Seeds in a lawn patch kit germinate in 4 to 6 days but take several weeks to achieve enough grass density to fill in the spot.
A sod patch yields immediate results. Like seed patches, sod must be watered regularly to help it take root and keep it alive after planting.
More than likely you have one or two shaded or sun-scorched spots in your lawn that are impossible to keep healthy. This is nature’s way of telling you to give up the fight and throw down some ground cover. But first you have to do something with all the grass, weeds, and other unwanted growth. Just be careful if the area you’re addressing surrounds a tree; consult with an arborist before disturbing the soil. Some types of trees have very shallow root systems that are easily damaged by light digging or even heavy foot traffic.
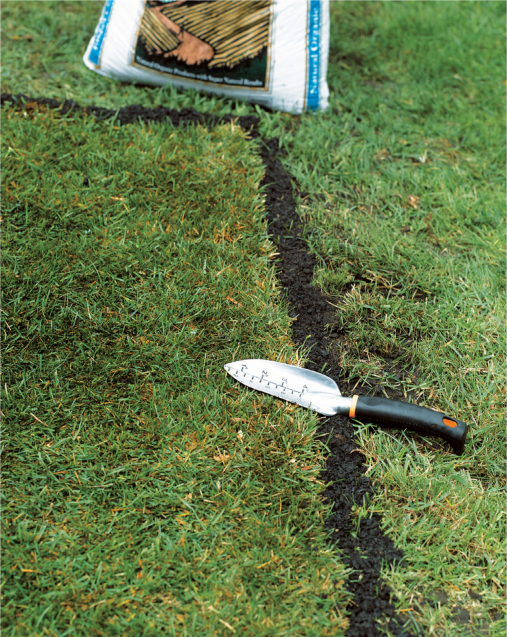
To turn those ugly areas into planting beds, all you have to do is dig up the grass and root layer and add topsoil and amendments to prepare for new plants or flowers. Start by marking the border of the bed with a garden hose, creating straight or curving lines as desired. Cut straight down along the border with a flat shovel or spade to form a clean edge. Then, dig out the grass and roots, removing about 3 inches of material to expose the pure soil underneath. You can do this with a good, sharp spade. It’s a good idea to add border material along the edges of the bed to help prevent soil erosion and keep encroaching grass at bay. Black plastic edging is the cheapest and easiest border to install. Dig out the turf with a sharp spade and/or a mattock (a tool similar to a pick axe but with a broad, flat cutter on one end of the head). Once all the foliage is gone, cover the soil with landscape fabric. Lay down a two- to three-inch layer of rock or mulch as desired.

Landscape fabric and edging combine forces to control weeds, keep groundcover contained, and make mowing grass easier.
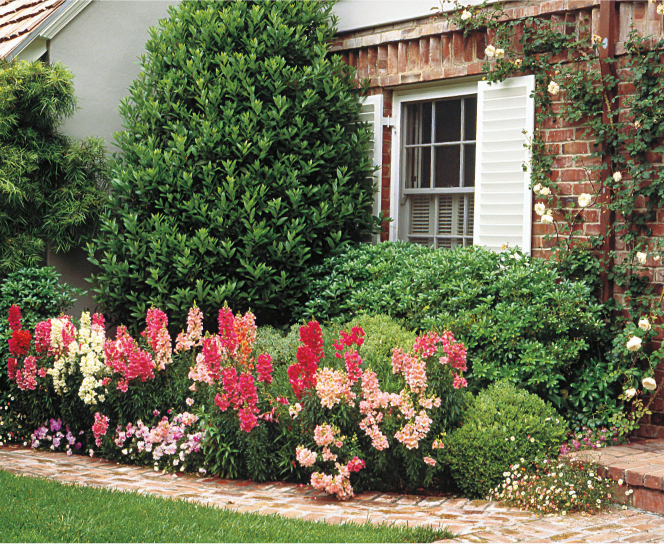
Flowers for Fixer-Uppers
Whether they’re found in planting beds, in pots on the front stoop, or in border strips along the driveway or front walkway, flowers are a great way to dress up a home for sale or to brighten your new home. Choose colorful annuals that complement the house and landscape. A blanket of wood-chip mulch covering the soil in the flowerbed adds a nice finishing touch and slows evaporation.
Lighting can be a subtle yet effective way of attracting interested home buyers who decide to take a peek at your house after dark. It’s also a nice way for new owners to send the message to neighbors that the house is now under the care of proud new residents.
Low-voltage landscape lights come in a huge range of styles and system configurations, but the easiest and cheapest fixtures to install are freestanding solar lights that require no digging, wiring, or exterior power supply (except, of course, the sun). All you have to do is spike them into the ground and let the sun take it from there. Position the lights wherever you want to highlight trees and other landscape features, brighten your home’s facade, or create a welcoming path of light leading visitors to your front door.
If your house does not have a motion-detector security light near every entrance, install them. A floodlight or two directed out into the yard comes in handy for those late-night croquet matches, and a light that illuminates your house number so it can be read from the street is always a good idea.
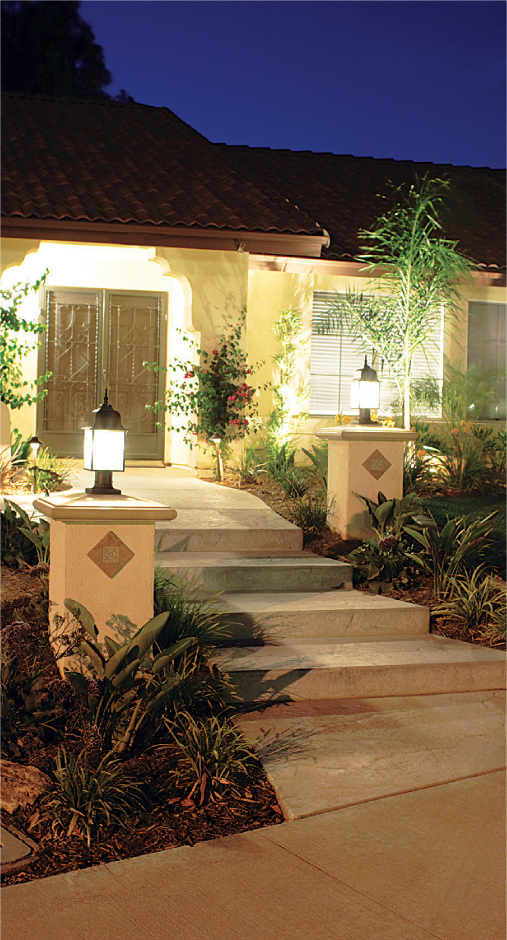
Help your house sell itself at night with spotlights or floodlights shining up from the ground onto nice architectural features or your house numbers.

“Uplighting” trees, walls, and other landscape elements with spotlights or well lights creates magical nighttime features.